


2.1 案例准备
我们本次是使用的电商项目中的商品微服务、订单微服务为案例进行讲解。
2.1.1技术选型
maven:3.5.0+
数据库:MySQL 5.7以上
持久层: Mybatis-plus 《Mybatis Mapper Mybatis-plus》
其他: SpringCloud Alibaba 技术栈 druid
2.1.2 模块设计
springcloud-alibaba 父工程 《jar版本的管理》
shop-common 公共模块【实体类】 《实体类,公共依赖,工具类。》
shop-product 商品微服务 【端口: 8080~8089 搭建集群】
shop-order 订单微服务 【端口: 8090~8099 搭建集群】

2.1.3 微服务调用
在微服务架构中,最常见的场景就是微服务之间的相互调用。我们以电商系统中常见的用户下单为
例来演示微服务的调用:客户向订单微服务发起一个下单的请求,在进行保存订单之前需要调用商品微服务查询商品的信息。
我们一般把服务的主动调用方称为服务消费者,把服务的被调用方称为服务提供者。
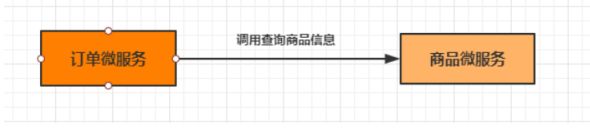
在这种场景下,订单微服务就是一个服务消费者, 商品微服务就是一个服务提供者。
2.2 创建父工程
创建一个maven工程 然后在pom.xml文件中添加
<?xml version="1.0" encoding="UTF-8"?>

<project xmlns="http://maven.apache.org/POM/4.0.0" xmlns:xsi="http://www.w3.org/2001/XMLSchema-instance"
  xsi:schemaLocation="http://maven.apache.org/POM/4.0.0 http://maven.apache.org/xsd/maven-4.0.0.xsd">
  <modelVersion>4.0.0</modelVersion>

  <groupId>org.example</groupId>
  <artifactId>springcloud</artifactId>
  <version>1.0-SNAPSHOT</version>
  <modules>
    <module>comment</module>
    <module>product</module>
    <module>order</module>
  </modules>
  <packaging>pom</packaging>

  <!--继承springboot的父工程-->
  <parent>
    <artifactId>spring-boot-starter-parent</artifactId>
    <groupId>org.springframework.boot</groupId>
    <version>2.3.2.RELEASE</version>
  </parent>

  <!--定义版本号-->
  <properties>
    <java.version>1.8</java.version>
    <project.build.sourceEncoding>UTF-8</project.build.sourceEncoding>
    <project.reporting.outputEncoding>UTF- 8</project.reporting.outputEncoding>
    <spring-cloud.version>Hoxton.SR8</spring-cloud.version>
    <spring-cloud-alibaba.version>2.2.5.RELEASE</spring-cloud-alibaba.version>
  </properties>

  <name>springcloud Maven Webapp</name>
  <!-- FIXME change it to the project's website -->
  <url>http://www.example.com</url>
  <!--dependencyManagement:它只负责jar的管理  不负责jar的下载,如果想下载需要再子工程中引入依赖来下载。
    -->
  <dependencyManagement>
    <dependencies>
      <dependency>
        <groupId>org.springframework.cloud</groupId>
        <artifactId>spring-cloud-dependencies</artifactId>
        <version>${spring-cloud.version}</version>
        <type>pom</type>
        <scope>import</scope>
      </dependency>
      <dependency>
        <groupId>com.alibaba.cloud</groupId>
        <artifactId>spring-cloud-alibaba-dependencies</artifactId>
        <version>${spring-cloud-alibaba.version}</version>
        <type>pom</type>
        <scope>import</scope>
      </dependency>
    </dependencies>

  </dependencyManagement>


  <dependencies>
    <dependency>
      <groupId>junit</groupId>
      <artifactId>junit</artifactId>
      <version>4.11</version>
      <scope>test</scope>
    </dependency>
    <dependency>
      <groupId>com.alibaba.cloud</groupId>
      <artifactId>spring-cloud-alibaba-nacos-discovery</artifactId>
      <version>2.2.0.RELEASE</version>
    </dependency>
  </dependencies>

  <build>
    <finalName>springcloud</finalName>
    <pluginManagement><!-- lock down plugins versions to avoid using Maven defaults (may be moved to parent pom) -->
      <plugins>
        <plugin>
          <artifactId>maven-clean-plugin</artifactId>
          <version>3.1.0</version>
        </plugin>
        <!-- see http://maven.apache.org/ref/current/maven-core/default-bindings.html#Plugin_bindings_for_war_packaging -->
        <plugin>
          <artifactId>maven-resources-plugin</artifactId>
          <version>3.0.2</version>
        </plugin>
        <plugin>
          <artifactId>maven-compiler-plugin</artifactId>
          <version>3.8.0</version>
        </plugin>
        <plugin>
          <artifactId>maven-surefire-plugin</artifactId>
          <version>2.22.1</version>
        </plugin>
        <plugin>
          <artifactId>maven-war-plugin</artifactId>
          <version>3.2.2</version>
        </plugin>
        <plugin>
          <artifactId>maven-install-plugin</artifactId>
          <version>2.5.2</version>
        </plugin>
        <plugin>
          <artifactId>maven-deploy-plugin</artifactId>
          <version>2.8.2</version>
        </plugin>
      </plugins>
    </pluginManagement>
  </build>
</project>
2.3 创建基础模块
1 创建common模块 在pom.xml文件中添加依赖
<?xml version="1.0" encoding="UTF-8"?>

<project xmlns="http://maven.apache.org/POM/4.0.0" xmlns:xsi="http://www.w3.org/2001/XMLSchema-instance"
         xsi:schemaLocation="http://maven.apache.org/POM/4.0.0 http://maven.apache.org/xsd/maven-4.0.0.xsd">
    <parent>
        <artifactId>springcloud</artifactId>
        <groupId>org.example</groupId>
        <version>1.0-SNAPSHOT</version>
    </parent>
    <modelVersion>4.0.0</modelVersion>

    <artifactId>comment</artifactId>
    <packaging>war</packaging>

    <name>comment Maven Webapp</name>
    <!-- FIXME change it to the project's website -->
    <url>http://www.example.com</url>

    <properties>
        <project.build.sourceEncoding>UTF-8</project.build.sourceEncoding>
        <maven.compiler.source>1.7</maven.compiler.source>
        <maven.compiler.target>1.7</maven.compiler.target>
    </properties>

    <dependencies>
        <dependency>
            <groupId>junit</groupId>
            <artifactId>junit</artifactId>
            <version>4.11</version>
            <scope>test</scope>
        </dependency>
        <dependency>
            <groupId>org.projectlombok</groupId>
            <artifactId>lombok</artifactId>
        </dependency>
        <dependency>
            <groupId>com.baomidou</groupId>
            <artifactId>mybatis-plus-boot-starter</artifactId>
            <version>3.4.1</version>
        </dependency>
        <dependency>
            <groupId>mysql</groupId>
            <artifactId>mysql-connector-java</artifactId>
        </dependency>
        <dependency>
            <groupId>com.alibaba</groupId>
            <artifactId>fastjson</artifactId>
            <version>1.2.72</version>
        </dependency>
    </dependencies>

    <build>
        <finalName>comment</finalName>
        <pluginManagement><!-- lock down plugins versions to avoid using Maven defaults (may be moved to parent pom) -->
            <plugins>
                <plugin>
                    <artifactId>maven-clean-plugin</artifactId>
                    <version>3.1.0</version>
                </plugin>
                <!-- see http://maven.apache.org/ref/current/maven-core/default-bindings.html#Plugin_bindings_for_war_packaging -->
                <plugin>
                    <artifactId>maven-resources-plugin</artifactId>
                    <version>3.0.2</version>
                </plugin>
                <plugin>
                    <artifactId>maven-compiler-plugin</artifactId>
                    <version>3.8.0</version>
                </plugin>
                <plugin>
                    <artifactId>maven-surefire-plugin</artifactId>
                    <version>2.22.1</version>
                </plugin>
                <plugin>
                    <artifactId>maven-war-plugin</artifactId>
                    <version>3.2.2</version>
                </plugin>
                <plugin>
                    <artifactId>maven-install-plugin</artifactId>
                    <version>2.5.2</version>
                </plugin>
                <plugin>
                    <artifactId>maven-deploy-plugin</artifactId>
                    <version>2.8.2</version>
                </plugin>
            </plugins>
        </pluginManagement>
    </build>
</project>
2. 创建实体类
package com.cyy.entry;

import com.baomidou.mybatisplus.annotation.IdType;
import com.baomidou.mybatisplus.annotation.TableId;
import com.baomidou.mybatisplus.annotation.TableName;
import lombok.Data;

/**
 * @program: springcloud
 * @description: 订单的实体类
 * @author: 崔艺耀
 * @create: 2021-07-06 14:31
 **/
@Data
@TableName("shop_order")
public class Order{
    @TableId(type = IdType.AUTO)
    private Long oid; //订单id
    private Integer uid;//用户id
    private String username;//用户名
    private Integer pid;//商品id
    private String pname;//商品名称
    private Double pprice;//商品价格
    private Integer number;//购买数量
}
package com.cyy.entry;
import com.baomidou.mybatisplus.annotation.IdType;
import com.baomidou.mybatisplus.annotation.TableId;
import com.baomidou.mybatisplus.annotation.TableName;
import lombok.Data;
/**
* @program: springcloud
* @description: 商品的实体类
* @author: 崔艺耀
* @create: 2021-07-06 14:45
**/
@Data
@TableName(value="shop_product")
public class Product {
@TableId(type= IdType.AUTO)
private Integer pid;
private String pname;//商品名称
private Double pprice;//商品价格
private Integer stock;//库存
}2.4 创建商品微服务
步骤:
1 创建模块 导入依赖
2 创建SpringBoot主类
3 加入配置文件
4 创建必要的接口和实现类(controller service dao)
新建一个 product 模块,然后进行下面操作
<?xml version="1.0" encoding="UTF-8"?>
<project xmlns="http://maven.apache.org/POM/4.0.0"
         xmlns:xsi="http://www.w3.org/2001/XMLSchema-instance"
         xsi:schemaLocation="http://maven.apache.org/POM/4.0.0 http://maven.apache.org/xsd/maven-4.0.0.xsd">
    <parent>
        <artifactId>springcloud</artifactId>
        <groupId>org.example</groupId>
        <version>1.0-SNAPSHOT</version>
    </parent>
    <modelVersion>4.0.0</modelVersion>

    <groupId>com.cyy</groupId>
    <artifactId>product</artifactId>
    <dependencies>
        <dependency>
            <groupId>org.example</groupId>
            <artifactId>comment</artifactId>
            <version>1.0-SNAPSHOT</version>
        </dependency>
        <dependency>
            <groupId>org.springframework.boot</groupId>
            <artifactId>spring-boot-starter-web</artifactId>
        </dependency>
        <dependency>
            <groupId>com.alibaba.cloud</groupId>
            <artifactId>spring-cloud-alibaba-nacos-discovery</artifactId>
            <version>2.2.0.RELEASE</version>
        </dependency>
        <dependency>
            <groupId>com.alibaba.cloud</groupId>
            <artifactId>spring-cloud-starter-alibaba-nacos-discovery</artifactId>
        </dependency>
    </dependencies>


</project>
2.编写主类
package com.cyy;

import org.mybatis.spring.annotation.MapperScan;
import org.springframework.boot.SpringApplication;
import org.springframework.boot.autoconfigure.SpringBootApplication;
import org.springframework.cloud.client.discovery.EnableDiscoveryClient;

/**
 * @program: springcloud
 * @description: 启动类
 * @author: 崔艺耀
 * @create: 2021-07-06 15:07
 **/
@SpringBootApplication
@EnableDiscoveryClient
@MapperScan(basePackages = "com.cyy.mapper")
public class ProductApplication {
    public static void main(String[] args) {
        SpringApplication.run(ProductApplication.class,args);
    }
}
3.创建配置文件
spring.datasource.username=root
spring.datasource.password=root
spring.datasource.url=jdbc:mysql://localhost:3306/springcloud?serverTimezone=Asia/Shanghai
spring.datasource.driver-class-name=com.mysql.cj.jdbc.Driver
server.port=8081

spring.application.name=product
spring.cloud.nacos.server-addr=localhost:8848

logging.level.com.cyy.mapper=debug
2.5 创建订单微服务
1 创建一个名为 order 的模块,并添加springboot依赖
<?xml version="1.0" encoding="UTF-8"?>
<project xmlns="http://maven.apache.org/POM/4.0.0"
         xmlns:xsi="http://www.w3.org/2001/XMLSchema-instance"
         xsi:schemaLocation="http://maven.apache.org/POM/4.0.0 http://maven.apache.org/xsd/maven-4.0.0.xsd">
    <parent>
        <artifactId>springcloud</artifactId>
        <groupId>org.example</groupId>
        <version>1.0-SNAPSHOT</version>
    </parent>
    <modelVersion>4.0.0</modelVersion>

    <groupId>com.cyy</groupId>
    <artifactId>order</artifactId>
    <dependencies>
        <dependency>
            <groupId>org.example</groupId>
            <artifactId>comment</artifactId>
            <version>1.0-SNAPSHOT</version>
        </dependency>
        <dependency>
            <groupId>org.springframework.boot</groupId>
            <artifactId>spring-boot-starter-web</artifactId>
        </dependency>
        <dependency>
            <groupId>com.alibaba.cloud</groupId>
            <artifactId>spring-cloud-alibaba-nacos-discovery</artifactId>
            <version>2.2.0.RELEASE</version>
        </dependency>
        <dependency>
            <groupId>com.alibaba.cloud</groupId>
            <artifactId>spring-cloud-starter-alibaba-nacos-discovery</artifactId>
        </dependency>
        <dependency>
            <groupId>org.springframework.cloud</groupId>
            <artifactId>spring-cloud-starter-openfeign</artifactId>
        </dependency>
    </dependencies>


</project>
2.创建工程的主类
package com.cyy.order;

import org.mybatis.spring.annotation.MapperScan;
import org.springframework.boot.SpringApplication;
import org.springframework.boot.autoconfigure.SpringBootApplication;
import org.springframework.context.annotation.Bean;
import org.springframework.web.client.RestTemplate;

/**
 * @program: springcloud-parent
 * @description: 主启动类
 * @author: 崔艺耀
 * @create: 2021-07-06 20:25
 **/
@SpringBootApplication
@MapperScan(basePackages = "com.cyy.order.mapper")
public class OrderApplication {
    public static void main(String[] args) {
        SpringApplication.run(com.cyy.order.OrderApplication.class,args);
    }
    @Bean
    public RestTemplate restTemplate(){
        return new RestTemplate();
    }
}
3.创建配置文件
spring.datasource.username=root
spring.datasource.password=984160322cyy
spring.datasource.url=jdbc:mysql://localhost:3306/springboot?serverTimezone=Asia/Shanghai
spring.datasource.driver-class-name=com.mysql.cj.jdbc.Driver
server.port=8092
4.创建mapper接口
package com.cyy.order.mapper;

import com.baomidou.mybatisplus.core.mapper.BaseMapper;
import com.cyy.coment.entry.Order;

public interface OrderMapper extends BaseMapper<Order> {
}
5.创建service接口和实现类
package com.cyy.order.sevice;

import com.cyy.coment.entry.Order;

public interface OrderService {
    public String saveOrder(Order order);
}
package com.cyy.order.sevice;
import com.cyy.coment.entry.Order;
import com.cyy.order.mapper.OrderMapper;
import org.springframework.beans.factory.annotation.Autowired;
import org.springframework.stereotype.Service;
/**
* @program: springcloud-parent
* @description: 订单的实现类
* @author: 崔艺耀
* @create: 2021-07-06 19:42
**/
@Service
public class OrderServiceImpl implements OrderService {
@Autowired
private OrderMapper orderMapper;
@Override
public String saveOrder(Order order) {
orderMapper.insert(order);
return "保存订单成功";
}
}5.创建contoller
package com.cyy.order.controller;

import com.cyy.coment.entry.Order;
import com.cyy.coment.entry.Product;
import com.cyy.order.sevice.OrderService;
import org.springframework.beans.factory.annotation.Autowired;
import org.springframework.web.bind.annotation.GetMapping;
import org.springframework.web.bind.annotation.RequestMapping;
import org.springframework.web.bind.annotation.RequestParam;
import org.springframework.web.bind.annotation.RestController;
import org.springframework.web.client.RestTemplate;

/**
 * @program: springcloud-parent
 * @description: 订单的控制层
 * @author: 崔艺耀
 * @create: 2021-07-06 19:50
 **/
@RestController
@RequestMapping("order")
public class OrderController {
    @Autowired
    private OrderService orderService;
    @Autowired
    private RestTemplate restTemplate;
    @GetMapping("saveOrder")
    public String saveOrder(@RequestParam Integer pid,Integer num){
        Order order=new Order();
        order.setNumber(num);
        order.setUid(2);
        order.setUsername("张三");
        order.setPid(pid);

        Product product = restTemplate.getForObject("http://localhost:8082/product/FindById/" + pid, Product.class);

        order.setPname(product.getPname());
        order.setPprice(product.getPprice());

        orderService.saveOrder(order);
        return "下单成功";
    }
}
6.启动工程,访问浏览器


 4876
4876


 被折叠的 条评论
为什么被折叠?
被折叠的 条评论
为什么被折叠?
 到【灌水乐园】发言


