


---------------------- 路漫漫其修远兮,吾将上下而求索。学无止境!----------------------
 ListView入门
之前了解了SQLite的知识,现在考虑如何将数据由数据库中取出,并在安卓界面中展示出来。这里,要用到ListView控件。ListView,可以将数据逐条显示到用户界面。
activity_main.xml
<RelativeLayout xmlns:android="http://schemas.android.com/apk/res/android"
    xmlns:tools="http://schemas.android.com/tools"
    android:layout_width="match_parent"
    android:layout_height="match_parent"
    android:paddingBottom="@dimen/activity_vertical_margin"
    android:paddingLeft="@dimen/activity_horizontal_margin"
    android:paddingRight="@dimen/activity_horizontal_margin"
    android:paddingTop="@dimen/activity_vertical_margin"
    tools:context=".MainActivity" >

    <ListView
        android:id="@+id/lv"
        android:layout_width="match_parent"
        android:layout_height="match_parent" >
    </ListView>

</RelativeLayout>
MainActivity.java
package com.lee.sql;

import java.util.List;

import com.lee.sql.dao.PersonDao2;
import com.lee.sql.model.Person;

import android.os.Bundle;
import android.view.View;
import android.view.ViewGroup;
import android.widget.BaseAdapter;
import android.widget.ListView;
import android.widget.TextView;
import android.app.Activity;
import android.graphics.Color;

public class MainActivity extends Activity {

	private ListView listView;
	private List<Person> persons;
	@Override
	protected void onCreate(Bundle savedInstanceState) {
		super.onCreate(savedInstanceState);
		setContentView(R.layout.activity_main);

		listView = (ListView) this.findViewById(R.id.lv);
		PersonDao2 personDao = new PersonDao2(this);
		persons = personDao.findAll();
		for (Person person : persons) {
			System.out.println(person);
		}
		//将listView控件加载自定义的适配器
		listView.setAdapter(new MyAdapter());
	}

	/**
	 * 我的适配器的实现,以内部类的形式
	 * @author Xiaobi
	 *
	 */
	private class MyAdapter extends BaseAdapter {

		//得到条目的总个数
		@Override
		public int getCount() {
			// TODO Auto-generated method stub
			return persons.size();
		}

		@Override
		public Object getItem(int arg0) {
			// TODO Auto-generated method stub
			return null;
		}

		@Override
		public long getItemId(int arg0) {
			// TODO Auto-generated method stub
			return 0;
		}

		//设置每个条目的显示
		@Override
		public View getView(int position, View convertView, ViewGroup parent) {
			// TODO Auto-generated method stub

			TextView textView = new TextView(getApplicationContext());
			textView.setTextSize(15);
			textView.setTextColor(Color.BLUE);
			Person person = persons.get(position);
			textView.setText(person.toString());

			return textView;

		}
	}

}
所有的数据库方面的操作在上一博文。
运行后的界面:

Layout的Inflater创建View对象
这样的运行界面比较单一,不便阅读,可以再次进行优化;
首先创建一个新的布局文件list_items.xml:这个文件是使用的TextView与LinearLayout进行界面设计。
<LinearLayout xmlns:android="http://schemas.android.com/apk/res/android"
    xmlns:tools="http://schemas.android.com/tools"
    android:layout_width="match_parent"
    android:layout_height="match_parent"
    android:orientation="horizontal" >

    <TextView
        android:id="@+id/tv_id"
        android:layout_width="wrap_content"
        android:layout_height="wrap_content"
        android:layout_marginLeft="10sp"
        android:layout_marginTop="10sp"
        android:text="id"
        android:textColor="#ff0000"
        android:textSize="20sp" />

    <LinearLayout
        android:layout_width="match_parent"
        android:layout_height="wrap_content"
        android:orientation="vertical" >

        <TextView
            android:id="@+id/tv_name"
            android:layout_width="wrap_content"
            android:layout_height="wrap_content"
            android:layout_marginLeft="15sp"
            android:layout_marginTop="5sp"
            android:text="姓名"
            android:textColor="#000000"
            android:textSize="15sp" />

        <TextView
            android:id="@+id/tv_age"
            android:layout_width="wrap_content"
            android:layout_height="wrap_content"
            android:layout_marginLeft="15sp"
            android:layout_marginTop="5sp"
            android:text="年龄"
            android:textColor="#66000000"
            android:textSize="15sp" />
    </LinearLayout>

</LinearLayout>
然后就是对展示部分代码的修改,修改后的代码:
MainActivity.java
package com.lee.sql;

import java.util.List;

import com.lee.sql.dao.PersonDao2;
import com.lee.sql.model.Person;

import android.os.Bundle;
import android.view.View;
import android.view.ViewGroup;
import android.widget.BaseAdapter;
import android.widget.ListView;
import android.widget.TextView;
import android.app.Activity;

public class MainActivity extends Activity {

	private ListView listView;
	private List<Person> persons;
	@Override
	protected void onCreate(Bundle savedInstanceState) {
		super.onCreate(savedInstanceState);
		setContentView(R.layout.activity_main);

		listView = (ListView) this.findViewById(R.id.lv);
		PersonDao2 personDao = new PersonDao2(this);
		persons = personDao.findAll();
		for (Person person : persons) {
			System.out.println(person);
		}
		//将listView控件加载自定义的适配器
		listView.setAdapter(new MyAdapter());
	}

	/**
	 * 我的适配器的实现,以内部类的形式
	 * @author Xiaobi
	 *
	 */
	private class MyAdapter extends BaseAdapter {

		//得到条目的总个数
		@Override
		public int getCount() {
			// TODO Auto-generated method stub
			return persons.size();
		}

		@Override
		public Object getItem(int arg0) {
			// TODO Auto-generated method stub
			return null;
		}

		@Override
		public long getItemId(int arg0) {
			// TODO Auto-generated method stub
			return 0;
		}

		//设置每个条目的显示
		@Override
		public View getView(int position, View convertView, ViewGroup parent) {
			// TODO Auto-generated method stub

			Person person = persons.get(position);

			/**
			 * 由于这里不再是main_activity.xml文件中的配置,而是list_items.xml中的,
			 * 因此通过View.inflate(Context context, int resource, ViewGroup root)来加载该布局文件
			 */
			View view = View.inflate(MainActivity.this,R.layout.list_items, null);

			//这里只能从上面的view中得到各个布局元素
			TextView tv_id = (TextView)view.findViewById(R.id.tv_id);
			tv_id.setText("id:"+person.getId());

			TextView tv_name = (TextView)view.findViewById(R.id.tv_name);
			tv_name.setText("姓名:"+person.getName());

			TextView tv_age = (TextView)view.findViewById(R.id.tv_age);
			tv_age.setText("年龄:"+person.getAge());

			return view;

		}
	}

}
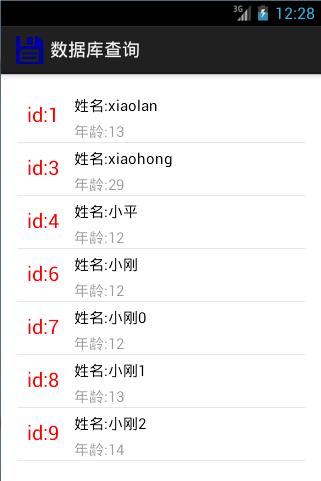
以上程序运行的结果比较适合阅读:
常用的数据适配器
ArrayAdapter
public ArrayAdapter(Context context, int resource, int textViewResourceId, T[] objects)
Parameters
| context | The current context. |
|---|---|
| resource | The resource ID for a layout file containing a layout to use when instantiating views. |
| textViewResourceId | The id of the TextView within the layout resource to be populated |
| objects | The objects to represent in the ListView. |
具体操作见源码
package com.lee.adapter;

import android.os.Bundle;
import android.widget.ArrayAdapter;
import android.widget.ListView;
import android.app.Activity;

public class MainActivity extends Activity {

	//定义一个功能数组
	private static String[] names = {"功能1","功能2","功能3","功能4","功能5"};
	@Override
	protected void onCreate(Bundle savedInstanceState) {
		super.onCreate(savedInstanceState);
		setContentView(R.layout.activity_main);

		ListView listView = (ListView)this.findViewById(R.id.lv);
		//ArrayAdapter的使用
		listView.setAdapter(new ArrayAdapter<String>(this, R.layout.text_view, R.id.tv, names));
	}

}
activity_main.xml
<LinearLayout xmlns:android="http://schemas.android.com/apk/res/android"
    xmlns:tools="http://schemas.android.com/tools"
    android:layout_width="match_parent"
    android:layout_height="match_parent"
    android:orientation="vertical" >

    <ListView
        android:id="@+id/lv"
        android:layout_width="wrap_content"
        android:layout_height="wrap_content" >
    </ListView>

</LinearLayout>
text_view.xml
<LinearLayout xmlns:android="http://schemas.android.com/apk/res/android"
    xmlns:tools="http://schemas.android.com/tools"
    android:layout_width="match_parent"
    android:layout_height="wrap_content"
    android:orientation="horizontal" >

    <ImageView
        android:layout_width="wrap_content"
        android:layout_height="wrap_content"
        android:src="@drawable/ic_launcher" />

    <TextView
        android:layout_marginTop="15dp"
        android:layout_marginLeft="15dp"
        android:textColor="#555555"
        android:textSize="15dp"
        android:id="@+id/tv"
        android:layout_width="match_parent"
        android:layout_height="wrap_content" >
    </TextView>

</LinearLayout>
SimpleAdapter
这里使用
android.widget.SimpleAdapter.SimpleAdapter(Context context, List<? extendsMap<String, ?>> data, int resource, String[] from,int[] to)
MainActivity.java
package com.lee.simpleAdapeter;

import java.util.ArrayList;
import java.util.HashMap;
import java.util.List;
import java.util.Map;

import android.os.Bundle;
import android.widget.ListView;
import android.widget.SimpleAdapter;
import android.app.Activity;

public class MainActivity extends Activity {

	private List<Map<String, Object>> datas;

	@Override
	protected void onCreate(Bundle savedInstanceState) {
		super.onCreate(savedInstanceState);
		setContentView(R.layout.activity_main);

		// 以下置入原始数据
		datas = new ArrayList<Map<String, Object>>();

		Map<String, Object> data1 = new HashMap<String, Object>();
		data1.put("name", "接电话啦");
		data1.put("icon", R.drawable.ic_jog_dial_answer);

		Map<String, Object> data2 = new HashMap<String, Object>();
		data2.put("name", "通话结束");
		data2.put("icon", R.drawable.ic_jog_dial_answer_and_end);

		Map<String, Object> data3 = new HashMap<String, Object>();
		data3.put("name", "电话繁忙");
		data3.put("icon", R.drawable.ic_jog_dial_answer_and_hold);

		Map<String, Object> data4 = new HashMap<String, Object>();
		data4.put("name", "挂断电话");
		data4.put("icon", R.drawable.ic_jog_dial_decline);

		Map<String, Object> data5 = new HashMap<String, Object>();
		data5.put("name", "调为震动");
		data5.put("icon", R.drawable.ic_jog_dial_vibrate_on);

		datas.add(data1);
		datas.add(data2);
		datas.add(data3);
		datas.add(data4);
		datas.add(data5);

		ListView listView = (ListView) this.findViewById(R.id.lv);

		// 这里是重点哦
		listView.setAdapter(new SimpleAdapter(this, datas, R.layout.list_items,
				new String[] { "name", "icon" }, new int[] { R.id.tv, R.id.iv }));
	}

}
list_items.xml
<LinearLayout xmlns:android="http://schemas.android.com/apk/res/android"
    xmlns:tools="http://schemas.android.com/tools"
    android:layout_width="match_parent"
    android:layout_height="match_parent"
    android:orientation="horizontal"
    tools:context=".MainActivity" >

    <ImageView
        android:id="@+id/iv"
        android:layout_width="wrap_content"
        android:layout_height="wrap_content" />

    <TextView
        android:id="@+id/tv"
        android:layout_width="match_parent"
        android:layout_height="wrap_content"
        android:layout_marginLeft="15dp"
        android:layout_marginTop="15dp"
        android:textColor="#ff8800"
        android:textSize="20sp" />

</LinearLayout>
activity_main.xml
<LinearLayout xmlns:android="http://schemas.android.com/apk/res/android"
xmlns:tools="http://schemas.android.com/tools"
android:layout_width="match_parent"
android:layout_height="match_parent"
android:orientation="vertical"
tools:context=".MainActivity" >
<ListView
android:id="@+id/lv"
android:layout_width="match_parent"
android:layout_height="wrap_content" />
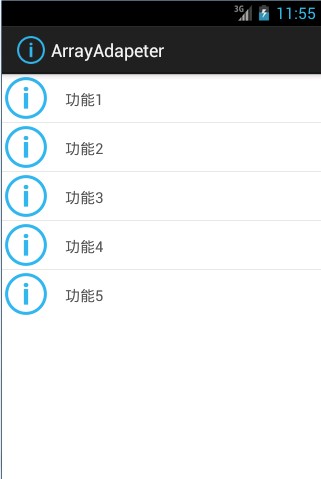
</LinearLayout>运行结果:

---------------------- 路漫漫其修远兮,吾将上下而求索。学无止境!----------------------
我的博客:http://blog.csdn.net/helloxiaobi


 被折叠的 条评论
为什么被折叠?
被折叠的 条评论
为什么被折叠?
 到【灌水乐园】发言


