


项目简介
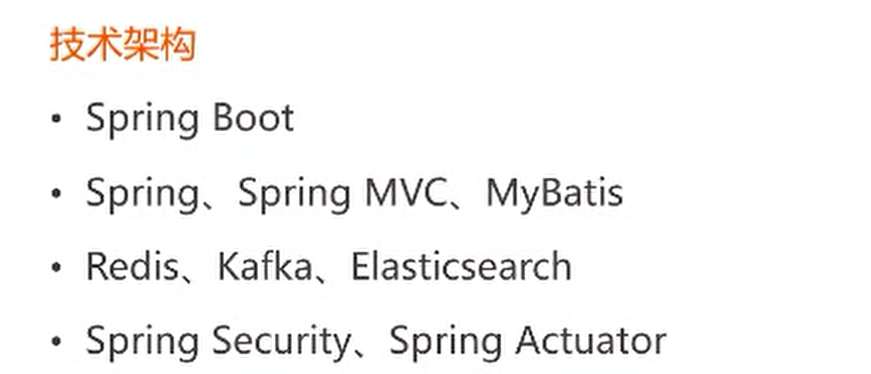
技术架构
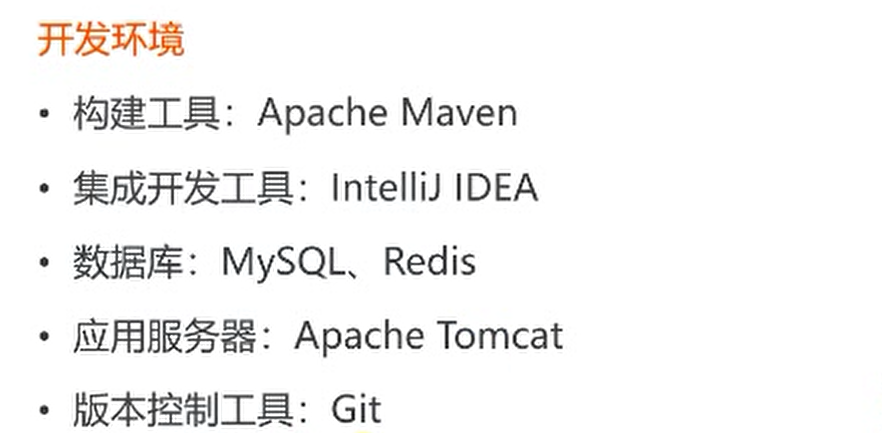
开发环境
项目架构

spring boot 开发社区首页
1.开发社区首页,显示前10个帖子
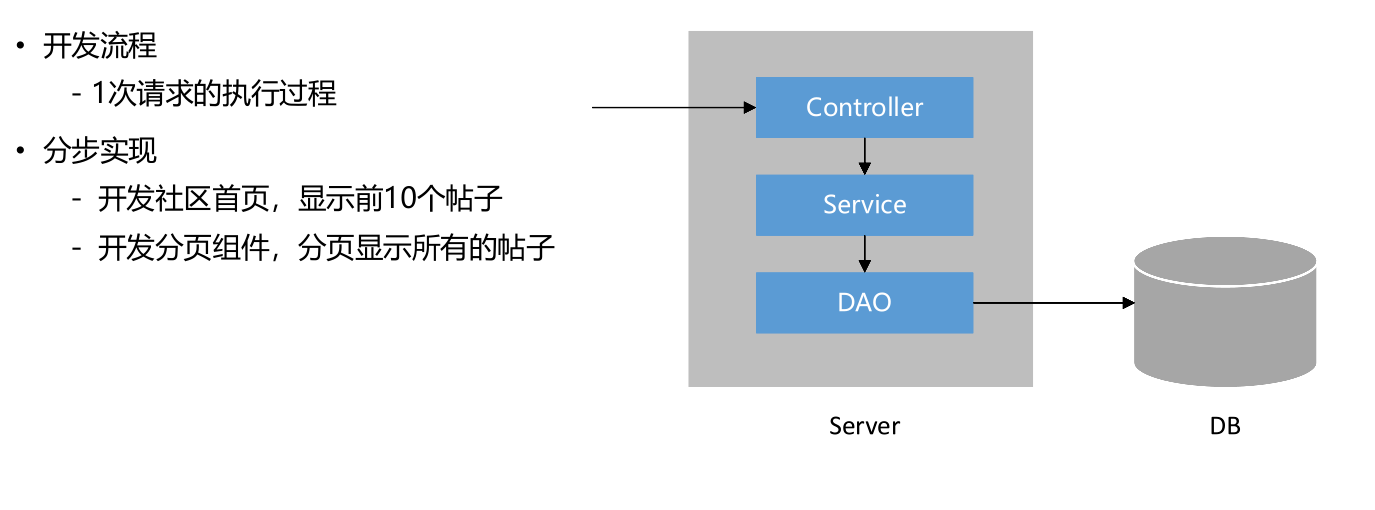
controller设定起始序号offset,以及每页显示的帖子数limit。调用service层的查询帖子函数获取到数据。
注意:查询到的帖子中只有用户的id,要显示用户名则需要调用userService来通过用户id查询得到用户名。
将帖子和用户一起存到List< map >中,并把这个结果集存到model中,前端通过thymeleaf引擎接收这个模板。
//接口
public interface DiscussPostMapper {
    /*id为0的时候代表没有用户登录,展示的是社区首页的所有帖子
    id非零的时候表示用户已经登录,显示的是该用户发表的帖子
    offset是起始序号,limit是每页显示多少条帖子*/
    List<User> selectDiscussPosts(int id,int offset,int limit);

    //@Param注解用于给参数取别名
    int selectDiscussPostRows(@Param("userId") int userId);
}

//对应mapper
    <select id="selectDiscussPosts" resultType="DiscussPost">
        select <include refid="selectFields"></include>
        from discuss_post
        where status!=2
        <if test="userId!=0">
            and user_id=#{userId}
        </if>
        order by type desc ,create_time desc  //0-普通; 1-置顶;
        limit #{offset},#{limit}
    </select>

//controller
	@RequestMapping(path = "/index",method = RequestMethod.GET)
    public String getIndexPage(Model model){
        List<DiscussPost> list=discussPostService.findDiscussPosts(0, 0, 10);
        List<Map<String,Object>> discussPosts=new ArrayList<>();
        if(list!=null){
            for(DiscussPost post:list){
                Map<String,Object> map=new HashMap<>();
                map.put("post", post);
                User user=userService.findUserById(post.getUserId());
                map.put("user", user);
                discussPosts.add(map);
            }
        }
        model.addAttribute("discussPosts", discussPosts);
        return "/index";
    }
2.开发分页组件,显示所有的帖子
2.1分页组件首先要写个Page类,要包含以下几个字段和以下几个方法
//当前页码
private int current=1;
//每页显示上限
private int limit=10;
//数据总数(用于计算总页数)
private int rows;
//查询路径(用于复用分页链接)
private String path;

    /*
    * 获取当前页的起始行
    * */
    public int getOffset(){
        // current*limit - limit
        return (current-1)*limit;
    }

    /*
    * 获取总页数
    * */
    public int getTotal(){
        if(rows%limit==0){
            return rows/limit;
        }else {
            return rows/limit+1;
        }
    }

    /*
    * 获取起始页
    * */
    public int getFrom(){
        int from=current-2;
        return from<1?1:from;
    }

    /*
    *获取结束页码
    * */
    public int getTo(){
        int to=current+2;
        int total=getTotal();
        return to>total?total:to;
    }
2.2 设置默认字段就能保证,每次访问当前页面总能先显示第一页。所以第一次访问这个页面的时候,Page里面的current和limit字段就已经有初始值了。
2.3 编写controller:首先要计算出记录数量,注入到Page中,用于计算总的页数。然后查询数据,保存在Model中
    @RequestMapping(path = "/index",method = RequestMethod.GET)
    public String getIndexPage(Model model, Page page){
        //方法调用前,SpringMVC会自动实例化Model和Page,并将page注入Model
        //所以,在thymeleaf中可以直接访问page对象中的数据
        page.setRows(discussPostService.findDiscussPostRows(0));
        page.setPath("/index");
        List<DiscussPost> list=discussPostService.findDiscussPosts(0, page.getOffset(), page.getLimit());
        List<Map<String,Object>> discussPosts=new ArrayList<>();
        if(list!=null){
            for(DiscussPost post:list){
                Map<String,Object> map=new HashMap<>();
                map.put("post", post);
                User user=userService.findUserById(post.getUserId());
                map.put("user", user);
                discussPosts.add(map);
            }
        }
        model.addAttribute("discussPosts", discussPosts);
        return "/index";
    }
2.4 前端页面:点击下一页上一页只需让current(当前页-1/+1)即可,首页让current=1,末页让current=总页数。
<!-- 分页 -->
<nav class="mt-5" th:if="${page.rows>0}">
    <ul class="pagination justify-content-center">
        <li class="page-item">
            <a class="page-link" th:href="@{${page.path}(current=1)}">首页</a>
        </li>
        <li th:class="|page-item ${page.current==1?'disabled':''}|">
            <a class="page-link" th:href="@{${page.path}(current=${page.current-1})}">上一页</a></li>
        <li th:class="|page-item ${i==page.current?'active':''}|" th:each="i:${#numbers.sequence(page.from,page.to)}">
            <a class="page-link" th:href="@{${page.path}(current=${i})}" th:text="${i}">1</a>
        </li>
        <li th:class="|page-item ${page.current==page.total?'disabled':''}|">
            <a class="page-link" th:href="@{${page.path}(current=${page.current+1})}">下一页</a>
        </li>
        <li class="page-item">
            <a class="page-link" th:href="@{${page.path}(current=${page.total})}">末页</a>
        </li>
    </ul>
</nav>
springboot 开发社区登录模块
1.发送邮件
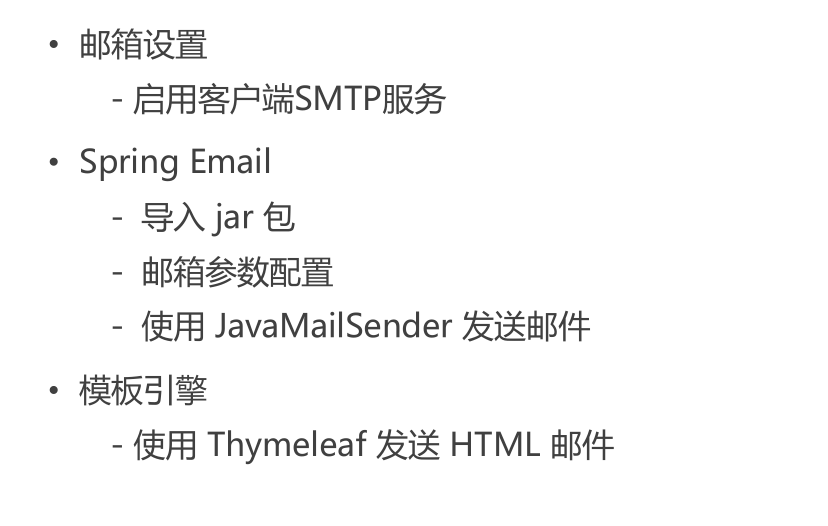
项目委托新浪邮箱,来给用户注册的时候发送邮件。
1.1 在properties中配置相关信息,并且加入spring-boot-starter-mail依赖
# MailProperties
spring.mail.host=smtp.sina.com
spring.mail.port=465
spring.mail.username=nk_community@sina.com   #委托的新浪邮箱账号
spring.mail.password=(填自己的)  	#注意这里是授权码,不是邮箱的密码
spring.mail.protocol=smtps
spring.mail.properties.mail.smtp.ssl.enable=true
1.2 编写工具类MailCilent
@Component
public class MailClient {

    private static final Logger logger= LoggerFactory.getLogger(MailClient.class);

    @Autowired
    private JavaMailSender mailSender;

    @Value("${spring.mail.username}")
    private String from;

    public void sendMail(String to,String subject,String content){
        try {
            MimeMessage message = mailSender.createMimeMessage();
            MimeMessageHelper helper = new MimeMessageHelper(message);
            helper.setFrom(from);
            helper.setTo(to);
            helper.setSubject(subject);
            helper.setText(content, true);  //true表示支持html文本
            mailSender.send(helper.getMimeMessage());
        } catch (MessagingException e) {
            logger.error("发送邮件失败:"+e.getMessage());
        }
    }
}
1.3 测试
public class MailTest {

    @Autowired
    private MailClient mailClient;

    @Autowired
    private TemplateEngine templateEngine;

    @Test
    public void mailTest(){
        Context context = new Context();  // Context对象可以将参数传给thymeleaf模板引擎
        context.setVariable("username", "sunday");
        String content = templateEngine.process("/mail/demo", context);
        //返回的content是html格式的邮件,context中保存内容,传到demo.html页面
        System.out.println(content);

        mailClient.sendMail("179545860@qq.com", "HTML", content);
    }
}
2.开发注册功能
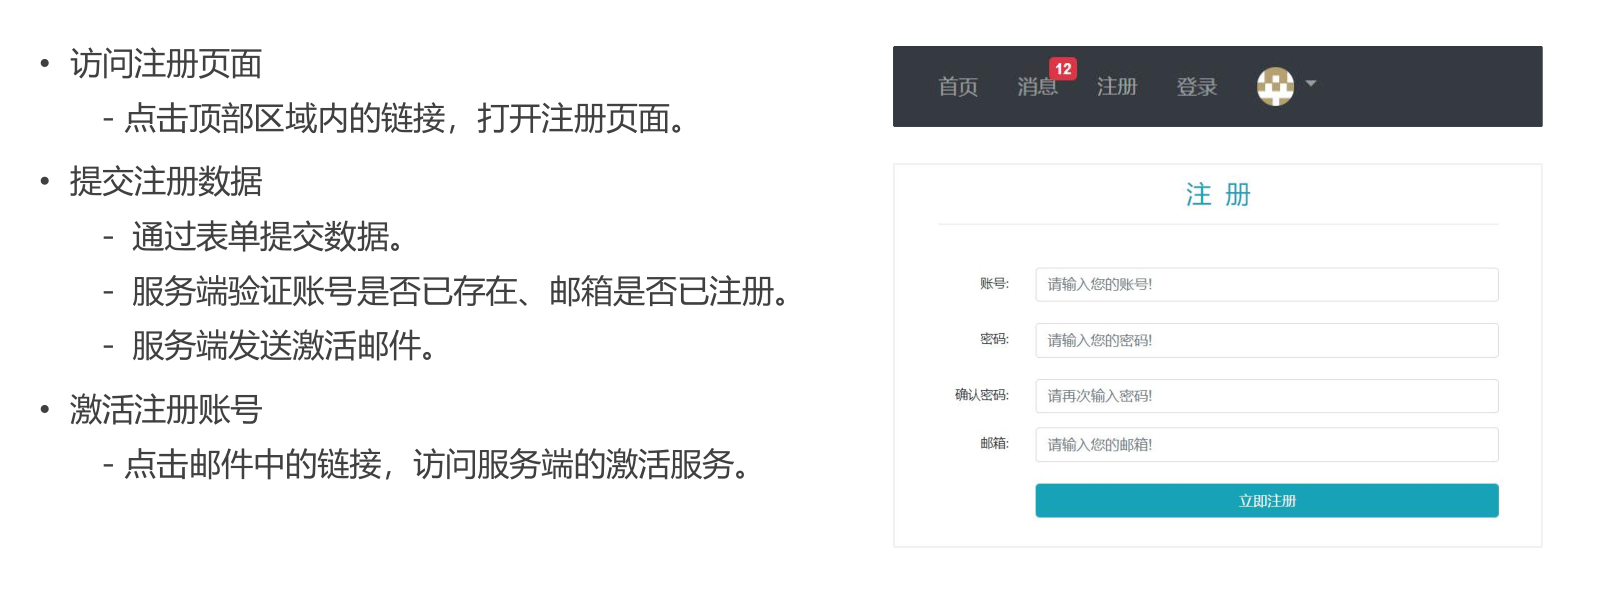
2.1 访问注册页面
编写/register
@RequestMapping(path = "/register",method = RequestMethod.GET)
public String getRegisterPage(){
    return "/site/register";
}
修改前端访问链接
<li class="nav-item ml-3 btn-group-vertical">
    <a class="nav-link" th:href="@{/register}">注册</a>
</li>
2.2 提交注册数据
2.2.1 编写CommunityUtil工具类
里面有两个方法,一个是生成随机字符串,还有个方法是用MD5给用户的密码加密。因为MD5加密对同一个字符串的加密结果都是一样的,所以要在密码链接一个字符串来提高安全性。
public class CommunityUtil {

    //生成随机字符串
    public static String generateUUID(){
        //随机生成的字符串中含有‘-’,要去掉
        return UUID.randomUUID().toString().replaceAll("-", "");
    }

    // MD5加密
    // hello -> abc123def456
    // hello + 3e4a8 -> abc123def456abc
    public static String md5(String key) {
        if (StringUtils.isBlank(key)) {  //字符串是否为空
            return null;
        }
        return DigestUtils.md5DigestAsHex(key.getBytes());
    }
}
2.2.2 在userService里面编写相应方法
验证账号和邮箱是否已经存在,并且发送邮件。
//注册用户
public Map<String,Object> register(User user){
Map<String,Object> map = new HashMap<>();
//空值处理
if(user==null){
throw new IllegalArgumentException("参数不能为空");
}
if(StringUtils.isBlank(user.getUsername())){
map.put("usernameMsg","账号不能为空!");
return map;
}
if(StringUtils.isBlank(user.getPassword())){
map.put("passwordMsg", "密码不能为空!");
return map;
}
if(StringUtils.isBlank(user.getEmail())){
map.put("emailMsg", "邮箱不能为空!");
return map;
}
//验证邮箱
User user1 = userMapper.selectByName(user.getUsername());
if(user1!=null){
map.put("usernameMsg", "该账号已存在!");
return map;
}
// 验证邮箱
user1 = userMapper.selectByEmail(user.getEmail());
if (user1 != null) {
map.put("emailMsg", "该邮箱已被注册!");
return map;
}
//注册账号
user.setSalt(CommunityUtil.generateUUID().substring(0,5));
//给密码加密
user.setPassword(CommunityUtil.md5(user.getPassword()+user.getSalt()));
user.setType(0);
user.setStatus(0);
user.setActivationCode(CommunityUtil.generateUUID());
user.setHeaderUrl(String.format("http://images.nowcoder.com/head/%dt.png", new Random().nextInt(1000)));
user.setCreateTime(new Date());
userMapper.insertUser(user);
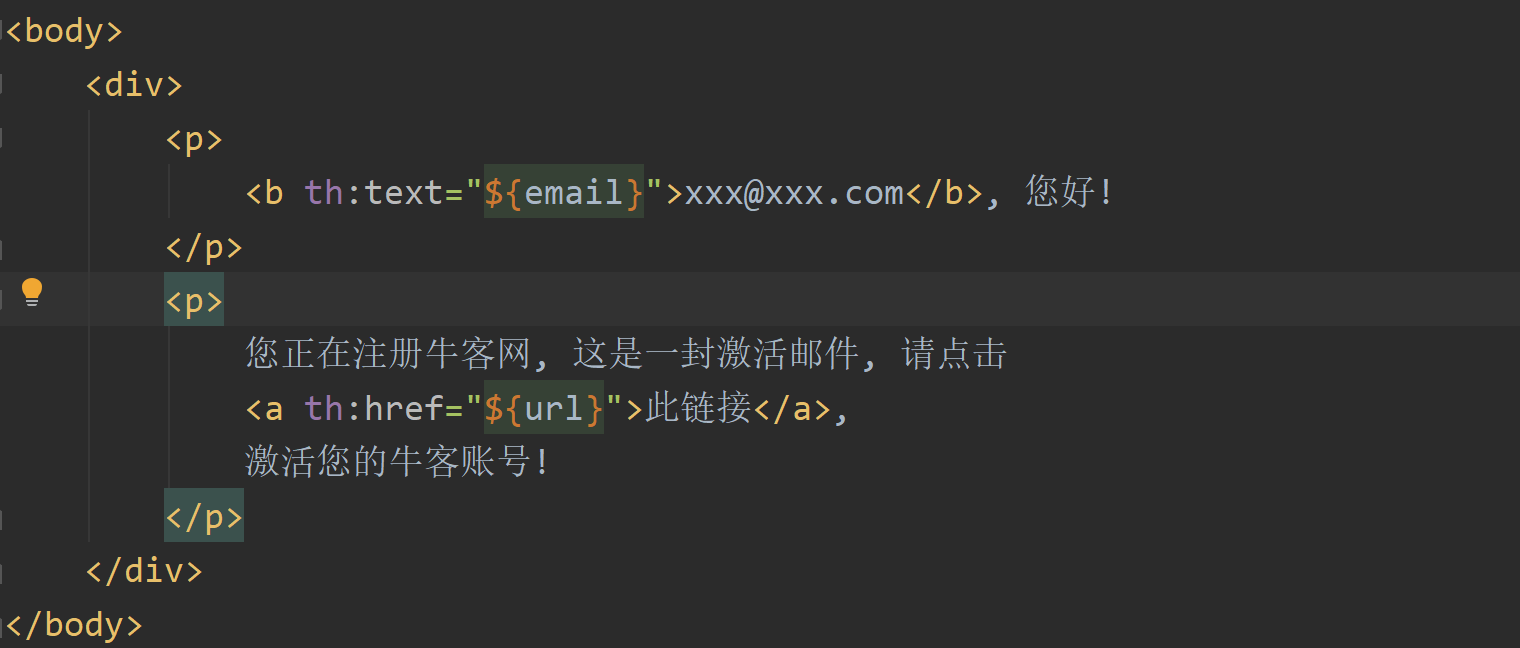
//激活邮件
Context context = new Context();
context.setVariable("email", user.getEmail());
// http://localhost:8080/community/activation/101/code
String url = domain + contextPath + "/activation/" + user.getId() + "/" + user.getActivationCode();
context.setVariable("url", url);
String content = templateEngine.process("/mail/activation", context);
mailClient.sendMail(user.getEmail(), "激活账号", content);
return map;
}
2.3 修改html邮件中的值为动态值
/mail/activation.html
2.2.4 编写相应controller
@RequestMapping(path="/register",method = RequestMethod.POST)
public String register(Model model,User user){ //参数会自动注入到user中,但前面标签中的字段要和User类中的字段名称相同
    Map<String, Object> map = userService.register(user);
    if(map==null || map.isEmpty()){
        model.addAttribute("msg", "注册成功,我们已经向您的邮箱发送了一封激活邮件,请尽快激活!");
        model.addAttribute("target", "/index");
        return "/site/operate-result";
    }else {
        model.addAttribute("usernameMsg", map.get("usernameMsg"));
        model.addAttribute("passwordMsg", map.get("passwordMsg"));
        model.addAttribute("emailMsg", map.get("emailMsg"));
        return "/site/register";
    }
}
2.2.5 修改注册成功的页面信息
/site/operate-result
2.2.6 处理注册失败信息
如果注册失败,controller层会将错误信息返回给注册页面register.html
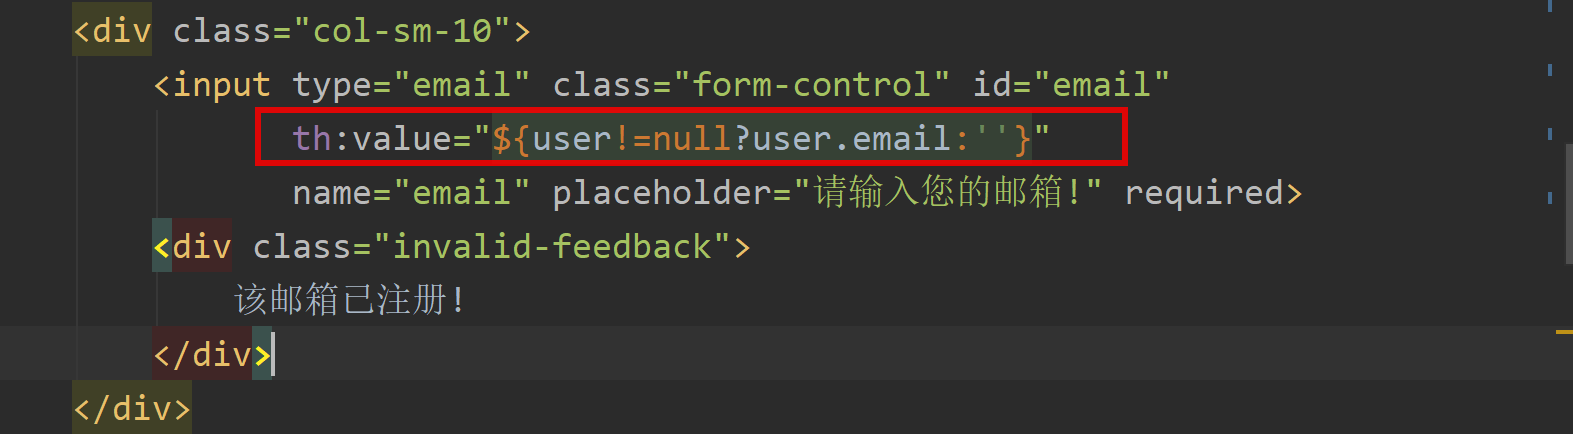
-
默认值的显示
比如说注册页面:首先进入注册页面的时候是没有默认值的,如果注册失败之后,框框里面是有个默认值的,因此要先判断对象是否为空,不为空才显示默认值
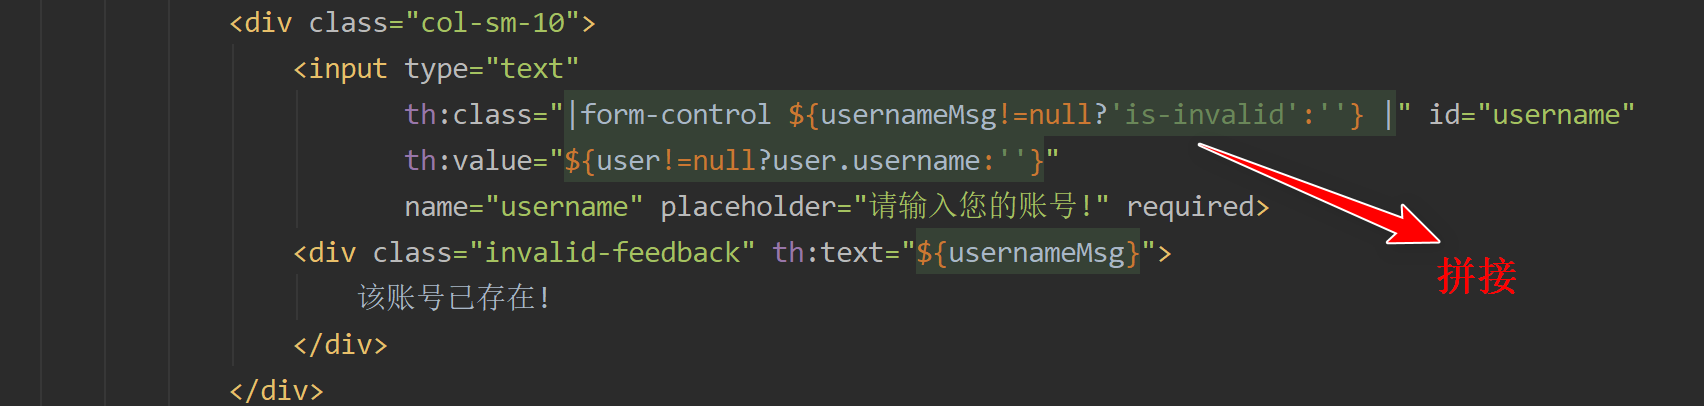
-
错误信息的显示
设置input的class属性,如果有is-invalid,则下面的div标签才会显示,因为div标签的calss属性是invalid-feedback (这个是bootstrap框架生成的,具体的我们不用管)
2.3 激活注册账号
注册成功之后,会受到一封邮件,点击邮件中的此链接可以激活账号(也就是可以将用户中的状态码status修改为1)
2.3.1 编写一个常量接口
任何实现了这个接口的类都可以直接使用里面的变量,编写CommunityConstant接口
public interface CommunityConstant {

    /**
     * 激活成功
     */
    int ACTIVATION_SUCCESS = 0;

    /**
     * 重复激活
     */
    int ACTIVATION_REPEAT = 1;

    /**
     * 激活失败
     */
    int ACTIVATION_FAILURE = 2;

    /**
     * 默认状态的登录凭证的超时时间
     */
    int DEFAULT_EXPIRED_SECONDS = 3600 * 12;

    /**
     * 记住状态的登录凭证超时时间
     */
    int REMEMBER_EXPIRED_SECONDS = 3600 * 24 * 100;
}
2.3.2 在userService里面编写激活业务
//激活账号
public int activation(int userId,String code){
    User user = userMapper.selectById(userId);
    if(user.getStatus()==1){
        return ACTIVATION_REPEAT;
    }else if(user.getActivationCode().equals(code)){
        userMapper.updateStatus(userId, 1);
        return ACTIVATION_SUCCESS;
    }else{
        return ACTIVATION_FAILURE;
    }
}
2.3.3 编写激活的controller
// http://localhost:8080/community/activation/101/code
@RequestMapping(path = "/activation/{userId}/{code}", method = RequestMethod.GET)
public String activation(Model model,@PathVariable("userId") int userId,@PathVariable("code") String code){
    int result = userService.activation(userId, code);
    if(result==ACTIVATION_SUCCESS){
        model.addAttribute("msg", "激活成功,您的账号已经可以正常使用了!");
        model.addAttribute("target", "/login");
    }else if(result==ACTIVATION_REPEAT){
        model.addAttribute("msg","该账号已经激活过了");
        model.addAttribute("target", "/index");
    }else{
        model.addAttribute("msg", "激活失败,您提供的激活码不正确!");
        model.addAttribute("target", "/index");
    }
    return "/site/operate-result";
}

//同时要处理下转到/login的请求
@RequestMapping(path = "/login", method = RequestMethod.GET)
public String getLoginPage() {
    return "/site/login";
}
3.4. 修改/site/operate-result.html
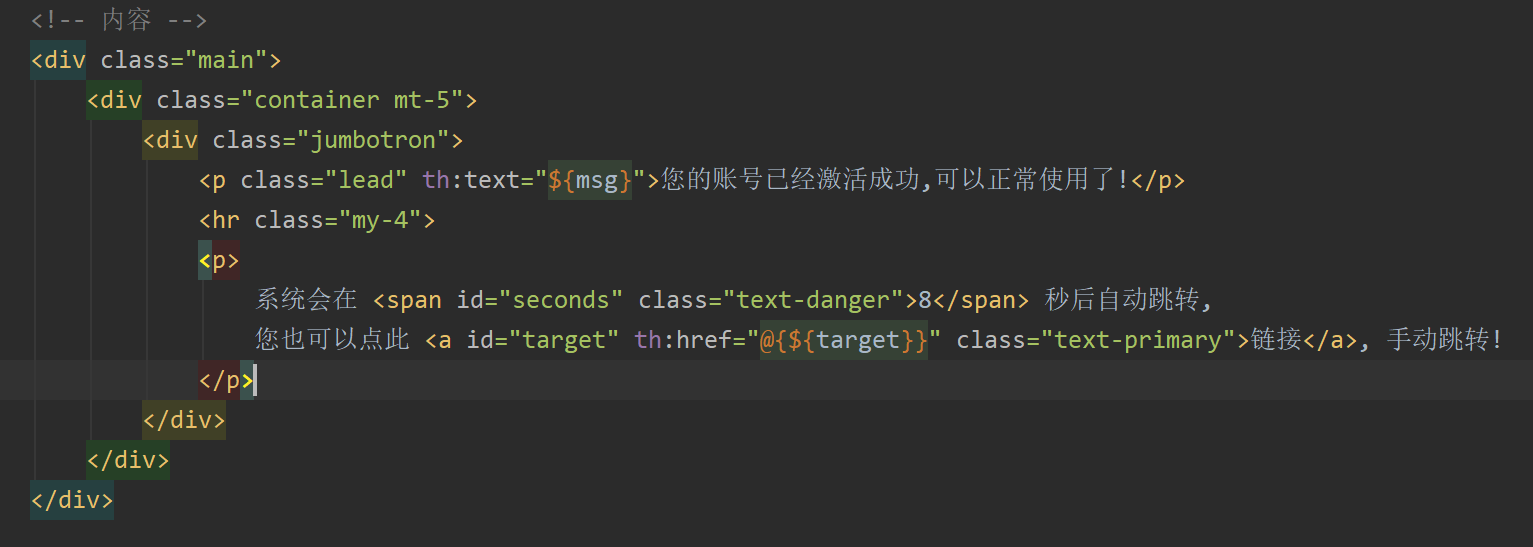
3.会话管理
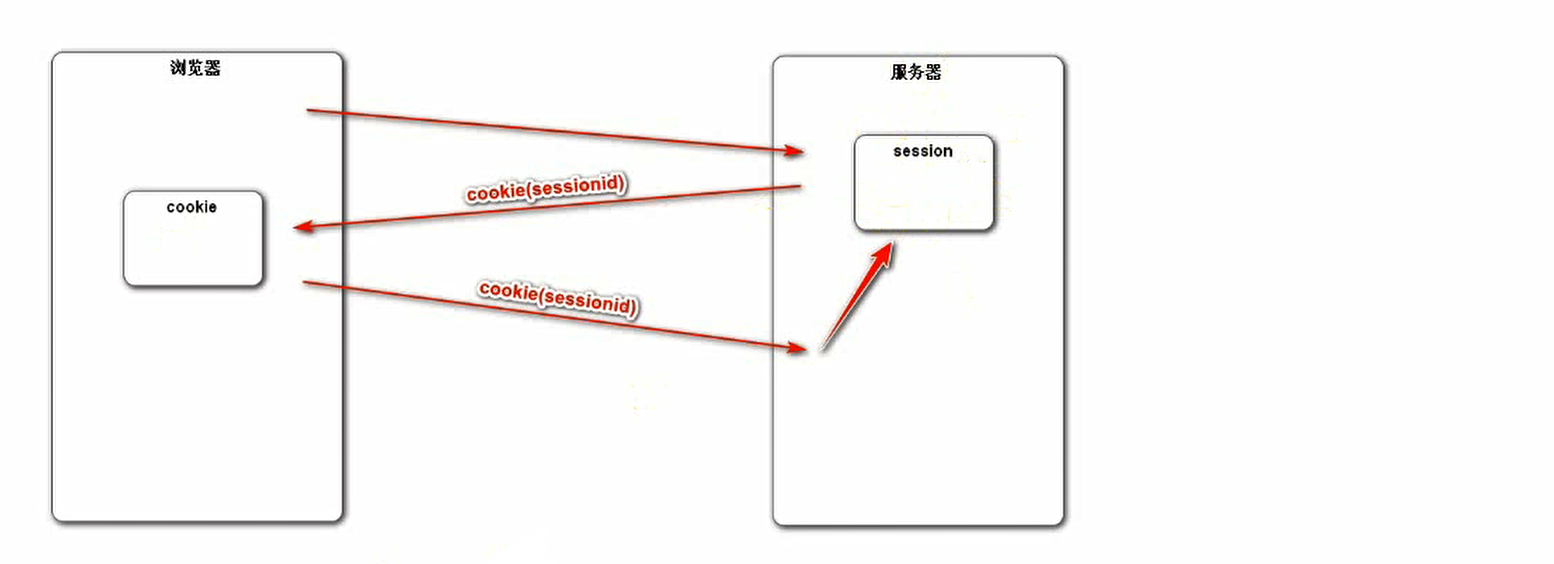
http本质是无状态的,通过Cookies可以创建有状态的会话。
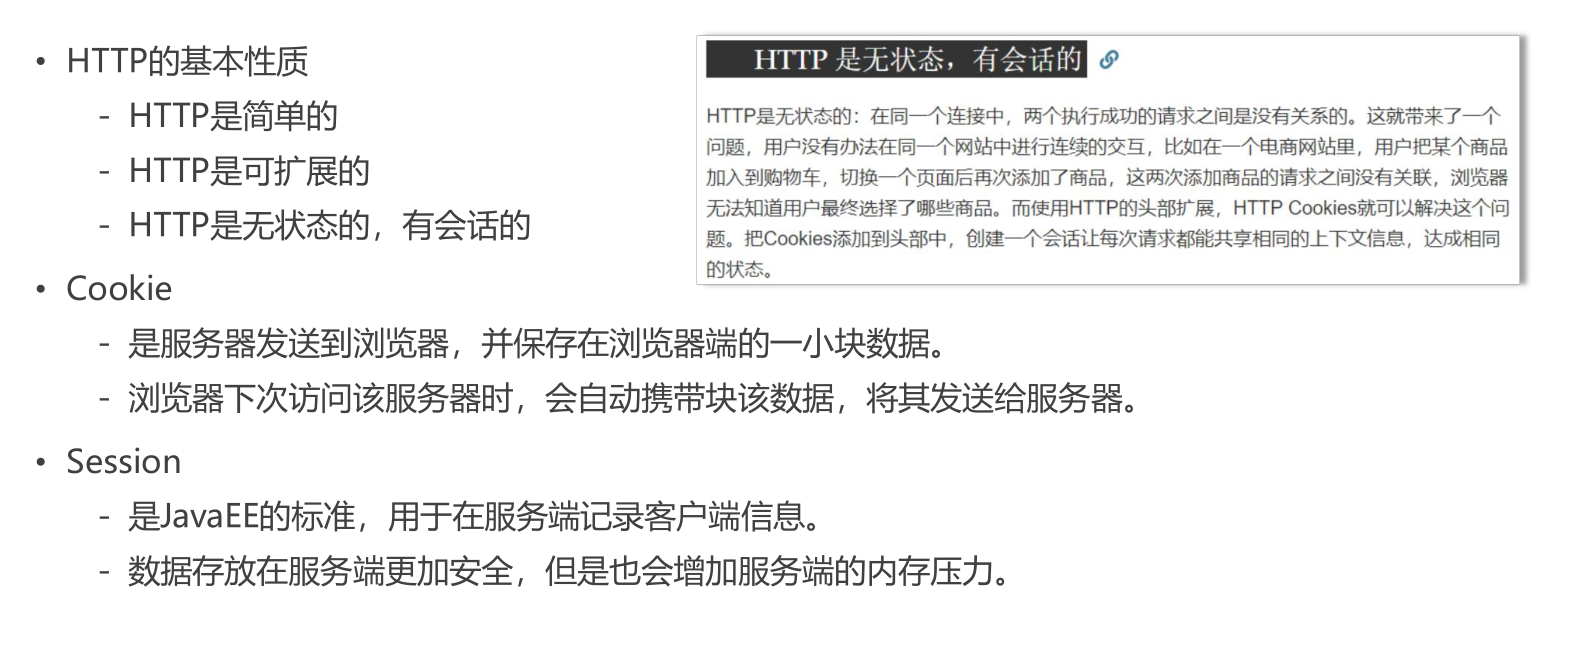
Cookie
cookie是存储在浏览器端的,不太安全。

// cookie示例

@RequestMapping(path = "/cookie/set", method = RequestMethod.GET)
@ResponseBody
public String setCookie(HttpServletResponse response) {
    // 创建cookie
    Cookie cookie = new Cookie("code", CommunityUtil.generateUUID());
    // 设置cookie生效的范围
    cookie.setPath("/community/alpha");
    // 设置cookie的生存时间
    cookie.setMaxAge(60 * 10);
    // 发送cookie
    response.addCookie(cookie);

    return "set cookie";
}

@RequestMapping(path = "/cookie/get", method = RequestMethod.GET)
@ResponseBody
public String getCookie(@CookieValue("code") String code) {  //将cookie中的code赋值给code
    System.out.println(code);
    return "get cookie";
}
Session
服务端在创建session后,会向浏览器端返回一个cookie,这个cookie用来记录sessionid
// session示例

@RequestMapping(path = "/session/set", method = RequestMethod.GET)
@ResponseBody
public String setSession(HttpSession session) {  //Spring MVC会自动注入Session
    session.setAttribute("id", 1);
    session.setAttribute("name", "Test");
    return "set session";
}

@RequestMapping(path = "/session/get", method = RequestMethod.GET)
@ResponseBody
public String getSession(HttpSession session) {
    System.out.println(session.getAttribute("id"));
    System.out.println(session.getAttribute("name"));
    return "get session";
}
4.生成验证码

4.1 导入jar包
4.2 编写Kaptcha配置类
@Configuration
public class KaptchaConfig {

    @Bean
    public Producer kaptchaProducer() {
        Properties properties = new Properties();
        properties.setProperty("kaptcha.image.width", "100");
        properties.setProperty("kaptcha.image.height", "40");
        properties.setProperty("kaptcha.textproducer.font.size", "32");
        properties.setProperty("kaptcha.textproducer.font.color", "0,0,0");
        properties.setProperty("kaptcha.textproducer.char.string", "0123456789ABCDEFGHIJKLMNOPQRSTUVWXYAZ");
        properties.setProperty("kaptcha.textproducer.char.length", "4");
        properties.setProperty("kaptcha.noise.impl", "com.google.code.kaptcha.impl.NoNoise"); //将验证码稍微变形

        DefaultKaptcha kaptcha = new DefaultKaptcha();
        Config config = new Config(properties);
        kaptcha.setConfig(config);
        return kaptcha;
    }

}
4.3 生成随机字符、生成随机图片
生成验证码后要将验证码存如session中,为了后续登录的时候,服务端可以从session中获取验证码来进行验证。
@Autowired
private Producer kaptchaProducer;

@RequestMapping(path="/kaptcha",method = RequestMethod.GET)
public void getKaptcha(HttpServletResponse response, HttpSession session){
    //生成验证码
    String text = kaptchaProducer.createText();
    BufferedImage image = kaptchaProducer.createImage(text);

    //将验证码存入session
    session.setAttribute("kaptcha", text);

    //将图片输出给浏览器
    response.setContentType("image/png");
    try {
        OutputStream os = response.getOutputStream();
        ImageIO.write(image, "png", os);
    } catch (IOException e) {
        logger.error("相应验证码失败:"+e.getMessage());
    }
}
4.修改登录页面login.html的验证码图片路径,并写一个js来刷新验证码

js刷新验证码
<script>
    function refresh_kaptcha(){
    var path = CONTENT_PATH+"/kaptcha?p=" + Math.random();
    $("#kaptcha").attr("src",path);
}
</script>
5.开发登录功能
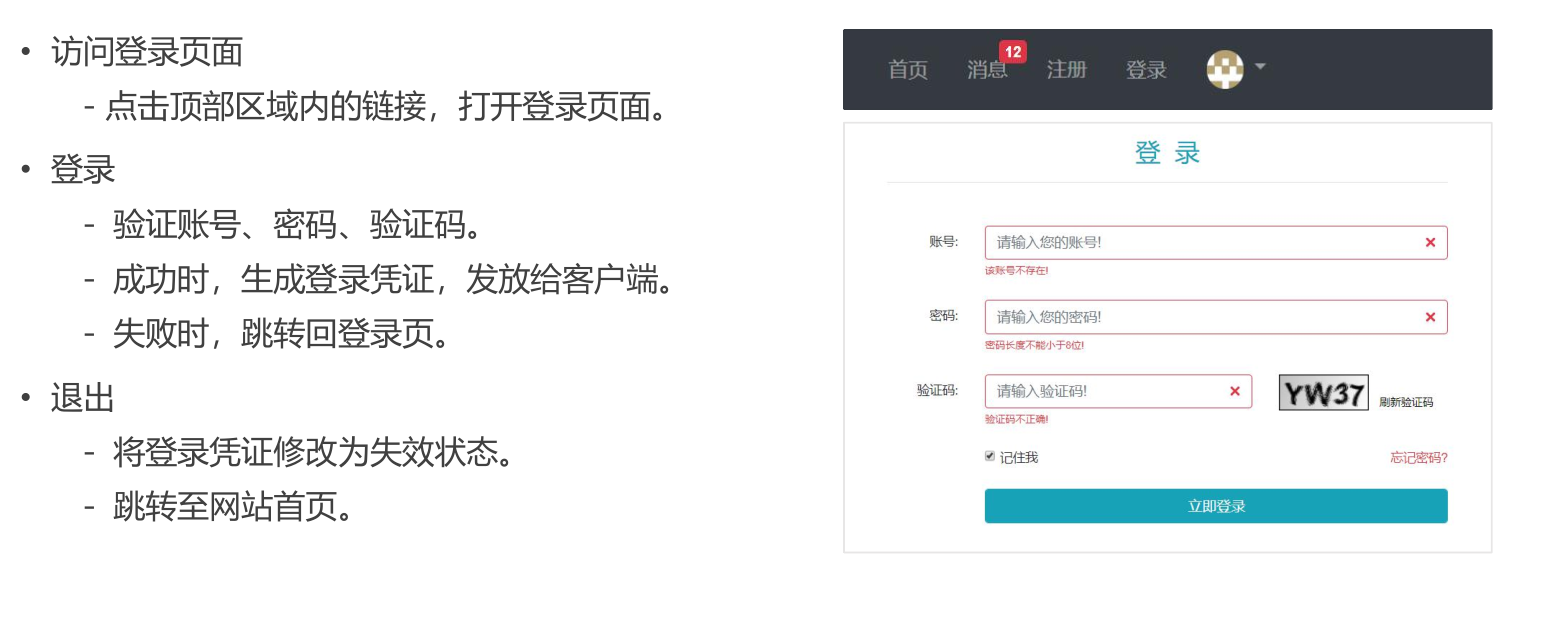
5.1 访问登录页面
//跳转到登录界面
@RequestMapping(path = "/login", method = RequestMethod.GET)
public String getLoginPage() {
    return "/site/login";
}
5.2 登录
5.2.1 编写登录凭证类LoginTicket
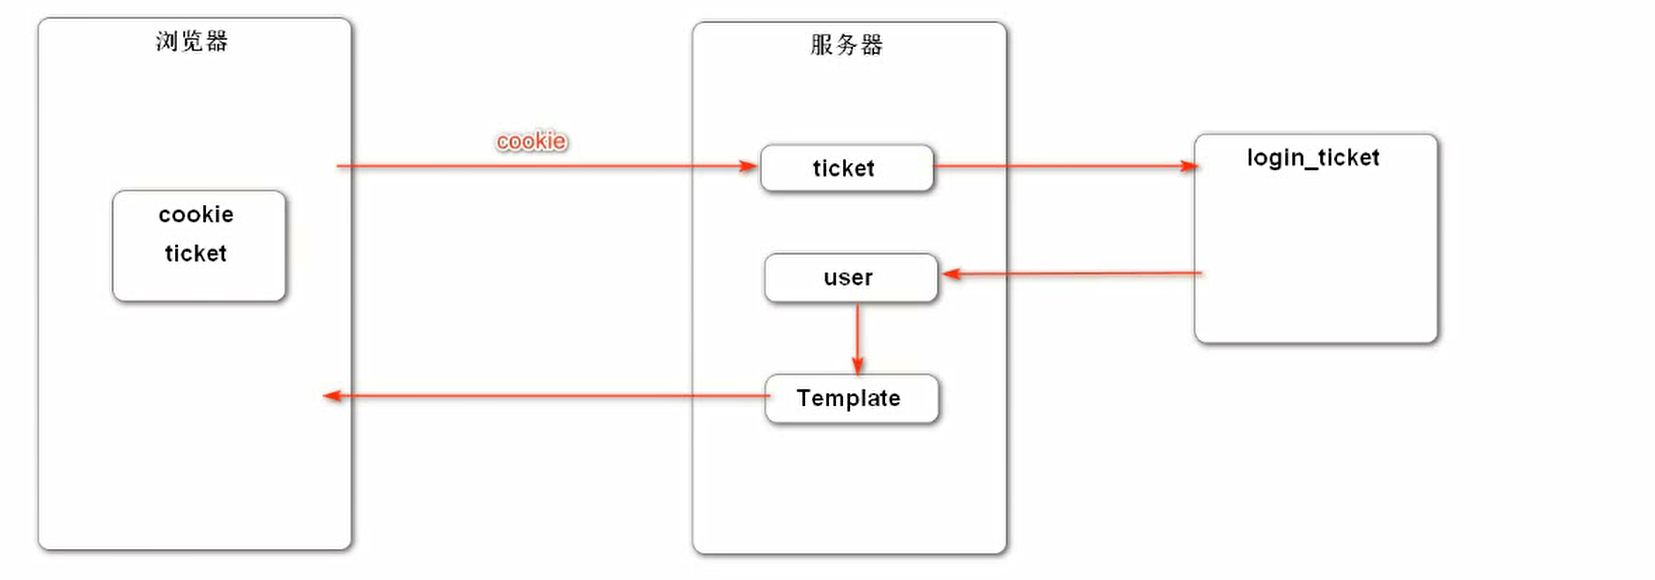
loginTicket表:用户登录成功后会生成一条记录在loginTicket中,服务端会将ticket返回给客户端保存,客户端再次访问服务端的时候就会把这个服务端来查找数据(类似session机制)

5.2.2 编写LoignTicketMapper接口
@Mapper
public interface LoginTicketMapper {

    int insertLoginTicket(LoginTicket loginTicket);

    LoginTicket selectByTicket(String ticket);

    int updateStatus(String ticket);
}
5.2.3 使用注解来编写接口的实现方法
(本质同mapper.xml文件中实现方法一样)
@Mapper
public interface LoginTicketMapper {

    @Insert({
            "insert into login_ticket(user_id,ticket,status,expired) ",
            "values(#{userId},#{ticket},#{status},#{expired})"
    })
    @Options(useGeneratedKeys = true,keyProperty = "id")
    int insertLoginTicket(LoginTicket loginTicket);

    @Select({
            "select id,user_id,ticket,status,expired ",
            "from login_ticket where ticket=#{ticket}"
    })
    LoginTicket selectByTicket(String ticket);

    @Update({
            "<script>",
            "update login_ticket set status=#{status} where ticket=#{ticket} ",
            "<if test=\"ticket!=null\"> ",
            "and 1=1 ",
            "</if>",
            "</script>"
    })  //这里只是展示一下如何拼接sql语句
    int updateStatus(String ticket, int status);
}
5.2.4 在userService中编写登录业务
1.判空
2.验证账号
3.生成凭证并记录
public Map<String,Object> login(String username,String password,int expiredSeconds){
    Map<String,Object> map = new HashMap<>();

    //空值处理
    if(StringUtils.isBlank(username)){
        map.put("usernameMsg", "账号不能为空!");
        return map;
    }
    if(StringUtils.isBlank(password)){
        map.put("passwordMsg", "密码不能为空!");
        return map;
    }

    //验证账号
    User user = userMapper.selectByName(username);
    if(user==null){
        map.put("usernameMsg", "用户不存在!");
        return map;
    }
    if(user.getStatus()==0){
        map.put("usernameMsg", "该账号未激活");
        return map;
    }
    password= CommunityUtil.md5( password+user.getSalt() );
    if(!user.getPassword().equals(password)){
        map.put("passwordMsg", "密码错误!");
        return map;
    }

    //登录成功,生成登录凭证并记录
    LoginTicket loginTicket = new LoginTicket();
    loginTicket.setUserId(user.getId());
    loginTicket.setTicket(CommunityUtil.generateUUID());
    loginTicket.setStatus(0);
    loginTicket.setExpired(new Date(System.currentTimeMillis()+expiredSeconds*1000));
    loginTicketMapper.insertLoginTicket(loginTicket);

    map.put("ticket", loginTicket.getTicket());

    return map;

}
5.2.5 在LoginController中编写请求
1.判断验证码是否合法:在进入到登录页面的时候,就已经请求了/kaptchar生成了验证码(那时候已经存入了session中),此时从session中获取验证码,并将获取的验证码和请求参数中的验证码进行对比。
2.检查账号和密码:如果登录成功,则将生成的登录凭证存到cookie中,并将保存到客户端;如果登录失败,则跳回登录页面
//处理登录请求
@RequestMapping(path = "/login",method = RequestMethod.POST)
public String login(Model model, String username, String password, String code, boolean remenmberme,
                    HttpSession session, HttpServletResponse response){
    //验证验证码
    String kaptchar = (String)session.getAttribute("kaptchar");
    if(StringUtils.isBlank(code) || StringUtils.isBlank(kaptchar) || kaptchar.equalsIgnoreCase(code)){
        model.addAttribute("codeMsg", "验证码不正确!");
        return "/site/login";
    }

    //检查账号,密码
    int expiredSeconds = remenmberme?REMEMBER_EXPIRED_SECONDS:DEFAULT_EXPIRED_SECONDS;
    Map<String, Object> map = userService.login(username, password, expiredSeconds);
    if(map.containsKey("ticket")){
        //登录成功,将cookie保存到客户端
        Cookie cookie = new Cookie("ticket", map.get("ticket").toString());
        cookie.setMaxAge(expiredSeconds);
        cookie.setPath(contextPath);
        response.addCookie(cookie);
        return "redirect:/index";
    }else {
        model.addAttribute("usernameMsg", map.get("usernameMsg"));
        model.addAttribute("passwordMsg", map.get("passwordMsg"));
        return "/site/login";
    }
}
5.2.6 在login.html页面处理出错请求
这里的处理同注册页面register.html
- 默认值显示

- 出错信息显示

5.3 退出
1.在userService中编写退出业务
更新login_ticket表中的status状态为1即可
//更新状态码
public void logout(String ticket){
    loginTicketMapper.updateStatus(ticket,1);
}
2.在loginController层中编写退出请求
//退出登录
@RequestMapping(value = "/logout",method = RequestMethod.GET)
public String logout(@CookieValue("ticket") String ticket){
    userService.logout(ticket);
    return "redirect:/login";
}
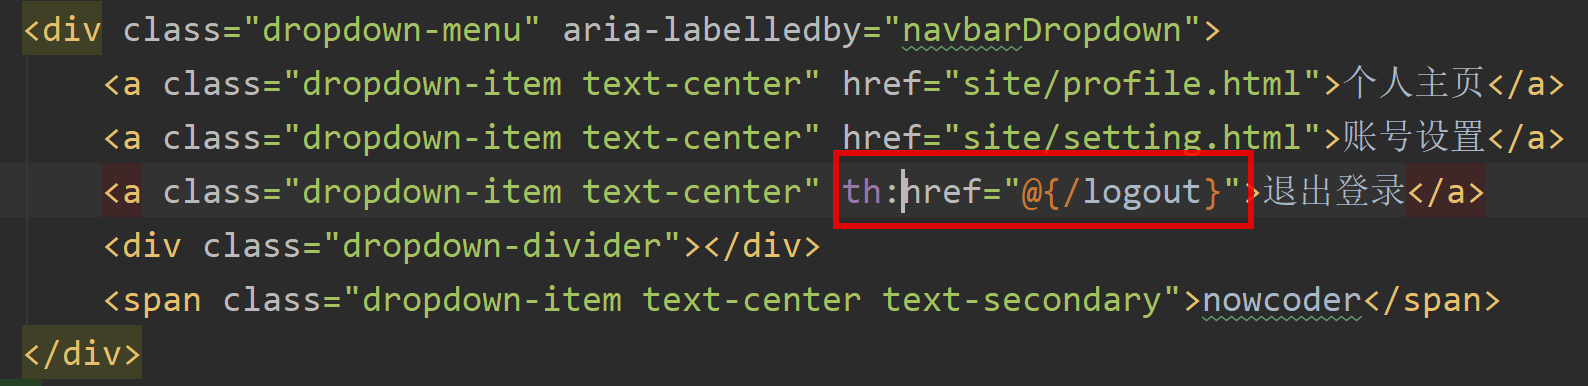
3.修改头部退出登录的链接地址
6.显示登录信息
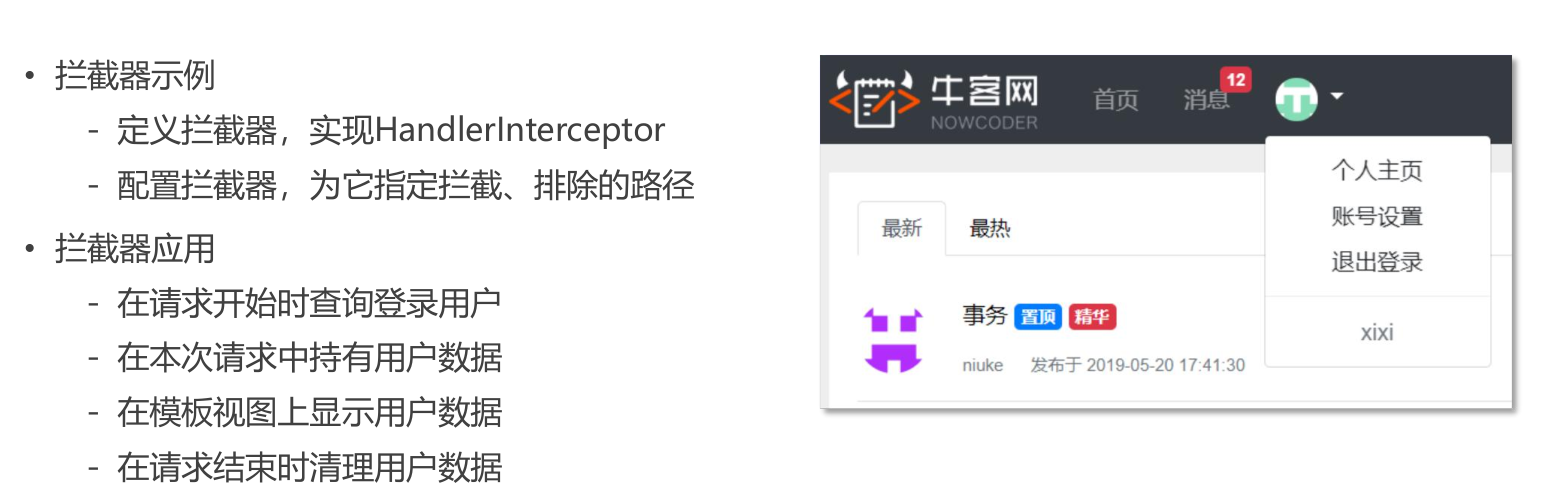
6.1 拦截器示例
6.1.1 定义拦截器
在controller包中的intercepto包下
@Component
public class AlphaInterceptor implements HandlerInterceptor {

    private static final Logger logger = LoggerFactory.getLogger(AlphaInterceptor.class);

    // 在Controller之前执行
    @Override
    public boolean preHandle(HttpServletRequest request, HttpServletResponse response, Object handler) throws Exception {
        logger.debug("preHandle: " + handler.toString());
        return true;
    }

    // 在Controller之后执行
    @Override
    public void postHandle(HttpServletRequest request, HttpServletResponse response, Object handler, ModelAndView modelAndView) throws Exception {
        logger.debug("postHandle: " + handler.toString());
    }

    // 在TemplateEngine之后执行
    @Override
    public void afterCompletion(HttpServletRequest request, HttpServletResponse response, Object handler, Exception ex) throws Exception {
        logger.debug("afterCompletion: " + handler.toString());
    }
}
6.1.2 配置拦截器
编写一个配置类,在config包中
@Configuration
public class WebMvcConfig implements WebMvcConfigurer {

    @Autowired
    private AlphaInterceptor alphaInterceptor;

    @Autowired
    private LoginTicketInterceptor loginTicketInterceptor;

    @Autowired
    private LoginRequiredInterceptor loginRequiredInterceptor;

    @Override
    public void addInterceptors(InterceptorRegistry registry) {
        registry.addInterceptor(alphaInterceptor)
                .excludePathPatterns("/**/*.css", "/**/*.js", "/**/*.png", "/**/*.jpg", "/**/*.jpeg")
                .addPathPatterns("/register", "/login");

        registry.addInterceptor(loginTicketInterceptor)
                .excludePathPatterns("/**/*.css", "/**/*.js", "/**/*.png", "/**/*.jpg", "/**/*.jpeg");

        registry.addInterceptor(loginRequiredInterceptor)
                .excludePathPatterns("/**/*.css", "/**/*.js", "/**/*.png", "/**/*.jpg", "/**/*.jpeg");
    }

}
6.2 项目拦截器应用
6.2.1 编写CookieUtil工具
因为在用户登录后,已经保存了登录凭证ticket在cookie中,因此写一个工具类来获取这个cookie,提高代码复用
public class CookieUtil {

    public static String getValue(HttpServletRequest request,String name){
        if(request==null || name==null){
            throw new IllegalArgumentException("参数为空!");
        }
        Cookie[] cookies = request.getCookies();
        if(cookies!=null){
            for(Cookie cookie:cookies){
                if(cookie.getName().equals(name)){
                    return cookie.getValue();
                }
            }
        }
        return name;
    }
}
6.2.2 编写拦截器
浏览器访问服务器的时候是多个浏览器访问服务器,是并发的,每个浏览器访问服务器,服务器都会创建一个独立的线程来解决这个请求。服务器在处理这个请求的时候是一个多线程的环境,如果只是简单的存储到一个工具或者容器当中, 是一个变量的话有可能或产生冲突(在并发的情况下)。考虑线程的隔离,每个线程单独存储对象。
考虑到这个就写了一个HostHolder类,持有用户信息,用于代替session对象。
/**
 * 持有用户信息,用于代替session对象.
 */
@Component
public class HostHolder {

    private ThreadLocal<User> users = new ThreadLocal<>();

    public void setUser(User user) {
        users.set(user);
    }

    public User getUser() {
        return users.get();
    }

    public void clear() {
        users.remove();
    }

}
然后编写拦截器
@Component
public class LoginTicketInterceptor implements HandlerInterceptor {

    @Autowired
    private UserService userService;

    @Autowired
    private HostHolder hostHolder;

    @Override
    public boolean preHandle(HttpServletRequest request, HttpServletResponse response, Object handler) throws Exception {
        //从cookie中获取凭证
        String ticket = CookieUtil.getValue(request, "ticket");

        if(ticket!=null){
            //查询凭证
            LoginTicket loginTicket = userService.findLoginTicket(ticket);
            if(loginTicket!=null && loginTicket.getStatus()==0 && loginTicket.getExpired().after(new Date())){
                //根据凭证查询用户
                User user = userService.findUserById(loginTicket.getUserId());
                hostHolder.setUser(user);
            }
        }
        return true;
    }

    @Override
    public void postHandle(HttpServletRequest request, HttpServletResponse response, Object handler, ModelAndView modelAndView) throws Exception {
        User user = hostHolder.getUser();
        if(user!=null){
            modelAndView.addObject("loginUser", user);
        }
    }

    @Override
    public void afterCompletion(HttpServletRequest request, HttpServletResponse response, Object handler, Exception ex) throws Exception {
        hostHolder.clear();
    }
}
6.2.3 配置拦截器
@Configuration
public class WebMvcConfig implements WebMvcConfigurer {

    @Autowired
    private LoginTicketInterceptor loginTicketInterceptor;

    @Override
    public void addInterceptors(InterceptorRegistry registry) {
        registry.addInterceptor(loginTicketInterceptor)
                .excludePathPatterns("/**/*.css", "/**/*.js", "/**/*.png", "/**/*.jpg", "/**/*.jpeg");
    }

}
6.2.4 修改index.html页面的头部信息展示
消息是登录之后才展示的,登录和注册是登录之前展示,登录之后就不要再展示的
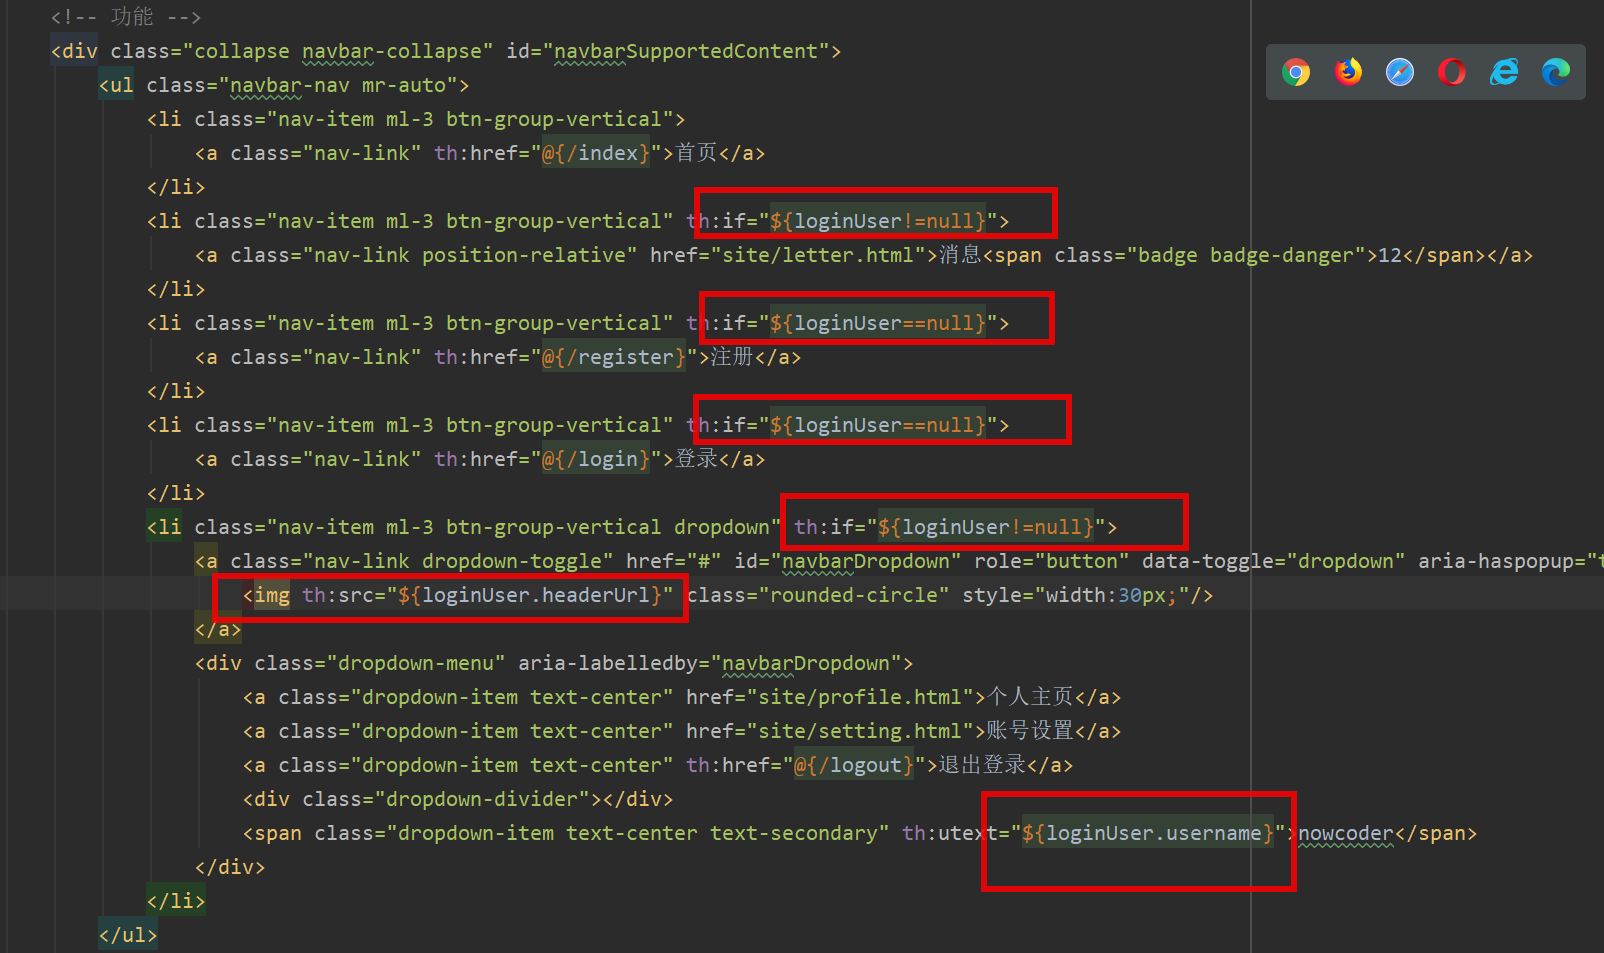
7. 账号设置

6.3.1 访问账号设置页面
处理账号设置请求
@Controller
@RequestMapping(path = "/user")
public class UserController {

    @RequestMapping(path = "/setting",method = RequestMethod.GET)
    public String getSettingPage(){
        return "/site/setting";
    }
}
修改index.html页面的超链接
6.3.2上传头像
编写上传头像请求
1.判断图片格式是否正确
2.修改图片的名字保存(防止文件名重复)
3.将图片存储到本地
4.更新当前用户图片的访问路径
@RequestMapping(path = "/upload",method = RequestMethod.POST)
public String uploadHeader(MultipartFile headerImage, Model model){
    if(headerImage==null){
        model.addAttribute("error", "您还没有选择图片!");
        return "/site/setting";
    }
    String fileName = headerImage.getOriginalFilename();
    String suffix = fileName.substring(fileName.lastIndexOf('.'));
    if(StringUtils.isBlank(suffix)){
        model.addAttribute("error", "文件的格式不正确!");
        return "/site/setting";
    }
    // 生成随机文件名
    fileName = CommunityUtil.generateUUID() + suffix;
    // 确定文件存放的路径
    File dest = new File(uploadPath + "/" + fileName);
    try {
        // 存储文件
        headerImage.transferTo(dest);
    } catch (IOException e) {
        logger.error("上传文件失败: ",e.getMessage());
        throw new RuntimeException("上传文件失败,服务器发生异常!", e);
    }
    //更新当前文件的访问路径
    // http://localhost:8080/community/user/header/xxx.png
    User user = hostHolder.getUser();
    String headerUrl = domain + contextPath + "/user/header/" + fileName;
    userService.updateHeader(user.getId(), headerUrl);

    return "redirect:/index";
}
5.在setting页面处理上传图片不合法的信息

6.3.3 获取头像
编写获取头像请求
@RequestMapping(path = "/header/{fileName}", method = RequestMethod.GET)
public void getHeader(@PathVariable("fileName") String fileName, HttpServletResponse response){
    //服务器图片存放路径
    fileName = uploadPath + "/" + fileName;
    //文件后缀
    String suffix = fileName.substring(fileName.lastIndexOf('.'));
    // 响应图片
    response.setContentType("image/" + suffix);
    try (
        FileInputStream fis = new FileInputStream(fileName);
        OutputStream os = response.getOutputStream();
    ) {
        byte[] buffer = new byte[1024];
        int b = 0;
        while ((b = fis.read(buffer)) != -1) {
            os.write(buffer, 0, b);
        }
    } catch (IOException e) {
        logger.error("读取头像失败: " + e.getMessage());
    }
}
6.3.4 修改密码
编写userService业务修改密码
//修改密码
public void updatePassword(int userId,String password){
    userMapper.updatePassword(userId, password);
}
编写修改密码请求
//修改密码请求
@RequestMapping(path = "/updatePassword",method = RequestMethod.POST)
public String updatePassword(String oldPassword,String newPassword,String confirmPassword,Model model){
    if(StringUtils.isBlank(oldPassword)){
        model.addAttribute("oldPasswordMsg", "原密码不能为空!");
        return "/site/setting";
    }
    if(StringUtils.isBlank(newPassword)){
        model.addAttribute("newPasswordMsg", "新密码不能为空!");
        return "/site/setting";
    }
    if(StringUtils.isBlank(confirmPassword)){
        model.addAttribute("confirmPasswordMsg", "确认密码不能为空!");
        return "/site/setting";
    }
    if(!confirmPassword.equals(newPassword)){
        model.addAttribute("confirmPasswordMsg", "两次输入的密码不一致!");
        return "/site/setting";
    }
    User user = hostHolder.getUser();
    String oldPw = CommunityUtil.md5(oldPassword + user.getSalt());
    if(!oldPw.equals(user.getPassword())){
        model.addAttribute("oldPasswordMsg", "原密码不正确!");
        return "/site/setting";
    }
    userService.updatePassword(user.getId(), CommunityUtil.md5(newPassword+user.getSalt()));
    return "redirect:/index";
}
修改setting.html页面,显示修改密码出错信息

8.检查登录状态

在未登录的情况下是不能访问这个页面的,所以要做登录状态检测
1.先写一个元注解
@Target(ElementType.METHOD)  //注解用在方法上
@Retention(RetentionPolicy.RUNTIME)  //运行时期有效
public @interface LoginRequired {

}
2.编写拦截器
@Component
public class LoginRequiredInterceptor implements HandlerInterceptor {

    @Autowired
    private HostHolder hostHolder;

    @Override
    public boolean preHandle(HttpServletRequest request, HttpServletResponse response, Object handler) throws Exception {

        if(handler instanceof HandlerMethod){
            HandlerMethod handlerMethod = (HandlerMethod)handler;
            Method method = handlerMethod.getMethod();
            LoginRequired loginRequired = method.getAnnotation(LoginRequired.class);
            if(loginRequired!=null && hostHolder.getUser()==null){
                response.sendRedirect(request.getContextPath()+"/login");
                return false;
            }
        }
        return true;
    }
}
3.为拦截器添加配置
@Override
public void addInterceptors(InterceptorRegistry registry) {
    registry.addInterceptor(loginTicketInterceptor)
        .excludePathPatterns("/**/*.css", "/**/*.js", "/**/*.png", "/**/*.jpg", "/**/*.jpeg");

    registry.addInterceptor(loginRequiredInterceptor)
        .excludePathPatterns("/**/*.css", "/**/*.js", "/**/*.png", "/**/*.jpg", "/**/*.jpeg");
}
spring boot 开发社区核心功能
1.过滤敏感词
1.1 定义敏感词
先写一个文本文件sensitive-words.txt用来定义敏感词(也可以存储在数据库中,这里存储在文本文件里面)
1.2 定义前缀树
写一个内部类
//前缀树
private class TrieNode{

    //关键词表示符号
    private boolean isKeywordEnd = false;

    //子节点(key是下级字符,TrieNode是下级节点
    private Map<Character,TrieNode> subNodes = new HashMap<>();

    public boolean isKeywordEnd() {
        return isKeywordEnd;
    }

    public void setKeywordEnd(boolean keywordEnd) {
        isKeywordEnd = keywordEnd;
    }

    //添加子节点
    public void addSubNode(Character c,TrieNode node){
        subNodes.put(c,node);
    }

    //获取子节点
    public TrieNode getSubNode(Character c){
        return subNodes.get(c);
    }
}
1.3 根据敏感词,初始化前缀树
@PostConstruct
public void init() {
    try (
        InputStream is =
        	this.getClass().getClassLoader().getResourceAsStream("sensitive-words.txt");
        BufferedReader reader = new BufferedReader(new InputStreamReader(is));
    ) {
        String keyword;
        while ((keyword = reader.readLine()) != null) {
            // 添加到前缀树
            this.addKeyword(keyword);
        }
    } catch (IOException e) {
        logger.error("加载敏感词文件失败: " + e.getMessage());
    }
}

// 将一个敏感词添加到前缀树中
private void addKeyword(String keyword) {
    TrieNode tempNode = rootNode;
    for (int i = 0; i < keyword.length(); i++) {
        char c = keyword.charAt(i);
        TrieNode subNode = tempNode.getSubNode(c);

        if (subNode == null) {
            // 初始化子节点
            subNode = new TrieNode();
            tempNode.addSubNode(c, subNode);
        }

        // 指向子节点,进入下一轮循环
        tempNode = subNode;

        // 设置结束标识
        if (i == keyword.length() - 1) {
            tempNode.setKeywordEnd(true);
        }
    }
}
1.4 编写过滤敏感词的方法
这里之所以用指针三来做循环的结束条件,是因为用指针三可以减少一些循环次数,比如当遍历到最后一个字符的时候,还没有遍历到叶子节点,这时候就可以退出循环了,而如果用指针二的话还得继续遍历。
/**
     * 过滤敏感词
     *
     * @param text 待过滤的文本
     * @return 过滤后的文本
     */
public String filter(String text) {
    if (StringUtils.isBlank(text)) {
        return null;
    }

    // 指针1
    TrieNode tempNode = rootNode;
    // 指针2
    int begin = 0;
    // 指针3
    int position = 0;
    // 结果
    StringBuilder sb = new StringBuilder();

    while (position < text.length()) {
        char c = text.charAt(position);

        // 跳过符号
        if (isSymbol(c)) {
            // 若指针1处于根节点,将此符号计入结果,让指针2向下走一步
            if (tempNode == rootNode) {
                sb.append(c);
                begin++;
            }
            // 无论符号在开头或中间,指针3都向下走一步
            position++;
            continue;
        }

        // 检查下级节点
        tempNode = tempNode.getSubNode(c);
        if (tempNode == null) {
            // 以begin开头的字符串不是敏感词
            sb.append(text.charAt(begin));
            // 进入下一个位置
            position = ++begin;
            // 重新指向根节点
            tempNode = rootNode;
        } else if (tempNode.isKeywordEnd()) {
            // 发现敏感词,将begin~position字符串替换掉
            sb.append(REPLACEMENT);
            // 进入下一个位置
            begin = ++position;
            // 重新指向根节点
            tempNode = rootNode;
        } else {
            // 检查下一个字符
            position++;
        }
    }

    // 将最后一批字符计入结果
    sb.append(text.substring(begin));

    return sb.toString();
}
2.发布帖子
2.1 编写DAO接口
//插入帖子
int insertDiscussPost(DiscussPost discussPost);
2.2 编写相应的mapper
<insert id="insertFields" parameterType="DiscussPost">
    insert into discuss_post(<include refid="insertFields"></include>)
    values (#{userId,#{title},#{content},#{type},#{status},#{createTime},
         #{commentCount},#{score});
</insert>
2.3 编写service方法
public int addDiscussPost(DiscussPost post){
    if(post==null){
        throw new IllegalArgumentException("参数不能为空!");
    }
    //转html标记
    post.setTitle(HtmlUtils.htmlEscape(post.getTitle()));
    post.setContent(HtmlUtils.htmlEscape(post.getContent()));
    // 过滤敏感词
    post.setTitle(sensitiveFilter.filter(post.getTitle()));
    post.setContent(sensitiveFilter.filter(post.getContent()));
    return discussPostMapper.insertDiscussPost(post);
}
2.4 编写工具类,将返回前端的信息改为JSON格式的字符串
通过这个工具,可以将提示信息以JSON格式的字符串返回,再通过@ResponseBody注解就可以将这个JSON格式的字符串转化为JSON格式的数据。
//转换成json格式的字符串
public static String getJSONString(int code, String msg, Map<String,Object> map){
    JSONObject json = new JSONObject();
    json.put("code", code);
    json.put("msg", msg);
    if(map!=null) {
        for (String key : map.keySet()) {
            map.put(key, map.get(key));
        }
    }
    return json.toJSONString();
}
public static String getJSONString(int code, String msg) {
    return getJSONString(code, msg, null);
}

public static String getJSONString(int code) {
    return getJSONString(code, null, null);
}
2.5 编写controller
@RequestMapping(path = "/add",method = RequestMethod.POST)
@ResponseBody
public String addDiscussPost(String title,String content){
    User user = hostHolder.getUser();
    if(user==null){
        return CommunityUtil.getJSONString(403, "你还没有登录哦!");
    }
    DiscussPost post = new DiscussPost();
    post.setUserId(user.getId());
    post.setTitle(title);
    post.setContent(content);
    post.setCreateTime(new Date());
    discussPostService.addDiscussPost(post);

    // 报错的情况,将来统一处理.
    return CommunityUtil.getJSONString(0, "发布成功!");
}
2.6 编写前端AJAX请求
$(function(){
	$("#publishBtn").click(publish);
});

function publish() {
	$("#publishModal").modal("hide");

	//获取标题和内容
	var title = $("#recipient-name").val();
	var content = $("#message-text").val();
	//发布异步请求
	$.post(
		CONTENT_PATH + "/discuss/add",
		{"title":title,"content":content},
		function (data) {
			data = $.parseJSON(data);
			//在提示框中返回消息
			$("#hintBody").text(data.msg);
			//显示提示框
			$("#hintModal").modal("show");
			//两秒后自动隐藏提示框
			setTimeout(function () {
				$("#hintModal").modal("hide");
				//刷新页面
				if(data.code==0){
					window.location.reload();
				}
			},2000);
		}
	);
}
3.帖子详情
1.编写mapper
//查询帖子
DiscussPost selectDiscussPostById(@Param("postId") int id);


<select id="selectDiscussPostById" resultType="DiscussPost">
    select <include refid="selectFields"></include>
    from discuss_post
    where id=#{postId}
</select>
2.编写service
//根据帖子id查询帖子
public DiscussPost findDiscussPost(int postId){
    DiscussPost discussPost = discussPostMapper.selectDiscussPostById(postId);
    return discussPost;
}
3.编写controller
@RequestMapping(path = "/detail/{postId}",method = RequestMethod.GET)
public String getDiscussDetail(@PathVariable("postId") int postId, Model model){
    DiscussPost post = discussPostService.findDiscussPost(postId);
    User user = userService.findUserById(post.getUserId());
    model.addAttribute("post", post);
    model.addAttribute("user", user);
    return "/site/discuss-detail";
}
4.在帖子标题增加连接

5.处理discusss-detail.html页面
- 处理静态资源访问路径
- 复用index.html的header区域
- 显示标题、作者、内容、发布时间等内容
4.事务管理
4.1 事务的特性
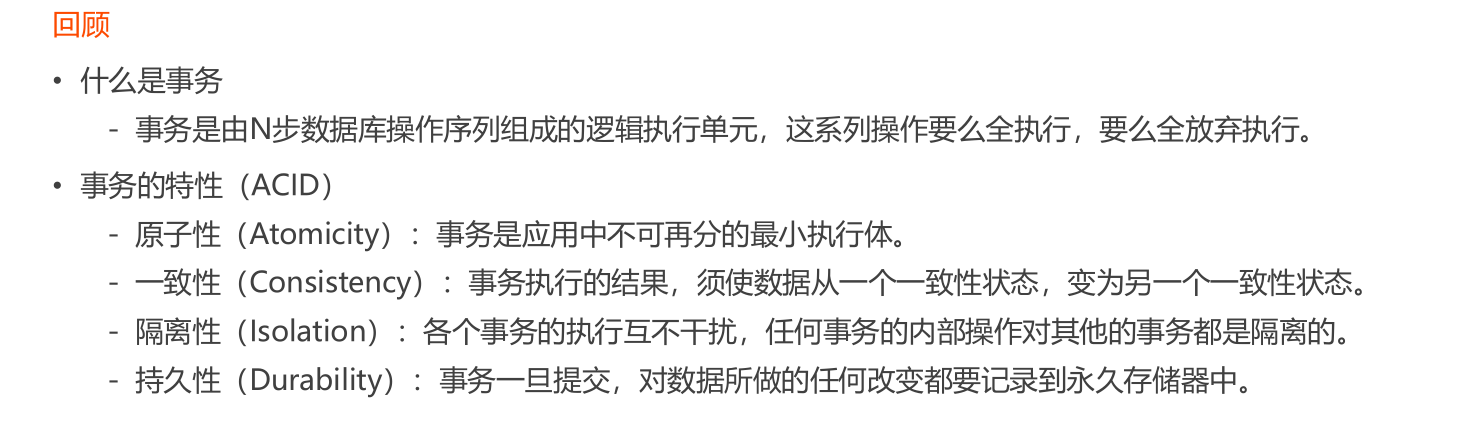
4.2 事务的并发问题
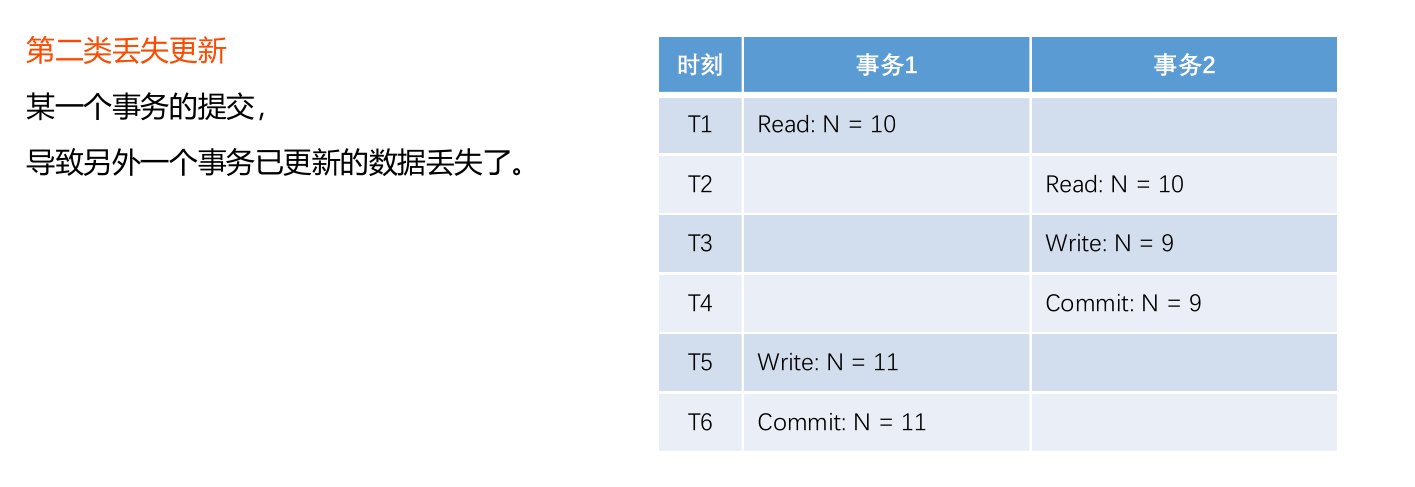
4.2.1 丢失更新
4.2.2 脏读

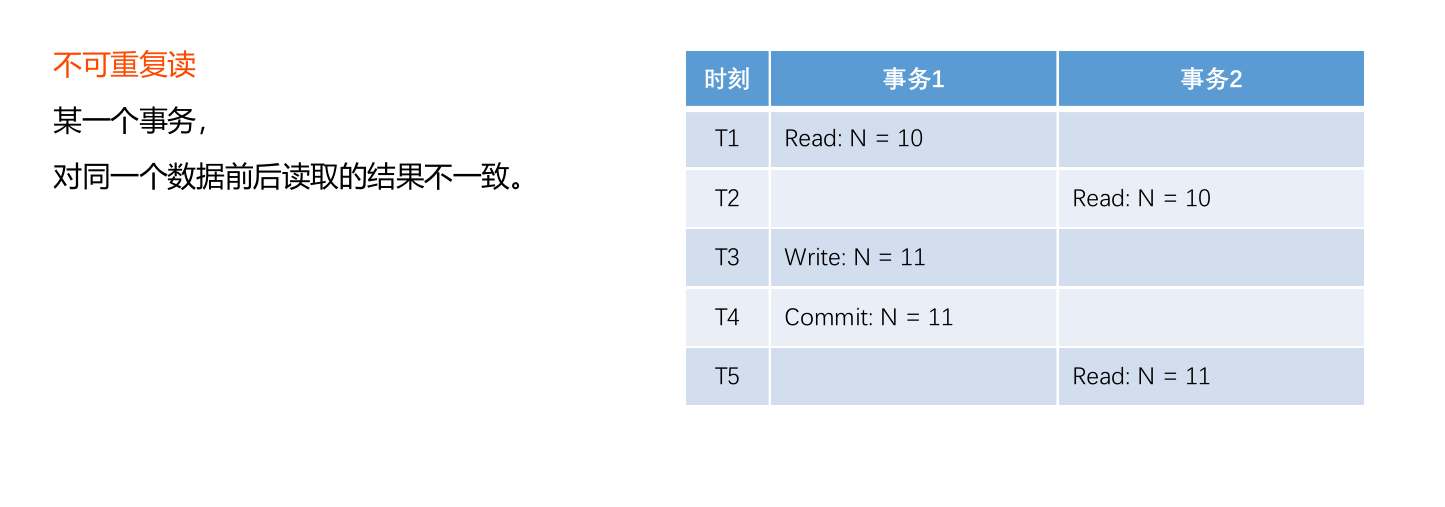
4.2.3 不可重复读
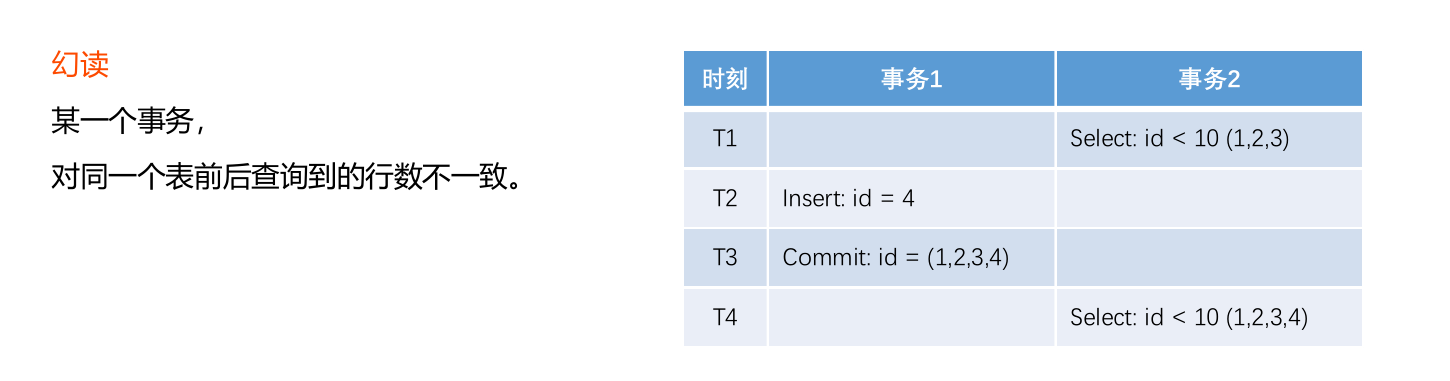
4.2.4 幻读
不可重复度是相对一条数据,幻读是查询一个表的行数不一致
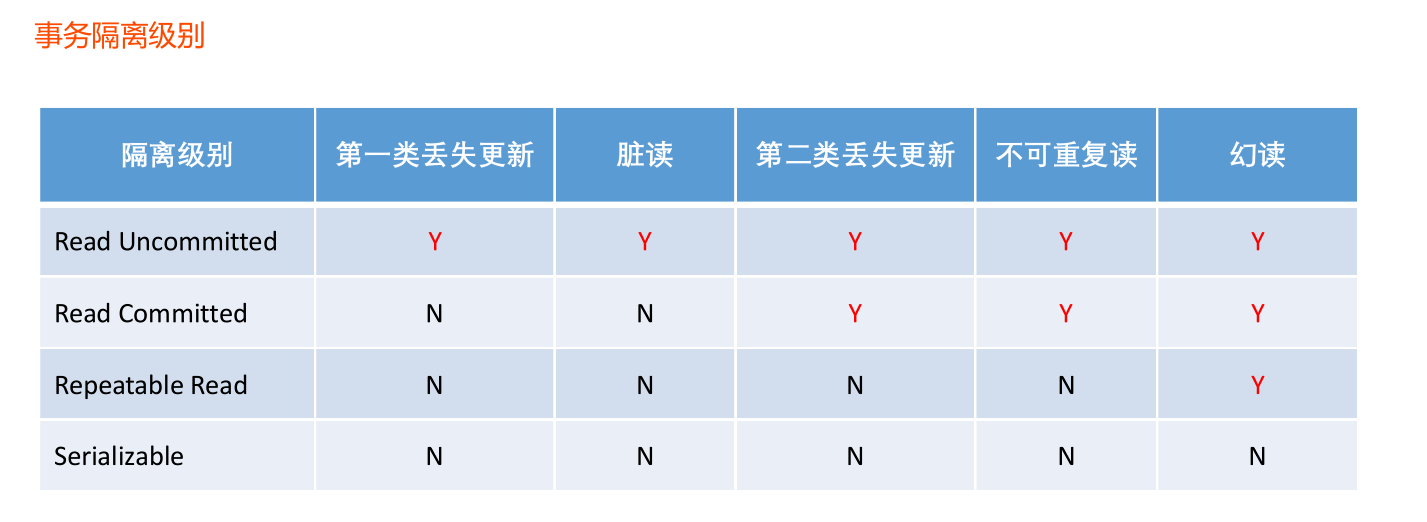
4.3 事务的隔离级别
通常幻读是可以允许的,一般项目用的隔离级别是读已提交或者可重复读(像银行这种对数据安全性要救比较高的可以用序列化)
4.4 实现机制

4.5 spring事务管理
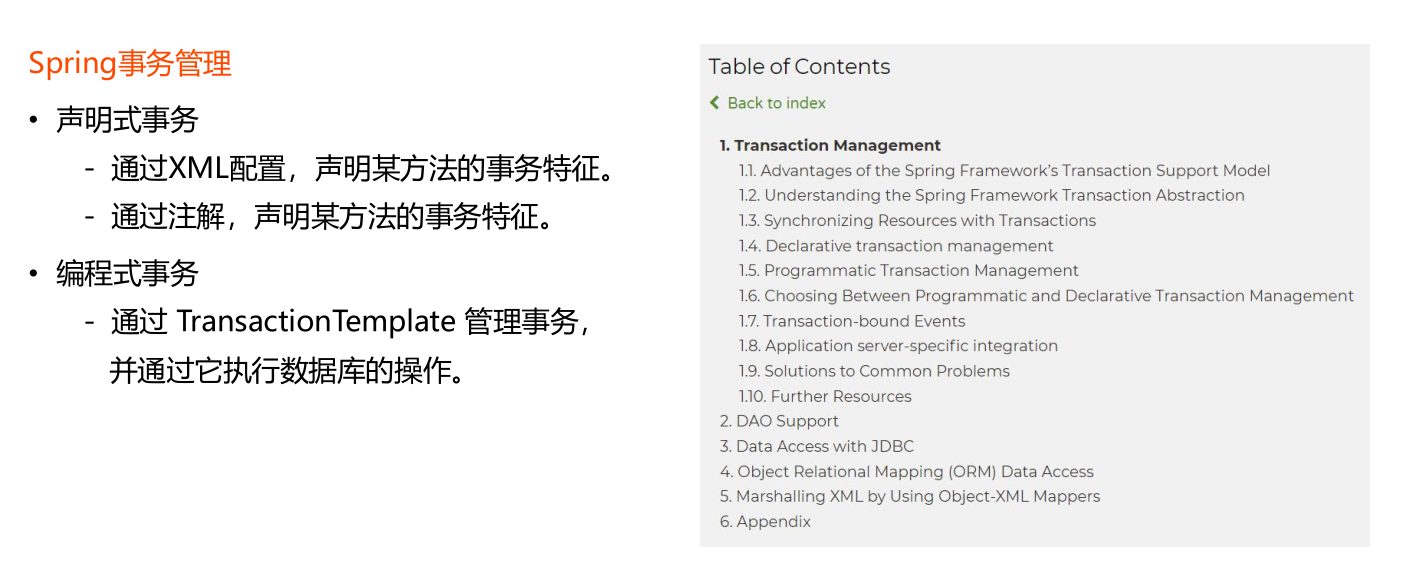
-
声明式事务 (优先使用这种)
// REQUIRED: 支持当前事务(外部事务),如果不存在则创建新事务. // REQUIRES_NEW: 创建一个新事务,并且暂停当前事务(外部事务). // NESTED: 如果当前存在事务(外部事务),则嵌套在该事务中执行(独立的提交和回滚),否则就会REQUIRED一样. @Transactional(isolation = Isolation.READ_COMMITTED, propagation = Propagation.REQUIRED) public Object save1() { // 新增用户 User user = new User(); user.setUsername("alpha"); user.setSalt(CommunityUtil.generateUUID().substring(0, 5)); user.setPassword(CommunityUtil.md5("123" + user.getSalt())); user.setEmail("alpha@qq.com"); user.setHeaderUrl("http://image.nowcoder.com/head/99t.png"); user.setCreateTime(new Date()); userMapper.insertUser(user); // 新增帖子 DiscussPost post = new DiscussPost(); post.setUserId(user.getId()); post.setTitle("Hello"); post.setContent("新人报道!"); post.setCreateTime(new Date()); discussPostMapper.insertDiscussPost(post); Integer.valueOf("abc"); return "ok"; } -
编程式事务
public Object save2() {
    transactionTemplate.setIsolationLevel(TransactionDefinition.ISOLATION_READ_COMMITTED);
    transactionTemplate.setPropagationBehavior(TransactionDefinition.PROPAGATION_REQUIRED);

    return transactionTemplate.execute(new TransactionCallback<Object>() {
        @Override
        public Object doInTransaction(TransactionStatus status) {
            // 新增用户
            User user = new User();
            user.setUsername("beta");
            user.setSalt(CommunityUtil.generateUUID().substring(0, 5));
            user.setPassword(CommunityUtil.md5("123" + user.getSalt()));
            user.setEmail("beta@qq.com");
            user.setHeaderUrl("http://image.nowcoder.com/head/999t.png");
            user.setCreateTime(new Date());
            userMapper.insertUser(user);

            // 新增帖子
            DiscussPost post = new DiscussPost();
            post.setUserId(user.getId());
            post.setTitle("你好");
            post.setContent("我是新人!");
            post.setCreateTime(new Date());
            discussPostMapper.insertDiscussPost(post);

            Integer.valueOf("abc");

            return "ok";
        }
    });
}
5.显示评论

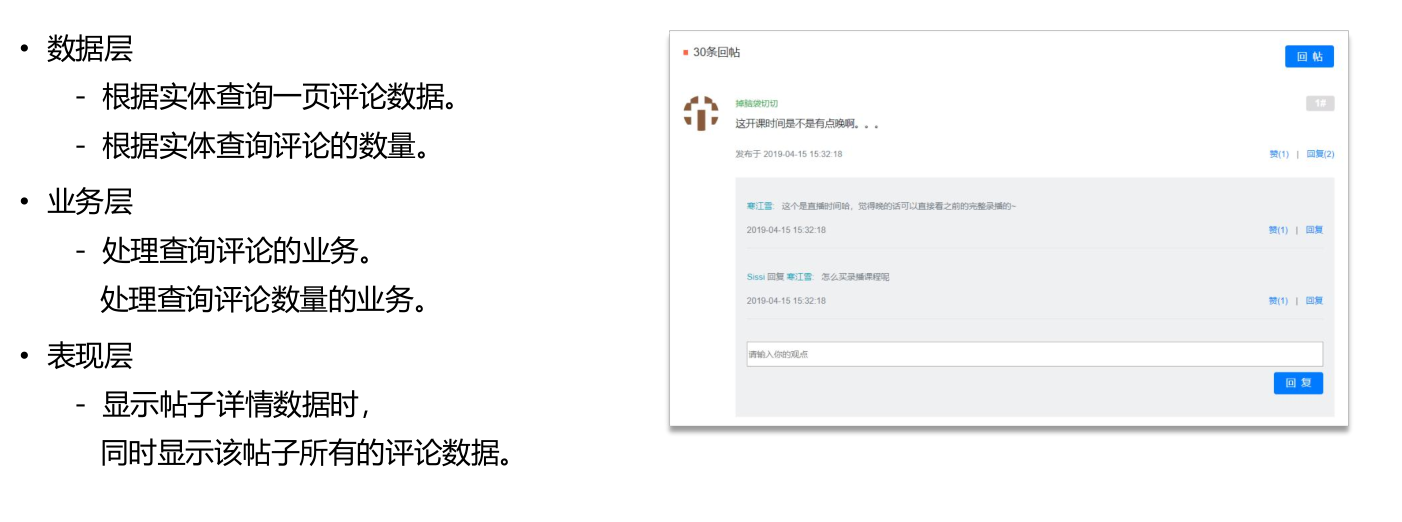
5.1 数据层
定义CommentMapper
根据实体查询一页评论数据,根据实体查询评论的数量。
entityType字段的设置主要是为了评论的复用,根据entityType可以将评论区分为对帖子的评论和对帖子的评论的评论等。
@Mapper
public interface CommentMapper {

    List<Comment> selectCommentsByEntity(int entityType,int entityId,int offset,int limit);

    int selectCountByEntity(int entityType,int entityId);
}
<select id="selectCommentsByEntity" resultType="Comment">
    select <include refid="selectFields"></include>
    from comment
    where status=0
    and entity_type = #{entityType}
    and entity_id = #{entityId}
    order by create_time
    limit #{offset},#{limit}
</select>

<select id="selectCountByEntity" resultType="int">
    select count(id)
    from comment
    where status = 0
    and entity_type = #{entityType}
    and entity_id = #{entityId}
</select>
5.2 业务层
@Service
public class CommentService {

    @Autowired
    private CommentMapper commentMapper;

    public List<Comment> findCommentsByEntity(int entityType, int entityId, int offset, int limit){
        return commentMapper.selectCommentsByEntity(entityType, entityId, offset, limit);
    }

    public int findCountByEntity(int entityType,int entityId){
        return commentMapper.selectCountByEntity(entityType, entityId);
    }
}
5.3 表现层
表现层这里要理清逻辑,每个帖子有若干评论,而每个评论又有若干回复。
评论: 给帖子的评论
回复: 给评论的评论
@RequestMapping(path = "/detail/{postId}",method = RequestMethod.GET)
public String getDiscussDetail(@PathVariable("postId") int postId, Model model, Page page){
    DiscussPost post = discussPostService.findDiscussPost(postId);
    User user = userService.findUserById(post.getUserId());
    model.addAttribute("post", post);
    model.addAttribute("user", user);

    //评论分页信息
    page.setLimit(5);
    page.setPath("/discuss/detail/" + postId);
    page.setRows(post.getCommentCount());

    // 评论: 给帖子的评论
    // 回复: 给评论的评论
    // 评论列表
    List<Comment> commentList = commentService.findCommentsByEntity(ENTITY_TYPE_POST, post.getId(), page.getOffset(), page.getLimit());
    //评论VO列表(view object)
    List<Map<String,Object>> commentVoList = new ArrayList<>();
    if(commentList!=null){
        for(Comment comment:commentList){
            //评论VO
            Map<String,Object> commentVo = new HashMap<>();
            //评论
            commentVo.put("comment", comment);
            //作者
            commentVo.put("user", userService.findUserById(comment.getUserId()));

            //回复列表
            List<Comment> replyList = commentService.findCommentsByEntity(ENTITY_TYPE_COMMENT, comment.getId(), 0, Integer.MAX_VALUE);
            // 回复VO列表
            List<Map<String, Object>> replyVoList = new ArrayList<>();
            if(replyList!=null){
                for(Comment reply:replyList){
                    Map<String,Object> replyVo = new HashMap<>();
                    //回复
                    replyVo.put("reply", reply);
                    //作者
                    replyVo.put("user", userService.findUserById(reply.getUserId()));
                    //回复目标
                    User target = reply.getTargetId() == 0 ? null : userService.findUserById(reply.getTargetId());
                    replyVo.put("target", target);
                    replyVoList.add(replyVo);
                }
            }
            commentVo.put("replies", replyVoList);
            // 回复数量
            int replyCount = commentService.findCountByEntity(ENTITY_TYPE_COMMENT, comment.getId());
            commentVo.put("replyCount", replyCount);

            commentVoList.add(commentVo);
        }
    }

    model.addAttribute("comments", commentVoList);

    return "/site/discuss-detail";
}
5.4 修改前端discuss-detail.html页面
这里比较麻烦,因为这个页面很多地方都要修改。对着这个静态页面一一仔细修改。
6.增加评论
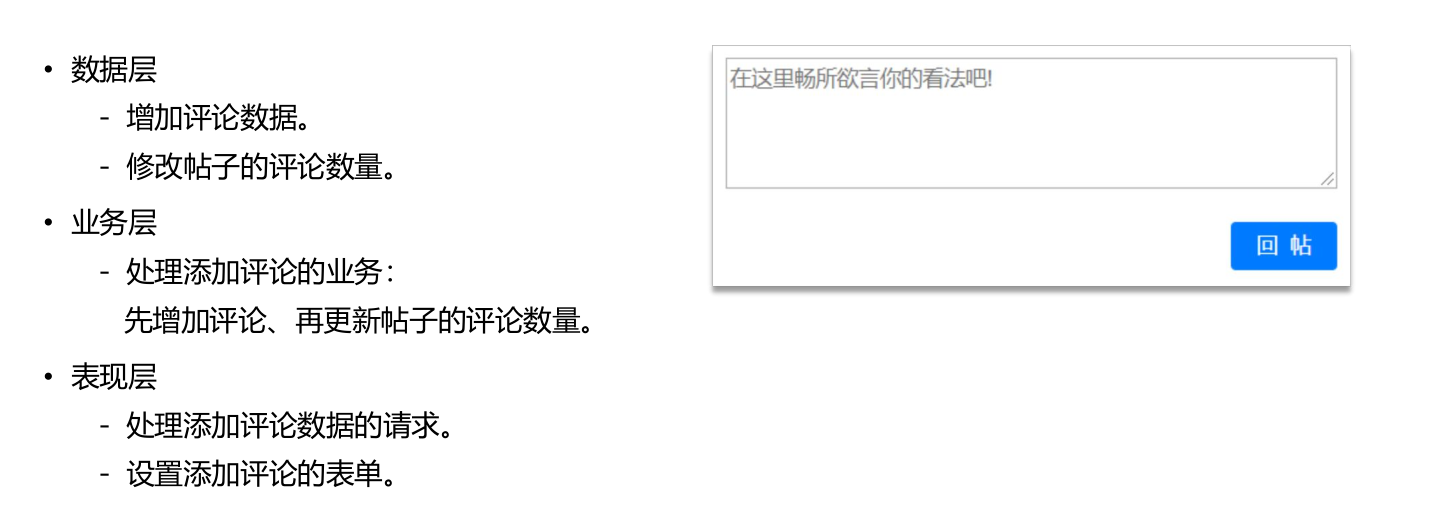
添加评论需要事务处理,先增加评论,再更新帖子的评论数量,这一组操作必须是同时成功或者同时失败。
6.1数据层
添加评论
int insertComment(Comment comment);
<insert id="insertComment" parameterType="Comment">
    insert into comment(<include refid="insertFields"></include>)
    values (#{userId},#{entityType},#{entityId},#{targetId},#{content},#{status},#{createTime})
</insert>
更新帖子的评论数量
//更新帖子的评论数量
int updateDiscussPostCommentCount(int discussPostId,int commentCount);
<update id="updateDiscussPostCommentCount">
    update discuss_post
    set comment_count = #{commentCount}
    where id = #{discussPostId}
</update>
6.2 业务层
添加评论(需启用事务)
//添加评论和更新帖子评论数量必须同时成功或者同时失败。
@Transactional(isolation = Isolation.READ_COMMITTED,propagation = Propagation.REQUIRED)
public int insertComment(Comment comment){
    if(comment==null){
        throw new IllegalArgumentException("参数不能为空!");
    }
    //添加评论
    comment.setContent(HtmlUtils.htmlEscape(comment.getContent()));
    comment.setContent(sensitiveFilter.filter(comment.getContent()));
    int rows = commentMapper.insertComment(comment);

    //更新帖子评论数量
    if(comment.getEntityType()==ENTITY_TYPE_POST){
        int count = commentMapper.selectCountByEntity(comment.getEntityType(),comment.getEntityId());
        discussPostService.updateCommentCount(comment.getEntityId(), count);
    }
    return rows;
}
更新帖子数量
//更新帖子评论数量
public int updateCommentCount(int discussPostId,int commentCount){
    return discussPostMapper.updateDiscussPostCommentCount(discussPostId, commentCount);
}
6.3 显示层
//添加评论
@RequestMapping(path = "/add/{discussPostId}",method = RequestMethod.POST)
public String addComment(@PathVariable("discussPostId") int discussPostId, Comment comment){
    comment.setUserId(hostHolder.getUser().getId());
    comment.setStatus(0);
    comment.setCreateTime(new Date());
    commentService.addComment(comment);

    return "redirect:/discuss/detail/" + discussPostId;
}
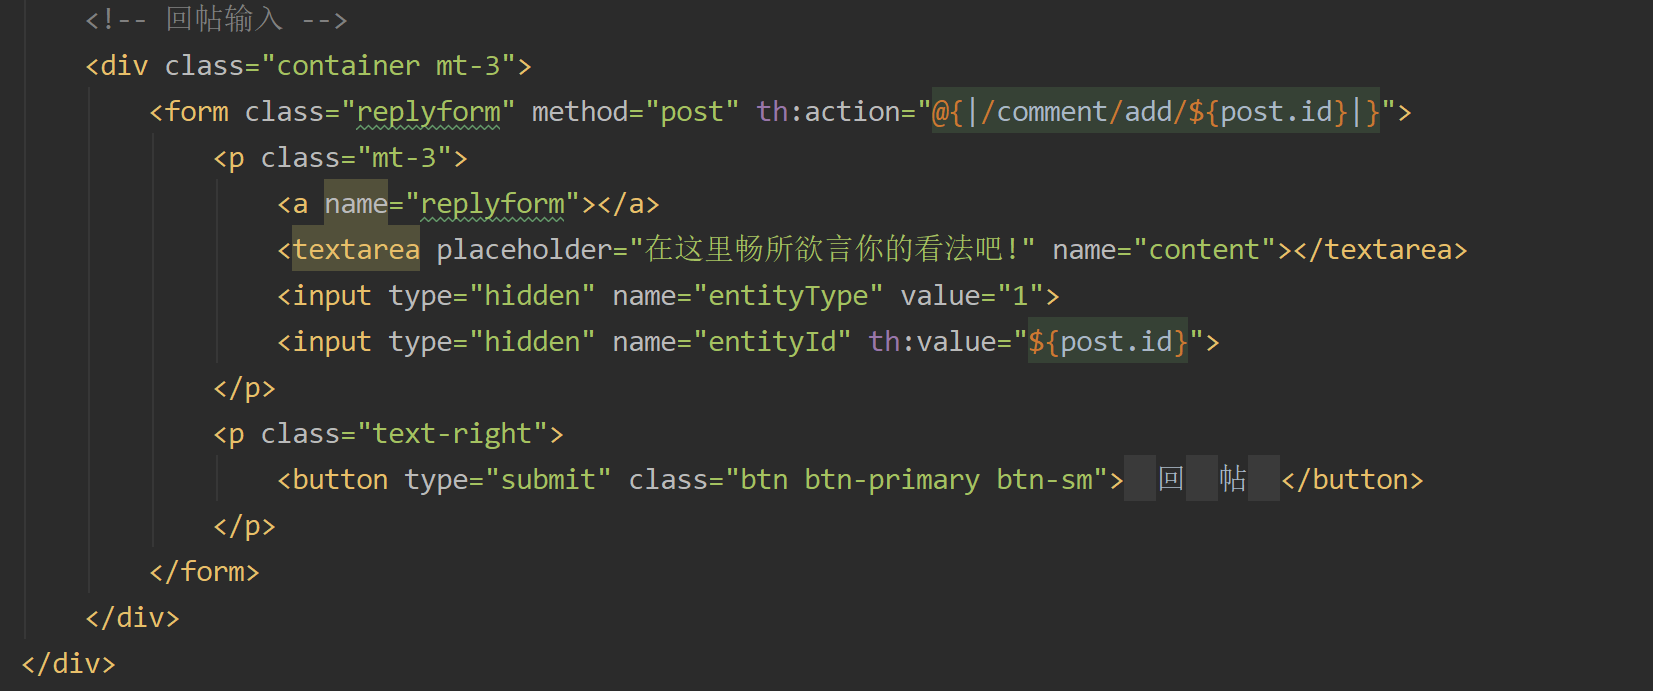
6.4 修改discuss-detail.html添加评论的表单
7.私信列表
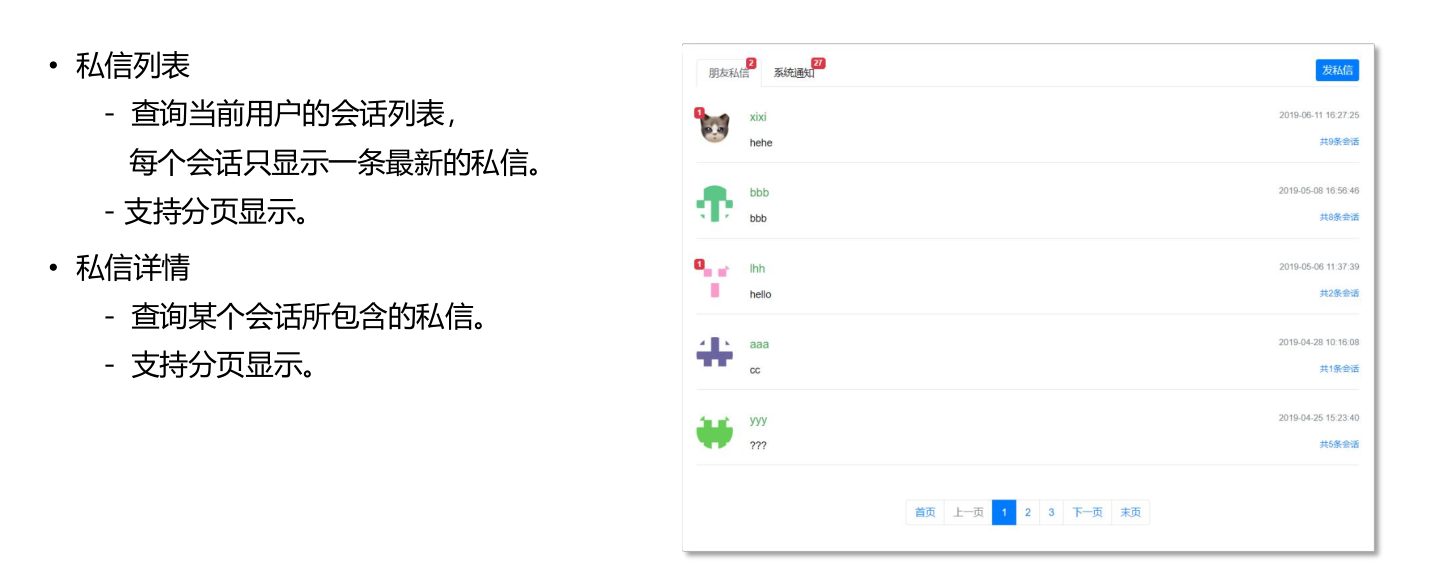
7.1 编写数据层
根据静态页面来推测需要哪些查询
**1.查询当前用户的会话列表:**搜索from_id或to_id等于当前用户id的message,并返回最新的一条消息。
**2.查询当前用户的会话数量:**对上面的查询1进行计数。
**3.查询某个会话所包含的私信列表:**根据conversation_id来查询,并进行排序。
**4.查询某个会话所包含的私信数量:**对上面查询3进行计数。
**5.查询未读私信的数量:**只要写一个函数复用即可(若参数conversation_id为空则是总的私信未读数量)
- 某个用户的发的私信未读数量
- 总的私信未读数量
MessageMapper
@Mapper
public interface MessageMapper {

    // 查询当前用户的会话列表,针对每个会话只返回一条最新的私信.
    List<Message> selectConversations(int userId, int offset, int limit);

    // 查询当前用户的会话数量.
    int selectConversationCount(int userId);

    // 查询某个会话所包含的私信列表.
    List<Message> selectLetters(String conversationId, int offset, int limit);

    // 查询某个会话所包含的私信数量.
    int selectLetterCount(String conversationId);

    // 查询未读私信的数量
    int selectLetterUnreadCount(int userId, String conversationId);

    // 新增消息
    int insertMessage(Message message);

    // 修改消息的状态
    int updateStatus(List<Integer> ids, int status);

}
message-mapper.xml
    <sql id="selectFields">
        id, from_id, to_id, conversation_id, content, status, create_time
    </sql>

    <sql id="insertFields">
        from_id, to_id, conversation_id, content, status, create_time
    </sql>

    <select id="selectConversations" resultType="Message">
        select <include refid="insertFields"></include>
        from message
        where id in(
            select max(id) from message
            where status!=2
            and from_id!=1
            and (from_id=#{userId} or to_id=#{userId} )
            group by conversation_id
        )
        order by id desc
        limit #{offset},#{limit}
    </select>

    <select id="selectConversationCount" resultType="int">
        select count(m.maxid) from (
            select max(id) as maxid from message
            where status != 2
            and from_id != 1
            and (from_id = #{userId} or to_id = #{userId})
            group by conversation_id
        ) as m
    </select>

    <select id="selectLetters" resultType="Message">
        select <include refid="selectFields"></include>
        from message
        where status != 2
        and from_id != 1
        and conversation_id = #{conversationId}
        order by id desc
        limit #{offset}, #{limit}
    </select>

    <select id="selectLetterCount" resultType="int">
        select count(id)
        from message
        where status != 2
        and from_id != 1
        and conversation_id = #{conversationId}
    </select>

    <select id="selectLetterUnreadCount" resultType="int">
        select count(id)
        from message
        where status = 0
        and from_id != 1
        and to_id = #{userId}
        <if test="conversationId!=null">
            and conversation_id = #{conversationId}
        </if>
    </select>
7.2 编写业务层
业务层逻辑比较简单,就是直接调用mapper的方法就可以了
@Autowired
private MessageMapper messageMapper;

public List<Message> findConversations(int userId, int offset, int limit) {
    return messageMapper.selectConversations(userId, offset, limit);
}

public int findConversationCount(int userId) {
    return messageMapper.selectConversationCount(userId);
}

public List<Message> findLetters(String conversationId, int offset, int limit) {
    return messageMapper.selectLetters(conversationId, offset, limit);
}

public int findLetterCount(String conversationId) {
    return messageMapper.selectLetterCount(conversationId);
}

public int findLetterUnreadCount(int userId, String conversationId) {
    return messageMapper.selectLetterUnreadCount(userId, conversationId);
}
7.3编写显示层
同前面帖子一样,对查询到的会话用map来绑定一些信息
@RequestMapping(path = "/letter/list",method = RequestMethod.GET)
public String getLetterList(Model model, Page page){
    User user = hostHolder.getUser();
    //分页信息
    page.setLimit(5);
    page.setPath("letter/list");
    page.setRows(messageService.findConversationCount(user.getId()));

    //会话列表
    List<Message> conversationList = messageService.findConversations(user.getId(), page.getOffset(), page.getLimit());
    List<Map<String,Object>> conversations = new ArrayList<>();
    if(conversationList!=null){
        for(Message message:conversationList){
            Map<String, Object> map = new HashMap<>();
            map.put("conversation", message);
            map.put("letterCount", messageService.findLetterCount(message.getConversationId()));
            map.put("unreadCount", messageService.findLetterUnreadCount(user.getId(), message.getConversationId()));
            int targetId = user.getId() == message.getFromId() ? message.getToId() : message.getFromId();
            map.put("target", userService.findUserById(targetId));

            conversations.add(map);
        }
    }
    model.addAttribute("conversations", conversations);
    //查询未读消息数量
    int letterUnreadCount = messageService.findLetterUnreadCount(user.getId(), null);
    model.addAttribute("letterUnreadCount", letterUnreadCount);

    return "/site/letter";
}
7.4 修改letter.html页面
主要是利用tymleaf填充数据
8.私信详情
8.1 编写显示层
@RequestMapping(path = "letter/detail/{conversationId}",method = RequestMethod.GET)
public String getLetterDetail(@PathVariable("conversationId") String conversationId, Page page, Model model){
    //分页信息
    page.setLimit(5);
    page.setPath("letter/detail");
    page.setRows(messageService.findLetterCount(conversationId));

    List<Message> letterList = messageService.findLetters(conversationId, page.getOffset(), page.getLimit());
    List<Map<String,Object>> letters = new ArrayList<>();
    if(letterList!=null){
        for(Message letter:letterList){
            Map<String,Object> map = new HashMap<>();
            map.put("letter", letter);
            map.put("fromUser", userService.findUserById(letter.getFromId()));
            letters.add(map);
        }
    }

    model.addAttribute("letters", letters);
    // 私信目标
    model.addAttribute("target", getLetterTarget(conversationId));

    return "/site/letter-detail";
}

private User getLetterTarget(String conversationId) {
    String[] ids = conversationId.split("_");
    int id0 = Integer.parseInt(ids[0]);
    int id1 = Integer.parseInt(ids[1]);

    if (hostHolder.getUser().getId() == id0) {
        return userService.findUserById(id1);
    } else {
        return userService.findUserById(id0);
    }
}
8.2 修改letter-detail.html页面
主要是利用tymleaf填充数据,并且复用index.html页面的分页栏。
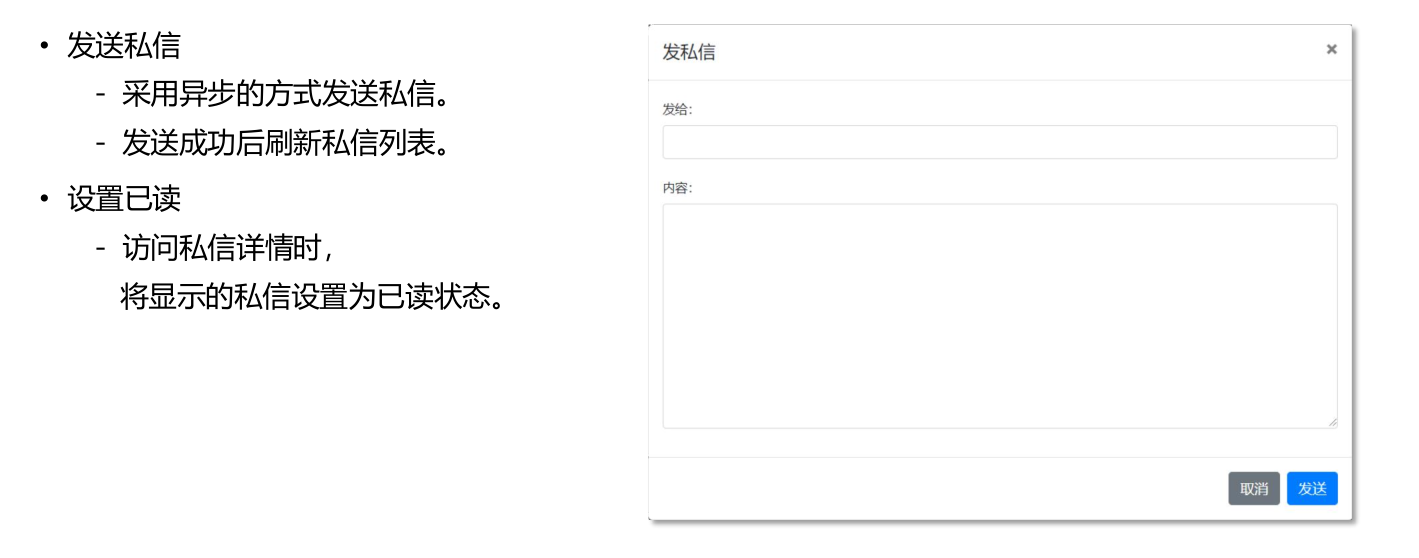
9.发送私信
9.1 编写数据层
// 新增消息
int insertMessage(Message message);

// 修改消息的状态,将消息设置为已读
int updateStatus(List<Integer> ids, int status);
<insert id="insertMessage" parameterType="Message" keyProperty="id">
    insert into message(<include refid="insertFields"></include>)
    values(#{fromId},#{toId},#{conversationId},#{content},#{status},#{createTime})
</insert>

<update id="updateStatus">
    update message set status = #{status}
    where id in
    <foreach collection="ids" item="id" open="(" separator="," close=")">
        #{id}
    </foreach>
</update>
9.2 编写业务层
//添加信息
public int addMessage(Message message){
    message.setContent(HtmlUtils.htmlEscape(message.getContent()));
    message.setContent(sensitiveFilter.filter(message.getContent()));
    return messageMapper.insertMessage(message);
}

//讲消息设置为已读
public int readMessage(List<Integer> ids){
    return messageMapper.updateStatus(ids, 1);
}
9.3 编写显示层
//发送私信
@RequestMapping(path = "/letter/send",method = RequestMethod.POST)
@ResponseBody
public String sendLetter(String toName,String content){
    User target = userService.findUserByUsername(toName);
    if(target==null){
        return CommunityUtil.getJSONString(1, "目标用户不存在!" );
    }
    Message message = new Message();
    message.setToId(target.getId());
    message.setFromId(hostHolder.getUser().getId());
    if (message.getFromId() < message.getToId()) {
        message.setConversationId(message.getFromId() + "_" + message.getToId());
    } else {
        message.setConversationId(message.getToId() + "_" + message.getFromId());
    }
    message.setContent(content);
    message.setCreateTime(new Date());
    messageService.addMessage(message);

    return CommunityUtil.getJSONString(0);
}


//在查看私信详情的时候要将消息设置为已读
@RequestMapping(path = "letter/detail/{conversationId}",method = RequestMethod.GET)
public String getLetterDetail(@PathVariable("conversationId") String conversationId, Page page, Model model){
    //分页信息
    page.setLimit(5);
    page.setPath("letter/detail");
    page.setRows(messageService.findLetterCount(conversationId));

    List<Message> letterList = messageService.findLetters(conversationId, page.getOffset(), page.getLimit());
    List<Map<String,Object>> letters = new ArrayList<>();
    if(letterList!=null){
        for(Message letter:letterList){
            Map<String,Object> map = new HashMap<>();
            map.put("letter", letter);
            map.put("fromUser", userService.findUserById(letter.getFromId()));
            letters.add(map);
        }
    }

    model.addAttribute("letters", letters);
    // 私信目标
    model.addAttribute("target", getLetterTarget(conversationId));

    //设置已读
    List<Integer> ids = getLettersIds(letterList);
    if(!ids.isEmpty()) {
        messageService.readMessage(ids);
    }

    return "/site/letter-detail";
}

//获取消息的目标
private User getLetterTarget(String conversationId) {
    String[] ids = conversationId.split("_");
    int id0 = Integer.parseInt(ids[0]);
    int id1 = Integer.parseInt(ids[1]);

    if (hostHolder.getUser().getId() == id0) {
        return userService.findUserById(id1);
    } else {
        return userService.findUserById(id0);
    }
}

//获取未读消息的id列表
private List<Integer> getLettersIds(List<Message> letterList){
    List<Integer> ids = new ArrayList<>();
    if(letterList!=null){
        for(Message message : letterList){
            if(message.getToId()==hostHolder.getUser().getId() && message.getStatus()==0){
                ids.add(message.getId());
            }
        }
    }
    return ids;
}
9.4 编写前端异步请求
点击发送按钮,触发ajax异步请求。
$(function(){
	$("#sendBtn").click(send_letter);
	$(".close").click(delete_msg);
});

function send_letter() {
	$("#sendModal").modal("hide");  //弹出框关闭
	var toName = $("#recipient-name").val();
	var content = $("#message-text").val();

	//发送异步请求
	$.post(
		CONTEXT_PATH + "/letter/send",
		{"toName": toName, "content": content},
		function (data) {
			data = $.parseJSON(data);
			if (data.code == 0) {
				$("#hintBody").text("发送成功!");
			} else {
				$("#hintBody").text(data.msg);
			}

			$("#hintModal").modal("show"); //提示框显示
			setTimeout(function () {
				$("#hintModal").modal("hide");
				location.reload();  //重新加载当前页面
			}, 2000);
		}
	)
}

function delete_msg() {
	// TODO 删除数据
	$(this).parents(".media").remove();
}
10.统一处理异常
数据层和业务层的异常都会抛给表现层,因此对表现层进行统一异常处理。
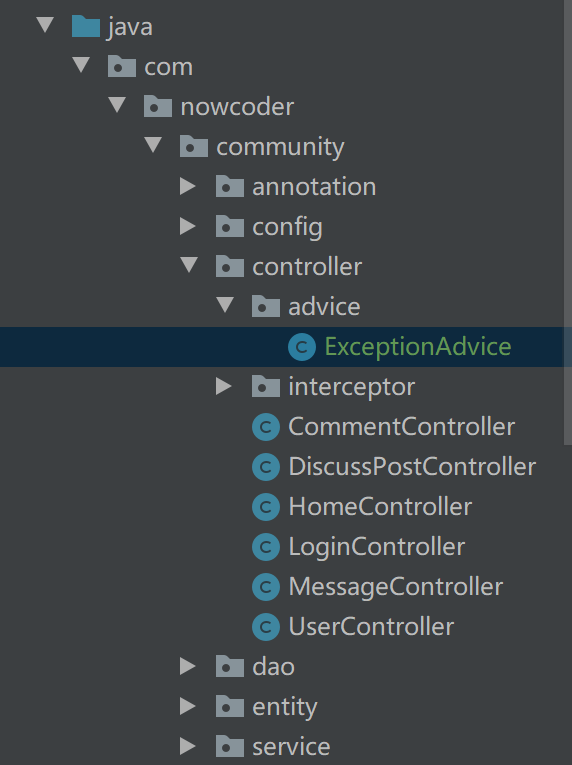
在template下建立一个error包,在里面写好404.html页面和500.html页面,当服务器发生错误的时候,springboot 就会自动跳转到这两个页面。但通常发生异常的时候我们会记录一下日志,所以会统一处理异常。
在controller包建一个advice包,在面编写一个ExceptionAdvice类来统一处理异常,并用@ExcepitonHandler来修饰方法,用来处理捕获到的异常。
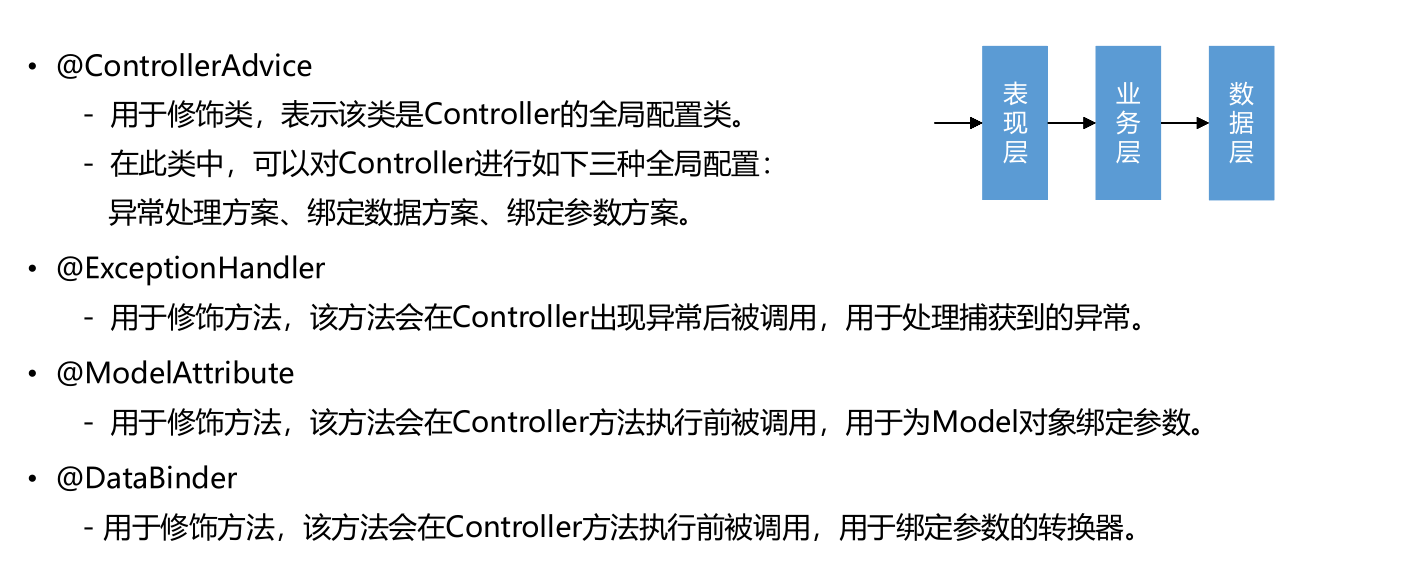
@ControllerAdvice
public class ExceptionAdvice {

    private static final Logger logger =  LoggerFactory.getLogger(ExceptionHandler.class);

    @ExceptionHandler
    public void handlerException(Exception e, HttpServletRequest request, HttpServletResponse response) throws IOException {
        logger.error("服务器发生异常: " + e.getMessage());
        for (StackTraceElement element : e.getStackTrace()) {
            logger.error(element.toString());
        }

        String xRequestedWith = request.getHeader("x-requested-with");
        if ("XMLHttpRequest".equals(xRequestedWith)) {
            response.setContentType("application/plain;charset=utf-8");
            PrintWriter writer = response.getWriter();
            writer.write(CommunityUtil.getJSONString(1, "服务器异常!"));
        } else {
            response.sendRedirect(request.getContextPath() + "/error");
        }
    }
}
11 统一记录日志
利用spring aop来记录日志(在目标类源代码不改变的情况下,增加功能)
写一个前置通知,在service中的方法执行之前记录日志
@Component
@Aspect
public class ServiceLogAspect {

    private static final Logger logger = LoggerFactory.getLogger(ServiceLogAspect.class);

    @Pointcut("execution(* com.nowcoder.community.service.*.*(..))")
    public void pointcut(){

    }

    @Before("pointcut()")
    public void before(JoinPoint joinPoint) {
        // 用户[1.2.3.4],在[xxx],访问了[com.nowcoder.community.service.xxx()].
        ServletRequestAttributes attributes = (ServletRequestAttributes) RequestContextHolder.getRequestAttributes();
        HttpServletRequest request = attributes.getRequest();
        String ip = request.getRemoteHost();
        String now = new SimpleDateFormat("yyyy-MM-dd HH:mm:ss").format(new Date());
        String target = joinPoint.getSignature().getDeclaringTypeName() + "." + joinPoint.getSignature().getName();
        logger.info(String.format("用户[%s],在[%s],访问了[%s].", ip, now, target));
    }
}
结果

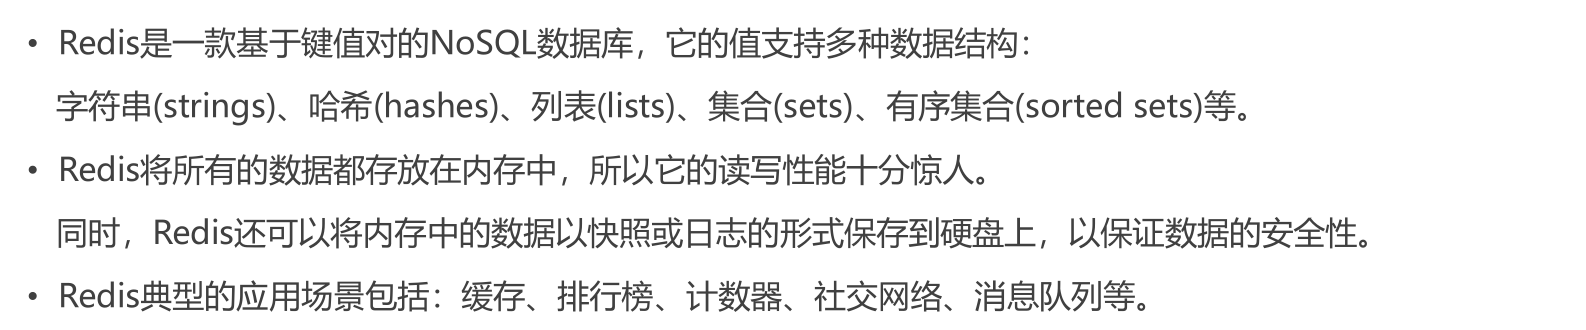
Redis 一站式高性能存储方案
windowshua环境下,redis会自动启动。启动redis客服端
redis-cli //启动客服端
1.spring整合Redis
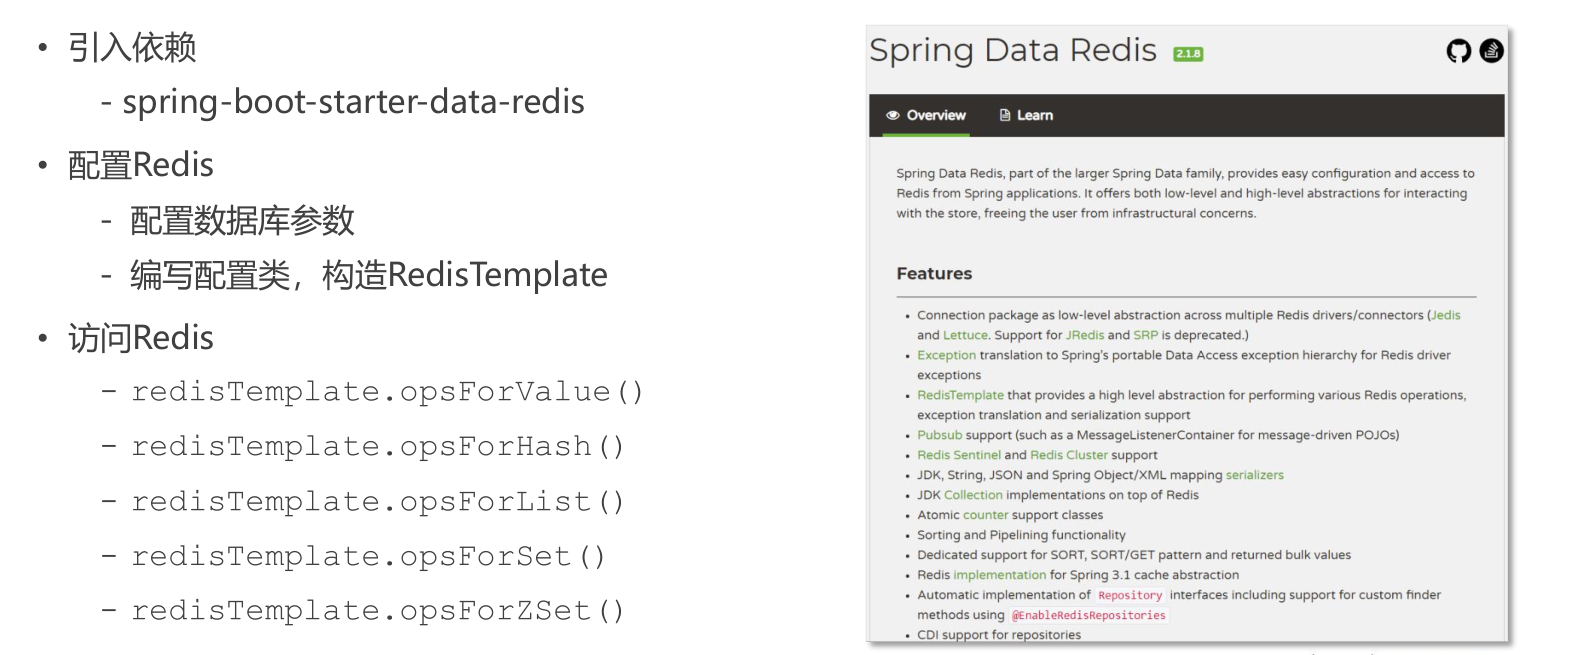
1.1 在properties文件中配置redis
# RedisProperties
spring.redis.database=11
spring.redis.host=localhost
spring.redis.port=6379
1.2 编写配置类 RedisConfig
构造RedisTemplate
@Configuration
public class RedisConfig {

    @Bean
    public RedisTemplate<String,Object> redisTemplate(RedisConnectionFactory factory){
        RedisTemplate template = new RedisTemplate();
        template.setConnectionFactory(factory);

        // 设置key的序列化方式
        template.setKeySerializer(RedisSerializer.string());
        // 设置value的序列化方式
        template.setValueSerializer(RedisSerializer.json());
        // 设置hash的key的序列化方式
        template.setHashKeySerializer(RedisSerializer.string());
        // 设置hash的value的序列化方式
        template.setHashValueSerializer(RedisSerializer.json());

        template.afterPropertiesSet();
        return template;
    }
}
1.3 测试
@RunWith(SpringRunner.class)
@SpringBootTest
@ContextConfiguration(classes = CommunityApplication.class)
public class RedisTest {

    @Autowired
    private RedisTemplate redisTemplate;

	@Test
    public void testStrings(){
        String redisKey = "test:count";

        redisTemplate.opsForValue().set(redisKey, 1);

        System.out.println(redisTemplate.opsForValue().get(redisKey));
        System.out.println(redisTemplate.opsForValue().increment(redisKey));
    }

    //hash
    @Test
    public void testHashes() {
        String redisKey = "test:user";

        redisTemplate.opsForHash().put(redisKey, "id", 1);
        redisTemplate.opsForHash().put(redisKey, "username", "zhangsan");

        System.out.println(redisTemplate.opsForHash().get(redisKey, "id"));
        System.out.println(redisTemplate.opsForHash().get(redisKey, "username"));
    }

    //list
    @Test
    public void testLists() {
        String redisKey = "test:ids";

        redisTemplate.opsForList().leftPush(redisKey, 101);
        redisTemplate.opsForList().leftPush(redisKey, 102);
        redisTemplate.opsForList().leftPush(redisKey, 103);

        System.out.println(redisTemplate.opsForList().size(redisKey));
        System.out.println(redisTemplate.opsForList().index(redisKey, 0));
        System.out.println(redisTemplate.opsForList().range(redisKey, 0, 2));

        System.out.println(redisTemplate.opsForList().leftPop(redisKey));
        System.out.println(redisTemplate.opsForList().leftPop(redisKey));
        System.out.println(redisTemplate.opsForList().leftPop(redisKey));
    }

    //set
    @Test
    public void testSets() {
        String redisKey = "test:teachers";

        redisTemplate.opsForSet().add(redisKey, "刘备", "关羽", "张飞", "赵云", "诸葛亮");

        System.out.println(redisTemplate.opsForSet().size(redisKey));
        System.out.println(redisTemplate.opsForSet().pop(redisKey));
        System.out.println(redisTemplate.opsForSet().members(redisKey));
    }

    //sortedSet
    @Test
    public void testSortedSets() {
        String redisKey = "test:students";

        redisTemplate.opsForZSet().add(redisKey, "唐僧", 80);
        redisTemplate.opsForZSet().add(redisKey, "悟空", 90);
        redisTemplate.opsForZSet().add(redisKey, "八戒", 50);
        redisTemplate.opsForZSet().add(redisKey, "沙僧", 70);
        redisTemplate.opsForZSet().add(redisKey, "白龙马", 60);

        System.out.println(redisTemplate.opsForZSet().zCard(redisKey));
        System.out.println(redisTemplate.opsForZSet().score(redisKey, "八戒"));
        System.out.println(redisTemplate.opsForZSet().reverseRank(redisKey, "八戒"));  //由大到小排序
        System.out.println(redisTemplate.opsForZSet().reverseRange(redisKey, 0, 2));
    }

    @Test
    public void testKeys() {
        redisTemplate.delete("test:user");

        System.out.println(redisTemplate.hasKey("test:user"));

        redisTemplate.expire("test:students", 10, TimeUnit.SECONDS);
    }

    // 批量发送命令,节约网络开销.
    @Test
    public void testBoundOperations() {
        String redisKey = "test:count";
        BoundValueOperations operations = redisTemplate.boundValueOps(redisKey);
        operations.increment();
        operations.increment();
        operations.increment();
        operations.increment();
        operations.increment();
        System.out.println(operations.get());
    }

    // 编程式事务
    @Test
    public void testTransaction() {
        Object result = redisTemplate.execute(new SessionCallback() {
            @Override
            public Object execute(RedisOperations redisOperations) throws DataAccessException {
                String redisKey = "text:tx";

                // 启用事务
                redisOperations.multi();
                redisOperations.opsForSet().add(redisKey, "zhangsan");
                redisOperations.opsForSet().add(redisKey, "lisi");
                redisOperations.opsForSet().add(redisKey, "wangwu");

                System.out.println(redisOperations.opsForSet().members(redisKey));

                // 提交事务
                return redisOperations.exec();
            }
        });
        System.out.println(result);
    }
}
2.点赞
开发点赞要考虑性能问题,将数据存储到redis中。
因为把数据存储到redis中,所以直接编写业务层。

2.1 编写RedisKeyUtil工具类
用于拼接生成redis中的key
public class RedisKeyUtil {

    private static final String SPLIT = ":";
    private static final String PREFIX_ENTITY_LIKE = "like:entity";

    // 某个实体的赞
    // like:entity:entityType:entityId -> set(userId)
    public static String getEntityLikeKey(int entityType, int entityId) {
        return PREFIX_ENTITY_LIKE + SPLIT + entityType + SPLIT + entityId;
    }
}
2.2 编写业务层
@Service
public class LikeService {

    @Autowired
    private RedisTemplate redisTemplate;

    //点赞(一条评论可以有很多人赞,所以用集合存储)
    public void like(int userId,int entityType,int entityId){
        String entityLikeKey = RedisKeyUtil.getEntityLikeKey(entityType, entityId);
        Boolean isMember = redisTemplate.opsForSet().isMember(entityLikeKey, userId);
        if(isMember){
            redisTemplate.opsForSet().remove(entityLikeKey, userId);
        }else {
            redisTemplate.opsForSet().add(entityLikeKey,userId);
        }
    }

    //查询某实体点赞的数量
    public long findEntityLikeCount(int entityType,int entityId){
        String entityLikeKey = RedisKeyUtil.getEntityLikeKey(entityType, entityId);
        return redisTemplate.opsForSet().size(entityLikeKey);
    }

    //查询某人对某实体的点赞状态
    public int findEntityLikeStatus(int userId,int entityType,int entityId){
        String entityLikeKey = RedisKeyUtil.getEntityLikeKey(entityType, entityId);
        return redisTemplate.opsForSet().isMember(entityLikeKey,userId) ? 1:0;
    }
}
2.3 编写显示层
@Controller
public class LikeController {

    @Autowired
    private  HostHolder hostHolder;

    @Autowired
    private LikeService likeService;

    //点赞
    @RequestMapping(path = "/like",method = RequestMethod.POST)
    @ResponseBody
    public String like(int entityType,int entityId){
        User user = hostHolder.getUser();

        //点赞
        likeService.like(user.getId(),entityType,entityId);
        //数量
        long likeCount = likeService.findEntityLikeCount(entityType, entityId);
        //状态
        int status = likeService.findEntityLikeStatus(user.getId(), entityType, entityId);
        //返回结果
        Map<String,Object> map = new HashMap<>();
        map.put("likeCount",likeCount);
        map.put("likeStatus", status);

        return CommunityUtil.getJSONString(0, null,map);
    }
}
2.4 编写ajax异步请求
因为点赞是异步请求,不需要刷新整个页面,所以写个js函数。
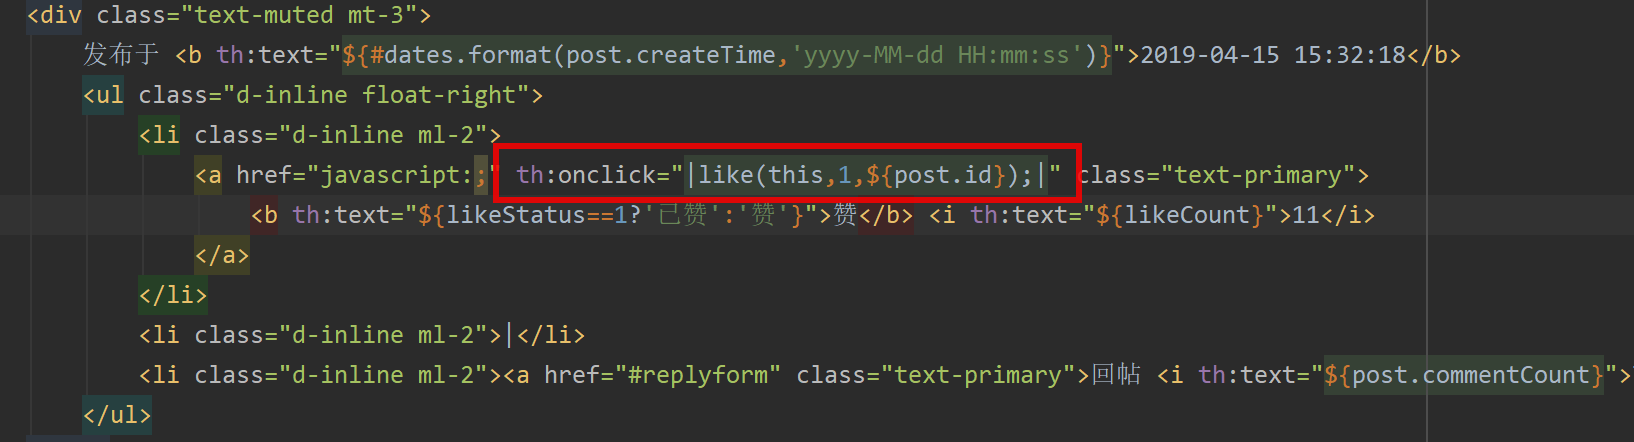
function like(btn, entityType, entityId) {
    $.post(
        CONTEXT_PATH + "/like",
        {"entityType":entityType,"entityId":entityId},
        function(data) {
            data = $.parseJSON(data);
            if(data.code == 0) {
                $(btn).children("i").text(data.likeCount);
                $(btn).children("b").text(data.likeStatus==1?'已赞':"赞");
            } else {
                alert(data.msg);
            }
        }
    );
}
2.5 处理页面的赞请求
因为在首页index.html页面和帖子详情页都需要显示赞的相关信息,所以修改DiscussController和HomeController,将赞的相关信息返回给相应页面。
3.我收到的点赞
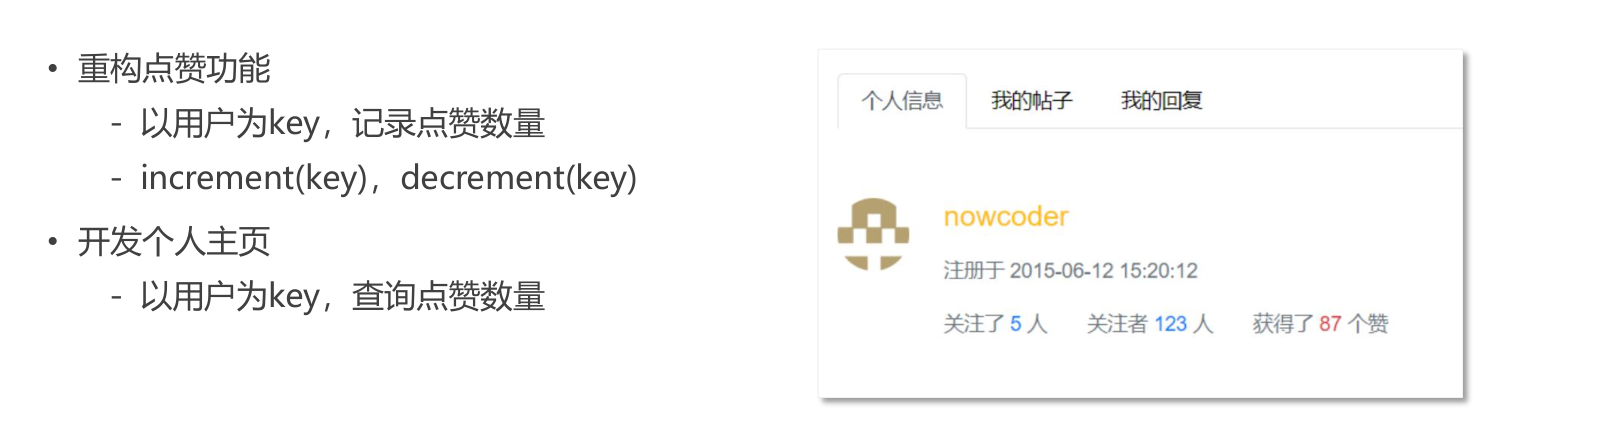
3.1 以用户key,记录点赞数量
对帖子(评论)点赞了,那么该帖子(评论)的作者收到的赞也要加一,因此需要使用事务。
注意:查询不要写进事务操作里面,因为redis中的事务时把一组操作先放进队列里面,然后一起执行。
@Service
public class LikeService {

    @Autowired
    private RedisTemplate redisTemplate;

    //点赞(一条评论可以有很多人赞,所以用集合存储)
    public void like(int userId,int entityType,int entityId,int entityUserId){

        redisTemplate.execute(new SessionCallback(){
            @Override
            public Object execute(RedisOperations operations) throws DataAccessException {
                String entityLikeKey = RedisKeyUtil.getEntityLikeKey(entityType, entityId);
                String userLikeKey = RedisKeyUtil.getUserLikeKey(entityUserId);

                //注意:查询不要写进事务操作里面,因为redis中的事务时把一组操作先放进队列里面,然后一起执行。
                Boolean isMember = redisTemplate.opsForSet().isMember(entityLikeKey, userId);

                operations.multi();

                if(isMember){
                    operations.opsForSet().remove(entityLikeKey, userId);
                    operations.opsForValue().decrement(userLikeKey);
                }else {
                    operations.opsForSet().add(entityLikeKey, userId);
                    operations.opsForValue().increment(userLikeKey);
                }
                return operations.exec();
            }
        });
    }

    //查询某实体点赞的数量
    public long findEntityLikeCount(int entityType,int entityId){
        String entityLikeKey = RedisKeyUtil.getEntityLikeKey(entityType, entityId);
        return redisTemplate.opsForSet().size(entityLikeKey);
    }
    // 查询某个用户获得的赞
    public int findUserLikeCount(int userId) {
        String userLikeKey = RedisKeyUtil.getUserLikeKey(userId);
        Integer count = (Integer) redisTemplate.opsForValue().get(userLikeKey);  //返回的是object,所以强制转换一下
        return count == null ? 0 : count.intValue();
    }

    //查询某人对某实体的点赞状态
    public int findEntityLikeStatus(int userId,int entityType,int entityId){
        String entityLikeKey = RedisKeyUtil.getEntityLikeKey(entityType, entityId);
        return redisTemplate.opsForSet().isMember(entityLikeKey,userId) ? 1:0;
    }
}
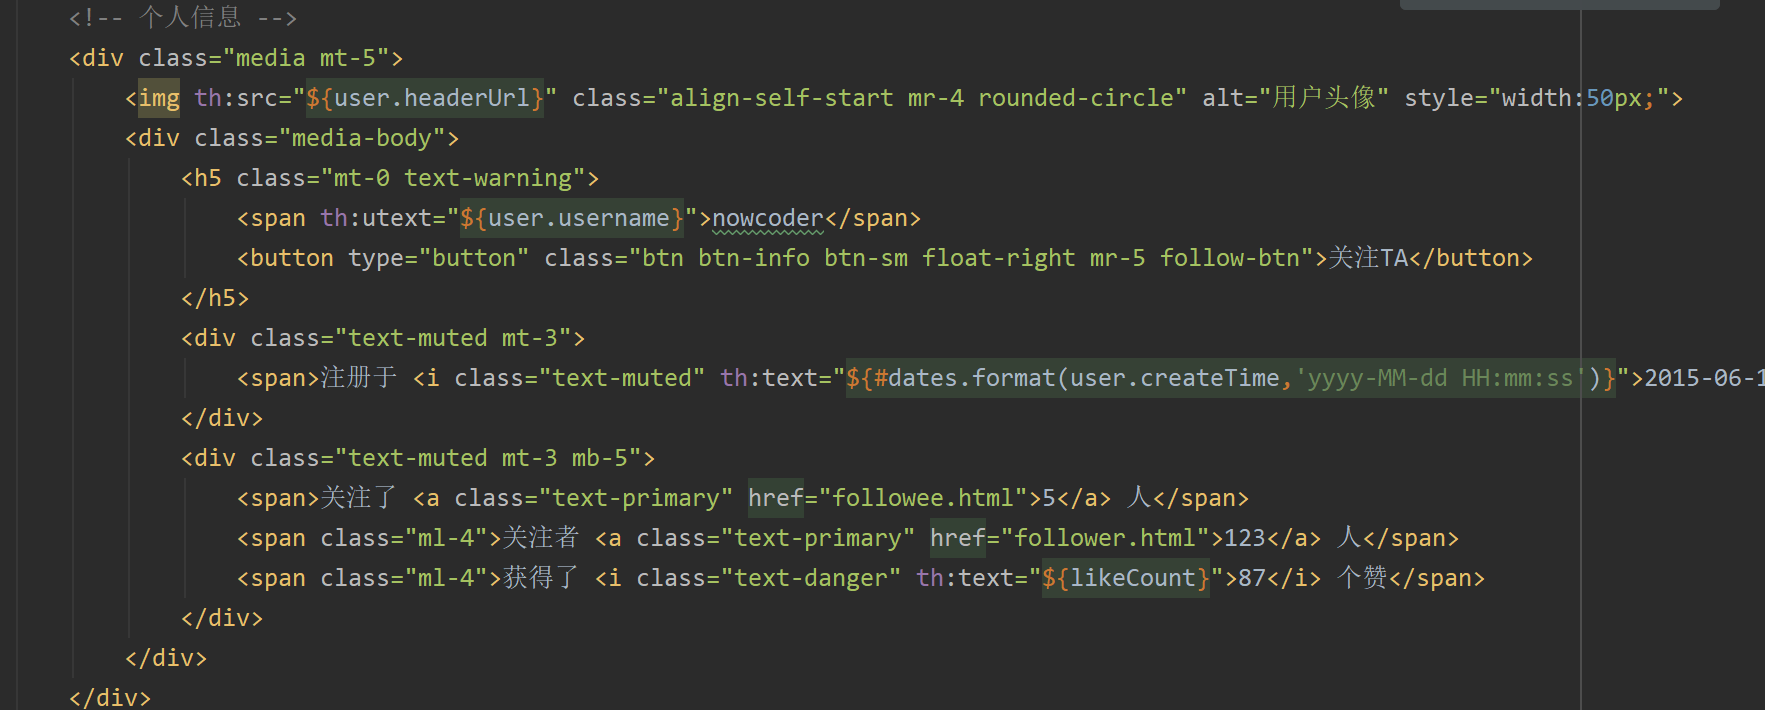
3.2 编写个人主页请求
// 个人主页
@RequestMapping(path = "/profile/{userId}", method = RequestMethod.GET)
public String getProfilePage(@PathVariable("userId") int userId, Model model) {
    User user = userService.findUserById(userId);
    if (user == null) {
        throw new RuntimeException("该用户不存在!");
    }

    // 用户
    model.addAttribute("user", user);
    // 点赞数量
    int likeCount = likeService.findUserLikeCount(userId);
    model.addAttribute("likeCount", likeCount);

    return "/site/profile";
}
3.3 修改index.html链接

3.4 修改profile.html页面
4.关注和取消关注
关注和点赞一样,是一个比较高频的操作,所以也把数据存储到redis中。

4.1 生成redis的key
用当前时间来做zset的分数,可能考虑到以后要显示某个用户关注的实体(比如要按照时间先后显示)
public class RedisKeyUtil {

    private static final String SPLIT = ":";
    private static final String PREFIX_ENTITY_LIKE = "like:entity";
    private static final String PREFIX_USER_LIKE = "like:user";
    private static final String PREFIX_FOLLOWEE = "followee";
    private static final String PREFIX_FOLLOWER = "follower";

    // 某个实体的赞
    // like:entity:entityType:entityId -> set(userId)
    public static String getEntityLikeKey(int entityType, int entityId) {
        return PREFIX_ENTITY_LIKE + SPLIT + entityType + SPLIT + entityId;
    }

    // 某个用户的赞
    // like:user:userId -> int
    public static String getUserLikeKey(int userId) {
        return PREFIX_USER_LIKE + SPLIT + userId;
    }

    // 某个用户关注的实体
    // followee:userId:entityType -> zset(entityId,now)
    public static String getFolloweeKey(int userId, int entityType) {
        return PREFIX_FOLLOWEE + SPLIT + userId + SPLIT + entityType;
    }

    // 某个实体拥有的粉丝
    // follower:entityType:entityId -> zset(userId,now)
    public static String getFollowerKey(int entityType, int entityId) {
        return PREFIX_FOLLOWER + SPLIT + entityType + SPLIT + entityId;
    }

}
4.2 编写业务层
关注和取消关注操作,需要事务
@Service
public class FollowService {
    @Autowired
    private RedisTemplate redisTemplate;

    //关注
    public void follow(int userId,int entityType,int entityId){
        redisTemplate.execute(new SessionCallback(){
            @Override
            public Object execute(RedisOperations operations) throws DataAccessException {
                String followeeKey = RedisKeyUtil.getFolloweeKey(userId, entityType);
                String followerKey = RedisKeyUtil.getFollowerKey(entityType, entityId);

                //事务
                operations.multi();

                operations.opsForZSet().add(followeeKey, entityId,System.currentTimeMillis());
                operations.opsForZSet().add(followerKey, userId,System.currentTimeMillis());

                return operations.exec();
            }
        });
    }

    //取消关注
    public void unFollow(int userId,int entityType,int entityId){
        redisTemplate.execute(new SessionCallback(){
            @Override
            public Object execute(RedisOperations operations) throws DataAccessException {
                String followeeKey = RedisKeyUtil.getFolloweeKey(userId, entityType);
                String followerKey = RedisKeyUtil.getFollowerKey(entityType, entityId);

                //事务
                operations.multi();

                operations.opsForZSet().remove(followeeKey, entityId);
                operations.opsForZSet().remove(followerKey, userId);

                return operations.exec();
            }
        });
    }

    // 查询关注的实体的数量
    public long findFolloweeCount(int userId, int entityType) {
        String followeeKey = RedisKeyUtil.getFolloweeKey(userId, entityType);
        return redisTemplate.opsForZSet().zCard(followeeKey);
    }

    // 查询实体的粉丝的数量
    public long findFollowerCount(int entityType, int entityId) {
        String followerKey = RedisKeyUtil.getFollowerKey(entityType, entityId);
        return redisTemplate.opsForZSet().zCard(followerKey);
    }

    // 查询当前用户是否已关注该实体
    public boolean hasFollowed(int userId, int entityType, int entityId) {
        String followeeKey = RedisKeyUtil.getFolloweeKey(userId, entityType);
        return redisTemplate.opsForZSet().score(followeeKey, entityId) != null;
    }

}
4.3编写显示层
@Controller
public class FollowController {

    @Autowired
    private FollowService followService;

    @Autowired
    private HostHolder hostHolder;

    @RequestMapping(path = "/follow", method = RequestMethod.POST)
    @ResponseBody
    public String follow(int entityType, int entityId) {
        User user = hostHolder.getUser();

        followService.follow(user.getId(), entityType, entityId);

        return CommunityUtil.getJSONString(0, "已关注!");
    }

    @RequestMapping(path = "/unFollow", method = RequestMethod.POST)
    @ResponseBody
    public String unFollow(int entityType, int entityId) {
        User user = hostHolder.getUser();

        followService.unFollow(user.getId(), entityType, entityId);

        return CommunityUtil.getJSONString(0, "已取消关注!");
    }
}
4.4 编写前端ajax异步请求
$(function(){
	$(".follow-btn").click(follow);
});

function follow() {
	var btn = this;
	if($(btn).hasClass("btn-info")) {
		// 关注TA
		$.post(
			CONTEXT_PATH + "/follow",
			{"entityType":3,"entityId":$(btn).prev().val()},
			function (data) {
				data = $.parseJSON(data);
				if(data.code==0){
					window.location.reload();
				}else{
					alert(data.msg);
				}
			}
		)
		//$(btn).text("已关注").removeClass("btn-info").addClass("btn-secondary");
	} else {
		// 取消关注
		$.post(
			CONTEXT_PATH + "/unFollow",
			{"entityType":3,"entityId":$(btn).prev().val()},
			function (data) {
				data = $.parseJSON(data);
				if(data.code==0){
					window.location.reload();  //为了
				}else{
					alert(data.msg);
				}
			}
		)
	 //$(btn).text("关注TA").removeClass("btn-secondary").addClass("btn-info");
	}
}
4.5在profile.html页面显示关注信息
上面四步写的是关注和取消关注的操作,但当用户访问profile页面的时候需要显示关注的相关信息,所以需要在UserController中编写请求,并且修改profile页面的一些显示信息。
// 个人主页
@RequestMapping(path = "/profile/{userId}", method = RequestMethod.GET)
public String getProfilePage(@PathVariable("userId") int userId, Model model) {
    User user = userService.findUserById(userId);
    if (user == null) {
        throw new RuntimeException("该用户不存在!");
    }

    // 用户
    model.addAttribute("user", user);
    // 点赞数量
    long likeCount = likeService.findUserLikeCount(userId);
    model.addAttribute("likeCount", likeCount);

    //关注数量
    long followeeCount = followService.findFolloweeCount(userId, ENTITY_TYPE_USER);
    model.addAttribute("followeeCount",followeeCount);
    //粉丝的数量
    long followerCount = followService.findFollowerCount(ENTITY_TYPE_USER, userId);
    model.addAttribute("followerCount",followerCount);

    // 是否已关注
    boolean hasFollowed = false;
    if (hostHolder.getUser() != null) {
        hasFollowed = followService.hasFollowed(hostHolder.getUser().getId(), ENTITY_TYPE_USER, userId);
    }
    model.addAttribute("hasFollowed", hasFollowed);

    return "/site/profile";
}
5.关注列表和粉丝列表
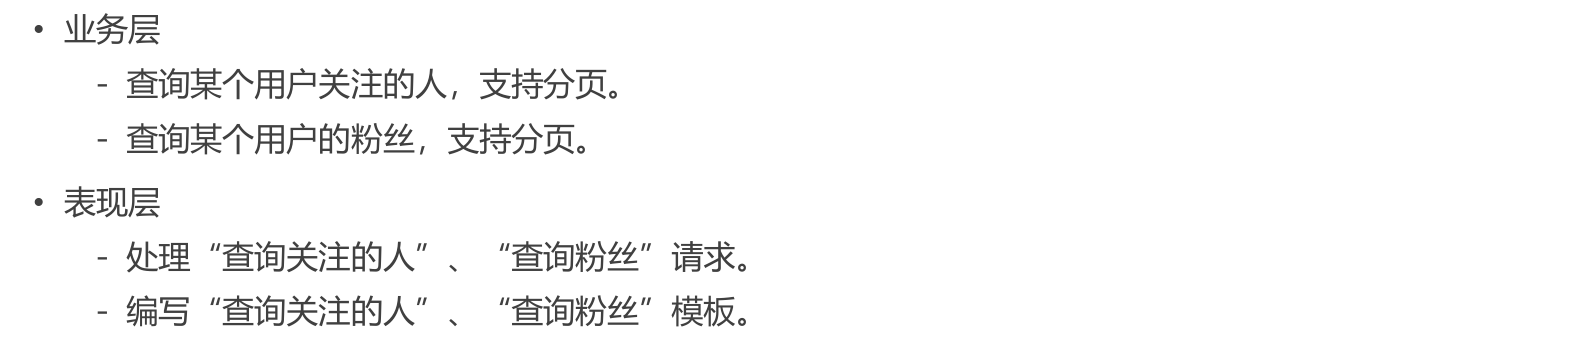
5.1 编写业务层
//查询某用户关注的人
public List<Map<String,Object>> findFollowees(int userId,int offset,int limit){
    String followeeKey = RedisKeyUtil.getFolloweeKey(userId, ENTITY_TYPE_USER);
    Set<Integer> targetIds = redisTemplate.opsForZSet().reverseRange(followeeKey, offset, offset + limit - 1);

    if(targetIds==null){
        return null;
    }

    List<Map<String, Object>> list = new ArrayList<>();
    for (Integer targetId : targetIds) {
        Map<String, Object> map = new HashMap<>();
        User user = userService.findUserById(targetId);
        map.put("user", user);
        Double score = redisTemplate.opsForZSet().score(followeeKey, targetId);
        map.put("followTime", new Date(score.longValue()));
        list.add(map);
    }
    return list;
}

// 查询某用户的粉丝
public List<Map<String, Object>> findFollowers(int userId, int offset, int limit) {
    String followerKey = RedisKeyUtil.getFollowerKey(ENTITY_TYPE_USER, userId);
    Set<Integer> targetIds = redisTemplate.opsForZSet().reverseRange(followerKey, offset, offset + limit - 1);

    if (targetIds == null) {
        return null;
    }

    List<Map<String, Object>> list = new ArrayList<>();
    for (Integer targetId : targetIds) {
        Map<String, Object> map = new HashMap<>();
        User user = userService.findUserById(targetId);
        map.put("user", user);
        Double score = redisTemplate.opsForZSet().score(followerKey, targetId);
        map.put("followTime", new Date(score.longValue()));
        list.add(map);
    }

    return list;
}
5.2 编写显示层
//查询关注的人
@RequestMapping(path = "/followees/{userId}", method = RequestMethod.GET)
public String getFollowees(@PathVariable("userId") int userId, Page page, Model model) {

    User user = userService.findUserById(userId);
    if(user==null){
        throw new RuntimeException("该用户不存在!");
    }
    model.addAttribute("user", user);

    page.setLimit(5);
    page.setPath("/followees/" + userId);
    page.setRows((int) followService.findFolloweeCount(userId, ENTITY_TYPE_USER));

    List<Map<String, Object>> userList = followService.findFollowees(userId, page.getOffset(), page.getLimit());
    if (userList != null) {
        for (Map<String, Object> map : userList) {
            User u = (User) map.get("user");
            map.put("hasFollowed", hasFollowed(u.getId()));
        }
    }
    model.addAttribute("users", userList);

    return "/site/followee";
}

//查询粉丝
@RequestMapping(path = "/followers/{userId}", method = RequestMethod.GET)
public String getFollowers(@PathVariable("userId") int userId, Page page, Model model) {

    User user = userService.findUserById(userId);
    if(user==null){
        throw new RuntimeException("该用户不存在!");
    }
    model.addAttribute("user", user);

    page.setLimit(5);
    page.setPath("/followers/" + userId);
    page.setRows((int) followService.findFollowerCount(ENTITY_TYPE_USER, userId));

    List<Map<String, Object>> userList = followService.findFollowers(userId, page.getOffset(), page.getLimit());
    if (userList != null) {
        for (Map<String, Object> map : userList) {
            User u = (User) map.get("user");
            map.put("hasFollowed", hasFollowed(u.getId()));
        }
    }
    model.addAttribute("users", userList);

    return "/site/follower";
}


private boolean hasFollowed(int userId) {
    if (hostHolder.getUser() == null) {
        return false;
    }
    return followService.hasFollowed(hostHolder.getUser().getId(), ENTITY_TYPE_USER, userId);
}
5.3 修改前端页面
先要修改profile页面的请求信息,然后修改followee.html和follower.html页面的相关信息
6.优化登录模块

6.1 生成Redis的key
public class RedisKeyUtil {

    private static final String SPLIT = ":";
    private static final String PREFIX_ENTITY_LIKE = "like:entity";
    private static final String PREFIX_USER_LIKE = "like:user";
    private static final String PREFIX_FOLLOWEE = "followee";
    private static final String PREFIX_FOLLOWER = "follower";
    private static final String PREFIX_KAPTCHA = "kaptcha";
    private static final String PREFIX_TICKET = "ticket";
    private static final String PREFIX_USER = "user";

    // 某个实体的赞
    // like:entity:entityType:entityId -> set(userId)
    public static String getEntityLikeKey(int entityType, int entityId) {
        return PREFIX_ENTITY_LIKE + SPLIT + entityType + SPLIT + entityId;
    }

    //某个用户的赞
    // like:user:userId -> int
    public static String getUserLikeKey(int userId){
        return PREFIX_USER_LIKE + SPLIT +userId;
    }

    // 某个用户关注的实体
    // followee:userId:entityType -> zset(entityId,now)
    public static String getFolloweeKey(int userId, int entityType) {
        return PREFIX_FOLLOWEE + SPLIT + userId + SPLIT + entityType;
    }

    // 某个实体拥有的粉丝
    // follower:entityType:entityId -> zset(userId,now)
    public static String getFollowerKey(int entityType, int entityId) {
        return PREFIX_FOLLOWER + SPLIT + entityType + SPLIT + entityId;
    }

    // 登录验证码
    public static String getKaptchaKey(String owner) {
        return PREFIX_KAPTCHA + SPLIT + owner;
    }

    // 登录的凭证
    public static String getTicketKey(String ticket) {
        return PREFIX_TICKET + SPLIT + ticket;
    }

    // 用户
    public static String getUserKey(int userId) {
        return PREFIX_USER + SPLIT + userId;
    }

}
6.2 使用Redis存储验证码
- 验证码是一个频繁访问与刷新的功能,对性能要求比较高;
- 验证码不需要永久保存,一会就应该让他失效;
- 分布式部署时,存在Session共享的问题。
对验证码生成一个标识,存储在cookie中,将这个标识作为key存储到redis中,在登录的时候从redis中取出验证码与用户输入的验证码进行比较。
生成验证码
@RequestMapping(path = "/kaptcha", method = RequestMethod.GET)
public void getKaptcha(HttpServletResponse response/*, HttpSession session*/) {
    // 生成验证码
    String text = kaptchaProducer.createText();
    BufferedImage image = kaptchaProducer.createImage(text);

    // 将验证码存入session
    // session.setAttribute("kaptcha", text);

    // 验证码的归属
    String kaptchaOwner = CommunityUtil.generateUUID();
    Cookie cookie = new Cookie("kaptchaOwner", kaptchaOwner);
    cookie.setMaxAge(60);
    cookie.setPath(contextPath);
    response.addCookie(cookie);
    // 将验证码存入Redis
    String redisKey = RedisKeyUtil.getKaptchaKey(kaptchaOwner);
    redisTemplate.opsForValue().set(redisKey, text, 60, TimeUnit.SECONDS);

    // 将突图片输出给浏览器
    response.setContentType("image/png");
    try {
        OutputStream os = response.getOutputStream();
        ImageIO.write(image, "png", os);
    } catch (IOException e) {
        logger.error("响应验证码失败:" + e.getMessage());
    }
}
登录
@RequestMapping(path = "/login", method = RequestMethod.POST)
public String login(String username, String password, String code, boolean rememberme,
                    Model model, /*HttpSession session, */HttpServletResponse response,
                    @CookieValue("kaptchaOwner") String kaptchaOwner) {
    // 检查验证码
    // String kaptcha = (String) session.getAttribute("kaptcha");
    String kaptcha = null;
    if (StringUtils.isNotBlank(kaptchaOwner)) {
        String redisKey = RedisKeyUtil.getKaptchaKey(kaptchaOwner);
        kaptcha = (String) redisTemplate.opsForValue().get(redisKey);
    }

    if (StringUtils.isBlank(kaptcha) || StringUtils.isBlank(code) || !kaptcha.equalsIgnoreCase(code)) {
        model.addAttribute("codeMsg", "验证码不正确!");
        return "/site/login";
    }

    // 检查账号,密码
    int expiredSeconds = rememberme ? REMEMBER_EXPIRED_SECONDS : DEFAULT_EXPIRED_SECONDS;
    Map<String, Object> map = userService.login(username, password, expiredSeconds);
    if (map.containsKey("ticket")) {
        Cookie cookie = new Cookie("ticket", map.get("ticket").toString());
        cookie.setPath(contextPath);
        cookie.setMaxAge(expiredSeconds);
        response.addCookie(cookie);
        return "redirect:/index";
    } else {
        model.addAttribute("usernameMsg", map.get("usernameMsg"));
        model.addAttribute("passwordMsg", map.get("passwordMsg"));
        return "/site/login";
    }
}
6.3 使用Redis存储登录凭证
修改UserService中的登录业务,还是在用户登录之后生成一个登录凭证,只是将登录凭证对象存储在redis中,这个登录凭证的ticket还是保存在cookie中,拦截器从cookie中获取这个ticket,并从redis中根据这个ticket来获取该LoginTicket对象。
public Map<String,Object> login(String username,String password,int expiredSeconds){
    Map<String,Object> map = new HashMap<>();

    //空值处理
    if(StringUtils.isBlank(username)){
        map.put("usernameMsg", "账号不能为空!");
        return map;
    }
    if(StringUtils.isBlank(password)){
        map.put("passwordMsg", "密码不能为空!");
        return map;
    }

    //验证账号
    User user = userMapper.selectByName(username);
    if(user==null){
        map.put("usernameMsg", "用户不存在!");
        return map;
    }
    if(user.getStatus()==0){
        map.put("usernameMsg", "该账号为激活");
        return map;
    }
    password= CommunityUtil.md5( password+user.getSalt() );
    if(!user.getPassword().equals(password)){
        map.put("passwordMsg", "密码错误!");
        return map;
    }

    //登录成功,生成登录凭证并记录
    LoginTicket loginTicket = new LoginTicket();
    loginTicket.setUserId(user.getId());
    loginTicket.setTicket(CommunityUtil.generateUUID());
    loginTicket.setStatus(0);
    loginTicket.setExpired(new Date(System.currentTimeMillis()+expiredSeconds*1000));
    // loginTicketMapper.insertLoginTicket(loginTicket);

    String redisKey = RedisKeyUtil.getTicketKey(loginTicket.getTicket());
    redisTemplate.opsForValue().set(redisKey, loginTicket);  //redis会把loginTicket转化为json格式的字符串保存

    map.put("ticket", loginTicket.getTicket());

    return map;
}

//更新状态码
public void logout(String ticket){
    //loginTicketMapper.updateStatus(ticket,1);
    String redisKey = RedisKeyUtil.getTicketKey(ticket);
    LoginTicket loginTicket = (LoginTicket) redisTemplate.opsForValue().get(redisKey);
    loginTicket.setStatus(1);
    redisTemplate.opsForValue().set(redisKey, loginTicket);
}

//根据ticket查询loginTikcket
public LoginTicket findLoginTicket(String ticket){
    // return loginTicketMapper.selectByTicket(ticket);
    String redisKey = RedisKeyUtil.getTicketKey(ticket);
    return (LoginTicket) redisTemplate.opsForValue().get(redisKey);
}
6.4 使用Redis缓存用户信息
处理每次请求时,都要根据凭证查询用户信息,访问的频率非常高,如下,每次拦截请求都要根据凭证查询用户,频率非常高,因此使用redis来缓存用户信息来提高效率。
public boolean preHandle(HttpServletRequest request, HttpServletResponse response, Object handler) throws Exception {
    //从cookie中获取凭证
    String ticket = CookieUtil.getValue(request, "ticket");

    if(ticket!=null){
        //查询凭证
        LoginTicket loginTicket = userService.findLoginTicket(ticket);
        if(loginTicket!=null && loginTicket.getStatus()==0 && loginTicket.getExpired().after(new Date())){
            //根据凭证查询用户
            User user = userService.findUserById(loginTicket.getUserId());
            hostHolder.setUser(user);
        }
    }
    return true;
}
重构UserService:
-
优先从缓存中取值
-
取不到时初始化缓存数据
-
数据变更时清除缓存数据
//1.优先从缓存中取值
private User getCache(int userId){
String redisKey = RedisKeyUtil.getUserKey(userId);
return (User) redisTemplate.opsForValue().get(redisKey);
}
//2.取不到时初始化缓存数据
private User initCache(int userId){
User user = userMapper.selectById(userId);
String redisKey = RedisKeyUtil.getUserKey(userId);
redisTemplate.opsForValue().set(redisKey, user,3600, TimeUnit.SECONDS);
return user;
}
//3.数据变更时,清楚缓存数据
private void clearCache(int userId){
String redisKey = RedisKeyUtil.getUserKey(userId);
redisTemplate.delete(redisKey);
}
重构UserService中的方法

```java
//通过用户id查询用户
public User findUserById(int userId){
 //return userMapper.selectById(userId);
 User user = getCache(userId);
 if(user==null){
     user = initCache(userId);
 }
 return user;
}

//更新头像
public void updateHeader(int userId,String headerUrl){
 userMapper.updateHeader(userId, headerUrl);
 clearCache(userId);
}

//修改密码
public void updatePassword(int userId,String password){
 userMapper.updatePassword(userId, password);
 clearCache(userId);
}
Kafka 构建TB级异步消息系统
1.阻塞队列
BlockingQueue是一个接口
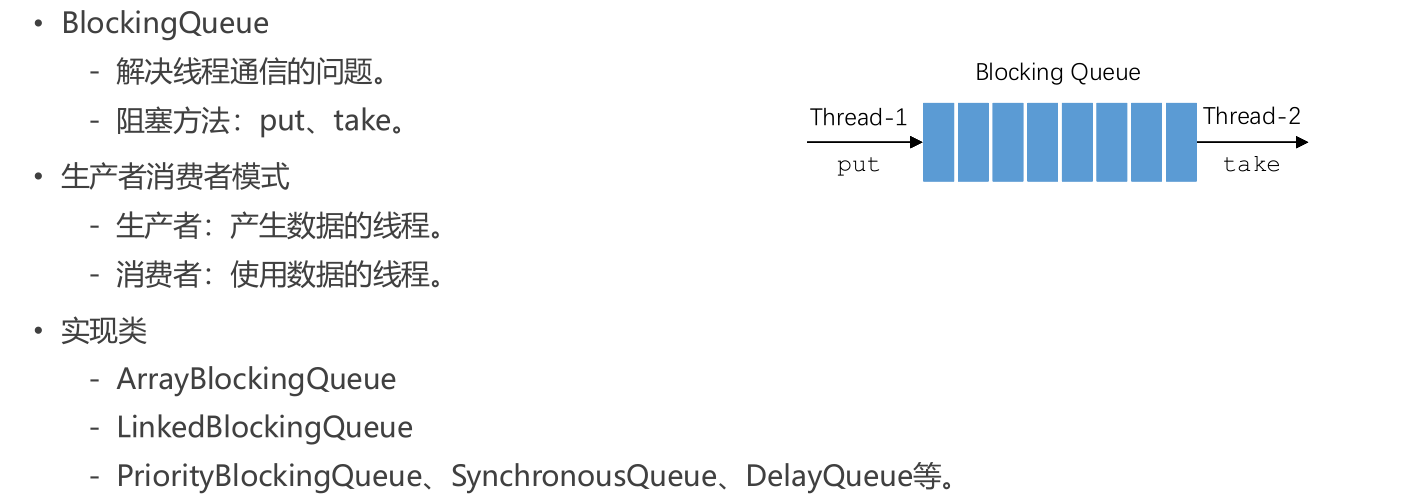
生产者与消费者例子
public class BlockingQueueTests {

    public static void main(String[] args) {
        BlockingQueue queue = new ArrayBlockingQueue(10);
        new Thread(new Producer(queue)).start();
        new Thread(new Consumer(queue)).start();
        new Thread(new Consumer(queue)).start();
        new Thread(new Consumer(queue)).start();
    }

}

class Producer implements Runnable {

    private BlockingQueue<Integer> queue;

    public Producer(BlockingQueue<Integer> queue) {
        this.queue = queue;
    }

    @Override
    public void run() {
        try {
            for (int i = 0; i < 100; i++) {
                Thread.sleep(20);
                queue.put(i);
                System.out.println(Thread.currentThread().getName() + "生产:" + queue.size());
            }
        } catch (Exception e) {
            e.printStackTrace();
        }
    }

}

class Consumer implements Runnable {

    private BlockingQueue<Integer> queue;

    public Consumer(BlockingQueue<Integer> queue) {
        this.queue = queue;
    }

    @Override
    public void run() {
        try {
            while (true) {
                Thread.sleep(new Random().nextInt(1000));
                queue.take();
                System.out.println(Thread.currentThread().getName() + "消费:" + queue.size());
            }
        } catch (Exception e) {
            e.printStackTrace();
        }
    }
}
2.Kafka入门
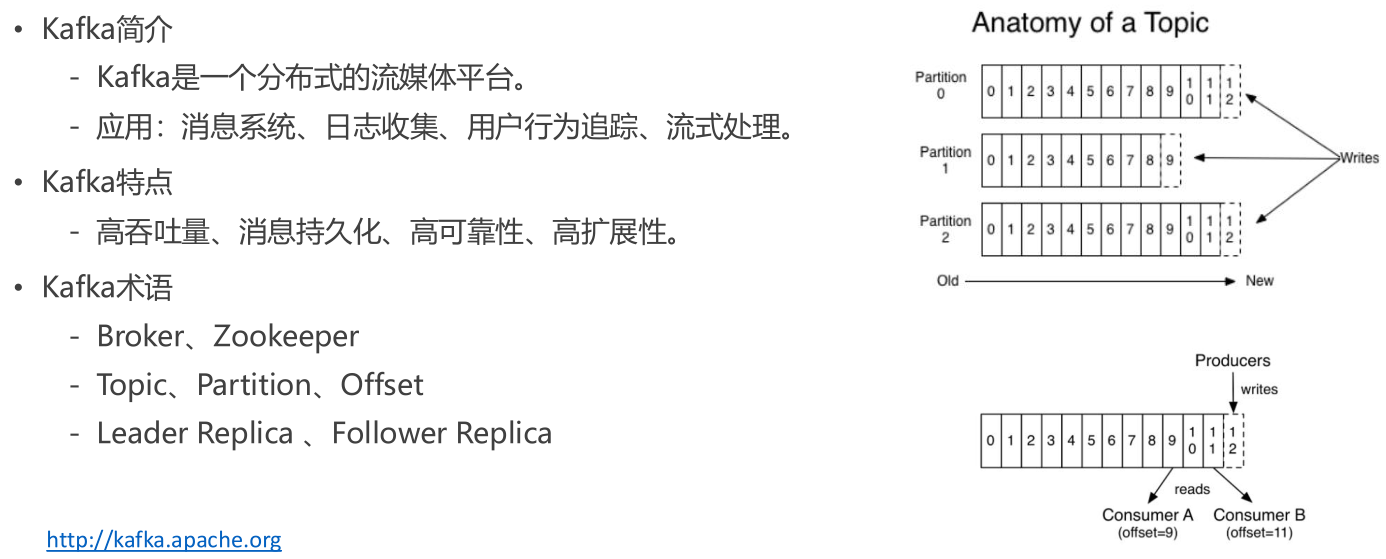
- Broker:kafka的服务器,kafka集群当中每一台服务器为一个broker。
- Zookeeper:Zookeeper是一个独立的软件(应用),用来管理集群,kafka也要做集群,因此可以用zookeeper来管路kafka的集群,下载的kafka里面内置了zookeeper。
- Topic:可以理解为一个文件夹,是消息的分类,用来存放消息的位置
- Partion:分区,如上图,目的是为了增强并发和服务器处理能力
- Offset:消息在这个分区内存放的索引
- Leader Replica:主副本
- Follower Reploca:从副本
启动zookeeper
bin\windows\zookeeper-server-start.bat config\zookeeper.properties
启动kafka
bin\windows\kafka-server-start.bat config\server.properties
如果kafka启动失败就把kafka日志文件夹删了
3.Spring整合kafka

向主题中传入数据
kafkaTemplate.send(topic,data);
当服务器启动后,该方法就会监听这个主题test,一旦发现这个主题有消息,就会调用这个方法去处理这个消息,并且会把消息自动包装成ConsumerRecord传进函数。
@KafkaListenner(topics={"test"})
public void handleMessage(ConsumerRecord record){}
示例
@RunWith(SpringRunner.class)
@SpringBootTest
@ContextConfiguration(classes = CommunityApplication.class)
public class KafkaTests {

    @Autowired
    private KafkaProducer kafkaProducer;   //被spring整合了,在spring容器里面

    @Test
    public void testKafka() {
        kafkaProducer.sendMessage("test", "你好");
        kafkaProducer.sendMessage("test", "在吗");
        try {
            Thread.sleep(1000 * 10);
        } catch (InterruptedException e) {
            e.printStackTrace();
        }
    }

}

@Component
class KafkaProducer {

    @Autowired
    private KafkaTemplate kafkaTemplate;

    public void sendMessage(String topic, String content) {
        kafkaTemplate.send(topic, content);
    }

}

@Component
class KafkaConsumer {

    @KafkaListener(topics = {"test"})
    public void handleMessage(ConsumerRecord record) {
        System.out.println(record.value());
    }

}
4.发送系统通知

4.1 定义事件
public class Event {

    private String topic;  //主题
    private int userId;    //触发事件的用户
    private int entityType; //实体的类型
    private int entityId;   //实体的id
    private int entityUserId; //实体的作者  (也就是事件的接受者)
    private Map<String, Object> data = new HashMap<>();

    public String getTopic() {
        return topic;
    }

    public Event setTopic(String topic) {
        this.topic = topic;
        return this;
    }

    public int getUserId() {
        return userId;
    }

    public Event setUserId(int userId) {
        this.userId = userId;
        return this;
    }

    public int getEntityType() {
        return entityType;
    }

    public Event setEntityType(int entityType) {
        this.entityType = entityType;
        return this;
    }

    public int getEntityId() {
        return entityId;
    }

    public Event setEntityId(int entityId) {
        this.entityId = entityId;
        return this;
    }

    public int getEntityUserId() {
        return entityUserId;
    }

    public Event setEntityUserId(int entityUserId) {
        this.entityUserId = entityUserId;
        return this;
    }

    public Map<String, Object> getData() {
        return data;
    }

    public Event setData(String key, Object value) {
        this.data.put(key, value);
        return this;
    }

}
4.2 开发事件的生产者
@Component
public class EventProducer {

    @Autowired
    private KafkaTemplate kafkaTemplate;

    //处理事件
    public void fireEvent(Event event){
        //将事件发布到指定的主题
        kafkaTemplate.send(event.getTopic(), JSONObject.toJSONString(event));
    }

}
4.3 开发事件的消费者
-
将id=1的用户定义为系统用户,用来给普通用户发送系统消息
-
因为只能是系统用户给普通用户发消息,而不能是普通用户给系统用户发消息,所以此时comment表中的conversation_id来存储拼接的id就没有意义,而是用来存储主题(topic)
-
内容content则是存储事件中的相关信息。
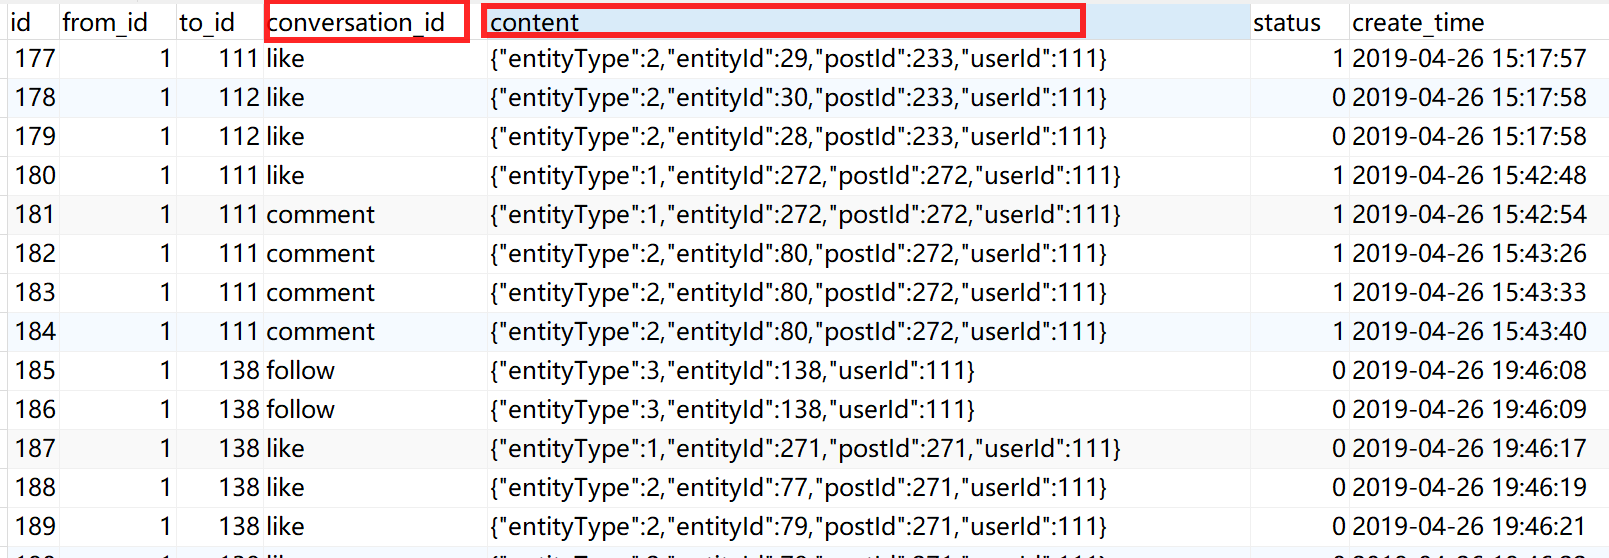
@Component
public class EventConsumer implements CommunityConstant {

    private static final Logger logger = LoggerFactory.getLogger(EventConsumer.class);

    @Autowired
    private MessageService messageService;

    @KafkaListener(topics = {TOPIC_COMMENT,TOPIC_FOLLOW,TOPIC_LIKE})
    public void handleCommentMessage(ConsumerRecord record){
        if(record==null || record.value()==null){
            logger.error("消息的内容为空!");
            return ;
        }
        Event event = JSONObject.parseObject(record.value().toString(), Event.class);
        if(event==null){
            logger.error("消息格式错误!");
            return;
        }
        // 发送站内通知
        Message message = new Message();
        message.setFromId(SYSTEM_USER_ID);
        message.setToId(event.getEntityUserId());  //事件的接收者
        message.setConversationId(event.getTopic());
        message.setCreateTime(new Date());

        Map<String,Object> content = new HashMap<>();
        content.put("userId", event.getUserId());   //事件的操作者
        content.put("entityType", event.getEntityType());
        content.put("entityId", event.getEntityId());

        if (!event.getData().isEmpty()) {
            for (Map.Entry<String, Object> entry : event.getData().entrySet()) {
                content.put(entry.getKey(), entry.getValue());
            }
        }
        message.setContent(JSONObject.toJSONString(content));
        messageService.addMessage(message);
    }

}
4.4 在controller中处理事件
CommentController,LikeController,FollowController这三个请求中处理
消息队列的好处就是可以异步(进程异步),将事件丢给eventProducer之后,程序就可以继续处理其他事情了,不用等待事件处理完成。
CommentController
@RequestMapping(path = "/add/{discussPostId}", method = RequestMethod.POST)
public String addComment(@PathVariable("discussPostId") int discussPostId, Comment comment) {
    comment.setUserId(hostHolder.getUser().getId());
    comment.setStatus(0);
    comment.setCreateTime(new Date());
    commentService.addComment(comment);

    // 触发评论事件
    Event event = new Event()
        .setTopic(TOPIC_COMMENT)
        .setUserId(hostHolder.getUser().getId())
        .setEntityType(comment.getEntityType())
        .setEntityId(comment.getEntityId())
        .setData("postId", discussPostId);
    if (comment.getEntityType() == ENTITY_TYPE_POST) {
        DiscussPost target = discussPostService.findDiscussPostById(comment.getEntityId());
        event.setEntityUserId(target.getUserId());
    } else if (comment.getEntityType() == ENTITY_TYPE_COMMENT) {
        Comment target = commentService.findCommentById(comment.getEntityId());
        event.setEntityUserId(target.getUserId());
    }
    eventProducer.fireEvent(event);

    return "redirect:/discuss/detail/" + discussPostId;
}
LikeController
触发事件类似CommentController
//点赞
@RequestMapping(path = "/like",method = RequestMethod.POST)
@ResponseBody
public String like(int entityType,int entityId,int entityUserId,int postId){
    User user = hostHolder.getUser();

    //点赞
    likeService.like(user.getId(),entityType,entityId,entityUserId);
    //数量
    long likeCount = likeService.findEntityLikeCount(entityType, entityId);
    //状态
    int likeStatus = likeService.findEntityLikeStatus(user.getId(), entityType, entityId);
    //返回结果
    Map<String,Object> map = new HashMap<>();
    map.put("likeCount",likeCount);
    map.put("likeStatus", likeStatus);

    //触发点赞事件
    if (likeStatus == 1) {
        Event event = new Event()
            .setTopic(TOPIC_LIKE)
            .setUserId(hostHolder.getUser().getId())
            .setEntityType(entityType)
            .setEntityId(entityId)
            .setEntityUserId(entityUserId)
            .setData("postId", postId);
        eventProducer.fireEvent(event);
    }

    return CommunityUtil.getJSONString(0, null,map);
}
FollowController
触发事件类似CommentController
@RequestMapping(path = "/follow", method = RequestMethod.POST)
@ResponseBody
public String follow(int entityType, int entityId) {
    User user = hostHolder.getUser();

    followService.follow(user.getId(), entityType, entityId);

    // 触发关注事件
    Event event = new Event()
        .setTopic(TOPIC_FOLLOW)
        .setUserId(hostHolder.getUser().getId())
        .setEntityType(entityType)
        .setEntityId(entityId)
        .setEntityUserId(entityId);
    eventProducer.fireEvent(event);


    return CommunityUtil.getJSONString(0, "已关注!");
}
5.显示系统通知
上面第四点编写了业务请求发送了系统通知,但是还没有处理系统通知的显示,这里统一进行处理。
经过上面第四点,系统已经将要发送的通知存储到了数据库中,因此只要查询即可,和前面的私信业务很相似。
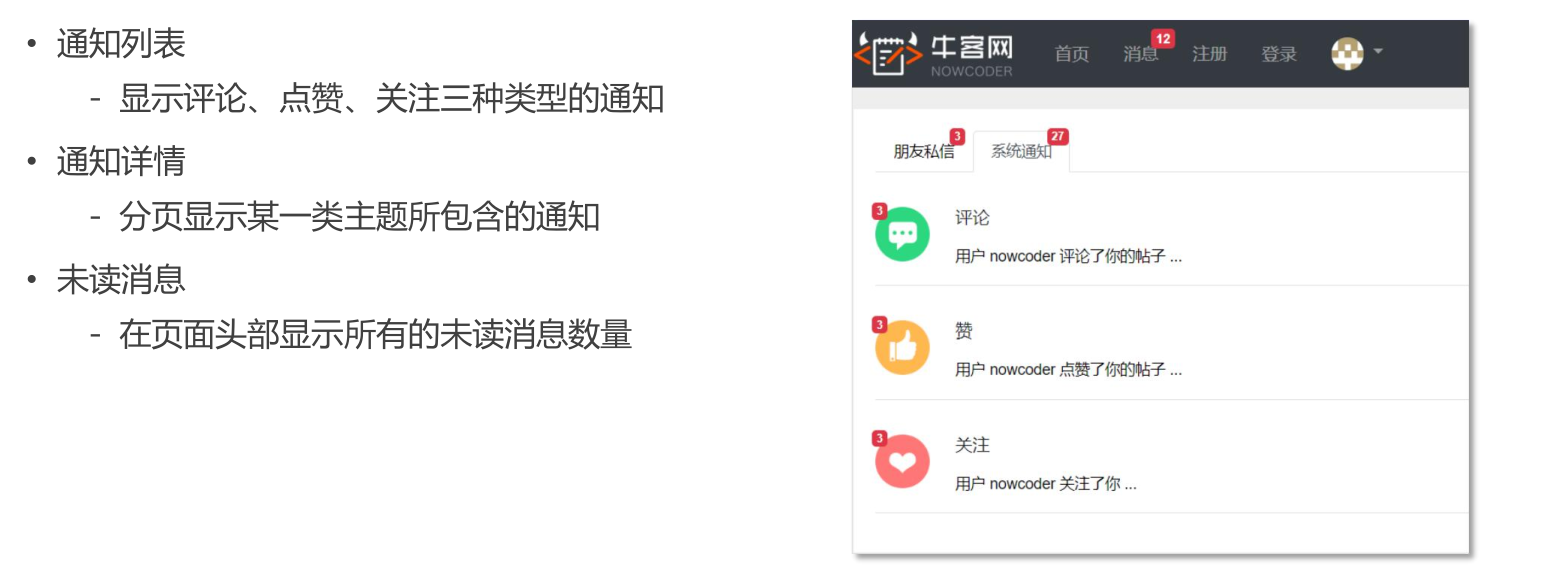
5.1 通知列表
数据层
- 查询某个主题下最新的通知
- 查询某个主题所包含的通知数量
- 查询某个主题的未读数量
- 查询某个主题所包含的通知列表
MessageMapper
// 查询某个主题下最新的通知
Message selectLatestNotice(int userId, String topic);

// 查询某个主题所包含的通知数量
int selectNoticeCount(int userId, String topic);

// 查询未读的通知的数量
int selectNoticeUnreadCount(int userId, String topic);
    <select id="selectLatestNotice" resultType="Message">
        select <include refid="selectFields"></include>
        from message
        where id in (
            select max(id) from message
            where status != 2
            and from_id = 1
            and to_id = #{userId}
            and conversation_id = #{topic}
        )
    </select>

    <select id="selectNoticeCount" resultType="int">
        select count(id) from message
        where status != 2
        and from_id = 1
        and to_id = #{userId}
        and conversation_id = #{topic}
    </select>

    <select id="selectNoticeUnreadCount" resultType="int">
        select count(id) from message
        where status = 0
        and from_id = 1
        and to_id = #{userId}
        <if test="topic!=null">
            and conversation_id = #{topic}
        </if>
    </select>
业务层
MessageService
//讲消息设置为已读
public int readMessage(List<Integer> ids){
    return messageMapper.updateStatus(ids, 1);
}

//查询最新通知
public Message findLatestNotice(int userId,String topic){
    return messageMapper.selectLatestNotice(userId, topic);
}

//查询通知数量
public int findNoticeCount(int userId,String topic){
    return messageMapper.selectNoticeCount(userId, topic);
}
显示层
MessageController
@RequestMapping(path = "/notice/list",method = RequestMethod.GET)
public String getNoticeList(Model model){
    User user = hostHolder.getUser();

    //查询评论类的通知
    Message message = messageService.findLatestNotice(user.getId(), TOPIC_COMMENT);
    Map<String,Object> messageVO = new HashMap<>();
    messageVO.put("message",message);
    if(message!=null){
        String content = HtmlUtils.htmlUnescape(message.getContent());  //去掉转义字符
        Map<String, Object> data = JSONObject.parseObject(content, HashMap.class);

        messageVO.put("user", userService.findUserById((Integer) data.get("userId")));
        messageVO.put("entityType", data.get("entityType"));
        messageVO.put("entityId", data.get("entityId"));
        messageVO.put("postId", data.get("postId"));

        int count = messageService.findNoticeCount(user.getId(), TOPIC_COMMENT);
        messageVO.put("count", count);
        int unread = messageService.findNoticeUnreadCount(user.getId(), TOPIC_COMMENT);
        messageVO.put("unread", unread);
    }
    model.addAttribute("commentNotice", messageVO);

    // 查询点赞类通知
    message = messageService.findLatestNotice(user.getId(), TOPIC_LIKE);
    messageVO = new HashMap<>();
    messageVO.put("message", message);
    if (message != null) {
        String content = HtmlUtils.htmlUnescape(message.getContent());
        Map<String, Object> data = JSONObject.parseObject(content, HashMap.class);

        messageVO.put("user", userService.findUserById((Integer) data.get("userId")));
        messageVO.put("entityType", data.get("entityType"));
        messageVO.put("entityId", data.get("entityId"));
        messageVO.put("postId", data.get("postId"));

        int count = messageService.findNoticeCount(user.getId(), TOPIC_LIKE);
        messageVO.put("count", count);

        int unread = messageService.findNoticeUnreadCount(user.getId(), TOPIC_LIKE);
        messageVO.put("unread", unread);
    }
    model.addAttribute("likeNotice", messageVO);

    // 查询关注类通知
    message = messageService.findLatestNotice(user.getId(), TOPIC_FOLLOW);
    messageVO = new HashMap<>();
    messageVO.put("message", message);
    if (message != null) {
        String content = HtmlUtils.htmlUnescape(message.getContent());
        Map<String, Object> data = JSONObject.parseObject(content, HashMap.class);

        messageVO.put("user", userService.findUserById((Integer) data.get("userId")));
        messageVO.put("entityType", data.get("entityType"));
        messageVO.put("entityId", data.get("entityId"));

        int count = messageService.findNoticeCount(user.getId(), TOPIC_FOLLOW);
        messageVO.put("count", count);

        int unread = messageService.findNoticeUnreadCount(user.getId(), TOPIC_FOLLOW);
        messageVO.put("unread", unread);
    }
    model.addAttribute("followNotice", messageVO);

    int letterUnreadCount = messageService.findLetterUnreadCount(user.getId(), null);
    model.addAttribute("letterUnreadCount",letterUnreadCount);
    int noticeUnreadCount = messageService.findNoticeUnreadCount(user.getId(), null);
    model.addAttribute("noticeUnreadCount", noticeUnreadCount);

    return "/site/notice";
}
修改letter.html和notice.htm页面
5.2 通知详情
数据层
// 查询某个主题所包含的通知列表
List<Message> selectNotices(int userId, String topic, int offset, int limit);
<select id="selectNotices" resultType="Message">
    select <include refid="selectFields"></include>
    from message
    where status != 2
    and from_id = 1
    and to_id = #{userId}
    and conversation_id = #{topic}
    order by create_time desc
    limit #{offset},#{limit}
</select>
业务层
//查询某个主题所包含的通知列表
public List<Message> findNotices(int userId,String topic,int offset,int limit){
    return messageMapper.selectNotices(userId, topic, offset, limit);
}
显示层
@RequestMapping(path = "/notice/detail/{topic}",method = RequestMethod.GET)
public String getNoticeDetail(@PathVariable("topic") String topic,Model model,Page page){

    User user = hostHolder.getUser();

    //分页信息
    page.setPath("/notice/detail");
    page.setRows(messageService.findNoticeCount(user.getId(),TOPIC_COMMENT));
    page.setLimit(5);

    List<Message> notices = messageService.findNotices(user.getId(), topic, page.getOffset(), page.getLimit());
    List<Map<String,Object>> noticeVoList = new ArrayList<>();
    if(notices!=null){
        for(Message notice : notices){
            Map<String, Object> map = new HashMap<>();
            // 通知
            map.put("notice", notice);
            // 内容
            String content = HtmlUtils.htmlUnescape(notice.getContent());
            Map<String, Object> data = JSONObject.parseObject(content, HashMap.class);
            map.put("user", userService.findUserById((Integer) data.get("userId")));
            map.put("entityType", data.get("entityType"));
            map.put("entityId", data.get("entityId"));
            map.put("postId", data.get("postId"));
            // 通知作者
            map.put("fromUser", userService.findUserById(notice.getFromId()));

            noticeVoList.add(map);
        }
    }
    model.addAttribute("notices", noticeVoList);

    // 设置已读
    List<Integer> ids = getLettersIds(notices);
    if (!ids.isEmpty()) {
        messageService.readMessage(ids);
    }
    return "/site/notice-detail";
}
修改notice-detail.html页面的显示信息。
5.3 未读消息
错误的写法,直接在HomeController中增加总的未读消息,然后返回给index.html页面,但是这样就只能在index.html页面中的头部会显示总的未读消息数量了。而index的头部是所有页面都复用的,所以只能写一个拦截器来拦截请求。
MessageInterceptor
@Component
public class MessageInterceptor implements HandlerInterceptor {

    @Autowired
    private HostHolder hostHolder;

    @Autowired
    private MessageService messageService;

    @Override
    public void postHandle(HttpServletRequest request, HttpServletResponse response, Object handler, ModelAndView modelAndView) throws Exception {
        User user = hostHolder.getUser();
        if(user!=null && modelAndView!=null){
            //未读消息数量
            int letterUnreadCount = messageService.findLetterUnreadCount(user.getId(), null);
            int noticeUnreadCount = messageService.findNoticeUnreadCount(user.getId(), null);
            modelAndView.addObject("messageCount", letterUnreadCount+noticeUnreadCount);
        }
    }
}
添加到拦截器配置中
@Configuration
public class WebMvcConfig implements WebMvcConfigurer {

    @Autowired
    private LoginTicketInterceptor loginTicketInterceptor;

    @Autowired
    private LoginRequiredInterceptor loginRequiredInterceptor;

    @Autowired
    private MessageInterceptor messageInterceptor;

    @Override
    public void addInterceptors(InterceptorRegistry registry) {
        registry.addInterceptor(loginTicketInterceptor)
            .excludePathPatterns("/**/*.css", "/**/*.js", "/**/*.png", "/**/*.jpg", "/**/*.jpeg");

        registry.addInterceptor(loginRequiredInterceptor)
            .excludePathPatterns("/**/*.css", "/**/*.js", "/**/*.png", "/**/*.jpg", "/**/*.jpeg");
        registry.addInterceptor(messageInterceptor)
            .excludePathPatterns("/**/*.css", "/**/*.js", "/**/*.png", "/**/*.jpg", "/**/*.jpeg");

    }
}
Elasticsearch,分布式搜索引擎
1.Elasticsearch入门
术语
-
索引:与数据库中的database相对应
-
文档:一个文档相当于一张表里面的一行(一条数据),通常采用JSON结构。(但7.0以后的版本就废弃了类型,而索引与表相对应)
-
字段:JSON中的每个属性叫字段
-
集群:多台服务器组合在一起部署
-
节点:集群中的每台服务器称为节点(分布式部署)
-
分片:分片是对索引的进一步划分
-
副本:副本是对分片的备份
-
对于es版本,最好使用和springboot内置的一样的版本号。安装的时候出错了,后面发现应该是和jdk版本不兼容,我电脑的jdk是14,所以ES下的7.8.0版本的。
-
启动ES,直接双击bin目录下的elasticsearch.bat文件即可
2.Spring整合Elasticsearch
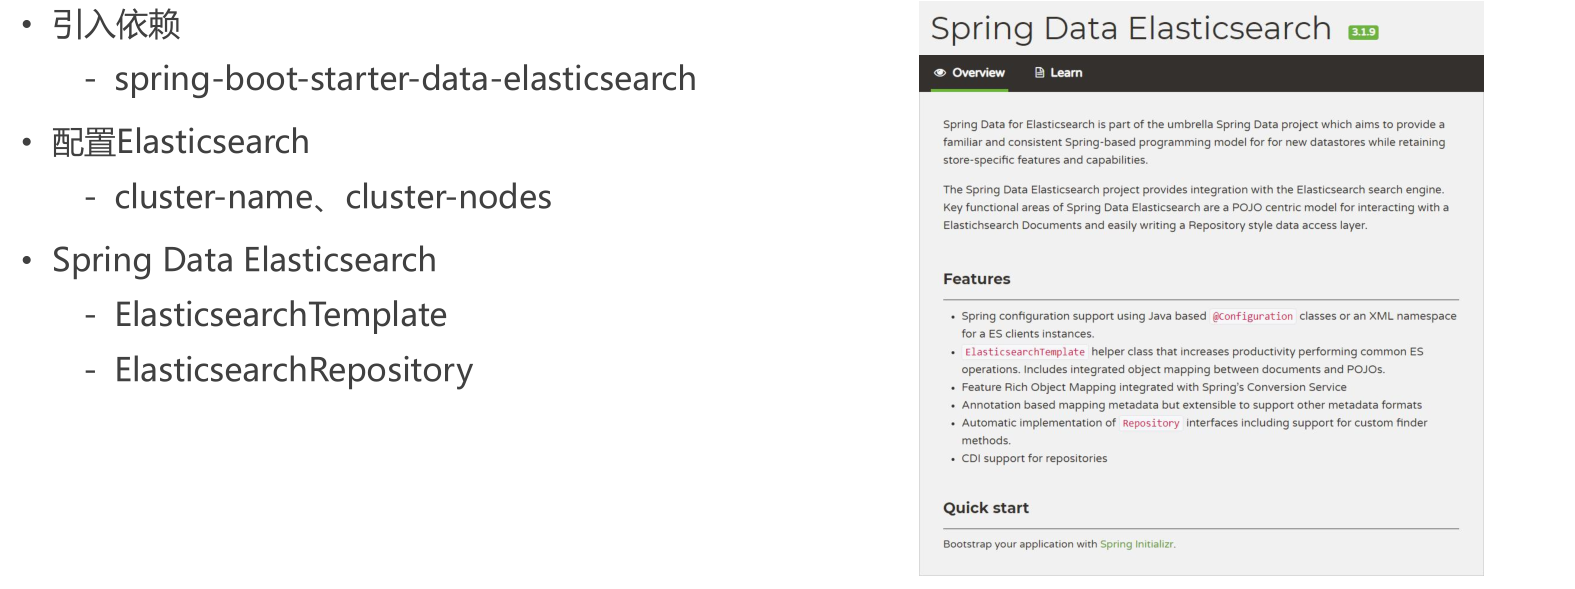
2.1 引入依赖
<!--ES-->
<dependency>
	<groupId>org.springframework.boot</groupId>
	<artifactId>spring-boot-starter-data-elasticsearch</artifactId>
</dependency>
2.2 配置Elasticsearch
application.properties配置类中对Elasticsearch的配置已经过期了,所以应该使用配置类的方式来注入bean

改用配置类的方式来注入Bean, 配置文件如下
@Configuration
public class EsConfig {

    @Value("${elasticSearch.url}")
    private String esUrl;

    //localhost:9200 写在配置文件中就可以了
    @Bean
    RestHighLevelClient client() {
        ClientConfiguration clientConfiguration = ClientConfiguration.builder()
                .connectedTo(esUrl)//elasticsearch地址
                .build();

        return RestClients.create(clientConfiguration).rest();
    }
}
2.3 测试
1.配置实体要和ES中索引的对应关系
这里配置DiscussPost实体
注意索引名字只能是小写,不然报错!!
//indexName是索引名字,shards是分片,replicas是副本
@Document(indexName = "discussPost",shards = 6,replicas = 3)
public class DiscussPost {

    //DiscussPost实体要和索引discussPost有对应关系

    @Id  //标识索引
    private int id;

    // 互联网校招
    // analyzer 存储时的解析器,比如将互联网校招分为,互联网、校招   ik_max_word表示尽可能的多拆
    // searchAnalyze 搜索时的解析器,搜索的时候要求尽可能的只能,比如尽可能多的匹配
    @Field(type = FieldType.Text, analyzer = "ik_max_word", searchAnalyzer = "ik_smart")
    private String title;  //标题

    @Field(type = FieldType.Text, analyzer = "ik_max_word", searchAnalyzer = "ik_smart")
    private String content; //内容

    @Field(type = FieldType.Integer)  //普通类型
    private int userId;

    @Field(type = FieldType.Integer)
    private int type;  //0-普通; 1-置顶;

    @Field(type = FieldType.Integer)
    private int status;  //0-正常; 1-精华; 2-拉黑;

    @Field(type = FieldType.Date)
    private Date createTime;

    @Field(type = FieldType.Integer)
    private int commentCount;

    @Field(type = FieldType.Double)
    private double score;  //帖子的分数
}
2.继承ElasticsearchRepository
ElasticsearchRepository接口中已经事先定义好了对ES服务器的增删改查等各种方法,Spring会自动给它做一个实现。
@Repository
public interface DiscussPostRepository extends ElasticsearchRepository<DiscussPost, Integer> {

}
2.创建测试类
- 先往ES里面存储数据(ES会自动创建索引)
- 从ES里面搜索数据
@RunWith(SpringRunner.class)
@SpringBootTest
@ContextConfiguration(classes = CommunityApplication.class)
public class ElasticsearchTests {

    @Autowired
    private DiscussPostMapper discussMapper;

    @Autowired
    private DiscussPostRepository discussRepository;

    @Autowired
    private ElasticsearchRestTemplate elasticsearchRestTemplate;


    //一次插入一条数据
    @Test
    public void testInsert() {
        discussRepository.save(discussMapper.selectDiscussPostById(241));  //ES会自动创建索引
        discussRepository.save(discussMapper.selectDiscussPostById(242));
        discussRepository.save(discussMapper.selectDiscussPostById(243));
    }

    //一次插入多条数据
    @Test
    public void testInsertList() {
        discussRepository.saveAll(discussMapper.selectDiscussPosts(101, 0, 100));
        discussRepository.saveAll(discussMapper.selectDiscussPosts(102, 0, 100));
        discussRepository.saveAll(discussMapper.selectDiscussPosts(103, 0, 100));
        discussRepository.saveAll(discussMapper.selectDiscussPosts(111, 0, 100));
        discussRepository.saveAll(discussMapper.selectDiscussPosts(112, 0, 100));
        discussRepository.saveAll(discussMapper.selectDiscussPosts(131, 0, 100));
        discussRepository.saveAll(discussMapper.selectDiscussPosts(132, 0, 100));
        discussRepository.saveAll(discussMapper.selectDiscussPosts(133, 0, 100));
        discussRepository.saveAll(discussMapper.selectDiscussPosts(134, 0, 100));
    }

    //更新数据
    @Test
    public void testUpdate() {
        DiscussPost post = discussMapper.selectDiscussPostById(231);
        post.setContent("我是新人,使劲灌水.");
        discussRepository.save(post);
    }

    //删除数据
    @Test
    public void testDelete() {
        discussRepository.deleteById(231);
        //discussRepository.deleteAll();
    }

    //查询数据
    @Test
    public void testSearchByTemplate() {
        // 构建查询条件
        NativeSearchQuery searchQuery = new NativeSearchQueryBuilder()
            .withQuery(QueryBuilders.multiMatchQuery("互联网寒冬", "title", "content"))
            .withSort(SortBuilders.fieldSort("type").order(SortOrder.DESC))// 按照帖子分类排序
            .withSort(SortBuilders.fieldSort("score").order(SortOrder.DESC))// 按照帖子分数排序
            .withSort(SortBuilders.fieldSort("createTime").order(SortOrder.DESC))// 按照帖子发布日期排序
            .withPageable(PageRequest.of(0, 10))// 每页十条数据
            .withHighlightFields(
            // 标题和内容中的匹配字段高亮展示
            new HighlightBuilder.Field("title").preTags("<em>").postTags("</em>"),
            new HighlightBuilder.Field("content").preTags("<em>").postTags("</em>")
        ).build();
        // 得到查询结果返回容纳指定内容对象的集合SearchHits
        SearchHits<DiscussPost> searchHits = elasticsearchRestTemplate.search(searchQuery, DiscussPost.class);

        // 设置一个需要返回的实体类集合
        List<DiscussPost> discussPosts = new ArrayList<>();
        // 遍历返回的内容进行处理
        for (SearchHit<DiscussPost> searchHit : searchHits) {
            // 高亮的内容
            Map<String, List<String>> highlightFields = searchHit.getHighlightFields();
            // 将高亮的内容填充到content中
            searchHit.getContent().setTitle(highlightFields.get("title") == null ?
                                            searchHit.getContent().getTitle() : highlightFields.get("title").get(0));
            searchHit.getContent().setTitle(highlightFields.get("content") == null ?
                                            searchHit.getContent().getContent() : highlightFields.get("content").get(0));
            // 放到实体类中
            discussPosts.add(searchHit.getContent());
        }
        // 输出结果
        System.out.println(discussPosts.size());
        for (DiscussPost discussPost : discussPosts) {
            System.out.println(discussPost);
        }
    }
}
3.开发社区搜索功能
3.1 搜索服务
编写ElasticsearchService业务
@Service
public class ElasticsearchService {

    @Autowired
    private DiscussPostRepository discussRepository;

    @Autowired
    private ElasticsearchRestTemplate elasticsearchRestTemplate;

    public void saveDiscussPost(DiscussPost post) {
        discussRepository.save(post);
    }

    public void deleteDiscussPost(int id) {
        discussRepository.deleteById(id);
    }

    public Map<String, Object> searchDiscussPost(String keyword, int current, int limit) {  //从第几页开始显示,每页显示几条数据
        // 构建查询条件
        NativeSearchQuery searchQuery = new NativeSearchQueryBuilder()
            .withQuery(QueryBuilders.multiMatchQuery(keyword, "title", "content"))
            .withSort(SortBuilders.fieldSort("type").order(SortOrder.DESC))// 按照帖子分类排序
            .withSort(SortBuilders.fieldSort("score").order(SortOrder.DESC))// 按照帖子分数排序
            .withSort(SortBuilders.fieldSort("createTime").order(SortOrder.DESC))// 按照帖子发布日期排序
            .withPageable(PageRequest.of(current, limit))// 每页十条数据
            .withHighlightFields(
            // 标题和内容中的匹配字段高亮展示
            new HighlightBuilder.Field("title").preTags("<em>").postTags("</em>"),
            new HighlightBuilder.Field("content").preTags("<em>").postTags("</em>")
        ).build();
        // 得到查询结果返回容纳指定内容对象的集合SearchHits
        SearchHits<DiscussPost> searchHits = elasticsearchRestTemplate.search(searchQuery, DiscussPost.class);

        // 设置一个需要返回的实体类集合
        List<DiscussPost> discussPosts = new ArrayList<>();
        // 遍历返回的内容进行处理
        for (SearchHit<DiscussPost> searchHit : searchHits) {
            // 高亮的内容
            Map<String, List<String>> highlightFields = searchHit.getHighlightFields();
            // 将高亮的内容填充到content中
            searchHit.getContent().setTitle(highlightFields.get("title") == null ?
                                            searchHit.getContent().getTitle() : highlightFields.get("title").get(0));
            searchHit.getContent().setTitle(highlightFields.get("content") == null ?
                                            searchHit.getContent().getContent() : highlightFields.get("content").get(0));
            // 放到实体类中
            discussPosts.add(searchHit.getContent());
        }

        // 返回结果
        Map<String, Object> res = new HashMap<>();
        res.put("row", searchHits.getTotalHits());
        res.put("discussPosts", discussPosts);
        return res;
    }
}
3.2 发布事件
发布帖子时,将帖子异步的提交到ElasticSearch服务器
@RequestMapping(path = "/add",method = RequestMethod.POST)
@ResponseBody
public String addDiscussPost(String title,String content){
    User user = hostHolder.getUser();
    if(user==null){
        return CommunityUtil.getJSONString(403, "你还没有登录哦!");
    }
    DiscussPost post = new DiscussPost();
    post.setUserId(user.getId());
    post.setTitle(title);
    post.setContent(content);
    post.setCreateTime(new Date());
    discussPostService.addDiscussPost(post);

    //触发发帖事件
    Event event = new Event()
        .setTopic(TOPIC_PUBLISH)
        .setUserId(user.getId())
        .setEntityType(ENTITY_TYPE_POST)
        .setEntityId(post.getId());
    eventProducer.fireEvent(event);

    // 报错的情况,将来统一处理.
    return CommunityUtil.getJSONString(0, "发布成功!");
}
增加评论时,将帖子异步的提交到ElasticSearch服务器(因为要更新帖子的评论数量)
//添加评论
@RequestMapping(path = "/add/{discussPostId}",method = RequestMethod.POST)
public String addComment(@PathVariable("discussPostId") int discussPostId, Comment comment){
    comment.setUserId(hostHolder.getUser().getId());
    comment.setStatus(0);
    comment.setCreateTime(new Date());
    commentService.addComment(comment);

    //触发评论事件
    Event event = new Event()
        .setTopic(TOPIC_COMMENT)
        .setUserId(hostHolder.getUser().getId())
        .setEntityType(comment.getEntityType())
        .setEntityId(comment.getEntityId())
        .setData("postId", discussPostId);
    if(comment.getEntityType()==ENTITY_TYPE_POST){
        DiscussPost target = discussPostService.findDiscussPost(comment.getEntityId());
        event.setEntityUserId(target.getUserId());
    }else if(comment.getEntityType()==ENTITY_TYPE_COMMENT){
        Comment target = commentService.findCommentById(comment.getEntityId());
        event.setEntityUserId(target.getUserId());
    }
    eventProducer.fireEvent(event);

    //触发发帖事件
    if(comment.getEntityType()==ENTITY_TYPE_POST){
        event = new Event()
            .setTopic(TOPIC_PUBLISH)
            .setUserId(comment.getUserId())
            .setEntityType(comment.getEntityType())
            .setEntityId(comment.getEntityId());
        eventProducer.fireEvent(event);
    }

    return "redirect:/discuss/detail/" + discussPostId;
}
在消费组件中增加一个方法,消费帖子发布事件
@KafkaListener(topics = {TOPIC_PUBLISH})
public void handlePublishMessage(ConsumerRecord record){
    if(record==null || record.value()==null){
        logger.error("消息的内容为空!");
        return ;
    }
    Event event = JSONObject.parseObject(record.value().toString(), Event.class);
    if(event==null){
        logger.error("消息格式错误!");
        return;
    }

    DiscussPost discussPost = discussPostService.findDiscussPost(event.getEntityId());
    elasticsearchService.saveDiscussPost(discussPost);
}
3.3 显示结果
@Controller
public class SearchController implements CommunityConstant {

    @Autowired
    private ElasticsearchService elasticsearchService;

    @Autowired
    private UserService userService;

    @Autowired
    private LikeService likeService;

    @RequestMapping(path = "/search",method = RequestMethod.GET)
    public String getSearch(String keyword, Page page, Model model){

        //查询ES中的数据
        Map<String, Object> map = elasticsearchService.searchDiscussPost(keyword, page.getCurrent(), page.getLimit());
        List<DiscussPost> discussPostList = (List<DiscussPost>) map.get("discussPosts");
        int rows = (int) map.get("rows");

        //分页信息
        page.setPath("/search?keyword=" + keyword);
        page.setRows(rows);

        // 聚合数据
        List<Map<String, Object>> discussPosts = new ArrayList<>();
        if(discussPosts!=null){
            for(DiscussPost post :discussPostList){
                Map<String,Object> m = new HashMap<>();
                m.put("post",post);
                m.put("user", userService.findUserById(post.getUserId()));
                m.put("likeCount",likeService.findEntityLikeCount(ENTITY_TYPE_POST,post.getId()));

                discussPosts.add(m);
            }
        }
        model.addAttribute("discussPosts", discussPosts);
        model.addAttribute("keyword", keyword);

        return "/site/search";

    }
}
项目进阶,构建安全高效的企业服务
1.spring security 入门
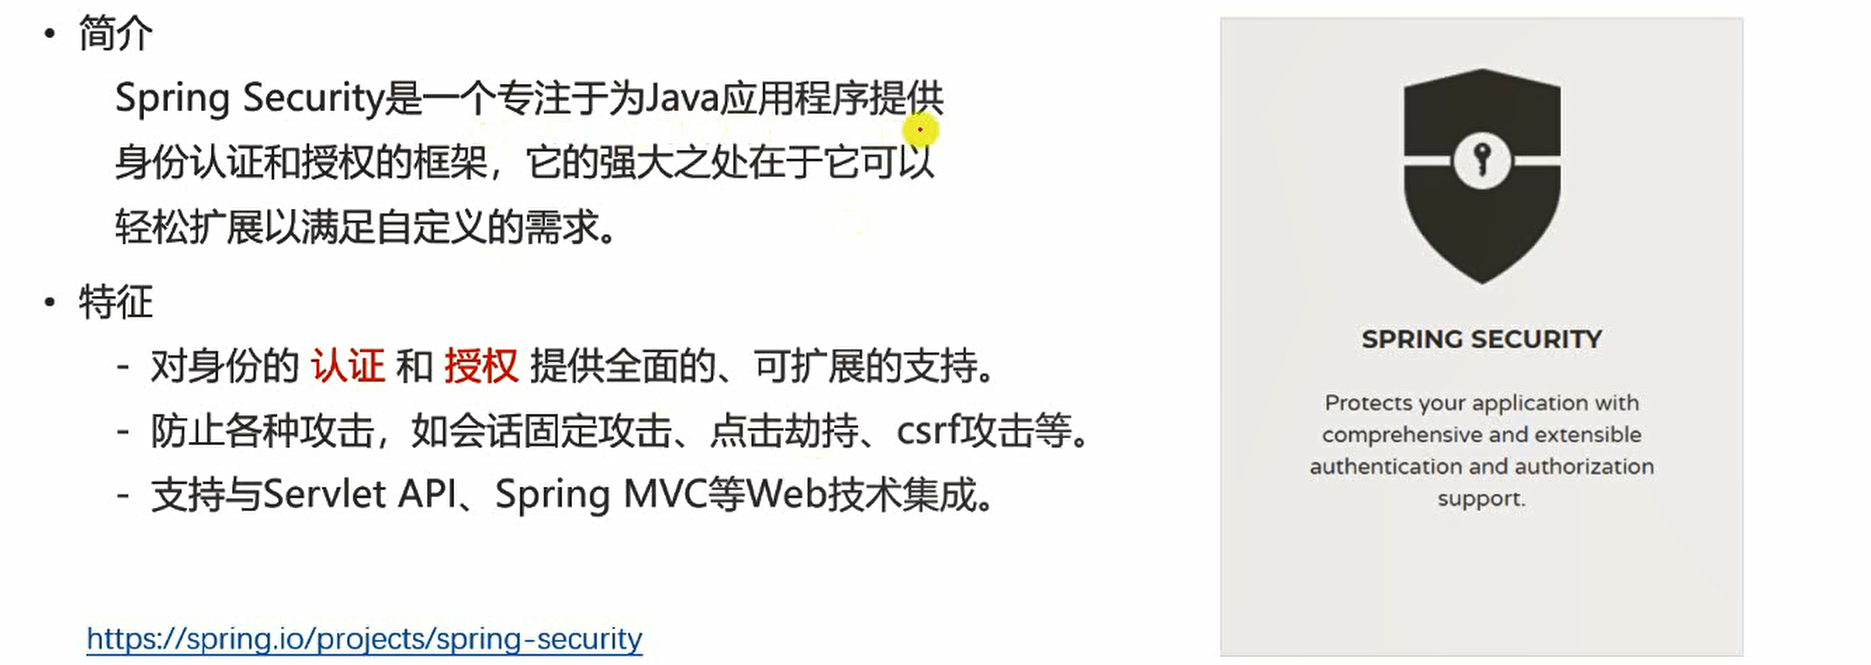

1.1 导入springsecuritydemo
在D:\IDEA_Workspace目录中
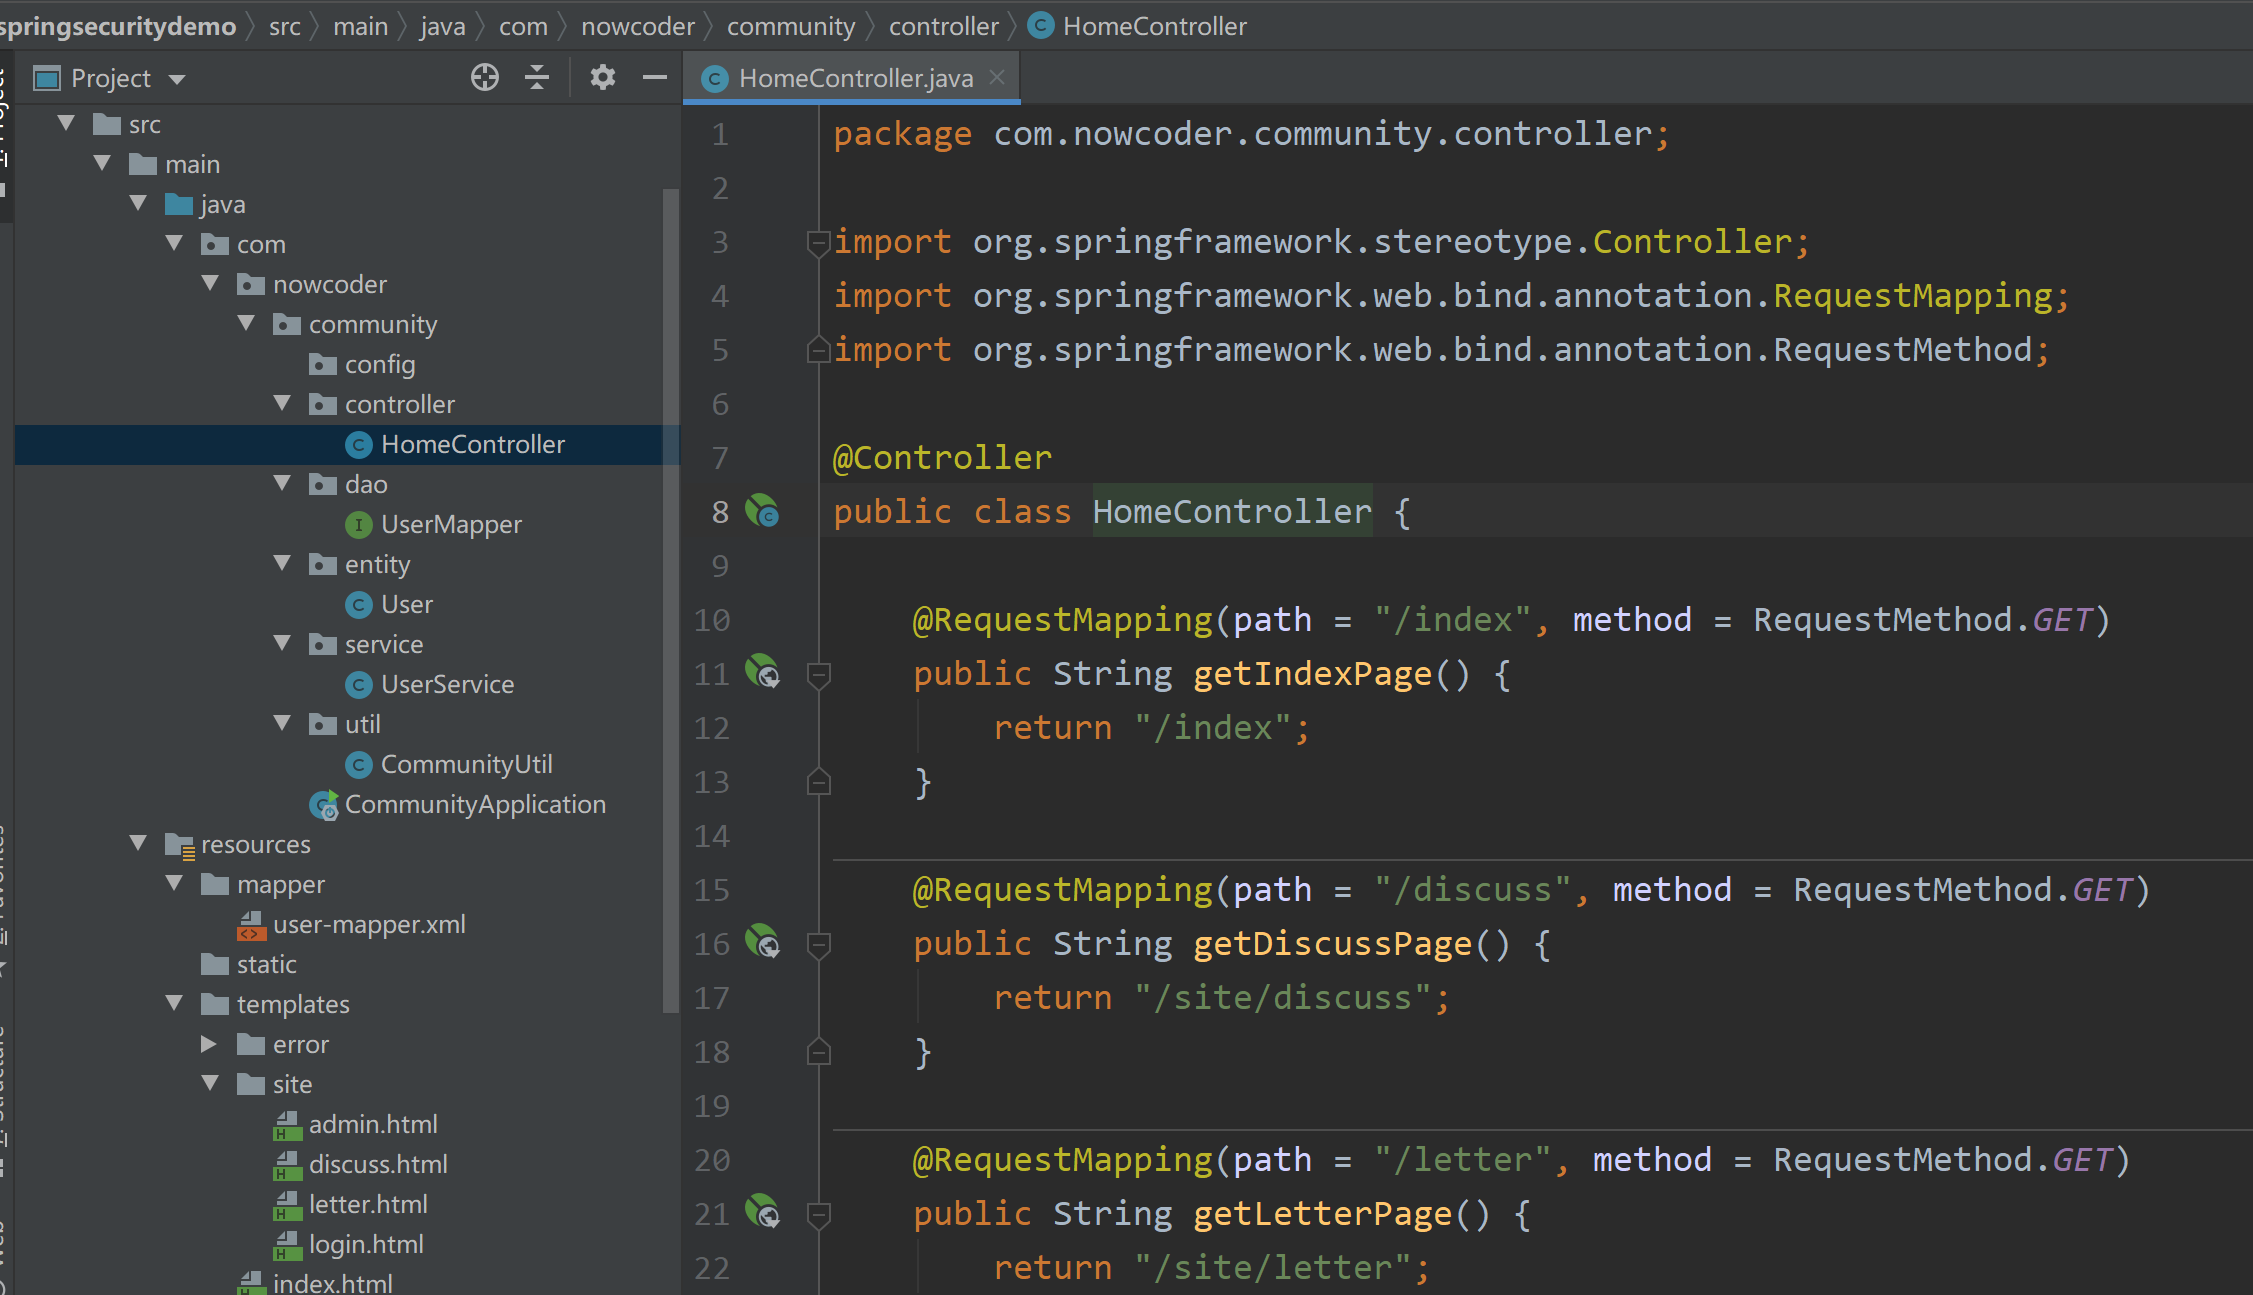
1.2 存在的问题
启动项目后,没有登录却也可以访问私信列表、管理员页面等等

1.3.SpringBoot整合Spring security
1.3.1 导入依赖
<!--security-->
<dependency>
    <groupId>org.springframework.boot</groupId>
    <artifactId>spring-boot-starter-security</artifactId>
</dependency>
当我们引入依赖后,SpringSecurity 就立即生效!启动项目主函数后,我们来测试访问下首页:http://localhost:8080/community/index,这时候它会自动被拦截到登SpringSecurity自带的登录页面:
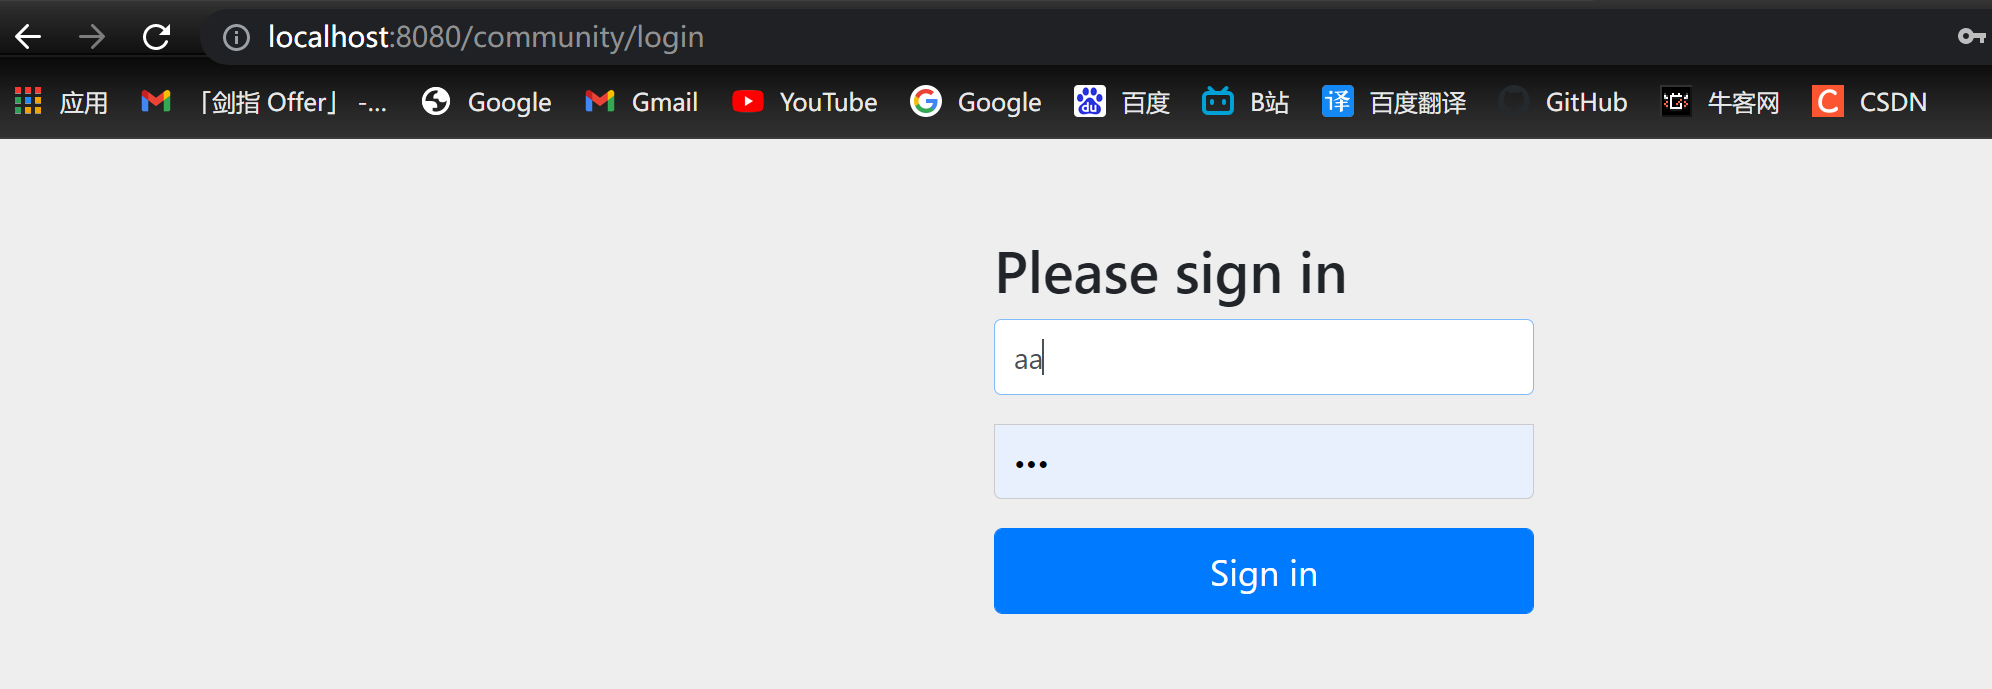
SpringSecurity默认提供的登录页面,账号默认是user,密码在我们启动项目主函数时,会以日志的形式打印在控制台:

输入账号密码登录后,就能进入我们项目的首页 inedx.html

问题:那么如何使用自己自定义的登录页面以及自己数据中的用户名和密码来控制登录权限呢?接下来就带着这个问题一步一步往下走!
1.3.2 对User实体进行加功处理
我们使用Lombok 插件的注解简化 setter/getter 以及构造函数和 toString 方法,还有个好处就是可以更清晰的展示实现 UserDetails 接口后需要重写的方法!
@Data 生成getter,setter ,toString等函数
@NoArgsConstructor 生成无参构造函数
@AllArgsConstructor 生成全参数构造函数
@Data
@AllArgsConstructor
@NoArgsConstructor
public class User implements UserDetails {

    private int id;
    private String username;
    private String password;
    private String salt;
    private String email;
    private int type;
    private int status;
    private String activationCode;
    private String headerUrl;
    private Date createTime;

    @Override
    public Collection<? extends GrantedAuthority> getAuthorities() {
        List<GrantedAuthority> list = new ArrayList<>();
        list.add(new GrantedAuthority() {
            @Override
            public String getAuthority() {
                switch (type) {
                    case 1:
                        return "ADMIN";
                    default:
                        return "USER";
                }
            }
        });
        return list;
    }


    /**
    * @Description:判断账号是否未过期
    * @return: boolean
     * 返回true:账号未过期
     * 返回false:账号过期
    **/
    @Override
    public boolean isAccountNonExpired() {
        return false;
    }

    /**
    * @Description:判断账号是否未锁定
    * @return: boolean
     * 返回true:账号未锁定
     * 返回false:账号锁定
    **/
    @Override
    public boolean isAccountNonLocked() {
        return false;
    }

    // true: 凭证未过期.
    @Override
    public boolean isCredentialsNonExpired() {
        return false;
    }

    // true: 账号可用.
    @Override
    public boolean isEnabled() {
        return false;
    }
}
1.3.3 对UserService 实现类进行加功处理
@Service
public class UserService implements UserDetailsService {

    @Autowired
    private UserMapper userMapper;

    /**
     * 我们自己写的根据用户名从数据库查询用户信息
     * @param username
     * @return
     */
    public User findUserByName(String username) {
        return userMapper.selectByName(username);
    }

    /**
     * UserDetailsService 接口提供的根据用户名获取用户信息的方法
     *
     * @param username
     * @return
     * @throws UsernameNotFoundException
     */
    @Override
    public UserDetails loadUserByUsername(String username) throws UsernameNotFoundException {
        // 调用我们自己的findUserByName 方法
        return this.findUserByName(username);
    }
}
1.3.4 SecurityConfig 配置类
/**
 * @Author: 卡卡罗特
 * @Date: 2021/12/25
 * @Time: 13:22
 * @Description:
 */
@Configuration
public class SecurityConfig extends WebSecurityConfigurerAdapter {

    @Autowired
    private UserService userService;


    /**
    * @Description: 用于配置一些拦截的资源
    * @Param web:
    * @return: void
    **/
    @Override
    public void configure(WebSecurity web) throws Exception {
        //忽略resource下的所有静态资源
        web.ignoring().antMatchers("/resource/**");
    }


    /**
     * Description:用于对认证进行处理(核心)
     * AuthenticationManager: 用于认证的核心接口.
     * AuthenticationManagerBuilder: 用于构建AuthenticationManager接口对象的工具.
     * ProviderManager: AuthenticationManager接口的默认实现类.
     * @param auth
     */
    @Override
    protected void configure(AuthenticationManagerBuilder auth) throws Exception {

        /** 内置(默认)的认证规则
        * auth.userDetailsService(userService).passwordEncoder(new Pbkdf2PasswordEncoder("12345"));
          对密码进行编码,Pbkdf2PasswordEncoder 加密时候附带的盐值
        **/

        /**
        * 自定义认证规则:
        * AuthenticationProvider: ProviderManager持有一组 AuthenticationProvider,
         *每个 AuthenticationProvider 负责一种认证.(比如有账号密码登录认证,微信第三方登录认证等等)
         *
         * 这种设计模式称为委托模式: ProviderManager 将认证委托给 AuthenticationProvider.
        **/

        auth.authenticationProvider(new AuthenticationProvider() {
            /**
             * Authentication: 用于封装认证信息的接口,不同的实现类代表不同类型的认证信息.
             *
             * @param authentication
             * @return
             * @throws AuthenticationException
             */

            @Override
            public Authentication authenticate(Authentication authentication) throws AuthenticationException {
                //获取用户名
                String username = authentication.getName();
                //获取密码
                String password = (String) authentication.getCredentials();
                User user = userService.findUserByName(username);
                if (user == null) {
                    throw new UsernameNotFoundException("账号不存在!");
                }

                // 对密码加密后再到数据库查询
                password = CommunityUtil.md5(password + user.getSalt());
                if (!user.getPassword().equals(password)) {
                    throw new BadCredentialsException("密码不正确!");
                }

                // principal: 认证的主要信息(比如user对象);
                // credentials: 证书(账号密码模式下,证书使用密码password表示);
                // authorities: 权限;
                return new UsernamePasswordAuthenticationToken(user, user.getPassword(), user.getAuthorities());
            }

            /**
             * 当前的 AuthenticationProvider支持的是哪种类型的认证.
             *
             * @param authentication
             * @return
             */
            @Override
            public boolean supports(Class<?> authentication) {
                // 支持账号密码认证模式:
                // UsernamePasswordAuthenticationToken: Authentication接口的常用的实现类.
                return UsernamePasswordAuthenticationToken.class.equals(authentication);
            }
        });
    }


    /**
     * 用于对授权进行处理(核心)
     *
     * @param http
     * @throws Exception
     */
    @Override
    protected void configure(HttpSecurity http) throws Exception {
        // 登录页面相关配置
        http.formLogin()
            // 指定登录页面和登录请求路径,会自动调用上面的接口进行验证
            .loginPage("/loginpage")
            .loginProcessingUrl("/login")
            //登录成功时候跳转的路径
            //.successForwardUrl("/xxx")
            //登录失败时跳转的路径
            // .failureForwardUrl("/xxx")
            // 登录成功后,做出相应处理的 handler
            .successHandler(new AuthenticationSuccessHandler() {
                @Override
                public void onAuthenticationSuccess(HttpServletRequest request,
                                                    HttpServletResponse response,
                                                    Authentication authentication)
                    throws IOException, ServletException {
                    // 重定向到首页
                    response.sendRedirect(request.getContextPath() + "/index");
                }
            })
            // 登录失败后,做出相应处理的 handler
            .failureHandler(new AuthenticationFailureHandler() {
                @Override
                public void onAuthenticationFailure(HttpServletRequest request,
                                                    HttpServletResponse response,
                                                    AuthenticationException exception)
                    throws IOException, ServletException {
                    // 储存错误信息
                    request.setAttribute("error", exception.getMessage());
                    // 转发到登录页面
                    request.getRequestDispatcher("/loginpage").forward(request, response);
                }
            });

        // 退出相关配置
        http.logout()
            // 处理登出的请求
            .logoutUrl("/logout")
            // 登出后,做出相应处理的 handler
            .logoutSuccessHandler(new LogoutSuccessHandler() {
                @Override
                public void onLogoutSuccess(HttpServletRequest request,
                                            HttpServletResponse response,
                                            Authentication authentication)
                    throws IOException, ServletException {
                    // 重定向到首页
                    response.sendRedirect(request.getContextPath() + "/index");
                }
            });

        // 授权配置
        http.authorizeRequests()
            .antMatchers("/letter").hasAnyAuthority("USER", "ADMIN")
            .antMatchers("/admin").hasAnyAuthority("ADMIN")
            // 如果没有权限,则访问 denied 提示页面
            .and().exceptionHandling().accessDeniedPage("/denied");


        // 增加一个Filter,用于处理验证码
        http.addFilterBefore(new Filter() {
            @Override
            public void doFilter(ServletRequest servletRequest, ServletResponse servletResponse, FilterChain filterChain) throws IOException, ServletException {
                HttpServletRequest request = (HttpServletRequest) servletRequest;
                HttpServletResponse response = (HttpServletResponse) servletResponse;

                if (request.getServletPath().equals("/login")) {
                    String verifyCode = request.getParameter("verifyCode");
                    // 这里把验证码校验写死,实际业务中是需要动态的验证码:
                    // 需要加一个验证码生成的方法,把验证码存入 cookie 或者 redis 中
                    // 这里仅仅是为了展示效果而已:
                    if (verifyCode == null || !verifyCode.equalsIgnoreCase("1234")) {
                        request.setAttribute("error", "验证码错误!");
                        request.getRequestDispatcher("/loginpage").forward(request, response);
                        return;
                    }
                }
                // 让请求继续向下执行.
                filterChain.doFilter(request, response);
            }
            // 新增的这个过滤器new Filter()会在 UsernamePasswordAuthenticationFilter 过滤器之前执行
        }, UsernamePasswordAuthenticationFilter.class);


        // 记住我
        http.rememberMe()
            // 存储用户数据的方案: new InMemoryTokenRepositoryImpl() 把用户数据存入内存
            // 如果是存cookie 或者 redis 存储token 需要自己写相关实现方法,并在这里new 出方法实例
            .tokenRepository(new InMemoryTokenRepositoryImpl())
            // 过期时间 24h
            .tokenValiditySeconds(3600 * 24)
            // 指定 userService
            .userDetailsService(userService);
    }

}
1.3.5 controller 层修改
@Controller
public class HomeController {

    @RequestMapping(path = "/index", method = RequestMethod.GET)
    public String getIndexPage(Model model) {
        // 认证成功后,结果会通过SecurityContextHolder存入SecurityContext中.
        Object obj = SecurityContextHolder.getContext().getAuthentication().getPrincipal();
        if (obj instanceof User) {
            model.addAttribute("loginUser", obj);
        }
        return "/index";
    }

    @RequestMapping(path = "/discuss", method = RequestMethod.GET)
    public String getDiscussPage() {
        return "/site/discuss";
    }

    @RequestMapping(path = "/letter", method = RequestMethod.GET)
    public String getLetterPage() {
        return "/site/letter";
    }

    @RequestMapping(path = "/admin", method = RequestMethod.GET)
    public String getAdminPage() {
        return "/site/admin";
    }

    @RequestMapping(path = "/loginpage", method = {RequestMethod.GET, RequestMethod.POST})
    public String getLoginPage() {
        return "/site/login";
    }

    // 拒绝访问时的提示页面
    @RequestMapping(path = "/denied", method = RequestMethod.GET)
    public String getDeniedPage() {
        return "/error/404";
    }
1.3.6 静态页面修改
index.html
login.html
2.权限控制
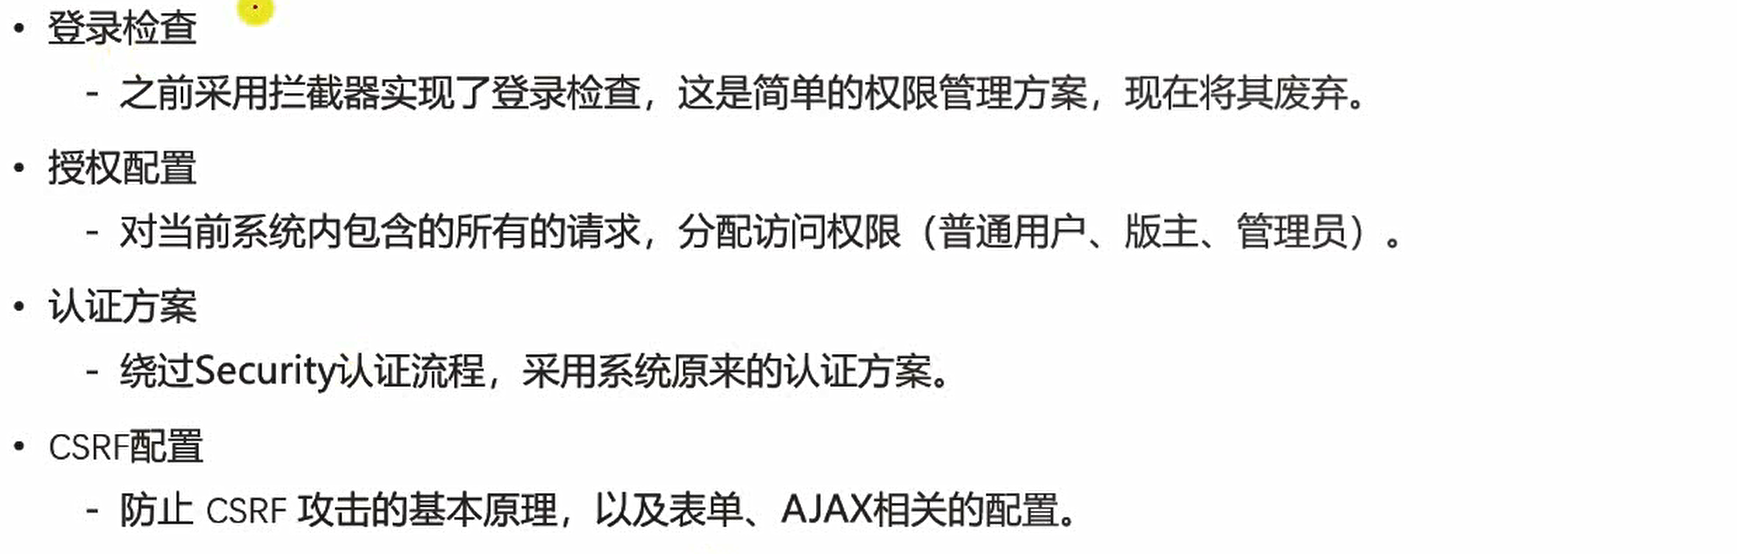
2.1 引入依赖
<dependency>
    <groupId>org.springframework.boot</groupId>
    <artifactId>spring-boot-starter-security</artifactId>
</dependency>
2.2 废弃登录需要拦截器
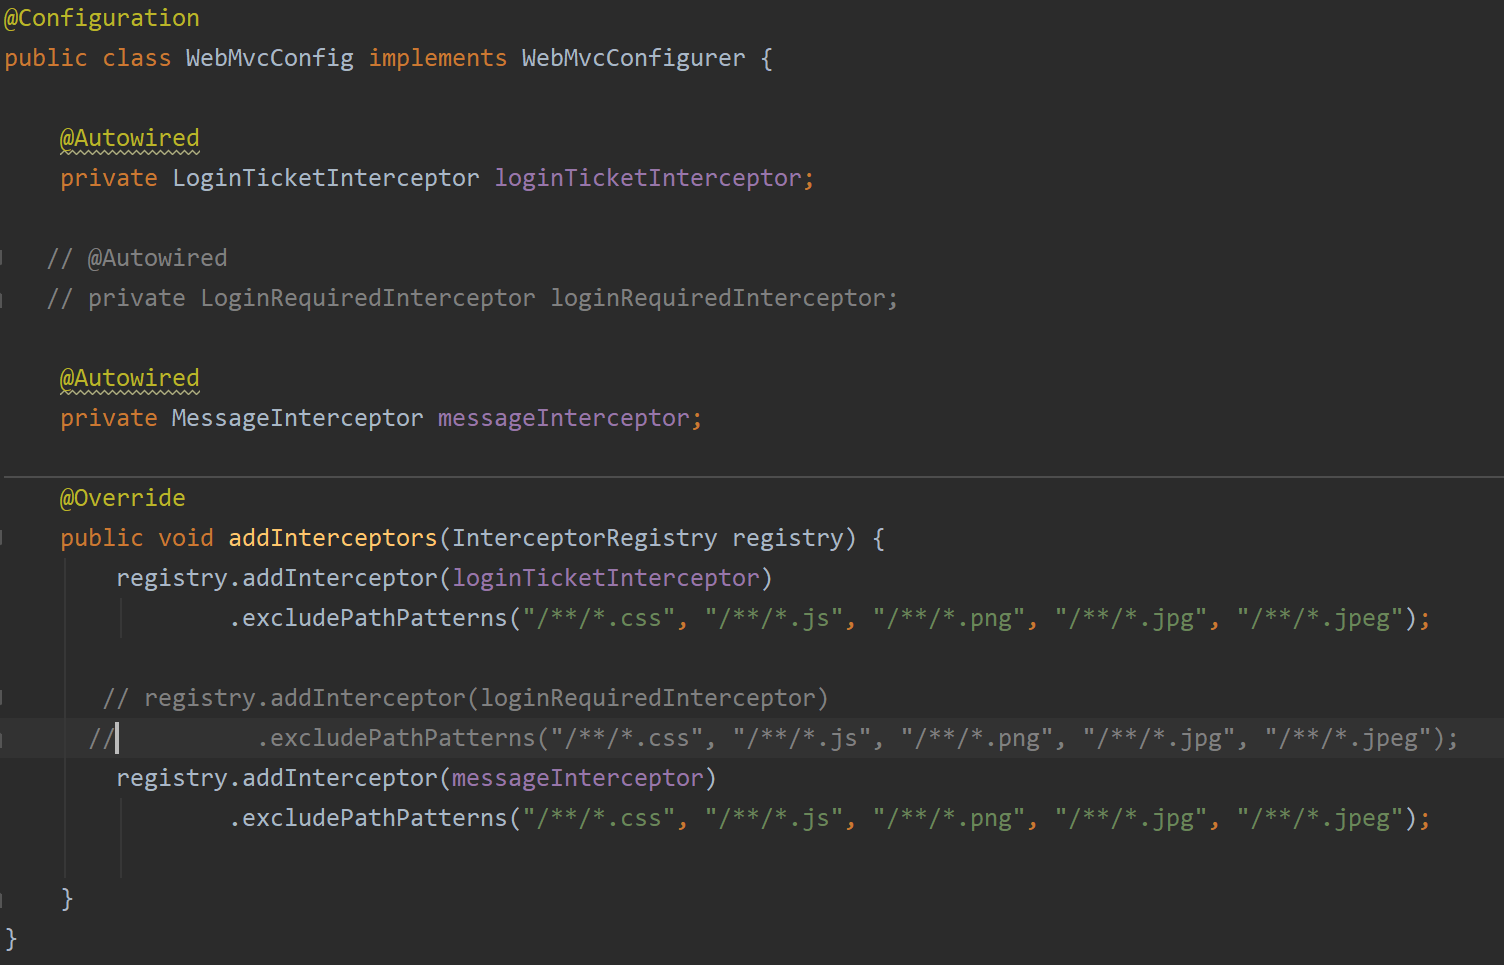
2.3 认证方案
因为系统写过自己的认证方案,所以绕过Security认证方案 (Security认证方案具体可以看spring security入门中的demo)
在UserService中编写方法获取用户的权限
public Collection<? extends GrantedAuthority> getAuthorities(int userId){
    User user = this.findUserById(userId);

    List<GrantedAuthority> list = new ArrayList<>();
    list.add(new GrantedAuthority() {
        @Override
        public String getAuthority() {
            switch (user.getType()){
                case 1:
                    return AUTHORITY_ADMIN;
                case 2:
                    return AUTHORITY_MODERATOR;
                default:
                    return AUTHORITY_USER;
            }
        }
    });
    return list;
}
在拦截器拦截请求判断用户是否登录的时候,构建用户认证的结论,并存入SecurityContext,以便于Security进行授权。
@Override
public boolean preHandle(HttpServletRequest request, HttpServletResponse response, Object handler) throws Exception {
    //从cookie中获取凭证
    String ticket = CookieUtil.getValue(request, "ticket");

    if(ticket!=null){
        //查询凭证
        LoginTicket loginTicket = userService.findLoginTicket(ticket);
        if(loginTicket!=null && loginTicket.getStatus()==0 && loginTicket.getExpired().after(new Date())){
            //根据凭证查询用户
            User user = userService.findUserById(loginTicket.getUserId());
            //在本次请求中持有用户
            hostHolder.setUser(user);
            //构建用户认证的结论,并存入SecurityContext,以便于Security进行授权
            Authentication authentication = new UsernamePasswordAuthenticationToken(
                user,user.getPassword(),userService.getAuthorities(user.getId())
            );
            SecurityContextHolder.setContext(new SecurityContextImpl(authentication));
        }
    }
    return true;
}

@Override
public void postHandle(HttpServletRequest request, HttpServletResponse response, Object handler, ModelAndView modelAndView) throws Exception {
    User user = hostHolder.getUser();
    if(user!=null && modelAndView!=null){
        modelAndView.addObject("loginUser", user);
    }
}

@Override
public void afterCompletion(HttpServletRequest request, HttpServletResponse response, Object handler, Exception ex) throws Exception {
    hostHolder.clear();
    SecurityContextHolder.clearContext();
}
2.4 授权配置
/**
 * @Author: 卡卡罗特
 * @Date: 2021/12/25
 * @Time: 15:31
 * @Description:
 */
public class SecurityConfig extends WebSecurityConfigurerAdapter implements CommunityConstant {

    /**
    * @Description:忽略对静态资源的访问
    * @return: null
    **/
    @Override
    public void configure(WebSecurity web) throws Exception {
        web.ignoring().antMatchers("/resources/**");
    }

    @Override
    protected void configure(HttpSecurity http) throws Exception {
        //授权
        http.authorizeRequests()
            .antMatchers(
            "/user/setting",// 用户设置
            "/user/upload",// 用户文件上传
            "/discuss/add",// 帖子发布
            "/comment/add/**",// 评论发布
            "/letter/**",// 私信相关内容
            "/notice/**",// 通知相关内容
            "/like",// 点赞
            "/follow",// 加关注
            "/unfollow"// 取消关注
        )// 只要有以下相关权限,都可以访问
            .hasAnyAuthority(
            AUTHORITY_USER,// 权限: 普通用户
            AUTHORITY_ADMIN,// 权限: 管理员
            AUTHORITY_MODERATOR// 权限: 版主
        )
          .anyRequest().permitAll()
          .and().csrf().disable();;


        // 如果权限不够时的处理
        http.exceptionHandling()
            //没有登录时的处理
            .authenticationEntryPoint(new AuthenticationEntryPoint() {
                @Override
                public void commence(HttpServletRequest request, HttpServletResponse response, AuthenticationException e) throws IOException, ServletException {
                    // 如果请求x-requested-with 中头包含XMLHttpRequest 说明是异步请求
                    String xRequestedWith = request.getHeader("x-requested-with");
                    if ("XMLHttpRequest".equals(xRequestedWith)) {
                        // 设置响应体是json 格式(因为是异步请求,所以返回内容要是json格式)
                        response.setContentType("application/plain;charset=utf-8");
                        // 拿到输出流,输出返回内容给前端页面
                        PrintWriter writer = response.getWriter();
                        writer.write(CommunityUtil.getJSONString(403, "你还没有登录哦!"));
                    } else {// 不是异步请求
                        // 重定向到登录页面
                        response.sendRedirect(request.getContextPath() + "/login");
                    }
                }
            })
            // 已经登录,但是拒绝访问(权限不足时的处理)
            .accessDeniedHandler(new AccessDeniedHandler() {
                @Override
                public void handle(HttpServletRequest request, HttpServletResponse response, AccessDeniedException e) throws IOException, ServletException {
                    String xRequestedWith = request.getHeader("x-requested-with");
                    if ("XMLHttpRequest".equals(xRequestedWith)) {
                        // 设置响应体是json 格式(因为是异步请求,所以返回内容要是json格式)
                        response.setContentType("application/plain;charset=utf-8");
                        // 拿到输出流,输出返回内容给前端页面
                        PrintWriter writer = response.getWriter();
                        writer.write(CommunityUtil.getJSONString(403, "你没有访问此功能的权限!"));
                    } else {// 不是异步请求
                        // 重定向到没有权限页面
                        response.sendRedirect(request.getContextPath() + "/denied");
                    }
                }
            });

        // Security底层默认会拦截/logout请求,进行退出处理.
        // 覆盖它默认的逻辑,才能执行我们自己的退出代码.
        http.logout().logoutUrl("/securitylogout");
    }
2.5 CSRF配置
防止CSRF攻击的基本原理,以及表单、AJAX的相关配置
CSRF:某网站盗取盗取你cookie中的凭证,模拟你的身份,向服务器提交表单,发送数据来获利。
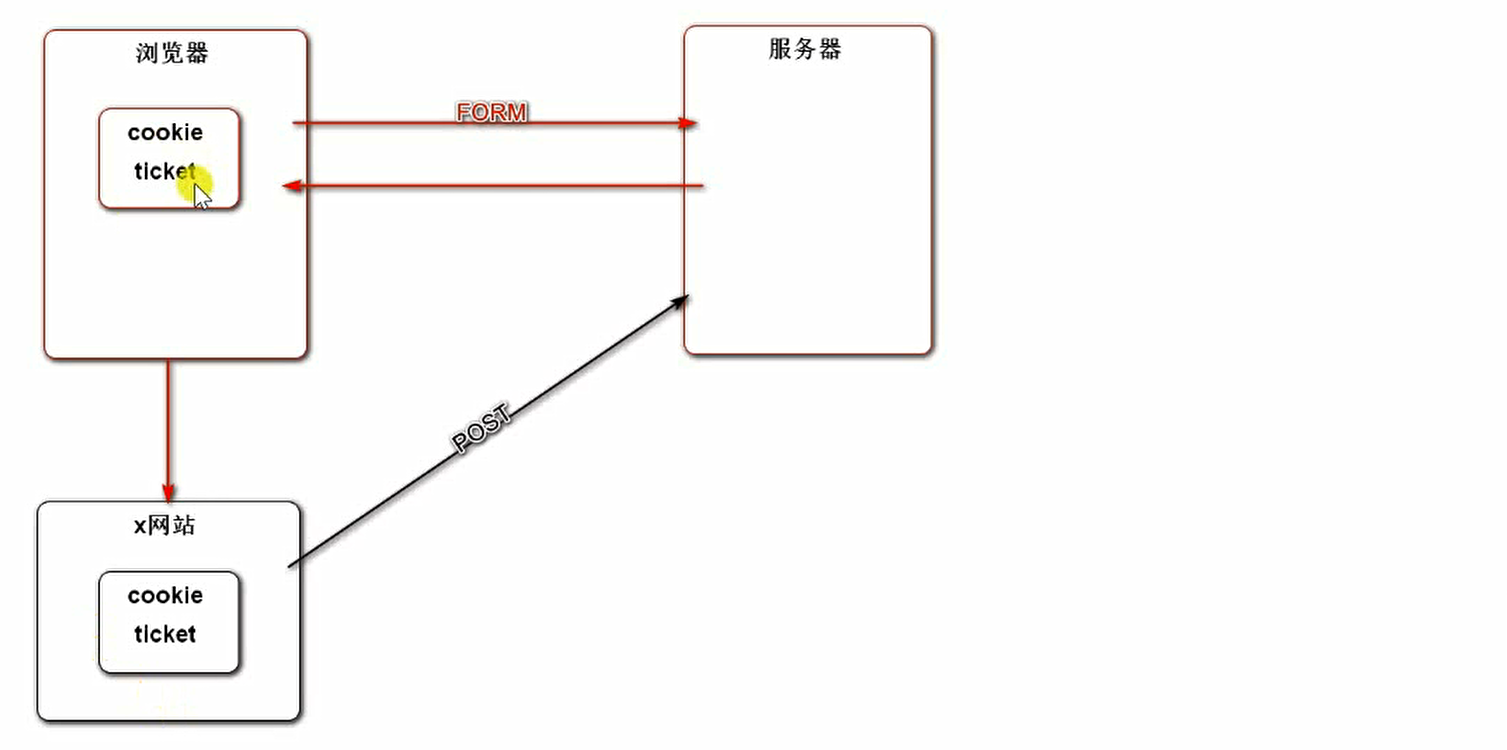
Spring security会发送一个token,来解决这个问题
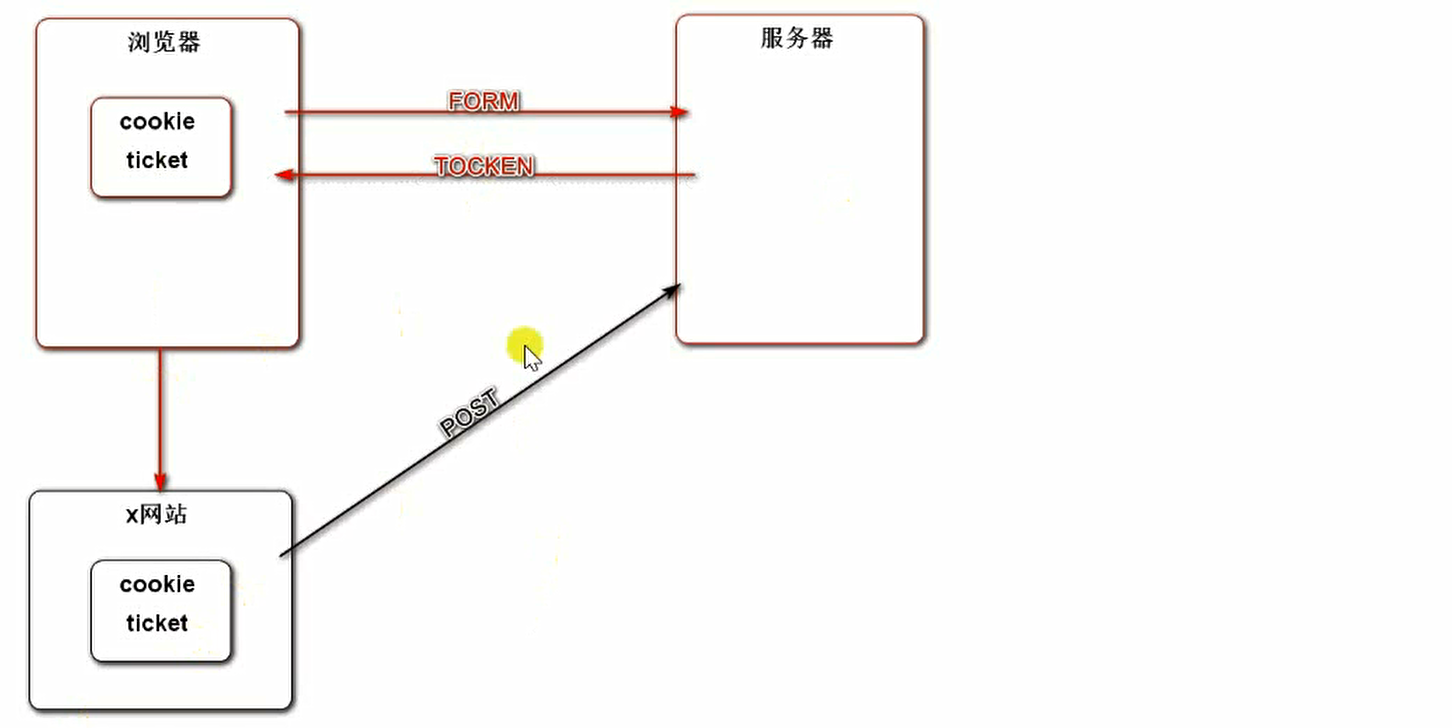
- 非异步请求,spring security会自动在页面中生成token
- 异步请求需要自己处理
本项目中暂不处理这个
3.置顶、加精和删除
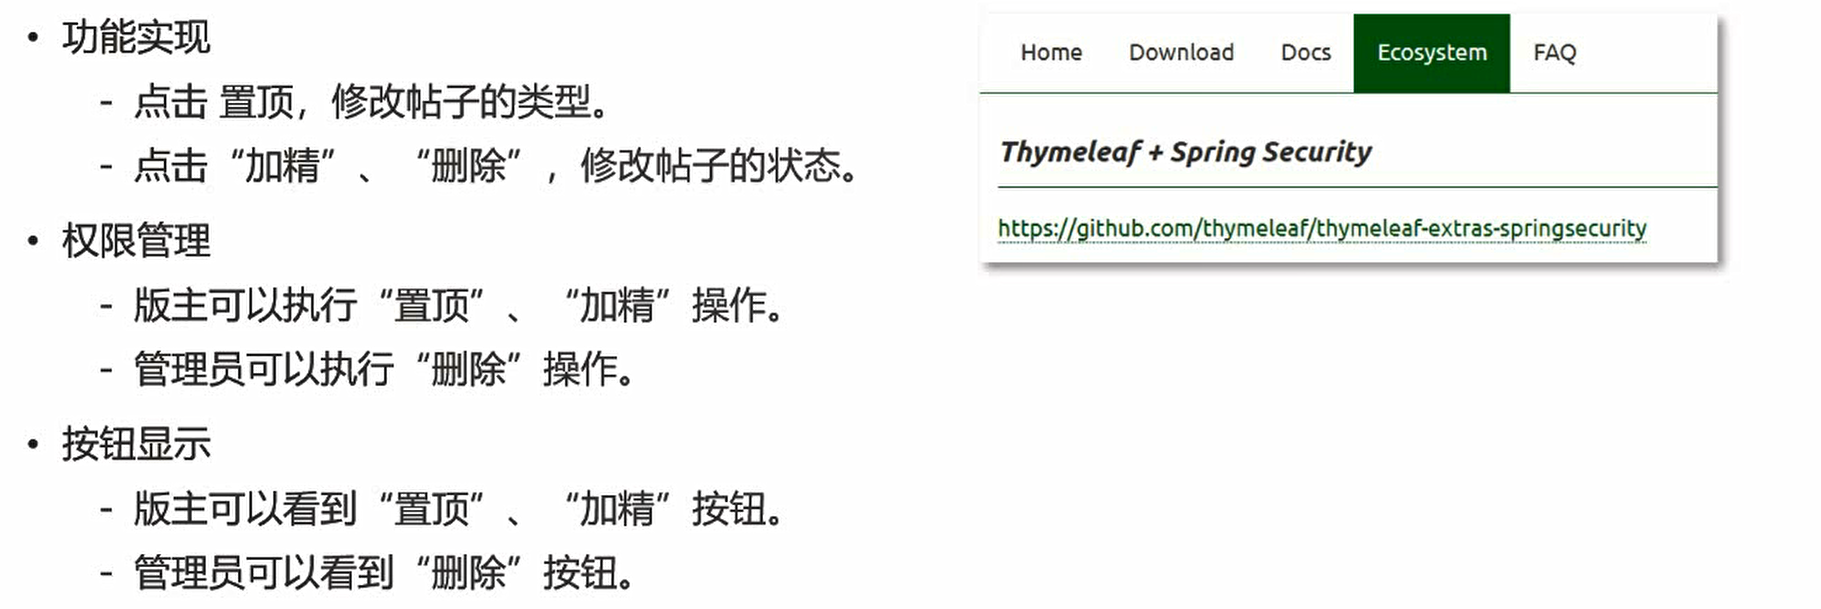
3.1 功能实现
引入依赖
<!-- https://mvnrepository.com/artifact/org.thymeleaf.extras/thymeleaf-extras-springsecurity5 -->
<dependency>
    <groupId>org.thymeleaf.extras</groupId>
    <artifactId>thymeleaf-extras-springsecurity5</artifactId>
    <version>3.0.4.RELEASE</version>
</dependency>
对应Mapper 和 Service 层的修改直接看完整代码即可!
    /**
     * @Description:帖子置顶操作
     * @Param postId
     **/
    @RequestMapping(path = "/top", method = RequestMethod.GET)
    @ResponseBody
    public String setTop(int postId) {
        discussPostService.updateType(postId, 1);
        //触发发帖事件
        // 帖子帖子后,触发事件:将刚帖子置顶的消息通知订阅的消费者
        // 消费者在消费帖子类型事件时,会将帖子信息 传递到 ES 服务器存储/更新数据
        Event event = new Event()
                .setTopic(TOPIC_PUBLISH)
                .setUserId(hostHolder.getUser().getId())
                .setEntityType(ENTITY_TYPE_POST)
                .setEntityId(postId);
        eventProducer.fireEvent(event);

        return CommunityUtil.getJSONString(0);
    }

    /**
     * @Description:帖子加精操作
     * @Param postId
     **/
    @RequestMapping(path = "/wonderful", method = RequestMethod.GET)
    public String setWonderful(int postId, int status) {
        discussPostService.updateStatus(postId, status);
        Event event = new Event()
                .setTopic(TOPIC_PUBLISH)
                .setUserId(hostHolder.getUser().getId())
                .setEntityType(ENTITY_TYPE_POST)
                .setEntityId(postId);
        eventProducer.fireEvent(event);

        return CommunityUtil.getJSONString(0);
    }

    /**
     * @return
     * @Description: 帖子删除操作
     * @Param postId
     **/
    @RequestMapping(path = "/delete", method = RequestMethod.POST)
    @ResponseBody
    public String setDelete(int postId) {
        discussPostService.updateStatus(postId, 2);
        // 触发删帖事件
        // 删除帖子后,触发事件:将刚删除帖子的消息通知订阅的消费者
        // 消费者在消费帖子类型事件时,会将帖子信息 传递到 ES 服务器存储/更新数据
        Event event = new Event()
                .setTopic(TOPIC_DELETE)// 主题: 删帖
                .setUserId(hostHolder.getUser().getId())// 登录用户id
                .setEntityType(ENTITY_TYPE_POST)// 实体类型: 帖子
                .setEntityId(postId);// 实体id
        eventProducer.fireEvent(event);
        return CommunityUtil.getJSONString(0);
    }
前端写好js (discuss.js)
$(function(){
    $("#topBtn").click(setTop);
    $("#wonderfulBtn").click(setWonderful);
    $("#deleteBtn").click(setDelete);
});


// 置顶
function setTop() {
    $.post(
        CONTEXT_PATH + "/discuss/top",
        {"id":$("#postId").val()},
        function(data) {
            data = $.parseJSON(data);
            if(data.code == 0) {
                $("#topBtn").attr("disabled", "disabled");
            } else {
                alert(data.msg);
            }
        }
    );
}

// 加精
function setWonderful() {
    $.post(
        CONTEXT_PATH + "/discuss/wonderful",
        {"id":$("#postId").val()},
        function(data) {
            data = $.parseJSON(data);
            if(data.code == 0) {
                $("#wonderfulBtn").attr("disabled", "disabled");
            } else {
                alert(data.msg);
            }
        }
    );
}

// 删除
function setDelete() {
    $.post(
        CONTEXT_PATH + "/discuss/delete",
        {"id":$("#postId").val()},
        function(data) {
            data = $.parseJSON(data);
            if(data.code == 0) {
                location.href = CONTEXT_PATH + "/index";
            } else {
                alert(data.msg);
            }
        }
    );
}
前端页面修改
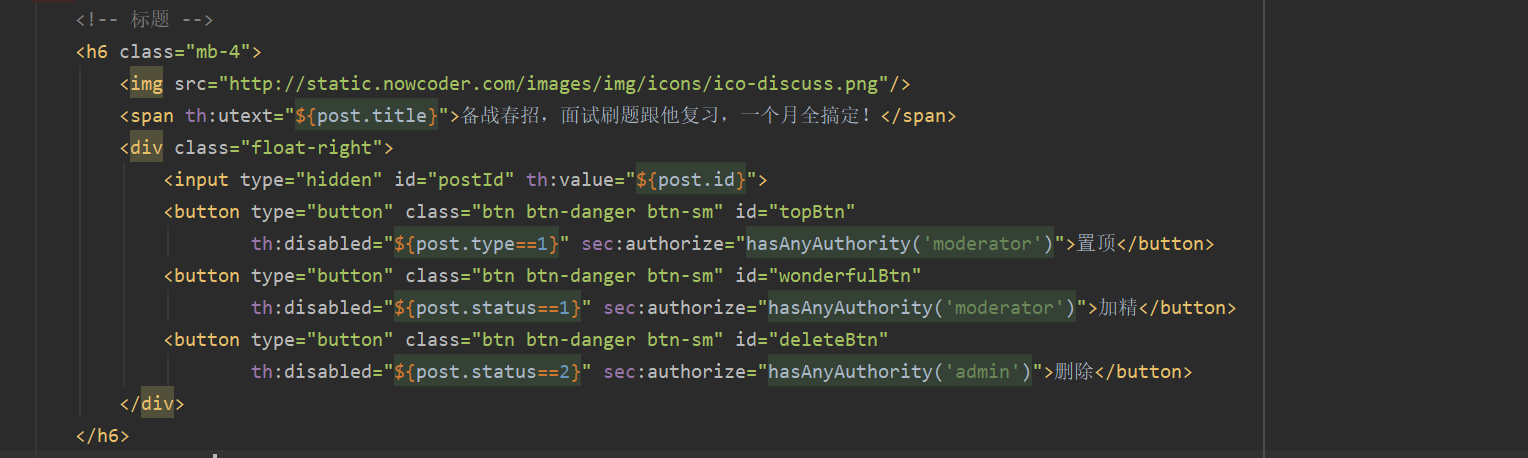
3.2 权限管理
// 授权
http.authorizeRequests()
    .antMatchers(
    "/user/setting",
    "/user/upload",
    "/discuss/add",
    "/comment/add/**",
    "/letter/**",
    "/notice/**",
    "/like",
    "/follow",
    "/unFollow"
)
    .hasAnyAuthority(
    AUTHORITY_USER,
    AUTHORITY_ADMIN,
    AUTHORITY_MODERATOR
)
    .antMatchers(
    "/discuss/top",     //加精置顶
    "/discuss/wonderful"
)
    .hasAnyAuthority(
    AUTHORITY_MODERATOR
)
    .antMatchers(
    "/discuss/delete"  //删除
)
    .hasAnyAuthority(
    AUTHORITY_ADMIN
)
    .anyRequest().permitAll()
    .and().csrf().disable();
3.3 按钮显示
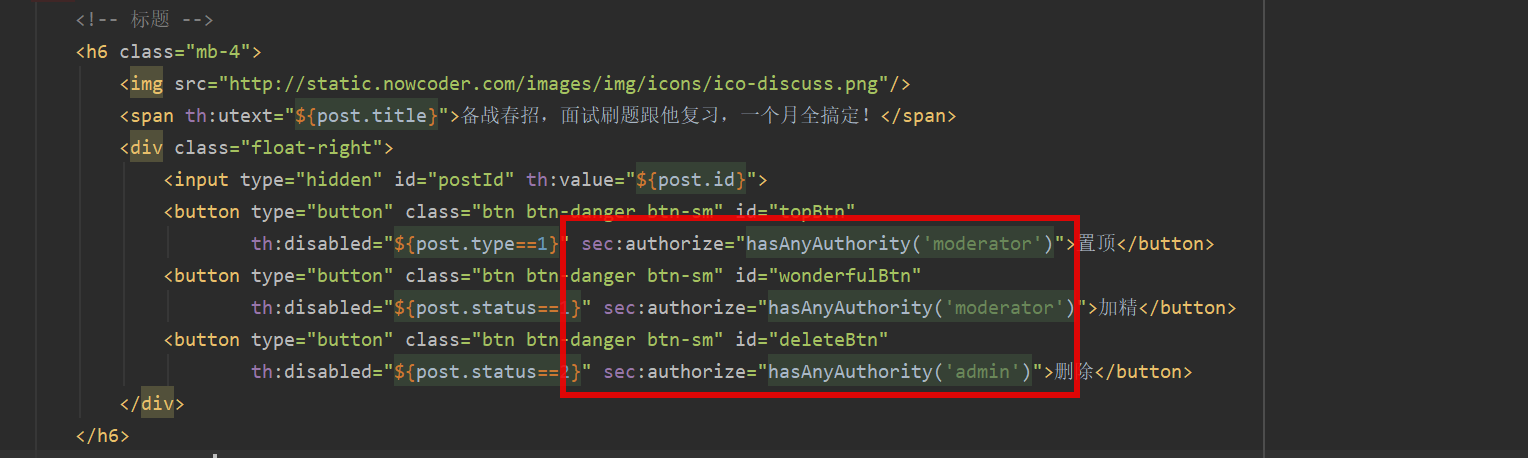
4.Redis高级数据类型

HyperLogLog
在工作当中,我们经常会遇到与统计相关的功能需求,比如统计网站PV(PageView页面访问量),可以使用Redis的incr、incrby轻松实现。
但像UV(UniqueVisitor,独立访客)、独立IP数、搜索记录数等需要去重和计数的问题如何解决?这种求集合中不重复元素个数的问题称为基数问题。
解决基数问题有很多种方案:
(1)数据存储在MySQL表中,使用distinct count计算不重复个数
(2)使用Redis提供的hash、set、bitmaps等数据结构来处理
以上的方案结果精确,但随着数据不断增加,导致占用空间越来越大,对于非常大的数据集是不切实际的。
能否能够降低一定的精度来平衡存储空间?Redis推出了HyperLogLog
Redis HyperLogLog 是用来做基数统计的算法,HyperLogLog 的优点是,在输入元素的数量或者体积非常非常大时,计算基数所需的空间总是固定的、并且是很小的。
在 Redis 里面,每个 HyperLogLog 键只需要花费 12 KB 内存,就可以计算接近 2^64 个不同元素的基数。这和计算基数时,元素越多耗费内存就越多的集合形成鲜明对比。
但是,因为 HyperLogLog 只会根据输入元素来计算基数,而不会储存输入元素本身,所以 HyperLogLog 不能像集合那样,返回输入的各个元素。
什么是基数?
比如数据集 {1, 3, 5, 7, 5, 7, 8}, 那么这个数据集的基数集为 {1, 3, 5 ,7, 8}, 基数(不重复元素)为5。 基数估计就是在误差可接受的范围内,快速计算基数。
使用实例
// 统计20万个重复数据的独立总数.
@Test
public void testHyperLogLog() {
    String redisKey = "test:hll:01";

    for (int i = 1; i <= 100000; i++) {
        redisTemplate.opsForHyperLogLog().add(redisKey, i);
    }

    for (int i = 1; i <= 100000; i++) {
        int r = (int) (Math.random() * 100000 + 1);
        redisTemplate.opsForHyperLogLog().add(redisKey, r);
    }

    long size = redisTemplate.opsForHyperLogLog().size(redisKey);
    System.out.println(size);
}

// 将3组数据合并, 再统计合并后的重复数据的独立总数.
@Test
public void testHyperLogLogUnion() {
    String redisKey2 = "test:hll:02";
    for (int i = 1; i <= 10000; i++) {
        redisTemplate.opsForHyperLogLog().add(redisKey2, i);
    }

    String redisKey3 = "test:hll:03";
    for (int i = 5001; i <= 15000; i++) {
        redisTemplate.opsForHyperLogLog().add(redisKey3, i);
    }

    String redisKey4 = "test:hll:04";
    for (int i = 10001; i <= 20000; i++) {
        redisTemplate.opsForHyperLogLog().add(redisKey4, i);
    }

    String unionKey = "test:hll:union";
    redisTemplate.opsForHyperLogLog().union(unionKey, redisKey2, redisKey3, redisKey4);

    long size = redisTemplate.opsForHyperLogLog().size(unionKey);
    System.out.println(size);
}
Bitmap
合理地使用操作位能够有效地提高内存使用率和开发效率。
Redis提供了Bitmaps这个“数据类型”可以实现对位的操作:
(1) Bitmaps本身不是一种数据类型, 实际上它就是字符串(key-value) , 但是它可以对字符串的位进行操作。
(2) Bitmaps单独提供了一套命令, 所以在Redis中使用Bitmaps和使用字符串的方法不太相同。 可以把Bitmaps想象成一个以位为单位的数组, 数组的每个单元只能存储0和1, 数组的下标在Bitmaps中叫做偏移量。
// 统计一组数据的布尔值
@Test
public void testBitMap() {
    String redisKey = "test:bm:01";

    // 记录
    redisTemplate.opsForValue().setBit(redisKey, 1, true);
    redisTemplate.opsForValue().setBit(redisKey, 4, true);
    redisTemplate.opsForValue().setBit(redisKey, 7, true);

    // 查询
    System.out.println(redisTemplate.opsForValue().getBit(redisKey, 0));
    System.out.println(redisTemplate.opsForValue().getBit(redisKey, 1));
    System.out.println(redisTemplate.opsForValue().getBit(redisKey, 2));

    // 统计
    Object obj = redisTemplate.execute(new RedisCallback() {
        @Override
        public Object doInRedis(RedisConnection connection) throws DataAccessException {
            return connection.bitCount(redisKey.getBytes());
        }
    });

    System.out.println(obj);
}

// 统计3组数据的布尔值, 并对这3组数据做OR运算.
@Test
public void testBitMapOperation() {
    String redisKey2 = "test:bm:02";
    redisTemplate.opsForValue().setBit(redisKey2, 0, true);
    redisTemplate.opsForValue().setBit(redisKey2, 1, true);
    redisTemplate.opsForValue().setBit(redisKey2, 2, true);

    String redisKey3 = "test:bm:03";
    redisTemplate.opsForValue().setBit(redisKey3, 2, true);
    redisTemplate.opsForValue().setBit(redisKey3, 3, true);
    redisTemplate.opsForValue().setBit(redisKey3, 4, true);

    String redisKey4 = "test:bm:04";
    redisTemplate.opsForValue().setBit(redisKey4, 4, true);
    redisTemplate.opsForValue().setBit(redisKey4, 5, true);
    redisTemplate.opsForValue().setBit(redisKey4, 6, true);

    String redisKey = "test:bm:or";
    Object obj = redisTemplate.execute(new RedisCallback() {
        @Override
        public Object doInRedis(RedisConnection connection) throws DataAccessException {
            connection.bitOp(RedisStringCommands.BitOperation.OR,
                             redisKey.getBytes(), redisKey2.getBytes(), redisKey3.getBytes(), redisKey4.getBytes());
            return connection.bitCount(redisKey.getBytes());
        }
    });

    System.out.println(obj);

    System.out.println(redisTemplate.opsForValue().getBit(redisKey, 0));
    System.out.println(redisTemplate.opsForValue().getBit(redisKey, 1));
    System.out.println(redisTemplate.opsForValue().getBit(redisKey, 2));
    System.out.println(redisTemplate.opsForValue().getBit(redisKey, 3));
    System.out.println(redisTemplate.opsForValue().getBit(redisKey, 4));
    System.out.println(redisTemplate.opsForValue().getBit(redisKey, 5));
    System.out.println(redisTemplate.opsForValue().getBit(redisKey, 6));
}
5.网站数据统计
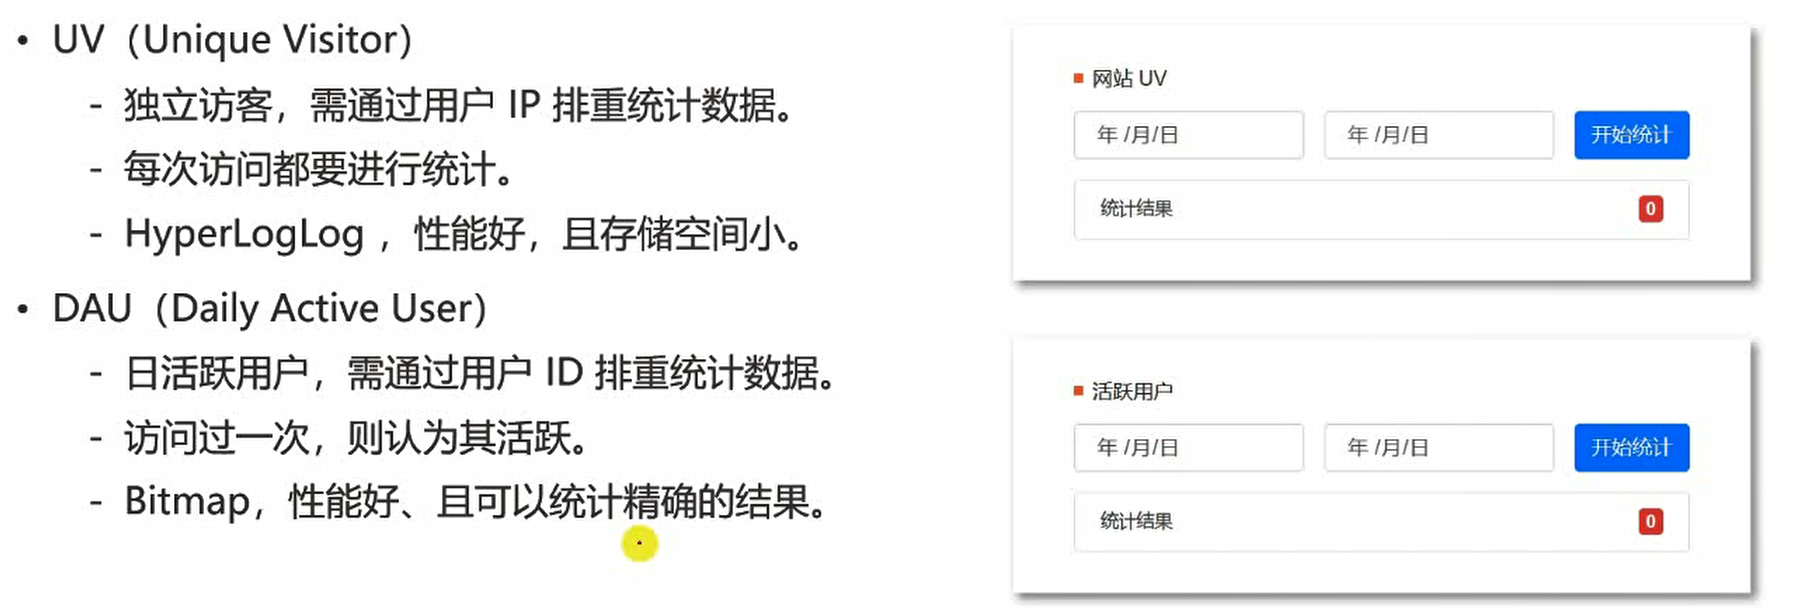
- UV是没登陆的用户也可以,通过ip统计数据,不一定要精确的结果
- DAU是必须是登录的用户(比如一天内登录一次的用户就算活跃用户),是需要精确的结果
5.1RedisKeyUtil 中添加行营的key 和方法
private static final String PREFIX_UV = "uv";// 独立访客(通过用户IP地址排重统计)
private static final String PREFIX_DAU = "dau";// 日活跃用户(通过ID排重统计)

/**
 * 获取单日UV集合(HyperLogLog)的key
 * @param date
 * @return
 */
public static String getUVKey(String date) {
    return PREFIX_UV + SPLIT + date;
}

/**
 * 获取区间UV(两个日期之间统计的UV)集合(HyperLogLog)的key
 * @param startDate
 * @param endDate
 * @return
 */
public static String getUVKey(String startDate, String endDate) {
    return PREFIX_UV + SPLIT + startDate + SPLIT + endDate;
}

/**
 * 获取单日活跃用户集合(Bitmap)的key
 * @param date
 * @return
 */
public static String getDAUKey(String date) {
    return PREFIX_DAU + SPLIT + date;
}

/**
 * 获取区间活跃用户(两个日期之间统计的活跃用户)集合(Bitmap)的key
 * @param startDate
 * @param endDate
 * @return
 */
public static String getDAUKey(String startDate, String endDate) {
    return PREFIX_DAU + SPLIT + startDate + SPLIT + endDate;
}
5.2 DataService
redis直接写业务层
/**
 * @Author: 卡卡罗特
 * @Description:
 */
public class DataService {

    @Autowired
    private RedisTemplate redisTemplate;

    private SimpleDateFormat simpleDateFormat = new SimpleDateFormat("yyyyMMdd");

    /**
    * @Description: 将指定的ip计入UV
    * @Param ip
    * @return:
    **/
    public void recordUV(String ip){
        //获取单日UV集合(hyperLogLog)的key
        String redisKey = RedisKeyUtil.getUVKey(simpleDateFormat.format(new Date()));
        //将数据记录到指定的redis的hyperLogLog中
        redisTemplate.opsForHyperLogLog().add(redisKey,ip);
    }

    /**
     * 统计指定日期时间段范围内的UV
     *
     * @param start
     * @param end
     * @return
     */
    public long calculateUV(Date start, Date end) {
        if (start == null || end == null) {
            throw new IllegalArgumentException("参数不能为空!");
        }

        // keyList 用于整理该日期范围内的key
        List<String> keyList = new ArrayList<>();
        // Calendar 用于对日期进行运算
        Calendar calendar = Calendar.getInstance();
        calendar.setTime(start);
        // !calendar.getTime().after(end) 当前时间的不晚于 end的时间时,进行while循环
        while (!calendar.getTime().after(end)) {
            // 获取单日UV集合(HyperLogLog)的key
            String key = RedisKeyUtil.getUVKey(simpleDateFormat.format(calendar.getTime()));
            // 将key 存入集合
            keyList.add(key);
            // 日期时间向后推一天
            calendar.add(Calendar.DATE, 1);
        }

        // 获取区间UV(两个日期之间统计的UV)集合(HyperLogLog)的key
        String redisKey = RedisKeyUtil.getUVKey(simpleDateFormat.format(start), simpleDateFormat.format(end));
        // 合并redisKey对应的HyperLogLog集合和keyList集合
        redisTemplate.opsForHyperLogLog().union(redisKey, keyList.toArray());

        // 返回HyperLogLog中统计的数量
        return redisTemplate.opsForHyperLogLog().size(redisKey);
    }

    /**
     * 将指定用户计入DAU
     *
     * @param userId
     */
    public void recordDAU(int userId) {
        // 获取单日活跃用户集合(Bitmap)的key
        String redisKey = RedisKeyUtil.getDAUKey(simpleDateFormat.format(new Date()));
        // 将数据记录到指定redisKey的Bitmap中,第三个参数表示是否活跃,true表示活跃
        redisTemplate.opsForValue().setBit(redisKey, userId, true);
    }

    public long calculateDAU(Date start, Date end){
        if(start==null || end==null){
            throw new IllegalArgumentException("参数不能为空!");
        }

        // keyList 用于整理该日期范围内的key
        List<byte[]> keyList = new ArrayList<>();
        Calendar calendar = Calendar.getInstance();
        calendar.setTime(start);
        // !calendar.getTime().after(end) 当前时间的不晚于 end的时间时,进行while循环
        while(!calendar.getTime().after(end)){
            //获取单日用户集合(Bigmap)的key
            String redisKey = RedisKeyUtil.getDAUKey(simpleDateFormat.format(calendar.getTime()));
            // 将key 存入集合(参数为key的byte数组)
            keyList.add(redisKey.getBytes());
            //日期向后推一天
            calendar.add(Calendar.DATE,1);
        }

        // 进行OR运算
        return (long) redisTemplate.execute(new RedisCallback() {
            @Override
            public Object doInRedis(RedisConnection connection) throws DataAccessException {
                String redisKey = RedisKeyUtil.getDAUKey(simpleDateFormat.format(start),
                        simpleDateFormat.format(end));
                connection.bitOp(RedisStringCommands.BitOperation.OR,
                        redisKey.getBytes(), keyList.toArray(new byte[0][0]));
                return connection.bitCount(redisKey.getBytes());
            }
        });
    }

}
5.3 使用拦截器来做访客统计
拦截器写好后,将其注册的 WebMvcConfig 中去!
/**
 * @Author: 卡卡罗特
 * @Description:访客统计
 */
@Component
public class DataInterceptor implements HandlerInterceptor {

    @Autowired
    private HostHolder hostHolder;

    @Autowired
    private DataService dataService;

    @Override
    public boolean preHandle(HttpServletRequest request, HttpServletResponse response, Object handler) throws Exception {

        //统计UV
        // 获得访客的IP
        String ip = request.getRemoteHost();
        // 将指定的IP计入UV
        dataService.recordUV(ip);

        // 统计DAU(日活跃用户)
        // 获取登录用户对象
        User user = hostHolder.getUser();
        if (user != null) {
            // 将指定用户计入DAU
            dataService.recordDAU(user.getId());
        }

        return true;
    }
}
5.4 显示统计数据

public class DataController {

    @Autowired
    private DataService dataService;

    //统计页面
    @RequestMapping(path = "/data", method = {RequestMethod.GET, RequestMethod.POST})
    public String getDataPage() {
        return "/site/admin/data";
    }

    //统计网站UV
    @RequestMapping(path = "/data/uv",method = RequestMethod.POST)
    public String getUV(@DateTimeFormat(pattern = "yyyy-MM-dd") Date start,
                        @DateTimeFormat(pattern = "yyyy-MM-dd") Date end, Model model){
        long uv = dataService.calculateUV(start, end);
        model.addAttribute("uvResult", uv);
        model.addAttribute("uvStartDate", start);
        model.addAttribute("uvEndDate", end);
        return "forward:/data";  //请求转发
        //return "/site/admin/data";
    }

    // 统计活跃用户
    @RequestMapping(path = "/data/dau", method = RequestMethod.POST)
    public String getDAU(@DateTimeFormat(pattern = "yyyy-MM-dd") Date start,
                         @DateTimeFormat(pattern = "yyyy-MM-dd") Date end, Model model) {
        long dau = dataService.calculateDAU(start, end);
        model.addAttribute("dauResult", dau);
        model.addAttribute("dauStartDate", start);
        model.addAttribute("dauEndDate", end);
        return "forward:/data";
        //return "/site/admin/data";
    }

}
5.5 设置权限
SercurityConfig.java
.antMatchers(
    "/discuss/delete",
    "/data/**"   //后台数据
)
    .hasAnyAuthority(
    AUTHORITY_ADMIN
)
5.6 修改data.html页面显示
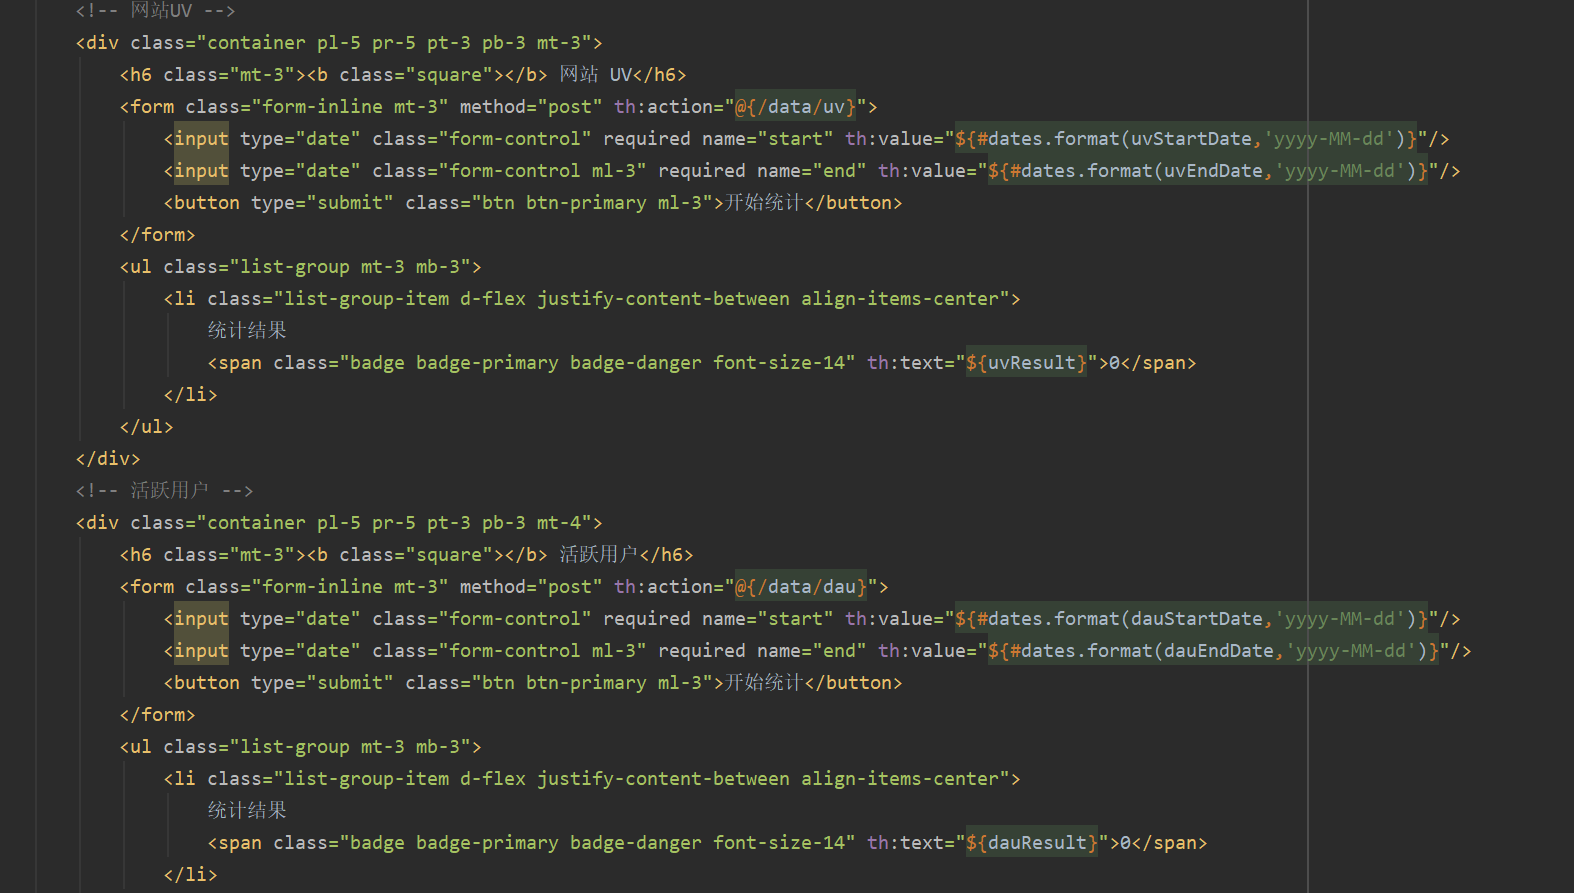
6.任务执行和调度
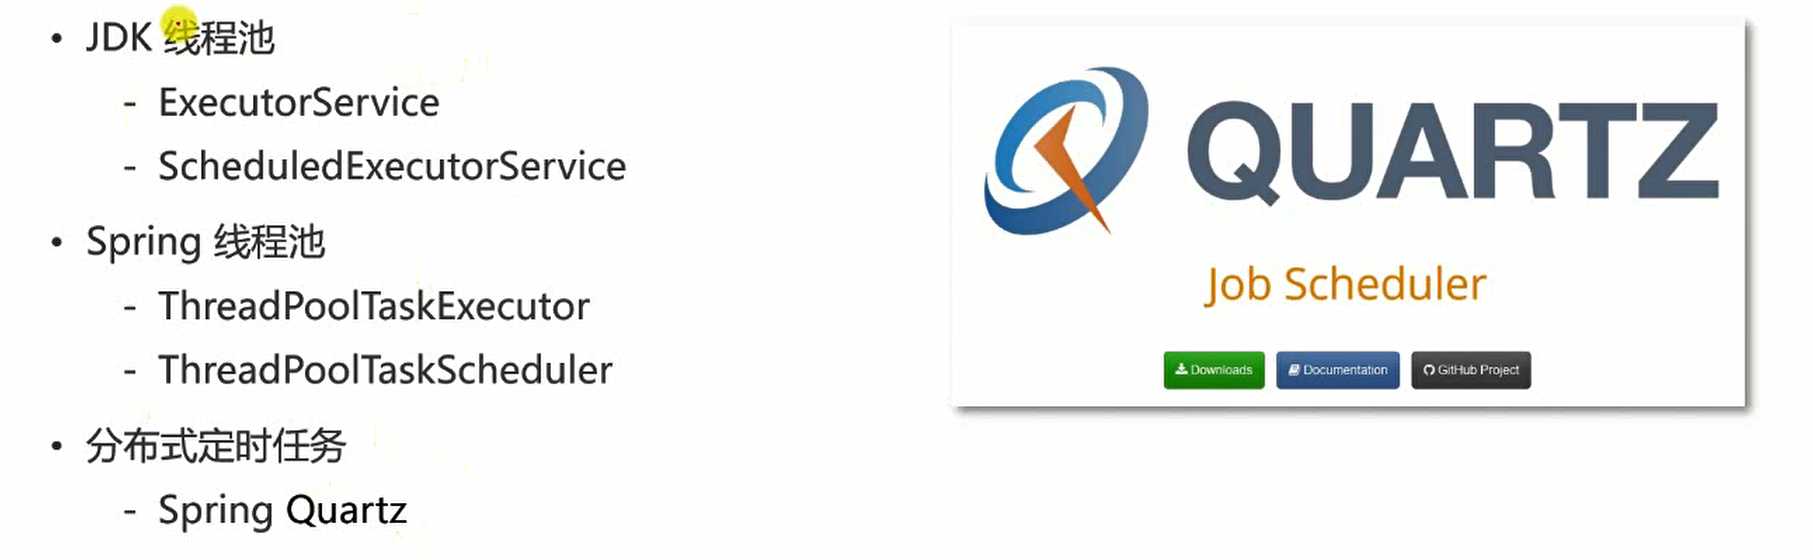
Quartz可以解决分布式共享问题,Quartz依赖数据库,程序启动以后,quartz就会读取配置信息并且把读到的配置信息自动存储到数据库的固定的表里,以后某个服务器就去读取那个表来执行任务,在某个服务器读取d到数据库的配置信息并执行任务的时候,其他服务器并不会取执行,因此就可以解决spring线程池和JDK线程池会多台服务器重复运行的问题。
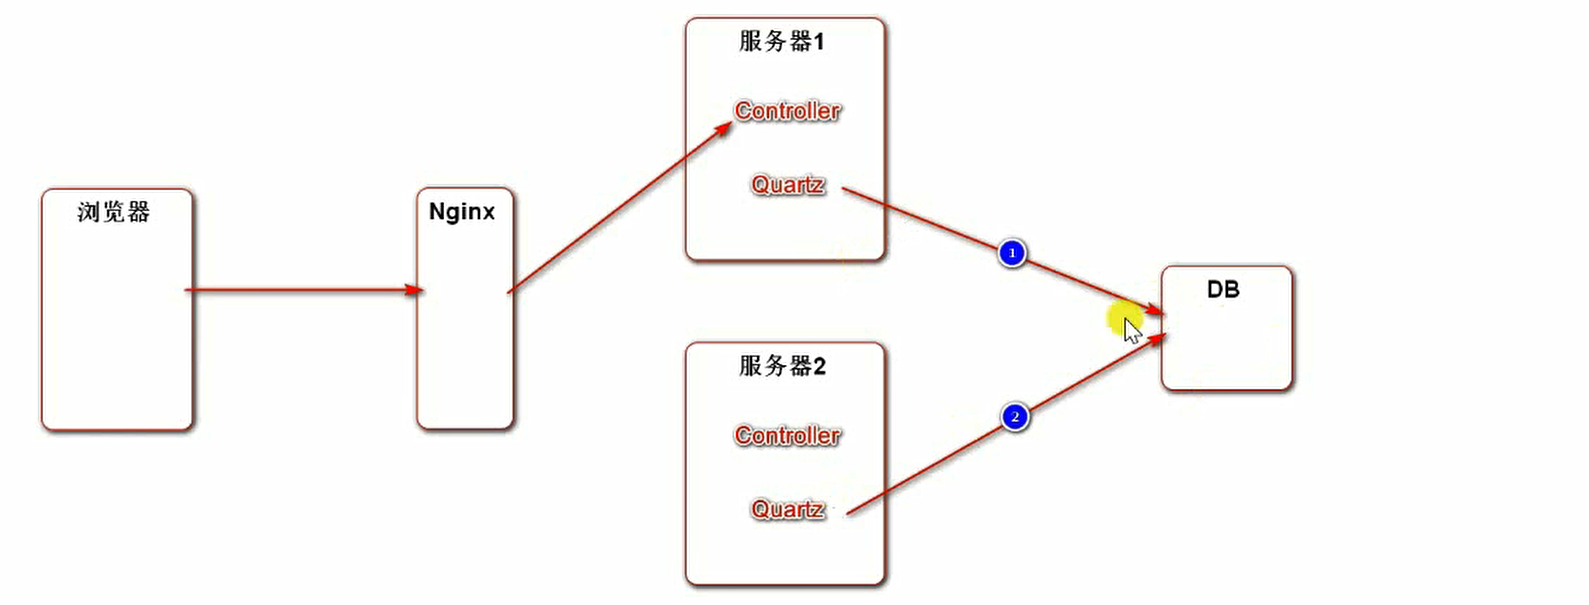
6.1数据库sql
导入

6.2 application.properties 中配置 quartz
# QuartzProperties
spring.quartz.job-store-type=jdbc
spring.quartz.scheduler-name=communityScheduler
spring.quartz.properties.org.quartz.scheduler.instanceId=AUTO  //调度器id自动生成
spring.quartz.properties.org.quartz.jobStore.class=org.quartz.impl.jdbcjobstore.JobStoreTX
spring.quartz.properties.org.quartz.jobStore.driverDelegateClass=org.quartz.impl.jdbcjobstore.StdJDBCDelegate
spring.quartz.properties.org.quartz.jobStore.isClustered=true
spring.quartz.properties.org.quartz.threadPool.class=org.quartz.simpl.SimpleThreadPool
spring.quartz.properties.org.quartz.threadPool.threadCount=5
6.3 定义任务类
public class AlphaJob implements Job {
    @Override
    public void execute(JobExecutionContext context) throws JobExecutionException {
        System.out.println(Thread.currentThread().getName() + ": execute a quartz job.");
    }
}
6.4 QuartzConfig 配置类
/**
 * @Description: quartz 分布式定时任务调度相关配置类
 * <p>
 * 作用:
 * 1. -> 仅仅当第一次访问时读取该配置
 * 2. -> 并将该配置封装的信息初始化到数据库数据库
 * 3. -> 以后每次quartz是访问数据去调用,而不再访问该配置类!
 */
// 配置 -> 数据库 -> 调用
@Configuration
public class QuartzConfig {

    // FactoryBean可简化Bean的实例化过程:
    // 1.通过FactoryBean封装Bean的实例化过程.
    // 2.将FactoryBean装配到Spring容器里.
    // 3.将FactoryBean注入给其他的Bean.
    // 4.该Bean得到的是FactoryBean所管理的对象实例.

    // 配置JobDetail
    // @Bean
    public JobDetailFactoryBean alphaJobDetail() {
        JobDetailFactoryBean factoryBean = new JobDetailFactoryBean();
        factoryBean.setJobClass(AlphaJob.class);
        factoryBean.setName("alphaJob");
        factoryBean.setGroup("alphaJobGroup");
        factoryBean.setDurability(true);
        factoryBean.setRequestsRecovery(true);
        return factoryBean;
    }

    // 配置Trigger(SimpleTriggerFactoryBean, CronTriggerFactoryBean)
    // @Bean
    public SimpleTriggerFactoryBean alphaTrigger(JobDetail alphaJobDetail) {
        SimpleTriggerFactoryBean factoryBean = new SimpleTriggerFactoryBean();
        factoryBean.setJobDetail(alphaJobDetail);
        factoryBean.setName("alphaTrigger");
        factoryBean.setGroup("alphaTriggerGroup");
        factoryBean.setRepeatInterval(3000);
        factoryBean.setJobDataMap(new JobDataMap());
        return factoryBean;
    }

}
7.热帖排行
采用定时任务(利用quartz 线程池实现)的方式对帖子进行热度计算。在用户点赞、评论等操作的时候(这些操作会影响帖子的分数),不去对帖子进行算分,而是把分数变化的帖子先存到缓存里(redis),等定时的时间到了,再把缓存里这些帖子算一下分,这样分数没变化的帖子就不用计算,效率就比较高。
热帖排行算法
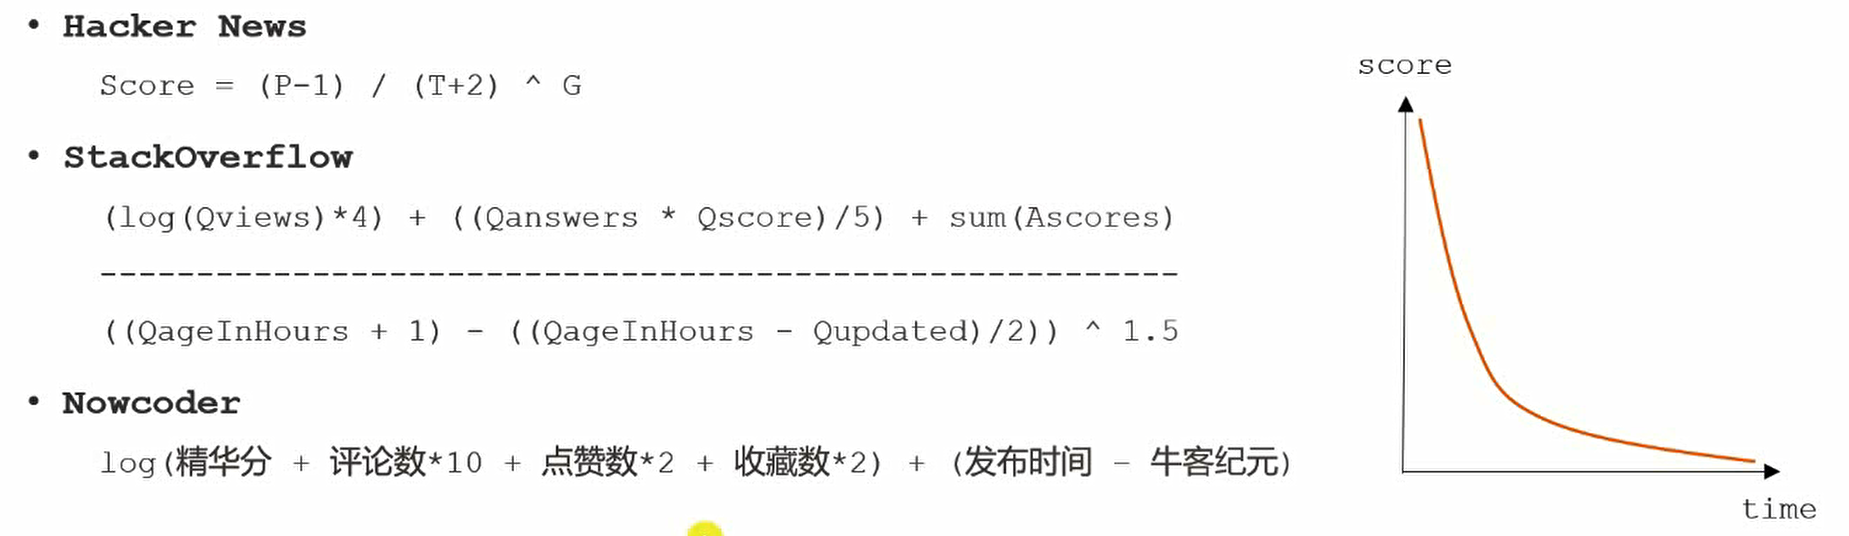
7.1 定义redis的key
    /**
    * @Description: 帖子分数
    * @Param
    * @return:
    **/
    public static String getPostScoreKey() {
        return PREFIX_POST + SPLIT + "score";
    }
7.2 处理影响帖子的操作
DiscussController
发布帖子的时候也要算下分(初始值),置顶的帖子不用计算
/**
  * @Description:帖子加精操作
  * @Param postId
**/
@RequestMapping(path = "/wonderful", method = RequestMethod.POST)
@ResponseBody
public String setWonderful(int postId) {
    discussPostService.updateStatus(postId,1);
    Event event = new Event()
        .setTopic(TOPIC_PUBLISH)
        .setUserId(hostHolder.getUser().getId())
        .setEntityType(ENTITY_TYPE_POST)
        .setEntityId(postId);
    eventProducer.fireEvent(event);

    // 计算帖子分数
    String redisKey = RedisKeyUtil.getPostScoreKey();
    redisTemplate.opsForSet().add(redisKey, postId);

    return CommunityUtil.getJSONString(0);
}
CommentController和LikeController中同样处理
7.3 编写任务类PostScoreRefreshJob
public class PostScoreRefreshJob implements Job, CommunityConstant {

    private static final Logger logger = LoggerFactory.getLogger(PostScoreRefreshJob.class);

    @Autowired
    private RedisTemplate redisTemplate;

    @Autowired
    private DiscussPostService discussPostService;

    @Autowired
    private LikeService likeService;

    @Autowired
    private ElasticsearchService elasticsearchService;

    // 牛客纪元
    private static final Date epoch;

    static {
        try {
            epoch = new SimpleDateFormat("yyyy-MM-dd HH:mm:ss").parse("2014-08-01 00:00:00");
        } catch (ParseException e) {
            throw new RuntimeException("初始化牛客纪元失败!", e);
        }
    }

    @Override
    public void execute(JobExecutionContext context) throws JobExecutionException {
        String redisKey = RedisKeyUtil.getPostScoreKey();
        BoundSetOperations operations = redisTemplate.boundSetOps(redisKey);

        if (operations.size() == 0) {
            logger.info("[任务取消] 没有需要刷新的帖子!");
            return;
        }

        logger.info("[任务开始] 正在刷新帖子分数: " + operations.size());
        while (operations.size() > 0) {
            this.refresh((Integer) operations.pop());
        }
        logger.info("[任务结束] 帖子分数刷新完毕!");
    }

    private void refresh(int postId) {
        DiscussPost post = discussPostService.findDiscussPostById(postId);

        if (post == null) {
            logger.error("该帖子不存在: id = " + postId);
            return;
        }

        // 是否精华
        boolean wonderful = post.getStatus() == 1;
        // 评论数量
        int commentCount = post.getCommentCount();
        // 点赞数量
        long likeCount = likeService.findEntityLikeCount(ENTITY_TYPE_POST, postId);

        // 计算权重
        double w = (wonderful ? 75 : 0) + commentCount * 10 + likeCount * 2;
        // 分数 = 帖子权重 + 距离天数
        double score = Math.log10(Math.max(w, 1))
            + (post.getCreateTime().getTime() - epoch.getTime()) / (1000 * 3600 * 24);
        // 更新帖子分数
        discussPostService.updateScore(postId, score);
        // 同步搜索数据
        post.setScore(score);
        elasticsearchService.saveDiscussPost(post);
    }

}
7.4 配置QuartzConfig配置类
/**
 * @Description: quartz 分布式定时任务调度相关配置类
 * <p>
 * 作用:
 * 1. -> 仅仅当第一次访问时读取该配置
 * 2. -> 并将该配置封装的信息初始化到数据库数据库
 * 3. -> 以后每次quartz是访问数据去调用,而不再访问该配置类!
 */
// 配置 -> 数据库 -> 调用
@Configuration
public class QuartzConfig {

    // FactoryBean可简化Bean的实例化过程:
    // 1.通过FactoryBean封装Bean的实例化过程.
    // 2.将FactoryBean装配到Spring容器里.
    // 3.将FactoryBean注入给其他的Bean.
    // 4.该Bean得到的是FactoryBean所管理的对象实例.

    // 刷新帖子分数任务
    @Bean
    public JobDetailFactoryBean postScoreRefreshJobDetail() {
        JobDetailFactoryBean factoryBean = new JobDetailFactoryBean();
        factoryBean.setJobClass(PostScoreRefreshJob.class);
        factoryBean.setName("postScoreRefreshJob");
        factoryBean.setGroup("communityJobGroup");
        factoryBean.setDurability(true);
        factoryBean.setRequestsRecovery(true);
        return factoryBean;
    }

    @Bean
    public SimpleTriggerFactoryBean postScoreRefreshTrigger(JobDetail postScoreRefreshJobDetail) {
        SimpleTriggerFactoryBean factoryBean = new SimpleTriggerFactoryBean();
        factoryBean.setJobDetail(postScoreRefreshJobDetail);
        factoryBean.setName("postScoreRefreshTrigger");
        factoryBean.setGroup("communityTriggerGroup");
        factoryBean.setRepeatInterval(1000 * 60 * 5);//5分钟计算一次
        factoryBean.setJobDataMap(new JobDataMap());
        return factoryBean;
    }
}
7.5 热帖显示
加一个参数orderMode,用来帖子查询复用,orderMode为0则按最新排序,为1则按最热(分数)排序。
@RequestMapping(path = "/index",method = RequestMethod.GET)
public String getIndexPage(Model model, Page page,
                           @RequestParam(name = "orderMode", defaultValue = "0") int orderMode){
    //方法调用前,SpringMVC会自动实例化Model和Page,并且将page注入Model
    //所以,在thymeleaf中可以直接访问page对象中的数据
    page.setRows(discussPostService.findDiscussPostRows(0));
    page.setPath("/index?orderMode=" + orderMode);
    List<DiscussPost> list=discussPostService.findDiscussPosts(0, page.getOffset(), page.getLimit(),orderMode);
    List<Map<String,Object>> discussPosts=new ArrayList<>();
    if(list!=null){
        for(DiscussPost post:list){
            Map<String,Object> map=new HashMap<>();
            map.put("post", post);
            User user=userService.findUserById(post.getUserId());
            map.put("user", user);

            long likeCount = likeService.findEntityLikeCount(ENTITY_TYPE_POST, post.getId());
            map.put("likeCount", likeCount);

            discussPosts.add(map);
        }
    }
    model.addAttribute("discussPosts", discussPosts);
    model.addAttribute("orderMode", orderMode);

    return "/index";
}
8.生成长图
8.1 SpringBoot 整合wkhtmltopdf
# wk 工具相关配置
# wk 工具的路径(生成图片)
wk.image.command=D:/software/wkhtml/wkhtmltopdf/bin/wkhtmltoimage
# wk 工具的路径(生成pdf)
wk.pdf.command=D:/software/wkhtml/wkhtmltopdf/bin/wkhtmltopdf
# 生成的图片文件存储路径
wk.image.storage=D:/software/wkhtml/wk-images/
# 生成的pdf文件存储路径
wk.pdf.storage=D:/software/wkhtml/wk-pdfs/
8.2 WkConfig 配置类
创建图片存放目录
@Configuration
public class WkConfig {

    private static final Logger logger = LoggerFactory.getLogger(WkConfig.class);

    @Value("${wk.image.storage}")
    private String wkImageStorage;


    /**
     * 该注解修饰的方法会自动执行,
     * 执行顺序:Constructor(构造方法) —> @Autowired(依赖注入) —> @PostConstruct(注释的方法)
     */
    @PostConstruct
    public void init() {
        // 创建WK图片目录
        File file = new File(wkImageStorage);
        if (!file.exists()) {
            file.mkdir();
            logger.info("创建WK图片目录: " + wkImageStorage);
        }
    }
}
8.3 ShareController
/**
 * @Author: 卡卡罗特
 * @Description:图片生成并分享
 */
public class ShareController implements CommunityConstant {
    private static final Logger logger = LoggerFactory.getLogger(ShareController.class);

    @Autowired
    private EventProducer eventProducer;

    @Value("${community.path.domain}")
    private String domain;

    @Value("${server.servlet.context-path}")
    private String contextPath;

    @Value("${wk.image.storage}")
    private String wkImageStorage;

    @RequestMapping(path = "/share", method = RequestMethod.GET)
    @ResponseBody
    public String share(String htmlUrl) {
        // 文件名
        String fileName = CommunityUtil.generateUUID();

        // 异步生成长图
        Event event = new Event()
            .setTopic(TOPIC_SHARE)
            .setData("htmlUrl", htmlUrl)
            .setData("fileName", fileName)
            .setData("suffix", ".png");
        eventProducer.fireEvent(event);

        // 返回访问路径
        Map<String, Object> map = new HashMap<>();
        map.put("shareUrl", domain + contextPath + "/share/image/" + fileName);

        return CommunityUtil.getJSONString(0, null, map);
    }

    /**
     * 获取长图
     * @param fileName
     * @param response
     */
    @RequestMapping(path = "/share/image/{fileName}", method = RequestMethod.GET)
    public void getShareImage(@PathVariable("fileName") String fileName, HttpServletResponse response) {
        if (StringUtils.isBlank(fileName)) {
            throw new IllegalArgumentException("文件名不能为空!");
        }

        response.setContentType("image/png");
        File file = new File(wkImageStorage + "/" + fileName + ".png");
        try {
            OutputStream os = response.getOutputStream();
            FileInputStream fis = new FileInputStream(file);
            byte[] buffer = new byte[1024];
            int b = 0;
            while ((b = fis.read(buffer)) != -1) {
                os.write(buffer, 0, b);
            }
        } catch (IOException e) {
            logger.error("获取长图失败: " + e.getMessage());
        }
    }

}
8.4 在Kafka 事件消费者消费生成图片事件
// wk 工具的路径(生成图片)
@Value("${wk.image.command}")
private String wkImageCommand;
// 图片存储位置
@Value("${wk.image.storage}")
private String wkImageStorage;

/**
 * 消费图片分享事件
 *
 * @param record
 */
@KafkaListener(topics = TOPIC_SHARE)
public void handleShareMessage(ConsumerRecord record) {
    if (record == null || record.value() == null) {
        logger.error("消息的内容为空!");
        return;
    }
    Event event = JSONObject.parseObject(record.value().toString(), Event.class);
    if (event == null) {
        logger.error("消息格式错误!");
        return;
    }
    String htmlUrl = (String) event.getData().get("htmlUrl");
    String fileName = (String) event.getData().get("fileName");
    String suffix = (String) event.getData().get("suffix");
    // cmd 命令
    String cmd = wkImageCommand + " --quality 75 "
            + htmlUrl + " " + wkImageStorage + "/" + fileName + suffix;
    try {
        // 操作系统执行cmd 命令
        Runtime.getRuntime().exec(cmd);
        logger.info("生成长图成功: " + cmd);
    } catch (IOException e) {
        logger.error("生成长图失败: " + e.getMessage());
    }
}
9.将文件上传到阿里云OSS
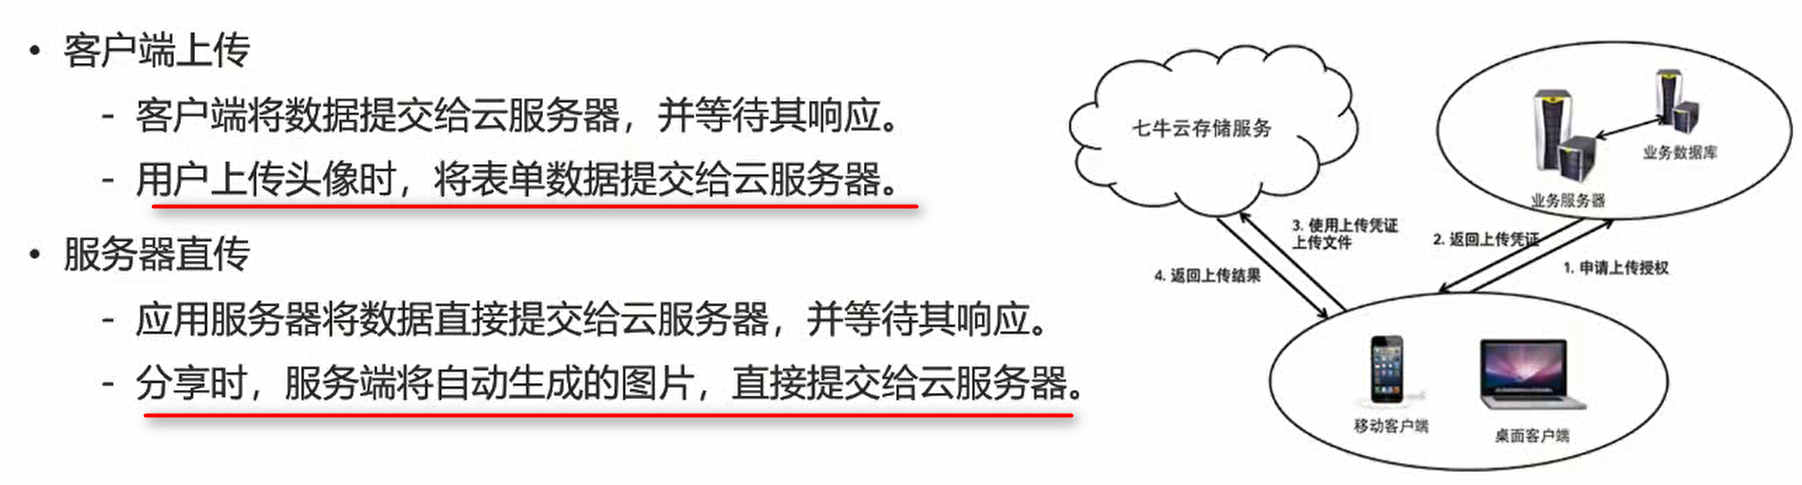
项目使用阿里云OSS来存储

9.1 客服端上传
9.1.1 导入依赖
<!--
  个人版本踩坑:
  不加这个依赖的话,当在配置类中
  使用@ConfigurationProperties(prefix = "aliyun")注解时,
  我这个版本的spring boot会提示有问题
  -->
<dependency>
    <groupId>org.springframework.boot</groupId>
    <artifactId>spring-boot-configuration-processor</artifactId>
    <optional>true</optional>
</dependency>
<!-- aliyun-oos -->
<dependency>
    <groupId>com.aliyun.oss</groupId>
    <artifactId>aliyun-sdk-oss</artifactId>
    <version>2.8.3</version>
</dependency>
application-aliyun-oss.properties配置
# aliyun  以下按照自己的信息填写
# 地域节点
aliyun.endPoint=
# accessKey Id
aliyun.accessKeyId=
# accessKey Secret
aliyun.accessKeySecret=
#存放生成头像的bucket
aliyun.bucketName=
#bucket的域名
aliyun.bucketUrl=
# 存放在OSS的文件夹
aliyun.fileHost=image
9.1.2 编写阿里云配置类
/**
 * @Auther: 卡卡罗特
 * @Description: 阿里云 OSS 基本配置
 */
@Configuration // 声明配置类,放入Spring容器
// 指定配置文件位置
@PropertySource(value = {"classpath:application-aliyun-oss.properties"})
// 指定配置文件中自定义属性前缀
@ConfigurationProperties(prefix = "aliyun")
@Data// lombok
@Accessors(chain = true)// 开启链式调用
public class AliyunOssConfig {

    /**
     * 地域节点
     */
    private String endPoint;
    private String accessKeyId;
    private String accessKeySecret;

    /**
     * OSS的Bucket名称
     */
    private String bucketName;

    /**
     * Bucket 域名
     */
    private String bucketUrl;

    /**
     * 目标文件夹
     */
    private String fileHost;

    /**
     * 将OSS 客户端交给Spring容器托管
     *
     * @return
     */
    @Bean
    public OSS OSSClient() {
        return new OSSClient(endPoint, accessKeyId, accessKeySecret);
    }
}
9.1.3 service层
在service使用ossClient操作阿里云OSS,进行上传、下载、删除、查看所有文件等操作,同时可以将图片的url进行入库操作。
/**
 * @Description: 文件上传Service
 */
@Service("fileUploadService")
public class FileUploadService {


    private static final Logger logger = LoggerFactory.getLogger(FileUploadService.class);

    @Autowired
    private OSS ossClient;// 注入阿里云oss文件服务器客户端
    @Autowired
    private AliyunOssConfig aliyunOssConfig;// 注入阿里云OSS基本配置类

    /**
     * 图片上传
     * 注:阿里云OSS文件上传官方文档链接:https://help.aliyun.com/document_detail/84781.html?spm=a2c4g.11186623.6.749.11987a7dRYVSzn
     *
     * @param: uploadFile
     * @return: string
     */
    public String upload(MultipartFile headerImage) {

        /**
        * @Description:获取阿里云配置信息
        **/
        // 获取oss的Bucket名称
        String bucketName = aliyunOssConfig.getBucketName();
        // 获取oss的地域节点
        String endpoint = aliyunOssConfig.getEndPoint();
        // 获取oss的AccessKeySecret
        String accessKeySecret = aliyunOssConfig.getAccessKeySecret();
        // 获取oss的AccessKeyId
        String accessKeyId = aliyunOssConfig.getAccessKeyId();
        // 获取oss目标文件夹
        String fileHost = aliyunOssConfig.getFileHost();

        /**
        * @Description: 生成阿里云图片存储路径
        **/
        // 获取文件原名称
        String originalFilename = headerImage.getOriginalFilename();
        // 获取文件类型
        String fileType = originalFilename.substring(originalFilename.lastIndexOf("."));
        // 新文件名称(生成随机文件名)
        String newFileName = CommunityUtil.generateUUID() + fileType;
        // 构建日期路径, 例如:OSS目标文件夹/2020/10/31/文件名
        String fileTime = new SimpleDateFormat("yyyy/MM/dd").format(new Date());
        // 文件上传的路径地址
        String uploadImageUrl = fileHost + "/" + fileTime + "/" + newFileName;

        // 获取文件输入流
        InputStream inputStream = null;
        try {
            inputStream = headerImage.getInputStream();
        } catch (IOException e) {
            e.printStackTrace();
        }
        /**
         * 下面两行代码是重点坑:
         * 现在阿里云OSS 默认图片上传ContentType是image/jpeg
         * 也就是说,获取图片链接后,图片是下载链接,而并非在线浏览链接,
         * 因此,这里在上传的时候要解决ContentType的问题,将其改为image/jpg
         */
        ObjectMetadata meta = new ObjectMetadata();
        meta.setContentType("image/jpg");

        //文件上传至阿里云OSS
        ossClient.putObject(bucketName, uploadImageUrl, inputStream, meta);
        /**
         * 注意:在实际项目中,文件上传成功后,数据库中存储文件地址
         */
        // 获取文件上传后的图片返回地址
        String aliyunImageUrl = aliyunOssConfig.getBucketUrl() + "/" + uploadImageUrl;

        return aliyunImageUrl;
    }

}
9.1.4 修改controller层
在userController中。
/**
     * 头像上传操作(基于OSS的头像上传,推荐使用)
     * @param: file
     * @return: com.alibaba.fastjson.JSONObject
     */
@LoginRequired
@RequestMapping(path = "/ossUpload", method = RequestMethod.POST)
public String ossUploadHeader(
    @RequestParam("headerImage") MultipartFile headerImage, Model model) {

    if (headerImage != null) {
        // 校验图片格式
        boolean isLegal = false;
        String fileName = headerImage.getOriginalFilename();
        String suffix = "";
        if(fileName.contains(".")){  //图片是否包含‘ . ’,包含就取图片的后缀名
            suffix = fileName.substring(fileName.lastIndexOf("."));
        }
        for (String type : IMAGE_TYPE) {
            if (StringUtils.endsWithIgnoreCase(suffix, type)) {
                isLegal = true;
                break;
            }
        }
        if (!isLegal) {// 如果图片格式不合法,则直接返回错误信息
            model.addAttribute("error", "文件的格式不正确!");
            return "/site/setting";
        }
        //上传图片到阿里云OSS
        String returnFileUrl = fileUploadService.upload(headerImage);
        //更新数据库头像url
        userService.updateHeader(hostHolder.getUser().getId(),returnFileUrl);

        return "redirect:/index";
    } else { //图片为空
        model.addAttribute("error", "您还没有选择图片!");
        return "/site/setting";
    }
}
9.2 服务端上传
将生成的长图上传至阿里云OSS
9.2.1 获取长图
@RequestMapping(path = "/share", method = RequestMethod.GET)
@ResponseBody
public String share(String htmlUrl) {
    // 文件名
    String fileName = CommunityUtil.generateUUID();
    // 获取oss目标文件夹
    String fileHost = aliyunOssConfig.getShareFileHost();

    // 异步生成长图
    Event event = new Event()
        .setTopic(TOPIC_SHARE)
        .setData("htmlUrl", htmlUrl)
        .setData("fileName", fileName)
        .setData("suffix", ".png");
    eventProducer.fireEvent(event);

    // 返回访问路径
    Map<String, Object> map = new HashMap<>();
    //     map.put("shareUrl", domain + contextPath + "/share/image/" + fileName);
    //存放至阿里云OSS,并将路径返回
    map.put("shareUrl",aliyunOssConfig.getBucketUrl() + "/" + fileHost + "/" + fileName + ".png");

    return CommunityUtil.getJSONString(0, null, map);
}
9.2. 修改消费者事件
这里需要用线程池,因为生成长图是一个比较费时的操作,所以启用定时器,监视该图片,一旦生成成功了,就把该图片上传至OSS。当分布式部署的时候,虽然多个服务器都部署了Consumer,但并不会每个服务器都去消费这个事件,而是监听到了这个事件的服务器才会去消费。(每个消息队列都有的机制)
/**
     * 消费图片分享事件
     *
     * @param record
     */
@KafkaListener(topics = TOPIC_SHARE)
public void handleShareMessage(ConsumerRecord record) {
    if (record == null || record.value() == null) {
        logger.error("消息的内容为空!");
        return;
    }
    Event event = JSONObject.parseObject(record.value().toString(), Event.class);
    if (event == null) {
        logger.error("消息格式错误!");
        return;
    }
    String htmlUrl = (String) event.getData().get("htmlUrl");
    String fileName = (String) event.getData().get("fileName");
    String suffix = (String) event.getData().get("suffix");
    // cmd 命令
    String cmd = wkImageCommand + " --quality 75 "
        + htmlUrl + " " + wkImageStorage + "/" + fileName + suffix;
    try {
        // 操作系统执行cmd 命令
        Runtime.getRuntime().exec(cmd);
        logger.info("生成长图成功: " + cmd);
    } catch (IOException e) {
        logger.error("生成长图失败: " + e.getMessage());
    }

    // 启用定时器,监视该图片,一旦生成成功了,就把该图片上传至OSS.
    // 启用定时器,监视该图片,一旦生成成功了,就把该图片上传至OSS.
    UploadTask task = new UploadTask(fileName, suffix);
    Future future = taskScheduler.scheduleAtFixedRate(task, 500);
    task.setFuture(future);

}

/**
     * 上传任务内部类
     */
class UploadTask implements Runnable {

    // 文件名称
    private String fileName;
    // 文件后缀
    private String suffix;
    // 启动任务的返回值
    private Future future;
    // 开始时间
    private long startTime;
    // 上传次数
    private int uploadTimes;

    public UploadTask(String fileName, String suffix) {
        this.fileName = fileName;
        this.suffix = suffix;
        this.startTime = System.currentTimeMillis();
    }

    public void setFuture(Future future) {
        this.future = future;
    }

    @Override
    public void run() {
        // 生成失败
        if (System.currentTimeMillis() - startTime > 30000) {
            logger.error("执行时间过长,终止任务:" + fileName);
            future.cancel(true);
            return;
        }
        // 上传失败
        if (uploadTimes >= 3) {
            logger.error("上传次数过多,终止任务:" + fileName);
            future.cancel(true);
            return;
        }

        String path = wkImageStorage + "/" + fileName + suffix;
        File file = new File(path);
        if (file.exists()) {
            logger.info(String.format("开始第%d次上传[%s].", ++uploadTimes, fileName));
            try {
                String upload = fileUploadService.upload(file);
                logger.info(String.format("第%d次上传成功[%s].", uploadTimes, fileName));
                future.cancel(true);
            } catch (Exception e) {
                logger.info(String.format("第%d次上传失败[%s].", uploadTimes, fileName));
            }
        } else {
            logger.info("等待图片生成[" + fileName + "].");
        }
    }

}
10.优化网站的性能
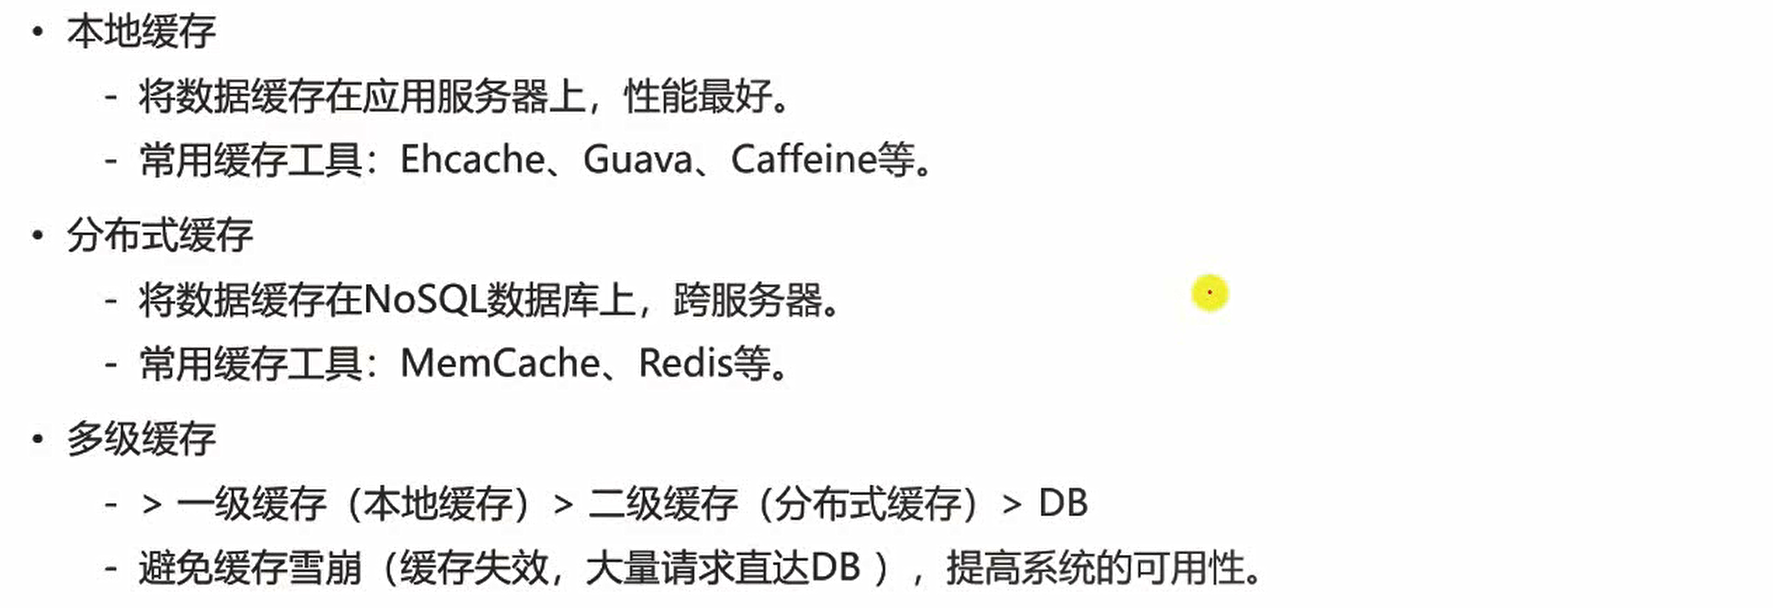
本地缓存
本地缓存不适合存储用户相关的一些信息,假设用户访问了服务器1,并登录了,此时服务器就会将用户的信息(比如登录凭证和登录用户的id)保存在缓存中。此时用户在再访问网站,碰到服务器2处理,但服务器2并没有用户的信息,因此会认位用户没有登录,所以本地缓存不适合存储用户相关的信息,就需要用分布式缓存。
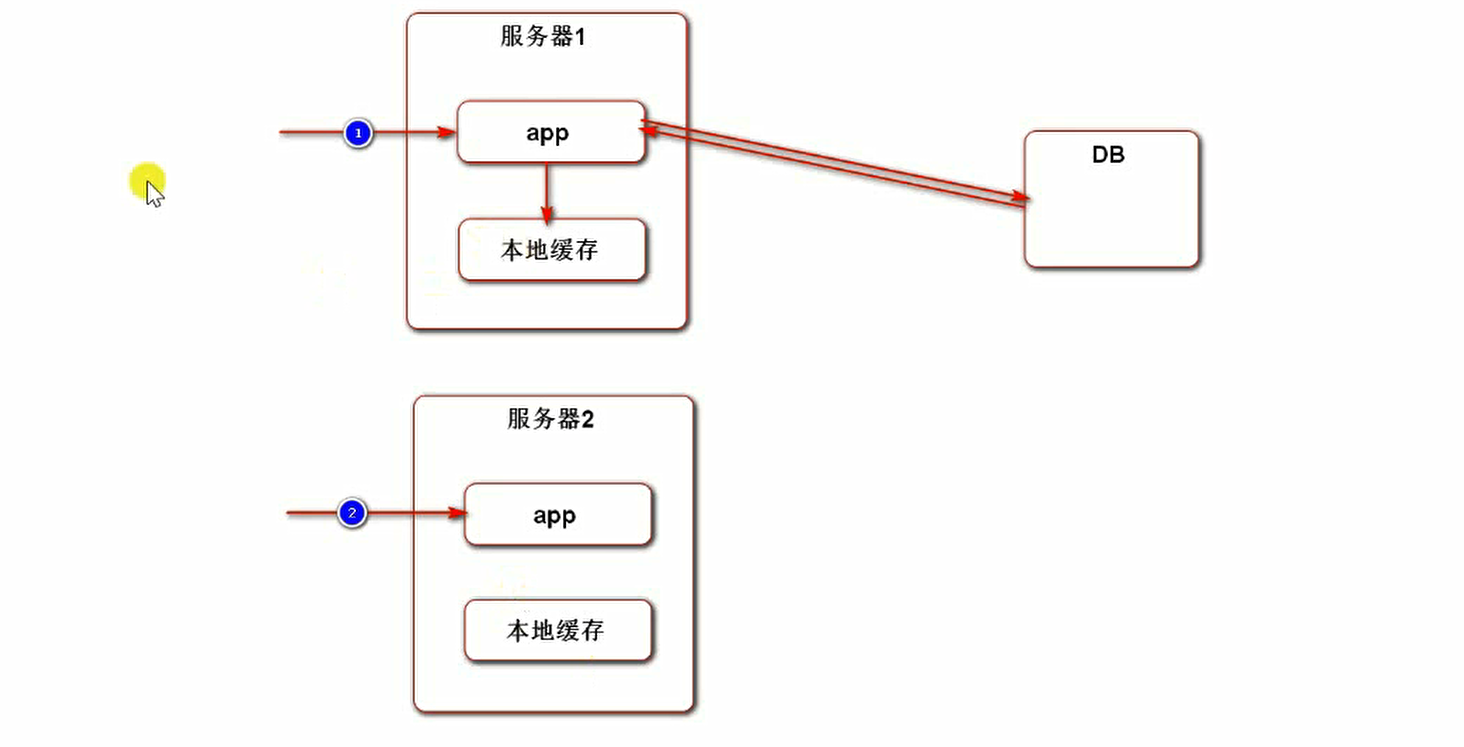
Redis分布式缓存。

多级缓存

这里将帖子按照热度排序做一个缓存来优化,但按照最新时间排序是不能做缓存的。帖子的总数也是可以缓存的,因为显示的页数不需要那么精确,排在最后面的一些帖子可以不显示。
帖子缓存在程序启动后,初始化一次就可以了,因此用@PostConstruct注解来实现。
10.1 pom.xml导入caffeine依赖
<!-- https://mvnrepository.com/artifact/com.github.ben-manes.caffeine/caffeine -->
<!--caffeine-->
<dependency>
    <groupId>com.github.ben-manes.caffeine</groupId>
    <artifactId>caffeine</artifactId>
    <version>2.7.0</version>
</dependency>
10.2 application.properties 配置文件中添加配置
# caffeine 本地缓存相关配置
# 缓存的帖子列表(max-size:表示本地缓存空间内最多能缓存的数据条数 15条)
caffeine.posts.max-size=15
# 缓存的帖子列表(expire-seconds:表示本地缓存数据的过期时间 180s)
caffeine.posts.expire-seconds=180
10.3 优化Service层相关的代码
为Service层相关的代码加上本地缓存:
DiscussPostService 中添加缓存相关代码
@Value("${caffeine.posts.max-size}")
private int caffeineCacheMaxSize;// 最大本地缓存数据的条数

@Value("${caffeine.posts.expire-seconds}")
private int caffeineCacheExpireSeconds;// 本地缓存数据的过期时间

/**
     * Caffeine 核心接口:Cache , LoadingCache(同步) , AsyncLoadingCache(异步)
     */
// 帖子列表缓存
private LoadingCache<String, List<DiscussPost>> discussPostListCache;

// 帖子总数缓存
private LoadingCache<Integer, Integer> discussPostRowsCache;


@PostConstruct
public void init(){
    //初始化帖子列表缓存
    discussPostListCache = Caffeine.newBuilder()
        //最大本地缓存数据的条数
        .maximumSize(caffeineCacheMaxSize)
        // 本地缓存数据的过期时间
        .expireAfterWrite(caffeineCacheExpireSeconds, TimeUnit.SECONDS)
        .build(new CacheLoader<String, List<DiscussPost>>(){
            @Nullable
            @Override
            //方法作用:在查询缓存里面没有数据的时候,就调用该方法去数据库里面查
            public List<DiscussPost> load(@NonNull String key) throws Exception {
                // 判断获取缓存的key 是否为空
                if (key == null || key.length() == 0) {
                    throw new IllegalArgumentException("key为空...");
                }
                // 分割key 获得参数(limit 和 offset)
                String[] params = key.split(":");
                if (params == null || params.length != 2) {
                    throw new IllegalArgumentException("参数错误...");
                }
                int offset = Integer.valueOf(params[0]);
                int limit = Integer.valueOf(params[1]);
                // 扩展:可以自己再加一个二级缓存 Redis -> Mysql
                // 从数据库查数据,获取后将数据放入本地缓存
                logger.info("从DB中获取帖子列表数据...");
                return discussPostMapper.selectDiscussPosts(0, offset, limit, 1);
            }
        });

    // 初始化帖子总数缓存
    discussPostRowsCache = Caffeine.newBuilder()
        // 最大本地缓存数据的条数
        .maximumSize(caffeineCacheMaxSize)
        // 本地缓存数据的过期时间
        .expireAfterWrite(caffeineCacheExpireSeconds, TimeUnit.SECONDS)
        .build(new CacheLoader<Integer, Integer>() {
            @Override
            //方法作用:在查询缓存里面没有数据的时候,就调用该方法去数据库里面查
            public @Nullable Integer load(@NonNull Integer key) throws Exception {
                // 从数据库查数据,获取后将数据放入本地缓存
                logger.info("从DB中获取帖子总数量...");
                return discussPostMapper.selectDiscussPostRows(key);
            }
        });

}

/**
     * 查询用户发布的所有帖子(分页)
     *
     * @param userId 用户id
     * @param offset 起始位置
     * @param limit  每一页的数量
     * @return
     */
public List<DiscussPost> findDiscussPosts(int userId,int offset,int limit,int orderMode){
    // 当用户id为0 且 orderMode为1即热门帖子
    if (userId == 0 && orderMode == 1) {
        String cacheKey = offset + ":" + limit;
        // 从本地缓存中获取数据
        return discussPostListCache.get(cacheKey);
    }

    // 不满足以上条件,则从数据库查数据
    logger.info("从DB中获取帖子列表数据...");
    return discussPostMapper.selectDiscussPosts(userId, offset, limit,orderMode);
}

public int findDiscussPostRows(int userId){
    if(userId==0){
        Integer cacheKey = userId;
        // 从本地缓存中获取数据
        return discussPostRowsCache.get(cacheKey);
    }
    // 不满足以上条件,则从数据库查数据
    logger.info("从DB中获取帖子数据的总数量...");
    return discussPostMapper.selectDiscussPostRows(userId);
}
10.4 测试
前三次查询都是查询按热度排序的帖子(orderMode=1),第四次查询是按照时间排序的,需要从数据库查询。
@Test
public void testCache() {
    System.out.println(postService.findDiscussPosts(0, 0, 10, 1));
    System.out.println(postService.findDiscussPosts(0, 0, 10, 1));
    System.out.println(postService.findDiscussPosts(0, 0, 10, 1));
    System.out.println(postService.findDiscussPosts(0, 0, 10, 0));
}
可以在查询热帖的时候,看到控制台只有第一次访问的时候打印sql(从DB中查询数据),后面两次都是走本地缓存获取数据!这样就能提高热点页面访问速度。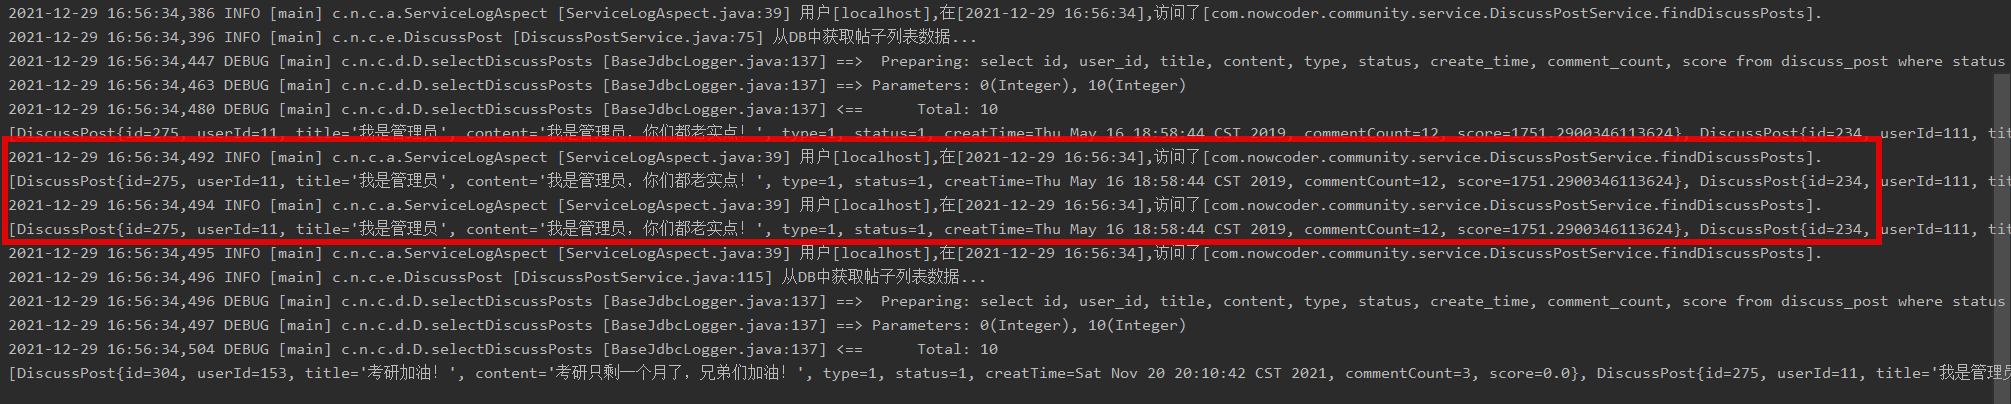
项目发布
项目我是发布到自己购买的阿里云服务器上,要2核4G才能把程序运行起来。
-
" + cmd);
} catch (IOException e) {
logger.error("生成长图失败: " + e.getMessage());
}// 启用定时器,监视该图片,一旦生成成功了,就把该图片上传至OSS.
// 启用定时器,监视该图片,一旦生成成功了,就把该图片上传至OSS.
UploadTask task = new UploadTask(fileName, suffix);
Future future = taskScheduler.scheduleAtFixedRate(task, 500);
task.setFuture(future);

}
/**
* 上传任务内部类
*/
class UploadTask implements Runnable {
// 文件名称
private String fileName;
// 文件后缀
private String suffix;
// 启动任务的返回值
private Future future;
// 开始时间
private long startTime;
// 上传次数
private int uploadTimes;

public UploadTask(String fileName, String suffix) {
    this.fileName = fileName;
    this.suffix = suffix;
    this.startTime = System.currentTimeMillis();
}

public void setFuture(Future future) {
    this.future = future;
}

@Override
public void run() {
    // 生成失败
    if (System.currentTimeMillis() - startTime > 30000) {
        logger.error("执行时间过长,终止任务:" + fileName);
        future.cancel(true);
        return;
    }
    // 上传失败
    if (uploadTimes >= 3) {
        logger.error("上传次数过多,终止任务:" + fileName);
        future.cancel(true);
        return;
    }

    String path = wkImageStorage + "/" + fileName + suffix;
    File file = new File(path);
    if (file.exists()) {
        logger.info(String.format("开始第%d次上传[%s].", ++uploadTimes, fileName));
        try {
            String upload = fileUploadService.upload(file);
            logger.info(String.format("第%d次上传成功[%s].", uploadTimes, fileName));
            future.cancel(true);
        } catch (Exception e) {
            logger.info(String.format("第%d次上传失败[%s].", uploadTimes, fileName));
        }
    } else {
        logger.info("等待图片生成[" + fileName + "].");
    }
}
}
### 10.优化网站的性能

[外链图片转存中...(img-haR3plpZ-1641361773388)]


**本地缓存**

本地缓存不适合存储用户相关的一些信息,假设用户访问了服务器1,并登录了,此时服务器就会将用户的信息(比如登录凭证和登录用户的id)保存在缓存中。此时用户在再访问网站,碰到服务器2处理,但服务器2并没有用户的信息,因此会认位用户没有登录,所以本地缓存不适合存储用户相关的信息,就需要用分布式缓存。

[外链图片转存中...(img-u93VWWfm-1641361773389)]

**Redis分布式缓存。**

[外链图片转存中...(img-a4Q47iXF-1641361773389)]

**多级缓存**

[外链图片转存中...(img-ei2pU3bm-1641361773389)]


> 这里将帖子按照热度排序做一个缓存来优化,但按照最新时间排序是不能做缓存的。帖子的总数也是可以缓存的,因为显示的页数不需要那么精确,排在最后面的一些帖子可以不显示。
>
> 帖子缓存在程序启动后,初始化一次就可以了,因此用@PostConstruct注解来实现。

#### 10.1 pom.xml导入caffeine依赖

```xml
<!-- https://mvnrepository.com/artifact/com.github.ben-manes.caffeine/caffeine -->
<!--caffeine-->
<dependency>
    <groupId>com.github.ben-manes.caffeine</groupId>
    <artifactId>caffeine</artifactId>
    <version>2.7.0</version>
</dependency>
10.2 application.properties 配置文件中添加配置
# caffeine 本地缓存相关配置
# 缓存的帖子列表(max-size:表示本地缓存空间内最多能缓存的数据条数 15条)
caffeine.posts.max-size=15
# 缓存的帖子列表(expire-seconds:表示本地缓存数据的过期时间 180s)
caffeine.posts.expire-seconds=180
10.3 优化Service层相关的代码
为Service层相关的代码加上本地缓存:
DiscussPostService 中添加缓存相关代码
@Value("${caffeine.posts.max-size}")
private int caffeineCacheMaxSize;// 最大本地缓存数据的条数

@Value("${caffeine.posts.expire-seconds}")
private int caffeineCacheExpireSeconds;// 本地缓存数据的过期时间

/**
     * Caffeine 核心接口:Cache , LoadingCache(同步) , AsyncLoadingCache(异步)
     */
// 帖子列表缓存
private LoadingCache<String, List<DiscussPost>> discussPostListCache;

// 帖子总数缓存
private LoadingCache<Integer, Integer> discussPostRowsCache;


@PostConstruct
public void init(){
    //初始化帖子列表缓存
    discussPostListCache = Caffeine.newBuilder()
        //最大本地缓存数据的条数
        .maximumSize(caffeineCacheMaxSize)
        // 本地缓存数据的过期时间
        .expireAfterWrite(caffeineCacheExpireSeconds, TimeUnit.SECONDS)
        .build(new CacheLoader<String, List<DiscussPost>>(){
            @Nullable
            @Override
            //方法作用:在查询缓存里面没有数据的时候,就调用该方法去数据库里面查
            public List<DiscussPost> load(@NonNull String key) throws Exception {
                // 判断获取缓存的key 是否为空
                if (key == null || key.length() == 0) {
                    throw new IllegalArgumentException("key为空...");
                }
                // 分割key 获得参数(limit 和 offset)
                String[] params = key.split(":");
                if (params == null || params.length != 2) {
                    throw new IllegalArgumentException("参数错误...");
                }
                int offset = Integer.valueOf(params[0]);
                int limit = Integer.valueOf(params[1]);
                // 扩展:可以自己再加一个二级缓存 Redis -> Mysql
                // 从数据库查数据,获取后将数据放入本地缓存
                logger.info("从DB中获取帖子列表数据...");
                return discussPostMapper.selectDiscussPosts(0, offset, limit, 1);
            }
        });

    // 初始化帖子总数缓存
    discussPostRowsCache = Caffeine.newBuilder()
        // 最大本地缓存数据的条数
        .maximumSize(caffeineCacheMaxSize)
        // 本地缓存数据的过期时间
        .expireAfterWrite(caffeineCacheExpireSeconds, TimeUnit.SECONDS)
        .build(new CacheLoader<Integer, Integer>() {
            @Override
            //方法作用:在查询缓存里面没有数据的时候,就调用该方法去数据库里面查
            public @Nullable Integer load(@NonNull Integer key) throws Exception {
                // 从数据库查数据,获取后将数据放入本地缓存
                logger.info("从DB中获取帖子总数量...");
                return discussPostMapper.selectDiscussPostRows(key);
            }
        });

}

/**
     * 查询用户发布的所有帖子(分页)
     *
     * @param userId 用户id
     * @param offset 起始位置
     * @param limit  每一页的数量
     * @return
     */
public List<DiscussPost> findDiscussPosts(int userId,int offset,int limit,int orderMode){
    // 当用户id为0 且 orderMode为1即热门帖子
    if (userId == 0 && orderMode == 1) {
        String cacheKey = offset + ":" + limit;
        // 从本地缓存中获取数据
        return discussPostListCache.get(cacheKey);
    }

    // 不满足以上条件,则从数据库查数据
    logger.info("从DB中获取帖子列表数据...");
    return discussPostMapper.selectDiscussPosts(userId, offset, limit,orderMode);
}

public int findDiscussPostRows(int userId){
    if(userId==0){
        Integer cacheKey = userId;
        // 从本地缓存中获取数据
        return discussPostRowsCache.get(cacheKey);
    }
    // 不满足以上条件,则从数据库查数据
    logger.info("从DB中获取帖子数据的总数量...");
    return discussPostMapper.selectDiscussPostRows(userId);
}
10.4 测试
前三次查询都是查询按热度排序的帖子(orderMode=1),第四次查询是按照时间排序的,需要从数据库查询。
@Test
public void testCache() {
    System.out.println(postService.findDiscussPosts(0, 0, 10, 1));
    System.out.println(postService.findDiscussPosts(0, 0, 10, 1));
    System.out.println(postService.findDiscussPosts(0, 0, 10, 1));
    System.out.println(postService.findDiscussPosts(0, 0, 10, 0));
}
可以在查询热帖的时候,看到控制台只有第一次访问的时候打印sql(从DB中查询数据),后面两次都是走本地缓存获取数据!这样就能提高热点页面访问速度。[外链图片转存中…(img-KYfGxZ3i-1641361773390)]
项目发布
项目我是发布到自己购买的阿里云服务器上,要2核4G才能把程序运行起来。
[外链图片转存中…(img-6cHzUZYJ-1641361773390)]


 285
285


 被折叠的 条评论
为什么被折叠?
被折叠的 条评论
为什么被折叠?
 到【灌水乐园】发言


