


This is a quik guidance to create an app with Django and python.
Overview
Because Django was developed in a fast-paced newsroom environment, it was designed to make common Web-development tasks fast and easy. Here’s an informal overview of how to write a database-driven Web app with Django.
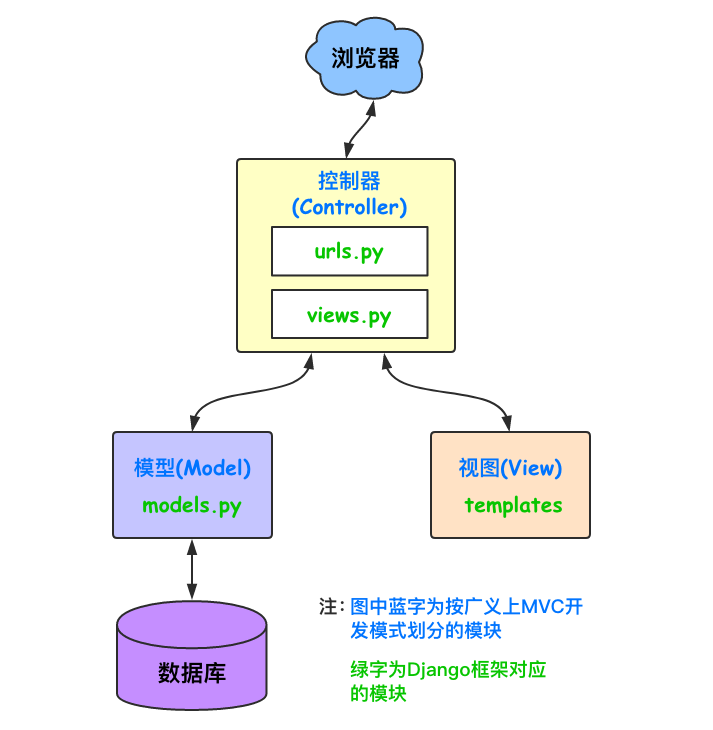
MTV Pattern of Django
- Model: In charge of Objects for operations and databases (ORM)
- Template: In charge of show web pages to users.
- View: In charge of operation logic, and call Model and Template at the right time.
Besides, Django has a url distributor, its usage is to distribute requested URL to different View, and View request corresponding Template and Model.
Quick Start
Install:
pip install Django
Project Structure:
To Create project, by typing in the cmd:
django-admin startproject ProjectName
After Creating the project, the project is shown below:
mysite+
	-manage.py # Files managed by Django
	-mysite+
		-_init_.py
		-settings.py # Configuration files
		-urls.py # Routing system, url configuration
		-wsgi.py # The decided wsgi of the structure
These files are:
- The outer
mysite/root directory is a container for your project. Its name doesn’t matter to Django; you can rename it to anything you like. manage.py: A command-line utility that lets you interact with this Django project in various ways. You can read all the details aboutmanage.pyin django-admin and manage.py.- The inner
mysite/directory is the actual Python package for your project. Its name is the Python package name you’ll need to use to import anything inside it (e.g.mysite.urls). mysite/__init__.py: An empty file that tells Python that this directory should be considered a Python package. If you’re a Python beginner, read more about packages in the official Python docs.mysite/settings.py: Settings/configuration for this Django project. Django settings will tell you all about how settings work.mysite/urls.py: The URL declarations for this Django project; a “table of contents” of your Django-powered site. You can read more about URLs in URL dispatcher.mysite/asgi.py: An entry-point for ASGI-compatible web servers to serve your project. See How to deploy with ASGI for more details.mysite/wsgi.py: An entry-point for WSGI-compatible web servers to serve your project. See How to deploy with WSGI for more details.
Run the Project:
By cmd:
python manager.py runserver # 127.0.0.1:8000

You can also customize your port in configuration:

settings.py:
In side setting.py, there lies configuration of this project.
- Bass directory of the project is shown below:

- html templates:

Template files are shown in 'DIRS'.
Start the First HTTP request:
Inside url.py, you can resolve HTTP responses:
from django.contrib import admin
from django.shortcuts import HttpResponse,render
from django.urls import path


def index(request):
    # logic

    # return result
    # return HttpResponse('index') # Return a String
    return render(request, 'index.html')  # Return a HTML page

urlpatterns = [
    path('admin/', admin.site.urls),
    path('index/', index),
]
After reaching 127.0.0.1:8000/index/, you can be successfully routed to String index page. Also, you can be routed to a HTML page by returning reder(request, 'HTMLpage.html').
Import Static Files
To start this step, let’s go to Bootstrap, and fetch a simple static HTML template, copy and paste in to our project-./templates/lohin.html:

After creating a HTML file, we need to add a link connecting to it inside url.py.
def login(request):
    return render(request, 'login.html')


urlpatterns = [
    path('admin/', admin.site.urls),
    path(r'index/', index),
    path('login/',login)
]
This time, when we start running Django and access http://127.0.0.1:8000/login, we can obtain a page without any static templates:

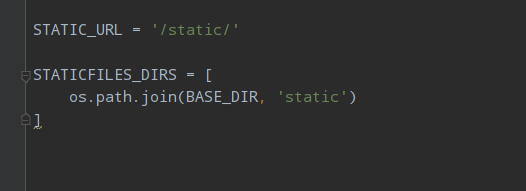
Then, we need to guide into static files. To do this, we need to add a reference to the real path of static files in settings.py, and add static files directory.
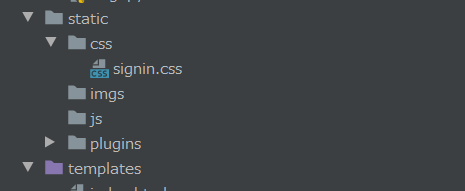
We then need to found the required static dependencies. After we downloading Bootstrap from its official website, we can add the package in to ./static/plugins/bootstrap-3.3.7-dist.
Then, the required CSS file can be found in the resources page, then we can fetch it into out own project structure, and add it into ./static/css.signin.css
Finally, we can add link in the HTML page inside to link the static files:
<link rel="stylesheet" href="/static/plugins/bootstrap-3.3.7-dist/css/bootstrap.css">
<link rel="stylesheet" href="/static/css/signin.css">
After all these have done, we can then access the page with static files:

Realize Sign In:
To realize signing in, use form label <form></form>to submit the content to aimed location, inside which:
action=""is the location to be submitted (default the current location),method=""is the requesting method (including get and post, default get).<input></input>label should indicatename=""- There should be a
<buttion></button>.
Below shows a sample form label.
<form class="form-signin" action="" method="post" novalidate>
    <h2 class="form-signin-heading">Please sign in</h2>
    <label for="inputEmail" class="sr-only">Email address</label>
    <input type="email" id="inputEmail" class="form-control" name="user" placeholder="Email address" required="" autofocus="">
    <label for="inputPassword" class="sr-only">Password</label>
    <input type="password" id="inputPassword" class="form-control" placeholder="Password" required="">
    <div class="checkbox">
        <label>
            <input type="checkbox" value="remember-me"> Remember me
        </label>
    </div>
    <button class="btn btn-lg btn-primary btn-block" type="submit">Sign in</button>
</form>
To submit a form with Post request successfully, there need to annotate a MIDLEWARE called csrf inside settins.py:
MIDDLEWARE = [
    'django.middleware.security.SecurityMiddleware',
    'django.contrib.sessions.middleware.SessionMiddleware',
    'django.middleware.common.CommonMiddleware',
    # 'django.middleware.csrf.CsrfViewMiddleware',
    'django.contrib.auth.middleware.AuthenticationMiddleware',
    'django.contrib.messages.middleware.MessageMiddleware',
    'django.middleware.clickjacking.XFrameOptionsMiddleware',
]
Then, when pressing the button without entering anything, we can see the request message is a GET message.

However, when we input some message and hand in the form, it becomes a Post message.

If we print out the POST requests, and the corresponding type, we can find that the input value type is dict, thus, we can obtain the value inside the returning message:
def login(request):
    print(request, type(request))
    print(request.method, type(request.method))
    if request.method == 'GET':
        return render(request, 'login.html')
    else:
        # The logic of dealing with POST request
        # Obtain the user name and pwd users input
        print(request.POST, type(request.POST))
        print(request.POST.get('user')), type(request.POST['user'])
        print(request.POST['pwd'], type(request.POST['pwd']))
        user = request.POST.get('user')
        pwd = request.POST.get('pwd')
        # To validate the input value via database
        # If validation successes, inform the success of login
        # If validation fails, return the login page
Out put is shown below:
Django version 3.1.7, using settings 'Django.settings'
Starting development server at http://127.0.0.1:8000/
Quit the server with CTRL-BREAK.March 15, 2021 - 16:34:26
<WSGIRequest: POST '/login/'> <class 'django.core.handlers.wsgi.WSGIRequest'>
POST <class 'str'>
<QueryDict: {'user': ['alex'], 'pwd': ['123']}> <class 'django.http.request.QueryDict'>
alex
123 <class 'str'>
After accomplish the logic of dealing with the login process, the logic of code is shown below:
def login(request):
    if request.method == 'POST':
        # The logic of dealing with POST request
        # Obtain the user name and pwd users input
        user = request.POST.get('user')
        pwd = request.POST.get('pwd')
        # To validate the input value via database
        if user == 'alex' and pwd == '123':
            # If validation successes, inform the success of login
            return HttpResponse('Login Success!!!')
    # Else return the original page
    return render(request, 'login.html')
If we get the right password and username, the browser will take us to a new page showing “Login Success!!!”, if we get the wrong user name or password, or just send a GET request, the page will stay unchanged.

-
Differences between POST and GET request:
If using GET request, the request message will appear on the url (?user=alex&pwd=123),
and to fetch the value, use
requst.GETrather thanrequest.POST.If using POST request, the data will be submitted on form without appearance.

Redirect:
Instead of using render(), We can use redirect() to redirect to another page if user succeeds in logging in.
def login(request):
    if request.method == 'POST':
        # The logic of dealing with POST request
        # Obtain the user name and pwd users input
        user = request.POST.get('user')
        pwd = request.POST.get('pwd')
        # To validate the input value via database
        if user == 'alex' and pwd == '123':
            # If validation successes, inform the success of login
            return redirect('/index/')
    # Else return the original page
    return render(request, 'login.html')
Start an App:
-
By CMD:
python manage.py startapp appName. -
By running
manage.pyby task:tools -> run
manage.pyby task -> appear an window -> type in command.

-
To register an App, go to
settings.pyto add one app configuration:INSTALLED_APPS = [ 'django.contrib.admin', 'django.contrib.auth', 'django.contrib.contenttypes', 'django.contrib.sessions', 'django.contrib.messages', 'django.contrib.staticfiles', 'app01.apps.App01Config' # add new app ] -
To rearrange URL routing functions, we need to transfer the functions in
urls.pyto./app01/views.py, then import these functions tourl.py.from django.contrib import admin from django.shortcuts import HttpResponse, render, redirect from django.urls import path from app01 import views urlpatterns = [ path('admin/', admin.site.urls), path(r'index/', views.index), path('login/', views.login) ]
Object Relation Mapping (ORM):
ORM majorly figures out the mapping between an object and an database table, every instance corresponds to one entity in an table, and the parameters in one object correspond to the column in the table.
ORM                           DB
class --------------------->>>Table
Object -------------------->>>Row
Attribute ----------------->>>Field
ORM provides the mapping of object to database, so that writing SQL statements is not necessary, only by manipulate objects can ones set database.
-
Configurate Database connection in
settings.py:DATABASES = { 'default': { 'ENGINE': 'django.db.backends.sqlite3', 'NAME': BASE_DIR / 'db.sqlite3', } } -
Write one class under
./app01/models.py:
from django.db import models


# Create your models here.
class User(models.Model):
    username = models.CharField(max_length=32)    # Varchar(32)
    password = models.CharField(max_length=32)
-
Execute database migration:
python manage.py makemigrations  # Scan the #changes under all the models.py, and make the #changes into migration files
python manage.py migrate

-
Test ORM:
We can write printing function in Index request:
def index(request):
    # logic
    # Test ORM
    from app01 import models
    res = models.User.objects.all()
    for i in res:
        print(i, i.username, i.password, type(i.username))
    print(res, type(res))
    return render(request, 'index.html')  # Return a HTML page
Then, the out put will be the entities added in the database:
User object (1) Danny 123 <class 'str'> User object (2) Alex 456 <class 'str'> <QuerySet [<User: User object (1)>, <User: User object (2)>]> <class 'django.db.models.query.QuerySet'> -
Check database when logging in:
We can add one configuration when consulting the database, if the user and password can be found in the database, return
./index.html, if there is not any match, stay in./login.html.def login(request): if request.method == 'POST': # The logic of dealing with POST request # Obtain the user name and pwd users input user = request.POST.get('user') pwd = request.POST.get('pwd') # To validate the input value via database # if user == 'alex' and pwd == '123': if models.User.objects.filter(username=user, password=pwd): # If validation successes, inform the success of login return redirect('/index/') # Else return the original page return render(request, 'login.html')
CURD (Create Update Read Delete)
In this session, we are going to set up a book publishing control system which is able to create, read, update, delete data in mysql database.
Set Up Environment:
First, we need to create and connect to a database which contains Primary Key (id) and name of each publisher, and add a Publisher object in medels.py. Then as shown in the previous session, we are required to make database migration through calling python manage.py makemigrations and python manage.py migrate. After finishing all these, the output is shown below:

Following that, we can write new routing relation in urls.py, and write new routing function in ./app01/views.py, also, do not forget to create a HTML page containing a data representation (a simple table).
Routing function in ./app01/views.py which print out all the objects added in the database:
def publisher_list(request):
    # Logic
    # Obtain all the information of Publishers
    # Return a page which contains the information
    all_publishers = models.Publisher.objects.all()
    for i in all_publishers:
        print(i)
        print(i.id)
        print(i.name)
    return render(request, 'publisher_list.html')
Added url pattern in url.py:
urlpatterns = [
    path('admin/', admin.site.urls),
    path(r'index/', views.index),
    path('login/', views.login),
    url(r'publisher_list/', views.publisher_list)
]
A simple testing page with a table is created in ./templates/publisher.html
<!DOCTYPE html>
<html lang="en">
<head>
    <meta charset="UTF-8">
    <title>Publishers</title>
</head>
<body>
<table border="1">
    <thead>
    <tr>
        <th>Sequence Number</th>
        <th>ID</th>
        <th>Publisher Name</th>
    </tr>
    </thead>
    <tbody>
    <tr>
        <td>1</td>
        <td>1</td>
        <td>Publisher</td>
    </tr>
    </tbody>
</table>

</body>
</html>
After running the project, the output is shown below:

Template Grammar:
To transfer data from database to template, there is a pattern in template grammar. First, we need to add one parameter in routing function:
def publisher_list(request):
    # Logic
    # Obtain all the information of Publishers
    # Return a page which contains the information
    all_publishers = models.Publisher.objects.all()  # Objests list
    return render(request, 'publisher_list.html', {'all_Publishers': all_publishers})
Then, we need to add parameter transfer function in our template. In out table body, {{ variable_name }} is used to pass in corresponding parameter in routing function, and {% to_apply_tags_inside %}:
<table border="1">
    <thead>
    <tr>
        <th>Sequence Number</th>
        <th>ID</th>
        <th>Publisher Name</th>
    </tr>
    </thead>
    <tbody>
        {% for i in all_Publishers %}
            <tr>
                <td>{{ forloop.counter }}</td>
                <td>{{ i.id }}</td>
                <td>{{ i.name }}</td>
            </tr>
        {% endfor %}

    </tbody>
</table>
After we mapping the variables on the page, the results looks like:

Create:
First, when customer send a Get request get to a page, the page returns returns a Form which can be used to intake information, then after customer clicking a button to submit, the page can submit a Post request, and the server can insert the data into database, finally, the server returns a Redirect page, and the page can show all the refreshed data to the user.
-
Add a new HTML page containing a Form and a new url pattern in
urls.py.publisher_add.htmlis shown below:<!DOCTYPE html> <html lang="en"> <head> <meta charset="UTF-8"> <title>Publisher_add</title> </head> <body> <form action="" method="post"> Publisher_Name: <input type="text" name="pub_name"> <button> Submit </button> </form> </body> </html>Url patterns inside
urls.py:urlpatterns = [ path('admin/', admin.site.urls), path(r'index/', views.index), path('login/', views.login), url(r'publisher_list/', views.publisher_list), url(r'publisher_add', views.publisher_add) ] -
Write a routing function in
./app01/views.pyto resolve the GET request and the POST request:# Add new publishers def publisher_add(request): if request.method == 'POST': # Post request # Obtain the data user input pub_name = request.POST.get('pub_name') # print(pub_name) # Add the data into database res = models.Publisher.objects.create(name=pub_name) # print(res, type(res)) # return a new page containing new data return redirect('/publisher_list/') # Get request returns a page containing Form return render(request, 'publisher_add.html') -
After we testing the function, the submit page and the returning page with is shown below:


Delete:
We can add a routing function in ./app01/views.py called publisher_del(), and we need to add corresponding url pattern in url.py. To show the deletion operation on front page, we need also to add a button option to delete the item with send back an request:
In the table body, add the following line:
<tbody>
    {% for i in all_Publishers %}
        <tr>
            <td>{{ forloop.counter }}</td>
            <td>{{ i.id }}</td>
            <td>{{ i.name }}</td>
            <td><a href="/publisher_del/?pk={{ i.id }}">Delete</a> </td>
        </tr>
    {% endfor %}

</tbody>
The routing function which contains database query is shown below, it firstly obtain the object whose id equal to the number of row which user is intend to delete, and then delete it from the database. And finally redirect to the updated page.
def publisher_del(request):
    # Obtain the id of the object
    pk = request.GET.get('pk')
    # print(pk)
    # Delete the id from database
    models.Publisher.objects.get(pk=pk).delete()
    # Redirect to the original page
    return redirect('/publisher_list/')
Update:
The update page is almost the same as the delete page, only the logic is different. To update a value, firstly, the button on the publisher_list which provide the function will rout user to the edit page, where back-end gets the Primary key of which user choose to edit and transfer the PK to routing function publisher_edit().
<tbody>
    {% for i in all_Publishers %}
        <tr>
            <td>{{ forloop.counter }}</td>
            <td>{{ i.id }}</td>
            <td>{{ i.name }}</td>
            <td>
                <a href="/publisher_del/?pk={{ i.id }}">Delete</a>
                <a href="/publisher_edit/?pk={{ i.id }}">Edit</a>  {# Value of pk equals to object's id #}
            </td>
        </tr>
    {% endfor %}

</tbody>
publisher_edit.html:
<!DOCTYPE html>
<html lang="en">
<head>
    <meta charset="UTF-8">
    <title>Publisher_edit</title>
</head>
<body>
<form action="" method="post">
    Publisher_Name: <input type="text" name="pub_name" value="{{ pub_obj.name }}"> <span>{{ error }}</span>
    <button>
        Submit
    </button>
</form>
</body>
After that, user can manipulate the data in the corresponding row. After submission, and the name of the changed value is not empty or duplicated, the chosen object’s name will be updated and confirmed. Then it will redirect user to the original page.
# Edit Publishers
def publisher_edit(request):
    pk = request.GET.get('pk')
    pub_obj = models.Publisher.objects.get(pk=pk)

    # Get Request: return a page containing Form, and input the original data
    if request.method == 'GET':
        return render(request, 'publisher_edit.html', {'pub_obj': pub_obj})

    # Post Request:
    else:
        # Get the name of publisher user submitted
        pub_name = request.POST.get('pub_name')

        # If there are duplicated names already in database
        if models.Publisher.objects.filter(name=pub_name):
            return render(request, 'publisher_edit.html', {'error': 'Name already exits!'})

        # If the name is empty
        if not pub_name:
            return render(request, 'publisher_edit.html', {'error': 'Name cannot be empty!'})

        # Manipulate the data in database
        pub_obj.name = pub_name
        # Submit the change
        pub_obj.save()
        # Redirect to the original page in Publisher_list
        return redirect('/publisher_list')
The manipulation steps are shown below:


Add Static Files:
We will go to official web of Bootstrap to get a model to implement our ideas. Go to https://v3.bootcss.com/examples/dashboard/, which is a dashboard template to show, then we can select the inside its source code, and replace the unnecessary lines with our tables.
<body>

    <nav class="navbar navbar-inverse navbar-fixed-top">
      <div class="container-fluid">
        <div class="navbar-header">
          <button type="button" class="navbar-toggle collapsed" data-toggle="collapse" data-target="#navbar" aria-expanded="false" aria-controls="navbar">
            <span class="sr-only">Toggle navigation</span>
            <span class="icon-bar"></span>
            <span class="icon-bar"></span>
            <span class="icon-bar"></span>
          </button>
          <a class="navbar-brand" href="#">Project name</a>
        </div>
        <div id="navbar" class="navbar-collapse collapse">
          <ul class="nav navbar-nav navbar-right">
            <li><a href="#">Dashboard</a></li>
            <li><a href="#">Settings</a></li>
            <li><a href="#">Profile</a></li>
            <li><a href="#">Help</a></li>
          </ul>
          <form class="navbar-form navbar-right">
            <input type="text" class="form-control" placeholder="Search...">
          </form>
        </div>
      </div>
    </nav>

    <div class="container-fluid">
      <div class="row">
        <div class="col-sm-3 col-md-2 sidebar">
          <ul class="nav nav-sidebar">
            <li class="active"><a href="#">Overview <span class="sr-only">(current)</span></a></li>
            <li><a href="#">Reports</a></li>
            <li><a href="#">Analytics</a></li>
            <li><a href="#">Export</a></li>
          </ul>
          <ul class="nav nav-sidebar">
            <li><a href="">Nav item</a></li>
            <li><a href="">Nav item again</a></li>
            <li><a href="">One more nav</a></li>
            <li><a href="">Another nav item</a></li>
            <li><a href="">More navigation</a></li>
          </ul>
          <ul class="nav nav-sidebar">
            <li><a href="">Nav item again</a></li>
            <li><a href="">One more nav</a></li>
            <li><a href="">Another nav item</a></li>
          </ul>
        </div>
        <div class="col-sm-9 col-sm-offset-3 col-md-10 col-md-offset-2 main">
          <h1 class="page-header">Dashboard</h1>

          <div class="row placeholders">
            <div class="col-xs-6 col-sm-3 placeholder">
              <img src="data:image/gif;base64,R0lGODlhAQABAIAAAHd3dwAAACH5BAAAAAAALAAAAAABAAEAAAICRAEAOw==" class="img-responsive" alt="Generic placeholder thumbnail" width="200" height="200">
              <h4>Label</h4>
              <span class="text-muted">Something else</span>
            </div>
          </div>

          <h2 class="sub-header">Section title</h2>
          <div class="table-responsive">
            <table class="table table-striped">
              <thead>
                <tr>
                  <th>#</th>
                  <th>Header</th>
                  <th>Header</th>
                  <th>Header</th>
                  <th>Header</th>
                </tr>
              </thead>
              <tbody>
                <tr>
                  <td>1,001</td>
                  <td>Lorem</td>
                  <td>ipsum</td>
                  <td>dolor</td>
                  <td>sit</td>
                </tr>
                <tr>
                  <td>1,002</td>
                  <td>amet</td>
                  <td>consectetur</td>
                  <td>adipiscing</td>
                  <td>elit</td>
                </tr>
                <tr>
                  <td>1,003</td>
                  <td>Integer</td>
                  <td>nec</td>
                  <td>odio</td>
                  <td>Praesent</td>
                </tr>
                <tr>
                  <td>1,003</td>
                  <td>libero</td>
                  <td>Sed</td>
                  <td>cursus</td>
                  <td>ante</td>
                </tr>
                <tr>
                  <td>1,004</td>
                  <td>dapibus</td>
                  <td>diam</td>
                  <td>Sed</td>
                  <td>nisi</td>
                </tr>
                <tr>
                  <td>1,005</td>
                  <td>Nulla</td>
                  <td>quis</td>
                  <td>sem</td>
                  <td>at</td>
                </tr>
                <tr>
                  <td>1,006</td>
                  <td>nibh</td>
                  <td>elementum</td>
                  <td>imperdiet</td>
                  <td>Duis</td>
                </tr>
                <tr>
                  <td>1,007</td>
                  <td>sagittis</td>
                  <td>ipsum</td>
                  <td>Praesent</td>
                  <td>mauris</td>
                </tr>
                <tr>
                  <td>1,008</td>
                  <td>Fusce</td>
                  <td>nec</td>
                  <td>tellus</td>
                  <td>sed</td>
                </tr>
                <tr>
                  <td>1,009</td>
                  <td>augue</td>
                  <td>semper</td>
                  <td>porta</td>
                  <td>Mauris</td>
                </tr>
                <tr>
                  <td>1,010</td>
                  <td>massa</td>
                  <td>Vestibulum</td>
                  <td>lacinia</td>
                  <td>arcu</td>
                </tr>
                <tr>
                  <td>1,011</td>
                  <td>eget</td>
                  <td>nulla</td>
                  <td>Class</td>
                  <td>aptent</td>
                </tr>
                <tr>
                  <td>1,012</td>
                  <td>taciti</td>
                  <td>sociosqu</td>
                  <td>ad</td>
                  <td>litora</td>
                </tr>
                <tr>
                  <td>1,013</td>
                  <td>torquent</td>
                  <td>per</td>
                  <td>conubia</td>
                  <td>nostra</td>
                </tr>
                <tr>
                  <td>1,014</td>
                  <td>per</td>
                  <td>inceptos</td>
                  <td>himenaeos</td>
                  <td>Curabitur</td>
                </tr>
                <tr>
                  <td>1,015</td>
                  <td>sodales</td>
                  <td>ligula</td>
                  <td>in</td>
                  <td>libero</td>
                </tr>
              </tbody>
            </table>
          </div>
        </div>
      </div>
    </div>

    <!-- Bootstrap core JavaScript
    ================================================== -->
    <!-- Placed at the end of the document so the pages load faster -->
    <script src="https://cdn.bootcss.com/jquery/1.12.4/jquery.min.js"></script>
    <script src="https://cdn.bootcss.com/bootstrap/3.3.7/js/bootstrap.min.js"></script>
    <!-- Just to make our placeholder images work. Don't actually copy the next line! -->


</body>
Inside its template, we can replace the table divs with our own divs, and delete the surplus lines including title, sidebar, then, we can also add some style link in the . the ultimate page looks like:
<!DOCTYPE html>
<html lang="en">
<head>
    <meta charset="UTF-8">
    <title>Publishers</title>

    <link rel="stylesheet" href="/static/plugins/bootstrap-3.3.7-dist/css/bootstrap.min.css">
    <link rel="stylesheet" href="/static/css/dsv.css">

</head>


<body>

    <nav class="navbar navbar-inverse navbar-fixed-top">
      <div class="container-fluid">
        <div class="navbar-header">
          <button type="button" class="navbar-toggle collapsed" data-toggle="collapse" data-target="#navbar" aria-expanded="false" aria-controls="navbar">
            <span class="sr-only">Toggle navigation</span>
            <span class="icon-bar"></span>
            <span class="icon-bar"></span>
            <span class="icon-bar"></span>
          </button>
          <a class="navbar-brand" href="#">Project name</a>
        </div>
        <div id="navbar" class="navbar-collapse collapse">
          <ul class="nav navbar-nav navbar-right">
            <li><a href="#">Dashboard</a></li>
            <li><a href="#">Settings</a></li>
            <li><a href="#">Profile</a></li>
            <li><a href="#">Help</a></li>
          </ul>
          <form class="navbar-form navbar-right">
            <input type="text" class="form-control" placeholder="Search...">
          </form>
        </div>
      </div>
    </nav>

    <div class="container-fluid">
      <div class="row">
        <div class="col-sm-3 col-md-2 sidebar">
          <ul class="nav nav-sidebar">
            <li class="active"><a href="/publisher_list/">Publishers List <span class="sr-only">(current)</span></a></li>
            <li><a href="#">Reports</a></li>
            <li><a href="#">Analytics</a></li>
            <li><a href="#">Export</a></li>
          </ul>

        </div>
        <div class="col-sm-9 col-sm-offset-3 col-md-10 col-md-offset-2 main">


          <h2 class="sub-header">Publisher Table</h2>
          <div class="table-responsive">
            <table class="table table-bordered table-hover">
                <thead>
                <tr>
                    <th>Sequence Number</th>
                    <th>ID</th>
                    <th>Publisher Name</th>
                    <th>Operation</th>
                </tr>
                </thead>
                <tbody>
                {% for i in all_Publishers %}
                    <tr>
                        <td>{{ forloop.counter }}</td>
                        <td>{{ i.id }}</td>
                        <td>{{ i.name }}</td>
                        <td>
                            <a class="btn btn-danger btn-sm" href="/publisher_del/?pk={{ i.id }}">Delete</a>
                            <a class="btn btn-primary btn-sm"  href="/publisher_edit/?pk={{ i.id }}">Edit</a>
                        </td>
                    </tr>
                {% endfor %}

                </tbody>


            </table>
          </div>
        </div>
      </div>
    </div>

    <!-- Bootstrap core JavaScript
    ================================================== -->
    <!-- Placed at the end of the document so the pages load faster -->
    <script src="https://cdn.bootcss.com/jquery/1.12.4/jquery.min.js"></script>
    <script src="https://cdn.bootcss.com/bootstrap/3.3.7/js/bootstrap.min.js"></script>
</body>
</html>
The page look like:

Django Admin
We can create a superuser in Django by typing: python manage.py createsuperuser, in which we can utilize the interface to control the database.
To create a super user, we need to assign a user name and a password. After the creation, we can go to 127.0.0.1: 8000/admin, and the interface looks like:

To control the database inside the interface, we need to register out models inside admin.py. To register, we can use
admin.site.register(modelname, model)
Admin Configuration:
To configure what to display in our interface, we need to set the entities of our models to display.
Here, we create a model called Gift and Gift images inside models.py, in which there are entities gift_name, gift_intro, num_search, num_collection, tag_price, tag_species, tag_color, tag_festival, tag_user, create_time, last_time.
from django.db import models


# Create your models here.
class Gift(models.Model):
    gift_name = models.CharField(max_length=32)
    gift_intro = models.CharField(max_length=1000, blank=True, null=True)
    num_search = models.IntegerField(blank=True, null=True)
    num_collection = models.IntegerField(blank=True, null=True)
    tag_price = models.CharField(max_length=60, blank=True, null=True, verbose_name='price')
    tag_species = models.CharField(max_length=60, blank=True, null=True, verbose_name='species')
    tag_color = models.CharField(max_length=60, blank=True, null=True, verbose_name='color')
    tag_festival = models.CharField(max_length=100, blank=True, null=True, verbose_name='festival')
    tag_user = models.CharField(choices=(('female', 'Girl'), ('male', 'Boy'), ('Both', 'Girl&Boy')), max_length=16, blank=True, null=True, verbose_name='user')
    create_time = models.DateField(auto_now=True, verbose_name='Create Time')
    last_time = models.DateField(auto_now=True, verbose_name='Last Modified Time')

    # null=True: entity in database can be null
    # blank=True: entity in admin can be null
    # verbosename='entity_name': names displayed in the admin filed
    # choices=((0,'name0'),(1,'name2'),(2,'name3'))
    # auto_now=True: keep track of creation time and modify time
    # default=: add default value in the entity
    # choices=(tuples): can specify different values for managers to choose in a drop down menu

    def __str__(self):
        return self.gift_name
    # display entity name inside admin

    # Meta data of our table to be displayed in admin
    class Meta:
        db_table = 'gift_info'  # table name to be displayed in admin
        unique_together = (('gift_name', 'id'),)  # gift_name and id together cannot be true
        verbose_name = 'gift'  # table name in admin
        verbose_name_plural = verbose_name  # Plural display name
Then, to make entities display in the setting session, we need to configure the verbosename. Inside admin.py, we can make the costumed settings.
from django.contrib import admin
from gift.models import Gift, gift_imgs_repo


# Register your models here.


class GiftAdmin(admin.ModelAdmin):
    list_display = ('gift_name', 'gift_intro', 'tag_price', 'tag_species', 'tag_color', 'tag_festival', 'tag_user',
                     'gift_img', 'create_time', 'last_time')
    # list_select_related = 3
    # list_filter = ('gift_name')  # Filter, to check different type of goods
    search_fields = ('id', 'gift_name')  # Search fields
    list_per_page = 5  # display number each page


class gift_img_repoAdmin(admin.ModelAdmin):
    list_display = ('more_img', 'gift')
    search_fields = ('from_gift',)


# class TagAdmin()

admin.site.register(Gift, GiftAdmin)
admin.site.register(gift_imgs_repo, gift_img_repoAdmin)
After the creation of our tables, the tables with all the entities inside our gift model can be displayed and configured. Inside the setting, list_display is the columns to be displayed in our admin tables, search_fields is the search bar that can be used to search corresponding items inside our database, and list_per_page is the configuration that can be used to set page display.
After all the settings are done, our admin page looks like:

And our entities inside table looks like:

Then, we can utilize our admin page to CURD our data.
Add Image to Our Models:
To add images to our gift entities, we need configure the media storage for Django.
First, to set our media path, we need to go to settings.py to add a static media path configuration, and add a folder called **/media/**inside our project to hold images:
MEDIA_ROOT = os.path.join(BASE_DIR, 'media')

MEDIA_URL = '/media/'
Then, we should deploy our static files in urls.py . For example, if our MEDIA_URL is defined as ***/media/***, we can do this by adding the following snippet to our url.py:
from django.conf import settings
from django.conf.urls import url
from django.contrib import admin
from django.urls import path
from django.conf.urls.static import static
from gift import views as gift_view

urlpatterns = [
    path('admin/', admin.site.urls),
    path('index/', gift_view.index),
] + static(settings.MEDIA_URL, document_root=settings.MEDIA_ROOT)  # Add img root to conf
Then, inside our models, we can add new entities to add new images for our gifts:
 gift_img = models.ImageField(verbose_name='gift_Image', upload_to='gift_imgs', width_field='img_width', height_field='img_height', null=True, blank=True) # The newly added images will be stored into "/media/gift_imgs"
    img_width = models.IntegerField(verbose_name='img_width', null=True)
    img_height = models.IntegerField(verbose_name='img_height', null=True)
The image_width and image_height can be null, and Django will configure it for images automatically. After the migration, we need to install a package call Pillow. Then, we can specify images for our gifts.


 382
382


 被折叠的 条评论
为什么被折叠?
被折叠的 条评论
为什么被折叠?
 到【灌水乐园】发言


