


引言
本次案例:图书管理是基于使用Spring Boot整合Thymeleaf实现的项目效果,书籍借鉴Spring Boot企业级开发教程第2版第4章节的跟练,由于本人电脑配置的idea,maven以及jdk都偏高版本些,因此在代码上有一定的修改以及调试,下文我也会有一定的注释,如果你也遇到相同的问题,希望能帮助到你哦!以下文章皆本人自创,若有错误,欢迎指正,非常感谢!
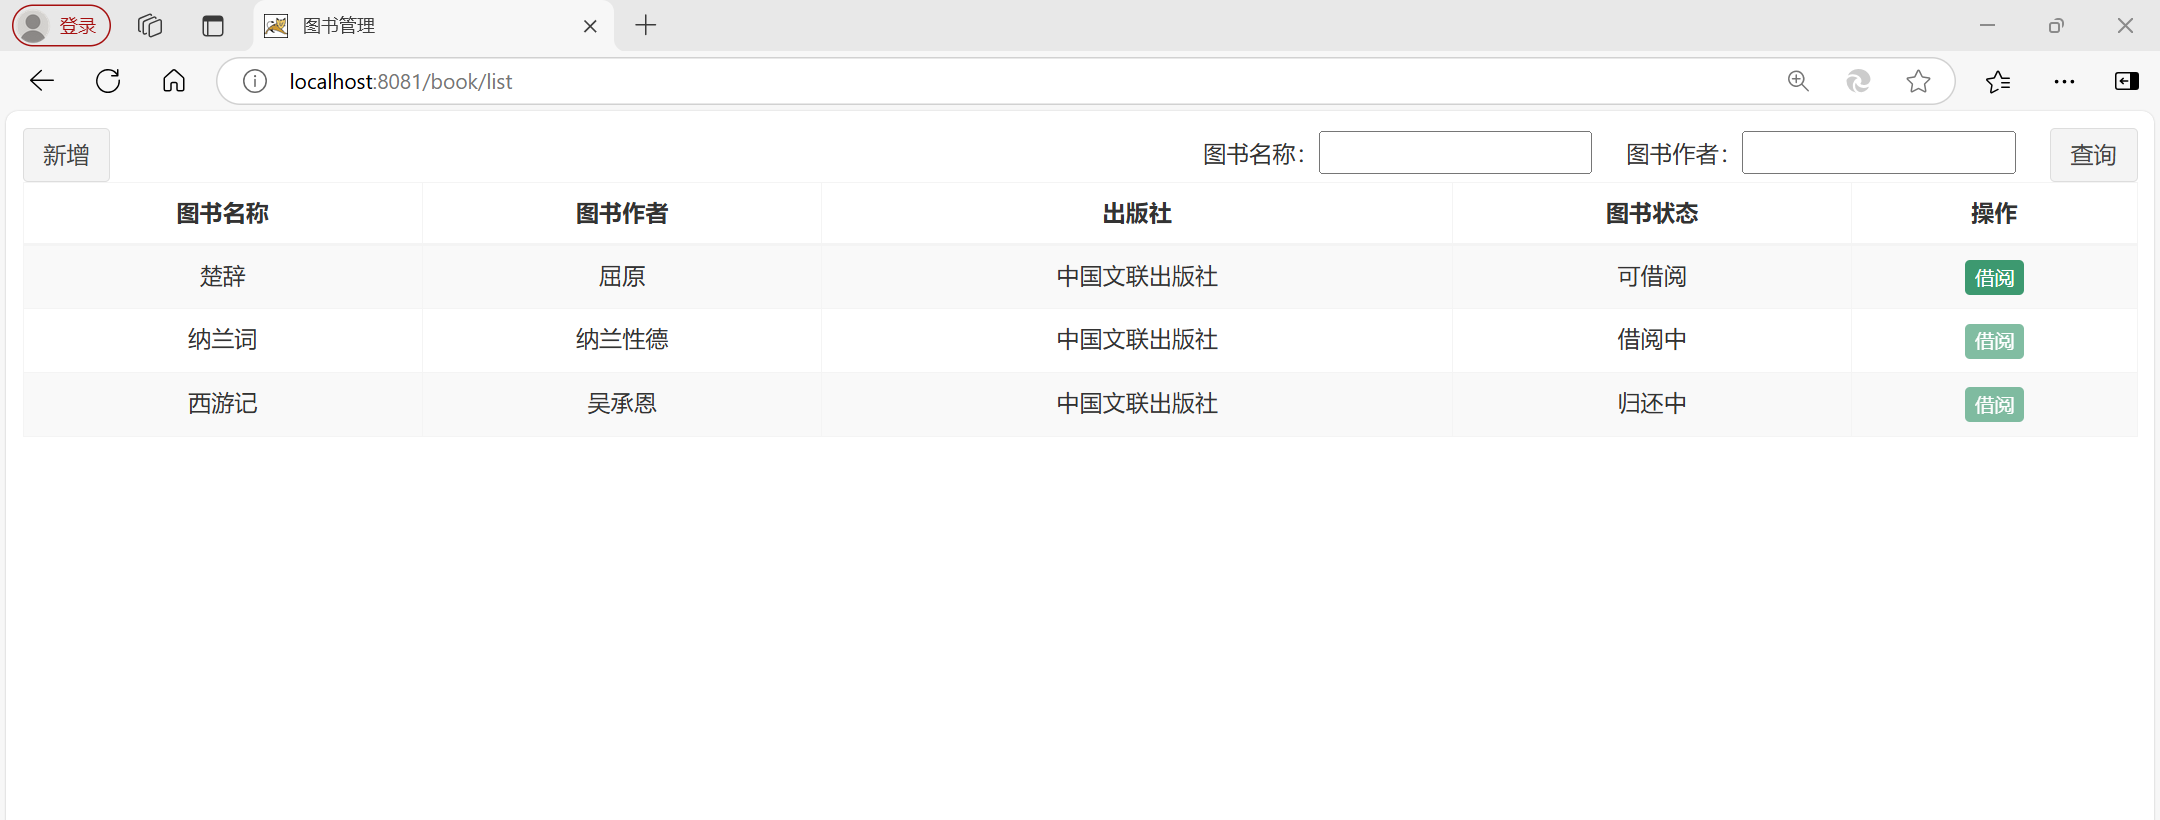
效果截图:
一、操作设备
IntelliJ IDEA:2024.2.1
Maven: 3.8.1
二、任务实现
1.Spring Boot整合Thymeleaf
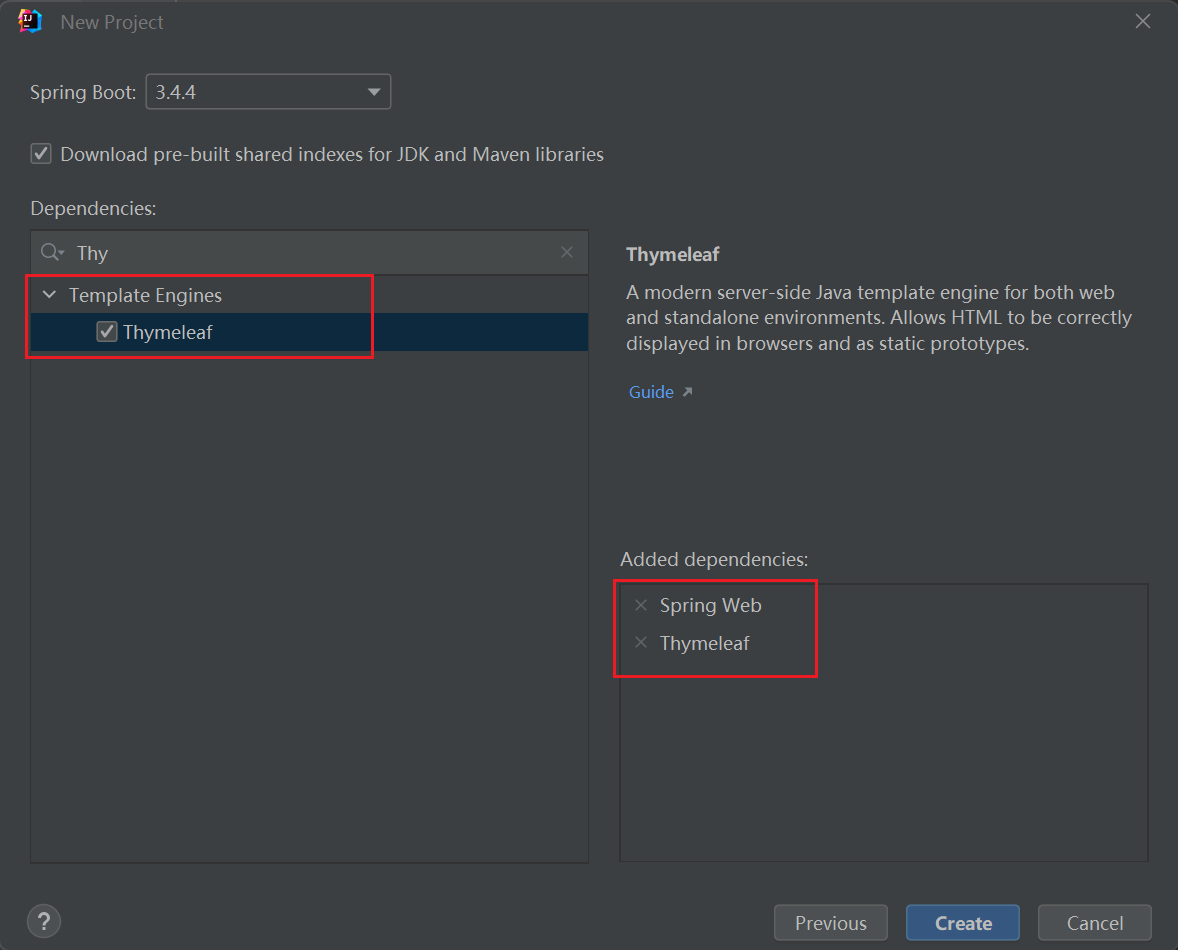
1) 使用SPring Initializr方式构建Spring Boot项目(具体可参考前面我发的文章),在Spring Boot场景依赖选择界面添加Thymeleaf依赖(tips:这里也需要加Spring Web)
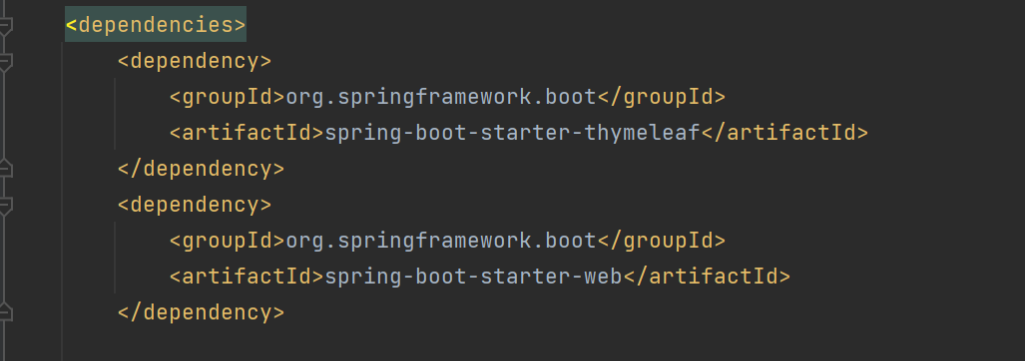
2) 使用Maven方式构建Spring Boot项目后,在pom.xml文件引入Thymeleaf启动器。且项目需要使用Spring MVC
//本代码仅供参考,具体还需个人配置环境进行适当调试
<?xml version="1.0" encoding="UTF-8"?>
<project xmlns="http://maven.apache.org/POM/4.0.0" xmlns:xsi="http://www.w3.org/2001/XMLSchema-instance"
         xsi:schemaLocation="http://maven.apache.org/POM/4.0.0 https://maven.apache.org/xsd/maven-4.0.0.xsd">
    <modelVersion>4.0.0</modelVersion>
    <parent>
        <groupId>org.springframework.boot</groupId>
        <artifactId>spring-boot-starter-parent</artifactId>
        <version>3.4.4</version>
        <relativePath/> <!-- lookup parent from repository -->
    </parent>
    <groupId>com.example</groupId>
    <artifactId>SpringBootBook1</artifactId>
    <version>0.0.1-SNAPSHOT</version>
    <name>SpringBootBook1</name>
    <description>SpringBootBook1</description>
    <url/>
    <licenses>
        <license/>
    </licenses>
    <developers>
        <developer/>
    </developers>
    <scm>
        <connection/>
        <developerConnection/>
        <tag/>
        <url/>
    </scm>
    <properties>
        <java.version>21</java.version>
    </properties>
    <dependencies>
        <dependency>
            <groupId>org.springframework.boot</groupId>
            <artifactId>spring-boot-starter-thymeleaf</artifactId>
        </dependency>
        <dependency>
            <groupId>org.springframework.boot</groupId>
            <artifactId>spring-boot-starter-web</artifactId>
        </dependency>

        <dependency>
            <groupId>org.springframework.boot</groupId>
            <artifactId>spring-boot-starter-test</artifactId>
            <scope>test</scope>
        </dependency>
    </dependencies>
    <build>
        <plugins>
            <plugin>
                <groupId>org.springframework.boot</groupId>
                <artifactId>spring-boot-maven-plugin</artifactId>
            </plugin>
        </plugins>
    </build>

</project>
2.创建实体类
User.java
package com.example.SpringBootBook1.entity;
import java.io.Serializable;
public class User implements Serializable {
    private String name;      //用户名称
    private String role;      //用户角色
    public User(String name, String role) {
        this.name = name;
        this.role = role;
    }
    public String getName() {
        return name;
    }
    public void setName(String name) {
        this.name = name;
    }
    public String getRole() {
        return role;
    }
    public void setRole(String role) {
        this.role = role;
    }
}
Book.java
package com.example.SpringBootBook1.entity;

public class Book  {
    private Integer id;        //图书编号
    private String name;       //图书名称
    private String author;     //图书作者
    private String press;      //图书出版社

    private String status;     //图书状态

    public Book(Integer id, String name, String author,String press,  String status) {
        this.id = id;
        this.name = name;
        this.press = press;
        this.author = author;
        this.status = status;
    }

    public Integer getId() {
        return id;
    }

    public void setId(Integer id) {
        this.id = id;
    }

    public String getName() {
        return name;
    }

    public void setName(String name) {
        this.name = name;
    }

    public String getPress() {
        return press;
    }

    public void setPress(String press) {
        this.press = press;
    }

    public String getAuthor() {
        return author;
    }

    public void setAuthor(String author) {
        this.author = author;
    }

    public String getStatus() {
        return status;
    }

    public void setStatus(String status) {
        this.status = status;
    }

    @Override
    public String toString() {
        return "Book{" +
                "id=" + id +
                ", name='" + name + '\'' +
                ", author='" + author + '\'' +
                ", press='" + press + '\'' +
                ", status='" + status + '\'' +
                '}';
    }
}
Data.java
package com.example.SpringBootBook1.entity;
import java.util.ArrayList;
public class Data {
    public static ArrayList<Book> getData(){
        ArrayList<Book> books=new ArrayList<>();
        books.add(new Book(1,"楚辞","屈原","中国文联出版社","0"));
        books.add(new Book(2,"纳兰词","纳兰性德","中国文联出版社","1"));
        books.add(new Book(3,"西游记","吴承恩","中国文联出版社","2"));
        return books;
    }
}
3.创建控制器类
BookController.java
package com.example.SpringBootBook1. controller;
import com.example.SpringBootBook1.entity.Book;
import com.example.SpringBootBook1.entity.Data;
import com.example.SpringBootBook1.entity.User;
import org.springframework.stereotype.Controller;
import org.springframework.ui.Model;
import org.springframework.web.bind.annotation.GetMapping;
import org.springframework.web.bind.annotation.ModelAttribute;
import org.springframework.web.bind.annotation.PathVariable;
import org.springframework.web.bind.annotation.RequestMapping;
import jakarta.servlet.http.HttpSession;
import java.util.ArrayList;
@Controller
@RequestMapping("book")
public class BookController {
// private List<Book> books = new ArrayList<>();
//获取所有图书信息
ArrayList<Book> books = Data.getData();
@GetMapping("list")
public String findBook(Model model, HttpSession session) {
User user = new User("HongHaoyan", "ADMIN");
session.setAttribute("user", user);
model.addAttribute("books", books);
return "books";
}
//获取所有图书信息
// ArrayList<Book> books = Data.getData();
@RequestMapping("search")
public String searchBook(@ModelAttribute Book book, Model model, HttpSession session){
ArrayList<Book> bs=new ArrayList<>();
String bname=book.getName();
String bauthor=book.getAuthor();
if(bname.isEmpty()&&bauthor.isEmpty()){
bs= (ArrayList<Book>) books;
}else{
for (Book b : books) {
if((!bname.isEmpty()&&b.getName().contains(bname))||
(!bauthor.isEmpty()&&b.getAuthor().contains(bauthor))){
bs.add(b);
}
}
}
session.setAttribute("user",new User("HongHaoyan","ADMIN"));
model.addAttribute("books",bs);
return "books";
}
/**
*获取借阅图书的编号
*/
@RequestMapping("find/{id}")
public String findBook(@PathVariable("id") Integer id){
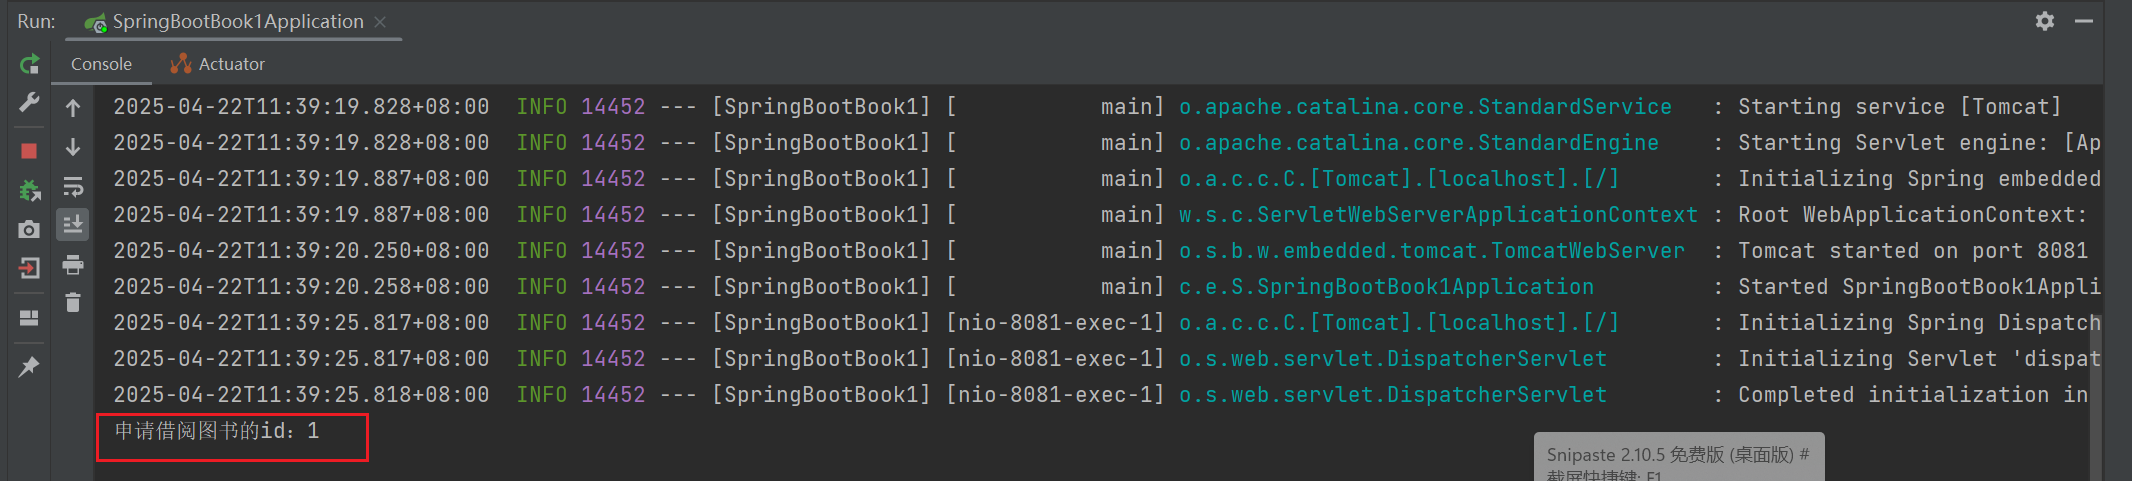
System.out.println("申请借阅图书的id:"+id);
return "redirect:/book/list";
}
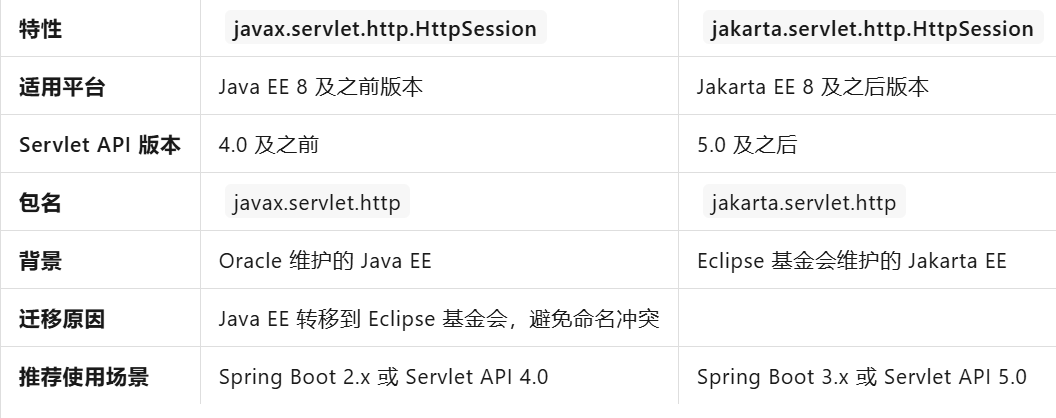
}tips:javax.servlet.http.HttpSession 和 jakarta.servlet.http.HttpSession 的精简对比表格:(这里我使用了jakarta.servlet.http.HttpSession)
4.创建模板文件
books.html
<!DOCTYPE HTML>
<html xmlns:th="http://www.thymeleaf.org">
<head>
<meta charset="utf-8">
<title>图书管理</title>
<link rel="stylesheet" th:href="@{/css/bootstrap.css}">
<link rel="stylesheet" th:href="@{/css/AdminLTE.css}">
<link rel="stylesheet" th:href="@{/css/pagination.css}">
<script th:src="@{/js/jquery.min.js}"></script>
</head>
<body>
<div class="box-body">
<div class="pull-left" th:if="${session.user != null and session.user.role != null and session.user.role == 'ADMIN'}">
<div class="btn-group">
<button type="button" class="btn btn-default"> 新增</button>
</div>
</div>
<!--数据搜索 -->
<div class="pull-right">
<div class="has-feedback">
<form th:action="@{/book/search}" method="post">
图书名称:<input name="name">    
图书作者:<input name="author">    
<input class="btn btn-default" type="submit" value="查询">
</form>
</div>
</div>
<div class="table-box">
<!-- 数据表格 -->
<table id="dataList" class="table table-bordered table-striped table-hover text-center">
<thead>
<tr>
<th>图书名称</th>
<th>图书作者</th>
<th>出版社</th>
<th>图书状态</th>
<th>操作</th>
</tr>
</thead>
<tbody>
<th:block th:each="book : ${books}">
<tr>
<td th:text="${book.name}"></td>
<td th:text="${book.author}"></td>
<td th:text="${book.press}"></td>
<td>
<th:block th:if="${book.status == '0'}">
可借阅
</th:block>
<th:block th:if="${book.status =='1'}">
借阅中
</th:block>
<th:block th:if="${book.status =='2'}">
归还中
</th:block>
</td>
<td class="text-center">
<button th:if="${book.status =='0'}" type="button" class="btn bg-olive btn-xs"
th:onclick="|findBookById(${book.id})|"> 借阅
</button>
<button th:if="${book.status =='1' || book.status =='2'}" type="button"
class="btn bg-olive btn-xs"
disabled="true">借阅
</button>
</td>
</tr>
</th:block>
</tbody>
</table>
</div>
</div>
</body>
<script>
function findBookById(id) {
$.get("/book/find/"+id)
}
</script>
</html>
tips:在编写books.html过程中,出现的问题是我花费了较长的时间才解决,前端一直出现505页面,最后是修改了以下div才最终实现了效果

5.测试图书管理
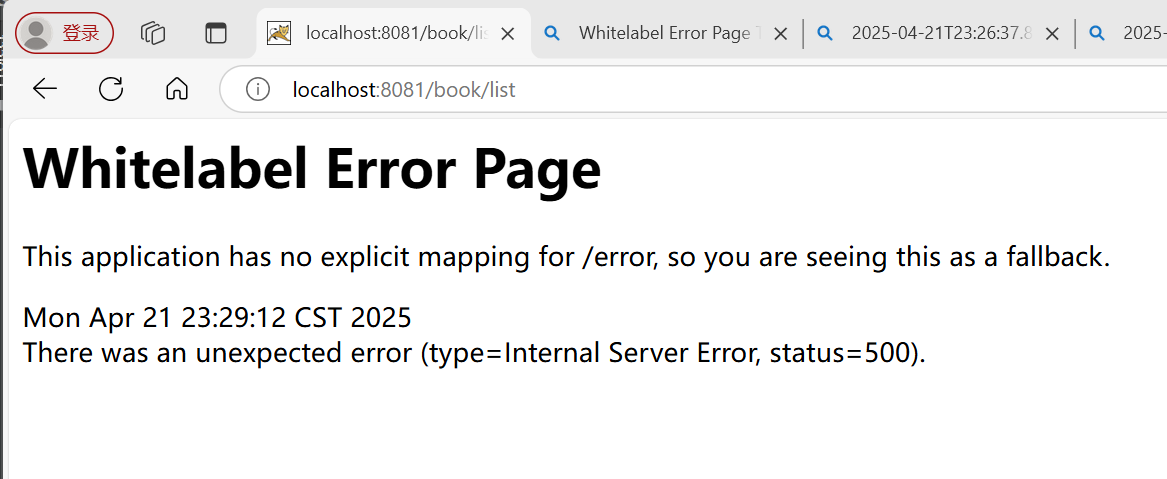
1)访问http://localhost:8081/book/list查询所有图书信息(由于我电脑的8080端口被占用,因此在application.properties中修改为8081端口)
spring.application.name=SpringBootBook1
server.port = 8081

2)按条件查询图书信息

3)点击借阅,控制台输出信息


 被折叠的 条评论
为什么被折叠?
被折叠的 条评论
为什么被折叠?
 到【灌水乐园】发言


