录音
- AVAudioRecorder是AVFoundation中的类,提供了简单的录音功能。
常用方法
- 初始化方法
- (id)initWithURL:(NSURL *)url settings:(NSDictionary *)settings error:(NSError **)outError;- 录音操作
// 1、准备开始录音
- (BOOL)prepareToRecord;

// 2、开始录音
- (BOOL)record;

// 3、暂停录音
- (void)pause;

// 4、停止录音
- (void)stop;

// 5、删除录音文件
- (BOOL)deleteRecording;
常用属性
delegate:设置委托
currentTime:获取当前录音时长
recording:获取录音状态
settings:录音设置
AVAudioRecorderDelegate
// 1、录音结束
- (void)audioRecorderDidFinishRecording:(AVAudioRecorder *)recorder successfully:(BOOL)flag;

// 2、录音错误
- (void)audioRecorderEncodeErrorDidOccur:(AVAudioRecorder *)recorder error:(NSError * __nullable)error;
AVAudioSession
音频预设
录音前需要对音频操作进行预设:
[[AVAudioSession sharedInstance] setCategory:AVAudioSessionCategoryPlayAndRecord error:nil];

[[AVAudioSession sharedInstance] setActive:YES error:nil];
Category
AVAudioSessionCategoryAmbient 或 kAudioSessionCategory_AmbientSound
用于非以语音为主的应用,使用这个category的应用会随着静音键和屏幕关闭而静音。并且不会中止其它应用播放声音,可以和其它自带应用如iPod,safari等同时播放声音。注意:该Category无法在后台播放声音AVAudioSessionCategorySoloAmbient 或 kAudioSessionCategory_SoloAmbientSound
类似于AVAudioSessionCategoryAmbient 不同之处在于它会中止其它应用播放声音。 这个category为默认category。该Category无法在后台播放声音AVAudioSessionCategoryPlayback 或 kAudioSessionCategory_MediaPlayback
用于以语音为主的应用,使用这个category的应用不会随着静音键和屏幕关闭而静音。可在后台播放声音AVAudioSessionCategoryRecord 或 kAudioSessionCategory_RecordAudio
用于需要录音的应用,设置该category后,除了来电铃声,闹钟或日历提醒之外的其它系统声音都不会被播放。该Category只提供单纯录音功能AVAudioSessionCategoryPlayAndRecord 或 kAudioSessionCategory_PlayAndRecord
用于既需要播放声音又需要录音的应用,语音聊天应用(如微信)应该使用这个category。该Category提供录音和播放功能。如果你的应用需要用到iPhone上的听筒,该category是你唯一的选择,在该Category下声音的默认出口为听筒(在没有外接设备的情况下)。
Tips
并不是一个应用只能使用一个category,程序应该根据实际需要来切换设置不同的category,举个例子,录音的时候,需要设置为AVAudioSessionCategoryRecord,当录音结束时,应根据程序需要更改category为AVAudioSessionCategoryAmbient,AVAudioSessionCategorySoloAmbient或AVAudioSessionCategoryPlayback中的一种
Audio Route的选择
当你的iPhone接有多个外接音频设备时(耳塞,蓝牙耳机等),AudioSession将遵循last-in wins的原则来选择外接设备,即声音将被导向最后接入的设备。
当没有接入任何音频设备时,一般情况下声音会默认从扬声器出来,但有一个例外的情况:在PlayAndRecord这个category下,听筒会成为默认的输出设备。如果你想要改变这个行为,可以提供MPVolumeView来让用户切换到扬声器,也可通过overrideOutputAudioPort方法来programmingly切换到扬声器,也可以修改category option为AVAudioSessionCategoryOptionDefaultToSpeaker。
PlayandRecord下切换到扬声器:
除了让用户手动选择,你也可以通过以下两种方法在程序里进行切换。
// steps 1 修改Category的默认行为:
[audioSession setCategory:AVAudioSessionCategoryPlayAndRecord withOptions:AVAudioSessionCategoryOptionDefaultToSpeaker error:&error];


// steps 2 OverrideOutputAudioPort:
[audioSession overrideOutputAudioPort:AVAudioSessionPortOverrideSpeaker error:&error];
录音案例
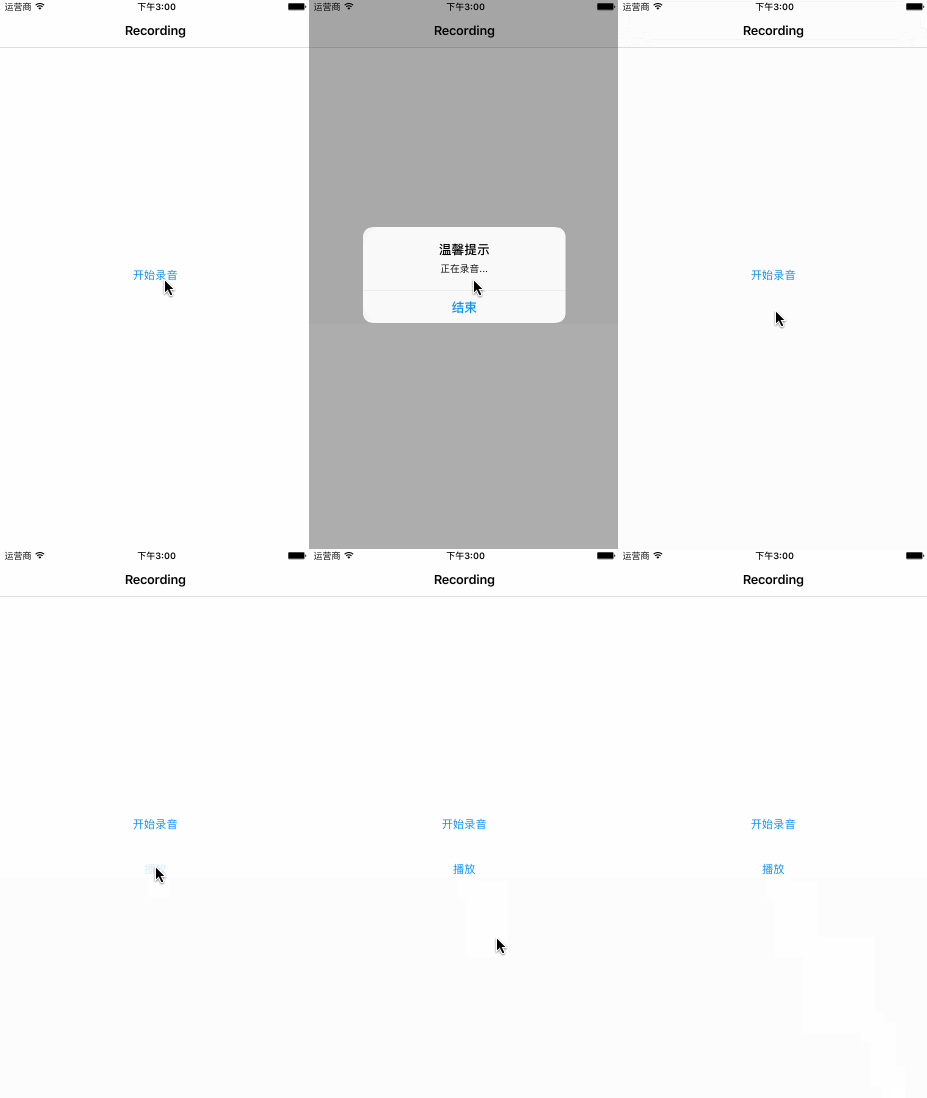
效果展示
代码示例
#import "ViewController.h"
#import <AVFoundation/AVFoundation.h>

enum {
    PlayBtnTag = 10,
    RecodeBtnTag
};

@interface ViewController ()

@property (nonatomic, strong) AVAudioRecorder *recoder; /**< 录音器 */
@property (nonatomic, strong) AVAudioPlayer *player; /**< 播放器 */
@property (nonatomic, strong) UIButton *playBtn; /**< 播放按钮 */
@property (nonatomic, strong) UIButton *recodeBtn; /**< 录音按钮 */


- (void)initializeAudioSession;  /**< 初始化音频会议 */
- (void)initializeUserInterface; /**< 初始化用户界面 */

@end

@implementation ViewController

- (void)viewDidLoad {
    [super viewDidLoad];
    [self initializeAudioSession];
    [self initializeUserInterface];
}

#pragma mark *** Initialize methods ***
- (void)initializeAudioSession {
    // 配置音频处理模式
    AVAudioSession *audioSession = [AVAudioSession sharedInstance];

    NSError *error = nil;

    BOOL success = NO;

    // 音频处理模式设置为播放及录音
    success = [audioSession setCategory:AVAudioSessionCategoryPlayAndRecord error:&error];
    NSAssert(success, @"set audio session category failed with error message '%@'.", [error localizedDescription]);

    // 激活音频处理
    success = [audioSession setActive:YES error:&error];
    NSAssert(success, @"set audio session active failed with error message '%@'.", [error localizedDescription]);
}

- (void)initializeUserInterface {
    self.view.backgroundColor = [UIColor whiteColor];

    // 加载视图
    [self.view addSubview:self.recodeBtn];
    [self.view addSubview:self.playBtn];
}

#pragma mark *** Events ***
- (void)respondsToButton:(UIButton *)sender {
    switch (sender.tag) {
            // 录音
        case RecodeBtnTag: {
            if (!self.playBtn.hidden) {
                self.playBtn.hidden = YES;
            }
            // 设置音频存储路径
            NSString *documentPath = NSSearchPathForDirectoriesInDomains(NSDocumentDirectory, NSUserDomainMask, YES).firstObject;
            NSString *outputPath = [documentPath stringByAppendingString:@"/recodOutput.caf"];
            NSURL *outputUrl = [NSURL fileURLWithPath:outputPath];

            // 初始化录音器
            NSError *error = nil;
            // settings:
            // AVSampleRateKey:播放速度
            // AVNumberOfChannelsKey:录音声道
            self.recoder = [[AVAudioRecorder alloc] initWithURL:outputUrl settings:@{AVSampleRateKey:@(1.0)} error:&error];
            if (error) {
                NSLog(@"initialize recoder error. reason:“%@”", error.localizedDescription);
            }else {
                // 准备录音
                [_recoder prepareToRecord];
                // 录音
                [_recoder record];

                // 弹框
                UIAlertController *alertController = [UIAlertController alertControllerWithTitle:@"温馨提示" message:@"正在录音..." preferredStyle:UIAlertControllerStyleAlert];
                [alertController addAction:[UIAlertAction actionWithTitle:@"结束" style:UIAlertActionStyleCancel handler:^(UIAlertAction * _Nonnull action) {
                    // 停止录音
                    [_recoder stop];

                    _playBtn.hidden = NO;
                }]];
                [self presentViewController:alertController animated:YES completion:nil];
            }

        }
            break;
            // 播放
        case PlayBtnTag: {
            // 播放录制的音频文件
            NSError *error = nil;
            self.player = [[AVAudioPlayer alloc] initWithContentsOfURL:self.recoder.url error:&error];
            if (error) {
                NSLog(@"%@", error.localizedDescription);
            }else {
                // 设置循环次数
                // -1:无限循环
                //  0:不循环
                //  1:循环1次...
                _player.numberOfLoops = 0;
                [_player prepareToPlay];
                [_player play];
            }
        }
            break;

        default:
            break;
    }
}

#pragma mark *** Setters ***
- (void)setRecoder:(AVAudioRecorder *)recoder {
    if (_recoder != recoder) {
        // 删除录制的音频文件
        [_recoder deleteRecording];

        _recoder = nil;

        _recoder = recoder;
    }
}

- (void)setPlayer:(AVAudioPlayer *)player {
    if (_player != player) {
        [_player stop];

        _player = nil;

        _player = player;
    }
}

#pragma mark *** Getters ***
- (UIButton *)recodeBtn {
    if (!_recodeBtn) {
        _recodeBtn = [UIButton buttonWithType:UIButtonTypeSystem];
        _recodeBtn.bounds = CGRectMake(0, 0, 100, 30);
        _recodeBtn.center = self.view.center;
        _recodeBtn.tag = RecodeBtnTag;
        [_recodeBtn setTitle:@"开始录音" forState:UIControlStateNormal];
        [_recodeBtn addTarget:self action:@selector(respondsToButton:) forControlEvents:UIControlEventTouchUpInside];

    }
    return _recodeBtn;
}
- (UIButton *)playBtn {
    if (!_playBtn) {
        _playBtn = [UIButton buttonWithType:UIButtonTypeSystem];
        _playBtn.bounds = CGRectMake(0, 0, 100, 30);
        _playBtn.center = CGPointMake(CGRectGetMidX(self.view.bounds), CGRectGetMaxY(self.recodeBtn.frame) + CGRectGetMidY(_playBtn.bounds) + 30);
        _playBtn.tag = PlayBtnTag;
        _playBtn.hidden = YES;
        [_playBtn setTitle:@"播放" forState:UIControlStateNormal];
        [_playBtn addTarget:self action:@selector(respondsToButton:) forControlEvents:UIControlEventTouchUpInside];
    }
    return _playBtn;
}
@end
音效
- AudioToolBox.framework提供了多种音效处理功能,包括混音、音效播放等。
音效使用
1、获取音效文件的路径
NSURL *url = [[NSBundle mainBundle] URLForResource:@"music_fail" withExtension:@"mp3"];2、加载音效文件,得到对应的音效ID
SystemSoundID soundID = 0;

AudioServicesCreateSystemSoundID((__bridge CFURLRef)(url), &soundID);
3、播放音效
AudioServicesPlaySystemSound(soundID);注意:音效文件只需加载1次。
音效播放常见函数
// 1、加载音效文件
AudioServicesCreateSystemSoundID(CFURLRef inFileURL, SystemSoundID *outSystemSoundID)

// 2、释放音效资源
AudioServicesDisposeSystemSoundID(SystemSoundID inSystemSoundID)

// 3、播放音效
AudioServicesPlaySystemSound(SystemSoundID inSystemSoundID)

// 4、播放音效带点震动
AudioServicesPlayAlertSound(SystemSoundID inSystemSoundID)
音效代码示例
#import "ViewController.h"
#import <AVFoundation/AVFoundation.h>

@interface ViewController () {
    SystemSoundID _soundID;
}

- (void)initializeUserInterface; /**< 初始化用户界面 */

@end

@implementation ViewController

- (void)viewDidLoad {
    [super viewDidLoad];
    [self initializeUserInterface];
}

#pragma mark *** Initialize ***
- (void)initializeUserInterface {

    self.view.backgroundColor = [UIColor whiteColor];

    // 播放音效按钮
    UIButton *playButton = [UIButton buttonWithType:UIButtonTypeSystem];
    playButton.bounds = CGRectMake(0, 0, 100, 30);
    playButton.center = self.view.center;

    [playButton setTitle:@"播放音效" forState:UIControlStateNormal];
    [playButton addTarget:self
                   action:@selector(respondsToButton:)
         forControlEvents:UIControlEventTouchUpInside];
    [self.view addSubview:playButton];
}

#pragma mark *** Events ***
- (void)respondsToButton:(UIButton *)sender {

    // 1、获取音效文件全路径,music_fail.mp3为自行导入的音效素材
    NSURL *url = [[NSBundle mainBundle] URLForResource:@"music_fail" withExtension:@"mp3"];

    // 2、加载音效文件,创建音效ID(SoundID,一个ID对应一个音效文件)
    AudioServicesCreateSystemSoundID((__bridge CFURLRef)(url), &_soundID);


    // 3、播放音效文件
    // 下面的两个函数都可以用来播放音效文件,第一个函数伴随有震动效果
    AudioServicesPlayAlertSound(_soundID);
    AudioServicesPlaySystemSound(_soundID);

    // 4、把需要销毁的音效文件的ID传递给它既可销毁
    // AudioServicesDisposeSystemSoundID(_soundID);
}

@end


 7035
7035

 被折叠的 条评论
为什么被折叠?


