


简介
UIPickerView 是一个选择器控件, 它可以生成单列的选择器,也可生成多列的选择器,而且开发者完全可以自定义选择项的外观,因此用法非常灵活。 UIPickerView 直接继承了 UIView ,没有继承 UIControl ,因此,它不能像 UIControl 那样绑定事件处理方法, UIPickerView 的事件处理由其委托对象完成。
苹果官方解释:
The UIPickerView class implements objects, called picker views, that use a spinning-wheel or slot-machine metaphor to show one or more sets of values. Users select values by rotating the wheels so that the desired row of values aligns with a selection indicator.
初始化
- (instancetype)initWithFrame:(CGRect)frame;常用属性
dataSource:设置数据源
delegate:设置代理
showsSelectionIndicator:该属性控制是否显示UIPickerView中的选中标记(以高亮背景作为选中标记)。
numberOfComponents: 获取UIPickerView指定列中包含的列表项的数量。该属性是一个只读属性。
常用方法
// 1、刷新所有列
- (void)reloadAllComponents;

// 2、刷新指定列
- (void)reloadComponent:(NSInteger)component;

// 3、获取UIPickerView包含的列数量
- (NSInteger)numberOfRowsInComponent:(NSInteger)component;

// 4、获取UIPickerView包含的指定列中列表项的大小。该方法返回一个CGSize对象
- (CGSize)rowSizeForComponent:(NSInteger)component;
UIPickerViewDataSource
数据源,UIPickerViewDataSource为一个协议,该协议提供了如下方法配置UIPickerView的列数与行数。
// 1、设置列数
- (NSInteger)numberOfComponentsInPickerView:(UIPickerView *)pickerView;

// 2、设置行数
- (NSInteger)pickerView:(UIPickerView *)pickerView numberOfRowsInComponent:(NSInteger)component;
UIPickerViewDelegate
代理,同样的,UIPickerViewDelegate也为一个协议,该协议可监听用户交互,选中某行数据,亦可配置UIPickerView的行高及列宽等。
// 1、设置列宽
- (CGFloat)pickerView:(UIPickerView *)pickerView widthForComponent:(NSInteger)component;

// 2、设置行高
- (CGFloat)pickerView:(UIPickerView *)pickerView rowHeightForComponent:(NSInteger)component;

// 3、设置每行显示标题
- (nullable NSString *)pickerView:(UIPickerView *)pickerView titleForRow:(NSInteger)row forComponent:(NSInteger)component;

// 4、自定义行视图
- (UIView *)pickerView:(UIPickerView *)pickerView viewForRow:(NSInteger)row forComponent:(NSInteger)component reusingView:(nullable UIView *)view;

// 5、选择某行
- (void)pickerView:(UIPickerView *)pickerView didSelectRow:(NSInteger)row inComponent:(NSInteger)component;
案例
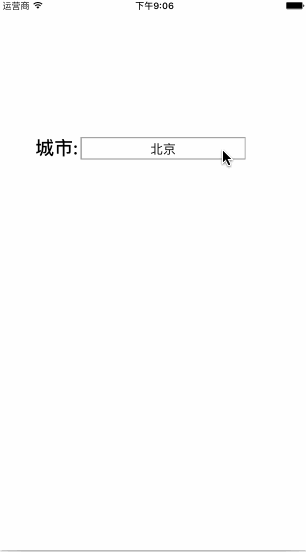
效果展示
代码实现
案例分析:从上面效果当点击北京所在的视图的时候,从屏幕下方弹出了拾取视图,是不是有点熟悉呢?没错,这似乎类似于文本输入框,当文本输入框在响应用户交互的时候,对应的键盘会弹起。那我们就按照这样的思路去实现上述效果。首先,我们需自定义键盘,通过设置文本输入框的inputView属性,将其设值为pickerView即可,那么【确定】按钮又如何实现呢?其实很简单,对应的我们可设置文本输入框的附件视图属性inputAccessoryView,解决了这个问题之后,可能还有疑问,那就是文本输入框的光标如何解决呢?不用担心,我们可设置文本输入框的tintColor属性,设值为透明色clearColor即可。解决了几个主要的问题,那么要实现上述效果就变得简单了,下面我将直接贴上源码,供各位参考,不到之处,还望指点。
#import "ViewController.h"

#define RGB_COLOR(_R,_G,_B,_A) [UIColor colorWithRed:_R/255.0 green:_G/255.0 blue:_B/255.0 alpha:_A]

@interface ViewController () <UIPickerViewDelegate, UIPickerViewDataSource> {

    NSArray  *_dataSource; /**< 数据源 */
    NSInteger _index;
}

@property (nonatomic, strong) UIPickerView *pickerView;/**< 拾取器 */
@property (nonatomic, strong) UITextField  *textField; /**< 文本输入框 */

- (void)initializeDataSource; /**< 初始化数据源 */
- (void)initializeUserInterface; /**< 初始化用户界面 */

@end

@implementation ViewController

- (void)viewDidLoad {
    [super viewDidLoad];
    [self initializeDataSource];
    [self initializeUserInterface];

}

#pragma mark *** Initialize methods ***

- (void)initializeDataSource {
    // 初始化数据源
    _dataSource = @[@"北京", @"上海", @"成都", @"上海", @"深圳"];
}

- (void)initializeUserInterface {

    // 文本标签
    UILabel *titleLabel = [[UILabel alloc] init];

    titleLabel.bounds = CGRectMake(0, 0, 60, 30);
    titleLabel.center = CGPointMake(80, 200);
    titleLabel.text = @"城市:";
    titleLabel.font = [UIFont boldSystemFontOfSize:25];

    [self.view addSubview:titleLabel];

    // 加载文本输入框
    [self.view addSubview:self.textField];

    // 自定义键盘样式
    self.textField.inputView = self.pickerView;


    UIButton *sureButton = [[UIButton alloc] init];

    sureButton.bounds = CGRectMake(0, 0, CGRectGetWidth(self.view.bounds), 30);
    sureButton.center = CGPointMake(CGRectGetMidX(self.view.bounds), 25);
    sureButton.backgroundColor = RGB_COLOR(231, 231, 231, 1);
    // 设置标题对齐方式请1
    sureButton.contentHorizontalAlignment = UIControlContentHorizontalAlignmentRight;

    [sureButton setTitle:@"【确 定】" forState:UIControlStateNormal];
    [sureButton setTitleColor:[UIColor blueColor] forState:UIControlStateNormal];
    [sureButton setTitleColor:[UIColor redColor] forState:UIControlStateHighlighted];
    [sureButton addTarget:self action:@selector(respondsToSureButton:) forControlEvents:UIControlEventTouchUpInside];

    // 自定义键盘附件视图
    _textField.inputAccessoryView = sureButton;
}

#pragma mark *** Events ***
- (void)respondsToSureButton:(UIButton *)sender {
    // 收起键盘,失去第一响应
    [_textField resignFirstResponder];

    _textField.text = _dataSource[_index];
}

#pragma mark ***  <UIPickerViewDelegate, UIPickerViewDataSource> ***
// 设置列
- (NSInteger)numberOfComponentsInPickerView:(UIPickerView *)pickerView {
    return 1;
}

// 设置行
- (NSInteger)pickerView:(UIPickerView *)pickerView numberOfRowsInComponent:(NSInteger)component {
    return _dataSource.count;
}

// 设置标题
- (NSString *)pickerView:(UIPickerView *)pickerView titleForRow:(NSInteger)row forComponent:(NSInteger)component {
    return _dataSource[row];
}

// 点击某行
- (void)pickerView:(UIPickerView *)pickerView didSelectRow:(NSInteger)row inComponent:(NSInteger)component {

    _index = row;
}

// 自定义行
/*
 - (UIView *)pickerView:(UIPickerView *)pickerView viewForRow:(NSInteger)row forComponent:(NSInteger)component reusingView:(UIView *)view {
 return nil;
 }
 */

#pragma mark *** Touches ***
- (void)touchesBegan:(NSSet *)touches withEvent:(UIEvent *)event {
    [self.view endEditing:YES];
}


#pragma mark *** Getters ***

- (UITextField *)textField {
    if (!_textField) {
        // 文本输入框
        _textField = [[UITextField alloc] init];
        _textField.bounds = CGRectMake(0, 0, 220, 30);
        _textField.center = CGPointMake(220, 200);
        _textField.borderStyle = UITextBorderStyleBezel;
        _textField.textAlignment = NSTextAlignmentCenter;
        // 修改光标颜色
        _textField.tintColor = [UIColor clearColor];
        _textField.text = @"北京";
    }
    return _textField;
}
- (UIPickerView *)pickerView {
    if (!_pickerView) {
        _pickerView = [[UIPickerView alloc] initWithFrame:CGRectMake(0, 0, 300, 220)];
        _pickerView.backgroundColor = RGB_COLOR(244, 244, 244, 1);
        // 设置代理
        _pickerView.delegate = self;
        // 设置数据源
        _pickerView.dataSource = self;
        _pickerView.showsSelectionIndicator = YES;
    }
    return _pickerView;
}


@end


 524
524

 被折叠的 条评论
为什么被折叠?
被折叠的 条评论
为什么被折叠?
 到【灌水乐园】发言


