简介
在iOS开发中,可能会用到发短信、发邮件、打电话及摇一摇等功能,比如在应用程序的‘关于’界面,我们可能会留下电话号码或邮箱等联系方式,为了方便用户直接在应用程序中做操作,提升用户体验,我们会设计一些交互动作,让用户轻松的去发短信、打电话或发邮件等。如下我将简单介绍几种功能的具体实现方法。需要注意的是,如下功能的实现必须通过真机调试,模拟器暂不支持如上功能。
打电话
methods 1:直接跳转到打电话界面
NSURL *url = [NSURL URLWithString:[@"tel://电话号码"];

[[UIApplication sharedApplication] openURL:url];
缺陷:直接拨打,不提示。
methods 2:直接跳转到打电话界面,有提示
NSURL *url = [NSURL URLWithString:[@"telprompt://电话号码"];

[[UIApplication sharedApplication] openURL:url];
methods 3:基于UIWebView实现打电话功能,有提示
UIWebView *webView = [[UIWebView alloc] init];

NSURL *url = [NSURL URLWithString:[@"tel://电话号码"];

[webView loadRequest:[NSURLRequest requestWithURL:url]];

[self.view addSubview:webView];
发短信
methods 1:直接跳转到发送短信界面
NSURL *url = [NSURL URLWithString:[@"sms://手机号码"];

[[UIApplication sharedApplication] openURL:url];
缺陷:不能定义发送短信的内容,且发完短信后不能自动回到原应用。
methods 2:使用 MessageUI 框架发送短信
注意:需要包含头文件 #import
MFMessageComposeViewController *msgVc = [[MFMessageComposeViewController alloc] init];

// 设置短信内容
msgVc.body = @"您好,今天天气不错,一起出去玩么?";

// 设置收件人列表
msgVc.recipients = @[电话号码];

// 设置代理
msgVc.messageComposeDelegate = self;

// 显示控制器
[self presentViewController:msgVc animated:YES completion:nil];
}
实现代理方法:
// 点击取消按钮会自动调用
- (void)messageComposeViewController:(MFMessageComposeViewController *)controller didFinishWithResult:(MessageComposeResult)result {

    [controller dismissViewControllerAnimated:YES completion:nil];

}
发邮件
methods 1:用自带的邮件客户端
NSURL *url = [NSURL URLWithString:[@"mailto://邮箱地址"];

[[UIApplication sharedApplication] openURL:url];
methods 2:使用 MessageUI 框架发送邮件
// 异常处理
if (![MFMailComposeViewController canSendMail]) {
    return;
}

MFMailComposeViewController *mailVc = [[MFMailComposeViewController alloc] init];

// 设置邮件主题
[mailVc setSubject:@"部门会议"];

// 设置邮件内容
[mailVc setMessageBody:@"下午3点半,召开部门会议,请准时参加。" isHTML:NO];

// 设置收件人列表
[mailVc setToRecipients:@[收件人邮箱地址]];

// 设置抄送人列表
[mailVc setCcRecipients:@[抄送人邮箱地址]];

// 设置代理
mailVc.mailComposeDelegate = self;

// 显示控制器
[self presentViewController:mailVc animated:YES completion:nil];
实现代理方法
#pragma mark - MFMailComposeViewControllerDelegate
- (void)mailComposeController:(MFMailComposeViewController *)controller didFinishWithResult:(MFMailComposeResult)result error:(NSError *)error {

    [controller dismissViewControllerAnimated:YES completion:nil];

}
摇一摇
iOS本身支持摇一摇功能,在UIResponder中存在如下方法:
// 1、检测到摇动
- (void)motionBegan:(UIEventSubtype)motion withEvent:(nullable UIEvent *)event NS_AVAILABLE_IOS(3_0);

// 2、摇动结束
- (void)motionEnded:(UIEventSubtype)motion withEvent:(nullable UIEvent *)event NS_AVAILABLE_IOS(3_0);

// 3、摇动取消
- (void)motionCancelled:(UIEventSubtype)motion withEvent:(nullable UIEvent *)event NS_AVAILABLE_IOS(3_0);
使用摇一摇功能实际很简单,首先你只需调用如下方法让控制器支持摇动即可:
[[UIApplication sharedApplication] setApplicationSupportsShakeToEdit:YES];其次你还需将视图控制器成为第一响应者,如下所示:
[self becomeFirstResponder];代码示例:
#import "ViewController.h"

@interface ViewController ()

@end

@implementation ViewController

- (void)viewDidLoad {
    [super viewDidLoad];

    [[UIApplication sharedApplication] setApplicationSupportsShakeToEdit:YES];

    [self becomeFirstResponder];
}


#pragma mark - Motion methos
- (void)motionBegan:(UIEventSubtype)motion withEvent:(UIEvent *)event {
    NSLog(@"检测到摇动");
}

- (void)motionCancelled:(UIEventSubtype)motion withEvent:(UIEvent *)event {
    NSLog(@"摇动取消");
}

- (void)motionEnded:(UIEventSubtype)motion withEvent:(UIEvent *)event {
    NSLog(@"摇动结束");

    if (event.subtype == UIEventSubtypeMotionShake) {
        // 处理业务逻辑
    }
}

@end
打电话、发短信、发邮件案例
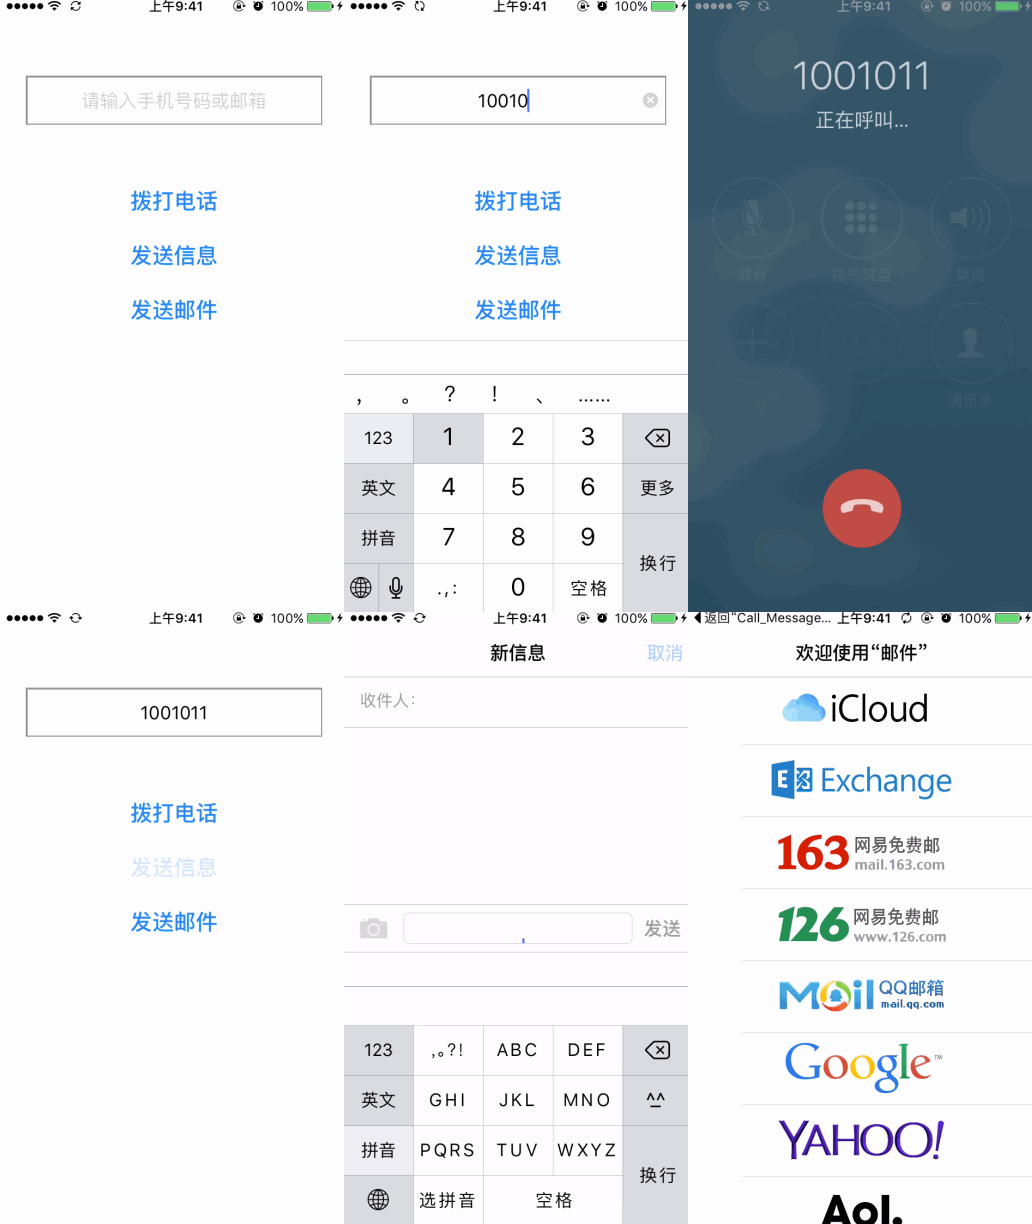
效果展示
代码示例
#import "ViewController.h"
#import <MessageUI/MessageUI.h>

#define Screen_Width [UIScreen mainScreen].bounds.size.width

@interface ViewController () <MFMessageComposeViewControllerDelegate, MFMailComposeViewControllerDelegate>

@property (nonatomic, strong) UITextField *textField;
@property (nonatomic, strong) UIButton *callBtn;
@property (nonatomic, strong) UIButton *sendMsgBtn;
@property (nonatomic, strong) UIButton *sendEmailBtn;

- (void)initializeUserInterface; /**< 初始化用户界面 */

@end

@implementation ViewController

- (void)viewDidLoad {
    [super viewDidLoad];
    [self initializeUserInterface];
}

#pragma mark - Initialize
- (void)initializeUserInterface {
    self.view.backgroundColor = [UIColor whiteColor];

    [self.view addSubview:self.textField];
    [self.view addSubview:self.callBtn];
    [self.view addSubview:self.sendMsgBtn];
    [self.view addSubview:self.sendEmailBtn];
}

#pragma mark - Events
- (void)respondsToCallBtn:(UIButton *)sender {

    [self.view endEditing:YES];

    NSString *phoneNumber = self.textField.text;

    // 方法一:
    // NSURL *url = [NSURL URLWithString:[@"tel://" stringByAppendingString:phoneNumber]];
    // [[UIApplication sharedApplication] openURL:url];

    // 方法二:
    // NSURL *url = [NSURL URLWithString:[@"telprompt://" stringByAppendingString:phoneNumber]];
    // [[UIApplication sharedApplication] openURL:url];

    // 方法三:
    UIWebView *webView = [[UIWebView alloc] init];
    NSURL *url = [NSURL URLWithString:[@"tel://" stringByAppendingString:phoneNumber]];
    [webView loadRequest:[NSURLRequest requestWithURL:url]];
    [self.view addSubview:webView];

}

- (void)respondsToSendMsgBtn:(UIButton *)sender {
    [self.view endEditing:YES];

    NSString *phoneNumber = self.textField.text;

    // 方法一:直接跳转到发短信界面
    // 缺点:不能定义发送短信的内容,且发完短信后不能自动回到原应用。

    // NSURL *url = [NSURL URLWithString:[@"sms://" stringByAppendingString:phoneNumber]];
    // [[UIApplication sharedApplication] openURL:url];

    // 方法二:使用MessageUI 框架发送短信,需要包含头文件 #import <MessageUI/MessageUI.h>

    MFMessageComposeViewController *msgVc = [[MFMessageComposeViewController alloc] init];
    // 设置短信内容
    msgVc.body = @"您好,今天天气不错,一起出去玩么?";
    // 设置收件人列表
    msgVc.recipients = @[phoneNumber];
    // 设置代理
    msgVc.messageComposeDelegate = self;
    // 显示控制器
    [self presentViewController:msgVc animated:YES completion:nil];
}

- (void)respondsToSendEamilBtn:(UIButton *)sender {
    [self.view endEditing:YES];

    NSString *email = self.textField.text;

    // 方法一:用自带的邮件客户端
    // 缺点:发完邮件后不会自动回到原应用
     NSURL *url = [NSURL URLWithString:[@"mailto://" stringByAppendingString:email]];
     [[UIApplication sharedApplication] openURL:url];

    // 方法二:类似于发短信的第二种方法
    // 异常处理
    /*
    if (![MFMailComposeViewController canSendMail]) {
        return;
    }
    MFMailComposeViewController *mailVc = [[MFMailComposeViewController alloc] init];
    // 设置邮件主题
    [mailVc setSubject:@"部门会议"];
    // 设置邮件内容
    [mailVc setMessageBody:@"下午3点半,召开部门会议,请准时参加。" isHTML:NO];
    // 设置收件人列表
    [mailVc setToRecipients:@[email]];
    // 设置抄送人列表
    [mailVc setCcRecipients:@[]];
    // 设置代理
    mailVc.mailComposeDelegate = self;
    // 显示控制器
    [self presentViewController:mailVc animated:YES completion:nil];
     */
}

#pragma mark - Touches
- (void)touchesBegan:(NSSet<UITouch *> *)touches withEvent:(UIEvent *)event {
    [self.view endEditing:YES];
}

#pragma mark - MFMessageComposeViewControllerDelegate
// 点击取消按钮会自动调用
- (void)messageComposeViewController:(MFMessageComposeViewController *)controller didFinishWithResult:(MessageComposeResult)result {
    [controller dismissViewControllerAnimated:YES completion:nil];
}

#pragma mark - MFMailComposeViewControllerDelegate
- (void)mailComposeController:(MFMailComposeViewController *)controller didFinishWithResult:(MFMailComposeResult)result error:(NSError *)error {
    [controller dismissViewControllerAnimated:YES completion:nil];
}

#pragma mark - Getters
// 打电话布局
- (UITextField *)textField {
    if (!_textField) {
        _textField = [[UITextField alloc] init];
        _textField.bounds = CGRectMake(0, 0, Screen_Width * 0.85, 45);
        _textField.center = CGPointMake(Screen_Width * 0.5, 64 + CGRectGetMidY(_textField.bounds) + 10);
        _textField.textAlignment = NSTextAlignmentCenter;
        _textField.placeholder = @"请输入手机号码或邮箱";
        _textField.clearButtonMode = UITextFieldViewModeWhileEditing;
        _textField.borderStyle = UITextBorderStyleBezel;
    }
    return _textField;
}

- (UIButton *)callBtn {
    if (!_callBtn) {
        _callBtn = [UIButton buttonWithType:UIButtonTypeSystem];
        _callBtn.bounds = CGRectMake(0, 0, 100, 30);
        _callBtn.center = CGPointMake(Screen_Width * 0.5, CGRectGetMaxY(self.textField.frame) + CGRectGetMidX(_callBtn.bounds) + 20);
        _callBtn.titleLabel.font = [UIFont boldSystemFontOfSize:20];
        [_callBtn setTitle:@"拨打电话" forState:UIControlStateNormal];
        [_callBtn addTarget:self action:@selector(respondsToCallBtn:) forControlEvents:UIControlEventTouchUpInside];
    }
    return _callBtn;
}

// 发消息
- (UIButton *)sendMsgBtn {
    if (!_sendMsgBtn) {
        _sendMsgBtn = [UIButton buttonWithType:UIButtonTypeSystem];
        _sendMsgBtn.bounds = CGRectMake(0, 0, 100, 30);
        _sendMsgBtn.center = CGPointMake(Screen_Width * 0.5, CGRectGetMaxY(self.callBtn.frame) + CGRectGetMidY(_sendMsgBtn.bounds) + 20);
        _sendMsgBtn.titleLabel.font = [UIFont boldSystemFontOfSize:20];
        [_sendMsgBtn setTitle:@"发送信息" forState:UIControlStateNormal];
        [_sendMsgBtn addTarget:self action:@selector(respondsToSendMsgBtn:) forControlEvents:UIControlEventTouchUpInside];
    }
    return _sendMsgBtn;
}

// 发邮件
- (UIButton *)sendEmailBtn {
    if (!_sendEmailBtn) {
        _sendEmailBtn = [UIButton buttonWithType:UIButtonTypeSystem];
        _sendEmailBtn.bounds = CGRectMake(0, 0, 100, 30);
        _sendEmailBtn.center = CGPointMake(Screen_Width * 0.5, CGRectGetMaxY(self.sendMsgBtn.frame) + CGRectGetMidY(_sendEmailBtn.bounds) + 20);
        _sendEmailBtn.titleLabel.font = [UIFont boldSystemFontOfSize:20];
        [_sendEmailBtn setTitle:@"发送邮件" forState:UIControlStateNormal];
        [_sendEmailBtn addTarget:self action:@selector(respondsToSendEamilBtn:) forControlEvents:UIControlEventTouchUpInside];
    }
    return _sendEmailBtn;
}

@end


 1万+
1万+

 被折叠的 条评论
为什么被折叠?


