


            enableLights(false)

            enableVibration(false)

            vibrationPattern = LongArray(0)

            setSound(null, null)

        }

    notificationManager.createNotificationChannel(channel)

}
}
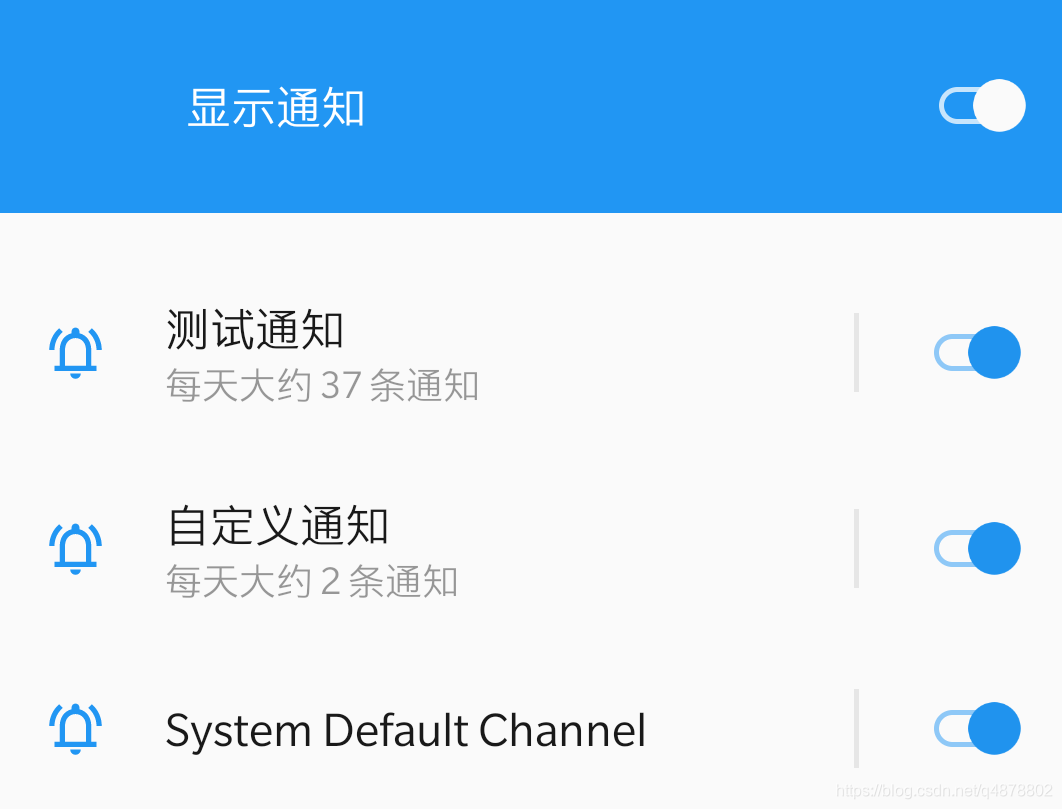
此操作需要在显示通知前完成,可以重复调用。
创建完通道后可以再设置中看到。
`CHANNEL_ID_NOTIFICATION_BASIC` 是我们自定义的 `CHANNEL_ID` 后面显示通知的时候会用到
private const val CHANNEL_ID_NOTIFICATION_BASIC = “CHANNEL_ID_NOTIFICATION_BASIC”
在显示通知之前,我们先创建一个`NotificationManager`
private lateinit var notificationManager: NotificationManager
notificationManager = getSystemService(Context.NOTIFICATION_SERVICE) as NotificationManager
[]( )基本样式通知
----------------------------------------------------------------
```
/**
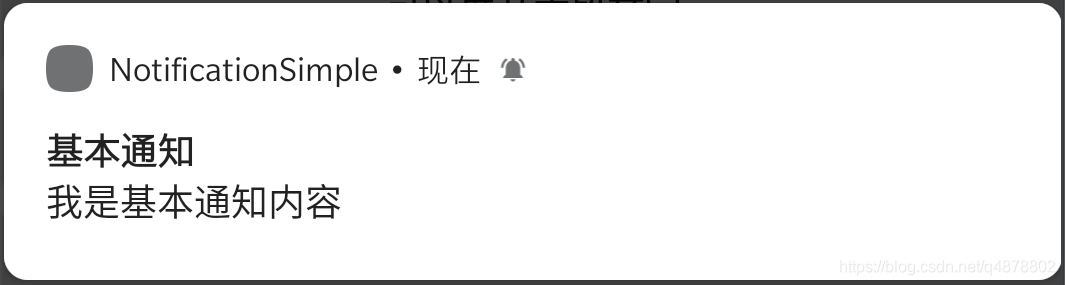
* 显示基本通知
*/
private fun showBasicNotification2() {
val build = NotificationCompat.Builder(this, CHANNEL_ID_NOTIFICATION_BASIC)
.setSmallIcon(R.mipmap.ic_launcher)
.setContentTitle("基本通知")
.setContentText("我是基本通知内容")
.setPriority(NotificationCompat.PRIORITY_DEFAULT)
.build()
notificationManager.notify(id++, build)
}

 ```
```
private fun showBigPictureNotification() {
val bitmap = BitmapFactory.decodeStream(resources.assets.open("picture.jpg"))

val build = NotificationCompat.Builder(this, CHANNEL_ID_NOTIFICATION_BASIC)

    .setSmallIcon(R.mipmap.ic_launcher)

    .setContentTitle("可展开大图")

    .setContentText("我是可展开大图的通知")

    .setStyle(NotificationCompat.BigPictureStyle().bigPicture(bitmap))

    .build()

notificationManager.notify(id++, build)
}
[]( )可以展开大段文字的通知
---------------------------------------------------------------------
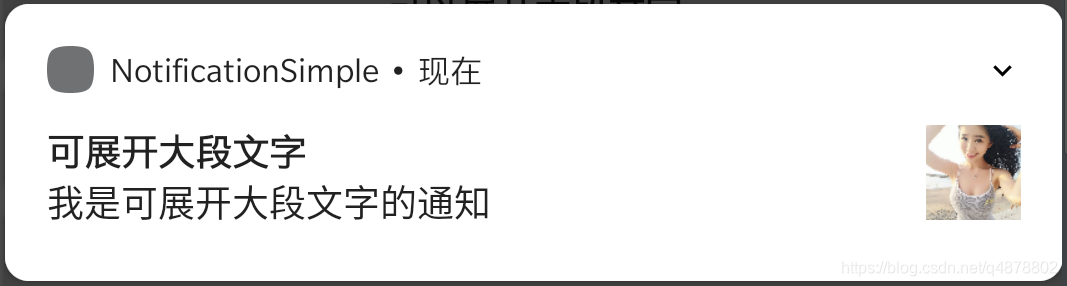 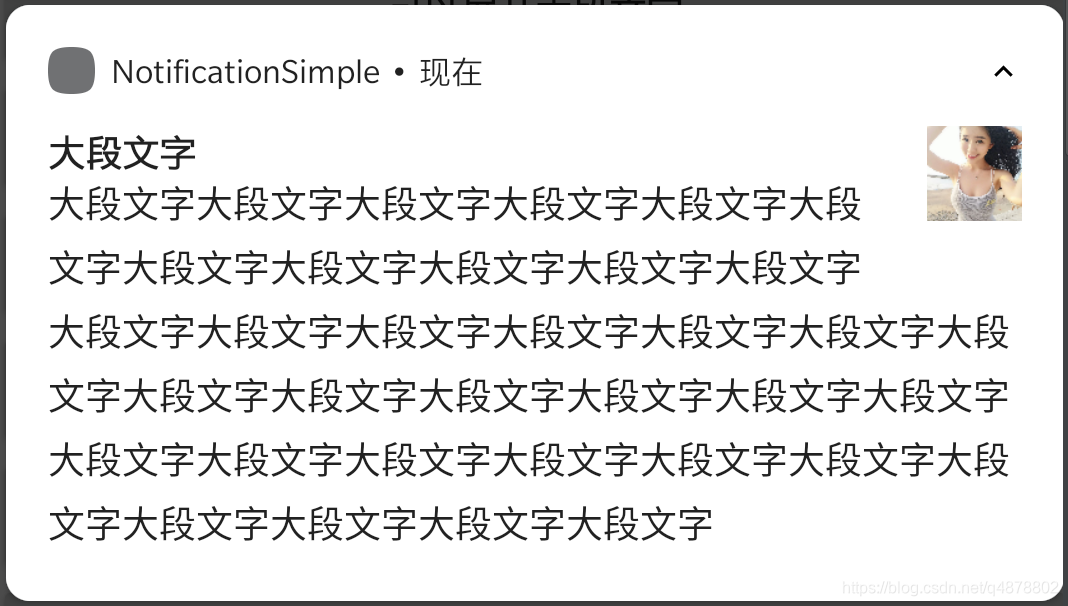```
private fun showBigTextNotification() {
val bitmap = BitmapFactory.decodeStream(resources.assets.open("picture.jpg"))
val build = NotificationCompat.Builder(this, CHANNEL_ID_NOTIFICATION_BASIC)
.setSmallIcon(R.mipmap.ic_launcher)
.setContentTitle("可展开大段文字")
.setContentText("我是可展开大段文字的通知")
.setLargeIcon(bitmap)
.setStyle(
NotificationCompat.BigTextStyle()
.setBigContentTitle("大段文字")
.bigText("大段文字大段文字大段文字大段文字大段文字大段文字大段文字大段文字大段文字大段文字大段文字大段文字大段文字大段文字大段文字大段文字大段文字大段文字大段文字")
)
.build()
notificationManager.notify(id++, build)
}

 ```
```
private fun showMessageSnippetNotification() {
val bitmap = BitmapFactory.decodeStream(resources.assets.open("picture.jpg"))

val build = NotificationCompat.Builder(this, CHANNEL_ID_NOTIFICATION_BASIC)

    .setSmallIcon(R.mipmap.ic_launcher)

    .setContentTitle("列表样式的通知")

    .setContentText("我是列表样式的通知")

    .setLargeIcon(bitmap)

    .setStyle(

        NotificationCompat.InboxStyle()

            .addLine("1111111")

            .addLine("2222222")

            .addLine("3")

            .addLine("444")

            .addLine("555555555555555555555555555555555555555555555555555555555555555555555555555555555555555555")

            .addLine("6666666666666666")

    )

    .build()


notificationManager.notify(id++, build)
}
> 列表中最多显示6行(addLine 6次),多余6行的内容将无法显示。
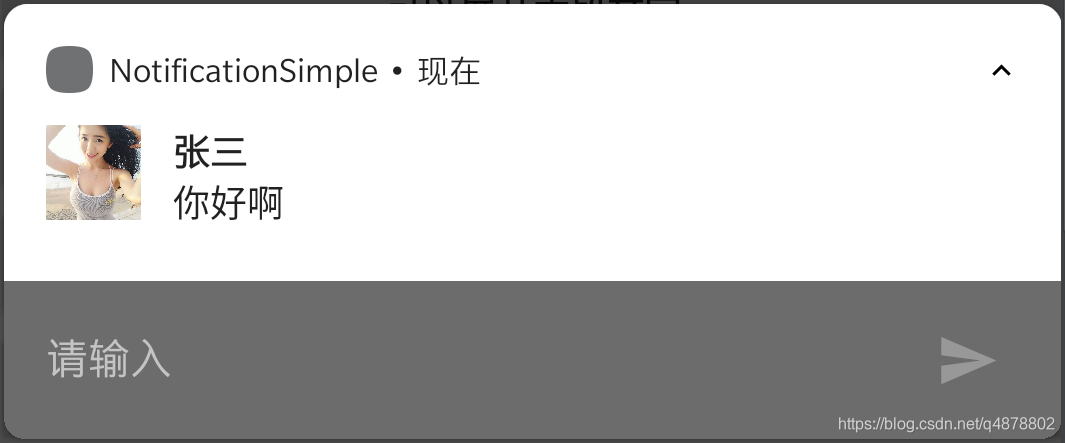
[]( )对话样式的通知
-----------------------------------------------------------------
 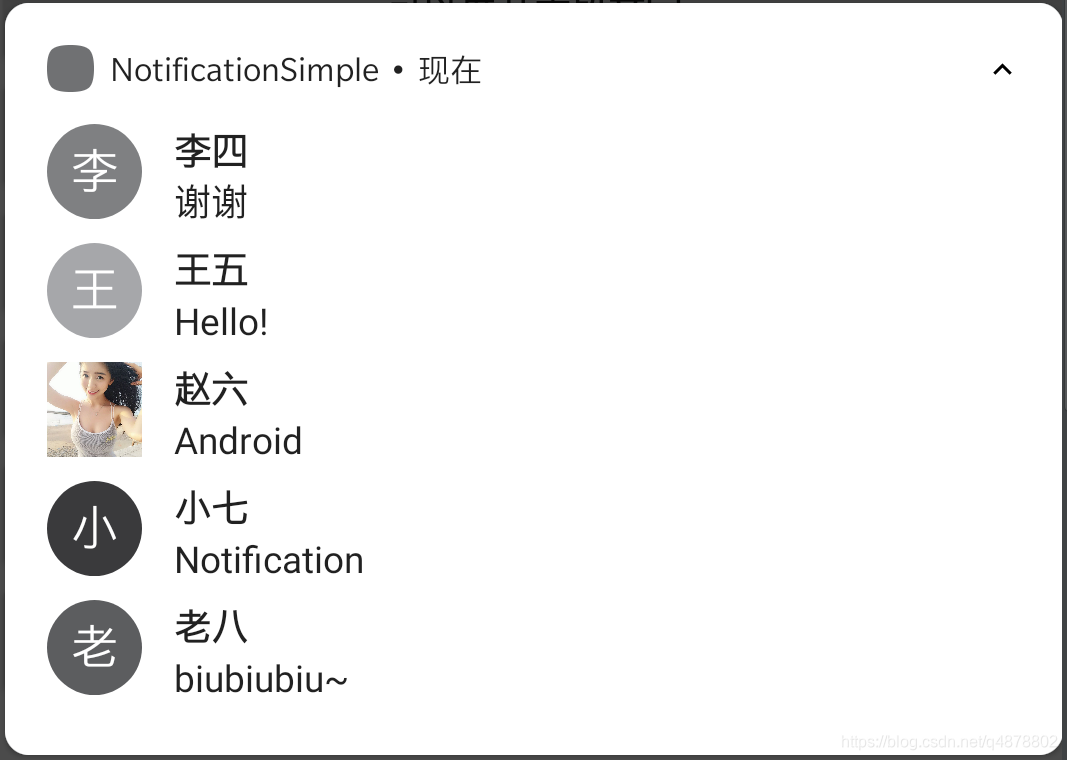```
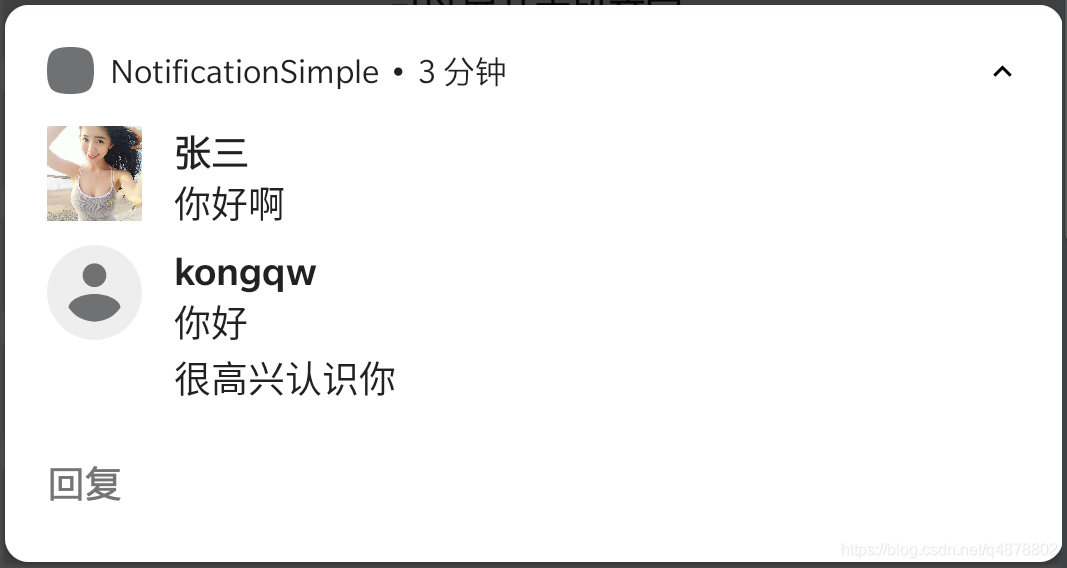
private fun showMessagingNotification() {
val bitmap = BitmapFactory.decodeStream(resources.assets.open("picture.jpg"))
val createWithBitmap = IconCompat.createWithBitmap(bitmap)
val message1 = NotificationCompat.MessagingStyle.Message("你好啊", System.currentTimeMillis(), Person.Builder().setName("张三").setIcon(createWithBitmap).build())
val message2 = NotificationCompat.MessagingStyle.Message("谢谢", System.currentTimeMillis(), Person.Builder().setName("李四").setBot(true).build())
val message3 = NotificationCompat.MessagingStyle.Message("Hello!", System.currentTimeMillis(), Person.Builder().setName("王五").setImportant(true).build())
val message4 = NotificationCompat.MessagingStyle.Message("Android", System.currentTimeMillis(), Person.Builder().setName("赵六").setIcon(createWithBitmap).build())
val message5 = NotificationCompat.MessagingStyle.Message("Notification", System.currentTimeMillis(), Person.Builder().setName("小七").build())
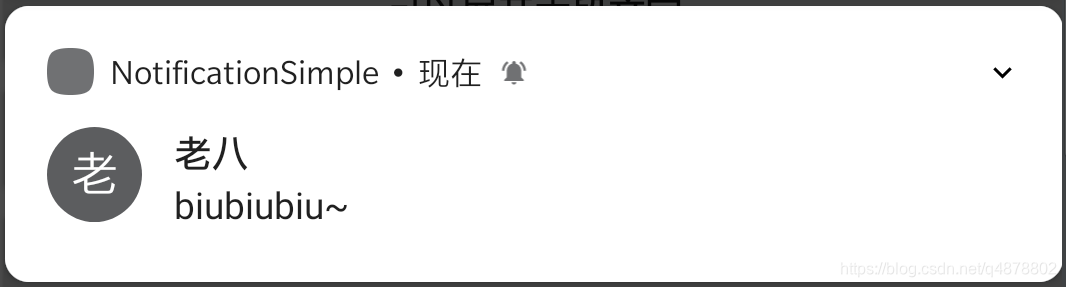
val message6 = NotificationCompat.MessagingStyle.Message("biubiubiu~", System.currentTimeMillis(), Person.Builder().setName("老八").build())
val build = NotificationCompat.Builder(this, CHANNEL_ID_NOTIFICATION_BASIC)
.setSmallIcon(R.mipmap.ic_launcher)
.setLargeIcon(bitmap)
.setStyle(
NotificationCompat.MessagingStyle(Person.Builder().setName("kongqw").build())
.addMessage(message1)
.addMessage(message2)
.addMessage(message3)
.addMessage(message4)
.addMessage(message5)
.addMessage(message6)
)
.build()
notificationManager.notify(id++, build)
}
列表中最多显示5条,后添加的消息会挤掉前面的消息。


需要先添加一个依赖
implementation "androidx.media:media:1.1.0"
private fun showMediaNotification() {


    val bitmap = BitmapFactory.decodeStream(resources.assets.open("picture.jpg"))


    val pendingIntentPrevious: PendingIntent = PendingIntent.getBroadcast(this, 0, Intent("com.kongqw.notification.media.previous"), 0)

    val pendingIntentPause: PendingIntent = PendingIntent.getBroadcast(this, 0, Intent("com.kongqw.notification.media.pause"), 0)

    val pendingIntentNext: PendingIntent = PendingIntent.getBroadcast(this, 0, Intent("com.kongqw.notification.media.next"), 0)

    val pendingIntentPlay: PendingIntent = PendingIntent.getBroadcast(this, 0, Intent("com.kongqw.notification.media.play"), 0)


    val build = NotificationCompat.Builder(this, CHANNEL_ID_NOTIFICATION_BASIC)

        .setVisibility(NotificationCompat.VISIBILITY_PUBLIC)

        .setSmallIcon(R.mipmap.ic_launcher)

        .setContentTitle("媒体控件样式通知")

        .setContentText("我是媒体控件样式通知")

        .addAction(android.R.drawable.ic_media_previous, "Previous", pendingIntentPrevious)

        .addAction(android.R.drawable.ic_media_pause, "Pause", pendingIntentPause)

        .addAction(android.R.drawable.ic_media_next, "Next", pendingIntentNext)

        .addAction(android.R.drawable.ic_media_play, "Play", pendingIntentPlay)

        .setLargeIcon(bitmap)

        .setStyle(

            androidx.media.app.NotificationCompat.MediaStyle().setShowActionsInCompactView(0, 1, 2) // .setMediaSession()

        )

        .build()


    notificationManager.notify(id++, build)

}
上述代码中addAction添加了4个控制按钮,setShowActionsInCompactView设置了通知在收起状态下,显示第0、1、2个按钮。
在基本样式通知的基础上举例,只需要setContentIntent即可
private fun showBasicNotification3() {

    // 创建一个跳转的Intent

    val intent = Intent(this, MainActivity::class.java).apply {

        // ... 其他一些设置信息

    }

    // 创建 PendingIntent

    val jumpIntent: PendingIntent = PendingIntent.getActivity(this, 0, intent, 0)


    val build = NotificationCompat.Builder(this, CHANNEL_ID_NOTIFICATION_BASIC)

        .setSmallIcon(R.mipmap.ic_launcher)

        .setContentTitle("基本通知")

        .setContentText("我是基本通知内容,点击可以跳转Activity.")

        .setPriority(NotificationCompat.PRIORITY_DEFAULT)

        // 设置跳转,点击打开MainActivity

        .setContentIntent(jumpIntent)

        .build()


    notificationManager.notify(id++, build)

}
同样在基本样式通知的基础上举例,Action可以添加点击跳转行为,也可以添加点击发送广播的行为。
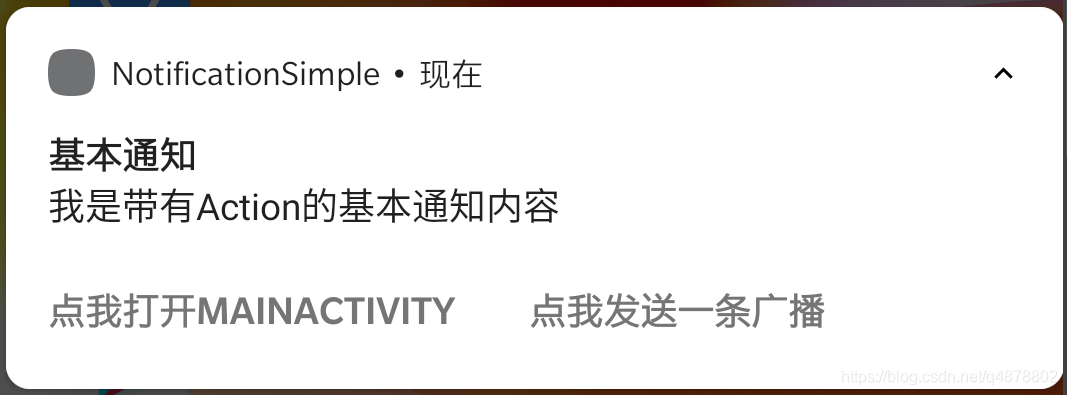
private fun showBasicNotification4() {

    // 创建一个跳转的Intent

    val intent = Intent(this, MainActivity::class.java).apply {

        // ... 其他一些设置信息

    }

    // 创建 PendingIntent

    val jumpIntent: PendingIntent = PendingIntent.getActivity(this, 0, intent, 0)


    // 创建发送广播的Intent

    val sendBroadcastIntent: PendingIntent = PendingIntent.getBroadcast(this, 0, Intent("com.kongqw.notificationsimple.action"), 0)


    val build = NotificationCompat.Builder(this, CHANNEL_ID_NOTIFICATION_BASIC)

        .setSmallIcon(R.mipmap.ic_launcher)

        .setContentTitle("基本通知")

        .setContentText("我是带有Action的基本通知内容")

        .setPriority(NotificationCompat.PRIORITY_DEFAULT)

        // 设置点击跳转的Action

        .addAction(R.mipmap.ic_launcher, "点我打开MainActivity", jumpIntent)

        // 设置点击发送广播的Action

        .addAction(R.mipmap.ic_launcher, "点我发送一条广播", sendBroadcastIntent)

        .build()


    notificationManager.notify(id++, build)

}
-
jumpIntent 设置了点击跳转到MainActivity
-
sendBroadcastIntent 设置了发送广播的内容,动态注册一个广播后自行验证即可。
 ```
```
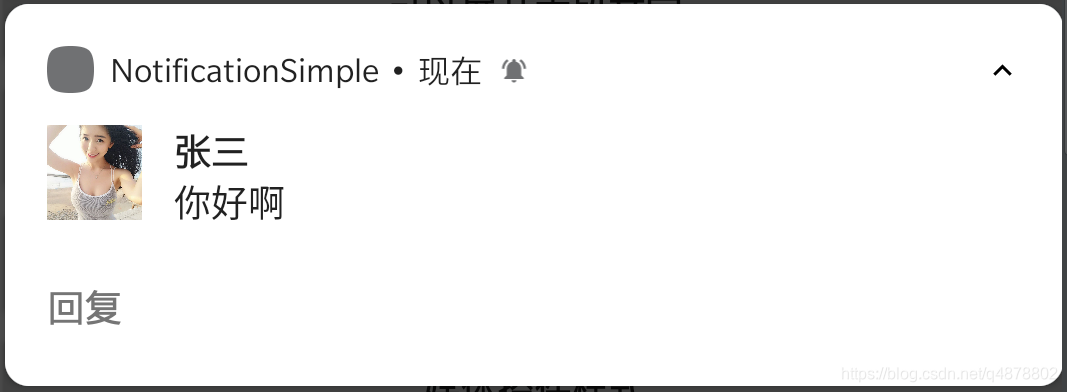
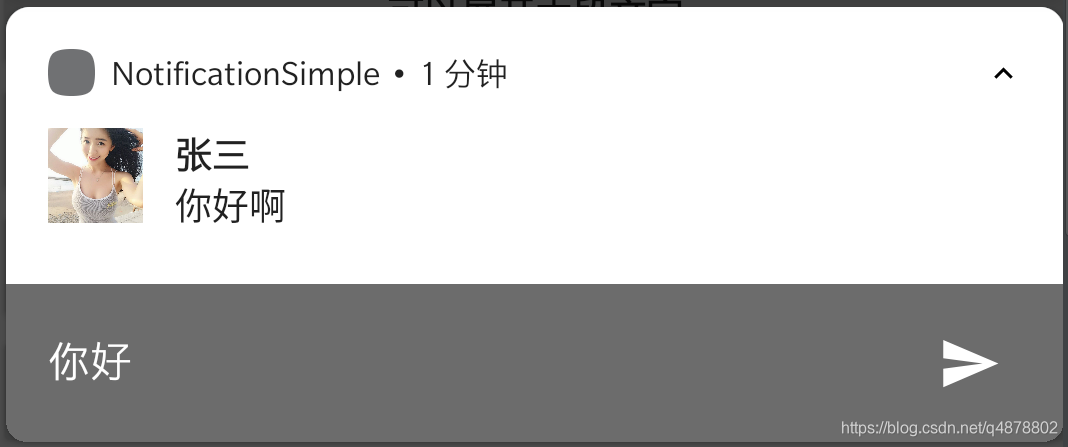
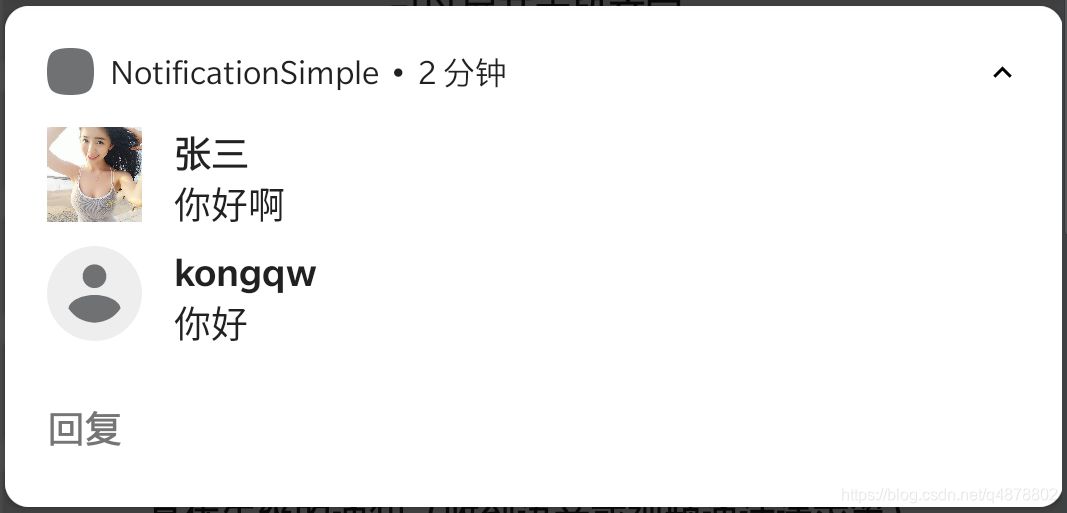
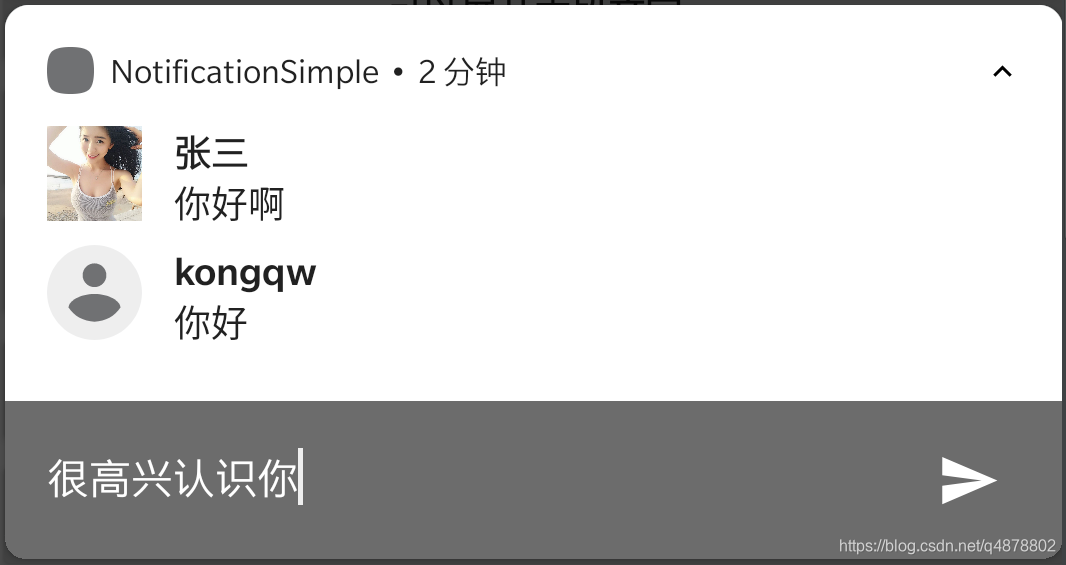
private fun showReplayNotification() {
// 设置回复后的广播

val replyPendingIntent: PendingIntent = PendingIntent.getBroadcast(applicationContext, 0, Intent("com.kongqw.notificationsimple.reply"), PendingIntent.FLAG_UPDATE_CURRENT)

// 设置回复输入框

val remoteInput: RemoteInput = RemoteInput.Builder("KEY_TEXT_REPLY").setLabel("请输入").build()

// 设置回复按钮

val replyAction = NotificationCompat.Action.Builder(R.drawable.ic_launcher_background, "回复", replyPendingIntent).addRemoteInput(remoteInput).build()

// 模拟收到的消息

val bitmap = BitmapFactory.decodeStream(resources.assets.open("picture.jpg"))

val message = NotificationCompat.MessagingStyle.Message("你好啊", System.currentTimeMillis(), Person.Builder().setName("张三").setIcon(IconCompat.createWithBitmap(bitmap)).build())


val build = NotificationCompat.Builder(this, CHANNEL_ID_NOTIFICATION_BASIC)

    .setSmallIcon(R.mipmap.ic_launcher)

    .setPriority(NotificationCompat.PRIORITY_DEFAULT)

    .setStyle(NotificationCompat.MessagingStyle(Person.Builder().setName("kongqw").build()).addMessage(message))

    // 回复

    .addAction(replyAction)

    .build()


notificationManager.notify(id++, build)
}
*   KEY\_TEXT\_REPLY 用来标记回复的文字内容,在广播接收者中使用该字段来获取回复的文字


广播接收(代码仅供参考,注册广播请自行处理)
inner class MyBroadcastReceiver : BroadcastReceiver() {
override fun onReceive(context: Context?, intent: Intent?) {

    when (intent?.action) {

        "com.kongqw.notificationsimple.action" -> Toast.makeText(applicationContext, "收到广播", Toast.LENGTH_SHORT).show()

        "com.kongqw.notificationsimple.reply" -> {

            val charSequence = RemoteInput.getResultsFromIntent(intent)?.getCharSequence("KEY_TEXT_REPLY")

            Toast.makeText(applicationContext, "回复:$charSequence", Toast.LENGTH_SHORT).show()

        }

    }

}
}
[]( )自定义样式的通知
------------------------------------------------------------------
最后部分,我们来模拟网易云音乐,实现一个自定义的通知样式(仅实现基础样式、不包含功能),先看图(上:网易云音乐,下:自定义)
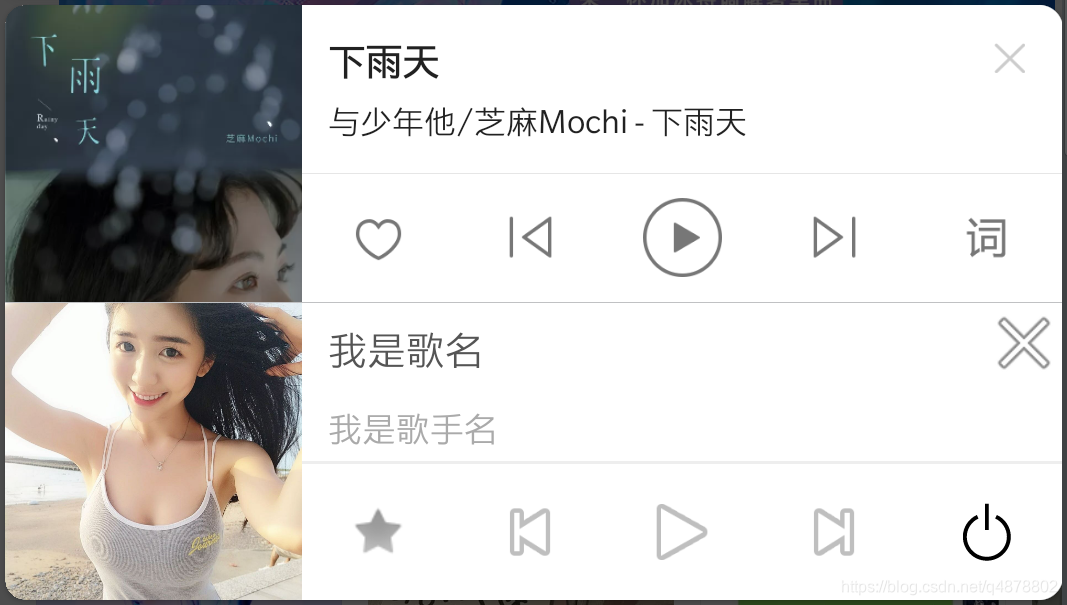
因为网易云音乐的通知有一些设置,例如:不能滑动删除、静音、没有震动等,所以我们重新创建一个通道,专门来显示我们的自定义通知。
private fun createNotificationChannel2() {
if (Build.VERSION.SDK_INT >= Build.VERSION_CODES.O) {

    val name = "播放器"

    val descriptionText = "模仿网易云音乐的通知"

    val importance = NotificationManager.IMPORTANCE_DEFAULT

    val channel =

        NotificationChannel(CHANNEL_ID_NOTIFICATION_CUSTOM_MEDIA, name, importance).apply {

            description = descriptionText

            // 禁用呼吸灯

            enableLights(false)

            // 禁止震动

            enableVibration(false)

            vibrationPattern = LongArray(0)

            // 静音

            setSound(null, null)

        }

    notificationManager.createNotificationChannel(channel)

}
}
直接上代码部分
private fun showCustomNotification() {
// 自定义的通知页面

val remoteViewsMedia = RemoteViews(packageName, R.layout.custom_notification_media)

// 设置通知页面上按钮的点击广播

remoteViewsMedia.setOnClickPendingIntent(R.id.ib_close, PendingIntent.getBroadcast(applicationContext, 0, Intent("com.kongqw.notification.custom.media.close"), 0))

remoteViewsMedia.setOnClickPendingIntent(R.id.ib_1, PendingIntent.getBroadcast(applicationContext, 0, Intent("com.kongqw.notification.custom.media.btn1"), 0))

remoteViewsMedia.setOnClickPendingIntent(R.id.ib_2, PendingIntent.getBroadcast(applicationContext, 0, Intent("com.kongqw.notification.custom.media.btn2"), 0))

remoteViewsMedia.setOnClickPendingIntent(R.id.ib_3, PendingIntent.getBroadcast(applicationContext, 0, Intent("com.kongqw.notification.custom.media.btn3"), 0))

remoteViewsMedia.setOnClickPendingIntent(R.id.ib_4, PendingIntent.getBroadcast(applicationContext, 0, Intent("com.kongqw.notification.custom.media.btn4"), 0))

remoteViewsMedia.setOnClickPendingIntent(R.id.ib_5, PendingIntent.getBroadcast(applicationContext, 0, Intent("com.kongqw.notification.custom.media.btn5"), 0))

// 设置封面

remoteViewsMedia.setImageViewBitmap(R.id.iv_cover, BitmapFactory.decodeStream(resources.assets.open("picture.jpg")))


build = NotificationCompat.Builder(this, CHANNEL_ID_NOTIFICATION_CUSTOM_MEDIA)

    .setSmallIcon(R.mipmap.ic_launcher)

    // .setStyle(NotificationCompat.DecoratedCustomViewStyle())

    .setCustomContentView(remoteViewsMedia)

    .setAutoCancel(false)

    // 禁止滑动删除

    .setOngoing(true)


build?.priority = if (Build.VERSION.SDK_INT >= Build.VERSION_CODES.N) {

    NotificationManager.IMPORTANCE_MAX

} else {

    NotificationCompat.PRIORITY_MAX

}


notificationManager.notify(66, build?.build())
}
自定义通知,最核心的的部分就在`setCustomContentView`,添加了一个自定义的View,这里是一个`RemoteViews`,因此想到之前的`Widget`开发,通知的自定义布局和Widget的自定义布局一样,能且仅能使用部分布局和组件,详见[Widget]( )。


这里在复述一遍,

可使用的布局包括:


*   FrameLayout

*   LinearLayout

*   RelativeLayout

*   GridLayout


可使用的控件包括:


*   AnalogClock

*   Button

*   Chronometer

*   ImageButton

*   ImageView

*   ProgressBar

*   TextView

*   ViewFlipper

*   ListView

*   GridView

*   StackView

*   AdapterViewFlipper


注:如果使用除此之外的布局或控件,通知将无法显示。


布局文件 `custom_notification_media.xml` 提供一下仅供参考
<LinearLayout xmlns:android=“http://schemas.android.com/apk/res/android”
xmlns:app="http://schemas.android.com/apk/res-auto"

android:layout_width="match_parent"

android:layout_height="113dp"

android:orientation="horizontal">


<ImageView

    android:id="@+id/iv_cover"

    android:layout_width="113dp"

    android:layout_height="113dp"

    android:background="@drawable/ic_launcher_background"

    android:scaleType="centerCrop" />


<LinearLayout

    android:layout_width="match_parent"

    android:layout_height="match_parent"

    android:orientation="vertical"

    android:weightSum="10">


    <RelativeLayout

        android:layout_width="match_parent"

        android:layout_height="60dp">


 1025
1025

 被折叠的 条评论
为什么被折叠?
被折叠的 条评论
为什么被折叠?
 到【灌水乐园】发言


