


最后
其实Android开发的知识点就那么多,面试问来问去还是那么点东西。所以面试没有其他的诀窍,只看你对这些知识点准备的充分程度。so,出去面试时先看看自己复习到了哪个阶段就好。
上面分享的腾讯、头条、阿里、美团、字节跳动等公司2019-2021年的高频面试题,博主还把这些技术点整理成了视频和PDF(实际上比预期多花了不少精力),包含知识脉络 + 诸多细节,由于篇幅有限,上面只是以图片的形式给大家展示一部分。
【Android思维脑图(技能树)】
知识不体系?这里还有整理出来的Android进阶学习的思维脑图,给大家参考一个方向。

【Android高级架构视频学习资源】
**Android部分精讲视频领取学习后更加是如虎添翼!**进军BATJ大厂等(备战)!现在都说互联网寒冬,其实无非就是你上错了车,且穿的少(技能),要是你上对车,自身技术能力够强,公司换掉的代价大,怎么可能会被裁掉,都是淘汰末端的业务Curd而已!现如今市场上初级程序员泛滥,这套教程针对Android开发工程师1-6年的人员、正处于瓶颈期,想要年后突破自己涨薪的,进阶Android中高级、架构师对你更是如鱼得水,赶快领取吧!
网上学习资料一大堆,但如果学到的知识不成体系,遇到问题时只是浅尝辄止,不再深入研究,那么很难做到真正的技术提升。
一个人可以走的很快,但一群人才能走的更远!不论你是正从事IT行业的老鸟或是对IT行业感兴趣的新人,都欢迎加入我们的的圈子(技术交流、学习资源、职场吐槽、大厂内推、面试辅导),让我们一起学习成长!
notificationManager.notify(id++, build)
}
上述代码中`addAction`添加了4个控制按钮,`setShowActionsInCompactView`设置了通知在收起状态下,显示第`0`、`1`、`2`个按钮。


[]( )点击通知跳转Activity

------------------------------------------------------------------------


在`基本样式通知`的基础上举例,只需要`setContentIntent`即可
private fun showBasicNotification3() {
// 创建一个跳转的Intent

val intent = Intent(this, MainActivity::class.java).apply {

    // ... 其他一些设置信息

}

// 创建 PendingIntent

val jumpIntent: PendingIntent = PendingIntent.getActivity(this, 0, intent, 0)


val build = NotificationCompat.Builder(this, CHANNEL_ID_NOTIFICATION_BASIC)

    .setSmallIcon(R.mipmap.ic_launcher)

    .setContentTitle("基本通知")

    .setContentText("我是基本通知内容,点击可以跳转Activity.")

    .setPriority(NotificationCompat.PRIORITY_DEFAULT)

    // 设置跳转,点击打开MainActivity

    .setContentIntent(jumpIntent)

    .build()


notificationManager.notify(id++, build)
}
[]( )添加Action
------------------------------------------------------------------
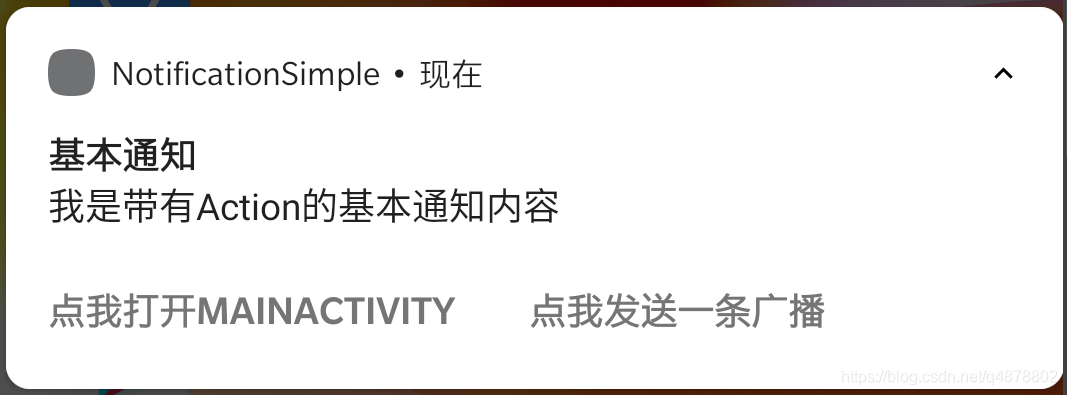
同样在`基本样式通知`的基础上举例,Action可以添加点击跳转行为,也可以添加点击发送广播的行为。
private fun showBasicNotification4() {
// 创建一个跳转的Intent

val intent = Intent(this, MainActivity::class.java).apply {

    // ... 其他一些设置信息

}

// 创建 PendingIntent

val jumpIntent: PendingIntent = PendingIntent.getActivity(this, 0, intent, 0)


// 创建发送广播的Intent

val sendBroadcastIntent: PendingIntent = PendingIntent.getBroadcast(this, 0, Intent("com.kongqw.notificationsimple.action"), 0)


val build = NotificationCompat.Builder(this, CHANNEL_ID_NOTIFICATION_BASIC)

    .setSmallIcon(R.mipmap.ic_launcher)

    .setContentTitle("基本通知")

    .setContentText("我是带有Action的基本通知内容")

    .setPriority(NotificationCompat.PRIORITY_DEFAULT)

    // 设置点击跳转的Action

    .addAction(R.mipmap.ic_launcher, "点我打开MainActivity", jumpIntent)

    // 设置点击发送广播的Action

    .addAction(R.mipmap.ic_launcher, "点我发送一条广播", sendBroadcastIntent)

    .build()


notificationManager.notify(id++, build)
}
* jumpIntent 设置了点击跳转到MainActivity
* sendBroadcastIntent 设置了发送广播的内容,动态注册一个广播后自行验证即可。
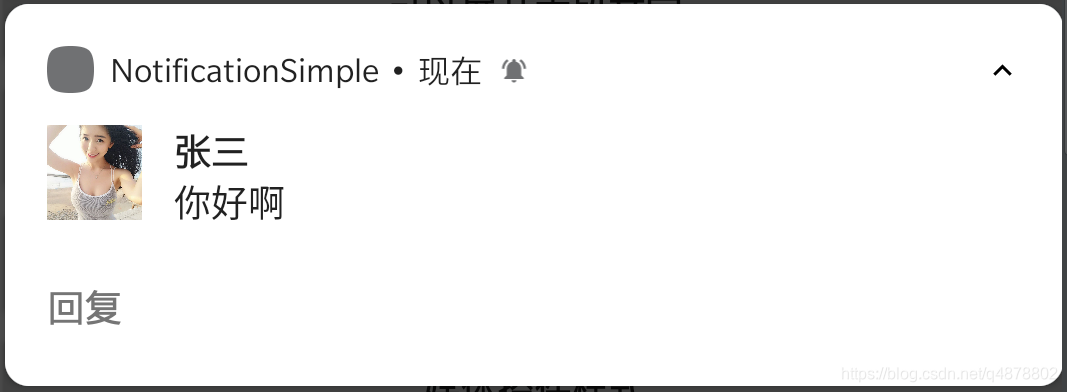
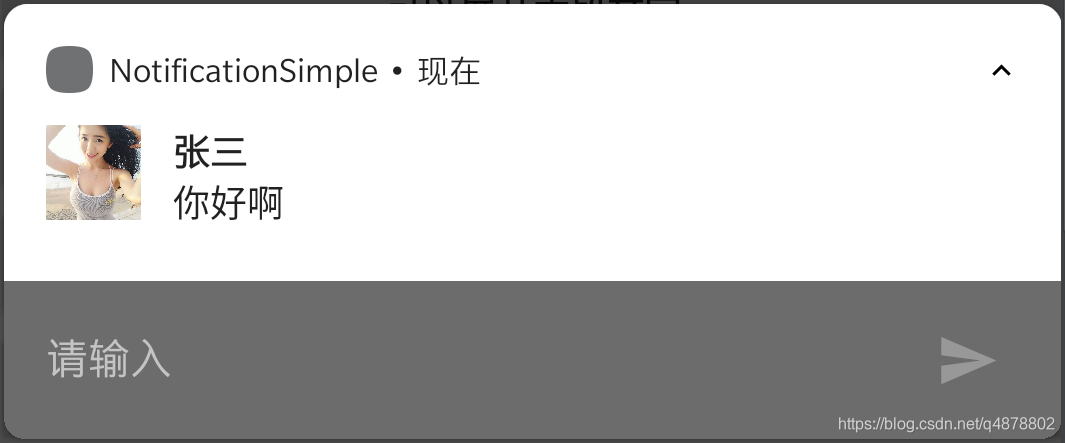
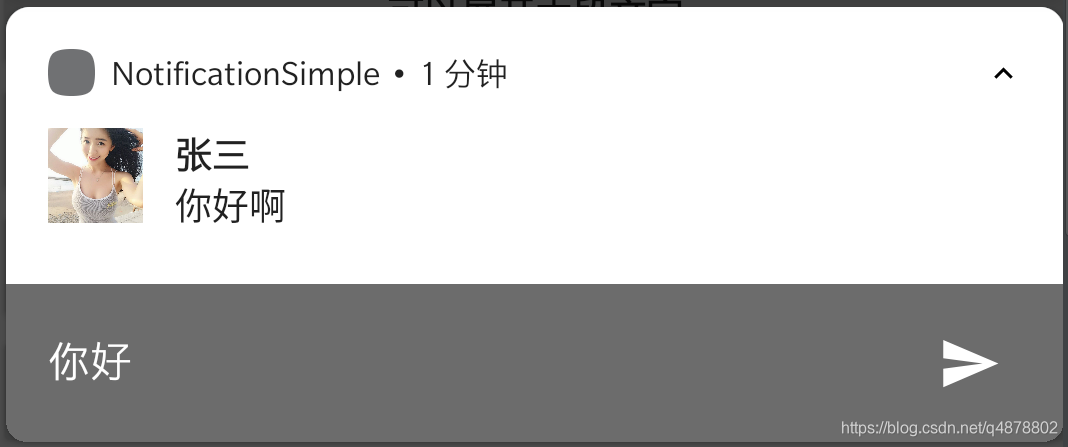
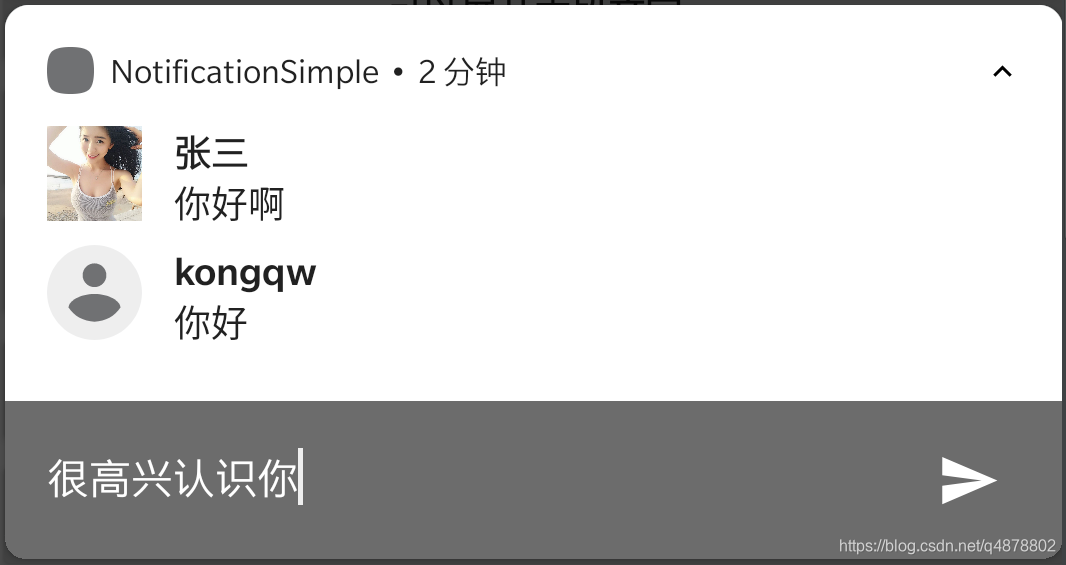
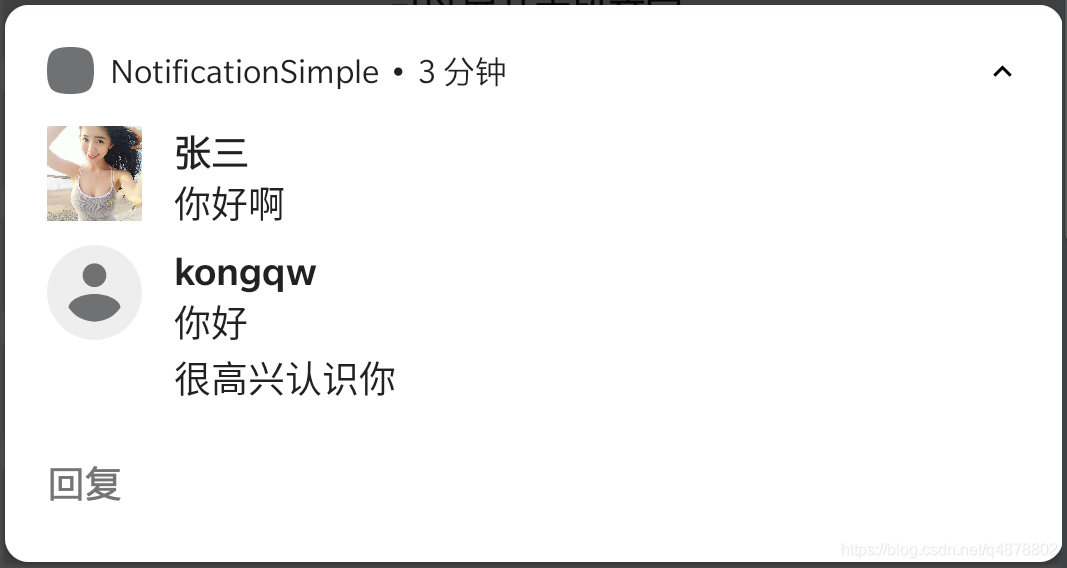
[]( )在通知中直接回复
------------------------------------------------------------------
   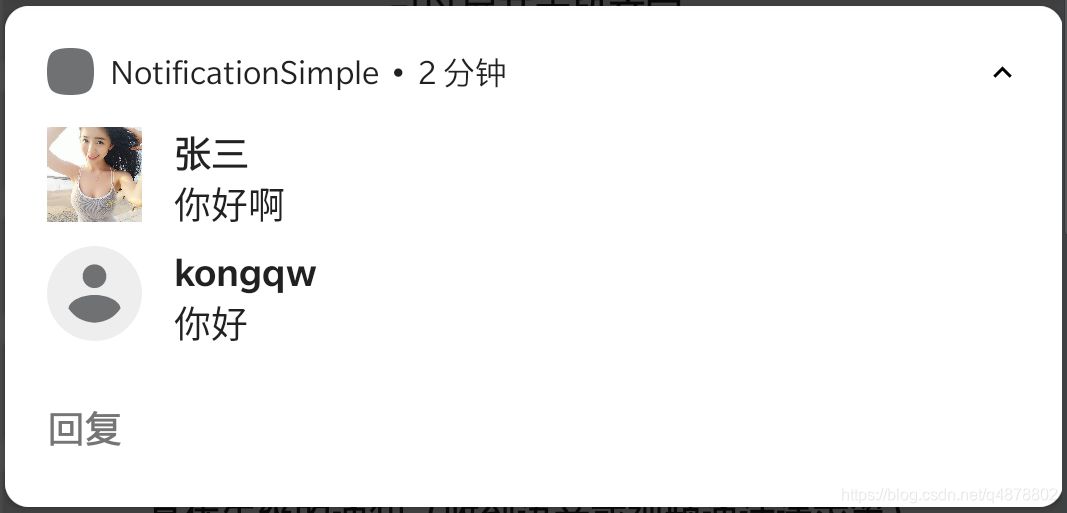  ```
private fun showReplayNotification() {
// 设置回复后的广播
val replyPendingIntent: PendingIntent = PendingIntent.getBroadcast(applicationContext, 0, Intent("com.kongqw.notificationsimple.reply"), PendingIntent.FLAG_UPDATE_CURRENT)
// 设置回复输入框
val remoteInput: RemoteInput = RemoteInput.Builder("KEY_TEXT_REPLY").setLabel("请输入").build()
// 设置回复按钮
val replyAction = NotificationCompat.Action.Builder(R.drawable.ic_launcher_background, "回复", replyPendingIntent).addRemoteInput(remoteInput).build()
// 模拟收到的消息
val bitmap = BitmapFactory.decodeStream(resources.assets.open("picture.jpg"))
val message = NotificationCompat.MessagingStyle.Message("你好啊", System.currentTimeMillis(), Person.Builder().setName("张三").setIcon(IconCompat.createWithBitmap(bitmap)).build())
val build = NotificationCompat.Builder(this, CHANNEL_ID_NOTIFICATION_BASIC)
.setSmallIcon(R.mipmap.ic_launcher)
.setPriority(NotificationCompat.PRIORITY_DEFAULT)
.setStyle(NotificationCompat.MessagingStyle(Person.Builder().setName("kongqw").build()).addMessage(message))
// 回复
.addAction(replyAction)
.build()
notificationManager.notify(id++, build)
}
- KEY_TEXT_REPLY 用来标记回复的文字内容,在广播接收者中使用该字段来获取回复的文字
广播接收(代码仅供参考,注册广播请自行处理)
inner class MyBroadcastReceiver : BroadcastReceiver() {

    override fun onReceive(context: Context?, intent: Intent?) {

        when (intent?.action) {

            "com.kongqw.notificationsimple.action" -> Toast.makeText(applicationContext, "收到广播", Toast.LENGTH_SHORT).show()

            "com.kongqw.notificationsimple.reply" -> {

                val charSequence = RemoteInput.getResultsFromIntent(intent)?.getCharSequence("KEY_TEXT_REPLY")

                Toast.makeText(applicationContext, "回复:$charSequence", Toast.LENGTH_SHORT).show()

            }

        }

    }

}
最后部分,我们来模拟网易云音乐,实现一个自定义的通知样式(仅实现基础样式、不包含功能),先看图(上:网易云音乐,下:自定义)

因为网易云音乐的通知有一些设置,例如:不能滑动删除、静音、没有震动等,所以我们重新创建一个通道,专门来显示我们的自定义通知。
private fun createNotificationChannel2() {

    if (Build.VERSION.SDK_INT >= Build.VERSION_CODES.O) {

        val name = "播放器"

        val descriptionText = "模仿网易云音乐的通知"

        val importance = NotificationManager.IMPORTANCE_DEFAULT

        val channel =

            NotificationChannel(CHANNEL_ID_NOTIFICATION_CUSTOM_MEDIA, name, importance).apply {

                description = descriptionText

                // 禁用呼吸灯

                enableLights(false)

                // 禁止震动

                enableVibration(false)

                vibrationPattern = LongArray(0)

                // 静音

                setSound(null, null)

            }

        notificationManager.createNotificationChannel(channel)

    }

}
直接上代码部分
private fun showCustomNotification() {

    // 自定义的通知页面

    val remoteViewsMedia = RemoteViews(packageName, R.layout.custom_notification_media)

    // 设置通知页面上按钮的点击广播

    remoteViewsMedia.setOnClickPendingIntent(R.id.ib_close, PendingIntent.getBroadcast(applicationContext, 0, Intent("com.kongqw.notification.custom.media.close"), 0))

    remoteViewsMedia.setOnClickPendingIntent(R.id.ib_1, PendingIntent.getBroadcast(applicationContext, 0, Intent("com.kongqw.notification.custom.media.btn1"), 0))

    remoteViewsMedia.setOnClickPendingIntent(R.id.ib_2, PendingIntent.getBroadcast(applicationContext, 0, Intent("com.kongqw.notification.custom.media.btn2"), 0))

    remoteViewsMedia.setOnClickPendingIntent(R.id.ib_3, PendingIntent.getBroadcast(applicationContext, 0, Intent("com.kongqw.notification.custom.media.btn3"), 0))

    remoteViewsMedia.setOnClickPendingIntent(R.id.ib_4, PendingIntent.getBroadcast(applicationContext, 0, Intent("com.kongqw.notification.custom.media.btn4"), 0))

    remoteViewsMedia.setOnClickPendingIntent(R.id.ib_5, PendingIntent.getBroadcast(applicationContext, 0, Intent("com.kongqw.notification.custom.media.btn5"), 0))

    // 设置封面

    remoteViewsMedia.setImageViewBitmap(R.id.iv_cover, BitmapFactory.decodeStream(resources.assets.open("picture.jpg")))


    build = NotificationCompat.Builder(this, CHANNEL_ID_NOTIFICATION_CUSTOM_MEDIA)

        .setSmallIcon(R.mipmap.ic_launcher)

        // .setStyle(NotificationCompat.DecoratedCustomViewStyle())

        .setCustomContentView(remoteViewsMedia)

        .setAutoCancel(false)

        // 禁止滑动删除

        .setOngoing(true)


    build?.priority = if (Build.VERSION.SDK_INT >= Build.VERSION_CODES.N) {

        NotificationManager.IMPORTANCE_MAX

    } else {

        NotificationCompat.PRIORITY_MAX

    }


    notificationManager.notify(66, build?.build())

}
自定义通知,最核心的的部分就在setCustomContentView,添加了一个自定义的View,这里是一个RemoteViews,因此想到之前的Widget开发,通知的自定义布局和Widget的自定义布局一样,能且仅能使用部分布局和组件,详见Widget。
这里在复述一遍,
可使用的布局包括:
-
FrameLayout
-
LinearLayout
-
RelativeLayout
-
GridLayout
可使用的控件包括:
-
AnalogClock
-
Button
-
Chronometer
-
ImageButton
-
ImageView
-
ProgressBar
-
TextView
-
ViewFlipper
-
ListView
-
GridView
-
StackView
-
AdapterViewFlipper
注:如果使用除此之外的布局或控件,通知将无法显示。
布局文件 custom_notification_media.xml 提供一下仅供参考
<?xml version="1.0" encoding="utf-8"?>

<LinearLayout xmlns:android="http://schemas.android.com/apk/res/android"

    xmlns:app="http://schemas.android.com/apk/res-auto"

    android:layout_width="match_parent"

    android:layout_height="113dp"

    android:orientation="horizontal">


    <ImageView

        android:id="@+id/iv_cover"

        android:layout_width="113dp"

        android:layout_height="113dp"

        android:background="@drawable/ic_launcher_background"

        android:scaleType="centerCrop" />


    <LinearLayout

        android:layout_width="match_parent"

        android:layout_height="match_parent"

        android:orientation="vertical"

        android:weightSum="10">


        <RelativeLayout

            android:layout_width="match_parent"

            android:layout_height="60dp">


            <ImageButton

                android:id="@+id/ib_close"

                android:layout_width="30dp"

                android:layout_height="30dp"

                android:layout_alignParentEnd="true"

                android:layout_alignParentRight="true"

                android:background="@android:color/transparent"

                android:src="@android:drawable/ic_menu_close_clear_cancel" />


            <TextView

                android:id="@+id/tv_title"

                android:layout_width="match_parent"

                android:layout_height="35dp"

                android:layout_toStartOf="@id/ib_close"

                android:layout_toLeftOf="@id/ib_close"

                android:gravity="center_vertical"

                android:paddingStart="10dp"

                android:paddingEnd="10dp"

                android:text="我是歌名"

                android:textColor="#555555"

                android:textSize="15sp" />


            <TextView

                android:id="@+id/tv_des"

                android:layout_width="match_parent"

                android:layout_height="match_parent"

                android:layout_below="@id/tv_title"

                android:layout_toStartOf="@id/ib_close"

                android:layout_toLeftOf="@id/ib_close"

                android:gravity="center_vertical"

                android:paddingStart="10dp"

                android:paddingEnd="10dp"

                android:text="我是歌手名"

                android:textColor="#AAAAAA"

                android:textSize="13sp" />


        </RelativeLayout>


        <TextView

            android:layout_width="match_parent"

            android:layout_height="1dp"

            android:background="#EEEEEE" />


        <LinearLayout

            android:layout_width="match_parent"

            android:layout_height="match_parent"

            android:orientation="horizontal"

            android:weightSum="5">


            <ImageButton

                android:id="@+id/ib_1"

                android:layout_width="0dp"

                android:layout_height="match_parent"

                android:layout_weight="1"

                android:background="@android:color/transparent"

                android:src="@android:drawable/star_off" />


            <ImageButton

                android:id="@+id/ib_2"

                android:layout_width="0dp"

                android:layout_height="match_parent"

                android:layout_weight="1"

                android:background="@android:color/transparent"

                android:src="@android:drawable/ic_media_previous" />


            <ImageButton

                android:id="@+id/ib_3"

                android:layout_width="0dp"

                android:layout_height="match_parent"

                android:layout_weight="1"

                android:background="@android:color/transparent"

                android:src="@android:drawable/ic_media_play" />


            <ImageButton

                android:id="@+id/ib_4"

                android:layout_width="0dp"

                android:layout_height="match_parent"

                android:layout_weight="1"

                android:background="@android:color/transparent"

                android:src="@android:drawable/ic_media_next" />


            <ImageButton

                android:id="@+id/ib_5"

                android:layout_width="0dp"

                android:layout_height="match_parent"

                android:layout_weight="1"

                android:background="@android:color/transparent"

                android:src="@android:drawable/ic_lock_power_off" />


        </LinearLayout>

    </LinearLayout>

</LinearLayout>
广播的注册
private val mMyBroadcastReceiver = MyBroadcastReceiver()

private val mIntentFilter = IntentFilter().apply {

    addAction("com.kongqw.notification.custom.media.close")

    addAction("com.kongqw.notification.custom.media.btn1")

    addAction("com.kongqw.notification.custom.media.btn2")

    addAction("com.kongqw.notification.custom.media.btn3")

    addAction("com.kongqw.notification.custom.media.btn4")

    addAction("com.kongqw.notification.custom.media.btn5")

}
registerReceiver(mMyBroadcastReceiver, mIntentFilter)
反注册
unregisterReceiver(mMyBroadcastReceiver)
广播接收者
inner class MyBroadcastReceiver : BroadcastReceiver() {
override fun onReceive(context: Context?, intent: Intent?) {
when (intent?.action) {
"com.kongqw.notification.custom.media.close" -> {
### 最后
感谢您的阅读,在文末给大家准备一个福利。本人从事Android开发已经有十余年,算是一名资深的移动开发架构师了吧。根据我的观察发现,对于很多初中级Android工程师而言,想要提升技能,往往是自己摸索成长,不成体系的学习效果低效漫长且无助。
所以在此将我十年载,从萌新小白一步步成长为Android移动开发架构师的学习笔记,从Android四大组件到手写实现一个架构设计,我都有一一的对应笔记为你讲解。
当然我也为你们整理好了百度、阿里、腾讯、字节跳动等等互联网超级大厂的历年面试真题集锦。这也是我这些年来养成的习惯,一定要学会把好的东西,归纳整理,然后系统的消化吸收,这样才能极大的提高学习效率和成长进阶。碎片、零散化的东西,我觉得最没有价值的。就好比你给我一张扑克牌,我只会觉得它是一张废纸,但如果你给我一副扑克牌,它便有了它的价值。这和我们收集资料就要收集那些系统化的,是一个道理。
>
最后,赠与大家一句诗,共勉!
> 不驰于空想,不骛于虚声。不忘初心,方得始终。
**网上学习资料一大堆,但如果学到的知识不成体系,遇到问题时只是浅尝辄止,不再深入研究,那么很难做到真正的技术提升。**
**[需要这份系统化学习资料的朋友,可以戳这里获取](https://bbs.csdn.net/topics/618156601)**
**一个人可以走的很快,但一群人才能走的更远!不论你是正从事IT行业的老鸟或是对IT行业感兴趣的新人,都欢迎加入我们的的圈子(技术交流、学习资源、职场吐槽、大厂内推、面试辅导),让我们一起学习成长!**
fication.custom.media.close" -> {
### 最后
感谢您的阅读,在文末给大家准备一个福利。本人从事Android开发已经有十余年,算是一名资深的移动开发架构师了吧。根据我的观察发现,对于很多初中级Android工程师而言,想要提升技能,往往是自己摸索成长,不成体系的学习效果低效漫长且无助。
所以在此将我十年载,从萌新小白一步步成长为Android移动开发架构师的学习笔记,从Android四大组件到手写实现一个架构设计,我都有一一的对应笔记为你讲解。
当然我也为你们整理好了百度、阿里、腾讯、字节跳动等等互联网超级大厂的历年面试真题集锦。这也是我这些年来养成的习惯,一定要学会把好的东西,归纳整理,然后系统的消化吸收,这样才能极大的提高学习效率和成长进阶。碎片、零散化的东西,我觉得最没有价值的。就好比你给我一张扑克牌,我只会觉得它是一张废纸,但如果你给我一副扑克牌,它便有了它的价值。这和我们收集资料就要收集那些系统化的,是一个道理。
>[外链图片转存中...(img-t2XuNO6a-1715229234489)]
最后,赠与大家一句诗,共勉!
> 不驰于空想,不骛于虚声。不忘初心,方得始终。
**网上学习资料一大堆,但如果学到的知识不成体系,遇到问题时只是浅尝辄止,不再深入研究,那么很难做到真正的技术提升。**
**[需要这份系统化学习资料的朋友,可以戳这里获取](https://bbs.csdn.net/topics/618156601)**
**一个人可以走的很快,但一群人才能走的更远!不论你是正从事IT行业的老鸟或是对IT行业感兴趣的新人,都欢迎加入我们的的圈子(技术交流、学习资源、职场吐槽、大厂内推、面试辅导),让我们一起学习成长!**


 843
843

 被折叠的 条评论
为什么被折叠?
被折叠的 条评论
为什么被折叠?
 到【灌水乐园】发言


