


Powershell快速转换生成指定尺寸的Kindle屏保图
01 前言
周末无事,想到手头还有一泡面盖儿(Kindle Paperwhite 3),正好玩一玩。一顿操作猛如虎,成功越狱,过程略,可参考 这里。终于可以换上自己喜欢的屏保图了,图片有了,怎么快速转成指定的尺寸和格式就成了新的问题。有PS大法(参考 这里),N年不用PS了不说,还得注意图片大小,觉得麻烦,也可以网上搜一搜,不过萝卜青菜各有所爱。于是动手写了一个脚本实现批量转换(不想写界面-_-//),支持自动缩放(不管图片尺寸够不够,原图居中,不够的地方就留黑),支持自动重命名,支持转为灰度图(并增加15点对比度),默认竖屏,这不就舒服了嘛,记录一下。
02 正文
在win 10,64位开发,powershell 脚本如下:
<#
批量将图片处理为kindle屏保图片

功能:
    1、将图片按比例缩放,适合指定屏幕大小(不拉伸),转为24位图
    2、转为灰度图,并设置15点对比度
    3、按格式批量重命名

by hokis

on 2022-05-16 20:47

#>

function Set-Pic
{
    [CmdletBinding()]
    Param
    (
        [Parameter(Mandatory=$true,
                   Position=0)]
        [string]
        $imgPath,

        [Parameter(Mandatory=$true,
                   Position=1)]
        [ValidateSet('KPW3ANDUP', 'KPW1AND2','KO2', 'K7ANDOTHER')]
        [string]
        $devType,

        [Parameter(Mandatory=$true,
                   Position=2)]
        [string]
        $outPath,

        [switch]
        $toGray
    )

    Begin
    {
        if(-not (Test-Path -LiteralPath $imgPath -PathType Leaf)){
            Write-Host ('找不到图片路径:'+$imgPath)
            return
        }

        #不存在则创建
        if(-not (Test-Path -Path $outPath)){
            mkdir $outPath -ErrorAction Stop | Out-Null
        }

        #默认是KPW3ANDUP或以上的屏幕尺寸
        $size = @(1448,1072)

        if($devType -eq 'KPW1AND2'){
            $size = @(1024,758)
        }elseif($devType -eq 'KO2'){
            $size = @(1680,1264)
        }elseif($devType -eq 'K7ANDOTHER'){
            $size = @(800,600)
        }

        #一般高比宽大(竖屏),所以换位置
        [int]$fixWidth = $size[1]
        [int]$fixHeight = $size[0]

        Write-Verbose ('待输出尺寸大小(px),宽:'+ $fixWidth + ',高:' + $fixHeight)

        #加载库
        [void][reflection.assembly]::Load('System.Drawing, Version=2.0.0.0, Culture=neutral, PublicKeyToken=b03f5f7f11d50a3a')
    }
    Process
    {
        [System.Drawing.Image]$img = [System.Drawing.Image]::FromFile($imgPath)

        Write-Verbose ('原图尺寸大小(px),宽:'+ $img.Width + ',高:' + $img.Height)

        #计算缩放比例
        [float]$nPercentW = $fixWidth / $img.Width
        [float]$nPercentH = $fixHeight / $img.Height
        #取小的缩放比例
        [float]$nPercent = $nPercentW;
        if($nPercentH -lt $nPercentW){
            $nPercent = $nPercentH
        }
        Write-Verbose ('缩放比例:'+ $nPercent)

        #缩放后的宽高
        [int]$newWidth = $img.Width * $nPercent
        [int]$newHeight = $img.Height * $nPercent

        Write-Verbose ('缩放后尺寸大小(px),宽:'+ $newWidth + ',高:' + $newHeight)


        #引用c#代码处理

        $code = @'
        /// <summary>
        /// 图像设置灰度
        /// </summary>
        /// <param name='curBitmpap'>原始图</param>
        /// <returns></returns>
        public static System.Drawing.Bitmap MakeGrayscale(System.Drawing.Bitmap curBitmpap)
        {
            if (curBitmpap != null)
            {
                //位图矩形
                System.Drawing.Rectangle rect = new System.Drawing.Rectangle(0, 0, curBitmpap.Width, curBitmpap.Height);
                //以可读写的方式锁定全部位图像素
                System.Drawing.Imaging.BitmapData bmpData = curBitmpap.LockBits(rect, System.Drawing.Imaging.ImageLockMode.ReadWrite, curBitmpap.PixelFormat);
                //得到首地址
                IntPtr ptr = bmpData.Scan0;

                //定义被锁定的数组大小,由位图数据与未用空间组成的
                int bytes = bmpData.Stride * bmpData.Height;
                //定义位图数组
                byte[] rgbValues = new byte[bytes];
                //复制被锁定的位图像素值到该数组内
                System.Runtime.InteropServices.Marshal.Copy(ptr, rgbValues, 0, bytes);

                //灰度化
                double colorTemp = 0;
                for (int i = 0; i < bmpData.Height; i++)
                {
                    //只处理每行中是图像像素的数据,舍弃未用空间
                    for (int j = 0; j < bmpData.Width * 3; j += 3)
                    {
                        //利用公式计算灰度值
                        colorTemp = rgbValues[i * bmpData.Stride + j + 2] * 0.299 + rgbValues[i * bmpData.Stride + j + 1] * 0.587 + rgbValues[i * bmpData.Stride + j] * 0.114;
                        //R=G=B
                        rgbValues[i * bmpData.Stride + j] = rgbValues[i * bmpData.Stride + j + 1] = rgbValues[i * bmpData.Stride + j + 2] = (byte)colorTemp;
                    }
                }

                //把数组复制回位图
                System.Runtime.InteropServices.Marshal.Copy(rgbValues, 0, ptr, bytes);
                //解锁位图像素
                curBitmpap.UnlockBits(bmpData);
            }
			return curBitmpap;
        }

        /// <summary>
        /// 图像对比度调整
        /// </summary>
        /// <param name='b'>原始图</param>
        /// <param name='degree'>对比度[-100, 100]</param>
        /// <returns></returns>
          public static System.Drawing.Bitmap KiContrast(System.Drawing.Bitmap b, int degree)
         {
            if (b == null)
            {
                return null;
            }

            if (degree < -100) degree = -100;
            if (degree > 100) degree = 100;

            try
            {

                double pixel = 0;
                double contrast = (100.0 + degree) / 100.0;
                contrast *= contrast;
                int width = b.Width;
                int height = b.Height;
                System.Drawing.Imaging.BitmapData data = b.LockBits(new System.Drawing.Rectangle(0, 0, width, height), System.Drawing.Imaging.ImageLockMode.ReadWrite, b.PixelFormat);
                unsafe
                {
                    byte* p = (byte*)data.Scan0;
                    int offset = data.Stride - width * 3;
                    for (int y = 0; y < height; y++)
                    {
                        for (int x = 0; x < width; x++)
                        {
                            // 处理指定位置像素的对比度
                            for (int i = 0; i < 3; i++)
                            {
                                pixel = ((p[i] / 255.0 - 0.5) * contrast + 0.5) * 255;
                                if (pixel < 0) pixel = 0;
                                if (pixel > 255) pixel = 255;
                                p[i] = (byte)pixel;
                            }
                            p += 3;
                        }
                        p += offset;
                    }
                }
                b.UnlockBits(data);
                return b;
            }
            catch
            {
                return null;
            }
        }

'@

        #自定义编译参数
        [System.CodeDom.Compiler.CompilerParameters]$cp = [System.CodeDom.Compiler.CompilerParameters]::new()
        [void]$cp.ReferencedAssemblies.Add('System.Drawing.dll')
        #如果含有unsafe代码要设置一下
        $cp.CompilerOptions = '/unsafe'

        #ReferencedAssemblies 与 CompilerParameters参数不能同时使用
        $type = Add-Type -MemberDefinition $code -Name myapi -PassThru -CompilerParameters $cp


        #如果宽相等,但是高小于固定的
        #或者高相等,但是宽小于固定的
        #则直接输出调整比例后的图片
        if(($newWidth -eq $fixWidth -and $newHeight -lt $fixHeight) -or ($newHeight -eq $fixHeight -and $newWidth -lt $fixWidth)){
            #24位
            [System.Drawing.Bitmap]$newPic = [System.Drawing.Bitmap]::new($fixWidth,$fixHeight,[System.Drawing.Imaging.PixelFormat]::Format24bppRgb)
            [System.Drawing.Graphics]$gs = [System.Drawing.Graphics]::FromImage($newPic)
            $gs.InterpolationMode = [System.Drawing.Drawing2D.InterpolationMode]::HighQualityBicubic
            #设置图片,居中
            #距离上边
            $toTop = ($fixHeight - $newHeight) / 2
            #距离左边
            $toLeft = ($fixWidth - $newWidth) / 2
            #图片
            $gs.DrawImage($img,$toLeft,$toTop,$newWidth,$newHeight)
            $gs.Dispose()

            #时间戳加个随机数,避免处理快而覆盖了
            $ts = (Get-Date -Format 'yyyyMMdd_HHmmss_') + (Get-Random -Minimum 1 -Maximum 30000)
            $outFile = Join-Path -Path $outPath -ChildPath ($ts+'.png')

            #如果已存在则先删掉原文件
            if(Test-Path -Path $outFile){
                Remove-Item -Path $outFile -Force | Out-Null
            }
            if($toGray){
                #增加15点对比度
                $type::KiContrast($type::MakeGrayscale($newPic),15).Save($outFile,[System.Drawing.Imaging.ImageFormat]::Png)
            }else{
                $newPic.Save($outFile,[System.Drawing.Imaging.ImageFormat]::Png)
            }
        }

    }
    End
    {
        Write-Verbose '处理完成...'
    }
}

function Rename-Pic{
    [CmdletBinding()]
    Param
    (
        [Parameter(Mandatory=$true,
                   Position=0)]
        [string]
        $imgPath
    )
    Begin{}
    Process{
        $index = 0
        $files = dir -Path $imgPath -Filter '*.png'
        foreach($file in $files){
            Rename-Item -Path $file.FullName -NewName (Join-Path -Path $file.DirectoryName -ChildPath ( 'bg_ss'+('{0:d2}' -f $index) +'.png') ) | Out-Null
            $index++
        }
    }
    End{}
}


$ver = $PSVersionTable.PSVersion.Major
if($ver -lt 5){
    Write-Host ('PowerShell版本过低【'+$ver+'】,请升级~')
    exit
}

$handlePicBtn = [System.Management.Automation.Host.ChoiceDescription]::new('&1 处理图片','仅处理图片')
$renamePicOnlyBtn = [System.Management.Automation.Host.ChoiceDescription]::new('&2 批量重命名','仅重命名')
$exitBtn = [System.Management.Automation.Host.ChoiceDescription]::new('&0 退出','退出程序')
$answerOfAction = $Host.UI.PromptForChoice('功能选择', '请选择:', [System.Management.Automation.Host.ChoiceDescription[]]@($handlePicBtn, $renamePicOnlyBtn,$exitBtn), 0)


if($answerOfAction -eq 0){
    #各个选择
    $KPW3ANDUPBtn = [System.Management.Automation.Host.ChoiceDescription]::new('&1 KPW3ANDUP(1448 * 1072)','Kindle Paperwhite 3 and up/Kindle Voyage')
    $KPW1AND2Btn = [System.Management.Automation.Host.ChoiceDescription]::new('&2 KPW1AND2(1024 * 758)','Kindle Paperwhite 1/2')
    $KO2Btn = [System.Management.Automation.Host.ChoiceDescription]::new('&3 KO2(1680 * 1264)','Kindle Oasis 2(KO2)')
    $K7ANDOTHERBtn = [System.Management.Automation.Host.ChoiceDescription]::new('&4 K7ANDOTHER(800 * 600)','Kindle 7/8/Other')

    $answerOfSize = $Host.UI.PromptForChoice('要转为哪种类型屏幕大小(默认竖屏)?', '请选择:', [System.Management.Automation.Host.ChoiceDescription[]]@($KPW3ANDUPBtn, $KPW1AND2Btn,$KO2Btn,$K7ANDOTHERBtn, $exitBtn), 0)

    [string]$devType = ''
    switch ($answerOfSize)
    {
	    0 { $devType = 'KPW3ANDUP' }
	    1 { $devType = 'KPW1AND2' }
        2 { $devType = 'KO2' }
        3 { $devType = 'K7ANDOTHER' }
        default {}
    }

    if($devType.Length -lt 1){
        Write-Host ('未选择类型~')
        exit
    }

    $toGrayBtn = [System.Management.Automation.Host.ChoiceDescription]::new('&1 置灰','设置成灰度图,且增加15点对比度')
    $notToGrayBtn = [System.Management.Automation.Host.ChoiceDescription]::new('&2 不处理','不处理,按原图')
    $answerOfGray = $Host.UI.PromptForChoice('是否转灰度图?', '请选择:', [System.Management.Automation.Host.ChoiceDescription[]]@($toGrayBtn, $notToGrayBtn), 0)

    $toGray = $false
    switch ($answerOfGray)
    {
	    0 { $toGray = $true }
        default {}
    }

    #批量处理
    $imgPath = $Host.UI.Prompt('','请输入要处理的图片所在文件全路径(如D:\pic,自动查找子目录,仅支持JPG/PNG格式)',[System.Management.Automation.Host.FieldDescription]::new('path'))
    if(-not $imgPath.path){
        Write-Host ('路径不能为空~')
        exit
    }

    if(-not (Test-Path -Path $imgPath.path.Trim() -PathType Container -ErrorAction Stop)){
        Write-Host ('【'+$imgPath.path+'】图片路径不存在~')
        exit
    }

    $savePath = $Host.UI.Prompt('','请输入处理后输出路径(如D:\out,不存在则自动创建)',[System.Management.Automation.Host.FieldDescription]::new('path'))
    if((-not $savePath.path) -or (-not $savePath.path.Trim()) -or (-not (Test-Path -Path ([System.IO.Path]::GetFullPath($savePath.path.Trim())) -IsValid))){
        Write-Host ('无效的输出路径~')
        exit
    }
    $outPath = [System.IO.Path]::GetFullPath($savePath.path.Trim())
    #不存在则创建目录
    if(-not (Test-Path -Path $outPath)){
        mkdir $outPath.path.Trim() -ErrorAction Stop | Out-Null
    }

    #所有图片
    $imgefiles = dir -Path (Join-Path -Path $imgPath.path.Trim() -ChildPath '*') -Include @('*.jpg','*.png') -Recurse

    if(-not ($imgefiles -and $imgefiles.Length -gt 0)){
        Write-Host ('该路径无JPG或PNG图片文件,请检查~')
        exit
    }
    #限制数量不应过大
    if($imgefiles.Length -gt 1000){
        Write-Host ('该路径图片文件过多【'+$imgefiles.Length+'】,请限制在1000以内~')
        exit
    }

    Write-Host ''
    Write-Host '-------------------【本次执行概要】-------------------'
    Write-Host ('图片源路径:'+$imgPath.path.Trim())
    Write-Host ('是否置灰:'+$toGray)
    Write-Host ('输出路径:'+$outPath)
    Write-Host ('即将处理图片数量:'+$imgefiles.Length)
    Write-Host '------------------------------------------------------'

    #是否继续
    $continueBtn = [System.Management.Automation.Host.ChoiceDescription]::new('&1 继续','继续运行')

    $answerOfContinue = $Host.UI.PromptForChoice('是否继续?', '请选择:', [System.Management.Automation.Host.ChoiceDescription[]]@($continueBtn, $exitBtn), 0)

    if($answerOfContinue -ne 0){
        Write-Host '结束....'
        exit
    }


    $index = 0
    foreach($img in $imgefiles){
        Write-Host ('总共:'+$imgefiles.Length+',当前:'+($index + 1)+',余:'+($imgefiles.Length - $index - 1 ))
        if($toGray){
            Set-Pic -imgPath $img.FullName -devType $devType -outPath $outPath -toGray | Out-Null
        }else{
            Set-Pic -imgPath $img.FullName -devType $devType -outPath $outPath | Out-Null
        }
        $index++
    }


    Write-Host '处理完成....'
    $answerOfRename = $Host.UI.PromptForChoice('是否自动按格式重命名(bg_ss_00.png,bg_ss_01.png...)?', '请选择:', [System.Management.Automation.Host.ChoiceDescription[]]@($continueBtn, $exitBtn), 0)
    if($answerOfRename -eq 0){
        Rename-Pic -imgPath $outPath
        Write-Host '重命名完成...'
    }
}
elseif($answerOfAction -eq 1){
    $fPath = $Host.UI.Prompt('','请输入要处理路径(如D:\out)',[System.Management.Automation.Host.FieldDescription]::new('path'))
    #Write-Host ($savePath.path)
    if((-not $fPath.path) -or (-not $fPath.path.Trim()) -or (-not (Test-Path -Path ([System.IO.Path]::GetFullPath($fPath.path.Trim()))))){
        Write-Host ('无效的路径~')
        exit
    }
    $path = ([System.IO.Path]::GetFullPath($fPath.path.Trim()))
    Rename-Pic -imgPath $path
    Write-Host ('【'+$path+'】下所有PNG图片重命名成功~')
}

Write-Host ('感谢使用,Bye~.'+(Get-Date -Format 'yyyy-MM-dd HH:mm:ss'))
使用:
方式1:代码另存为.ps1,右键,“使用Powershell运行”即可。如不能运行,参考此处解决。
方式2:见后文。
说明:
1.运行程序后,前三个选择可直接按回车键,第四个需要输入图片所在的全路径(支持子文件夹),第五个输入处理后保存图片的路径,确认无误后,直接按回车键继续执行。处理完成后,可自行选择是否重命名图片,按回车键则执行,否则结束运行
2.如果非中文操作系统,可能提示会乱码
3.低于win10系统可能运行异常
4.喜欢折腾的可根据需要自行调整
稍微解释一下各步骤:
1、功能选择
【1】处理图片——直接处理图片
【2】批量重命名——只给图片重命名
2、屏幕大小选择(选择对应kindle型号)
【1】KPW3ANDUP——Kindle Paperwhite 3 及更高、Kindle Voyage
【2】KPW1AND2——Kindle Paperwhite 1或2
【3】KO2——Kindle Oasis 2
【4】K7ANDOTHER——Kindle 7或8,其他
3、是否转为灰度图
【1】置灰——转为灰度图,且增加15点对比度
【2】不处理——原图是彩色就是彩色
4、要处理的图片所在文件全路径(递归查找所有子文件夹下的图片)
5、输出路径(如果不存在会自动创建)
6、是否确认继续执行
7、是否自动重命名
【1】继续——给生成的图片重命名
【2】退出——结束
运行过程:
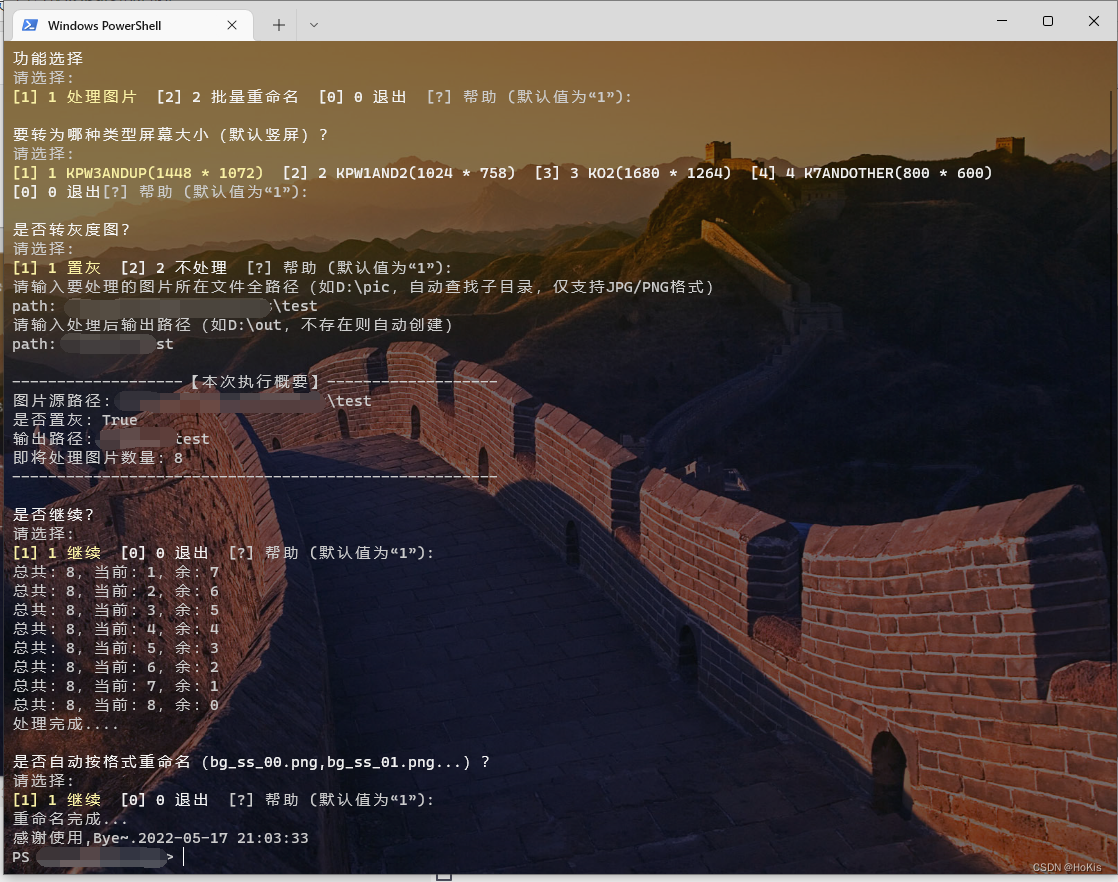
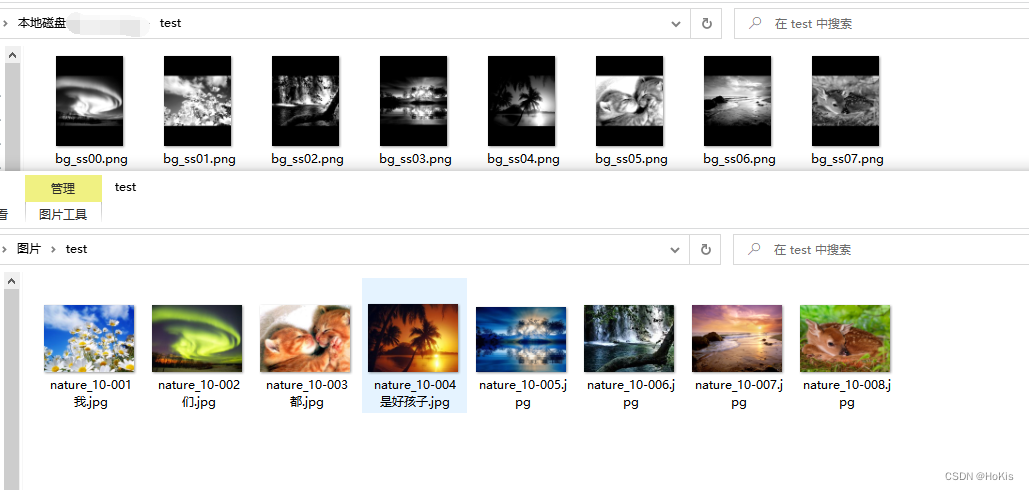
转换效果(上方是转换后的):
虽然不想写成界面的,但是肯定也有不喜欢折腾的,还是稍微封装成.exe文件,可以直接双击运行(不过运行起来后还是黑窗口),下载链接: 提取码: 6xks。
03 后记
如果有些图片转灰度图,且增加了15点对比度后,会变的比较丑,可以自行修改此行代码中的15:
$type::KiContrast($type::MakeGrayscale($newPic),15).Save($outFile,[System.Drawing.Imaging.ImageFormat]::Png)
多试几次就好了。
有其他想法的小伙伴可以交流交流~


 1408
1408

 被折叠的 条评论
为什么被折叠?
被折叠的 条评论
为什么被折叠?
 到【灌水乐园】发言


