


本文为霍格沃兹测试开发学社学员学习笔记分享
原文链接:https://ceshiren.com/t/topic/24832
1、SeleniumIDE用例录制
SeleniumIDE用例录制使用场景
- 刚开始入门UI自动化测试
- 团队代码基础较差
- 技术成长之后学习价值不高
SeleniumIDE的下载以及安装
- 官网:https://www.selenium.dev/
- Chrome插件:https://chrome.google.com/webstore/detail/selenium-ide/mooikfkahbdckldjjndioackbalphokd
- Firefox插件:https://addons.mozilla.org/en-US/firefox/addon/selenium-ide/
- github release:https://github.com/SeleniumHQ/selenium-ide/releases
- 其它版本:https://addons.mozilla.org/en-GB/firefox/addon/selenium-ide/versions/ 注意:Chrome插件在国内无法下载,Firefox可以直接下载。
启动
-
安装完成后,通过在浏览器的菜单栏中点击它的图标来启动它:
-
如果没看到图标,首先确保是否安装了Selenium IDE扩展插件
-
通过以下链接访问所有插件
- Chrome: chrome://extensions
- Firefox: about:addons
SeleniumIDE常用功能
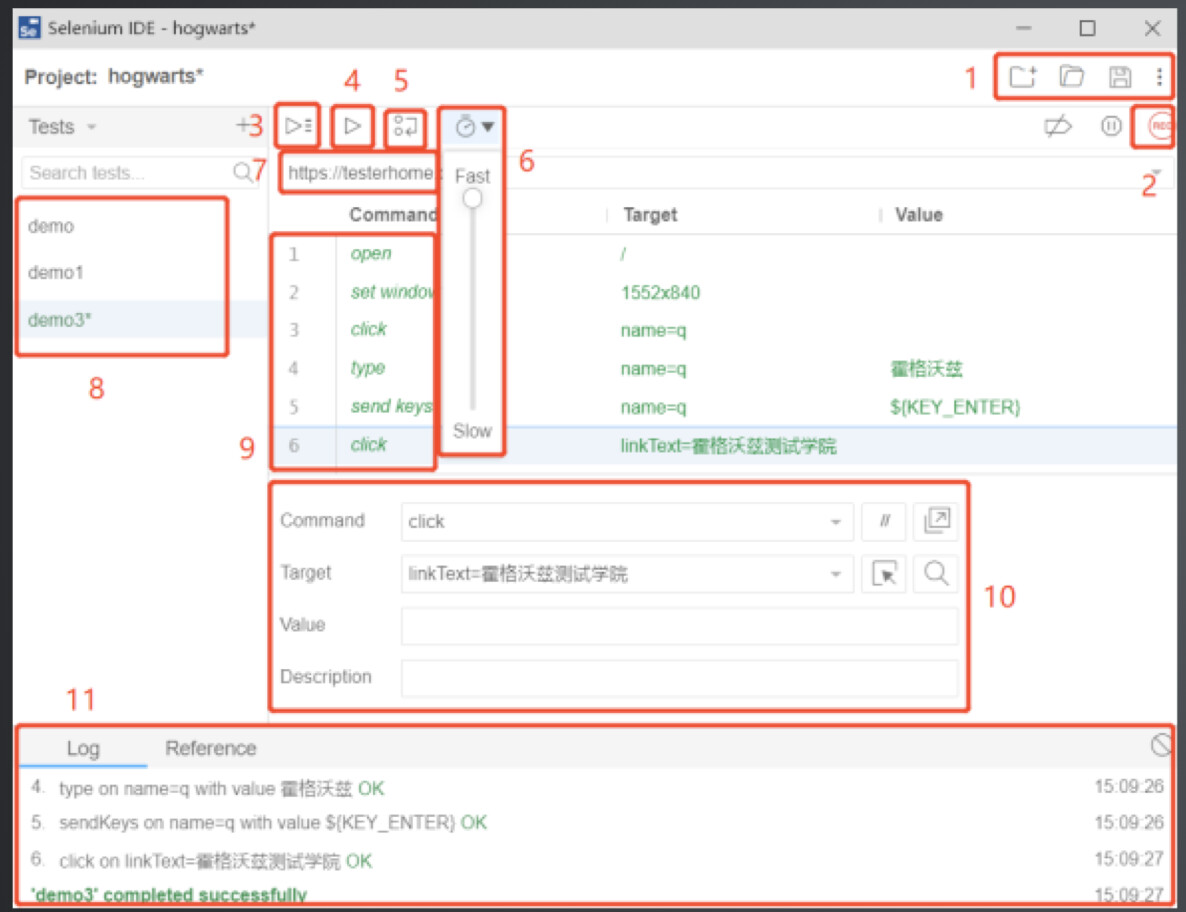
- 新建、保存、打开
- 开始和停止录制
- 运行8中的所有的实例
- 运行单个实例
- 调试模式
- 调整案例的运行速度
- 要录制的网址
- 实例列表
- 动作、目标、值
- 对单条命令的解释
- 运行日志
其他常用功能
- 用例管理
- 保存和回放
SeleniumIDE脚本导出
- Java
- Python
2、自动化测试用例结构分析
目录
- 用例结构
- 录制用例分析
- 录制用例优化
标准的用例结构
- 用例标题
- 前提条件
- 用例步骤
- 预期结果
- 实际结果
| 用例标题 | 类型 | 前提条件 | 用例步骤 | 预期结果 | 实际结果 |
|---|---|---|---|---|---|
| 搜狗搜索功能 | 正例 | 进入搜狗首页 | 1. 输入搜索关键词 2.按下回车键 | 1. 搜索成功 2. 搜索结果列表包含关键字 |
用例结构对比
| 自动化测试用例 | 作用 | |
|---|---|---|
| 用例标题 | 测试包、文件、类、方法名称 | 用例的唯一标识 |
| 前提条件 | setup、setup_class(Pytest); | |
| BeforeEach、BeforeAll(JUnit) | 测试用例前的准备动作,比如读取数据或者driver的初始化 | |
| 用例步骤 | 测试方法内的代码逻辑 | 测试用例具体的步骤行为 |
| 预期结果 | assert 实际结果 = 预期结果 | 断言,印证用例是否执行成功 |
| 实际结果 | assert 实际结果 = 预期结果 | 断言,印证用例是否执行成功 |
| 后置动作 | teardown、teardown_class(Pytest); | |
| @AfterEach、@AfterAll(JUnit) | 脏数据清理、关闭driver进程 |
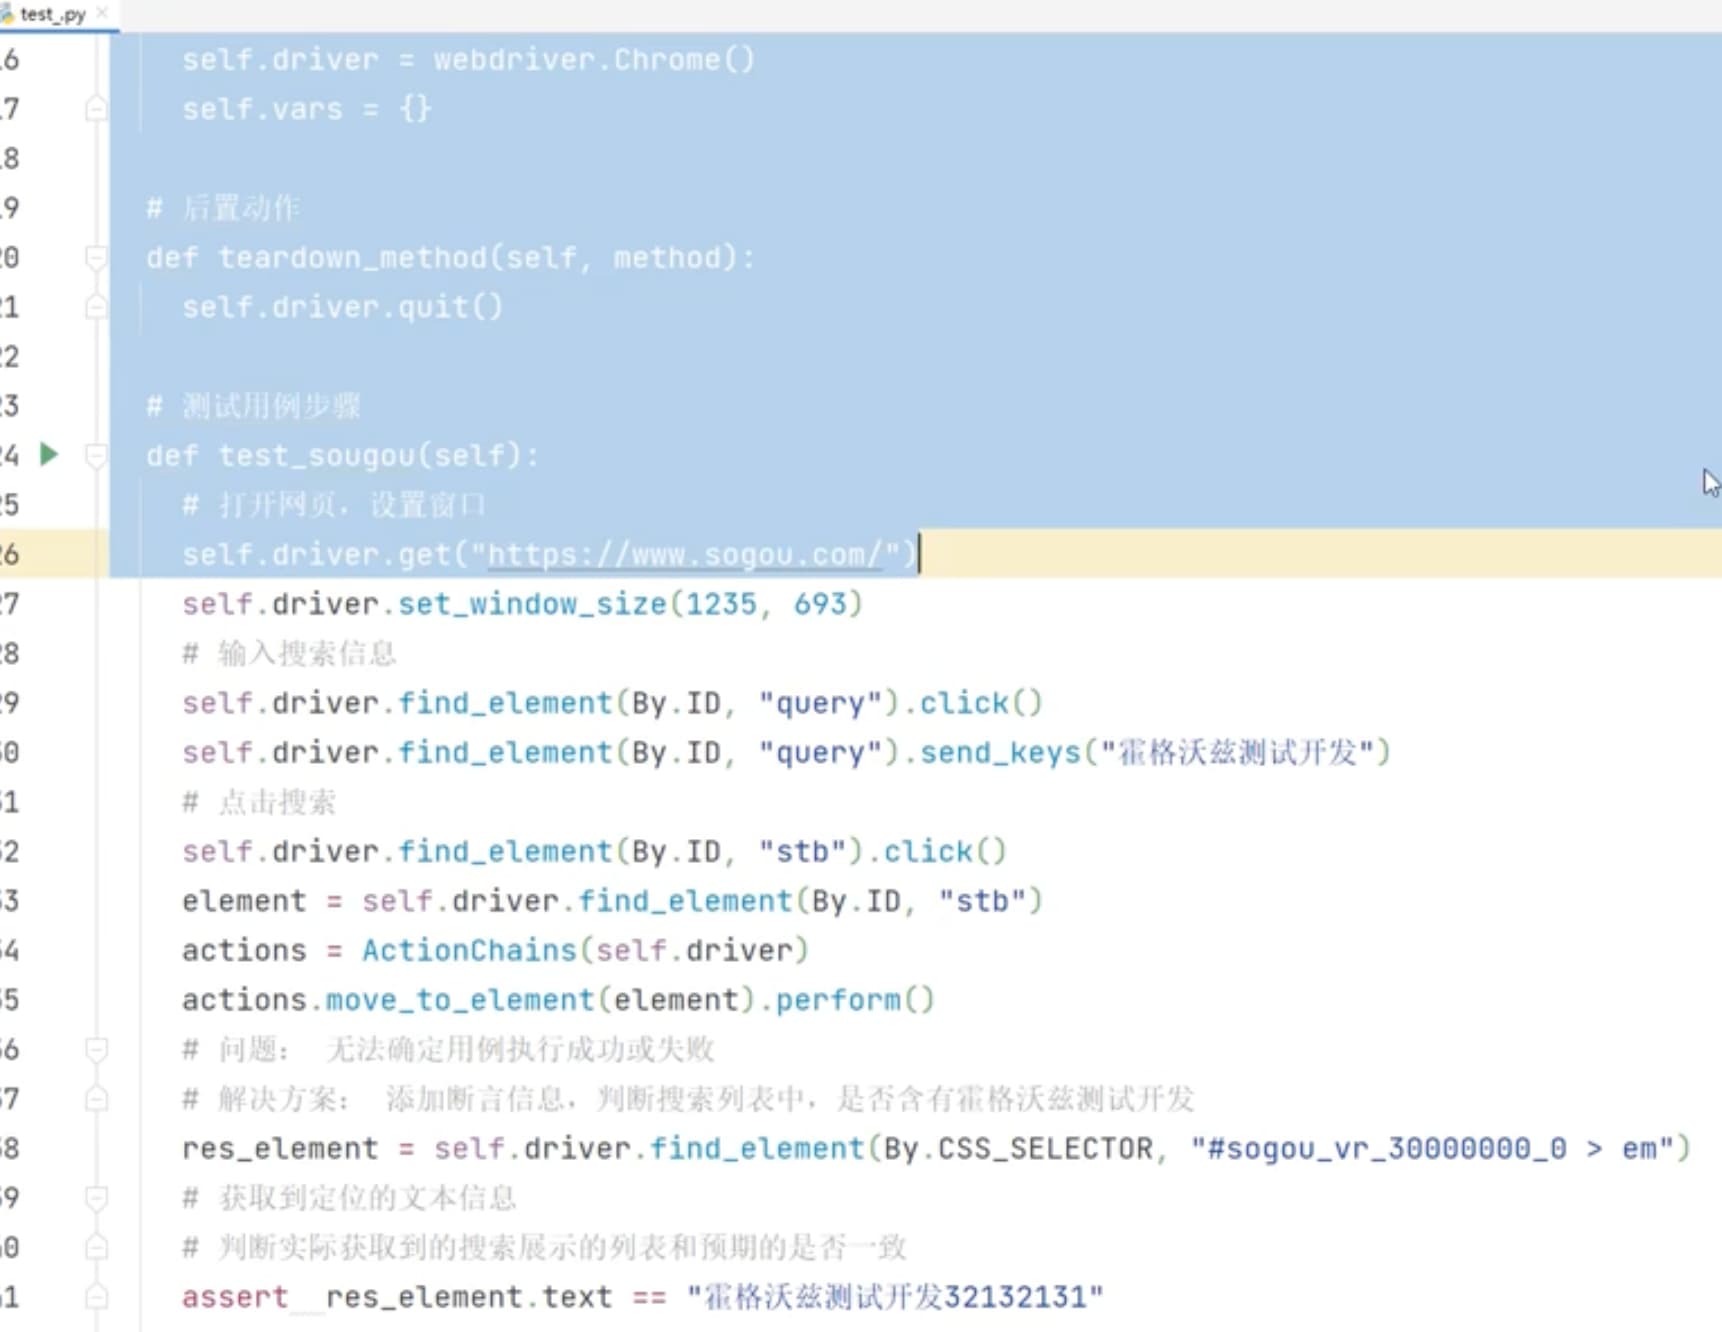
IDE录制脚本
-
脚本步骤:
- 访问搜狗网站
- 搜索框输入“霍格沃兹测试开发”
- 点击搜索按钮
# Generated by Selenium IDE
import pytest
import time
import json
from selenium import webdriver
from selenium.webdriver.common.by import By
from selenium.webdriver.common.action_chains import ActionChains
from selenium.webdriver.support import expected_conditions
from selenium.webdriver.support.wait import WebDriverWait
from selenium.webdriver.common.keys import Keys
from selenium.webdriver.common.desired_capabilities import DesiredCapabilities

class Test():
  def setup_method(self, method):
    self.driver = webdriver.Chrome()
    self.vars = {}

  def teardown_method(self, method):
    self.driver.quit()

  def test_sougou(self):
    # 打开网页,设置窗口
    self.driver.get("https://www.sogou.com/")
    self.driver.set_window_size(1235, 693)
    # 输入搜索信息
    self.driver.find_element(By.ID, "query").click()
    self.driver.find_element(By.ID, "query").send_keys("霍格沃兹测试开发")
    # 点击搜索
    self.driver.find_element(By.ID, "stb").click()
    element = self.driver.find_element(By.ID, "stb")
    actions = ActionChains(self.driver)
    actions.move_to_element(element).perform()
脚本优化
import pytest
import time
import json
from selenium import webdriver
from selenium.webdriver.common.by import By
from selenium.webdriver.common.action_chains import ActionChains
from selenium.webdriver.support import expected_conditions
from selenium.webdriver.support.wait import WebDriverWait
from selenium.webdriver.common.keys import Keys
from selenium.webdriver.common.desired_capabilities import DesiredCapabilities

class TestDemo01():
  def setup_method(self, method):
    # 实例化chromedriver
    self.driver = webdriver.Chrome()
    # 添加全局隐式等待
    self.driver.implicitly_wait(5)

  def teardown_method(self, method):
    # 关闭driver
    self.driver.quit()

  def test_demo01(self):
    # 访问网站
    self.driver.get("https://www.baidu.com/")
    # 设置窗口
    self.driver.set_window_size(1330, 718)
    # 点击输入框
    self.driver.find_element(By.ID, "kw").click()
    # 输入框输入信息
    self.driver.find_element(By.ID, "kw").send_keys("霍格沃兹测试开发")
    # 点击搜索按钮
    self.driver.find_element(By.ID, "su").click()
    # 等待界面加载
    time.sleep(5)
    # 元素定位后获取文本信息
    res = self.driver.find_element(By.XPATH,"//*[@id='1']/h3/a").get_attribute("text")
    # 打印文本信息
    print(res)
    # 添加断言
    assert "霍格沃兹测试开发" in res
    # 查看界面展示
    time.sleep(5)
IDE 录制脚本(Java)
// Generated by Selenium IDE
import org.junit.Test;
import org.junit.Before;
import org.junit.After;
import org.openqa.selenium.By;
import org.openqa.selenium.WebDriver;
import org.openqa.selenium.firefox.FirefoxDriver;
import org.openqa.selenium.chrome.ChromeDriver;
import org.openqa.selenium.Dimension;
import org.openqa.selenium.JavascriptExecutor;
import org.openqa.selenium.Alert;
import org.openqa.selenium.Keys;
import java.util.*;
import java.net.MalformedURLException;
import java.net.URL;
public class TestSogouTest {
  private WebDriver driver;
  private Map<String, Object> vars;
  JavascriptExecutor js;
  @Before
  public void setUp() {
    driver = new ChromeDriver();
    js = (JavascriptExecutor) driver;
    vars = new HashMap<String, Object>();
  }
  @After
  public void tearDown() {
    driver.quit();
  }
  @Test
  public void testSogou() {
    driver.get("https://www.sogou.com/");
    driver.manage().window().setSize(new Dimension(1671, 1417));
    driver.findElement(By.id("query")).sendKeys("霍格沃兹测试开发");
    driver.findElement(By.id("query")).sendKeys(Keys.ENTER);
  }
}
pom依赖(Java)
<?xml version="1.0" encoding="UTF-8"?>
<project xmlns="http://maven.apache.org/POM/4.0.0"
         xmlns:xsi="http://www.w3.org/2001/XMLSchema-instance"
         xsi:schemaLocation="http://maven.apache.org/POM/4.0.0 http://maven.apache.org/xsd/maven-4.0.0.xsd">
    <modelVersion>4.0.0</modelVersion>

    <groupId>org.example</groupId>
    <artifactId>beginner</artifactId>
    <version>1.0-SNAPSHOT</version>
    <properties>
        <project.build.sourceEncoding>UTF-8</project.build.sourceEncoding>
        <java.version>11</java.version>
        <!-- 使用 Java 11 语言特性 ( -source 11 ) 并且还希望编译后的类与 JVM 11 ( -target 11 )兼容,您可以添加以下两个属性,它们是默认属性插件参数的名称-->
        <maven.compiler.target>11</maven.compiler.target>
        <!-- 对应junit Jupiter的版本号;放在这里就不需要在每个依赖里面写版本号,导致对应版本号会冲突-->
        <junit.jupiter.version>5.8.2</junit.jupiter.version>
        <maven.compiler.version>3.8.1</maven.compiler.version>
        <maven.surefire.version>3.0.0-M5</maven.surefire.version>
        <hamcrest.version>2.2</hamcrest.version>
        <!-- plugins -->
        <maven-surefire-plugin.version>3.0.0-M5</maven-surefire-plugin.version>
        <!-- log日志 -->
        <slf4j.version>2.0.0-alpha7</slf4j.version>
        <logback.version>1.3.0-alpha16</logback.version>

    </properties>
    <dependencies>
        <dependency>
            <groupId>org.slf4j</groupId>
            <artifactId>slf4j-api</artifactId>
            <version>${slf4j.version}</version>
        </dependency>
        <dependency>
            <groupId>ch.qos.logback</groupId>
            <artifactId>logback-classic</artifactId>
            <version>${logback.version}</version>
        </dependency>
        <dependency>
            <groupId>org.seleniumhq.selenium</groupId>
            <artifactId>selenium-java</artifactId>
            <version>4.2.1</version>
        </dependency>
        <dependency>
            <groupId>org.junit.jupiter</groupId>
            <artifactId>junit-jupiter-engine</artifactId>
            <version>${junit.jupiter.version}</version>
        </dependency>
        <dependency>
            <groupId>org.junit.vintage</groupId>
            <artifactId>junit-vintage-engine</artifactId>
            <version>${junit.jupiter.version}</version>
        </dependency>
    </dependencies>
    <build>
        <!-- maven 运行的依赖插件 -->
        <plugins>
            <plugin>
                <groupId>org.apache.maven.plugins</groupId>
                <artifactId>maven-compiler-plugin</artifactId>
                <version>3.8.1</version>
                <configuration>
                    <parameters>true</parameters>
                    <source>11</source>
                    <target>11</target>
                    <encoding>UTF-8</encoding>
                </configuration>
            </plugin>
            <plugin>
                <groupId>org.apache.maven.plugins</groupId>
                <artifactId>maven-surefire-plugin</artifactId>
                <version>3.0.0-M7</version>
                <configuration>
                    <includes>
                        <include>**/*Test.java</include>
                    </includes>
                </configuration>
            </plugin>
        </plugins>
    </build>

</project>
脚本优化(Java)
- 隐式等待(了解即可)
- 断言信息
// Generated by Selenium IDE
import org.junit.Test;
import org.junit.Before;
import org.junit.After;
import org.openqa.selenium.By;
import org.openqa.selenium.WebDriver;
import org.openqa.selenium.firefox.FirefoxDriver;
import org.openqa.selenium.chrome.ChromeDriver;
import org.openqa.selenium.Dimension;
import org.openqa.selenium.JavascriptExecutor;
import org.openqa.selenium.Alert;
import org.openqa.selenium.Keys;

import java.time.Duration;
import java.util.*;
import java.net.MalformedURLException;
import java.net.URL;

import static org.junit.Assert.assertEquals;

public class TestSogouTest {
  private WebDriver driver;
  private Map<String, Object> vars;
  JavascriptExecutor js;
  @Before
  public void setUp() {
    //  实例化chromedriver
    driver = new ChromeDriver();
    //  添加全局隐式等待
    js = (JavascriptExecutor) driver;
    vars = new HashMap<String, Object>();
    driver.manage().timeouts().implicitlyWait(Duration.ofSeconds(10));

  }
  @After
  //  关闭driver
  public void tearDown() {
    driver.quit();
  }
  @Test
  public void testSogou() {
    // 打开网页
    driver.get("https://www.sogou.com/");
    // 设置窗口
    driver.manage().window().setSize(new Dimension(1671, 1417));
    // 输入霍格沃兹测试开发
    driver.findElement(By.id("query")).sendKeys("霍格沃兹测试开发");
    // 回车搜索
    driver.findElement(By.id("query")).sendKeys(Keys.ENTER);
    // 获取搜索的文本结果
    String text = driver.findElement(By.cssSelector("#sogou_vr_30000000_0 > em")).getText();
    // 断言是否包含期望文本
    assertEquals("霍格沃兹测试开发", text);

  }
}


 111
111


 被折叠的 条评论
为什么被折叠?
被折叠的 条评论
为什么被折叠?
 到【灌水乐园】发言


