


文章目录
git
git介绍
Git 是一个开源的分布式版本控制系统,用于敏捷高效地处理任何或小或大的项目。
Git 是 Linus Torvalds 为了帮助管理 Linux 内核开发而开发的一个开放源码的版本控制软件。
详细介绍中文版https://git-scm.com/book/zh/v2
-
Git特点:
- 速度;
- 简单的设计;
- 对非线性开发模式的强力支持(允许成千上万个并行开发的分支);
- 完全分布式;
- 有能力高效管理类似 Linux 内核一样的超大规模项目(速度和数据量)。
-
Git有三种状态:已提交(committed)、已修改(modified) 和 已暂存(staged)。
- 已修改表示修改了文件,但还没保存到数据库中;
- 已暂存表示对一个已修改文件的当前版本做了标记,使之包含在下次提交的快照中;
- 已提交表示数据已经安全地保存在本地数据库中。
这会让 Git 项目拥有三个阶段:工作区、暂存区以及 Git 目录。

git安装
安装很简单,本地资源就有git服务,直接安装即可
[root@server1 ~]# yum install -y git
获取 Git 仓库通常有两种方式:
- 将尚未进行版本控制的本地目录转换为 Git 仓库。
- 从其它服务器克隆 一个已存在的 Git 仓库。比如: git clone
目前我们还没有git仓库,所以就是自己去建立一个git目录
[root@server1 ~]# mkdir testgit	#创建一个目录,名字随意
[root@server1 ~]# cd testgit/	#进入目录
[root@server1 testgit]# git init		#执行操作,将目录初始化为git目录
Initialized empty Git repository in /root/testgit/.git/
[root@server1 testgit]# ls -A	#执行有会一个.git目录
.git
.git目录,目录是git跟踪管理版本库的,没事绝对不要去动
git命令操作
首先在建立出git目录之后需要去设定用户信息,安装完 Git 之后,要做的第一件事就是设置你的用户名和邮件地址。 这一点很重要,因为每一个 Git 提交都会使用这些信息,它们会写入到你的每一次提交中,不可更改:
[root@server1 testgit]# git config --global user.name "Howei"	#设定用户
[root@server1 testgit]# git config --global user.email howei@example.com	#设定邮箱
注意: 如果使用了 --global 选项,那么该命令只需要运行一次,因为之后无论你在该系统上做任何事情, Git 都会使用那些信息。 当你想针对特定项目使用不同的用户名称与邮件地址时,可以在那个项目目录下运行没有 --global 选项的命令来配置。
还可以配置默认文本编辑器,当 Git 需要你输入信息时会调用它。 如果未配置,Git 会使用操作系统默认的文本编辑器。
如果你想使用不同的文本编辑器,例如 Emacs,可以如下操做:
[root@server1 testgit]# git config --global core.editor emacs
可以去查看设定的配置,或指定key值去查看value值
[root@server1 testgit]# git config --list
user.name=Howei
user.email=howei@example.com
core.repositoryformatversion=0
core.filemode=true
core.bare=false
core.logallrefupdates=true

[root@server1 testgit]# git config user.name
Howei
[root@server1 testgit]# git config user.email
howei@example.com
如何让文件提交到git上呢
在我们的git目录里创建一个文件,写入内容
[root@server1 testgit]# echo redhat > file1	#建立一个有内容的文件
[root@server1 testgit]# git status -s	#简化输出状态,也可以不加-s
?? file1
可以看到我们新建立的文件前面有两个??,这是表示文件当前的状态刚被添加到工作目录中但是还没有在版本控制里添加。
其他的状态还有
 M file1  	#更改但未暂存的文件
MM file1	#更改添加到暂存,又进行了更改
A  file1	#新添加到暂存区中的文件
M  file1	#更改并提交到暂存区
?? file1	#新添加的未跟踪文件
跟踪新文件
现在对刚才的file1来进行添加,注意看状态的变化
[root@server1 testgit]# git add file1
[root@server1 testgit]# git status -s
A  file1
提交更新
然后提交暂存的内容,参数-m可以添加描述,提交的时候不需要指定文件名,会自动提交所有在暂存区的文件
[root@server1 testgit]# git commit -m file1:v1	#这里我的描述是自定义一个版本号方便区分
[root@server1 testgit]# git status -s #提交后就不会有暂存或新文件或修改等状态了
对文件进行更改,状态会有一个在右侧的M
[root@server1 testgit]# echo redhat >> file1
[root@server1 testgit]# git status -s
 M file1
[root@server1 testgit]# git add file1
[root@server1 testgit]# git status -s
M file1	#添加后M会到左侧
查看已暂存和未暂存的修改
git diff 可以针对添加到暂存区和没有添加的修改进行对比,检测区别
[root@server1 testgit]# echo redhat111 > file1	#第一次修改
[root@server1 testgit]# git add file1	#添加
[root@server1 testgit]# echo redhat > file1	#第二次修改,为添加
[root@server1 testgit]# git status -s
MM file1	#状态是两个M
[root@server1 testgit]# git diff		#对比文件的区别
diff --git a/file1 b/file1
index 6cf1323..8e9ab21 100644
--- a/file1
+++ b/file1
@@ -1 +1 @@
-redhat111
+redhat
跳过使用暂存区域
可以直接在修改后跳过暂存直接提交,使用-a参数
[root@server1 testgit]# git commit -a -m file1:v3
[master cb37932] file1:v3
 1 file changed, 1 insertion(+), 1 deletion(-)
忽略文件
一般我们总会有些文件无需纳入 Git 的管理,也不希望它们总出现在未跟踪文件列表。 通常都是些自动生成的文件,比如日志文件,或者编译过程中创建的临时文件等。 在这种情况下,我们可以创建一个名为 .gitignore 的文件,列出要忽略的文件的模式。
可以看一下官方的事例,以下内容都是写在 .gitignore 里的
# 忽略所有的 .a 文件
*.a

# 但跟踪所有的 lib.a,即便你在前面忽略了 .a 文件
!lib.a

# 只忽略当前目录下的 TODO 文件,而不忽略 subdir/TODO
/TODO

# 忽略任何目录下名为 build 的文件夹
build/

# 忽略 doc/notes.txt,但不忽略 doc/server/arch.txt
doc/*.txt

# 忽略 doc/ 目录及其所有子目录下的 .pdf 文件
doc/**/*.pdf
重命名文件
git mv 重命名文件,重命名之后也是需要提交的
[root@server1 testgit]# git mv file1 testfile	#重命名
[root@server1 testgit]# ls
testfile
[root@server1 testgit]# git status -s
R  file1 -> testfile	#状态是在暂存区的
[root@server1 testgit]# git commit -m "rename file1"
[master 885a667] rename file1
 1 file changed, 0 insertions(+), 0 deletions(-)
 rename file1 => testfile (100%)
移除文件
[root@server1 testgit]# git rm testfile	#移除文件
rm 'testfile'
[root@server1 testgit]# git status -s
D  testfile	#状态是删除待提交
[root@server1 testgit]# git commit -m "Delete"	#提交状态
[master 74ec64a] Delete
 1 file changed, 1 deletion(-)
 delete mode 100644 testfile
版本回退
当删除文件之后,后悔了怎么办,很简单,直接使用版本回退功能
[root@server1 testgit]# git reflog	#列出所有提交过的版本状态,第一列相当区id,可以用来进行版本回退
74ec64a HEAD@{0}: commit: Delete
885a667 HEAD@{1}: commit: rename file1
cb37932 HEAD@{2}: commit: file1:v3
1edb685 HEAD@{3}: commit: file1:v2
5cfa415 HEAD@{4}: commit: file1
f1f4106 HEAD@{5}: commit (initial): file1

[root@server1 testgit]# git reset --hard 885a667 	#选择要回退的版本
HEAD is now at 885a667 rename file1
[root@server1 testgit]# ls
testfile
取消状态
取消暂存的状态
[root@server1 testgit]# echo test > testfile
[root@server1 testgit]# git status -s
 M testfile
[root@server1 testgit]# git add .	#可以用“.”表示所有需要添加的文件名
[root@server1 testgit]# git status -s
M  testfile	#目前的状态是修改添加在暂存区

[root@server1 testgit]# git reset HEAD testfile #取消暂存
Unstaged changes after reset:
M	testfile
[root@server1 testgit]# git status -s
 M testfile
取消修改的状态
[root@server1 testgit]# git checkout -- testfile
[root@server1 testgit]# git status -s
查看提交历史
查看提交的版本历史,这里展示的历史信息只是你的当前版本之前的历史,如果是版本回退,回退的版本之后的信息是不会展示的
[root@server1 testgit]# git log	#查看详细的记录
commit 885a667f328b2863719043e6b55bbcec5349c804
Author: Howei <howei@example.com>
Date:   Mon Jun 15 15:29:38 2020 +0800

    rename file1

commit cb37932d623202316b26486185f38cafb2aa250b
Author: Howei <howei@example.com>
Date:   Mon Jun 15 15:19:59 2020 +0800

    file1:v3

[root@server1 testgit]# git log --pretty=oneline		#
885a667f328b2863719043e6b55bbcec5349c804 rename file1
cb37932d623202316b26486185f38cafb2aa250b file1:v3
1edb68586197c717e4c7848f3d7e15da57931789 file1:v2
5cfa415121b5fce2a0ef5d4cf4fd07b15977d78e file1
f1f4106a8703fb8e5df8edc86818803364c5aaaf file1
远程仓库
github仓库是运行在网络上的开源服务,可以将个人的作品上传上去公所有人使用,这是一种开源精神,并且上传的内容自己也方便在其他地方也同样可以随时取下拉使用。
首先需要注册github的账号,网站:https://github.com
创建储存库
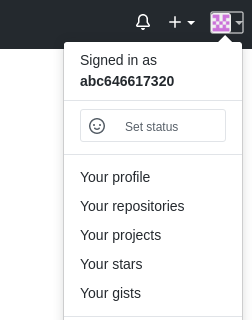
注册登陆之后,在右上角的头像上,选择:Your repositorys,进入个人储存库里,新建库
选择NEW,新加库

进入创建界面之后,我们自定义库名称,下面选public就可以,私有是要收费的,然后直接点Create repository

创建完成后,还需要选择一个连接方式,https或ssh,https每次在连接是都需要输入用户名密码,所以我们选择ssh方便连接

设置ssh免密操作
在本机上,生成密钥
[root@server1 ~]# ssh-keygen 	#生成密钥
[root@server1 ~]# cat /root/.ssh/id_rsa.pub	#取出公钥
右上角头像点击选择Settings

左侧选择SSH and GPG keys ,然后点击New SSH key,将公钥粘贴进去

添加成功后就可以看到设置了

连接远程仓库
可以回到刚才创建的储存库里,上面会有提示操作

先让我们创建本地的库,我们已经操作完成了,然后就需要连接远程库,第一次推送需要加 -u参数
[root@server1 testgit]# git remote add origin git@github.com:abc646617320/testgit.git
[root@server1 testgit]# git remote -v	#查看连接信息
origin	git@github.com:abc646617320/testgit.git (fetch)
origin	git@github.com:abc646617320/testgit.git (push)
连接后,执行推送
[root@server1 testgit]# git push -u origin master
成功后刷细储存库页面,就看到我们的文件同步到github的库里了

clone 远程仓库
如果本地没有git库或者不小心把之前的git库删除了,就可以直接从远程库克隆下来,页面上可以看到一个克隆的链接

复制这个链接使用git clone,将仓库搬下来
[root@server1 ~]# rm -fr testgit/	#删除git工作目录
[root@server1 ~]# git clone git@github.com:abc646617320/testgit.git	#从远程库里克隆
Cloning into 'testgit'...
remote: Enumerating objects: 9, done.
remote: Counting objects: 100% (9/9), done.
remote: Compressing objects: 100% (3/3), done.
remote: Total 9 (delta 0), reused 9 (delta 0), pack-reused 0
Receiving objects: 100% (9/9), done.
[root@server1 ~]# ls -R
.:
testgit

./testgit:
file1
gitlab代码仓库(私有仓库)
GitLab是一个利用 Ruby on Rails 开发的开源应用程序,实现一个自托管的Git项目仓库,可通过Web界面进行访问公开的或者私人项目。
它拥有与Github类似的功能,能够浏览源代码,管理缺陷和注释。可以管理团队对仓库的访问,它非常易于浏览提交过的版本并提供一个文件历史库。它还提供一个代码片段收集功能可以轻松实现代码复用,便于日后有需要的时候进行查找。
我们可以使用gitlub去搭建内部的私有仓库
安装
官网:https://about.gitlab.com/install/
软件下载(官方下载慢,推荐使用国内镜像站点): https://mirrors.tuna.tsinghua.edu.cn/gitlab-ce/yum/
目前最新的包是:gitlab-ce-13.0.6-ce.0.el7.x86_64.rpm
这个软件是比较吃内存的,所以官方推荐的是至少4G内存
安装
[root@server1 ~]# yum install -y curl policycoreutils-python openssh-server	#首先需要安装一些依赖性

[root@server1 ~]# yum install -y gitlab-ce-13.0.6-ce.0.el7.x86_64.rpm
安装成功之后,需要去修改gitlib的访问地址
[root@server1 ~]# vim /etc/gitlab/gitlab.rb
29 external_url 'http://172.25.254.1'

[root@server1 ~]# gitlab-ctl reconfigure		#修改配置后重载服务
gitlab的一些常用操作命令
| 命令 | 说明 |
|---|---|
| gitlab-ctl start | 启动所有 gitlab 组件 |
| gitlab-ctl stop | 停止所有 gitlab 组件 |
| gitlab-ctl restar | t重启所有 gitlab 组件 |
| gitlab-ctl status | 查看服务状态 |
| gitlab-ctl reconfigure | 重载服务 |
| gitlab-ctl tail | 查看日志 |
gitlab操作
网页访问gitlab
第一次访问会强制修改密码,一定要记住密码,我的密码是redhat123

密码设置完之后就是登陆界面,用户我使用root,登陆后就可以开始创建了

注意 gitlab是支持中文的,右上角头像里选择设定

进入后左侧选择Preferences
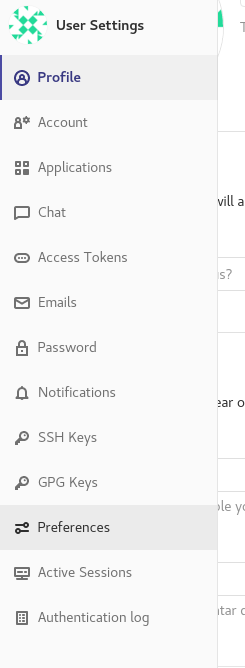
然后到最下方语言选择为简体中文,保存成改,就成功了

新建项目
在左上角选择您的项目,点击后选择Create a project
创建一个私有仓库

最后点击创建即可
创建出来的项目,也是可以直接克隆到本地的,删除之前的testgit,因为名字冲突,如果使用ssh克隆,记着配置ssh密匙
同样在gitlab的设置里选择ssh密匙,将之前生成的公钥写进去

[root@server1 ~]# git clone git@172.25.254.1:root/testgit.git	#克隆库
Cloning into 'testgit'...
remote: Enumerating objects: 3, done.
remote: Counting objects: 100% (3/3), done.
remote: Total 3 (delta 0), reused 0 (delta 0), pack-reused 0
Receiving objects: 100% (3/3), done.
[root@server1 ~]# ls
testgit	#确认克隆下来了
[root@server1 ~]# cd testgit/
[root@server1 testgit]# git remote -v	#并且为我们自动配置了连接信息
origin	git@172.25.254.1:root/testgit.git (fetch)
origin	git@172.25.254.1:root/testgit.git (push)
现在就可以在本地创建文件后去上传到gitlab
[root@server1 testgit]# echo www.redhat.com > index.html
[root@server1 testgit]# git add index.html
[root@server1 testgit]# git commit -m "add index.html"
[master 9d42e71] add index.html
 1 file changed, 1 insertion(+)
 create mode 100644 index.html
[root@server1 testgit]# git push -u origin master


 3988
3988


 被折叠的 条评论
为什么被折叠?
被折叠的 条评论
为什么被折叠?
 到【灌水乐园】发言


