


Phoenix简介
官网地址 http://phoenix.apache.org/
Phoenix是HBase的开源SQL皮肤。可以使用标准JDBC API代替HBase客户端API来创建表,插入数据和查询HBase数据。
Phoenix特点:
1)容易集成:如Spark,Hive,Pig,Flume和Map Reduce;
2)操作简单:DML命令以及通过DDL命令创建和操作表和版本化增量更改;
3)支持HBase二级索引创建。
Phoenix架构

Phoenix安装部署
(1)上传并解压tar包
[linux@node1 software]$ tar -zxvf apache-phoenix-5.0.0-HBase-2.0-bin.tar.gz -C /opt/module/

[linux@node1 module]$ mv apache-phoenix-5.0.0-HBase-2.0-bin/ phoenix
(2)配置环境变量
sudo vim /etc/profile.d/my_env.sh
#PHOENIX_HOME
export PHOENIX_HOME=/opt/module/phoenix
export PHOENIX_CLASSPATH=$PHOENIX_HOME
export PATH=$PATH:$PHOENIX_HOME/bin
(3)复制phoenix中的一个server包并拷贝到各个节点的hbase/lib
[linux@node1 phoenix]$ cd /opt/module/phoenix/

[linux@node1 phoenix]$ cp phoenix-5.0.0-HBase-2.0-server.jar /opt/module/hbase/lib/
[linux@node1 phoenix]$ scp phoenix-5.0.0-HBase-2.0-server.jar linux@node2:/opt/module/hbase/lib/
[linux@node1 phoenix]$ scp phoenix-5.0.0-HBase-2.0-server.jar linux@node3:/opt/module/hbase/lib/
(4)重启HBase
[linux@node1 bin]$ stop-hbase.sh

[linux@node1 bin]$ start-hbase.sh
(5)连接Phoenix
[linux@node1 phoenix]$ bin/sqlline.py node1,node2,node3:2181
Phoenix Shell 表操作
官方文档 http://phoenix.apache.org/language/index.html#create
(1)显示所有表
!table 或 !tables
(2)创建表
在phoenix中建表,在hbase中查询时列限定符(name,age)以编码形式存在,必须加上官方指定参数column_encoded_bytes=0
#直接指定单个列作为RowKey
CREATE TABLE IF NOT EXISTS student(
id VARCHAR primary key,
name VARCHAR,
age VARCHAR) column_encoded_bytes=0;
#指定多个列的联合作为RowKey
CREATE TABLE IF NOT EXISTS teacher(
id VARCHAR,
name VARCHAR,
address VARCHAR,
City VARCHAR,
CONSTRAINT my_pk PRIMARY KEY (id,name));
(3)在phoenix中,表名等会自动转换为大写,若要小写,使用双引号,如"people"。
CREATE TABLE IF NOT EXISTS "people"(
"id" VARCHAR primary key,
"name" VARCHAR,
"age" VARCHAR);

#查询也需要加引号
select * from "people";
(4)插入数据
upsert into student values('1001','zhangsan','102');
(5)查询记录
select * from student;
select * from student where id='1001';
(6)删除记录
delete from student where id='1001';
(7)删除表
drop table student;
(8)退出命令行
!quit
phoenix和hbase表的映射
(1)表的关系
默认情况下,直接在HBase中创建的表,通过Phoenix是查看不到的。如果要在Phoenix中操作直接在HBase中创建的表,则需要在Phoenix中进行表的映射。映射方式有两种:表映射和视图映射。
(2)hbase中创建测试表test
hbase(main):001:0> create 'test','info1','info2'

hbase(main):012:0> put 'test','1001','info1:name','shier'
hbase(main):013:0> put 'test','1002','info2:name','ergou'
hbase(main):014:0> put 'test','1002','info2:age','25'
(3)表映射
使用Apache Phoenix创建对HBase的表映射,有两种方法:
a.HBase中不存在表时,可以直接使用create table指令创建需要的表,系统将会自动在Phoenix和HBase中创建test表,并会根据指令内的参数对表结构进行初始化。(如果不指定列族的话,默认会在hbase中创建_0列族)
b.当HBase中已经存在表时,可以以类似创建phoenix的方式创建关联表,建表时要指定列族,主键对应rowkey可以随便指定,
 create table "test"(
 id varchar primary key,
 "info1"."name" varchar,
 "info2"."age" varchar
 ) column_encoded_bytes=0;
(4)视图映射
a.phoenix创建的视图是只读的,所以只能用来做查询,无法通过视图对源数据进行修改等操作。
b.在phoenix中删除视图,不会删除对应对应的hbase中的表
c.hbase表不存在不能创建对应视图
 create view "test"(
    id varchar primary key,
    "info1"."name" varchar,
	"info2"."name" varchar,
	"info2"."age" varchar
 )column_encoded_bytes=0;
(5)命名空间表映射
phoenix默认不能映射命名空间的表,如果需要映射则修改hbase的hbase-site.xml与phoenix中的hbase-site.xml
1)修改/opt/module/hbase/conf/hbase-site.xml与/opt/module/phoenix/bin/hbase-site.xml的配置文件
<property>
		<name>phoenix.schema.isNamespaceMappingEnabled</name>
	    <value>true</value>
</property>
<property>
		<name>phoenix.schema.mapSystemTablesToNamespace</name>
	    <value>true</value>
</property>
2)分发/opt/module/hbase/conf/hbase-site.xml
xsync /opt/module/hbase/conf/hbase-site.xml
3)在phoenix中创建schema
create schema "big"
注意: schema的名称必须与命名空间的名称一致
4)在phoenix中使用schema
use "big"
4)建立映射
create table "big"."person"(
id varchar primary key,
"base_info"."name" varchar,
"base_info"."age" varchar)COLUMN_ENCODED_BYTES=0
Phoenix JDBC操作
(1)要启动queryServer服务
[linux@node1 phoenix]$ bin/queryserver.py start
(2)创建项目并导入依赖
<dependencies>
<dependency>
       <groupId>org.apache.phoenix</groupId>
       <artifactId>phoenix-queryserver-client</artifactId>
       <version>5.0.0-HBase-2.0</version>
    </dependency>
    <dependency>
       <groupId>org.apache.httpcomponents</groupId>
       <artifactId>httpclient</artifactId>
       <version>4.5.6</version>
       <scope>provided</scope>
   </dependency>
   <dependency>
       <groupId>com.google.protobuf</groupId>
       <artifactId>protobuf-java</artifactId>
       <version>3.5.1</version>
   </dependency>
   <dependency>
       <groupId>io.grpc</groupId>
       <artifactId>grpc-netty</artifactId>
       <version>1.10.0</version>
   </dependency>
<dependency>
    	<groupId>junit</groupId>
    	<artifactId>junit</artifactId>
    	<version>4.12</version>
    </dependency>
</dependencies>
(3)编写代码
import org.apache.phoenix.queryserver.client.ThinClientUtil;
import org.junit.After;
import org.junit.Before;
import org.junit.Test;

import java.sql.Connection;
import java.sql.DriverManager;
import java.sql.PreparedStatement;
import java.sql.ResultSet;
import java.util.Properties;

public class PhoenixTest {

    Connection connection = null;

    PreparedStatement statement;

    @Before
    public void init() throws Exception{
        //1、创建连接
        String url = ThinClientUtil.getConnectionUrl("node1",8765);

        Properties props = new Properties();
        props.setProperty("phoenix.schema.isNamespaceMappingEnabled","true");
        props.setProperty("phoenix.schema.mapSystemTablesToNamespace","true");
        connection = DriverManager.getConnection(url,props);
        //自动提交
        connection.setAutoCommit(true);
    }

    @After
    public void close() throws Exception{

        //5、关闭
        if(statement!=null)
            statement.close();
        if(connection!=null)
            connection.close();
    }
    /**
     * 通过jdbc 创建表
     * @throws Exception
     */
    @Test
    public void createTable() throws Exception{


        //2、sql语句
        String sql = "create table dog(" +
                "id varchar primary key," +
                "name varchar," +
                "age varchar)COLUMN_ENCODED_BYTES = 0";
        //3、创建Statement对象
        statement = connection.prepareStatement(sql);

        //4、执行sql语句
        statement.execute();

    }

    /**
     * 插入数据
     * @throws Exception
     */
    @Test
    public void upsert() throws Exception{

        String sql = "upsert into dog values(?,?,?)";
        statement = connection.prepareStatement(sql);

        //sql赋值
        for(int i=0;i<=10;i++){
            statement.setString(1,i+"");
            statement.setString(2,"zhangsan-"+i);
            statement.setString(3,(20+i)+"");
            statement.executeUpdate();
        }

        //connection.commit();
    }

    /**
     * 批量操作
     * @throws Exception
     */
    @Test
    public void upsertBath() throws Exception{
        String sql = "upsert into dog values(?,?,?)";
        statement = connection.prepareStatement(sql);
        int index = 0;
        for(int i=0;i<=5200;i++){
            statement.setString(1,i+"");
            statement.setString(2,"zhangsan-"+i);
            statement.setString(3,(20+i)+"");
            //将当前数据添加到批次中
            statement.addBatch();
            if(index%1000==0){
                //提交一个批次
                statement.executeBatch();
                //情况批次
                statement.clearBatch();
            }
            index = index+1;
        }
        //提交最后一个不满1000条数据的批次
        statement.executeBatch();
    }

    /**
     * 查询数据
     * @throws Exception
     */
    @Test
    public void query() throws Exception{

        String sql = "select * from dog where id>=?";
        statement = connection.prepareStatement(sql);

        statement.setString(1,"3");

        ResultSet resultSet = statement.executeQuery();

        while (resultSet.next()){
            String id = resultSet.getString("id");
            String name = resultSet.getString("name");
            String age = resultSet.getString("age");
            System.out.println("id="+id+",name="+name+",age="+age);
        }
    }

    /**
     * 删除数据
     * @throws Exception
     */
    @Test
    public void delete() throws Exception{

        statement = connection.prepareStatement("delete from dog where id>?");

        statement.setString(1,"3");

        statement.executeUpdate();
    }
/**
 * 删除表
 * @throws Exception
 */
@Test
public void dropTable() throws Exception{

    statement = connection.prepareStatement("drop table dog");

    statement.execute();
}
}
Phoenix二级索引
1.全局二级索引
Global Index是默认的索引格式,创建全局索引时,会在HBase中建立一张新表。也就是说索引数据和数据表是存放在不同的表中的,因此全局索引适用于多读少写的业务场景。
写数据的时候会消耗大量开销,因为索引表也要更新,而索引表是分布在不同的数据节点上的,跨节点的数据传输带来了较大的性能消耗。
读数据的时候Phoenix会选择索引表来降低查询消耗的时间。
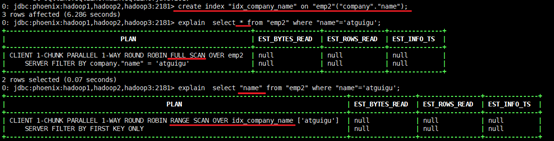
1)创建单个字段的全局索引
create index my_index on my_table (v1)

在hbase单独创建一张表,这张表的rowkey就为创建索引字段+“_”+原来的rowkey
如果想查询的字段不是索引字段的话索引表不会被使用,也就是说不会带来查询速度的提升。
2)创建携带两个和多个字段的全局索引
create index student_index on student(name,age)
创建的索引表中rowkey就为 nam_age_原来的rowkey,查询的时候必须先查age用不到索引表
3)创建携带其他字段的全局索引
create index my_index on my_table (v1) include (v2);

include里面的内容会被当成字段存在创建的索引表中,查询的时候会用到索引
2.本地二级索引
Local Index适用于写操作频繁的场景。
索引数据和数据表的数据是存放在同一张表中(且是同一个Region),避免了在写操作的时候往不同服务器的索引表中写索引带来的额外开销。查询的字段不是索引字段索引表也会被使用,这会带来查询速度的提升。
CREATE LOCAL INDEX my_index ON my_table (my_column);


 1225
1225


 被折叠的 条评论
为什么被折叠?
被折叠的 条评论
为什么被折叠?
 到【灌水乐园】发言


