


STM32使用固件库点亮LED
时间:2023-03-13
文章目录
1.参考和资料
1-1.新建工程—库函数版
1-3.
STM32F10xstandard peripheral library1-5.
gitee代码
2.建立工程
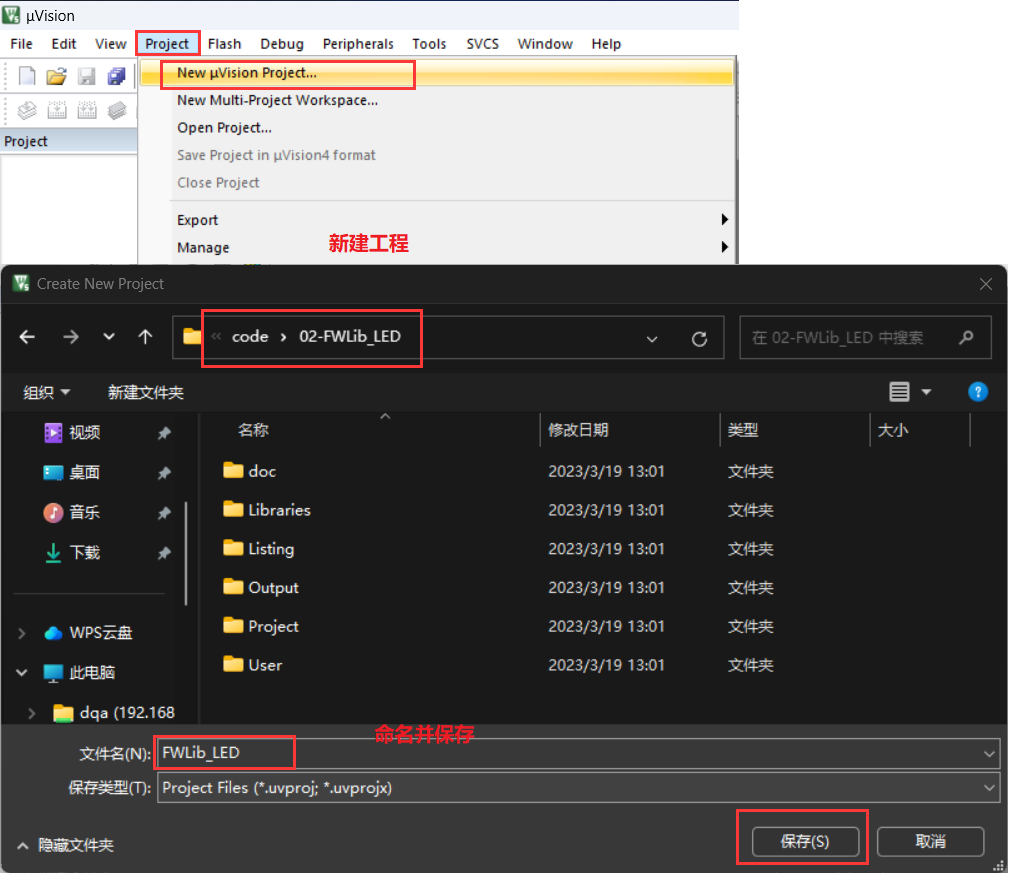
2-1.新建文件夹
$ mkdir Doc Libraries Listings Output Project User
2-2.新建工程
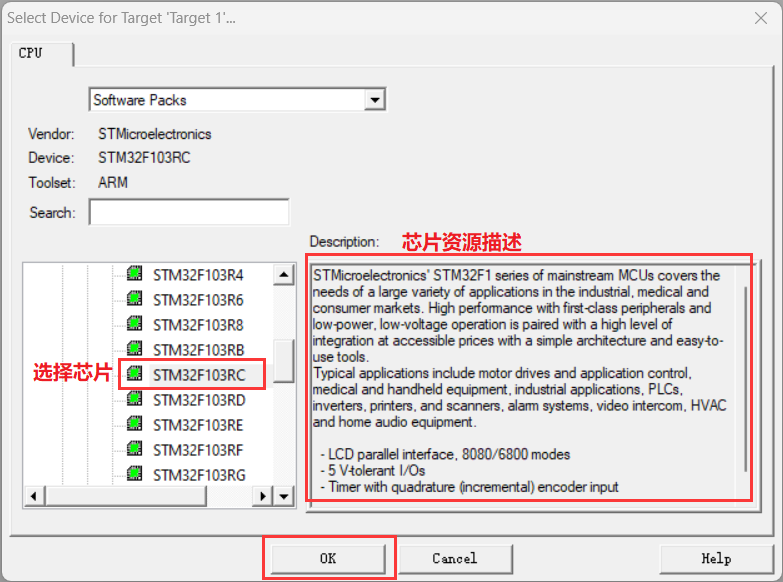
2-2-1.选择芯片
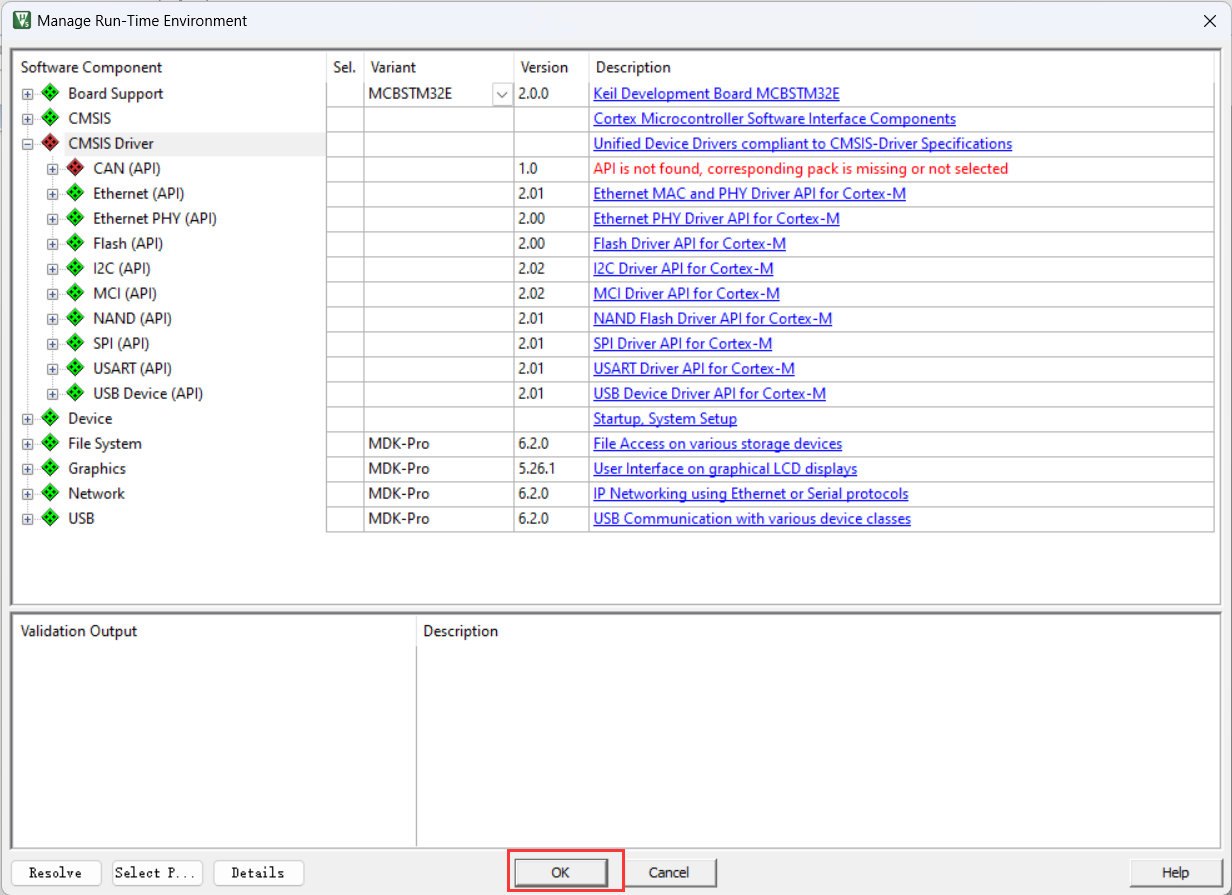
2-2-2.在线添加库文件
后续手动添加,这里直接关掉。
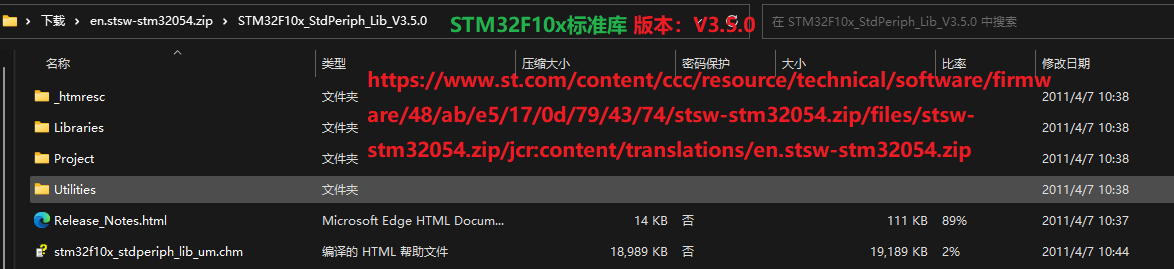
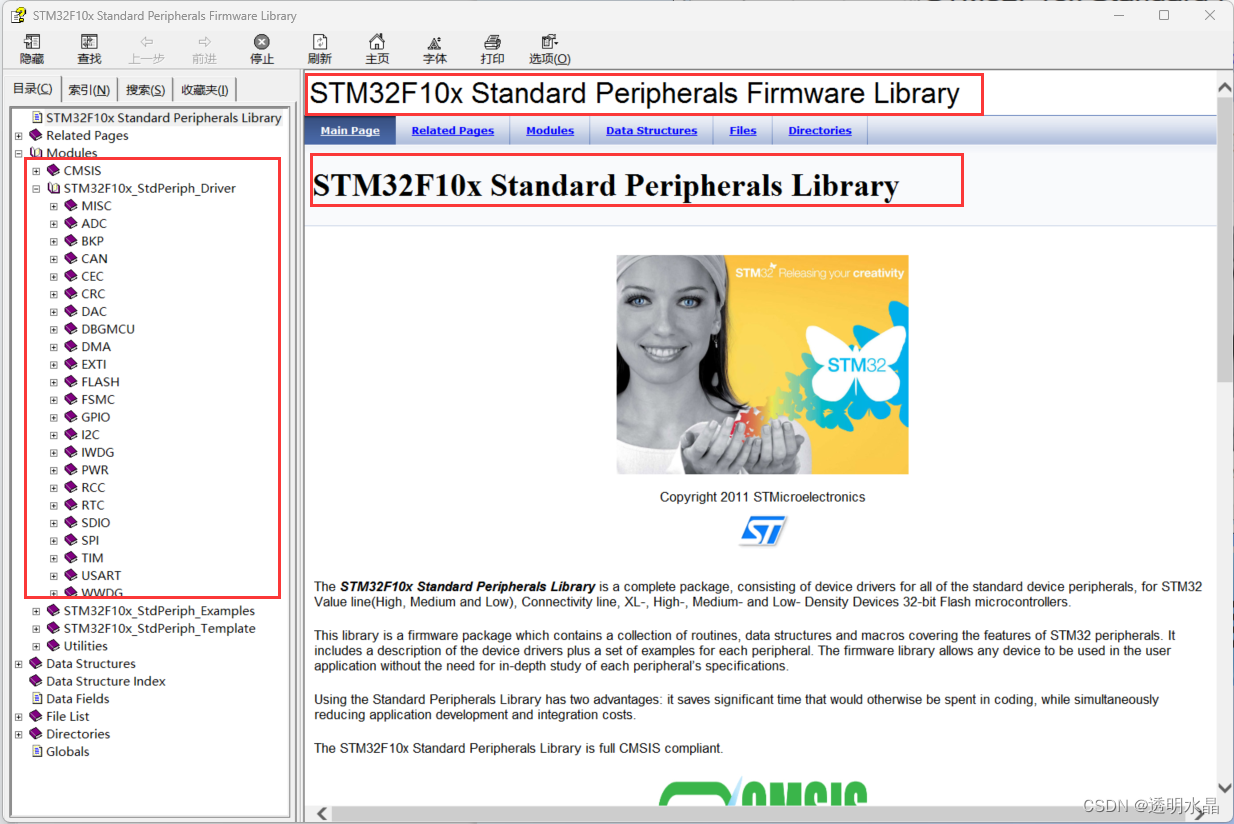
2-3.获取ST标准库

2-3-1.STM32F10x固件库文件分析
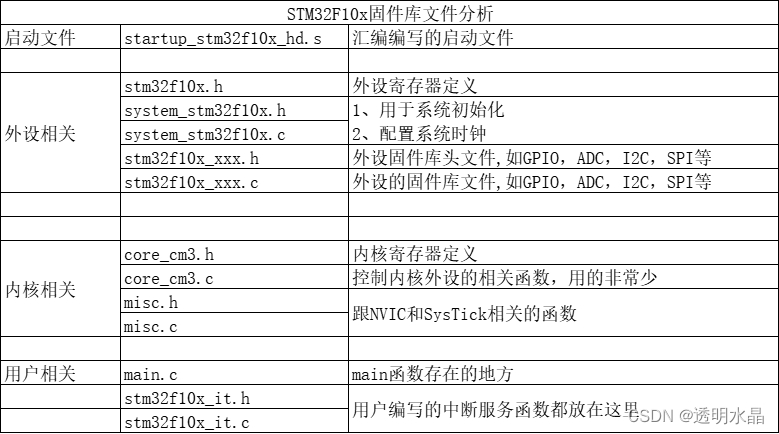
1-汇编编写的启动文件
startup_stm32f10x_hd.s:设置堆栈指针、设置PC指针、初始化中断向量表、配置系统时钟、对用C库函数_main最终去到C的世界2-时钟配置文件
system_stm32f10x.c:把外部时钟HSE=8M,经过PLL倍频为72M。3-外设相关的
stm32f10x.h:实现了内核之外的外设的寄存器映射
xxx:GPIO、USRAT、I2C、SPI、FSMC
stm32f10x_xx.c:外设的驱动函数库文件
stm32f10x_xx.h:存放外设的初始化结构体,外设初始化结构体成员的参数列表,外设固件库函数的声明4-内核相关的
CMSIS - Cortex微控制器软件接口标准
core_cm3.h:实现了内核里面外设的寄存器映射
core_cm3.c:内核外设的驱动固件库
NVIC(嵌套向量中断控制器)、SysTick(系统滴答定时器)
misc.h
misc.c5-头文件的配置文件
stm32f10x_conf.h:头文件的头文件
//stm32f10x_usart.h
//stm32f10x_i2c.h
//stm32f10x_spi.h
//stm32f10x_adc.h
//stm32f10x_fsmc.h
…6-专门存放中断服务函数的C文件
stm32f10x_it.c
stm32f10x_it.h中断服务函数你可以随意放在其他的地方,并不是一定要放在
stm32f10x_it.c#include "stm32f10x.h" // 相当于51单片机中的 #include <reg51.h> int main(void) { // 来到这里的时候,系统的时钟已经被配置成72M。 }
2-3-2.固件库工程参考模板
[FLY@fly-vm Fwlib-Template]$ tree -d
.
├── Doc
├── Libraries
│   ├── CMSIS
│   │   └── startup
│   └── STM32F10x_StdPeriph_Driver
│       ├── inc
│       └── src
├── Project
│   └── Objects
└── User

10 directories
[FLY@fly-vm Fwlib-Template]$ tree
.
├── Doc
│   └── readme.txt
├── Libraries
│   ├── CMSIS
│   │   ├── core_cm3.c
│   │   ├── core_cm3.h
│   │   ├── startup
│   │   │   ├── startup_stm32f10x_cl.s
│   │   │   ├── startup_stm32f10x_hd.s
│   │   │   ├── startup_stm32f10x_hd_vl.s
│   │   │   ├── startup_stm32f10x_ld.s
│   │   │   ├── startup_stm32f10x_ld_vl.s
│   │   │   ├── startup_stm32f10x_md.s
│   │   │   ├── startup_stm32f10x_md_vl.s
│   │   │   └── startup_stm32f10x_xl.s
│   │   ├── stm32f10x.h
│   │   ├── system_stm32f10x.c
│   │   └── system_stm32f10x.h
│   └── STM32F10x_StdPeriph_Driver
│       ├── inc
│       │   ├── misc.h
│       │   ├── stm32f10x_adc.h
│       │   ├── stm32f10x_bkp.h
│       │   ├── stm32f10x_can.h
│       │   ├── stm32f10x_cec.h
│       │   ├── stm32f10x_crc.h
│       │   ├── stm32f10x_dac.h
│       │   ├── stm32f10x_dbgmcu.h
│       │   ├── stm32f10x_dma.h
│       │   ├── stm32f10x_exti.h
│       │   ├── stm32f10x_flash.h
│       │   ├── stm32f10x_fsmc.h
│       │   ├── stm32f10x_gpio.h
│       │   ├── stm32f10x_i2c.h
│       │   ├── stm32f10x_iwdg.h
│       │   ├── stm32f10x_pwr.h
│       │   ├── stm32f10x_rcc.h
│       │   ├── stm32f10x_rtc.h
│       │   ├── stm32f10x_sdio.h
│       │   ├── stm32f10x_spi.h
│       │   ├── stm32f10x_tim.h
│       │   ├── stm32f10x_usart.h
│       │   └── stm32f10x_wwdg.h
│       └── src
│           ├── misc.c
│           ├── stm32f10x_adc.c
│           ├── stm32f10x_bkp.c
│           ├── stm32f10x_can.c
│           ├── stm32f10x_cec.c
│           ├── stm32f10x_crc.c
│           ├── stm32f10x_dac.c
│           ├── stm32f10x_dbgmcu.c
│           ├── stm32f10x_dma.c
│           ├── stm32f10x_exti.c
│           ├── stm32f10x_flash.c
│           ├── stm32f10x_fsmc.c
│           ├── stm32f10x_gpio.c
│           ├── stm32f10x_i2c.c
│           ├── stm32f10x_iwdg.c
│           ├── stm32f10x_pwr.c
│           ├── stm32f10x_rcc.c
│           ├── stm32f10x_rtc.c
│           ├── stm32f10x_sdio.c
│           ├── stm32f10x_spi.c
│           ├── stm32f10x_tim.c
│           ├── stm32f10x_usart.c
│           └── stm32f10x_wwdg.c
├── Project
│   ├── BH-F103.uvoptx
│   ├── BH-F103.uvprojx
│   └── Objects
│       └── BH-F103.sct
└── User
    ├── main.c
    ├── stm32f10x_conf.h
    ├── stm32f10x_it.c
    └── stm32f10x_it.h

10 directories, 67 files
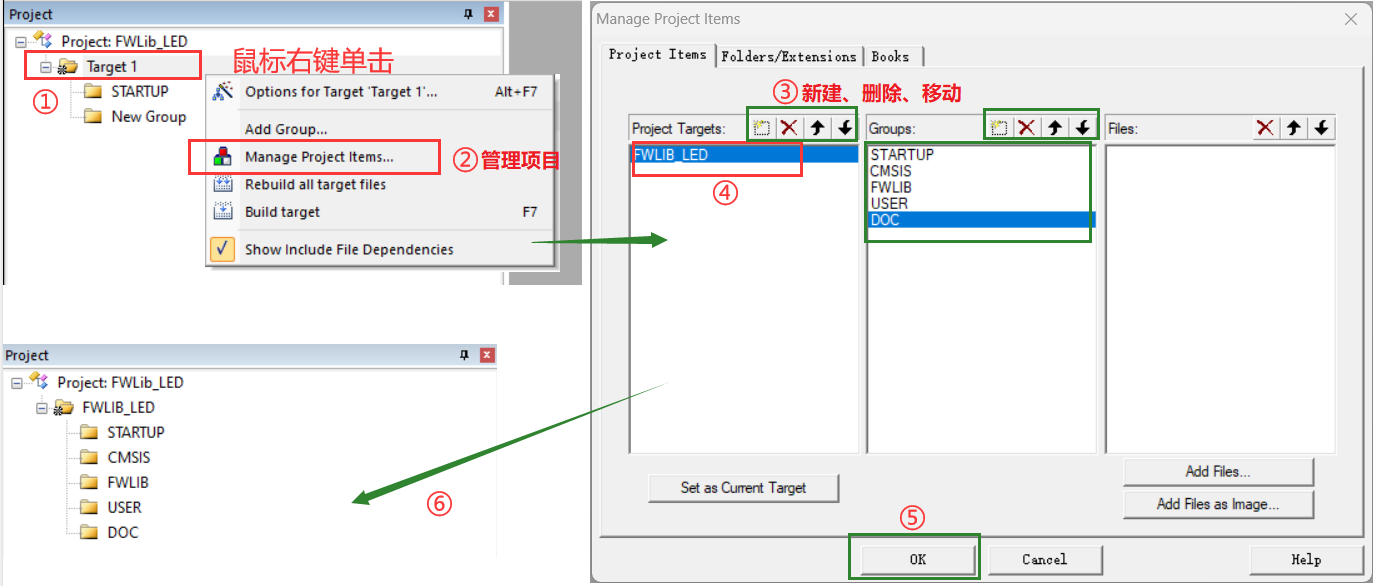
2-4.添加组文件夹
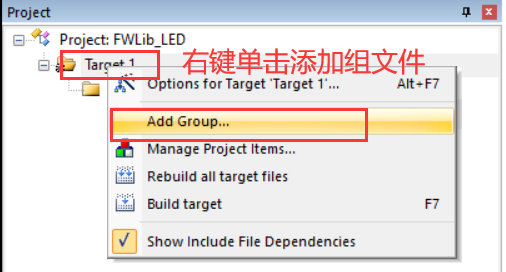
2-4-1.修改组文件夹的名字
2-5.新建文件
flyer@ThinkPad-FLY MINGW64 /d/05_study/STM32/stm32-f103rct6-mini-prj/code/02-FWLib_LED/User (master)
$ vim main.c

flyer@ThinkPad-FLY MINGW64 /d/05_study/STM32/stm32-f103rct6-mini-prj/code/02-FWLib_LED/User (master)
$ vim stm32f10x_it.c

flyer@ThinkPad-FLY MINGW64 /d/05_study/STM32/stm32-f103rct6-mini-prj/code/02-FWLib_LED/User (master)
$ cp stm32f10x_it.c stm32f10x_it.h

flyer@ThinkPad-FLY MINGW64 /d/05_study/STM32/stm32-f103rct6-mini-prj/code/02-FWLib_LED/User (master)
$ vim stm32f10x_it.h

flyer@ThinkPad-FLY MINGW64 /d/05_study/STM32/stm32-f103rct6-mini-prj/code/02-FWLib_LED/User (master)
$ vim stm32f10x_conf.c

flyer@ThinkPad-FLY MINGW64 /d/05_study/STM32/stm32-f103rct6-mini-prj/code/02-FWLib_LED/User (master)
$ mv stm32f10x_conf.c stm32f10x_conf.h

flyer@ThinkPad-FLY MINGW64 /d/05_study/STM32/stm32-f103rct6-mini-prj/code/02-FWLib_LED/User (master)
$ ls
main.c  stm32f10x_conf.h  stm32f10x_it.c  stm32f10x_it.h
flyer@ThinkPad-FLY MINGW64 /d/05_study/STM32/stm32-f103rct6-mini-prj/code/02-FWLib_LED (master)
$ cd Libraries/

flyer@ThinkPad-FLY MINGW64 /d/05_study/STM32/stm32-f103rct6-mini-prj/code/02-FWLib_LED/Libraries (master)
$ ls
STM32F10x_StdPeriph_Driver/

flyer@ThinkPad-FLY MINGW64 /d/05_study/STM32/stm32-f103rct6-mini-prj/code/02-FWLib_LED/Libraries (master)
$ mkdir CMSIS

flyer@ThinkPad-FLY MINGW64 /d/05_study/STM32/stm32-f103rct6-mini-prj/code/02-FWLib_LED/Libraries (master)
$ cd CMSIS/

flyer@ThinkPad-FLY MINGW64 /d/05_study/STM32/stm32-f103rct6-mini-prj/code/02-FWLib_LED/Libraries/CMSIS (master)
$ mkdir startup
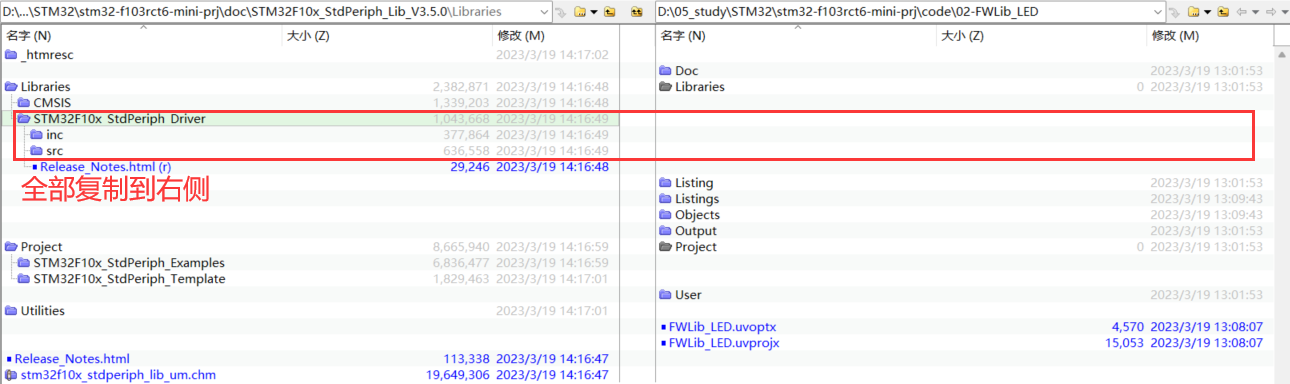
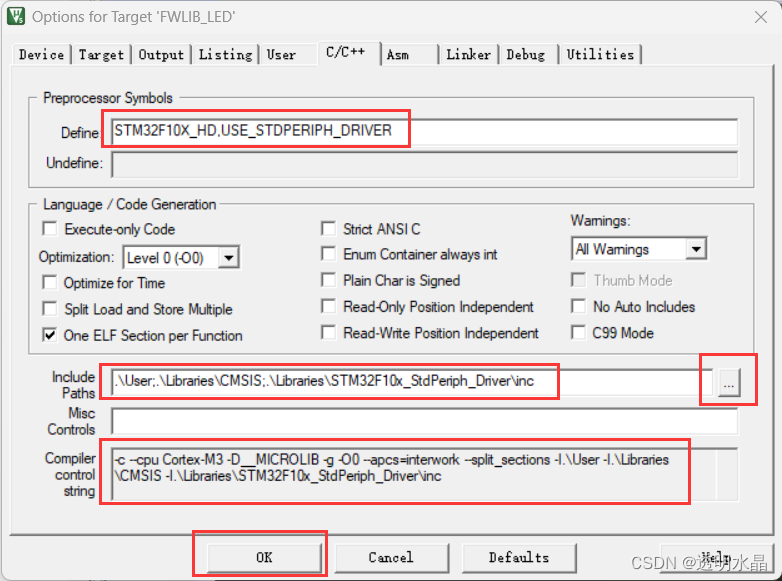
2-6.复制库文件到项目中


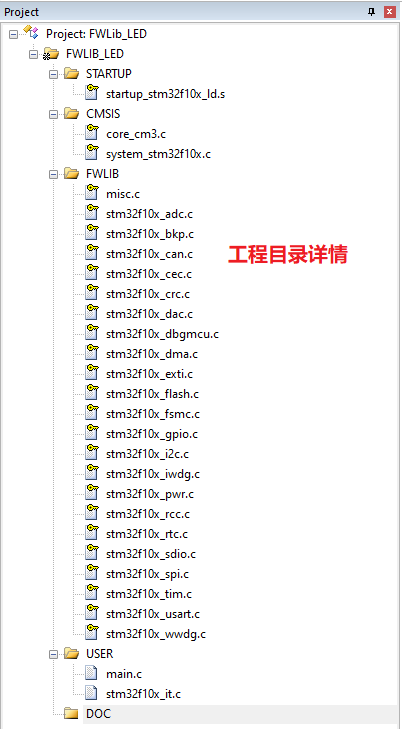
2-7.添加文件到工程中

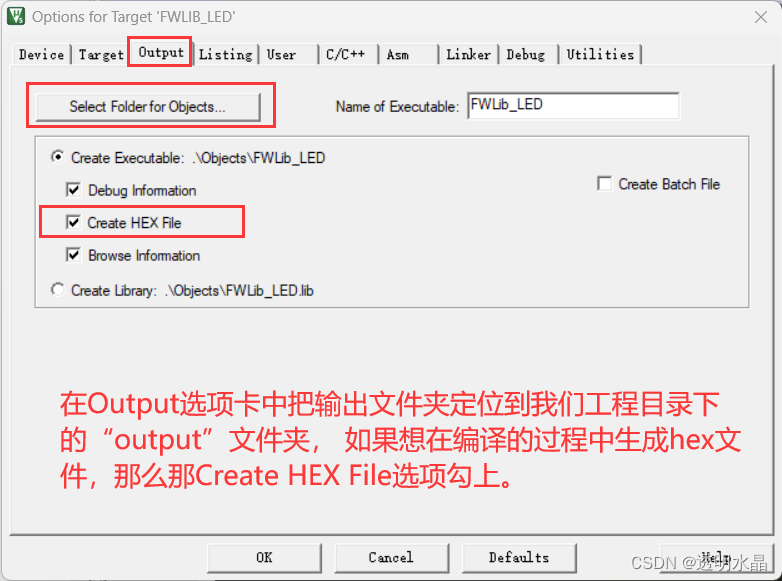
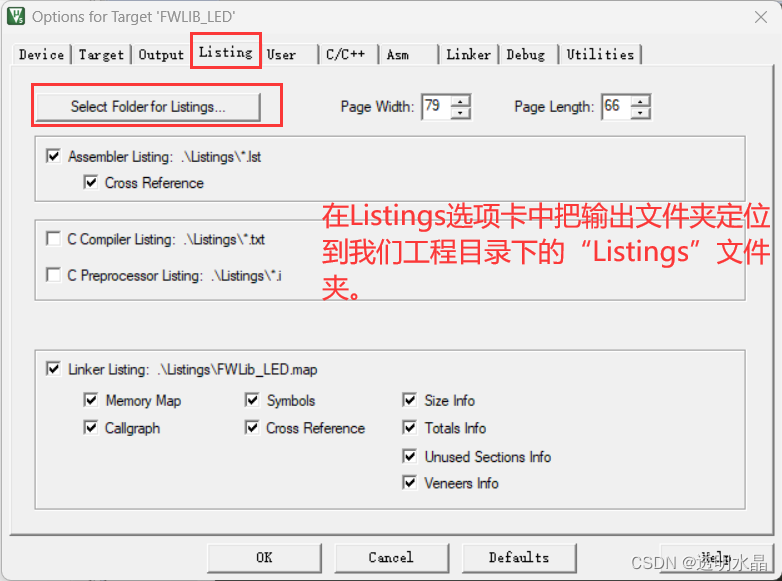
2-8.配置魔术棒选项卡

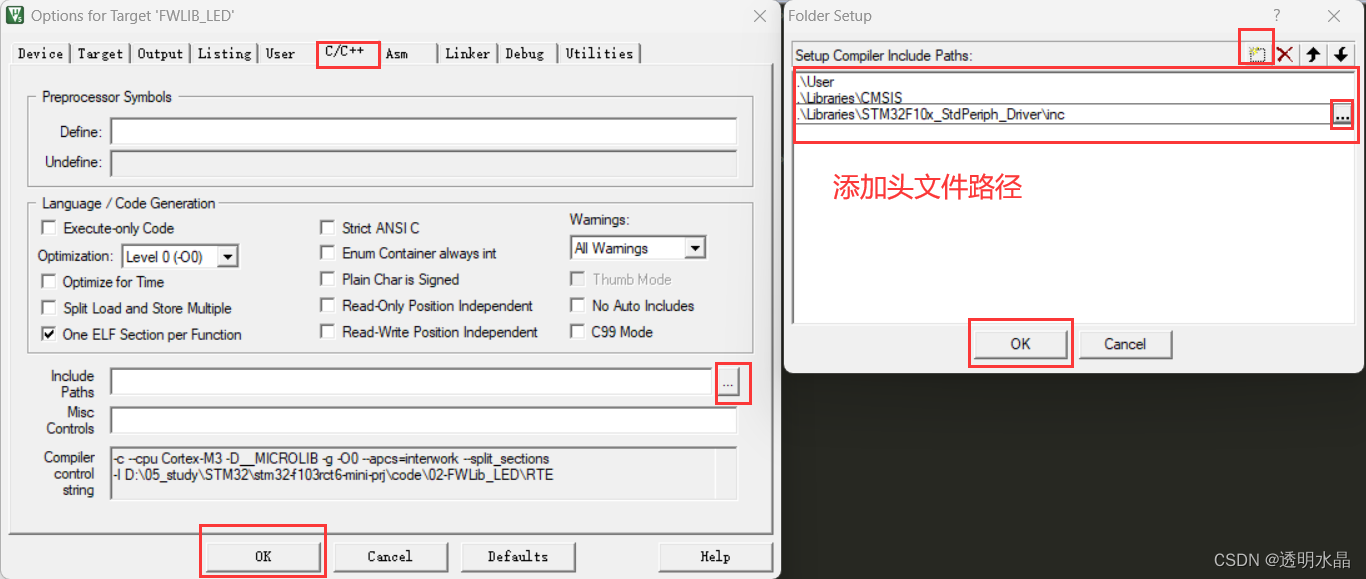
在这个选项中添加宏,就相当于我们在文件中使用“
#define”语句定义宏一样。在编译器中添加宏的好处就是,只要用了这个模版,就不用源文件中修改代码。
STM32F10X_HD宏:为了告诉STM32标准库,我们使用的芯片类型是大容量的,使STM32标准库根据我们选定的芯片型号来配置。
USE_STDPERIPH_DRIVER宏:为了让stm32f10x.h包含stm32f10x_conf.h这个头文件。
3.点亮LED
3-1.硬件原理
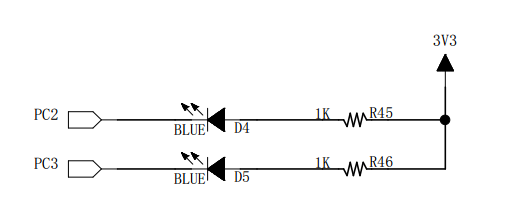
- 使能
GPIO端口时钟;- 初始化
GPIO目标引脚为推挽输出模式;- 编写简单测试程序,控制
GPIO引脚输出高、低电平。
3-2.代码编写
3-2-1.新建文件
flyer@ThinkPad-FLY MINGW64 /d/05_study/STM32/stm32-f103rct6-mini-prj/code/02-FWLib_LED/User/Led (master)
$ ls
bsp_led.c  bsp_led.h
stm32-f103rct6-mini-prj\code\02-FWLib_LED\User\Led\bsp_led.h
#ifndef __BSP_LED_H__
#define __BSP_LED_H__

#include "stm32f10x.h"

#define ON 0
#define OFF 1

#define LED1_GPIO_PORT      GPIOC
#define LED1_GPIO_CLK       RCC_APB2Periph_GPIOC
#define LED1_GPIO_PIN       GPIO_Pin_2

#define LED2_GPIO_PORT      GPIOC
#define LED2_GPIO_CLK       RCC_APB2Periph_GPIOC
#define LED2_GPIO_PIN       GPIO_Pin_3

#define LED1(a) if (a) \
                    GPIO_SetBits(LED1_GPIO_PORT, LED1_GPIO_PIN);\
                    else \
                    GPIO_ResetBits(LED1_GPIO_PORT, LED1_GPIO_PIN)

#define LED2(a) if (a) \
                    GPIO_SetBits(LED2_GPIO_PORT, LED2_GPIO_PIN);\
                    else \
                    GPIO_ResetBits(LED2_GPIO_PORT, LED2_GPIO_PIN)

extern void LED_GPIO_Config(void);

#endif
stm32-f103rct6-mini-prj\code\02-FWLib_LED\User\Led\bsp_led.c
/*******************************************************************
 *   > File Name: bsp_led.c
 *   > Create Time: Sun Mar 19 17:29:23 2023
 ******************************************************************/
#include "bsp_led.h"

void LED_GPIO_Config(void)
{
    GPIO_InitTypeDef GPIO_InitStructure;

    RCC_APB2PeriphClockCmd(LED1_GPIO_CLK | LED2_GPIO_CLK, ENABLE);

    GPIO_InitStructure.GPIO_Pin = LED1_GPIO_PIN;
    GPIO_InitStructure.GPIO_Mode = GPIO_Mode_Out_PP;
    GPIO_InitStructure.GPIO_Speed = GPIO_Speed_50MHz;

    GPIO_Init(LED1_GPIO_PORT, &GPIO_InitStructure);

    GPIO_InitStructure.GPIO_Pin = LED2_GPIO_PIN;
    GPIO_Init(LED2_GPIO_PORT, &GPIO_InitStructure);

    GPIO_SetBits(LED1_GPIO_PORT, LED1_GPIO_PIN);
    GPIO_SetBits(LED2_GPIO_PORT, LED2_GPIO_PIN);
}
stm32-f103rct6-mini-prj\code\02-FWLib_LED\User\main.c
/*******************************************************************
 *   > File Name: main.c
 *   > Create Time: Sun Mar 19 15:37:45 2023
 ******************************************************************/

#include "stm32f10x.h"   // �൱��51��Ƭ���е�  #include <reg51.h>
#include "bsp_led.h"

#define SOFT_DELAY  Delay(0xFFFFF);

void Delay(__IO uint32_t nCount)
{
    for(;nCount != 0; nCount --);
}

int main(void)
{
    LED_GPIO_Config();

    while(1){
        LED1(ON);
        SOFT_DELAY;
        LED1(OFF);

        LED2(ON);
        SOFT_DELAY;
        LED2(OFF);
    }

    return 0;
}
3-3.编译

Rebuild target 'FWLIB_LED'
assembling startup_stm32f10x_ld.s...
compiling core_cm3.c...
compiling system_stm32f10x.c...
compiling misc.c...
compiling stm32f10x_adc.c...
compiling stm32f10x_bkp.c...
compiling stm32f10x_can.c...
compiling stm32f10x_cec.c...
compiling stm32f10x_crc.c...
compiling stm32f10x_dac.c...
compiling stm32f10x_dbgmcu.c...
compiling stm32f10x_dma.c...
compiling stm32f10x_exti.c...
compiling stm32f10x_flash.c...
compiling stm32f10x_fsmc.c...
compiling stm32f10x_gpio.c...
compiling stm32f10x_i2c.c...
compiling stm32f10x_iwdg.c...
compiling stm32f10x_pwr.c...
compiling stm32f10x_rcc.c...
compiling stm32f10x_rtc.c...
compiling stm32f10x_sdio.c...
compiling stm32f10x_spi.c...
compiling stm32f10x_tim.c...
compiling stm32f10x_usart.c...
compiling stm32f10x_wwdg.c...
compiling main.c...
User\main.c(50): warning:  #111-D: statement is unreachable
      return 0;
User\main.c: 1 warning, 0 errors
compiling stm32f10x_it.c...
compiling bsp_led.c...
compiling bsp_key.c...
linking...
Program Size: Code=1156 RO-data=268 RW-data=4 ZI-data=1028
FromELF: creating hex file...
".\Objects\FWLib_LED.axf" - 0 Error(s), 1 Warning(s).
Build Time Elapsed:  00:00:10


 1736
1736


 被折叠的 条评论
为什么被折叠?
被折叠的 条评论
为什么被折叠?
 到【灌水乐园】发言


