


背景
- 平时玩应用的时候,遇到bug,应用会弹出一个“很抱歉,“xx”已停止运行”的对话框,当按下确定的时候,程序会强制退出,退回到上一个页面或者直接返回到桌面。这是android给我们提供的一种程序抛出异常结束应用默认的处理方式。开发测试中,我们可以查看到FC的原因。一旦应用发布后,用户体验时FC的日志,在不使用第三方框架捕获的情况下我们是无法获取到的。那么android有没有提供一些方法去解决这个问题呢。通过网上查找资料,在推酷上看到一篇文章:Android去除烦人的默认闪退Dialog。原来android已经预留一个线程异常退出中止前给我们提供了一个接口UnCaughtExceptionHandler,让我们去坐一些善后的工作。
了解UnCaughtExceptionHandler
- 从官网我们可以了解到,很简单的一个接口,只有一个抽象方法:
public abstract void uncaughtException (Thread thread, Throwable ex)`提供了两个参数 ,thread指的是抛出异常即将中止的线程;Throwable 指的是中止线程的一些原因和信息,可以通过getMessage(),getCause()去获取。
使用UnCaughtExceptionHandler
使用UnCaughtExceptionHandler有两种方式,一种可以在Application实现该接口处理,还有一种方法就是在BaseActivity里面实现该接口处理。处理方法都是下面3步,只是实现Thread.UncaughtExceptionHandler地方放的不同。
- Application或者BaseActivity实现Thread.UncaughtExceptionHandler接口
- onCreate()方法里面添加一句代码:Thread.setDefaultUncaughtExceptionHandler(this);
- 在Thread.UncaughtExceptionHandler接口要实现的抽象方法 uncaughtException(Thread thread, Throwable ex)里面做一些处理。
看起来很简单的样子,那就来一个简单的例子:
简单的例子
需求是这样的,我们还是使用系统默认的闪退对话框,类似下图,但是我们要去获取手机闪退的信息。

这里定义BaseActivity为抽象类,方便其他Activity继承,代码如下:
public abstract class BaseActivity extends AppCompatActivity implements Thread.UncaughtExceptionHandler{
    public Context mContext;
    private Thread.UncaughtExceptionHandler defalutHandler;
    @Override
    protected void onCreate(@Nullable Bundle savedInstanceState) {
        super.onCreate(savedInstanceState);
        mContext = this ;
        defalutHandler = Thread.getDefaultUncaughtExceptionHandler();
        Thread.setDefaultUncaughtExceptionHandler(this);
    }
    /**
     * @param thread 抛出异常的线程
     * @param ex 抛出异常的一些信息
     */
    @Override
    public void uncaughtException(Thread thread, Throwable ex) {
        HandleException(thread,ex);
    }
    /*
     * 默认处理保存信息
    */
    public void HandleException(Thread thread, Throwable ex){
    //打印出日志,方便调试的时候查看,否则不抛出异常
     Log.d("BaseActivity",thread.getName()+"exception==="+ex.getMessage());
         defalutHandler.uncaughtException(thread,ex);
         //判断是否有网
        if(CommUtil.checkNetwork(mContext)!=Const.NO_NETWORK){
            collectDeviceInfo(ex);
        }else{
            HashMap<String,String> map = new HashMap<>();
            map.put(Const.DEVICE_ID, Build.DEVICE);
            map.put(Const.CURRENT_VERSION,CommUtil.getCurrentVersion(mContext));
            map.put(Const.EXCEPTION_CAUSE,ex.getMessage());
            new SaveFileLogUtils().saveCrashInfo2File(mContext,ex,map);
        }
    }
    //测试使用,抛出的异常
    public void throwException(){
       throw new NullPointerException("珍爱生命,远离Exception");
    }
    private void collectDeviceInfo(Throwable ex){
        Intent intent = new Intent(mContext, UploadLogService.class);
        intent.putExtra(Const.DEVICE_ID, Build.DEVICE);
        intent.putExtra(Const.CURRENT_VERSION, CommUtil.getCurrentVersion(mContext));
        intent.putExtra(Const.EXCEPTION_CAUSE, ex.getMessage());
        startService(intent);
    }
}
代码其实就是先实现上面3步,然后通过Thread.getDefaultUncaughtExceptionHandler()去获取系统闪退的Dialog,返回的是一个Thread.UncaughtExceptionHandler类型的defalutHandler对象。然后在uncaughtException方法里面调用defalutHandler.uncaughtException(thread,ex),然后使用一个HandleException方法在BaseActivity里面进行默认处理,方便其他类去继承重写这个方法。收集闪退信息思路就是先判断当前网络环境是否有网,有网的情况下就是start一个service,把获取闪退的基本信息和手机基本信息通过Intent传递给service,在Service里面通过接口上传信息到服务器。如果没网的情况下,就先把信息保存到手机本地文件,在有网的情况下,把当前文件进行上传,文件上传具体步骤根据自己情况来处理就好了。
上传信息的Service代码:
public class UploadLogService extends IntentService{

    public UploadLogService() {
        super("UploadLogService");
    }

    @Override
    protected void onHandleIntent(Intent intent) {
        String deviceId = intent.getStringExtra(Const.DEVICE_ID);
        String currentVersion = intent.getStringExtra(Const.CURRENT_VERSION);
        String exception = intent.getStringExtra(Const.EXCEPTION_CAUSE);
        Log.d("zgx","deviceId======="+deviceId);
        Log.d("zgx","currentVersion======="+currentVersion);
        Log.d("zgx","exception======="+exception);
        try {
        //模拟接口上传时间
            Thread.sleep(4000);
        } catch (InterruptedException e) {
            e.printStackTrace();
        }
        //接口上传完成后,结束当前service
        stopSelf();
    }
}
保存信息到手机本地的代码:
SaveFileLogUtils.class
public class SaveFileLogUtils {
    //用于格式化日期,作为日志文件名的一部分
    private DateFormat formatter = new SimpleDateFormat("yyyy-MM-dd-HH-mm-ss");

    public void saveCrashInfo2File(Context context,Throwable ex, HashMap<String,String> hashMap){
        StringBuilder sb = new StringBuilder();
        for(Map.Entry<String,String> entry :hashMap.entrySet()){
            String key = entry.getKey();
            String value = entry.getValue();
            sb.append(key + "=" + value + "\n");
        }
        Writer writer = new StringWriter();
        PrintWriter printWriter = new PrintWriter(writer);
        ex.printStackTrace(printWriter);
        Throwable cause = ex.getCause() ;
        if(cause!=null){
            cause.printStackTrace(printWriter);
        }
        printWriter.close();
        String result = writer.toString();
        sb.append(result);
        try {
            long timestamp = System.currentTimeMillis();
            String time = formatter.format(new Date());
            String fileName = "crash-" + time + "-" + timestamp + ".log";
            String path = StorageUtils.getCacheDirectory(context).getAbsolutePath()+"/crash";
            File dir = new File(path);
            if (!dir.exists()) {
                dir.mkdirs();
            }
            FileOutputStream fos = new FileOutputStream(dir.getAbsolutePath() +"/"+fileName);
            fos.write(sb.toString().getBytes());
            fos.close();
        } catch (Exception e) {
        }
    }
}
StorageUtils.class
public final class StorageUtils {
    private static final String EXTERNAL_STORAGE_PERMISSION = "android.permission.WRITE_EXTERNAL_STORAGE";

    private StorageUtils() {
    }

    public static File getCacheDirectory(Context context) {
        return getCacheDirectory(context, true);
    }

    public static File getCacheDirectory(Context context, boolean preferExternal) {
        File appCacheDir = null;

        String externalStorageState;
        try {
            externalStorageState = Environment.getExternalStorageState();
        } catch (NullPointerException var5) {
            externalStorageState = "";
        } catch (IncompatibleClassChangeError var6) {
            externalStorageState = "";
        }

        if(preferExternal && "mounted".equals(externalStorageState) && hasExternalStoragePermission(context)) {
            appCacheDir = getExternalCacheDir(context);
        }

        if(appCacheDir == null) {
            appCacheDir = context.getFilesDir();
        }

        if(appCacheDir == null) {
            String cacheDirPath = "/data/data/" + context.getPackageName() + "/data/";
            appCacheDir = new File(cacheDirPath);
        }

        return appCacheDir;
    }

    private static File getExternalCacheDir(Context context) {
        File dataDir = new File(new File(Environment.getExternalStorageDirectory(), "Android"), "data");
        File appCacheDir = new File(new File(dataDir, context.getPackageName()), "data");
        if(!appCacheDir.exists()) {
            if(!appCacheDir.mkdirs()) {
                return null;
            }
            try {
                (new File(appCacheDir, ".nomedia")).createNewFile();
            } catch (IOException var4) {
            }
        }

        return appCacheDir;
    }

    private static boolean hasExternalStoragePermission(Context context) {
        int perm = context.checkCallingOrSelfPermission(EXTERNAL_STORAGE_PERMISSION);
        return perm == 0;
    }
}
简单写一个测试activity,代码如下:
CrashActivity.class
public class CrashActivity extends BaseActivity {

    @Override
    protected void onCreate(Bundle savedInstanceState) {
        super.onCreate(savedInstanceState);
        setContentView(R.layout.activity_exit_app);
        throwException();
    }
}
这个例子基本上就完成了。
有时候,突然想自己去实现这个闪退Dialog。那怎么办呢。这可怎么搞,其实基于上面的例子就很简单了。我们只需要在CrashActivity 里面重写HandleException方法。弹一个自定义对话框出来就行了。代码如下:
 @Override
    public void HandleException(Thread thread, Throwable ex) {
        super.HandleException(thread, ex);
        new Thread(new Runnable() {
            @Override
            public void run() {
                Looper.prepare();
                new AlertDialog.Builder(mContext).setTitle("提示").setCancelable(false)
                        .setMessage("oo,我挂掉了...").setNeutralButton("再来一次,让我重启复活吧", new DialogInterface.OnClickListener() {
                    @Override
                    public void onClick(DialogInterface dialog, int which) {
                        //第一种方式,结束fc的activity,直接返回activity栈上一层
                        finish();
                        System.exit(0);
                        //第二种方式,结束所有的activity,返回桌面
                       /*
                        finish();//结束当前fc的activity
                        Intent home = new Intent(Intent.ACTION_MAIN);
                        home.setFlags(Intent.FLAG_ACTIVITY_CLEAR_TOP);
                        home.addCategory(Intent.CATEGORY_HOME);
                        startActivity(home);
                        exitAllActivity();
                        System.exit(1);*/
                    }
                })
                        .create().show();
                Looper.loop();
            }
        }).start();
    }
然后在BaseActivity添加部分代码:
定义一个LinkedList,用来保存activity。
public static LinkedList<BaseActivity> allActivity = new LinkedList<>();在onCreate()添加代码
allActivity.add(this);在onDestroy()添加代码
allActivity.remove(this);添加方法
 public void exitAllActivity(){
        for(BaseActivity activity:allActivity){
            if(activity!=null){
                activity.finish();
            }
        }
    }
HandleException方法里面修改一句代码
defalutHandler.uncaughtException(thread,ex);替换为
  if(ex==null){
            defalutHandler.uncaughtException(thread,ex);
            return;
   }
因为main线程已经中止了(背景是黑色的原因),而HandleException运行在UI线程。这样我们就不能直接弹框。所以这里创建一个带消息体的线程,来处理弹框消息,效果如下图1,同时我们也可以测试创建一个新线程里面来抛异常,类似这样
new Thread(new Runnable() {
            @Override
            public void run() {
                throwException();
            }
        }).start();
则会产生下图2的效果。

图1:
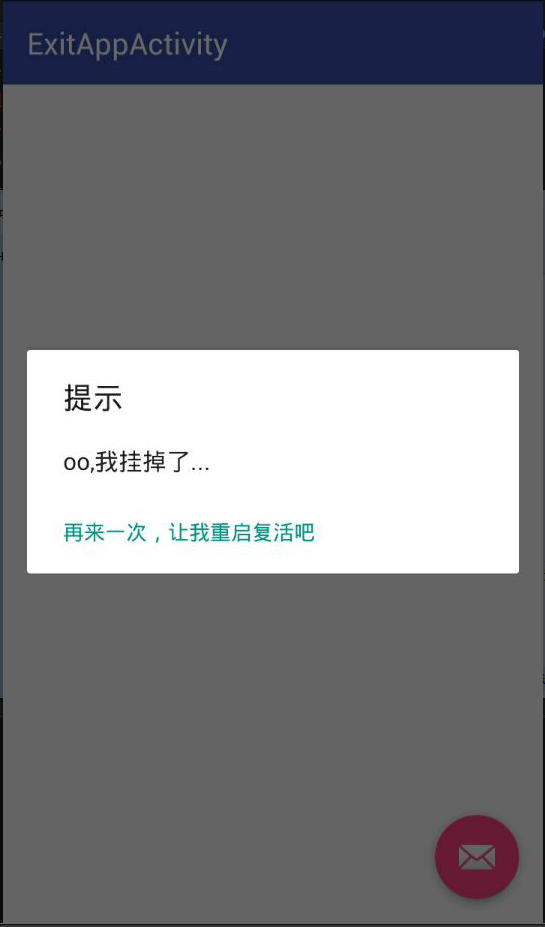
图2:
onClick以两种方式退出,一种是直接finish掉crash的activity,返回到栈上一个activity,也就是上一个页面。第二种方式就是直接退出整个应用。同时也可以在这里一定时间后重启应用,通过方法:
 Intent intent = new Intent();
 intent.setClassName("包名", MainActivity.class.getName());
 intent.addFlags(Intent.FLAG_ACTIVITY_NEW_TASK);
 PendingIntent restartIntent = PendingIntent.getActivity(getBaseContext(), 0, intent,   PendingIntent.FLAG_UPDATE_CURRENT);
添加几个权限
   <uses-permission android:name="android.permission.INTERNET" />
    <uses-permission android:name="android.permission.ACCESS_NETWORK_STATE" />
    <uses-permission android:name="android.permission.READ_PHONE_STATE" />
    <uses-permission android:name="android.permission.WRITE_EXTERNAL_STORAGE" />
最后,上传源码,开发环境为Android studio 2.1 Preview4。注意修改build.gradle的classpath


 941
941

 被折叠的 条评论
为什么被折叠?
被折叠的 条评论
为什么被折叠?
 到【灌水乐园】发言


