


Spring Boot整合JPA+MySQL+Redis
在开始之前,我们在pom.xml添入关键依赖:
JPA依赖:
<dependency>
    <groupId>org.springframework.boot</groupId>
    <artifactId>spring-boot-starter-data-jpa</artifactId>
</dependency>
MySQL依赖:
<dependency>
    <groupId>mysql</groupId>
    <artifactId>mysql-connector-java</artifactId>
    <scope>runtime</scope>
</dependency>
Redis依赖:
<dependency>
    <groupId>org.springframework.boot</groupId>
    <artifactId>spring-boot-starter-data-redis</artifactId>
</dependency>
下面开始整合过程:
①首先,我们在application.yml添入以下配置:
spring:
  ##配置数据源
  datasource:
    driver-class-name: com.mysql.jdbc.Driver
    url: ##数据库连接地址
    username: ##数据库用户名
    password: ##数据库密码
  ##开启JPA
  jpa:
    hibernate:
      ##自动建表
      ddl-auto: update
    ##打印sql语句
    show-sql: true
  ##配置redis
  redis:
    ##默认redis客户端连接为0 可修改
    database: 0
    host: ##连接地址 如:00.000.000.000
    ##连接端口号 默认是6379 可修改
    port: 6379
    password: ##redis客户端密码
    pool:
      ##连接池最大空闲连接
      max-idle: 8
      ##连接池最小空闲连接
      min-idle: 0
      ##连接池最大连接数
      max-active: 8
      ##连接池最大等待时间
      max-wait: 1
    ##连接超时时间
timeout: 5000②配置Redis,注意加上@EnableCaching注解开启缓存:
package com.java.config;

import org.springframework.beans.factory.annotation.Autowired;
import org.springframework.cache.CacheManager;
import org.springframework.cache.annotation.CachingConfigurerSupport;
import org.springframework.cache.annotation.EnableCaching;
import org.springframework.context.annotation.Bean;
import org.springframework.context.annotation.Configuration;
import org.springframework.data.redis.cache.RedisCacheManager;
import org.springframework.data.redis.connection.RedisConnectionFactory;
import org.springframework.data.redis.core.HashOperations;
import org.springframework.data.redis.core.ListOperations;
import org.springframework.data.redis.core.RedisTemplate;
import org.springframework.data.redis.core.SetOperations;
import org.springframework.data.redis.core.ValueOperations;
import org.springframework.data.redis.core.ZSetOperations;
import org.springframework.data.redis.serializer.JdkSerializationRedisSerializer;
import org.springframework.data.redis.serializer.StringRedisSerializer;

/**
 * Redis配置
 * @author zxy
 *
 */
@Configuration
@EnableCaching//启用缓存
public class RedisConfig extends CachingConfigurerSupport{

    /**
     * 注入 RedisConnectionFactory
     */
    @Autowired
    RedisConnectionFactory redisConnectionFactory;

    /**
     * 实例化 RedisTemplate 对象
     *
     * @return
     */
    @Bean
    public RedisTemplate<String, Object> functionDomainRedisTemplate() {
        RedisTemplate<String, Object> redisTemplate = new RedisTemplate<>();
        initDomainRedisTemplate(redisTemplate, redisConnectionFactory);
        return redisTemplate;
    }

    /**
     * 设置数据存入 redis 的序列化方式
     *
     * @param redisTemplate
     * @param factory
     */
    private void initDomainRedisTemplate(RedisTemplate<String, Object> redisTemplate, RedisConnectionFactory factory) {
        //定义key生成策略
        redisTemplate.setKeySerializer(new StringRedisSerializer());
        redisTemplate.setHashKeySerializer(new StringRedisSerializer());
        redisTemplate.setHashValueSerializer(new JdkSerializationRedisSerializer());
        redisTemplate.setValueSerializer(new JdkSerializationRedisSerializer());
        redisTemplate.setConnectionFactory(factory);
    }

    /**
     * 缓存管理器
     * @param redisTemplate
     * @return
     */
    @Bean
    public CacheManager cacheManager(RedisTemplate<?,?> redisTemplate) {
           CacheManager cacheManager = new RedisCacheManager(redisTemplate);
           return cacheManager;
    }

    /**
     * 实例化 HashOperations 对象,可以使用 Hash 类型操作
     *
     * @param redisTemplate
     * @return
     */
    @Bean
    public HashOperations<String, String, Object> hashOperations(RedisTemplate<String, Object> redisTemplate) {
        return redisTemplate.opsForHash();
    }

    /**
     * 实例化 ValueOperations 对象,可以使用 String 操作
     *
     * @param redisTemplate
     * @return
     */
    @Bean
    public ValueOperations<String, Object> valueOperations(RedisTemplate<String, Object> redisTemplate) {
        return redisTemplate.opsForValue();
    }

    /**
     * 实例化 ListOperations 对象,可以使用 List 操作
     *
     * @param redisTemplate
     * @return
     */
    @Bean
    public ListOperations<String, Object> listOperations(RedisTemplate<String, Object> redisTemplate) {
        return redisTemplate.opsForList();
    }

    /**
     * 实例化 SetOperations 对象,可以使用 Set 操作
     *
     * @param redisTemplate
     * @return
     */
    @Bean
    public SetOperations<String, Object> setOperations(RedisTemplate<String, Object> redisTemplate) {
        return redisTemplate.opsForSet();
    }

    /**
     * 实例化 ZSetOperations 对象,可以使用 ZSet 操作
     *
     * @param redisTemplate
     * @return
     */
    @Bean
    public ZSetOperations<String, Object> zSetOperations(RedisTemplate<String, Object> redisTemplate) {
        return redisTemplate.opsForZSet();
    }

}
③创建User实体类,一定要实现Serializable序列化:
package com.java.entity;

import java.io.Serializable;

import javax.persistence.Entity;
import javax.persistence.GeneratedValue;
import javax.persistence.Id;
import javax.persistence.Table;

@Entity
@Table(name="t_user")
public class User implements Serializable{

    /**
     *
     */
    private static final long serialVersionUID = 1L;

    private String redisKey;//redis中的key

    @Id
    @GeneratedValue
    private Integer id;

    private String name;

    private String sex;

    private String address;

    public String getRedisKey() {
        return redisKey;
    }

    public void setRedisKey(String keyStr) {
        this.redisKey = "user_"+keyStr;
    }

    public Integer getId() {
        return id;
    }

    public void setId(Integer id) {
        this.id = id;
    }

    public String getName() {
        return name;
    }

    public void setName(String name) {
        this.name = name;
    }

    public String getSex() {
        return sex;
    }

    public void setSex(String sex) {
        this.sex = sex;
    }

    public String getAddress() {
        return address;
    }

    public void setAddress(String address) {
        this.address = address;
    }

    @Override
    public String toString() {
        return "User [redisKey=" + redisKey + ", id=" + id + ", name=" + name + ", sex=" + sex + ", address=" + address
                + "]";
    }

}
④定义User用户JPA接口:
package com.java.repository;

import org.springframework.data.jpa.repository.JpaRepository;

import com.java.entity.User;

/**
 * 用户 Repository层接口
 * @author zxy
 *
 */
public interface UserRepository extends JpaRepository<User, Integer>{

}
⑤定义抽象类RedisService实现redis对泛型对象的操作,多态调用getRedisKey()方法获取子类的自定义redis key生成相应的Hash表结构:
package com.java.redis.service;

import java.util.List;
import java.util.Set;
import java.util.concurrent.TimeUnit;

import javax.annotation.Resource;

import org.springframework.beans.factory.annotation.Autowired;
import org.springframework.data.redis.core.HashOperations;
import org.springframework.data.redis.core.RedisTemplate;
import org.springframework.stereotype.Service;

@Service
public abstract class RedisService<T> {

    /**
     * 实例化 RedisTemplate对象
     */
    @Autowired
    protected RedisTemplate<String, Object> redisTemplate;

    /**
     * 定义Hash结构 操作存储实体对象
     */
    @Resource
    protected HashOperations<String, String, T> hashOperations;

    /**
     * 定义Hash表的redis key名称
     *
     * @return
     */
    protected abstract String getRedisKey();

    /**
     * 在相应Hash表中添加键值对 key:Object(doamin)
     *
     * @param key    key
     * @param doamin 对象
     * @param expire 过期时间(单位:秒),传入 -1 时表示不设置过期时间
     */
    public void put(String key, T doamin, long expire) {
        hashOperations.put(getRedisKey(), key, doamin);
        if (expire != -1) {
            redisTemplate.expire(getRedisKey(), expire, TimeUnit.SECONDS);
        }
    }

    /**
     * 在相应Hash表中删除key名称的元素
     *
     * @param key 传入key的名称
     */
    public void remove(String key) {
        hashOperations.delete(getRedisKey(), key);
    }

    /**
     * 在相应Hash表中查询key名称的元素
     *
     * @param key 查询的key
     * @return
     */
    public T get(String key) {
        return hashOperations.get(getRedisKey(), key);
    }

    /**
     * 获取在相应Hash表下的所有实体对象
     *
     * @return
     */
    public List<T> getAll() {
        return hashOperations.values(getRedisKey());
    }

    /**
     * 查询在相应Hash表下的所有key名称
     *
     * @return
     */
    public Set<String> getKeys() {
        return hashOperations.keys(getRedisKey());
    }

    /**
     * 判断在相应Hash表下key是否存在
     *
     * @param key 传入key的名称
     * @return
     */
    public boolean isKeyExists(String key) {
        return hashOperations.hasKey(getRedisKey(), key);
    }

    /**
     * 查询相应Hash表的缓存数量
     *
     * @return
     */
    public long count() {
        return hashOperations.size(getRedisKey());
    }

    /**
     * 清空相应Hash表的所有缓存
     */
    public void empty() {
        Set<String> set = hashOperations.keys(getRedisKey());
        set.stream().forEach(key -> hashOperations.delete(getRedisKey(), key));
    }

}
⑥继承RedisService类自定义实现UserRedisServiceImpl,泛型注入User实体,自定义redis key的名称为USER_KEY,User实体的所有缓存均存入名为USER_KEY的Hash表中:
package com.java.redis.service.impl;

import org.springframework.stereotype.Service;

import com.java.entity.User;
import com.java.redis.service.RedisService;

/**
 * 用户redis service继承类
 * @author zxy
 *
 */
@Service("userRedisService")
public class UserRedisServiceImpl extends RedisService<User>{

    //自定义redis key作为Hash表的key名称
    private static final String REDIS_KEY = "USER_KEY";

    @Override
    protected String getRedisKey() {
        // TODO Auto-generated method stub
        return REDIS_KEY;
    }

}
⑦定义User用户Service接口UserService:
package com.java.service;

import java.util.List;

import com.java.entity.User;

/**
 * 用户Service层接口
 * @author zxy
 *
 */
public interface UserService {

    /**
     * 根据Id查询用户信息
     * @param id
     * @return
     */
    public User findById(Integer id);

    /**
     * 查询所有用户信息
     * @return
     */
    public List<User> findAll();

    /**
     * 添加或修改用户信息
     * @param user
     */
    public void save(User user);

    /**
     * 根据Id删除用户信息
     * @param id
     */
    public void delete(Integer id);

}
⑧定义User用户Service接口实现类UserServiceImpl,@CacheEvict注解中的allEntries=true属性很重要,确保数据修改后缓存能够得到刷新:
package com.java.service.impl;

import java.util.List;

import javax.annotation.Resource;

import org.springframework.cache.annotation.CacheEvict;
import org.springframework.cache.annotation.Cacheable;
import org.springframework.stereotype.Service;

import com.java.entity.User;
import com.java.redis.service.impl.UserRedisServiceImpl;
import com.java.repository.UserRepository;
import com.java.service.UserService;

/**
 * 用户Service层接口实现类
 * @author zxy
 *
 */
@Service("userService")
public class UserServiceImpl implements UserService{

    @Resource
    private UserRepository userRepository;

    @Resource
    private UserRedisServiceImpl userRedisService;

    @Cacheable(value="userCache") //缓存,这里没有指定key.
    @Override
    public User findById(Integer id) {
        // TODO Auto-generated method stub
        return userRepository.findOne(id);
    }

    @Cacheable(value="userCache")
    @Override
    public List<User> findAll() {
        // TODO Auto-generated method stub
        return userRepository.findAll();
    }

    //allEntries 清空缓存所有属性 确保更新后缓存刷新
    @CacheEvict(value="userCache", allEntries=true)
    @Override
    public void save(User user) {
        // TODO Auto-generated method stub
        userRepository.save(user);
        if(user.getRedisKey()==null||"".equals(user.getRedisKey().trim())){
            user.setRedisKey(user.getId().toString());
            userRepository.save(user);
        }
        userRedisService.put(user.getRedisKey(), user, -1);
    }

    //allEntries 清空缓存所有属性 确保更新后缓存刷新
    @CacheEvict(value="userCache", allEntries=true)
    @Override
    public void delete(Integer id) {
        // TODO Auto-generated method stub
        User user=userRepository.findOne(id);
        userRedisService.remove(user.getRedisKey());
        userRepository.delete(id);
    }

}
自此,所有准备工作全部完成,下面定义一个Controller层测试类TestController:
package com.java.controller;

import java.util.List;

import javax.annotation.Resource;

import org.springframework.web.bind.annotation.PathVariable;
import org.springframework.web.bind.annotation.RequestMapping;
import org.springframework.web.bind.annotation.RestController;

import com.java.entity.User;
import com.java.service.UserService;

/**
 * 测试Controller层
 * @author zxy
 *
 */
@RestController
@RequestMapping("/test")
public class TestController {

    private static Integer userNum=0;

    @Resource
    private UserService userService;

    /**
     * 根据Id查询用户信息
     * @param id
     * @return
     */
    @RequestMapping("/findById/{id}")
    public User findById(@PathVariable("id")Integer id){
        return userService.findById(id);
    }

    /**
     * 查询所有用户信息
     * @return
     */
    @RequestMapping("/findAll")
    public List<User> findAll(){
        return userService.findAll();
    }

    /**
     * 添加用户信息
     * @return
     */
    @RequestMapping("/add")
    public String add(){
        User user=new User();
        ++userNum;
        user.setName("张三"+userNum);
        user.setSex("男"+userNum);
        user.setAddress("广州"+userNum);
        userService.save(user);
        return "success";
    }

    /**
     * 修改用户信息
     * @return
     */
    @RequestMapping("/update/{id}")
    public String update(@PathVariable("id")Integer id){
        User user=userService.findById(id);
        user.setName(user.getName()+"asd");
        user.setSex(user.getSex()+"asd");
        user.setAddress(user.getAddress()+"asd");
        userService.save(user);
        return "success";
    }

    /**
     * 根据Id删除用户信息
     * @return
     */
    @RequestMapping("/delete/{id}")
    public String delete(@PathVariable("id")Integer id){
        userService.delete(id);
        return "success";
    }

}
* 测试过程:
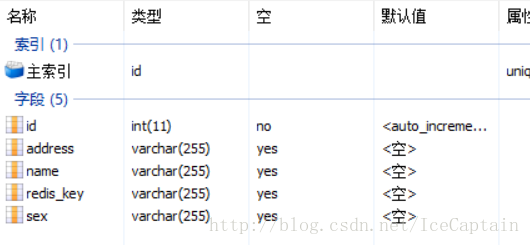
项目启动,redis客户端数据库均为空,数据表建表t_user结构:
地址栏两次访问http://localhost/test/add后:
MySQL数据库:

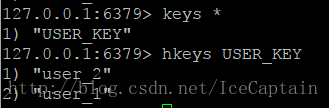
redis客户端:
地址栏两次访问http://localhost/test/findById/1后,可以看到只执行了一次sql语句:

页面数据显示:

地址栏访问http://localhost/test/update/1后,分别使用http://localhost/test/findById/1和http://localhost/test/findAll查询数据,可以看到数据均发生了修改(数据库和redis客户端的数据均对应发生变化,在此笔者就不贴图了):


地址栏访问http://localhost/test/delete/1后,使用http://localhost/test/findAll查询数据,可以看到数据的变化(数据库和redis客户端的数据均对应发生变化,在此笔者就不贴图了):

总结:以上为Spring Boot整合JPA+MySQL+Redis的所有过程,实现了作为中间层的redis缓存以及MySQL数据库和redis客户端的数据同步,完成了对实体对象的CRUD操作。笔者不才,如有遗漏、错误读者可提出建议。
*注:后续进一步的实现可参考笔者的下一篇文章,Spring Boot整合JPA+MySQL+Redis(二)


 3914
3914


 被折叠的 条评论
为什么被折叠?
被折叠的 条评论
为什么被折叠?
 到【灌水乐园】发言


