


—— 目录 ——
1. 创建 SpringBoot 项目
在 File > New > Project > SpringInitializr 中创建,填写基本信息就完毕了
默认扫描包机制
SpringBoot 默认会扫描与启动类同级的包目录,不需要再自己手动添加包扫描
2. 配置文件与配置类
springboot 项目默认创建的配置类是 application.properties,但官方推荐改为 application.yaml(.yml 也是一样的),下文的配置文件均基于 .yaml
配置文件可存放的位置(按优先级排序):
/config/,/,classpath:config/,classpath:/
配置文件
命名规则:application-xxx.yaml,并将其防止在配置文件支持的目录下
使用方法:在 application.yaml 中,通过 `-`` 后面的名字切换配置环境
spring:
  profiles:
    active: xxx
配置类主要注解:
@Configuration 表明该类为配置类
@ConfigurationProperties 表明该类中成员变量的值可以由配置文件赋予
@EnableConfigurationProperties 导入一个通过配置文件赋值的类
@Bean 表明该方法是一个 bean,方法名为 bean 的名称,返回值为类型
简单使用:
-- MyProperties.java --
@ConfigurationProperties(prefix = "my")
public class MyProperties {
    private int max;

    public int getMax() {
        return max;
    }

    public void setMax(int max) {
        this.max = max;
    }
}

-- MyConfiguration.java --
@Configuration
@EnableConfigurationProperties(MyProperties.class)
public class MyConfiguration {

    @Bean
    public int myRandom(MyProperties myProperties) {
        return (int) (Math.random() * myProperties.getMax());
    }
}

--TestController.java--
@Controller
public class TestController {

    @Autowired
    Random random;

    @GetMapping("/ran")
    @ResponseBody
    public String getRandom() {
        return "" + random.getRandom();
    }
}
配置拦截器
-- xxxInterceptor.java 拦截器类 --
@Component
public class xxxInterceptor implements HandlerInterceptor {
    @Override
    public boolean preHandle(HttpServletRequest request, HttpServletResponse response, Object handler) throws Exception {
    	// ...
    }
}

-- xxxConfiguration.java 自定义配置类 --
@Configuration
public class xxxConfiguration implements WebMvcConfigurer {
    @Autowired
    xxxInterceptor xxxInterceptor;

    /**
     * 重写这个方法添加拦截器
     */
    @Override
    public void addInterceptors(InterceptorRegistry registry) {
        registry.addInterceptor(redisInterceptor);
    }
}
3. 使用 JSR-303 校验
① 需要的依赖包
<!-- 使用 JSR-303 校验 -->
<dependency>
    <groupId>org.springframework.boot</groupId>
    <artifactId>spring-boot-starter-validation</artifactId>
</dependency>
② 常用注解
@Null				元素必须为 null
@NotNull 			元素必须不为 null
@AssertTrue 		元素必须为 true
@AssertFalse 		元素必须为 false
@Min(value) 		元素必须是一个数字,其值必须大于等于指定的最小值
@Max(value) 		元素必须是一个数字,其值必须小于等于指定的最大值
@DecimalMin(value) 	元素必须是一个数字,其值必须大于等于指定的最小值
@DecimalMax(value) 	元素必须是一个数字,其值必须小于等于指定的最大值
@Size(max, min) 	元素的大小必须在指定的范围内
@Past				元素必须是一个过去的日期
@Future				元素必须是一个将来的日期
@Email				元素必须是电子邮箱地址
@Length				字符串的大小必须在指定的范围内
@NotEmpty			字符串的必须非空
@Range				元素必须在合适的范围内
@Digits(integer, fraction)	元素必须是一个数字,其值必须在可接受的范围内

@Pattern(value)		被注释的元素必须符合指定的正则表达式
③ 简单使用:
@Valid 和 BindingResult 可以配套使用,一个 @Valid 对应一个 BindingResult,有多个就要写多对,这样做的好处是,当参数检验不匹配时,不会抛出错误,而是会将错误存放在 BindingResult 供我们进行进一步的处理(不这样做的话,参数出错就会直接抛出错误,这时可以使用全局异常来处理)
-- Test.java (一个简单的实体类) --
public class Test {

    @Null(message = "必须为 null")
    private String name;

    public String getName() {
        return name;
    }

    public void setName(String name) {
        this.name = name;
    }
}

-- xxxController.java --
@GetMapping("/jsr")
@ResponseBody
public Object jsr(@Valid Test test, BindingResult result) {
    // 如果检查出了错误
    if (result.hasErrors()){
        Map<String,Object> map = new HashMap<>();

        //校验失败,应该返回失败,在模态框中显示校验失败的错误信息
        List<FieldError> errors = result.getFieldErrors();
        for (FieldError fieldError : errors){
            System.out.println("错误的字段名:" + fieldError.getField());
            System.out.println("错误信息:" + fieldError.getDefaultMessage());
            map.put(fieldError.getField(), fieldError.getDefaultMessage());
        }
        return map;
    }

    return "测试成功";
}
使用效果:

http://localhost:8080/jsr?name=aaa
返回:{"name":"必须为 null"}

控制台输出:
错误的字段名:name
错误信息:必须为 null
4. 异步任务
应用场景: 后台需要处理耗时请求,而前端不希望过长时间的等待
主要注解:@Async @EnableAsync
在 Controller 层使用 @EnableAsync 表示请求支持异步任务
在需要的方法(如 Service 层中的)使用 @Async 表示该任务需要异步执行
简单例子:
@Controller
@EnableAsync
public class AsyncController {

    @Autowired
    AsyncService asyncService;

    @GetMapping("/asy1/{num}")
    @ResponseBody
    public Object asy1(@PathVariable int num) throws InterruptedException {
        asyncService.task1(num);
        System.out.println(Thread.currentThread().getName() + ") 返回前端收到消息");
        return "执行完毕";
    }
}
public interface AsyncService {
    void task1(int num) throws InterruptedException;
}
@Service
public class AsyncServiceImpl implements AsyncService {

    @Async
    @Override
    public void task1(int num) throws InterruptedException {
        for (int i=0; i<num; i++) {
            System.out.println(Thread.currentThread().getName() + ") 第" + i + "个任务执行完毕");
            Thread.sleep(100);
        }
    }
}
运行结果:(http://localhost:8080/asy1/50)
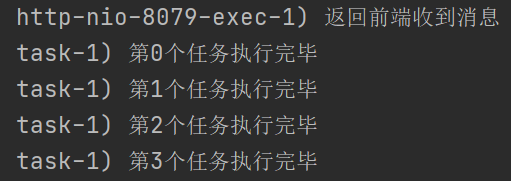
可以看到返回给前端信息的线程和执行任务的线程不是同一个,即使用注解顺利完成了任务的异步进行
这时前端的效果是,请求完立即收到返回,而不是等待 5 秒后才收到返回结果
问题:异步任务执行完毕后的结果,改怎么返回给前端?
思路1:使用 WebSocket 将结果返回
2021-9-10 修补
在使用过程中,发现异步任务失效情况(在两个注解齐全的情况下)
原因在于,异步任务方法必须由其他类来调用,这样才能进入代理类从而实现异步
如果是在本类中直接调用,则不会经过代理类,也就无法触发异步任务了
5. 定时任务
应用场景: 用于后台定时执行某些操作(如检测、缓存刷入)
主要注解:@Scheduled @EnableScheduling
在主函数(xxxApplication)中使用 @EnableScheduling 表示请求支持定时任务
在需要的方法上使用 @Scheduled 表示该任务需要定时执行
除了需要在主函数添加 @EnableScheduling 注解外,其他操作和 SSM 完全一致
详细可以见:【Spring之轨迹】结合 @Scheduled 实现定时将 Redis 缓存刷入数据库(配 Redis 工具类与例子实战)
6. 邮件任务
应用场景: 可以用于需要的提醒、验证功能(这里以 QQ 邮箱为例)
① 需要的依赖
<dependency>
    <groupId>org.springframework.boot</groupId>
    <artifactId>spring-boot-starter-mail</artifactId>
</dependency>
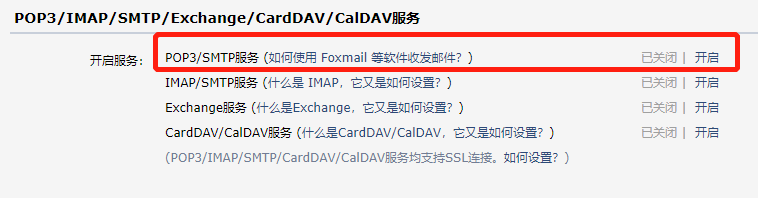
② 开启 QQ 邮箱的 POP3/SMTP 服务,获取授权码
位置:设置 》账户
③ 编写配置文件(application.yaml)
其中 password 填写的是授权码
spring:
  mail:
    username: xxx@qq.com
    password: xxx
    host: smtp.qq.com
④ 简单例子:(Controller)
@GetMapping("/send/{content}")
@ResponseBody
public Object sendMail(@PathVariable String content) {
    // 发送简单邮件
    SimpleMailMessage message = new SimpleMailMessage();
    message.setSubject("邮件任务测试");
    message.setText(content);
    message.setTo("<接收者>@qq.com");
    message.setFrom("<发送者>@qq.com");
    javaMailSender.send(message);
    return "发送成功";
}
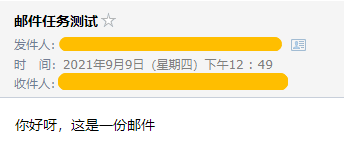
⑤ 效果:(localhost:8080/send/你好呀,这是一份邮件)
2021-9-10 修补
今天出现了部署到服务器,邮件发送不出去的情况,原因是发送邮件默认使用的是 25 端口,而 服务器直接开放 25 端口不安全,所以一般服务器都是禁用状态的
所以,为了能正常且安全地使用,推荐开放的端口是 465 端口(为SMTPS 协议服务开放的高安全可靠端口,可防止邮件泄露)
配置文件添加后如下:
spring:
  mail:
    username: xxx@qq.com
    password: xxx
    host: smtp.qq.com
    port: 465
    properties:
      mail:
        smtp:
          starttls:
            enable: true
            required: true
          ssl:
            enable: true
          socketFactory.class: javax.net.ssl.SSLSocketFactory
7. 整合 MyBatis
① 需要导入的依赖
<!-- 使用 jdbc -->
<dependency>
    <groupId>org.springframework.boot</groupId>
    <artifactId>spring-boot-starter-data-jdbc</artifactId>
</dependency>

<!-- mysql -->
<dependency>
    <groupId>mysql</groupId>
    <artifactId>mysql-connector-java</artifactId>
</dependency>

<!-- MyBatis -->
<dependency>
    <groupId>org.mybatis.spring.boot</groupId>
    <artifactId>mybatis-spring-boot-starter</artifactId>
    <version>2.2.0</version>
</dependency>

<!-- druid -->
<dependency>
    <groupId>com.alibaba</groupId>
    <artifactId>druid-spring-boot-starter</artifactId>
    <version>1.2.6</version>
</dependency>
② 默认的 mysql 版本是 8.x 的,如果需要使用 5.x 则再 properties 中手动指定
<properties>
    <mysql.version>5.x</mysql.version>
</properties>
③ 之后在配置文件中配置数据源信息,mybatis 信息
# 数据库连接信息
spring:
  datasource:
    driver-class-name: com.mysql.jdbc.Driver
    url: jdbc:mysql://xxx:3306
    username: xxx
    password: xxx

# mybatis 配置信息
mybatis:
  # 有写 .xml 主配置文件的话,这里可以指定配置文件的位置令其生效(注意主配置文件的配置和这里的配置不能有相同的)
  config-location: classpath:xxx
  # 有写 .xml mapper 文件的话,在这里配置令其生效
  mapper-locations: classpath:xxx
  # 主配置文件能配的东西,在这下面都能配
  configuration:
    map-underscore-to-camel-case: true
④ 注意: 在写 xxxMapper.java 是,需给类加上 @Mapper 注解,才能被自动扫描到
完成上面的流程后,就可以和以前一样正常使用了
8. 整合 Redis
① 需要的依赖
<!-- Redis -->
<dependency>
    <groupId>org.springframework.boot</groupId>
    <artifactId>spring-boot-starter-data-redis</artifactId>
</dependency>
② 编写配置文件
spring:
  redis:
    url: redis://<username>:<password>@<hostname>:<port>
注意: 若没有设置用户名,则可以直接空着不写
③ 切换客户端
SpringBoot 的 Redis 使用场景默认的客户端是 Lettuce,也可以手动切换到 Jedis
总共两步:导入 Jedis 依赖,以及在配置文件中切换客户端
<!-- Jedis 依赖包-->
<dependency>
    <groupId>redis.clients</groupId>
    <artifactId>jedis</artifactId>
</dependency>
spring:
  redis:
  	client-type: jedis
9. 整合 Log4j2
① 需要导入的依赖
springboot 默认使用 logback 进行日志记录,要使用 Log4j2 就要先排除掉它,否则会冲突
<dependency>
    <groupId>org.springframework.boot</groupId>
    <artifactId>spring-boot-starter-web</artifactId>
    <!-- 去掉 springboot 默认配置 -->
    <exclusions>
        <exclusion>
            <groupId>org.springframework.boot</groupId>
            <artifactId>spring-boot-starter-logging</artifactId>
        </exclusion>
    </exclusions>
</dependency>

<!-- 使用 log4j2 -->
<dependency>
    <groupId>org.springframework.boot</groupId>
    <artifactId>spring-boot-starter-log4j2</artifactId>
</dependency>
② 编写配置文件
log4j2 默认配置文件名为 log4j2-spring.xml,如果自定义了文件名,需要在 springboot 配置文件中指定
logging:
  config: xxxx.xml
③ 简单使用
log4j2 的配置文件可以自行找模板,具体使用如下
private static Logger logger = LoggerFactory.getLogger(xxx.class);
10. 整合 AOP 面向切面编程
① 需要导入的依赖
<!-- 使用 aop -->
<dependency>
    <groupId>org.springframework.boot</groupId>
    <artifactId>spring-boot-starter-aop</artifactId>
</dependency>
② 简单使用
注意:现在的切面类需要加上 @Component 注解,以前不需要是因为在配置文件中加上了包扫描,而现在没有就需要再异步添加到容器中去了(不然次类无效哦,被坑过了)
@Aspect
@Component
public class PowerLog {

    @Around("execution(* com.iceclean.service.*.*(..))")
    public Object powerLog(ProceedingJoinPoint joinPoint) throws Throwable {
        System.out.println("前置日志输出");
        Object proceed = joinPoint.proceed();
        System.out.println("后置日志输出");
        return proceed;
    }
}
11. 将 SpringBoot 项目部署到服务器
① war 包部署
SpringBoot 项目可以通过一个 jar 包再服务器跑起来(因为内置了 tomcat 服务器),很方便
但在 SSM 中已经习惯了将项目打包成 war 包直接放到服务器的 tomcat 上面跑,所以接下来记录的是 SpringBoot 项目 war 包的部署过程
① 使 springboot 内置的 tomcat 不要一起打包
以下这个依赖表明了在打包时,将 spring 内置的 tomcat 剔除不要一起打包,又服务器提供 tomcat 服务
<dependency>
    <groupId>org.springframework.boot</groupId>
    <artifactId>spring-boot-starter-tomcat</artifactId>
    <scope>provided</scope>
</dependency>
同时记得修改 pom 令其打包成 war 包:<packaging>war</packaging>
② 使启动程序支持 war 包的解析
以下这段代码做了:继承 SpringBootServletInitializer 并重写 configure 方法
@SpringBootApplication
public class xxxApplication extends SpringBootServletInitializer {

    public static void main(String[] args) {
        SpringApplication.run(xxxApplication.class, args);
    }

    @Override
    protected SpringApplicationBuilder configure(SpringApplicationBuilder builder) {
        return builder.sources(xxxApplication.class);
    }
}
接下来就和 SSM 项目一样,直接将项目打包,放到 webapps 下就可以正常运行了
注意: 由于使用的使服务器的 tomcat,所以 springboot 配置文件中的 server.port 配置是不生效的,端口依旧取决于服务器 tomcat 的配置
② jar 包部署
jar 包的部署就相对简单一点了,直接将程序打成一个 jar 包,丢到服务器
使用 java -jar xxx.jar 即可运行
但这种方式运行时,会进入终端界面,一旦退出将导致程序直接结束,所以可以采用后台挂起的方式运行项目,如下
nohup java -jar xxx.jar
这种方式将默认在后台开启一个进程运行,然后默认将日志输出到 nohup.out 中(具体位置看运行时的提示,一般在本目录下)
如果需要指定日志的位置,可按如下操作:
nohup java -jar xxx.jar > xxx.log 2>&1 &
2021-9-18
12. 整合跨域处理
只需要添加配置类即可:
注意是 allowedOriginPatterns,而不是 allowedOrigins(踩了网上的一个坑)
import org.springframework.context.annotation.Configuration;
import org.springframework.web.servlet.config.annotation.CorsRegistry;
import org.springframework.web.servlet.config.annotation.WebMvcConfigurer;

/**
 * @author : Ice'Clean
 * @date : 2021-09-18
 */
@Configuration
public class AdminConfig implements WebMvcConfigurer {
    @Override
    public void addCorsMappings(CorsRegistry registry) {
        registry.addMapping("/**")
                .allowedOriginPatterns("*")
                .allowedMethods("GET", "HEAD", "POST", "PUT", "DELETE", "OPTIONS")
                .allowCredentials(true)
                .maxAge(3600)
                .allowedHeaders("*");
    }
}
白雾崖壁,上去,便是万里朦胧(IceClean)


 1792
1792


 被折叠的 条评论
为什么被折叠?
被折叠的 条评论
为什么被折叠?
 到【灌水乐园】发言


