


概述
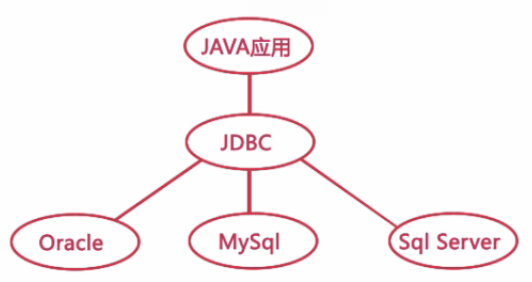
JDBC(Java DataBase Connectivity,Java数据库连接),提供了一种与平台无关的用于执行SQL语句的标准JavaAPI,可以方便地实现多种关系型数据库的统一操作,它由一组Java语言编写的类和接口组成。
在实际的开发中可以直接利用JDBC进行各个数据库的连接与操作,而且可以方便地向数据库中发送各种SQL命令。在JDBC中的是一套标准的接口,这样各个支持Java的数据库生产商只要按照此接口提供相应的实现,就都可以使用JDBC进行操作。极大体现了Java的可移植性的思想。
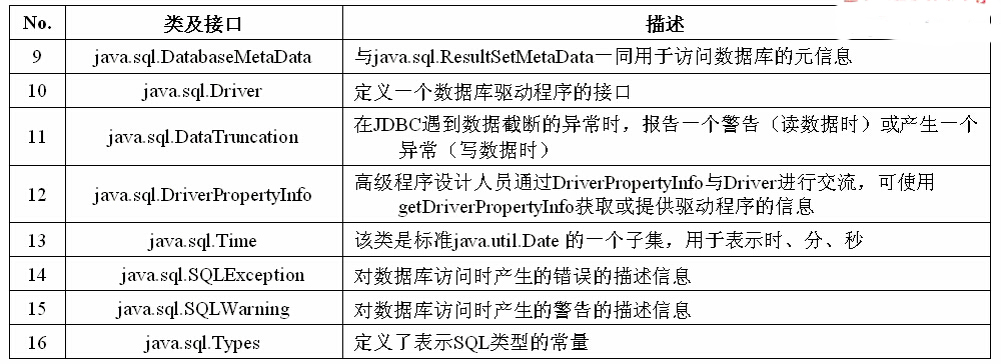
在JDBC中所有的类和接口都保存在java.sql包中。在此包中规定了大量的接口。

下面是一个用户登录的具体实例(中间的是应用服务器):

JDBC驱动分类
JDBC本身提供的是一套数据库的操作标准,而这个标准又需要各个数据库厂商实现,所以针对每一个厂商都会提供一个JDBC驱动程序,常见的JDBC驱动程序可以分为以下四类:
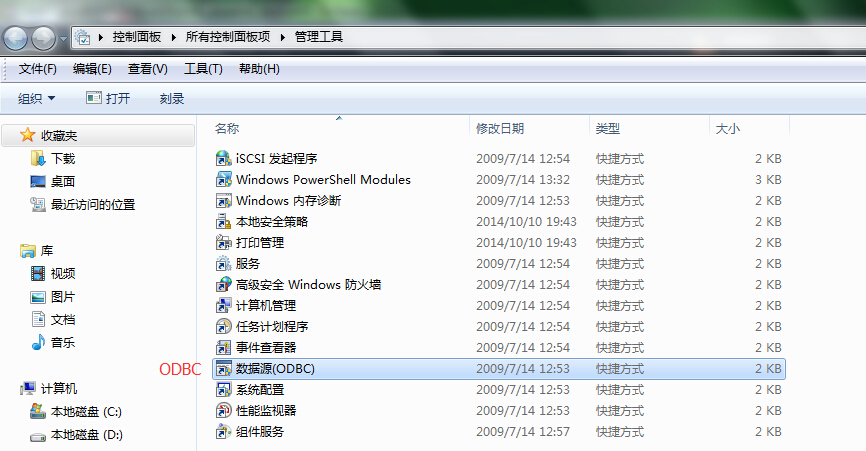
- JDBC-ODBC桥驱动
- JDBC本地驱动
- JDBC网络驱动
- 本地协议纯JDBC驱动
但是在实际开发中一般将以上的4类简单划分为以下的3类:
- JDBC-ODBC桥驱动
是由sun提供的标准的JDBC操作,直接利用微软的ODBC进行数据库的连接操作,操作性能低,不推荐使用。
- JDBC本地驱动
直接利用数据库生产商提供的JDBC驱动程序,但是因为其只能应用在特定的数据库上,会丧失程序的可移植性,但是性能较高。
JDBC本身提供的是一组类和接口,各个数据库生产厂商要实现这些接口,这些驱动程序都是需要单独配置的,往往是以一组jar包(zip包)的形式出现,如果需要使用的话肯定需要配置classpath——在开发中大部分的情况都是基于一种数据库的开发,一般使用这种模式。 - 网络JDBC驱动
这种驱动程序将JDBC转换成与DBMS无关的网络协议,之后这种网络协议又被某个服务器转换成为一种DBMS协议。这种网络服务器中间件能够将它的纯Java客户机连接到多种不同的数据库上。所用的具体协议取决于提供者。——通常这是最为灵活的JDBC驱动程序。
- JDBC-ODBC桥驱动


数据库的操作过程
1.启动数据库服务;
2.连接数据库。连接的时候一般要输入用户名和密码;
3.操作数据库。创建表、查询表、更新记录;
4.关闭数据库。
JDBC主要操作类和接口
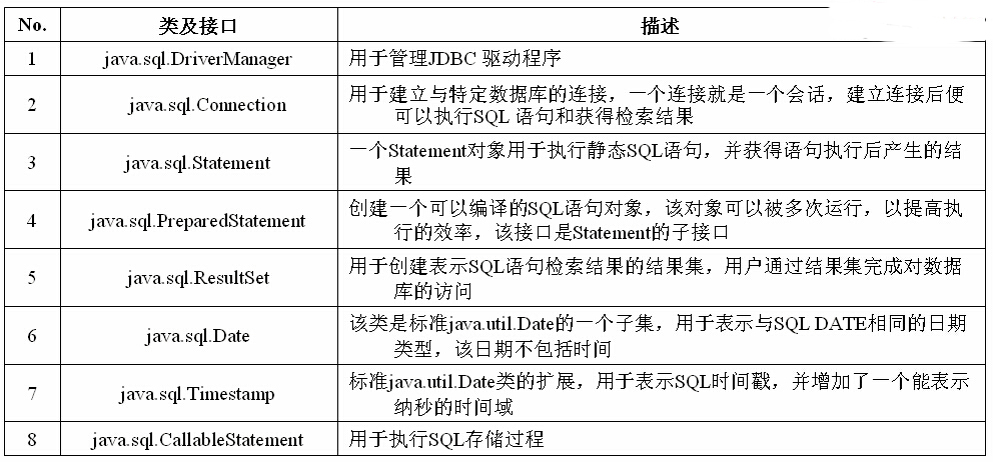
DriverManger:最常用的一个类,使用此类可以取得一个数据库的连接。
Connection:每一个Connection的实例化对象都表示一个数据库连接。
数据库操作:Statement、PreparedStatement
数据库查询:ResultSet
调用存储过程:CallableStatement
MySQL数据库
MySQL是一个小型的关系型DBMS,开发者为瑞典的MySQL AB公司。目前MySQL被广泛应用在Internet上的中小型网站中。由于其体积小、速度快、总体拥有成本低,尤其是开放源代码这一特点,许多中小型网站为了降低网站总体拥有成本而选择了MySQL作为网站的数据库。
MySQL配置
MySQL的默认端口号是3306
手工选择数据库的编码是GBK
将MySQL加入到windows的服务中。并将其加入到PATH环境变量中
设置超级管理员的用户名和密码
MySQL的配置文件:my.ini
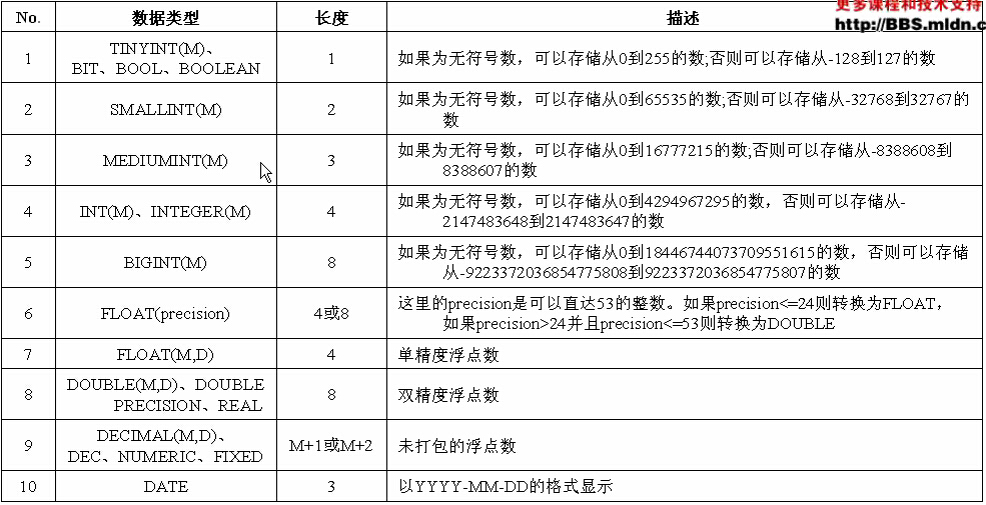
MySQL数据类型

MySQL命令
数据库的连接:mysql -u用户名 -p密码,例如,用户名为root,密码为mysqladmin,则应该在命令行使用下面的命令(没有空格):
mysql -uroot -pmysqladmin
- 1

- 1
如果需要知道mysql中有哪些命令,可以输入“?”进行查看。
进入MySQL数据库之后可以方便地创建和删除数据库,使用以下格式即可(注意:每一条SQL语句以分号结束):
创建数据库:
create database 数据库名称;
- 1
- 1
删除数据库:
drop database 数据库名称;
- 1
- 1
使用数据库(必须使用数据库才能进行一系列的表的操作):
use 数据库名称;
- 1
- 1
创建表:
create table 表名称(
    字段名称1   字段类型    [DEFAULT 默认值]   [约束],
    字段名称2   字段类型    [DEFAULT 默认值]   [约束],
    ……
    字段名称n   字段类型    [DEFAULT 默认值]   [约束]);
- 1
- 2
- 3
- 4
- 5
- 1
- 2
- 3
- 4
- 5
删除表:
drop table 表名称;
- 1
- 1
查看表的结构(仅仅是结构信息,不包含数据):
desc 表名称;
- 1
- 1

查看数据库信息:
在MySQL中可以使用show命令查看全部的数据库以及一个数据库下的所有表。
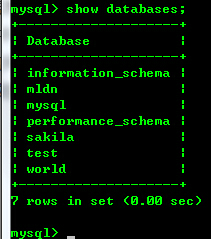
查看全部数据库:
show databases;
- 1
- 1
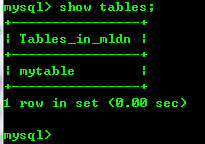
查看一个数据库(要先use该DB)下的所有表:
show tables;
- 1
- 1
SQL语法基础
SQL功能强大,概括起来可以分为以下3组:
- DML(Data Manipulation Language)——检索或者修改数据;
- DDL(Data Definition Language)——定义数据的结构,如创建、修改或者删除数据库对象;
- DCL(Data Control Language)——定义数据库用户的权限。
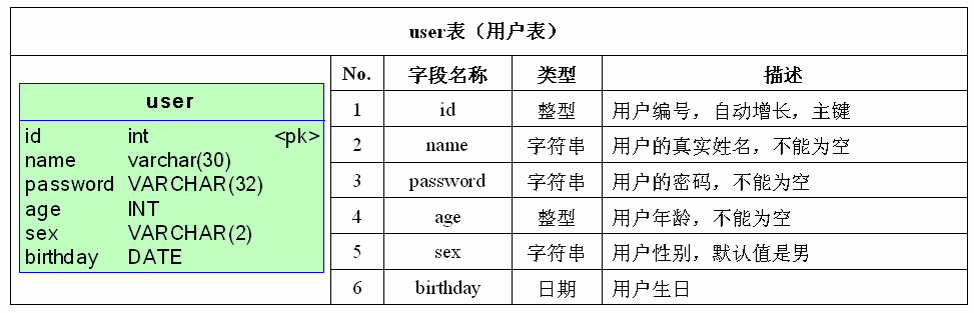
在MySQL中提供了标准的SQL语法支持,本文主要使用DDL,下面分别对数据库的增加、修改、查询语句进行介绍。为了方便操作,本部分使用下面的表完成全部操作:
创建user表(SQL脚本):
create table user(
    id          int auto_increment  primary key,
    name        varchar(30)         not null,
    password    varchar(32)         not null,
    age         int                 not null,
    sex         varchar(2)          default '男',
    birthday    date
);
- 1
- 2
- 3
- 4
- 5
- 6
- 7
- 8
- 1
- 2
- 3
- 4
- 5
- 6
- 7
- 8
增加记录:
insert into 表名称[(字段1,字段2,字段3,……字段n)]
            values(值1,值2,值3,……值n);
- 1
- 2
- 1
- 2
范例:向user表中插入2条记录:
insert into user(name,password,age,sex,birthday)
            values("Tom","123456",18,"男","1995-03-05");
insert into user(name,password,age,sex,birthday)
            values("Kitty","admin",16,"女","1996-09-18");
- 1
- 2
- 3
- 4
- 1
- 2
- 3
- 4
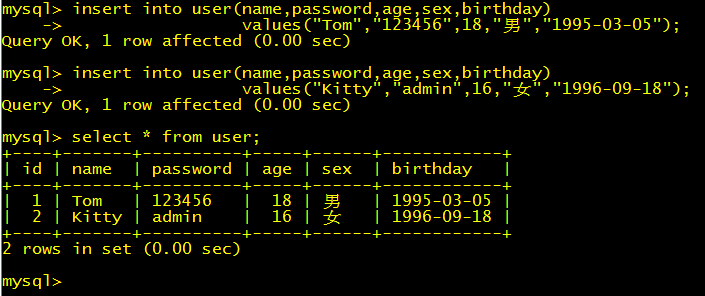
注意:在以上向表中插入内容的时候没有写id字段,因为id是从1开始自动增长的(此时id是不可回收的)。
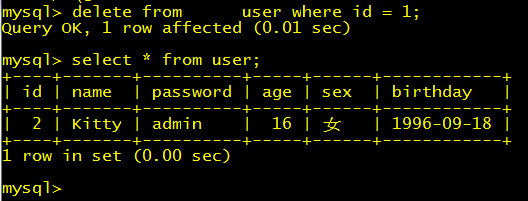
删除记录:
delete from 表名称[删除条件];
- 1
- 1
在删除表中的数据的时候最好指定删除的条件,如果没有指定的话则表示删除表中的全部记录,一般这个删除条件都使用id表示。
范例:删除关于tom的一条记录:
delete from user
    where id = 1;
- 1
- 2
- 1
- 2
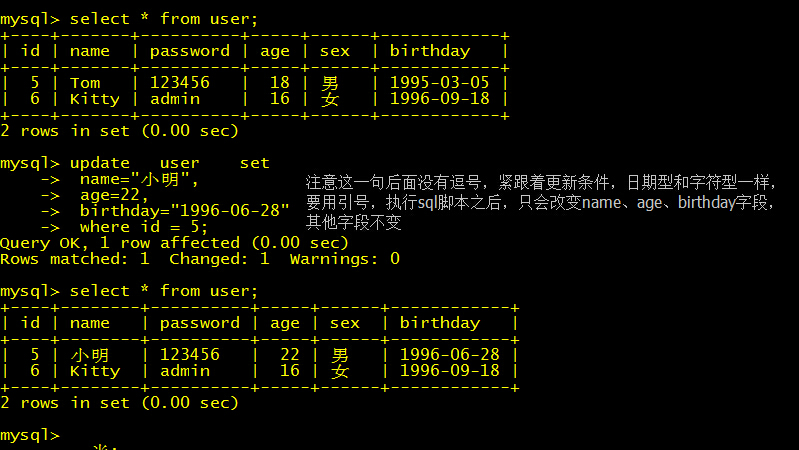
更新表中的记录:
update 表名称 set 字段1=值1,……字段n=值n[where 更新条件];
- 1
- 1
和删除语句一样,修改的时候也需要指定修改的条件,否则表中的全部记录都将被修改。这个更新条件一般也是用id指定。
修改一条记录:
update  user    set
    name="小明",
    age=22,
    birthday="1996-06-28"
    where id = 5;
- 1
- 2
- 3
- 4
- 5
- 1
- 2
- 3
- 4
- 5
对于数据库的操作而言,查询是最复杂的,查询分为以下几种:
1. 简单查询;
2. 限定查询(指定查询的条件);
3. 多表查询;
4. 分组统计;
5. 子查询;
6. 并、交、补。
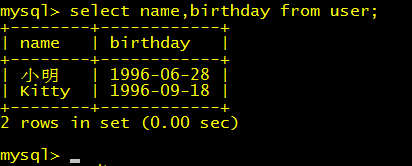
查询指定列,直接将”*”替换即可
select name,birthday from user;
- 1
- 1
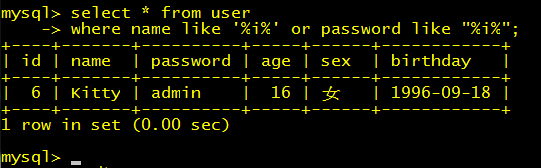
查询姓名或者密码中包含字母i的用户(条件查询和模糊匹配-通配符)
select * from user
where name like '%i%' or password like "%i%";
- 1
- 2
- 1
- 2
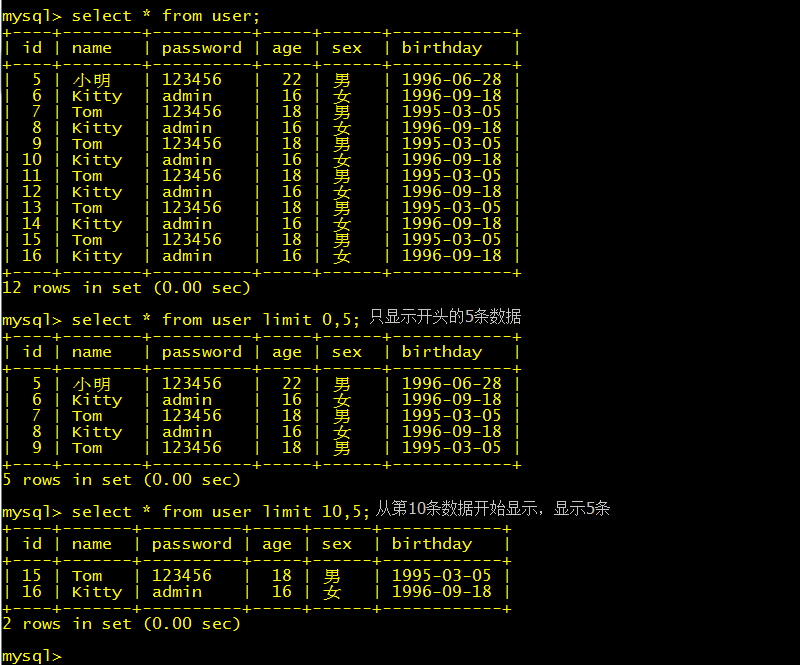
在开发中还有一种情况:查询部分数据,这在系统的分页程序中经常使用,查询指定的记录条数。见如下:如果我们只想查询前5条数据,可以这样:
select * from user limit 0,5;
- 1
- 1
limit的2个参数,第一个参数是起始位置,第二个参数是记录的个数
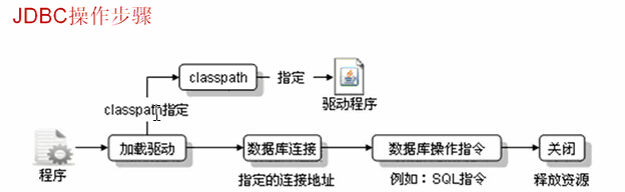
JDBC操作步骤和数据库的连接
JDBC本省是一个操作标准,所以其操作步骤是固定的,以后只需要修改很少的一部分代码就可以达到不同数据库之间的链接转换功能。数据库安装并配置完成之后就可以按照以下的步骤进行数据库的操作了:
1. 加载数据库驱动程序。各个数据库都会提供JDBC驱动程序开发包,直接将JDBC操作所需要的开发包(一般为.jar或者.zip)直接配置到classpath中即可(Eclipse中的Build Path)。
2. 连接数据库。根据各个数据库的不同,连接的地址也不同,此连接地址将由数据库厂商提供,一般在使用JDBC连接数据库的时候都会要求输入用户名和密码,在本文中,使用的数据库是MySQL,用户名为root,密码为mysqladmin,用户取得连接之后才可以对数据库进行查询或者更新操作。
3. 使用语句进行数据库操作。数据库操作分为更新和查询两种操作,除了可以使用标准的SQL语句之外,对于各个数据库也可以使用自己提供的各种命令。
4. 关闭数据库连接。数据库操作完毕之后需要关闭连接以释放资源。
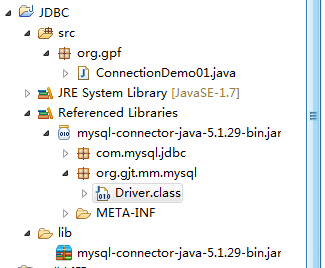
MySQL的JDBC驱动程序下载地址:http://cdn.mysql.com/Downloads/Connector-J/mysql-connector-java-gpl-5.1.34.msi
下载完成后一般会在C:\Program Files (x86)\MySQL\MySQL Connector J路径下有一个jar文件:

然后将此jar文件通过Eclipse Build Path即可。
加载JDBC驱动程序:
通过Class.forName()语句可以加载一个数据库驱动程序。
public class ConnectionDemo01 {
    // 定义MySQL的数据库驱动程序
    public static final String DRIVER = "org.gjt.mm.mysql.Driver";

    public static void main(String[] args) {
        try {
            Class.forName(DRIVER);//加载驱动程序
        } catch (ClassNotFoundException e) {
            e.printStackTrace();
        }

    }

}
- 1
- 2
- 3
- 4
- 5
- 6
- 7
- 8
- 9
- 10
- 11
- 12
- 13
- 14
- 1
- 2
- 3
- 4
- 5
- 6
- 7
- 8
- 9
- 10
- 11
- 12
- 13
- 14
连接及关闭数据库
DriverManger说明
DriverManger提供的主要操作就是取得一个数据库的连接,用getConnection()方法取得连接对象,此方法的返回值类型是Connection对象,不管采用哪种方式连接,都必须提供一个数据库的连接地址,如果在连接数据库的时候需要用户名和密码,则肯定需要将用户名和密码设置上。
MySQL数据库的连接地址格式:
jdbc:mysql://IP地址:端口号/数据库名称
- 1
- 1
JDBC虽然提供了与平台无关的数据库操作,但是各个数据库的连接地址是有差异的,JDBC的连接地址实际上有以下的3部分组成:
1. JDBC协议。JDBC URL中的协议总是jdbc:
2. 子协议。驱动程序名或数据库连接机制(这种机制可由一个或多个驱动程序支持)的名称,例如:mysql:
3. 子名称。一种标识数据库的方法。必须遵循”//主机名:端口/子协议”的标准URL命名约定,例如://localhost:3306/mldn。
Connection
通过DriverManger取得Connection对象之后,实际上就表示数据库连接上了,连接上数据库之后就可以进行数据库的更新和查询操作,但是操作的最后数据库连接必须关闭。
import java.sql.Connection;
import java.sql.DriverManager;
import java.sql.SQLException;

public class ConnectionDemo {
    // MySQL的数据库驱动程序
    public static final String DRIVER = "org.gjt.mm.mysql.Driver";
    // MySQL数据库的连接地址
    public static final String DBURL = "jdbc:mysql://localhost:3306/mldn";
    // MySQL数据库的用户名和密码
    public static final String DBUSER = "root";
    public static final String DBPASSWORD = "mysqladmin";

    public static void main(String[] args) {
        Connection coon = null;// 数据库连接

        try {
            Class.forName(DRIVER);// 加载驱动程序
        } catch (ClassNotFoundException e) {
            e.printStackTrace();
        }

        try {
            coon = DriverManager.getConnection(DBURL, DBUSER, DBPASSWORD);
        } catch (SQLException e) {
            e.printStackTrace();
        }
        System.out.println(coon);// 如果此时可以可以打印就表示正常连接

        try {
            coon.close(); // 关闭数据库连接
        } catch (SQLException e) {
            e.printStackTrace();
        }
    }

}
- 1
- 2
- 3
- 4
- 5
- 6
- 7
- 8
- 9
- 10
- 11
- 12
- 13
- 14
- 15
- 16
- 17
- 18
- 19
- 20
- 21
- 22
- 23
- 24
- 25
- 26
- 27
- 28
- 29
- 30
- 31
- 32
- 33
- 34
- 35
- 36
- 37
- 1
- 2
- 3
- 4
- 5
- 6
- 7
- 8
- 9
- 10
- 11
- 12
- 13
- 14
- 15
- 16
- 17
- 18
- 19
- 20
- 21
- 22
- 23
- 24
- 25
- 26
- 27
- 28
- 29
- 30
- 31
- 32
- 33
- 34
- 35
- 36
- 37
运行结果:

执行数据库的更新操作
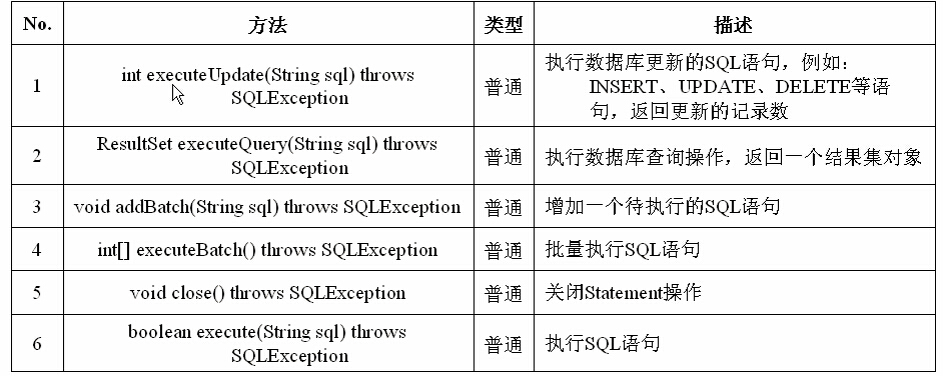
Statement接口
数据库的具体操作依赖于Statement接口完成,此接口可以使用Connection接口中提供的createStatement()方法实例化。该接口中的常用方法如下:
为了清楚地知道每一个语句的变化,所以将之前的user表重新建立一下:
DROP TABLE user ;   -- 删除表
CREATE TABLE user(
    id          INT         AUTO_INCREMENT PRIMARY KEY ,
    name        VARCHAR(30) NOT NULL ,
    password    VARCHAR(32) NOT NULL ,
    age         INT         NOT NULL ,
    sex         VARCHAR(2)  DEFAULT '男' ,
    birthday    DATE
) ;
- 1
- 2
- 3
- 4
- 5
- 6
- 7
- 8
- 9
- 1
- 2
- 3
- 4
- 5
- 6
- 7
- 8
- 9
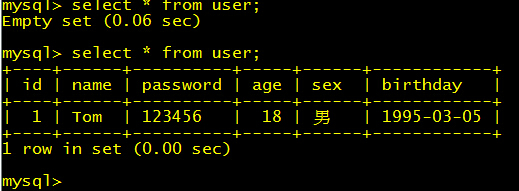
执行数据库的更新操作(向user表中插入一条记录【以前是空表】)
import java.sql.Connection;
import java.sql.DriverManager;
import java.sql.SQLException;
import java.sql.Statement;

public class InsertDemo {
    public static final String DRIVER = "org.gjt.mm.mysql.Driver";
    public static final String DBURL = "jdbc:mysql://localhost:3306/mldn";
    public static final String DBUSER = "root";
    public static final String DBPASSWORD = "mysqladmin";

    public static void main(String[] args) throws ClassNotFoundException,
            SQLException {
        Connection coon = null;// 数据库连接
        Statement statement = null;// 数据库操作
        Class.forName(DRIVER);// 加载数据库驱动程序
        String sql = "insert into user(name,password,age,sex,birthday)"
                + "values('Tom','123456',18,'男','1995-03-05')";
        coon = DriverManager.getConnection(DBURL, DBUSER, DBPASSWORD);// 取得数据库连接对象
        statement = coon.createStatement();// 实例化Statement对象
        statement.executeUpdate(sql);// 执行更新新操作
        statement.close();// 关闭操作
        coon.close();// 关闭数据库连接

    }

}
- 1
- 2
- 3
- 4
- 5
- 6
- 7
- 8
- 9
- 10
- 11
- 12
- 13
- 14
- 15
- 16
- 17
- 18
- 19
- 20
- 21
- 22
- 23
- 24
- 25
- 26
- 27
- 1
- 2
- 3
- 4
- 5
- 6
- 7
- 8
- 9
- 10
- 11
- 12
- 13
- 14
- 15
- 16
- 17
- 18
- 19
- 20
- 21
- 22
- 23
- 24
- 25
- 26
- 27
运行结果:
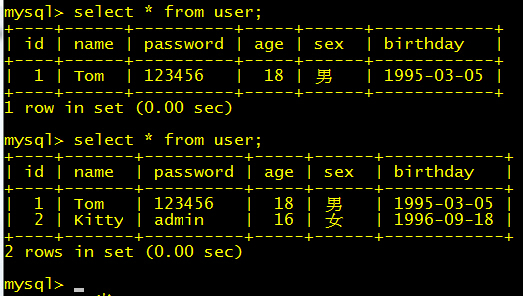
在以上程序中SQL语句是固定好了的,如果希望具体的内容是一个变量,则可以将代码修改为如下(通过字符串的拼接传递参数):
        String password = "admin";
        int age = 16;
        String sex = "女";
        String birthday = "1996-09-18";
        String sql = "insert into user(name,password,age,sex,birthday)"
                + "values('" + name + "','" + password + "'," + age + ",'"
                + sex + "','" + birthday + "')";
- 1
- 2
- 3
- 4
- 5
- 6
- 7
- 1
- 2
- 3
- 4
- 5
- 6
- 7
运行结果:
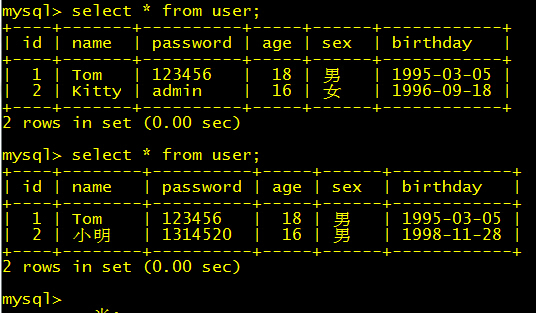
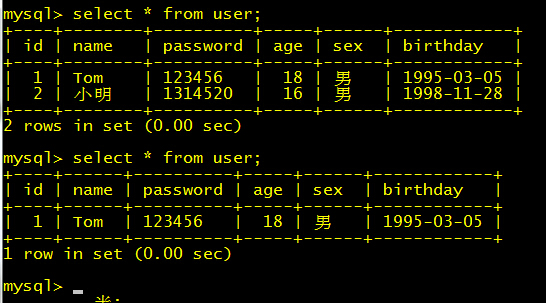
更新一条记录:
import java.sql.Connection;
import java.sql.DriverManager;
import java.sql.SQLException;
import java.sql.Statement;

public class UpdateDemo {
    public static final String DRIVER = "org.gjt.mm.mysql.Driver";
    public static final String DBURL = "jdbc:mysql://localhost:3306/mldn";
    public static final String DBUSER = "root";
    public static final String DBPASSWORD = "mysqladmin";

    public static void main(String[] args) throws ClassNotFoundException,
            SQLException {
        Connection coon = null;// 数据库连接
        Statement statement = null;// 数据库操作
        Class.forName(DRIVER);// 加载数据库驱动程序
        int id = 2;
        String name = "小明";
        String password = "1314520";
        String sex = "男";
        String birthday = "1998-11-28";
        String sql = "update user set name='" + name + "',password='" + password
                + "',sex='" + sex + "',birthday='" + birthday + "' where id="
                + id;
        coon = DriverManager.getConnection(DBURL, DBUSER, DBPASSWORD);// 取得数据库连接对象
        statement = coon.createStatement();// 实例化Statement对象
        statement.executeUpdate(sql);// 执行更新新操作
        statement.close();// 关闭操作
        coon.close();// 关闭数据库连接

    }

}
- 1
- 2
- 3
- 4
- 5
- 6
- 7
- 8
- 9
- 10
- 11
- 12
- 13
- 14
- 15
- 16
- 17
- 18
- 19
- 20
- 21
- 22
- 23
- 24
- 25
- 26
- 27
- 28
- 29
- 30
- 31
- 32
- 33
- 1
- 2
- 3
- 4
- 5
- 6
- 7
- 8
- 9
- 10
- 11
- 12
- 13
- 14
- 15
- 16
- 17
- 18
- 19
- 20
- 21
- 22
- 23
- 24
- 25
- 26
- 27
- 28
- 29
- 30
- 31
- 32
- 33
运行结果:
import java.sql.Connection;
import java.sql.DriverManager;
import java.sql.SQLException;
import java.sql.Statement;

public class DeleteDemo {
    public static final String DRIVER = "org.gjt.mm.mysql.Driver";
    public static final String DBURL = "jdbc:mysql://localhost:3306/mldn";
    public static final String DBUSER = "root";
    public static final String DBPASSWORD = "mysqladmin";

    public static void main(String[] args) throws SQLException,
            ClassNotFoundException {
        Connection coon = null;// 数据库连接
        Statement statement = null;// 数据库操作
        Class.forName(DRIVER);// 加载数据库驱动程序
        int id = 2;
        String sql = "delete from user where id=" + id;
        coon = DriverManager.getConnection(DBURL, DBUSER, DBPASSWORD);// 取得数据库连接对象
        statement = coon.createStatement();// 实例化Statement对象
        statement.executeUpdate(sql);// 执行更新新操作
        statement.close();// 关闭操作
        coon.close();// 关闭数据库连接
    }

}
- 1
- 2
- 3
- 4
- 5
- 6
- 7
- 8
- 9
- 10
- 11
- 12
- 13
- 14
- 15
- 16
- 17
- 18
- 19
- 20
- 21
- 22
- 23
- 24
- 25
- 26
- 1
- 2
- 3
- 4
- 5
- 6
- 7
- 8
- 9
- 10
- 11
- 12
- 13
- 14
- 15
- 16
- 17
- 18
- 19
- 20
- 21
- 22
- 23
- 24
- 25
- 26
ResultSet接口
数据库的操作主要分为查询和更新操作,查询操作就是将全部的查询结果返回给用户。
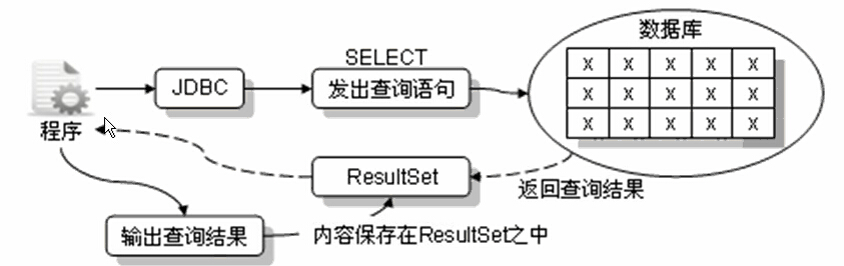
使用SQL中的select语句可以将数据库中的全部结果查询出来,并保留在内存中(尽量不要使用select *)在JDBC操作中数据库的所有查询记录将使用ResultSet进行接收并显示。
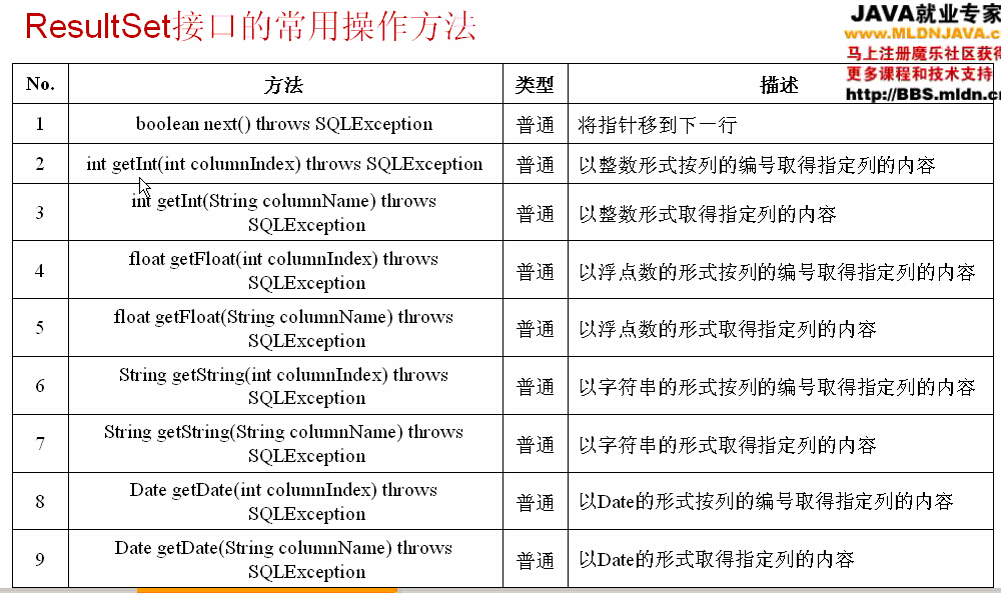
使用Statement中的ResultSet executeQuery(String sql)方法进行数据库的查询操作,该方法返回一个ResultSet实例。该接口的常用方法:
import java.sql.Connection;
import java.sql.Date;
import java.sql.DriverManager;
import java.sql.ResultSet;
import java.sql.SQLException;
import java.sql.Statement;

public class ResultSetDemo01 {

    public static final String DRIVER = "org.gjt.mm.mysql.Driver";
    public static final String DBURL = "jdbc:mysql://localhost:3306/mldn";
    public static final String DBUSER = "root";
    public static final String DBPASSWORD = "mysqladmin";

    public static void main(String[] args) throws ClassNotFoundException,
            SQLException {
        Connection coon = null;// 数据库连接对象
        Statement statement = null;// 数据库操作对象
        Class.forName(DRIVER);// 加载数据库驱动程序
        ResultSet resultSet = null;// 保存查询结果
        String sql = "select id,name,password,age,sex,birthday from user";
        coon = DriverManager.getConnection(DBURL, DBUSER, DBPASSWORD);// 取得数据库连接对象
        statement = coon.createStatement();// 实例化Statement对象
        resultSet = statement.executeQuery(sql);

        System.out.println("编号\t姓名\t密码\t年龄\t性别\t生日");
        // 依次取出内容
        while (resultSet.next()) {
            int id = resultSet.getInt("id");
            String name = resultSet.getString("name");
            String password = resultSet.getString("password");
            int age = resultSet.getInt("age");
            String sex = resultSet.getString("sex");
            Date date = resultSet.getDate("birthday");
            System.out.println(id + "\t" + name + '\t' + password + '\t' + age
                    + '\t' + sex + '\t' + date);
        }
        resultSet.close();// 关闭结果集
        statement.close();// 关闭操作
        coon.close();// 关闭数据库连接
    }

}
- 1
- 2
- 3
- 4
- 5
- 6
- 7
- 8
- 9
- 10
- 11
- 12
- 13
- 14
- 15
- 16
- 17
- 18
- 19
- 20
- 21
- 22
- 23
- 24
- 25
- 26
- 27
- 28
- 29
- 30
- 31
- 32
- 33
- 34
- 35
- 36
- 37
- 38
- 39
- 40
- 41
- 42
- 43
- 1
- 2
- 3
- 4
- 5
- 6
- 7
- 8
- 9
- 10
- 11
- 12
- 13
- 14
- 15
- 16
- 17
- 18
- 19
- 20
- 21
- 22
- 23
- 24
- 25
- 26
- 27
- 28
- 29
- 30
- 31
- 32
- 33
- 34
- 35
- 36
- 37
- 38
- 39
- 40
- 41
- 42
- 43
运行结果:

在取出ResultSet中的内容的时候除了可以指定列的别名外,还可以指定列的序号(序号从1开始)。
    // 依次取出内容
        while (resultSet.next()) {
            int id = resultSet.getInt(1);// 指定列的序号
            String name = resultSet.getString(2);
            String password = resultSet.getString(3);
            int age = resultSet.getInt(4);
            String sex = resultSet.getString(5);
            Date date = resultSet.getDate(6);
            System.out.println(id + "\t" + name + '\t' + password + '\t' + age
                    + '\t' + sex + '\t' + date);
        }
- 1
- 2
- 3
- 4
- 5
- 6
- 7
- 8
- 9
- 10
- 11
- 1
- 2
- 3
- 4
- 5
- 6
- 7
- 8
- 9
- 10
- 11
PreparedStatement接口
该接口是Statement的子接口,属于预处理操作。与直接使用Statement不同的是,PreparedStatement在操作时是先在数据表之中准备好了一条SQL语句,但是此SQL语句的具体内容暂时不设置,而是之后进行设置,以插入数据为例,使用PreparedStatement插入数据时,数据表中的指针首先指向最后一条数据之后,但是里面的内容是不知道的,而是等待用户分别设置【先占位,再设置内容】。

使用Statement操作的时候,肯定要执行的是一条完整的SQL语句,执行之前是使用Connection直接创建的。使用PreparedStatement就好比占座,证明此座位已经有人了,但是在等待人的到来。该接口通过Collection接口中的PreparedStatement prepareStatement(String sql)方法实例化,它有一系列的setXXX方法设置内容,如果执行更新语句语句的话会返回更新数据的记录数。
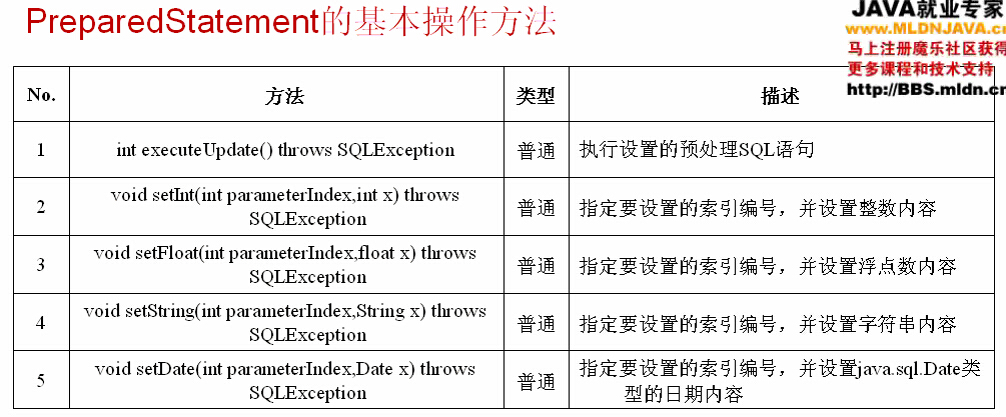
该接口的常用方法:
注意点:
关于日期的输入问题:在正常情况下都使用java.util.Date表示日期,但是在prepareStatement中要想使用日期则需要使用java.sql.Date类型。将java.util.Date转换成java.sql.Date的方法如下:
String birthday = "2007-02-03";
java.util.Date temp = null; // 声明一个Date对象
// 通过SimpleDateFormat将一个字符串变为java.util.Date类型
temp = new SimpleDateFormat("yyyy-MM-dd").parse(birthday);
// 通过java.util.Date取出具体的日期数,并将其变为java.sql.Date类型
java.sql.Date bir = new java.sql.Date(temp.getTime());
- 1
- 2
- 3
- 4
- 5
- 6
- 1
- 2
- 3
- 4
- 5
- 6
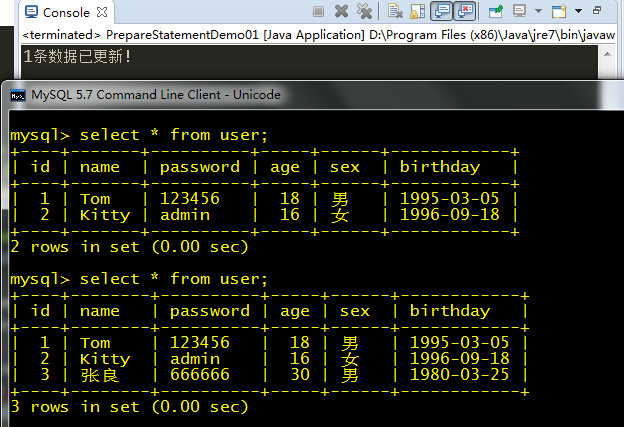
范例-使用prepareStatement执行数据库的插入操作。
import java.sql.Connection;
import java.sql.DriverManager;
import java.sql.PreparedStatement;
import java.sql.SQLException;
import java.text.ParseException;
import java.text.SimpleDateFormat;

public class PrepareStatementDemo01 {

    public static final String DRIVER = "org.gjt.mm.mysql.Driver";
    public static final String DBURL = "jdbc:mysql://localhost:3306/mldn";
    public static final String DBUSER = "root";
    public static final String DBPASSWORD = "mysqladmin";

    public static void main(String[] args) throws ClassNotFoundException, SQLException, ParseException {
        Connection coon = null;
        PreparedStatement preparedStatement = null;//数据库操作
        String name = "张良";
        String password = "666666";
        int age = 30;
        String sex = "男";
        String birthday = "1980-03-25";
        java.util.Date temp = null;
        temp = new SimpleDateFormat("yyyy-MM-dd").parse(birthday);
        java.sql.Date bir = new java.sql.Date(temp.getTime());
        String sql = "INSERT INTO user(name,password,age,sex,birthday) VALUES(?,?,?,?,?)";
        Class.forName(DRIVER);
        coon = DriverManager.getConnection(DBURL, DBUSER, DBPASSWORD);
        preparedStatement = coon.prepareStatement(sql);//实例化PreparedStatement对象
        //设置占位参数的具体值
        preparedStatement.setString(1, name);
        preparedStatement.setString(2, password);
        preparedStatement.setInt(3, age);
        preparedStatement.setString(4, sex);
        preparedStatement.setDate(5, bir);
        int t = preparedStatement.executeUpdate();//执行更新
        System.out.println(t+"条数据已更新!");

        preparedStatement.close();
        coon.close();
    }

}
- 1
- 2
- 3
- 4
- 5
- 6
- 7
- 8
- 9
- 10
- 11
- 12
- 13
- 14
- 15
- 16
- 17
- 18
- 19
- 20
- 21
- 22
- 23
- 24
- 25
- 26
- 27
- 28
- 29
- 30
- 31
- 32
- 33
- 34
- 35
- 36
- 37
- 38
- 39
- 40
- 41
- 42
- 43
- 1
- 2
- 3
- 4
- 5
- 6
- 7
- 8
- 9
- 10
- 11
- 12
- 13
- 14
- 15
- 16
- 17
- 18
- 19
- 20
- 21
- 22
- 23
- 24
- 25
- 26
- 27
- 28
- 29
- 30
- 31
- 32
- 33
- 34
- 35
- 36
- 37
- 38
- 39
- 40
- 41
- 42
- 43
运行结果:
有如下表,我们要实现模糊查询(查询姓张的)。
import java.sql.Connection;
import java.sql.Date;
import java.sql.DriverManager;
import java.sql.PreparedStatement;
import java.sql.ResultSet;
import java.sql.SQLException;
import java.text.ParseException;

public class PrepareStatementDemo02 {

    public static final String DRIVER = "org.gjt.mm.mysql.Driver";
    public static final String DBURL = "jdbc:mysql://localhost:3306/mldn";
    public static final String DBUSER = "root";
    public static final String DBPASSWORD = "mysqladmin";

    public static void main(String[] args) throws ClassNotFoundException,
            SQLException, ParseException {
        Connection coon = null;
        PreparedStatement preparedStatement = null;// 数据库操作
        String keyWord = "张";// 设置查询关键字
        ResultSet resultSet = null;// 接收查询结果
        String sql = "SELECT id,name,password,age,sex,birthday from user where name like ? or password like ? or sex like ?";
        Class.forName(DRIVER);
        coon = DriverManager.getConnection(DBURL, DBUSER, DBPASSWORD);
        preparedStatement = coon.prepareStatement(sql);// 实例化PreparedStatement对象
        // 设置占位参数的具体值
        preparedStatement.setString(1, "%" + keyWord + "%");
        preparedStatement.setString(2, "%" + keyWord + "%");
        preparedStatement.setString(3, "%" + keyWord + "%");

        resultSet = preparedStatement.executeQuery();// 执行查询
        System.out.println("模糊查询带" + "\"" + keyWord + "\"" + "的记录!");
        System.out.println("编号\t姓名\t密码\t年龄\t性别\t生日");
        while (resultSet.next()) {
            int id = resultSet.getInt(1);
            String name = resultSet.getString(2);
            String password = resultSet.getString(3);
            String age = resultSet.getString(4);
            String sex = resultSet.getString(5);
            Date bir = resultSet.getDate(6);
            System.out.println(id + "\t" + name + '\t' + password + '\t' + age
                    + '\t' + sex + '\t' + bir);
        }
        resultSet.close();
        preparedStatement.close();
        coon.close();
    }

}
- 1
- 2
- 3
- 4
- 5
- 6
- 7
- 8
- 9
- 10
- 11
- 12
- 13
- 14
- 15
- 16
- 17
- 18
- 19
- 20
- 21
- 22
- 23
- 24
- 25
- 26
- 27
- 28
- 29
- 30
- 31
- 32
- 33
- 34
- 35
- 36
- 37
- 38
- 39
- 40
- 41
- 42
- 43
- 44
- 45
- 46
- 47
- 48
- 49
- 1
- 2
- 3
- 4
- 5
- 6
- 7
- 8
- 9
- 10
- 11
- 12
- 13
- 14
- 15
- 16
- 17
- 18
- 19
- 20
- 21
- 22
- 23
- 24
- 25
- 26
- 27
- 28
- 29
- 30
- 31
- 32
- 33
- 34
- 35
- 36
- 37
- 38
- 39
- 40
- 41
- 42
- 43
- 44
- 45
- 46
- 47
- 48
- 49
运行结果:

Q:在开发中到底是使用PreparedStatement接口还是使用Statement接口操作呢?
A:在实际的开发中是不会有人使用Statement接口的,因为其采用的是拼凑的SQL语句形式,这样一来就可能造成SQL注入漏洞(最早的国内大部分站点,大家只需要输入”’”【单引号】进行查询,基本上站点就完了)。
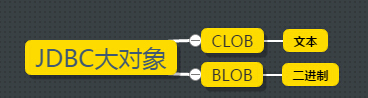
存储大对象
大对象主要指的是CLOB和BLOB两种类型的字段。
在JDBC中处理大对象需要使用PreparedStatement完成(不能使用Statement),所有的内容需要通过IO流的方式保存和读取。
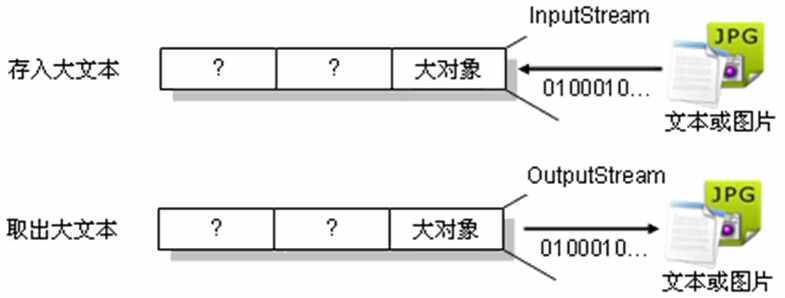
写入大对象数据(Statement的setXXX方法)
void setAsciiStream(int parameterIndex,InputStream x,int length)    // 写入文本
void setBinaryStream(int parameterIndex,InputStream x, int length)  // 写入二进制
- 1
- 2
- 1
- 2
读取大对象数据(ResultSet的getXXX方法)
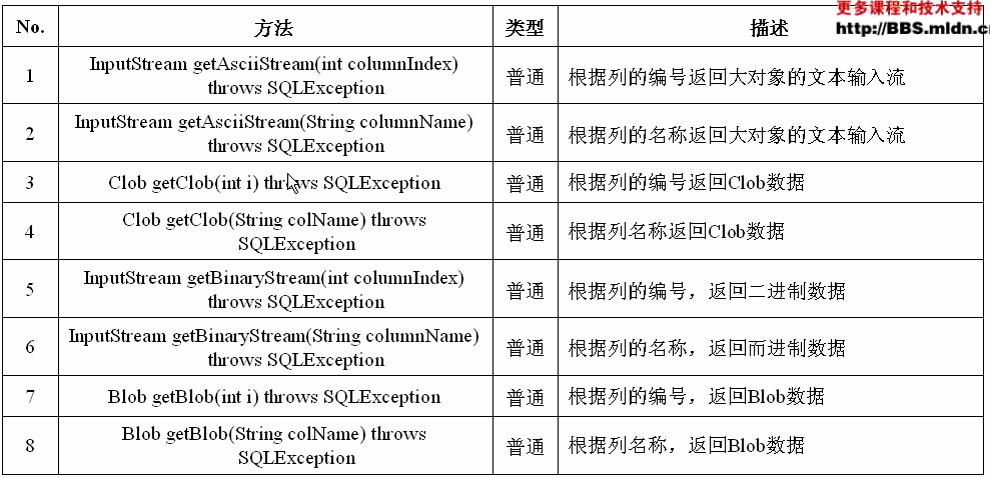
处理CLOB数据
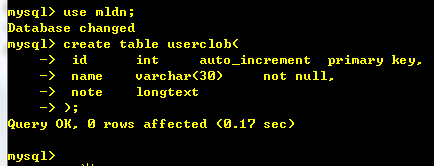
CLOB表示大文本数据,在MySQL中提供了LONGTEXT表示大文本数据。例如有下面的数据库创建脚本:
create table userclob(
    id  int auto_increment  primary key,
    name    varchar(30) not null,
    note    longtext
);
- 1
- 2
- 3
- 4
- 5
- 1
- 2
- 3
- 4
- 5
例如项目中有一个longtext.txt的大文本,现在需要将以上的文本写入到表的字段之中:
import java.io.FileInputStream;
import java.io.FileNotFoundException;
import java.sql.Connection;
import java.sql.DriverManager;
import java.sql.PreparedStatement;
import java.sql.SQLException;
public class CLOBDemo01 {
public static final String DRIVER = "org.gjt.mm.mysql.Driver";
public static final String DBURL = "jdbc:mysql://localhost:3306/mldn";
public static final String DBUSER = "root";
public static final String DBPASSWORD = "mysqladmin";
public static void main(String[] args) throws ClassNotFoundException,
SQLException, FileNotFoundException {
Connection connection = null;
PreparedStatement preparedStatement = null;
Class.forName(DRIVER);// 加载数据库驱动程序
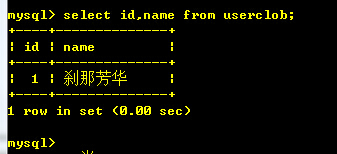
String name = "刹那芳华";
String sql = "insert into userclob(name,note) values(?,?);";
connection = DriverManager.getConnection(DBURL, DBUSER, DBPASSWORD);
preparedStatement = connection.prepareStatement(sql);
FileInputStream fis = new FileInputStream("longtext.txt");// 通过输入流读取文件
preparedStatement.setString(1, name);
preparedStatement.setAsciiStream(2, fis);
preparedStatement.executeUpdate();//执行更新
preparedStatement.close();
connection.close();
}
}
- 1
- 2
- 3
- 4
- 5
- 6
- 7
- 8
- 9
- 10
- 11
- 12
- 13
- 14
- 15
- 16
- 17
- 18
- 19
- 20
- 21
- 22
- 23
- 24
- 25
- 26
- 27
- 28
- 29
- 30
- 31
- 32
- 33
- 1
- 2
- 3
- 4
- 5
- 6
- 7
- 8
- 9
- 10
- 11
- 12
- 13
- 14
- 15
- 16
- 17
- 18
- 19
- 20
- 21
- 22
- 23
- 24
- 25
- 26
- 27
- 28
- 29
- 30
- 31
- 32
- 33
运行结果:
下面使用IO进行读取
import java.io.IOException;
import java.io.InputStream;
import java.sql.Connection;
import java.sql.DriverManager;
import java.sql.PreparedStatement;
import java.sql.ResultSet;
import java.sql.SQLException;
import java.util.Scanner;

public class CLOBDemo02 {

    public static final String DRIVER = "org.gjt.mm.mysql.Driver";
    public static final String DBURL = "jdbc:mysql://localhost:3306/mldn";
    public static final String DBUSER = "root";
    public static final String DBPASSWORD = "mysqladmin";

    public static void main(String[] args) throws ClassNotFoundException,
            SQLException, IOException {
        Connection connection = null;
        PreparedStatement preparedStatement = null;
        ResultSet resultSet = null;
        Class.forName(DRIVER);// 加载数据库驱动程序
        int id = 1;// 读取的编号
        String sql = "select name,note from userclob where id = ?;";
        connection = DriverManager.getConnection(DBURL, DBUSER, DBPASSWORD);
        preparedStatement = connection.prepareStatement(sql);
        preparedStatement.setInt(1, id);
        resultSet = preparedStatement.executeQuery();
        if (resultSet.next()) {
            String name = resultSet.getString(1);
            StringBuilder note = new StringBuilder();
            System.out.println("姓名:" + name);
            InputStream inputStream = resultSet.getAsciiStream("note");// 获得JDBC表中note字段的输入流
            Scanner scanner = new Scanner(inputStream, "utf-8");// 使用Scanner读取内容
            scanner.useDelimiter("\r\n");// 将回车作为分隔符
            while (scanner.hasNext()) {
                String string = (String) scanner.next();
                note.append(string).append("\n");
            }
            scanner.close();
            inputStream.close();
            System.out.println("内容:\n" + note);

        }

        resultSet.close();
        preparedStatement.close();
        connection.close();
    }

}
- 1
- 2
- 3
- 4
- 5
- 6
- 7
- 8
- 9
- 10
- 11
- 12
- 13
- 14
- 15
- 16
- 17
- 18
- 19
- 20
- 21
- 22
- 23
- 24
- 25
- 26
- 27
- 28
- 29
- 30
- 31
- 32
- 33
- 34
- 35
- 36
- 37
- 38
- 39
- 40
- 41
- 42
- 43
- 44
- 45
- 46
- 47
- 48
- 49
- 50
- 51
- 52
- 1
- 2
- 3
- 4
- 5
- 6
- 7
- 8
- 9
- 10
- 11
- 12
- 13
- 14
- 15
- 16
- 17
- 18
- 19
- 20
- 21
- 22
- 23
- 24
- 25
- 26
- 27
- 28
- 29
- 30
- 31
- 32
- 33
- 34
- 35
- 36
- 37
- 38
- 39
- 40
- 41
- 42
- 43
- 44
- 45
- 46
- 47
- 48
- 49
- 50
- 51
- 52
CLOB类
除了可以使用ResultSet得到输入流再读取文本的方式读取,也可以使用ResultSet中提供的getClob()方法将全部的文本内容变成Clob对象的内容。直接使用Clob可以方便取得文本数据,也可以对文本数据进行一些简单的操作,如:截取指定长度的文本。
import java.io.IOException;
import java.sql.Clob;
import java.sql.Connection;
import java.sql.DriverManager;
import java.sql.PreparedStatement;
import java.sql.ResultSet;
import java.sql.SQLException;
public class CLOBDemo03 {
public static final String DRIVER = "org.gjt.mm.mysql.Driver";
public static final String DBURL = "jdbc:mysql://localhost:3306/mldn";
public static final String DBUSER = "root";
public static final String DBPASSWORD = "mysqladmin";
public static void main(String[] args) throws ClassNotFoundException,
SQLException, IOException {
Connection connection = null;
PreparedStatement preparedStatement = null;
ResultSet resultSet = null;
Class.forName(DRIVER);// 加载数据库驱动程序
int id = 1;// 读取的编号
String sql = "select name,note from userclob where id = ?;";
connection = DriverManager.getConnection(DBURL, DBUSER, DBPASSWORD);
preparedStatement = connection.prepareStatement(sql);
preparedStatement.setInt(1, id);
resultSet = preparedStatement.executeQuery();
if (resultSet.next()) {
String name = resultSet.getString(1);
System.out.println("姓名:" + name);
Clob clob = resultSet.getClob(2);
String note = clob.getSubString(1, (int) clob.length());// 取得Clob中的字符串,从1开始
System.out.println("内容:\n" + note);
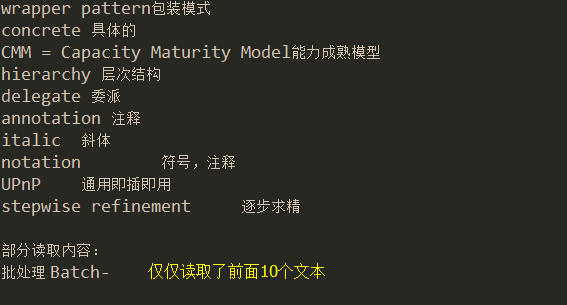
clob.truncate(10);//截取前10个文本
note = clob.getSubString(1, (int) clob.length());
System.out.println("部分读取内容:\n"+note);
}
resultSet.close();
preparedStatement.close();
connection.close();
}
}
- 1
- 2
- 3
- 4
- 5
- 6
- 7
- 8
- 9
- 10
- 11
- 12
- 13
- 14
- 15
- 16
- 17
- 18
- 19
- 20
- 21
- 22
- 23
- 24
- 25
- 26
- 27
- 28
- 29
- 30
- 31
- 32
- 33
- 34
- 35
- 36
- 37
- 38
- 39
- 40
- 41
- 42
- 43
- 44
- 1
- 2
- 3
- 4
- 5
- 6
- 7
- 8
- 9
- 10
- 11
- 12
- 13
- 14
- 15
- 16
- 17
- 18
- 19
- 20
- 21
- 22
- 23
- 24
- 25
- 26
- 27
- 28
- 29
- 30
- 31
- 32
- 33
- 34
- 35
- 36
- 37
- 38
- 39
- 40
- 41
- 42
- 43
- 44
运行结果:
BLOB
BLOB在MySQL中使用LONGBLOB声明,例如有以下的数据库创建脚本:
create table userblob(
    id int auto_increment primary key,
    name varchar(30) not null,
    photo longblob
);
- 1
- 2
- 3
- 4
- 5
- 1
- 2
- 3
- 4
- 5
将项目中的test.jpg存储到userblob表中(由于图片无法读取出来,所以可以把它另存为另外的一个文件):
import java.io.FileInputStream;
import java.io.FileOutputStream;
import java.io.IOException;
import java.io.InputStream;
import java.sql.Connection;
import java.sql.DriverManager;
import java.sql.PreparedStatement;
import java.sql.ResultSet;
import java.sql.SQLException;

public class BlobDemo01 {

    public static final String DRIVER = "org.gjt.mm.mysql.Driver";
    public static final String DBURL = "jdbc:mysql://localhost:3306/mldn";
    public static final String DBUSER = "root";
    public static final String DBPASSWORD = "mysqladmin";

    public static void main(String[] args) throws ClassNotFoundException,
            SQLException, IOException {
        Connection connection = null;
        PreparedStatement preparedStatement = null;
        ResultSet resultSet = null;

        Class.forName(DRIVER);// 加载数据库驱动程序
        String name = "潇潇暮雨";
        String sql = "insert into userblob(name,photo) values (?,?);";
        connection = DriverManager.getConnection(DBURL, DBUSER, DBPASSWORD);
        preparedStatement = connection.prepareStatement(sql);

        /* 将图片写入数据库 */
        preparedStatement.setString(1, name);
        FileInputStream fs = new FileInputStream("test.jpg");
        preparedStatement.setBinaryStream(2, fs);// 设置输入流,将二进制文件写入数据库

        preparedStatement.executeUpdate();

        /* 讲读取数据库中的图片并另存为新的文件 */
        sql = "select name,photo from userblob where id = ?;";
        int id = 1;
        preparedStatement = connection.prepareStatement(sql);
        preparedStatement.setInt(1, id);
        resultSet = preparedStatement.executeQuery();
        if (resultSet.next()) {
            name = resultSet.getString(1);
            System.out.println("姓名:\n" + name);

            InputStream inputStream = resultSet.getBinaryStream("photo");
            FileOutputStream fileOutputStream = new FileOutputStream(
                    "download_from_db.jpg");
            int temp;
            while ((temp = inputStream.read()) != -1) {
                fileOutputStream.write(temp);
            }

            inputStream.close();
            fileOutputStream.close();
        }
        resultSet.close();
        preparedStatement.close();
        connection.close();
    }

}
- 1
- 2
- 3
- 4
- 5
- 6
- 7
- 8
- 9
- 10
- 11
- 12
- 13
- 14
- 15
- 16
- 17
- 18
- 19
- 20
- 21
- 22
- 23
- 24
- 25
- 26
- 27
- 28
- 29
- 30
- 31
- 32
- 33
- 34
- 35
- 36
- 37
- 38
- 39
- 40
- 41
- 42
- 43
- 44
- 45
- 46
- 47
- 48
- 49
- 50
- 51
- 52
- 53
- 54
- 55
- 56
- 57
- 58
- 59
- 60
- 61
- 62
- 63
- 64
刷新项目文件夹得到:

以上程序使用的是IO流的方式完成的,为了简化操作也可以使用Blob类完成:
import java.io.FileOutputStream;
import java.io.IOException;
import java.io.InputStream;
import java.sql.Blob;
import java.sql.Connection;
import java.sql.DriverManager;
import java.sql.PreparedStatement;
import java.sql.ResultSet;
import java.sql.SQLException;

public class BlobDemo02 {

    public static final String DRIVER = "org.gjt.mm.mysql.Driver";
    public static final String DBURL = "jdbc:mysql://localhost:3306/mldn";
    public static final String DBUSER = "root";
    public static final String DBPASSWORD = "mysqladmin";

    public static void main(String[] args) throws ClassNotFoundException,
            SQLException, IOException {
        Connection connection = null;
        PreparedStatement preparedStatement = null;
        ResultSet resultSet = null;
        Class.forName(DRIVER);// 加载数据库驱动程序
        connection = DriverManager.getConnection(DBURL, DBUSER, DBPASSWORD);

        String sql = "select name,photo from userblob where id = ?;";
        int id = 1;
        preparedStatement = connection.prepareStatement(sql);
        preparedStatement.setInt(1, id);
        resultSet = preparedStatement.executeQuery();
        if (resultSet.next()) {
            String name = resultSet.getString(1);
            System.out.println("姓名:\n" + name);
            Blob blob = resultSet.getBlob(2);
            InputStream inputStream = resultSet.getBinaryStream("photo");
            FileOutputStream fileOutputStream = new FileOutputStream(
                    "download_from_db_blob.jpg");
            fileOutputStream.write(blob.getBytes(1, (int) blob.length()));
            inputStream.close();
            fileOutputStream.close();
        }
        resultSet.close();
        preparedStatement.close();
        connection.close();
    }

}
- 1
- 2
- 3
- 4
- 5
- 6
- 7
- 8
- 9
- 10
- 11
- 12
- 13
- 14
- 15
- 16
- 17
- 18
- 19
- 20
- 21
- 22
- 23
- 24
- 25
- 26
- 27
- 28
- 29
- 30
- 31
- 32
- 33
- 34
- 35
- 36
- 37
- 38
- 39
- 40
- 41
- 42
- 43
- 44
- 45
- 46
- 47
- 48
- 1
- 2
- 3
- 4
- 5
- 6
- 7
- 8
- 9
- 10
- 11
- 12
- 13
- 14
- 15
- 16
- 17
- 18
- 19
- 20
- 21
- 22
- 23
- 24
- 25
- 26
- 27
- 28
- 29
- 30
- 31
- 32
- 33
- 34
- 35
- 36
- 37
- 38
- 39
- 40
- 41
- 42
- 43
- 44
- 45
- 46
- 47
- 48
从实际应用来看,将一个过大的文件写入到DB中是一个不明智的选择(因为数据过大),往往采用的是映射路径的方式进行写入的。
CallableStatement接口
因为在现代的开发中存储过程的使用越来越少,因此对于这个只需要了解一下即可。
CallableStatement主要是调用数据库中的存储过程,该接口是Statement接口的子接口。在使用CallableStatement的时候可以接收过程的返回值。常用方法:

在JDBC中,如果想要设置过程的返回值,可以使用Types完成,在Types中定义了很多的常量,如果现在返回值类型为int,则使用Types.INTEGER。
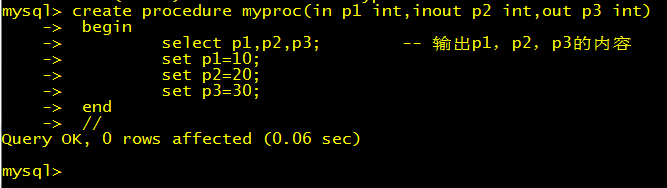
创建存储过程:
delimiter //
drop procedure  myproc  //
create procedure myproc(in p1 int,inout p2 int,out p3 int)
    begin
        select p1,p2,p3;    -- 输出p1,p2,p3的内容
        set p1=10;
        set p2=20;
        set p3=30;
    end
    //
- 1
- 2
- 3
- 4
- 5
- 6
- 7
- 8
- 9
- 10
- 1
- 2
- 3
- 4
- 5
- 6
- 7
- 8
- 9
- 10
in类型:默认的设置,什么都不声明就表示in类型,只是将类型传递进来(值传递);
inout类型:表示把值传递到过程中,并可以保留过程对此值的修改(引用传递);
out类型:可以不用传递内容,过程对此值的操作可以返回。
首先恢复分隔符:
delimiter ;
- 1
- 1
delimiter ;
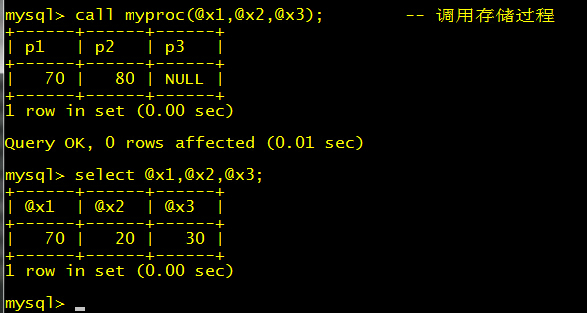
set @x1=70; --定义变量x1,值为70
set @x2=80; --定义变量x1,值为80
call myproc(@x1,@x2,@x3);
- 1
- 2
- 3
- 4
- 1
- 2
- 3
- 4
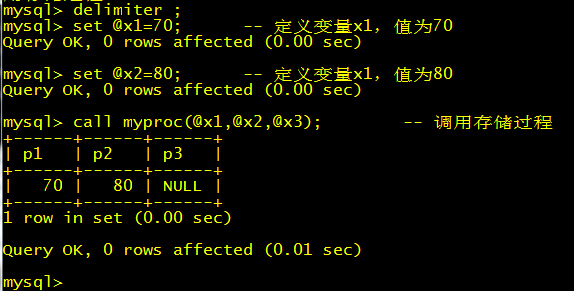
在存储过程中已经将@x2和@x3的值修改了,这个修改是可以保存下来的。
执行select @x1,@x2,@x3;得:
import java.sql.CallableStatement;
import java.sql.Connection;
import java.sql.DriverManager;
import java.sql.SQLException;
import java.sql.Types;

public class ProcDemo {

    public static final String DRIVER = "org.gjt.mm.mysql.Driver";
    public static final String DBURL = "jdbc:mysql://localhost:3306/mldn";
    public static final String DBUSER = "root";
    public static final String DBPASSWORD = "mysqladmin";

    public static void main(String[] args) throws ClassNotFoundException,
            SQLException {
        Connection coon = null;// 数据库连接
        CallableStatement callableStatement = null;//数据库操作
        String sql = "{call myproc(?,?,?)}";//调用存储过程
        Class.forName(DRIVER);// 加载驱动程序
        coon = DriverManager.getConnection(DBURL, DBUSER, DBPASSWORD);
        callableStatement = coon.prepareCall(sql);
        callableStatement.setInt(1, 70);// 设置第一个参数是70
        callableStatement.setInt(2, 80);//设置第二个参数是80

        callableStatement.registerOutParameter(2, Types.INTEGER);//将 OUT参数注册为 JDBC类型的 sqlType
        callableStatement.registerOutParameter(3, Types.INTEGER);

        callableStatement.execute();//执行过程
        System.out.println("inout类型的返回值:"+callableStatement.getInt(2));
        System.out.println("out类型的返回值:"+callableStatement.getInt(3));

        callableStatement.close();//关闭
        coon.close(); // 关闭数据库连接

    }

}
- 1
- 2
- 3
- 4
- 5
- 6
- 7
- 8
- 9
- 10
- 11
- 12
- 13
- 14
- 15
- 16
- 17
- 18
- 19
- 20
- 21
- 22
- 23
- 24
- 25
- 26
- 27
- 28
- 29
- 30
- 31
- 32
- 33
- 34
- 35
- 36
- 37
- 38
- 1
- 2
- 3
- 4
- 5
- 6
- 7
- 8
- 9
- 10
- 11
- 12
- 13
- 14
- 15
- 16
- 17
- 18
- 19
- 20
- 21
- 22
- 23
- 24
- 25
- 26
- 27
- 28
- 29
- 30
- 31
- 32
- 33
- 34
- 35
- 36
- 37
- 38
运行结果:

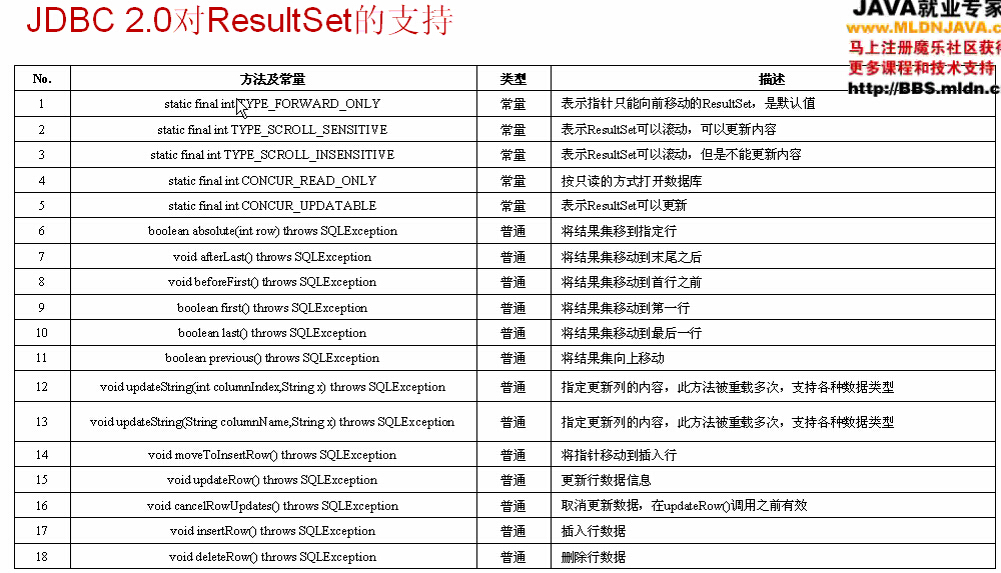
JDBC2.0操作
在JDBC2.0中加强了结果集ResultSet的功能,可以直接使用ResultSet执行更新操作,或者实现双向滚动。
在JDBC2.0中有一个最重要的概念就是批处理,可以一次完成多个语句的执行。
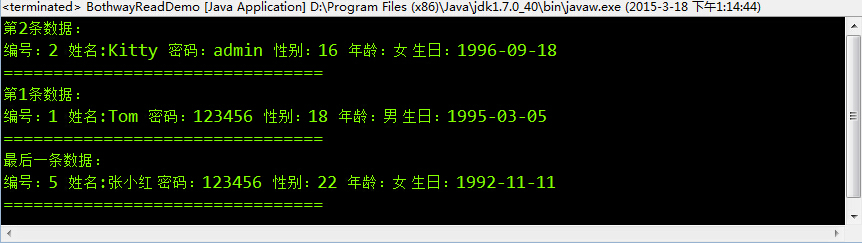
可滚动的结果集
如果要创建可滚动的结果集,则在创建PreparedStatement(Statement)的时候必须指定创建的类型(结果集的类型和并发模式:即上面的常量)。
Connection的PreparedStatement prepareStatement(String sql,int resultSetType,int resultSetConcurrency)方法返回一个设置好结果集类型和并发模式的PreparedStatement 。
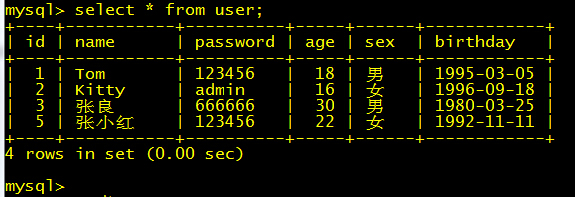
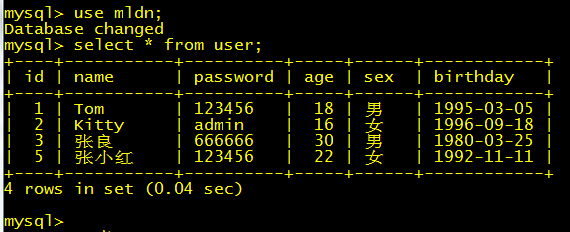
例如user表中有4条数据:
import java.sql.Connection;
import java.sql.DriverManager;
import java.sql.PreparedStatement;
import java.sql.ResultSet;
import java.sql.SQLException;

public class BothwayReadDemo {
    public static final String DRIVER = "org.gjt.mm.mysql.Driver";
    public static final String DBURL = "jdbc:mysql://localhost:3306/mldn";
    public static final String DBUSER = "root";
    public static final String DBPASSWORD = "mysqladmin";

    public static void main(String[] args) throws ClassNotFoundException,
            SQLException {
        Class.forName(DRIVER);// 加载数据库驱动程序
        Connection connection = DriverManager.getConnection(DBURL, DBUSER,
                DBPASSWORD);// 数据库连接对象

        String sql = "select id,name,password,age,sex,birthday from user;";
        // 可滚动的结果集,不可更改并发模式
        PreparedStatement preparedStatement = connection.prepareStatement(sql,
                ResultSet.TYPE_SCROLL_SENSITIVE, ResultSet.CONCUR_READ_ONLY);
        ResultSet resultSet = preparedStatement.executeQuery();// 查询操作,返回结果集

        resultSet.absolute(1);
        System.out.println("第2条数据:");
        print(resultSet, true);

        resultSet.beforeFirst();
        System.out.println("第1条数据:");
        print(resultSet, true);

        resultSet.afterLast();
        System.out.println("最后一条数据:");
        print(resultSet, false);

        preparedStatement.close();
        connection.close();// 关闭数据库连接
    }

    /**
     * @param rs结果集
     * @param re指定光标移动的方向true顺序,false逆序
     * @throws SQLException
     */
    public static void print(ResultSet rs, boolean re) throws SQLException {
        if (re) {
            rs.next();
        } else {
            rs.previous();
        }

        int id = rs.getInt(1);
        String name = rs.getString(2);
        String password = rs.getString(3);
        String sex = rs.getString(4);
        String age = rs.getString(5);
        java.util.Date birthday = rs.getDate(6);

        System.out.println("编号:" + id + " 姓名:" + name + " 密码:" + password
                + " 性别:" + sex + " 年龄:" + age + " 生日:" + birthday);
        System.out.println("================================");
    }

}
- 1
- 2
- 3
- 4
- 5
- 6
- 7
- 8
- 9
- 10
- 11
- 12
- 13
- 14
- 15
- 16
- 17
- 18
- 19
- 20
- 21
- 22
- 23
- 24
- 25
- 26
- 27
- 28
- 29
- 30
- 31
- 32
- 33
- 34
- 35
- 36
- 37
- 38
- 39
- 40
- 41
- 42
- 43
- 44
- 45
- 46
- 47
- 48
- 49
- 50
- 51
- 52
- 53
- 54
- 55
- 56
- 57
- 58
- 59
- 60
- 61
- 62
- 63
- 64
- 65
- 66
运行结果:
但是如果程序真的采用这种方式开发的话,内存的消耗会非常大。所以在一般的开发中不会使用到可滚动的结果集。
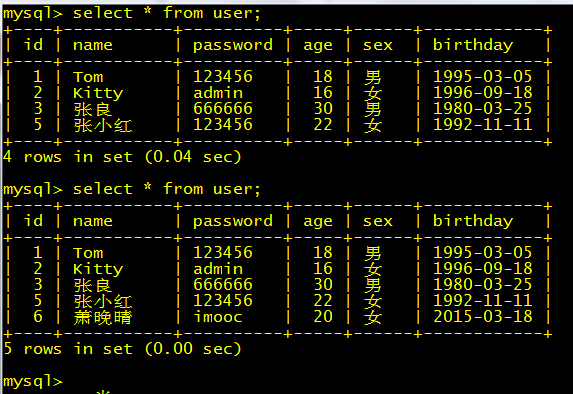
使用结果集插入数据
如果要想使用ResultSet插入数据,那么在创建数据库的操作的时候应该选择允许更新(ResultSet.CONCUR_UPDATABLE)。void moveToInsertRow() 方法将光标移动到插入行,再使用updateXXX方法进行列的更新,最后使用
void insertRow() 方法插入记录。
import java.sql.Connection;
import java.sql.DriverManager;
import java.sql.PreparedStatement;
import java.sql.ResultSet;
import java.sql.SQLException;

public class ResultSetInsertDemo {
    public static final String DRIVER = "org.gjt.mm.mysql.Driver";
    public static final String DBURL = "jdbc:mysql://localhost:3306/mldn";
    public static final String DBUSER = "root";
    public static final String DBPASSWORD = "mysqladmin";

    public static void main(String[] args) throws ClassNotFoundException,
            SQLException {
        Class.forName(DRIVER);
        Connection connection = DriverManager.getConnection(DBURL, DBUSER,
                DBPASSWORD);

        String sql = "select id,name,password,age,sex,birthday from user;";
        /* 结果集可更新 */
        PreparedStatement preparedStatement = connection.prepareStatement(sql,
                ResultSet.TYPE_SCROLL_SENSITIVE, ResultSet.CONCUR_UPDATABLE);
        ResultSet resultSet = preparedStatement.executeQuery();

        resultSet.moveToInsertRow();// 移动到插入行
        resultSet.updateString("name", "萧晚晴");
        resultSet.updateString("password", "imooc");
        resultSet.updateInt("age", 20);
        resultSet.updateString("sex", "女");
        resultSet.updateDate("birthday",
                new java.sql.Date(new java.util.Date().getTime()));
        resultSet.insertRow();// 真正提交数据

        resultSet.close();
        preparedStatement.close();
        connection.close();
    }

}
- 1
- 2
- 3
- 4
- 5
- 6
- 7
- 8
- 9
- 10
- 11
- 12
- 13
- 14
- 15
- 16
- 17
- 18
- 19
- 20
- 21
- 22
- 23
- 24
- 25
- 26
- 27
- 28
- 29
- 30
- 31
- 32
- 33
- 34
- 35
- 36
- 37
- 38
- 39
- 1
- 2
- 3
- 4
- 5
- 6
- 7
- 8
- 9
- 10
- 11
- 12
- 13
- 14
- 15
- 16
- 17
- 18
- 19
- 20
- 21
- 22
- 23
- 24
- 25
- 26
- 27
- 28
- 29
- 30
- 31
- 32
- 33
- 34
- 35
- 36
- 37
- 38
- 39
运行结果:
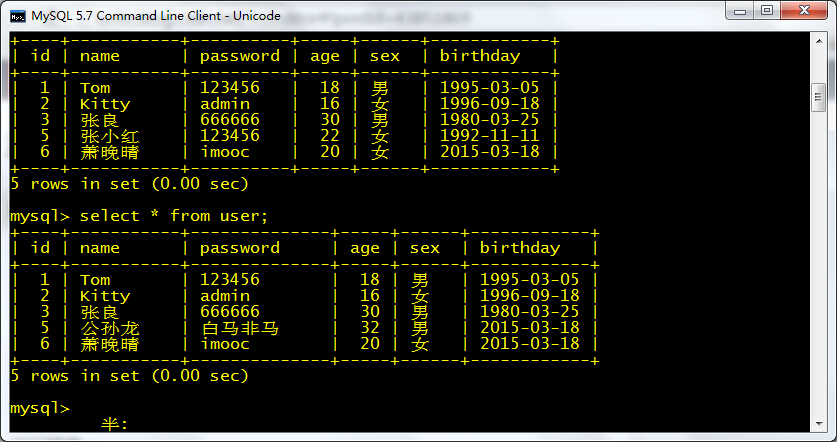
使用结果集更新数据
如果要使用结果集进行更新操作则首先要按照ID查询。。假设我们要更新数据库中id为5的记录,即:
| 5 | 张小红 | 123456 | 22 | 女 | 1992-11-11 |
- 1
- 1
import java.sql.Connection;
import java.sql.DriverManager;
import java.sql.PreparedStatement;
import java.sql.ResultSet;
import java.sql.SQLException;

public class ResultSetUpdateDemo {
    public static final String DRIVER = "org.gjt.mm.mysql.Driver";
    public static final String DBURL = "jdbc:mysql://localhost:3306/mldn";
    public static final String DBUSER = "root";
    public static final String DBPASSWORD = "mysqladmin";

    public static void main(String[] args) throws ClassNotFoundException,
            SQLException {
        Class.forName(DRIVER);
        Connection connection = DriverManager.getConnection(DBURL, DBUSER,
                DBPASSWORD);

        String sql = "select id,name,password,age,sex,birthday from user where id=?;";
        PreparedStatement preparedStatement = connection.prepareStatement(sql,
                ResultSet.TYPE_SCROLL_SENSITIVE, ResultSet.CONCUR_UPDATABLE);
        preparedStatement.setInt(1, 5);
        ResultSet resultSet = preparedStatement.executeQuery();

        resultSet.last();// 到达最后一行
        resultSet.updateString("name", "公孙龙");
        resultSet.updateString("password", "白马非马");
        resultSet.updateInt("age", 32);
        resultSet.updateString("sex", "男");
        resultSet.updateDate("birthday",
                new java.sql.Date(new java.util.Date().getTime()));
        resultSet.updateRow(); // 真正提交数据

        connection.close();
    }

}
- 1
- 2
- 3
- 4
- 5
- 6
- 7
- 8
- 9
- 10
- 11
- 12
- 13
- 14
- 15
- 16
- 17
- 18
- 19
- 20
- 21
- 22
- 23
- 24
- 25
- 26
- 27
- 28
- 29
- 30
- 31
- 32
- 33
- 34
- 35
- 36
- 37
- 38
- 1
- 2
- 3
- 4
- 5
- 6
- 7
- 8
- 9
- 10
- 11
- 12
- 13
- 14
- 15
- 16
- 17
- 18
- 19
- 20
- 21
- 22
- 23
- 24
- 25
- 26
- 27
- 28
- 29
- 30
- 31
- 32
- 33
- 34
- 35
- 36
- 37
- 38
运行结果:
如果在更新之前调用了void cancelRowUpdates() 方法则会取消更新。
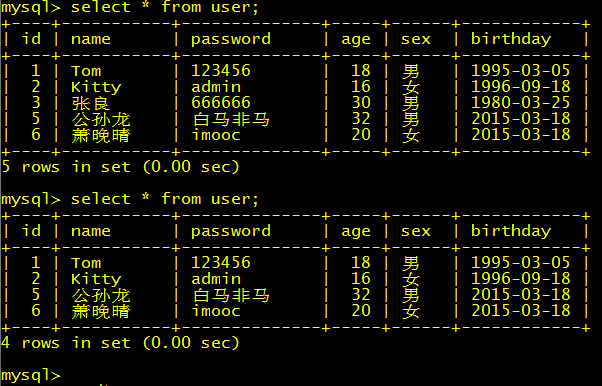
使用结果集删除数据
直接移动到需要删除的位置使用deleteRow() 方法即可。
例如删除id为3的记录。
import java.sql.Connection;
import java.sql.DriverManager;
import java.sql.PreparedStatement;
import java.sql.ResultSet;
import java.sql.SQLException;

public class ResultSetDeleteDemo {
    public static final String DRIVER = "org.gjt.mm.mysql.Driver";
    public static final String DBURL = "jdbc:mysql://localhost:3306/mldn";
    public static final String DBUSER = "root";
    public static final String DBPASSWORD = "mysqladmin";

    public static void main(String[] args) throws ClassNotFoundException,
            SQLException {
        Class.forName(DRIVER);
        Connection connection = DriverManager.getConnection(DBURL, DBUSER,
                DBPASSWORD);

        String sql = "select id,name,password,age,sex,birthday from user where id=?;";
        PreparedStatement preparedStatement = connection.prepareStatement(sql,
                ResultSet.TYPE_SCROLL_SENSITIVE, ResultSet.CONCUR_UPDATABLE);
        preparedStatement.setInt(1, 3);
        ResultSet resultSet = preparedStatement.executeQuery();

        resultSet.last();// 光标移动到最后一行
        resultSet.deleteRow();

        resultSet.close();
        preparedStatement.close();
        connection.close();
    }

}
- 1
- 2
- 3
- 4
- 5
- 6
- 7
- 8
- 9
- 10
- 11
- 12
- 13
- 14
- 15
- 16
- 17
- 18
- 19
- 20
- 21
- 22
- 23
- 24
- 25
- 26
- 27
- 28
- 29
- 30
- 31
- 32
- 33
- 1
- 2
- 3
- 4
- 5
- 6
- 7
- 8
- 9
- 10
- 11
- 12
- 13
- 14
- 15
- 16
- 17
- 18
- 19
- 20
- 21
- 22
- 23
- 24
- 25
- 26
- 27
- 28
- 29
- 30
- 31
- 32
- 33
但是在一般的开发中以上使用结果集的方式进行数据库的更新是不推荐使用的,不如直接使用PreparedStatement方便!
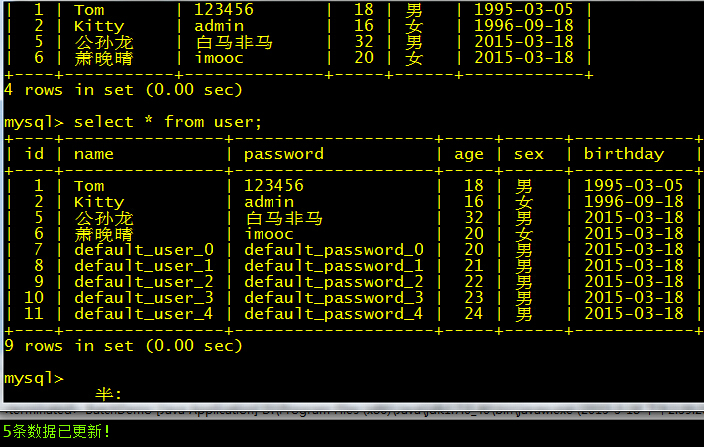
批处理
一次执行多条语句,一次提交。在PreparedStatement接口中有一个void addBatch() 方法——加入语句;
int[] executeBatch() 方法——执行批处理。
import java.sql.Connection;
import java.sql.DriverManager;
import java.sql.PreparedStatement;
import java.sql.SQLException;

public class BatchDemo {

    public static final String DRIVER = "org.gjt.mm.mysql.Driver";
    public static final String DBURL = "jdbc:mysql://localhost:3306/mldn";
    public static final String DBUSER = "root";
    public static final String DBPASSWORD = "mysqladmin";

    public static void main(String[] args) throws ClassNotFoundException,
            SQLException {
        Class.forName(DRIVER);
        Connection connection = DriverManager.getConnection(DBURL, DBUSER,
                DBPASSWORD);

        String sql = "insert into user(name,password,age,sex,birthday) values(?,?,?,?,?);";
        PreparedStatement preparedStatement = connection.prepareStatement(sql);
        for (int i = 0; i < 5; i++) {
            preparedStatement.setString(1, "default_user_" + i);
            preparedStatement.setString(2, "default_password_" + i);
            preparedStatement.setInt(3, 20 + i);
            preparedStatement.setString(4, "男");
            preparedStatement.setDate(5,
                    new java.sql.Date(new java.util.Date().getTime()));
            preparedStatement.addBatch();// 加入批处理,等待执行
        }
        int[] temp = preparedStatement.executeBatch();//执行批处理
        System.out.println(temp.length + "条数据已更新!");

        preparedStatement.close();
        connection.close();
    }

}
- 1
- 2
- 3
- 4
- 5
- 6
- 7
- 8
- 9
- 10
- 11
- 12
- 13
- 14
- 15
- 16
- 17
- 18
- 19
- 20
- 21
- 22
- 23
- 24
- 25
- 26
- 27
- 28
- 29
- 30
- 31
- 32
- 33
- 34
- 35
- 36
- 37
- 1
- 2
- 3
- 4
- 5
- 6
- 7
- 8
- 9
- 10
- 11
- 12
- 13
- 14
- 15
- 16
- 17
- 18
- 19
- 20
- 21
- 22
- 23
- 24
- 25
- 26
- 27
- 28
- 29
- 30
- 31
- 32
- 33
- 34
- 35
- 36
- 37
运行结果:
事务处理
事务:事务具有ACID【Atom原子性、Consistency一致性、Isolation隔离性、Durablility持久性】属性。
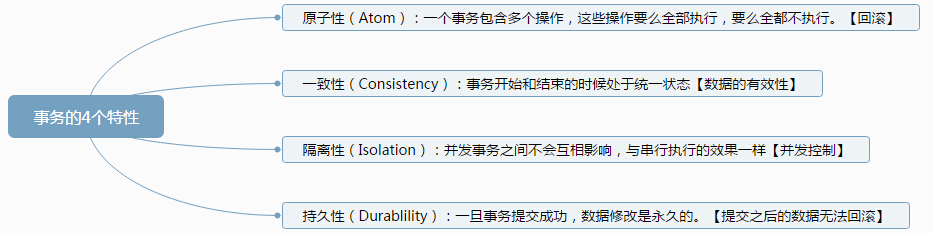
Atom:A转账和B接账分别是两个不可再分的操作,如果A的转账操作失败,那么B的接账操作也无法完成。

Consistency:如果A向B转账成功,则保持其一致性。如果A转账失败,则保持操作之前的一致性,即:A的钱不会减少,B的钱也不会增多。

MySQL对事务的支持
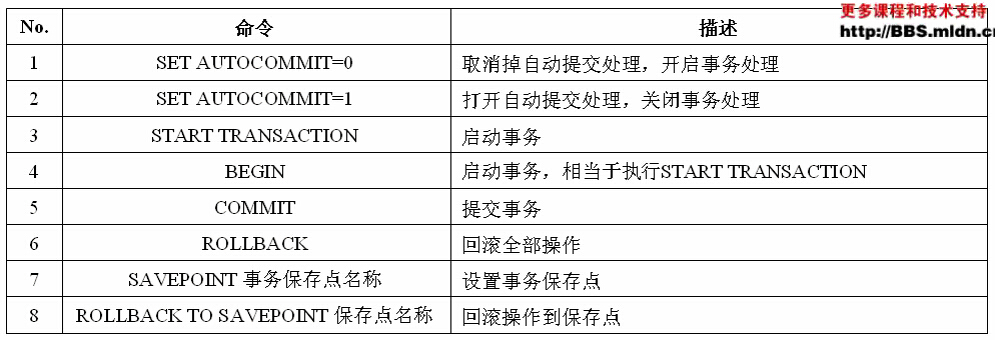
在MySQL中如果需要操作事务的话,必须按照以下的步骤完成:
1. 取消自动提交:每次执行数据库更新的时候发出SQL命令就已经提交上去了。
2. 开始事务。
3. 进行一系列的操作。
4. 如果操作全部合格则提交事务;如果发现有一个地方有问题则进行回滚或者设置SAVEPOINT保存事务的提交点。
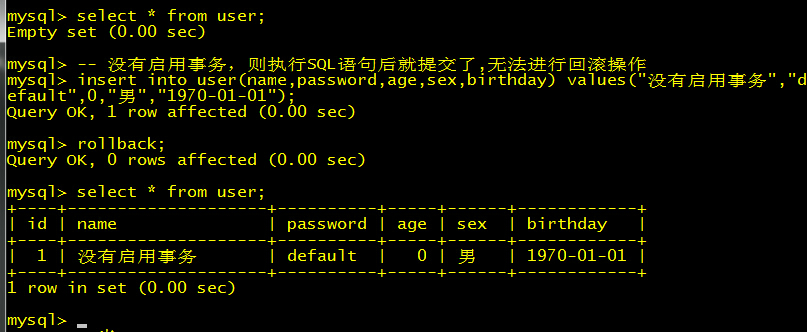
-- 没有启用事务,则执行SQL语句后就提交了,无法进行回滚操作
insert into user(name,password,age,sex,birthday) values("没有启用事务","default",0,"男","1970-01-01");
select * from user;
- 1
- 2
- 3
- 1
- 2
- 3
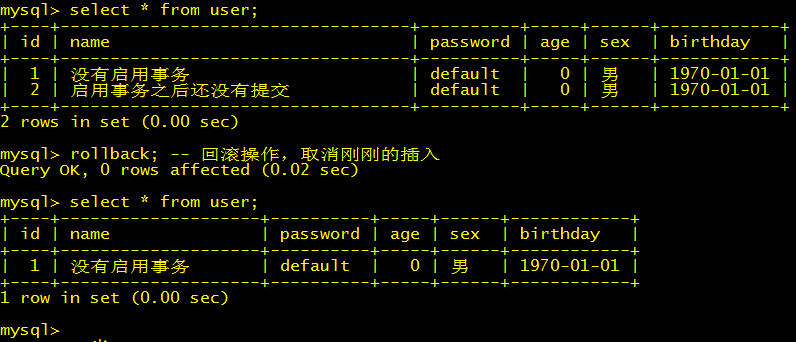
-- 启用事务,刚刚插入的数据可以回滚
set autocommit=0; -- 取消自动提交,开启事务
begin;  -- 开始事务
insert into user(name,password,age,sex,birthday) values("启用事务之后还没有提交","default",0,"男","1970-01-01");
select * from user;
rollback; -- 回滚操作,取消刚刚的插入
select * from user;
- 1
- 2
- 3
- 4
- 5
- 6
- 7
- 1
- 2
- 3
- 4
- 5
- 6
- 7
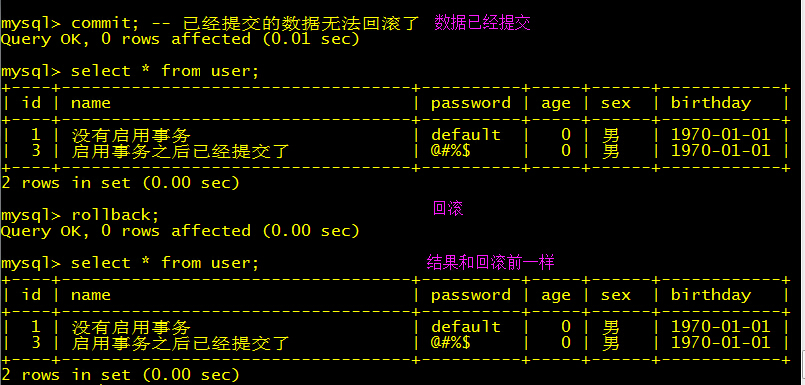
begin;
insert into user(name,password,age,sex,birthday) values("启用事务之后已经提交了","@#%$",0,"男","1970-01-01");
select * from user;
commit; -- 已经提交的数据无法回滚了【永久保存了】
select * from user;
rollback;
select * from user;
- 1
- 2
- 3
- 4
- 5
- 6
- 7
- 1
- 2
- 3
- 4
- 5
- 6
- 7
JDBC事务操作的步骤
先来看一下不使用事务处理的情况:
import java.sql.Connection;
import java.sql.DriverManager;
import java.sql.SQLException;
import java.sql.Statement;

public class TranDemo01 {

        public static final String DRIVER = "org.gjt.mm.mysql.Driver";
        public static final String DBURL = "jdbc:mysql://localhost:3306/mldn";
        public static final String DBUSER = "root";
        public static final String DBPASSWORD = "mysqladmin";

    public static void main(String[] args) throws ClassNotFoundException, SQLException {
        Class.forName(DRIVER);
        Connection connection = DriverManager.getConnection(DBURL, DBUSER, DBPASSWORD);

        Statement statement = connection.createStatement();
        statement.addBatch("INSERT INTO user(name,password,age,sex,birthday)" +
                " VALUES ('user_1','hello_1',1,'女','1970-01-01') ;");
        statement.addBatch("INSERT INTO user(name,password,age,sex,birthday)" +
                " VALUES ('user_2','hello_2',2,'男','1970-02-02') ;");

        /*注意:这一条语句插入的name字段多加了一个引号,不符合SQL语法,肯定是错误的*/
        statement.addBatch("INSERT INTO user(name,password,age,sex,birthday)" +
                " VALUES ('user_'3','hello_3',3,'女','1970-03-03') ;");

        statement.addBatch("INSERT INTO user(name,password,age,sex,birthday) " +
                "VALUES ('user_4','hello_4',4,'女','1970-04-04') ;");
        statement.addBatch("INSERT INTO user(name,password,age,sex,birthday) " +
                "VALUES ('user_5','hello_5',5,'男','1970-05-05') ;");
        int[]temp = statement.executeBatch();
        System.out.println(temp.length+"条数据已更新!");
        statement.close();

        connection.close();
    }

}
- 1
- 2
- 3
- 4
- 5
- 6
- 7
- 8
- 9
- 10
- 11
- 12
- 13
- 14
- 15
- 16
- 17
- 18
- 19
- 20
- 21
- 22
- 23
- 24
- 25
- 26
- 27
- 28
- 29
- 30
- 31
- 32
- 33
- 34
- 35
- 36
- 37
- 38
- 1
- 2
- 3
- 4
- 5
- 6
- 7
- 8
- 9
- 10
- 11
- 12
- 13
- 14
- 15
- 16
- 17
- 18
- 19
- 20
- 21
- 22
- 23
- 24
- 25
- 26
- 27
- 28
- 29
- 30
- 31
- 32
- 33
- 34
- 35
- 36
- 37
- 38
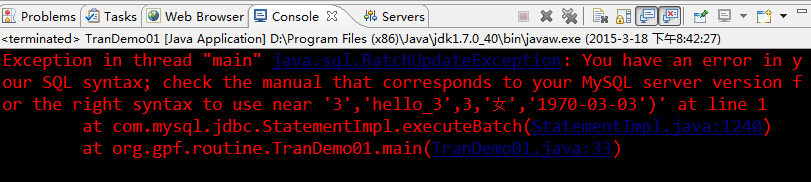
运行结果:
查看数据库:
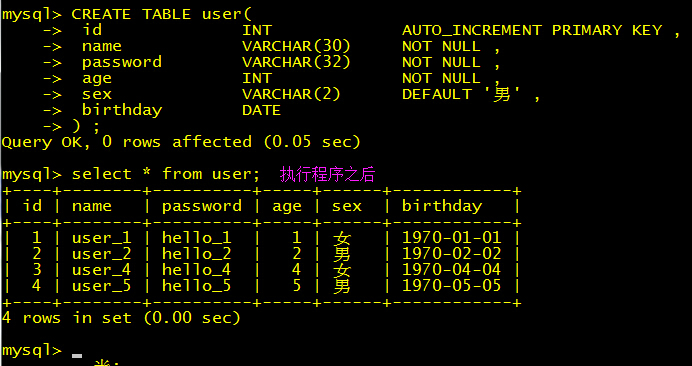
程序在执行插入第三条记录的时候出现了异常,但是在异常之后插入命令依然执行了。
如果现在要求要么全部插入,要么不插入——这样的需求就需要使用到数据库中事务的概念。
在JDBC中使用事务需要进行如下的步骤:
1. 取消Connection的自动提交方式coon.setAutocommit(false);
2. 如果批处理执行成功则提交事务:coon.commit();,操作失败则会出现异常,在异常处理代码中执行回滚(catch语句块):coon.rollback();
3. 可以设置Savepoint:SavePoint sp = coon.setSavePoint();设置回滚点。
import java.sql.Connection;
import java.sql.DriverManager;
import java.sql.SQLException;
import java.sql.Statement;
public class TranDemo01 {
public static final String DRIVER = "org.gjt.mm.mysql.Driver";
public static final String DBURL = "jdbc:mysql://localhost:3306/mldn";
public static final String DBUSER = "root";
public static final String DBPASSWORD = "mysqladmin";
public static void main(String[] args) throws ClassNotFoundException,
SQLException {
Class.forName(DRIVER);
Connection connection = DriverManager.getConnection(DBURL, DBUSER,
DBPASSWORD);
connection.setAutoCommit(false);// 取消自动提交
Statement statement = connection.createStatement();
statement.addBatch("INSERT INTO user(name,password,age,sex,birthday)"
+ " VALUES ('user_1','hello_1',1,'女','1970-01-01') ;");
statement.addBatch("INSERT INTO user(name,password,age,sex,birthday)"
+ " VALUES ('user_2','hello_2',2,'男','1970-02-02') ;");
/* 注意:这一条语句插入的name字段多加了一个引号,不符合SQL语法,肯定是错误的 */
statement.addBatch("INSERT INTO user(name,password,age,sex,birthday)"
+ " VALUES ('user_'3','hello_3',3,'女','1970-03-03') ;");
statement.addBatch("INSERT INTO user(name,password,age,sex,birthday) "
+ "VALUES ('user_4','hello_4',4,'女','1970-04-04') ;");
statement.addBatch("INSERT INTO user(name,password,age,sex,birthday) "
+ "VALUES ('user_5','hello_5',5,'男','1970-05-05') ;");
/* 事务处理 */
try {
int[] temp = statement.executeBatch();//执行批处理的时候可能有异常
System.out.println(temp.length + "条数据已更新!");
connection.commit();// 所有操作成功,则提交
} catch (Exception e) {
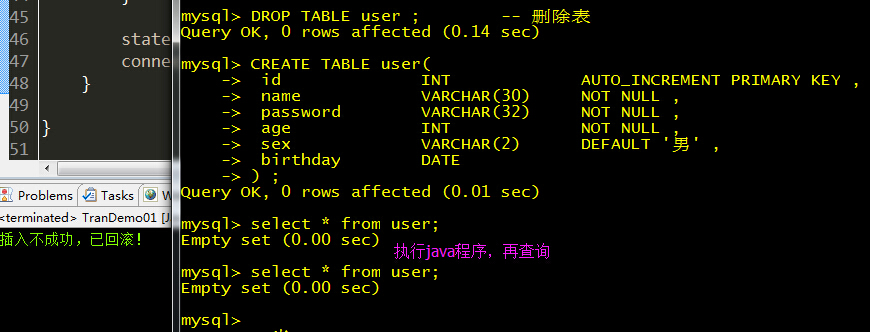
System.out.println("插入不成功,已回滚!");
connection.rollback();// 发生了异常就表示不是全部插入成功,回滚
}
statement.close();
connection.close();
}
}
- 1
- 2
- 3
- 4
- 5
- 6
- 7
- 8
- 9
- 10
- 11
- 12
- 13
- 14
- 15
- 16
- 17
- 18
- 19
- 20
- 21
- 22
- 23
- 24
- 25
- 26
- 27
- 28
- 29
- 30
- 31
- 32
- 33
- 34
- 35
- 36
- 37
- 38
- 39
- 40
- 41
- 42
- 43
- 44
- 45
- 46
- 47
- 48
- 49
- 1
- 2
- 3
- 4
- 5
- 6
- 7
- 8
- 9
- 10
- 11
- 12
- 13
- 14
- 15
- 16
- 17
- 18
- 19
- 20
- 21
- 22
- 23
- 24
- 25
- 26
- 27
- 28
- 29
- 30
- 31
- 32
- 33
- 34
- 35
- 36
- 37
- 38
- 39
- 40
- 41
- 42
- 43
- 44
- 45
- 46
- 47
- 48
- 49
运行结果:
有回退点的事务处理
例如一个Session的操作(每一个连接到数据库上的用户都称为一个Session):
操作1
操作2
SAVEPOINT 记录点1
操作3
操作4
rollback 记录点1 // 仅仅回滚3和4保留1,2
- 1
- 2
- 3
- 4
- 5
- 6
- 1
- 2
- 3
- 4
- 5
- 6
例如:
import java.sql.Connection;
import java.sql.DriverManager;
import java.sql.SQLException;
import java.sql.Savepoint;
import java.sql.Statement;

public class TranDemo03 {

        public static final String DRIVER = "org.gjt.mm.mysql.Driver";
        public static final String DBURL = "jdbc:mysql://localhost:3306/mldn";
        public static final String DBUSER = "root";
        public static final String DBPASSWORD = "mysqladmin";

    public static void main(String[] args) throws ClassNotFoundException, SQLException {
        Class.forName(DRIVER);
        Connection connection = DriverManager.getConnection(DBURL, DBUSER, DBPASSWORD);
        connection.setAutoCommit(false);// 取消自动提交

        Statement statement = connection.createStatement();
        statement.executeUpdate("INSERT INTO user(name,password,age,sex,birthday)" +
                " VALUES ('user_1','hello_1',1,'女','1970-01-01') ;");
        statement.executeUpdate("INSERT INTO user(name,password,age,sex,birthday)" +
                " VALUES ('user_2','hello_2',2,'男','1970-02-02') ;");

        Savepoint sp = connection.setSavepoint();//设置回滚的记录点

        statement.executeUpdate("INSERT INTO user(name,password,age,sex,birthday)" +
                " VALUES ('user_3','hello_3',3,'女','1970-03-03') ;");
        statement.executeUpdate("INSERT INTO user(name,password,age,sex,birthday) " +
                "VALUES ('user_4','hello_4',4,'女','1970-04-04') ;");

        connection.rollback(sp);//回滚到记录点,实际上只保存了前两条数据
        connection.commit();//提交事务

        statement.close();
        connection.close();
    }

}
- 1
- 2
- 3
- 4
- 5
- 6
- 7
- 8
- 9
- 10
- 11
- 12
- 13
- 14
- 15
- 16
- 17
- 18
- 19
- 20
- 21
- 22
- 23
- 24
- 25
- 26
- 27
- 28
- 29
- 30
- 31
- 32
- 33
- 34
- 35
- 36
- 37
- 38
- 39
- 1
- 2
- 3
- 4
- 5
- 6
- 7
- 8
- 9
- 10
- 11
- 12
- 13
- 14
- 15
- 16
- 17
- 18
- 19
- 20
- 21
- 22
- 23
- 24
- 25
- 26
- 27
- 28
- 29
- 30
- 31
- 32
- 33
- 34
- 35
- 36
- 37
- 38
- 39
运行结果:

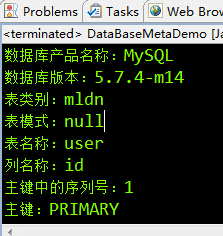
使用元数据分析数据库
DatabaseMetaDate
使用元数据可以分析数据库的基本信息,包括版本、数据库的名称、得到指定表的主键。
import java.sql.Connection;
import java.sql.DatabaseMetaData;
import java.sql.DriverManager;
import java.sql.ResultSet;
import java.sql.SQLException;

public class DataBaseMetaDemo {

    public static final String DRIVER = "org.gjt.mm.mysql.Driver";
    public static final String DBURL = "jdbc:mysql://localhost:3306/mldn";
    public static final String DBUSER = "root";
    public static final String DBPASSWORD = "mysqladmin";

    public static void main(String[] args) throws ClassNotFoundException,
            SQLException {
        Class.forName(DRIVER);
        Connection connection = DriverManager.getConnection(DBURL, DBUSER,
                DBPASSWORD);

        DatabaseMetaData databaseMetaData = connection.getMetaData();// 得到数据库的元数据对象
        System.out.println("数据库产品名称:"
                + databaseMetaData.getDatabaseProductName());
        System.out.println("数据库版本:"
                + databaseMetaData.getDatabaseProductVersion());
        ResultSet resultSet = databaseMetaData.getPrimaryKeys(null, null,
                "user");// 得到user表的主键
        while (resultSet.next()) {
            System.out.println("表类别:" + resultSet.getString(1));
            System.out.println("表模式:" + resultSet.getString(2));
            System.out.println("表名称:" + resultSet.getString(3));
            System.out.println("列名称:" + resultSet.getString(4));
            System.out.println("主键中的序列号:" + resultSet.getString(5));
            System.out.println("主键:" + resultSet.getString(6));
        }

        connection.close();
    }

}
- 1
- 2
- 3
- 4
- 5
- 6
- 7
- 8
- 9
- 10
- 11
- 12
- 13
- 14
- 15
- 16
- 17
- 18
- 19
- 20
- 21
- 22
- 23
- 24
- 25
- 26
- 27
- 28
- 29
- 30
- 31
- 32
- 33
- 34
- 35
- 36
- 37
- 38
- 39
- 1
- 2
- 3
- 4
- 5
- 6
- 7
- 8
- 9
- 10
- 11
- 12
- 13
- 14
- 15
- 16
- 17
- 18
- 19
- 20
- 21
- 22
- 23
- 24
- 25
- 26
- 27
- 28
- 29
- 30
- 31
- 32
- 33
- 34
- 35
- 36
- 37
- 38
- 39
运行结果:
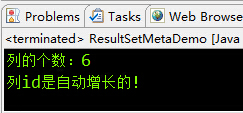
ResultSetMetaDate
import java.sql.Connection;
import java.sql.DriverManager;
import java.sql.PreparedStatement;
import java.sql.ResultSet;
import java.sql.ResultSetMetaData;
import java.sql.SQLException;

public class ResultSetMetaDemo {

    public static final String DRIVER = "org.gjt.mm.mysql.Driver";
    public static final String DBURL = "jdbc:mysql://localhost:3306/mldn";
    public static final String DBUSER = "root";
    public static final String DBPASSWORD = "mysqladmin";

    public static void main(String[] args) throws ClassNotFoundException,
            SQLException {
        Class.forName(DRIVER);
        Connection connection = DriverManager.getConnection(DBURL, DBUSER,
                DBPASSWORD);
        String sql = "select id,name,password,age,sex,birthday from user;";
        PreparedStatement preparedStatement = connection.prepareStatement(sql);
        ResultSet resultSet = preparedStatement.executeQuery();

        ResultSetMetaData resultSetMetaData = preparedStatement.getMetaData();
        System.out.println("列的个数:" + resultSetMetaData.getColumnCount());
        if (resultSetMetaData.isAutoIncrement(1)) {
            System.out.println("列" + resultSetMetaData.getColumnName(1)
                    + "是自动增长的!");
        }

        resultSet.close();
        preparedStatement.close();
        connection.close();
    }

}
- 1
- 2
- 3
- 4
- 5
- 6
- 7
- 8
- 9
- 10
- 11
- 12
- 13
- 14
- 15
- 16
- 17
- 18
- 19
- 20
- 21
- 22
- 23
- 24
- 25
- 26
- 27
- 28
- 29
- 30
- 31
- 32
- 33
- 34
- 35
- 36
- 1
- 2
- 3
- 4
- 5
- 6
- 7
- 8
- 9
- 10
- 11
- 12
- 13
- 14
- 15
- 16
- 17
- 18
- 19
- 20
- 21
- 22
- 23
- 24
- 25
- 26
- 27
- 28
- 29
- 30
- 31
- 32
- 33
- 34
- 35
- 36
运行结果:
使用JDBC连接Oracle
配置JDBC驱动
一般来说比较大型的数据库都会配置数据库的开发包。jdbc驱动程序位于:D:\app\oracleuser\product\12.1.0\dbhome_1\jdbc\lib目录。该目录下有很多的jar包。我们可以根据JDK版本的不同选择不同的驱动程序。在classpath上配置此jar包或者在Eclipse中选择add to BuildPath。
public class ConnetToOracle {

    private static final String DRIVER = "oracle.jdbc.driver.OracleDriver";
    private static final String DB_URL = "jdbc:oracle:thin:@localhost:1521:test";
    private static final String DB_USER = "c##scott";
    private static final String DB_PASSWORD = "tiger";

    public static void main(String[] args) throws ClassNotFoundException, SQLException {

        Class.forName(DRIVER);
        Connection conn = DriverManager.getConnection(DB_URL, DB_USER, DB_PASSWORD);
        String sql = "SELECT * FROM emp";
        PreparedStatement pstmt = conn.prepareStatement(sql);
        ResultSet rs = pstmt.executeQuery();
        while (rs.next()) {
            int empno = rs.getInt(1);
            String ename = rs.getString(2);
            String job = rs.getString(3);
            int mgr = rs.getInt(4);
            Date hiredate = rs.getDate(5);
            float sal = rs.getFloat(6);
            float comm = rs.getFloat(7);
            int deptno = rs.getInt(8);
            System.out.println("编号:" + empno +",姓名:" +ename +",职位:" + job + ",管理员编号:" + mgr + ",雇佣日期:" + hiredate + ",基本工资:" + sal + ",奖金:" + comm + ",部门编号:" + deptno) ;
        }
    }

}public class ConnetToOracle {

    private static final String DRIVER = "oracle.jdbc.driver.OracleDriver";
    private static final String DB_URL = "jdbc:oracle:thin:@localhost:1521:test";
    private static final String DB_USER = "c##scott";
    private static final String DB_PASSWORD = "tiger";

    public static void main(String[] args) throws ClassNotFoundException {

        Class.forName(DRIVER);
        Connection conn = null;
        try {
            conn = DriverManager.getConnection(DB_URL, DB_USER, DB_PASSWORD);
            String sql = "SELECT * FROM emp";
            PreparedStatement pstmt = conn.prepareStatement(sql);
            ResultSet rs = pstmt.executeQuery();
            while (rs.next()) {
                int empno = rs.getInt(1);
                String ename = rs.getString(2);
                String job = rs.getString(3);
                int mgr = rs.getInt(4);
                Date hiredate = rs.getDate(5);
                float sal = rs.getFloat(6);
                float comm = rs.getFloat(7);
                int deptno = rs.getInt(8);
                System.out.println("编号:" + empno +",姓名:" +ename +",职位:" + job + ",管理员编号:" + mgr + ",雇佣日期:" + hiredate + ",基本工资:" + sal + ",奖金:" + comm + ",部门编号:" + deptno) ;
            }
        } catch (SQLException e) {
            e.printStackTrace();
        }finally{
            try {
                conn.close();
            } catch (SQLException e) {
                e.printStackTrace();
            }
        }

    }

}
- 1
- 2
- 3
- 4
- 5
- 6
- 7
- 8
- 9
- 10
- 11
- 12
- 13
- 14
- 15
- 16
- 17
- 18
- 19
- 20
- 21
- 22
- 23
- 24
- 25
- 26
- 27
- 28
- 29
- 30
- 31
- 32
- 33
- 34
- 35
- 36
- 37
- 38
- 39
- 40
- 41
- 42
- 43
- 44
- 45
- 46
- 47
- 48
- 49
- 50
- 51
- 52
- 53
- 54
- 55
- 56
- 57
- 58
- 59
- 60
- 61
- 62
- 63
- 64
- 65
- 66
- 67


 1109
1109


 被折叠的 条评论
为什么被折叠?
被折叠的 条评论
为什么被折叠?
 到【灌水乐园】发言


