


JDBC核心技术
JDBC概述
-
JDBC(Java database Connectivity)是一个独立于特定数据管理系统、通用的 SQL 数据库存取和操作的公共接口
-
JDBC为访问不同的数据库提供了一种统一的途径,为开发者屏蔽了一些细节问题。
-
JDBC的目标是使Java程序员使用JDBC可以连接任何提供了JDBC驱动程序的数据库系统,这样就使得程序员无需对特定的数据库系统的特点有过多的了解,从而大大简化和加快了开发过程。
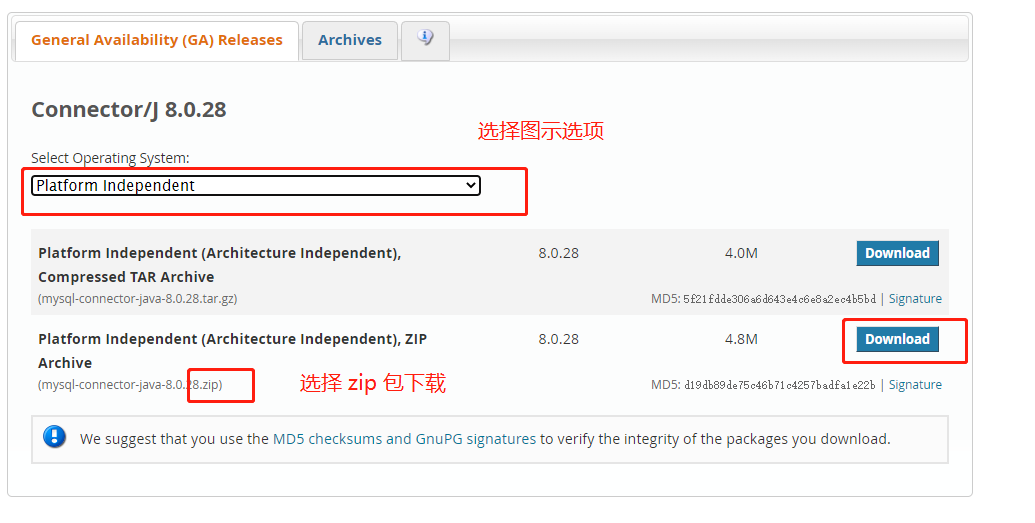
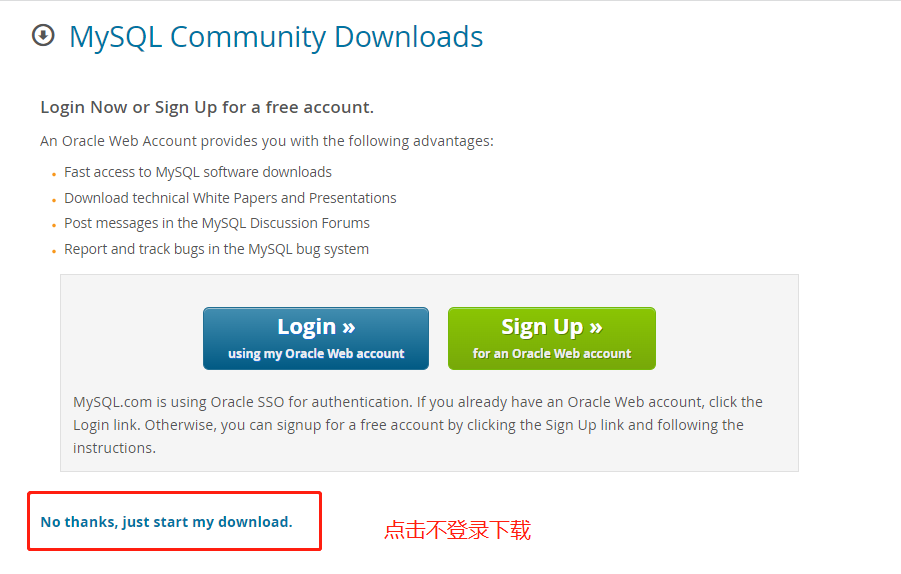
驱动下载和引用
首先进入官方地址
https://dev.mysql.com/downloads/connector/j/
[外链图片转存失败,源站可能有防盗链机制,建议将图片保存下来直接上传(img-tV8kgTs2-1647415848379)(https://cdn.jsdelivr.net/gh/SongZX0106/pictures/images/%E5%BE%AE%E4%BF%A1%E6%88%AA%E5%9B%BE_20220304132629.png)]
打开 idea 在项目目录新建一个文件夹,并起名为 lib
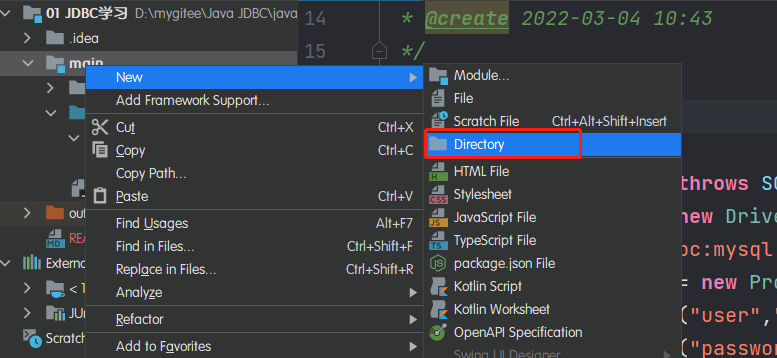
然后将上面复制的 jar 包粘贴到该文件夹下,点击OK
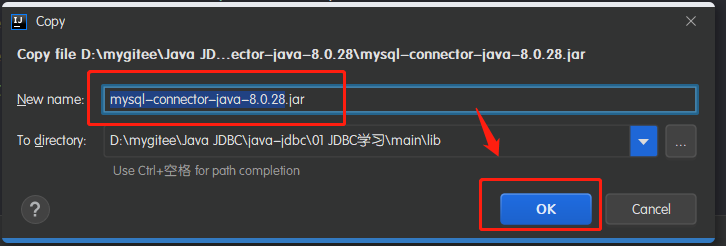
然后再 jar 包上右键选择 Add as Libary
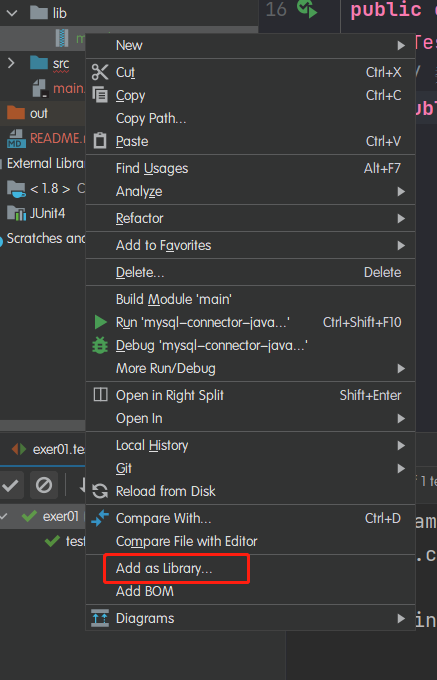
点击OK完成驱动导入
[外链图片转存失败,源站可能有防盗链机制,建议将图片保存下来直接上传(img-RN8V97SR-1647415848381)(https://cdn.jsdelivr.net/gh/SongZX0106/pictures/images/%E5%BE%AE%E4%BF%A1%E6%88%AA%E5%9B%BE_20220304133458.png)]
连接数据库
方式一
@Test
// 数据库链接方式一
public void test1() throws SQLException {
    Driver driver = new Driver();
    /*
        * jdbc:mysql: 协议
        * localhost 数据库地址
        * 3306 端口
        * test 要连接的数据库名称
        * */
    String url = "jdbc:mysql://localhost:3306/test";
    Properties info = new Properties();
    // 输入登录用户名
    info.setProperty("user","root");
    // 输入登录密码
    info.setProperty("password","abc123");
    Connection connect = driver.connect(url, info);
    // 连接成功后会打印出一个地址
    System.out.println(connect); //=> com.mysql.cj.jdbc.ConnectionImpl@693fe6c9
}
方式二
@Test
// 连接方式二:对方式一的迭代
public void test2() throws Exception {
    Class<?> aClass = Class.forName("com.mysql.cj.jdbc.Driver");
    Driver driver = (Driver) aClass.newInstance();

    String url = "jdbc:mysql://localhost:3306/test";
    Properties info = new Properties();
    // 输入登录用户名
    info.setProperty("user","root");
    // 输入登录密码
    info.setProperty("password","abc123");
    Connection connect = driver.connect(url, info);
    // 连接成功后会打印出一个地址
    System.out.println(connect); //=> com.mysql.cj.jdbc.ConnectionImpl@693fe6c9
}
方式三
// 连接方式三
public void test3() throws Exception{
    // 1.获取 Driver 实现类对象
    Class<?> aClass = Class.forName("com.mysql.cj.jdbc.Driver");
    Driver driver = (Driver) aClass.newInstance();

    // 2.提供三个连接的基本信息
    String url = "jdbc:mysql://127.0.0.1:3306/test";
    String user = "root";
    String password = "abc123";

    // 3.注册驱动
    DriverManager.registerDriver(driver);

    // 4.获取连接
    Connection connection = DriverManager.getConnection(url, user, password);
    System.out.println(connection);
}
方式四
这种方式省略了注册驱动的过程,这是因为 Driver 类中有一个静态代码块,里面帮我们写了注册的逻辑,在类加载时自动触发
// 连接四
public void test4() throws Exception {
    // 1.连接的三个基本信息
    String url = "jdbc:mysql://127.0.0.1:3306/test";
    String user = "root";
    String password = "abc123";

    // 2.获取 driver 运行时类
    Class.forName("com.mysql.cj.jdbc.Driver");

    // 3.获取连接
    Connection connection = DriverManager.getConnection(url, user, password);
    System.out.println(connection);
}
方式五:最终版
通过读取配置文件的方式优点
- 对代码内容进行解耦,通过修改配置文件就可以实现数据库连接的修改
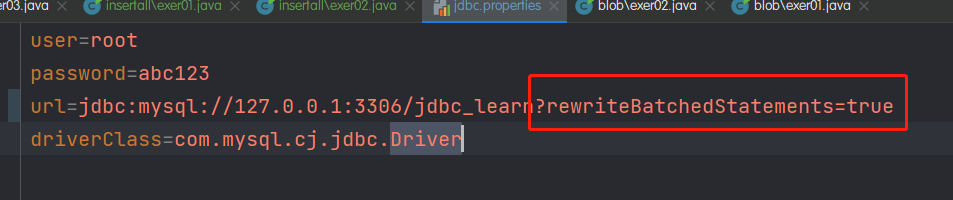
首先新建配置文件
user=root
password=abc123
url=jdbc:mysql://127.0.0.1:3306/jdbc_learn
driverClass=com.mysql.cj.jdbc.Driver
然后编写代码测试连接
@Test
// 最终版本,通过读取配置文件的方式获取连接
public void test5() throws  Exception{
    // 1.获取配置信息
    Properties properties = new Properties();
    FileInputStream fis = new FileInputStream("lib/jdbc.properties");
    properties.load(fis);

    // 2.连接的三个基本信息
    String url = properties.getProperty("url");
    String user = properties.getProperty("user");
    String password = properties.getProperty("password");

    // 3.获取 driver 运行时类
    Class.forName(properties.getProperty("driverClass"));

    // 4.获取连接
    Connection connection = DriverManager.getConnection(url, user, password);
    System.out.println(connection);
}
使用 prepareStatement 插入数据
package com.songzx.jdbc;

import java.io.FileInputStream;
import java.io.IOException;
import java.sql.*;
import java.text.ParseException;
import java.text.SimpleDateFormat;
import java.util.Properties;

/**
 * @author songzx
 * @create 2022-03-04 17:40
 */
public class exer02 {
    // 插入数据操作
    public static void main(String[] args){
        Connection conn = null;
        PreparedStatement pst = null;
        try {
            // 1.获取配置信息
            Properties properties = new Properties();
            FileInputStream fis = new FileInputStream("main/lib/jdbc.properties");
            properties.load(fis);

            // 2.连接的三个基本信息
            String url = properties.getProperty("url");
            String user = properties.getProperty("user");
            String password = properties.getProperty("password");

            // 3.获取 driver 运行时类
            Class.forName(properties.getProperty("driverClass"));

            // 4.获取连接
            conn = DriverManager.getConnection(url, user, password);

            // 5.预编译 SQL 语句,
            String sql = "INSERT INTO customers(`name`,email,birth) VALUES (?,?,?)";
            // 获取 prepareStatement 实例
            pst = conn.prepareStatement(sql);

            // 6.填充占位符,这里的下标是从1开始的
            pst.setString(1,"哪吒");
            pst.setString(2,"nezha@163.com");

            SimpleDateFormat sdf = new SimpleDateFormat("yyyy-MM-dd");
            java.util.Date date = sdf.parse("2000-01-06");
            pst.setDate(3,new Date(date.getTime()));

            // 7.执行操作
            pst.execute();
        } catch (IOException e) {
            e.printStackTrace();
        } catch (ClassNotFoundException e) {
            e.printStackTrace();
        } catch (SQLException throwables) {
            throwables.printStackTrace();
        } catch (ParseException e) {
            e.printStackTrace();
        } finally {
            // 8.关闭资源
            try {
                if(conn!=null){
                    conn.close();
                }
            } catch (SQLException throwables) {
                throwables.printStackTrace();
            }
            try {
                if(pst!=null){
                    pst.close();
                }
            } catch (SQLException throwables) {
                throwables.printStackTrace();
            }
        }
    }
}
封装 SQL 连接方法和关闭方法
package com.songzx.util;

import java.io.FileInputStream;
import java.sql.Connection;
import java.sql.DriverManager;
import java.sql.SQLException;
import java.sql.Statement;
import java.util.Properties;

/**
 * 封装链接 sql 的方法和关闭的方法
 * @author songzx
 * @create 2022-03-05 21:31
 */
public class JdbcUtils {
    public static Connection getConnection() throws Exception{
        // 1.获取配置信息
        Properties properties = new Properties();
        FileInputStream fis = new FileInputStream("main/lib/jdbc.properties");
        properties.load(fis);

        // 2.连接的三个基本信息
        String url = properties.getProperty("url");
        String user = properties.getProperty("user");
        String password = properties.getProperty("password");

        // 3.获取 driver 运行时类
        Class.forName(properties.getProperty("driverClass"));

        // 4.获取连接
        Connection connection = DriverManager.getConnection(url, user, password);

        return connection;
    }

    public static void closeConnection(Connection conn, Statement pst){
        try {
            if(conn!=null){
                conn.close();
            }
        } catch (SQLException throwables) {
            throwables.printStackTrace();
        }
        try {
            if(pst!=null){
                pst.close();
            }
        } catch (SQLException throwables) {
            throwables.printStackTrace();
        }
    }
}
更新数据
使用封装后的方法,简化代码操作
// 修改数据
public static void main(String[] args) throws Exception {
    // 创建连接
    Connection conn = JdbcUtils.getConnection();
    // 预编译sql
    String sql = "UPDATE customers SET `name` = ? WHERE id = ?";
    PreparedStatement pst = conn.prepareStatement(sql);
    pst.setString(1,"莫扎特");
    pst.setInt(2,18);
    // 执行
    pst.execute();
    // 关闭
    JdbcUtils.closeConnection(conn,pst);
}
封装一个通用的执行 SQL 方法
// 封装一个通用的执行SQL方法
public static void executeSql(String sql,Object ...arg) {
    Connection conn = null;
    PreparedStatement pst = null;
    try {
        // 连接
        conn = JdbcUtils.getConnection();
        // 预编译sql
        pst = conn.prepareStatement(sql);
        // 遍历参数
        for (int i = 0; i < arg.length; i++) {
            pst.setObject(i+1,arg[i]);
        }
        pst.execute();
    } catch (Exception e) {
        e.printStackTrace();
    } finally {
        // 关闭
        JdbcUtils.closeConnection(conn,pst);
    }
}
使用上面封装的方法删除数据
public static void main(String[] args) {
    // 使用封装的通用方法,删除表中数据
    String sql = "DELETE FROM customers WHERE id = ?";
    JdbcUtils.executeSql(sql,3);
}
使用上面的方法更新数据
public static void main(String[] args) {
    String sql2 = "UPDATE `order` SET order_name = ? WHERE order_id = ?";
	JdbcUtils.executeSql(sql2,"DD",2);
}
执行查询方法
首先新建一个对应 customers 表的 Customers类
package com.songzx.bean;

import java.sql.Date;

/**
 * 对应Custom表
 * @author songzx
 * @create 2022-03-05 22:39
 */
public class Customers {
    int id;
    String name;
    String email;
    Date birth;

    public Customers() {
    }

    public Customers(int id, String name, String email, Date birth) {
        this.id = id;
        this.name = name;
        this.email = email;
        this.birth = birth;
    }

    public int getId() {
        return id;
    }

    public void setId(int id) {
        this.id = id;
    }

    public String getName() {
        return name;
    }

    public void setName(String name) {
        this.name = name;
    }

    public String getEmail() {
        return email;
    }

    public void setEmail(String email) {
        this.email = email;
    }

    public Date getBirth() {
        return birth;
    }

    public void setBirth(Date birth) {
        this.birth = birth;
    }

    @Override
    public String toString() {
        return "Customers{" +
                "id=" + id +
                ", name='" + name + '\'' +
                ", email='" + email + '\'' +
                ", birth=" + birth +
                '}';
    }
}
在 JdbcUtils 中添加重载的关闭方法,增加一个参数
// 重载方法封装关闭方法
public static void closeConnection(Connection conn, Statement pst,ResultSet res){
    try {
        if(conn!=null){
            conn.close();
        }
    } catch (SQLException throwables) {
        throwables.printStackTrace();
    }
    try {
        if(pst!=null){
            pst.close();
        }
    } catch (SQLException throwables) {
        throwables.printStackTrace();
    }
    try {
        if(res!=null){
            res.close();
        }
    } catch (SQLException throwables) {
        throwables.printStackTrace();
    }
}
处理结果集获取返回值
调用 pst.executeQuery() 方法返回一个结果集
public static void main(String[] args) throws Exception {
    // 连接
    Connection conn = JdbcUtils.getConnection();
    // 预编译sql
    String sql = "select id,name,email,birth from customers where id = ?";
    PreparedStatement pst = conn.prepareStatement(sql);
    pst.setInt(1,1);

    // 处理结果集
    ResultSet resultSet = pst.executeQuery();

    // 获取结果
    // next():判断结果集的下一条是否有数据,如果有数据则返回true并往下继续判断,否则返回false
    if (resultSet.next()){
        // 调用 resultSet.getXXX 方法获取对应的查询列
        int id = resultSet.getInt(1);
        String name = resultSet.getString(2);
        String email = resultSet.getString(3);
        Date birth = resultSet.getDate(4);

        // 将获取到的数据添加到对象中
        Customers cus = new Customers(id, name, email, birth);
        System.out.println(cus);
    }

    // 关闭
    JdbcUtils.closeConnection(conn,pst,resultSet);
}
执行方法正确返回查询到的值

Java和SQL数据类型对应表
| Java类型 | SQL类型 |
|---|---|
| boolean | BIT |
| byte | TINYINT |
| short | SMALLINT |
| int | INTEGER |
| long | BIGINT |
| String | CHAR,VARCHAR,LONGVARCHAR |
| byte array | BINARY , VAR BINARY |
| java.sql.Date | DATE |
| java.sql.Time | TIME |
| java.sql.Timestamp | TIMESTAMP |
ORM 编程思想
- 一个数据表对应一个 Java 类
- 表中一条记录对应 Java 类的一个对象
- 表中一个字段对应 Java 类中的一个属性
实现一个 customers 表的通用查询方法
用到的新方法:
ResultSetMetaData rsmd = resultSet.getMetaData();获取结果集的元数据int columnCount = rsmd.getColumnCount();获取结果集中的列数String columnName = rsmd.getColumnName(int index);查询当前列名
package com.songzx.jdbc;

import com.songzx.bean.Customers;
import com.songzx.util.JdbcUtils;

import java.lang.reflect.Field;
import java.sql.Connection;
import java.sql.PreparedStatement;
import java.sql.ResultSet;
import java.sql.ResultSetMetaData;

/**
 * @author songzx
 * @create 2022-03-05 23:18
 */
public class exer06 {
    public static void main(String[] args) {
        String sql = "select name,email,birth from customers where id = ?";
        Customers cus = new exer06().customersQuery(sql, 4);
        System.out.println(cus);
    }
    // 针对于 customers 表的通用查询方法
    public Customers customersQuery(String sql,Object ...arg){
        Connection conn = null;
        PreparedStatement pst = null;
        ResultSet resultSet = null;
        try {
            // 连接方法
            conn = JdbcUtils.getConnection();
            // 编译sql
            pst = conn.prepareStatement(sql);
            // 添加占位符
            for (int i = 0; i < arg.length; i++) {
                pst.setObject(i+1,arg[i]);
            }
            // 执行sql获取结果集
            resultSet = pst.executeQuery();
            // 获取结果集的元数据
            ResultSetMetaData rsmd = resultSet.getMetaData();
            // 获取结果集中列的个数
            int columnCount = rsmd.getColumnCount();
            // 判断结果集是否有数据
            if(resultSet.next()){
                // 实例化 Customers 获取一个对象
                Customers cus = new Customers();
                // 根据查询到的结果集中包含列的个数往对象中添加数据
                for (int i = 0; i < columnCount; i++) {
                    // 查询当前的列名
                    String columnName = rsmd.getColumnName(i + 1);
                    // 查询当前列的值
                    Object columnValue = resultSet.getObject(i + 1);
                    // 通过反射动态的获取对象中的对象属性并向里面添加数据
                    Field field = Customers.class.getDeclaredField(columnName);
                    field.setAccessible(true);
                    field.set(cus,columnValue);
                }
                return cus;
            }
        } catch (Exception e) {
            e.printStackTrace();
        } finally {
            // 关闭连接
            JdbcUtils.closeConnection(conn,pst,resultSet);
        }
        return null;
    }
}
运行测试,正常返回。因为没有给 id 赋值,所以id默认是0

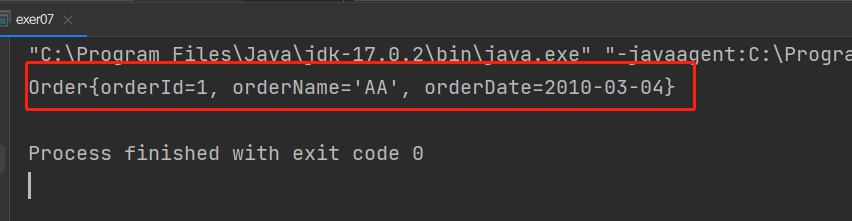
实现一个 order 表的通用查询方法
metaData.getColumnLabel方法获取列的别名,如果没有别名则获取本身的列名- 如果数据库的列名和类中的属性不一致,可以在 SQL 语句中给列起别名
public class exer07 {
    public static void main(String[] args) {
        String sql = "select order_id orderId,order_name orderName,order_date orderDate from `order` where order_id = ?";
        Order order = new exer07().orderQuery(sql, 1);
        System.out.println(order);
    }
    // 封装Order表通用的查询方法
    // metaData.getColumnLabel 方法获取列的别名,如果没有别名则获取本身的列名
    public Order orderQuery(String sql,Object ...arg){
        Connection conn = null;
        PreparedStatement pst = null;
        ResultSet resultSet = null;
        try {
            // 获取连接
            conn = JdbcUtils.getConnection();
            // 编译sql
            pst = conn.prepareStatement(sql);
            // 补充占位符
            for (int i = 0; i < arg.length; i++) {
                pst.setObject(i+1,arg[i]);
            }
            // 获取结果集
            resultSet = pst.executeQuery();
            // 获取元数据
            ResultSetMetaData metaData = resultSet.getMetaData();
            // 获取查询到的数据的列数
            int columnCount = metaData.getColumnCount();
            // 判断是否查询到数据
            if(resultSet.next()){
                Order order = new Order();
                for (int i = 0; i < columnCount; i++) {
                    // 获取当前列的值
                    Object value = resultSet.getObject(i + 1);
                    // 获取当前列的名
                    String label = metaData.getColumnLabel(i + 1);
                    // 通过反射给对象属性赋值
                    Field field = Order.class.getDeclaredField(label);
                    field.setAccessible(true);
                    field.set(order,value);
                }
                return order;
            }
        } catch (Exception e) {
            e.printStackTrace();
        } finally {
            // 关闭
            JdbcUtils.closeConnection(conn,pst,resultSet);
        }
        return  null;
    }
}
实现不同表的通用查询方法
public class exer08 {
    public static void main(String[] args) {
        String sql = "select id,name,email,birth from customers where id = ?";
        Customers customers = new exer08().classQuery(Customers.class, sql, 2);
        //=> Customers{id=2, name='王菲', email='wangf@163.com', birth=1988-12-26}
        System.out.println(customers);

        String sql1 = "select order_id orderId,order_name orderName,order_date orderDate from `order` where order_id = ?";
        Order order = new exer08().classQuery(Order.class, sql1, 2);
        //=> Order{orderId=2, orderName='DD', orderDate=2000-02-01}
        System.out.println(order);

    }
    public <T> T classQuery(Class<T> cazz, String sql, Object ...arg){
        Connection conn = null;
        PreparedStatement pst = null;
        ResultSet resultSet = null;
        try {
            // 获取连接
            conn = JdbcUtils.getConnection();
            // 编译sql
            pst = conn.prepareStatement(sql);
            // 赋值占位符
            for (int i = 0; i < arg.length; i++) {
                pst.setObject(i+1,arg[i]);
            }
            // 获取结果集
            resultSet = pst.executeQuery();
            // 获取元数据
            ResultSetMetaData metaData = resultSet.getMetaData();
            // 获取列数
            int columnCount = metaData.getColumnCount();
            // 获取列数据
            if(resultSet.next()){
                T t = cazz.newInstance();
                for (int i = 0; i < columnCount; i++) {
                    // 获取列值
                    Object value = resultSet.getObject(i + 1);
                    // 获取列名
                    String label = metaData.getColumnLabel(i + 1);
                    // 设置对象值
                    Field field = cazz.getDeclaredField(label);
                    field.setAccessible(true);
                    field.set(t,value);
                }
                return t;
            }
        } catch (Exception e) {
            e.printStackTrace();
        } finally {
            JdbcUtils.closeConnection(conn,pst,resultSet);
        }
        return null;
    }
}

实现不同表的通用查询方法,返回多条数据
public class exer09 {
    public static void main(String[] args) {
        String sql = "select id,name,email,birth from customers where id < ?";
        ArrayList<Customers> customers = new exer09().classQuery(Customers.class, sql,5);
        for (Customers customer : customers) {
            System.out.println(customer);
        }
    }
    public <T> ArrayList<T> classQuery(Class<T> cazz, String sql, Object ...arg){
        Connection conn = null;
        PreparedStatement pst = null;
        ResultSet resultSet = null;
        try {
            // 获取连接
            conn = JdbcUtils.getConnection();
            // 编译sql
            pst = conn.prepareStatement(sql);
            // 赋值占位符
            for (int i = 0; i < arg.length; i++) {
                pst.setObject(i+1,arg[i]);
            }
            // 获取结果集
            resultSet = pst.executeQuery();
            // 获取元数据
            ResultSetMetaData metaData = resultSet.getMetaData();
            // 获取列数
            int columnCount = metaData.getColumnCount();
            // 添加一个空集合
            ArrayList<T> ts = new ArrayList<T>();
            // 获取列数据
            while (resultSet.next()){
                T t = cazz.newInstance();
                for (int i = 0; i < columnCount; i++) {
                    // 获取列值
                    Object value = resultSet.getObject(i + 1);
                    // 获取列名
                    String label = metaData.getColumnLabel(i + 1);
                    // 设置对象值
                    Field field = cazz.getDeclaredField(label);
                    field.setAccessible(true);
                    field.set(t,value);
                }
                ts.add(t);
            }
            return ts;
        } catch (Exception e) {
            e.printStackTrace();
        } finally {
            JdbcUtils.closeConnection(conn,pst,resultSet);
        }
        return null;
    }
}

executeUpdate 方法
execute 方法和 executeUpdate 方法的返回值不同:
- execute 方法如果返回结果集时则返回 true,更新操作时返回的是 false
- executeUpdate 方法会返回更新时收到影响的行数
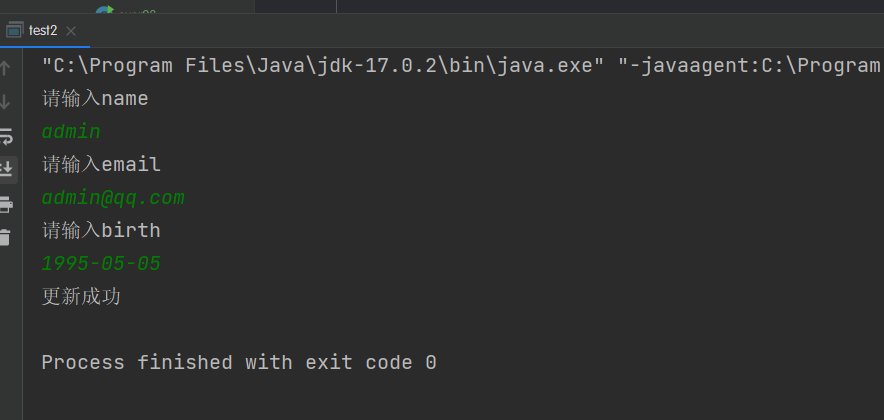
练习1:通过控制台插入数据
public class test2 {
    // 练习:通过控制台往 customers 表中添加一条数据
    public static void main(String[] args) throws Exception {
        Scanner scanner = new Scanner(System.in);
        System.out.println("请输入name");
        String name = scanner.next();
        System.out.println("请输入email");
        String email = scanner.next();
        System.out.println("请输入birth");
        String birth = scanner.next();
        SimpleDateFormat sdf = new SimpleDateFormat("yyyy-MM-dd");
        Date parse = sdf.parse(birth);
        java.sql.Date sqlbirth = new java.sql.Date(parse.getTime());


        Connection conn = JdbcUtils.getConnection();
        String sql = "insert into customers(name,email,birth) values (?,?,?)";
        PreparedStatement pst = conn.prepareStatement(sql);
        pst.setObject(1,name);
        pst.setObject(2,email);
        pst.setObject(3,sqlbirth);
        // execute 方法只会在返回结果集时返回true,更新操作返回false
        // pst.execute();

        // executeUpdate 方法返回的是更新后受影响的行数
        if(pst.executeUpdate() > 0){
            System.out.println("更新成功");
        }else{
            System.out.println("更新失败");
        }
        JdbcUtils.closeConnection(conn,pst);
    }
}
练习2:输入学生身份证号查询信息
首先封装好一个通用的查询方法
// 封装一个通用表的查询方法并返回数据
public static <T> ArrayList<T> executQuery(Class<T> clazz,String sql,Object ...arg){
    Connection conn = null;
    PreparedStatement pst = null;
    ResultSet resultSet = null;
    ArrayList<T> ts = new ArrayList<>();
    try {
        // 获取连接
        conn = JdbcUtils.getConnection();
        // 编译sql
        pst = conn.prepareStatement(sql);
        // 填充占位符
        for (int i = 0; i < arg.length; i++) {
            pst.setObject(i+1,arg[i]);
        }
        // 获取结果集
        resultSet = pst.executeQuery();
        // 获取元数据
        ResultSetMetaData metaData = resultSet.getMetaData();
        // 获取列数
        int columnCount = metaData.getColumnCount();
        // 获取每一行数据
        while (resultSet.next()){
            // 获取一个运行时对象
            T t = clazz.newInstance();
            // 获取当前行的每一列
            for (int i = 0; i < columnCount; i++) {
                // 获取列值
                Object value = resultSet.getObject(i + 1);
                // 获取列名
                String label = metaData.getColumnLabel(i + 1);
                // 获取对象的属性并赋值
                Field field = clazz.getDeclaredField(label);
                field.setAccessible(true);
                field.set(t,value);
            }
            // 将对象添加到集合中
            ts.add(t);
        }
        // 返回集合
        return ts;
    } catch (Exception e) {
        e.printStackTrace();
    } finally {
        JdbcUtils.closeConnection(conn,pst,resultSet);
    }
    return null;
}
创建一个 Examstudent 类
public class Examstudent {
    int FlowID;
    int Type;
    String IDCard;
    String ExamCard;
    String StudentName;
    String Location;
    int Grade;

    public Examstudent() {
    }

    public Examstudent(int flowID, int type, String IDCard, String examCard, String studentName, String location, int grade) {
        FlowID = flowID;
        Type = type;
        this.IDCard = IDCard;
        ExamCard = examCard;
        StudentName = studentName;
        Location = location;
        Grade = grade;
    }

    public int getFlowID() {
        return FlowID;
    }

    public void setFlowID(int flowID) {
        FlowID = flowID;
    }

    public int getType() {
        return Type;
    }

    public void setType(int type) {
        Type = type;
    }

    public String getIDCard() {
        return IDCard;
    }

    public void setIDCard(String IDCard) {
        this.IDCard = IDCard;
    }

    public String getExamCard() {
        return ExamCard;
    }

    public void setExamCard(String examCard) {
        ExamCard = examCard;
    }

    public String getStudentName() {
        return StudentName;
    }

    public void setStudentName(String studentName) {
        StudentName = studentName;
    }

    public String getLocation() {
        return Location;
    }

    public void setLocation(String location) {
        Location = location;
    }

    public int getGrade() {
        return Grade;
    }

    public void setGrade(int grade) {
        Grade = grade;
    }

    @Override
    public String toString() {
        return "Examstudent{" +
                "FlowID=" + FlowID +
                ", Type=" + Type +
                ", IDCard='" + IDCard + '\'' +
                ", ExamCard='" + ExamCard + '\'' +
                ", StudentName='" + StudentName + '\'' +
                ", Location='" + Location + '\'' +
                ", Grade=" + Grade +
                '}';
    }
}
编写测试方法
public class test4 {
    // 输入身份证号查询考试信息
    public static void main(String[] args) {
        String sql = "select * from examstudent where IDCard = ?";
        System.out.println("请输入身份证号");
        Scanner sc = new Scanner(System.in);
        String IDCard = sc.next();
        ArrayList<Examstudent> examstudents = JdbcUtils.executQuery(Examstudent.class, sql, IDCard);
        System.out.println(examstudents);
    }
}
[外链图片转存失败,源站可能有防盗链机制,建议将图片保存下来直接上传(img-bGTpcUhO-1647415848385)(https://cdn.jsdelivr.net/gh/SongZX0106/pictures/images/%E5%BE%AE%E4%BF%A1%E6%88%AA%E5%9B%BE_20220307135131.png)]
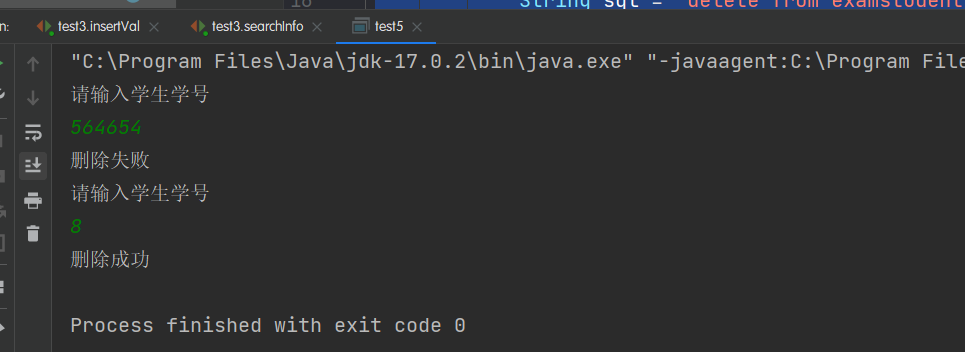
练习3:输入学号删除学生信息
如果输入的学号有误,则提示删除失败重新输入。输入成功则结束程序。
System.out.println("请输入学生学号");
Scanner sc = new Scanner(System.in);
String sql = "delete from examstudent where FlowID = ?";
String flowId = sc.next();
int i = JdbcUtils.executeSql(sql,flowId);
if(i > 0){
    System.out.println("删除成功");
    break;
}else{
    System.out.println("删除失败");
}
运行效果:
插入 Blob 数据
// 往数据表中插入 blob 数据
public static void main(String[] args) throws Exception {
    String sql = "INSERT INTO customers(`name`,email,birth,photo) VALUES(?,?,?,?)";
    // 获取一个文件流
    FileInputStream file = new FileInputStream(new File("main/src/1.jpg"));

    Connection conn = JdbcUtils.getConnection();
    PreparedStatement pst = conn.prepareStatement(sql);
    pst.setObject(1,"张三");
    pst.setObject(2,"250155555@qq.com");
    pst.setObject(3,"1995-05-25");
    pst.setBlob(4,file);
    pst.executeUpdate();

    JdbcUtils.closeConnection(conn,pst);
}
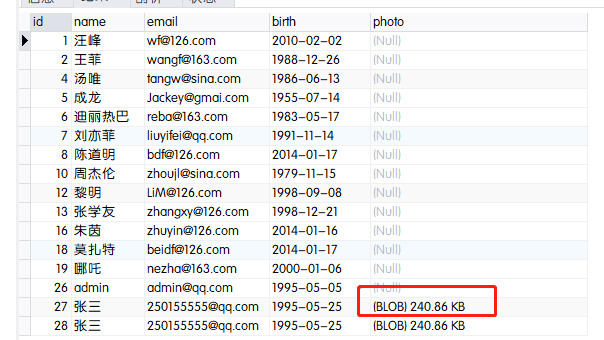
读取一个Blob数据并保存到本地
public class exer02 {
    public static void main(String[] args){
        Connection conn = null;
        PreparedStatement pst = null;
        ResultSet resultSet = null;
        try {
            conn = JdbcUtils.getConnection();
            String sql = "select photo from customers where id = ?";
            pst = conn.prepareStatement(sql);
            pst.setObject(1,27);
            resultSet = pst.executeQuery();
            if(resultSet.next()){
                // 读取数据表中的blob数据
                Blob photo = resultSet.getBlob(1);
                // 转换成输入二进制流
                InputStream bs = photo.getBinaryStream();
                // 声明一个输出流
                FileOutputStream fos = new FileOutputStream("2.jpg");
                byte[] bytes = new byte[1024];
                int len;
                // 写入数据
                while ((len = bs.read(bytes)) != -1){
                    fos.write(bytes,0,len);
                }
                bs.close();
                fos.close();
            }
        } catch (Exception e) {
            e.printStackTrace();
        } finally {
            JdbcUtils.closeConnection(conn,pst,resultSet);
        }
    }
}
运行代码后自动生成 2.jpg 文件
[外链图片转存失败,源站可能有防盗链机制,建议将图片保存下来直接上传(img-4Ab41tug-1647415848387)(https://cdn.jsdelivr.net/gh/SongZX0106/pictures/images/%E5%BE%AE%E4%BF%A1%E6%88%AA%E5%9B%BE_20220307163439.png)]
数据库的二进制类型大小
| 类型 | 大小 |
|---|---|
| TinyBlob | 最大 255 b |
| Blob | 最大 65KB |
| MediumBlob | 最大 16M |
| LongBlob | 最大 4G |
插入blob数据的特殊情况
在数据库中我们设置了字段类型为 mediumblob ,表示最大可以存储16M的文件,但是当我们插入一个超过1M的数据时会出现下面的错误:
我们插入一个大小为 8M 的ppt
public static void main(String[] args) throws FileNotFoundException {
    String sql = "INSERT INTO customers(photo) VALUES (?)";
    FileInputStream fis = new FileInputStream(new File("main/src/1.pptx"));
    JdbcUtils.executeSql(sql, fis);
}
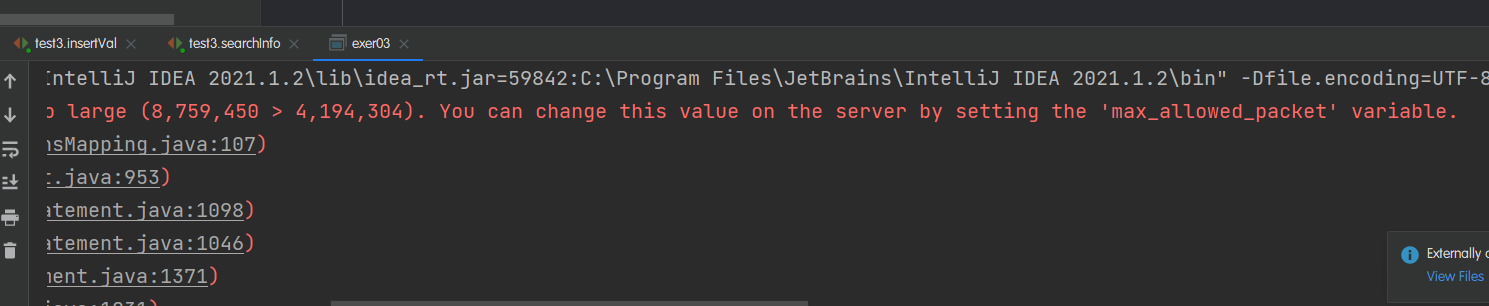
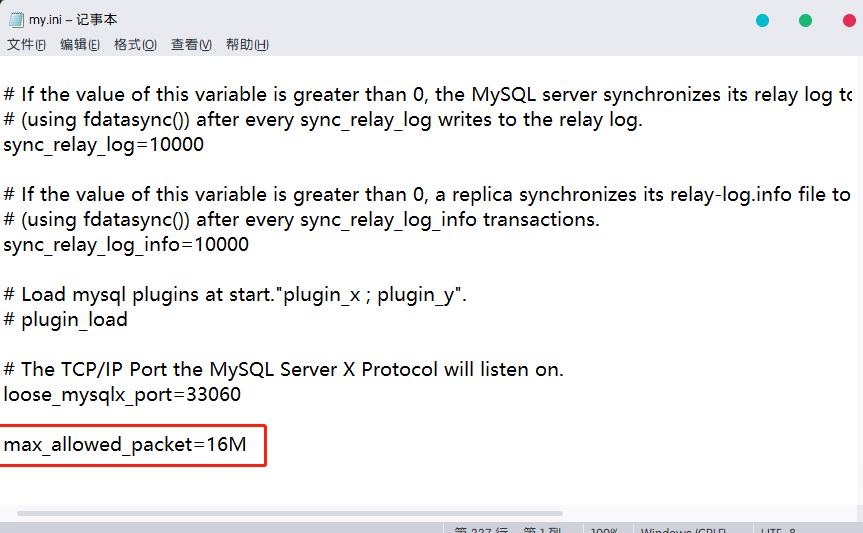
上述错误表示我们当前一次性插入的数据过大,这时我们要去修改 MySQL 的安装目录下的 my.ini 文件,添加如下内容。表示一次上传内容大小最大修改为 16M
之后一定要重启 MySQL 服务,然后再次运行程序,错误消失

查看数据库,成功插入其中
[外链图片转存失败,源站可能有防盗链机制,建议将图片保存下来直接上传(img-Df7NRbZp-1647415848390)(https://cdn.jsdelivr.net/gh/SongZX0106/pictures/images/%E5%BE%AE%E4%BF%A1%E6%88%AA%E5%9B%BE_20220307165959.png)]
批量插入数据
方式一:
prepareStatement 方法会提前预编译 SQL 语句,当批量插入时,会对同一 SQL 语句缓存,只需要传入占位值就可以执行对应的 SQL 语句
编辑代码,批量插入 5000 条数据
// 批量插入方式1
public static void main(String[] args){
    Connection conn = null;
    PreparedStatement pst = null;
    try {
        long strat = System.currentTimeMillis();
        String sql = "INSERT INTO goods(good_name) VALUES(?)";
        conn = JdbcUtils.getConnection();
        pst = conn.prepareStatement(sql);
        // 遍历5000次,批量插入5000条数据
        for (int i = 0; i < 5000; i++) {
            pst.setObject(1,"name_"+i+1);
            pst.executeUpdate();
        }
        long end = System.currentTimeMillis();
        System.out.println("花费时长:"+ (end - strat));
    } catch (Exception e) {
        e.printStackTrace();
    } finally {
        JdbcUtils.closeConnection(conn,pst);
    }
}
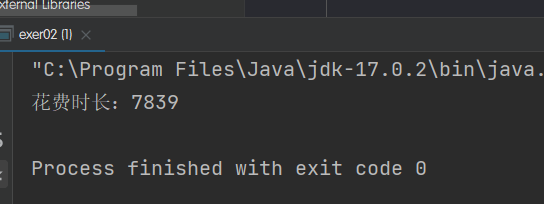
方式二:
使用 addBatch() / executeBatch() / clearBatch()
MySQL 默认关闭批处理功能,我们需要开启这个功能。在MySQL连接地址后面添加 ?rewriteBatchedStatements=true
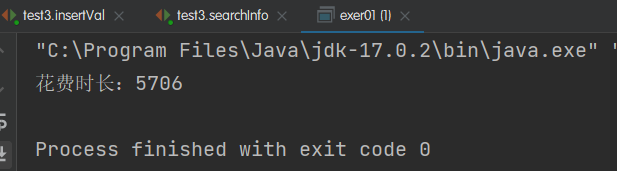
编辑代码,批量插入 1000000 条数据,花费:7839
// 批量插入方式二
public static void main(String[] args) {
    Connection conn = null;
    PreparedStatement pst = null;
    try {
        long strat = System.currentTimeMillis();
        String sql = "INSERT INTO goods(good_name) VALUES(?)";
        conn = JdbcUtils.getConnection();
        pst = conn.prepareStatement(sql);
        // 遍历1000000 次,批量插入1000000 条数据
        for (int i = 0; i < 1000000; i++) {
            pst.setObject(1,"name_"+i+1);
            //1.“攒”sql
            pst.addBatch();
            if(i % 500 == 0){
                //2.执行
                pst.executeBatch();
                //3.清空
                pst.clearBatch();
            }
        }
        long end = System.currentTimeMillis();
        System.out.println("花费时长:"+ (end - strat)); //=> 7839
    } catch (Exception e) {
        e.printStackTrace();
    } finally {
        JdbcUtils.closeConnection(conn,pst);
    }
}
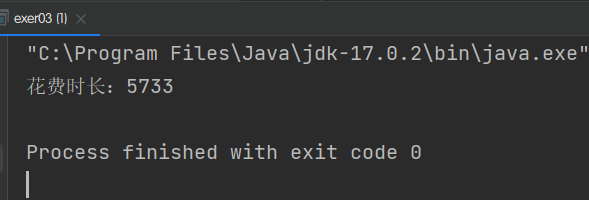
方式三:最终版
- 首先设置
conn.setAutoCommit(false); - 手动提交
conn.commit();
还是插入 1000000 数据,花费:5733
public static void main(String[] args){
    Connection conn = null;
    PreparedStatement pst = null;
    try {
        long strat = System.currentTimeMillis();
        conn = JdbcUtils.getConnection();
        // 设置不允许自动提交
        conn.setAutoCommit(false);
        String sql = "INSERT INTO goods(good_name) VALUES(?)";
        pst = conn.prepareStatement(sql);
        for (int i = 1; i <= 1000000 ; i++) {
            pst.setObject(1,"name" + i);
            pst.addBatch();
            if(i % 500 == 0){
                pst.executeBatch();
                pst.clearBatch();
            }
        }
        // 手动提交
        conn.commit();
        long end = System.currentTimeMillis();
        System.out.println("花费时长:"+ (end - strat)); //=> 5733
    } catch (Exception e) {
        e.printStackTrace();
    } finally {
        JdbcUtils.closeConnection(conn,pst);
    }
}
事务
什么是事务
- 事务:一组逻辑操作单元,使数据从一种状态变换成另外一种状态
- 事务处理:保证所有的事务都作为一个工作单元来执行,即使出现了故障,都不能改变这种执行方式。当在一个事务中执行多个操作时,要么所有的事务都被提交,那么这些修改就被永久的保存下来。要么数据库管理系统将放弃所做的所有修改,整个事务回滚到最初状态
通过案例引出事务
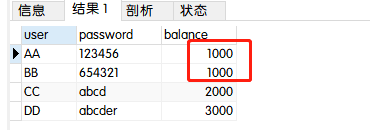
场景:账户A需要往账户B转100元,如果中间程序出错,使用下面的代码会出现什么问题
// 引出事务
public static void main(String[] args) {
    try {
        // 设置AA账户转出100
        String sql1 = "UPDATE user_table SET balance = balance - 100 WHERE `user` = ?";
        JdbcUtils.executeSql(sql1,"AA");

        // 模拟中间出错
        System.out.println(10/0);

        // 设置BB账户收到100
        String sql2 = "UPDATE user_table SET balance = balance + 100 WHERE `user` = ?";
        JdbcUtils.executeSql(sql2,"BB");
    } catch (Exception e) {
        e.printStackTrace();
    }
}
运行后AA账户少了100,但是BB账户没有增加
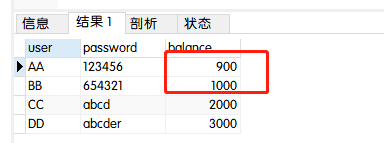
这时我们就要用到事务,事务的作用就是在同时执行多个SQL时,如果有一条执行失败,则全部SQL都执行失败
事务处理的原则
当一个事务执行多个操作时,要么所有事务都成功,否则会被回滚到最初状态
那些操作会自动提交
- DDL 操作一旦执行,都会自动提交
- DML 默认情况下会自动提交
- 可以通过 set autocommit = false 来关闭自动提交
- 默认关闭连接时,回自动提交
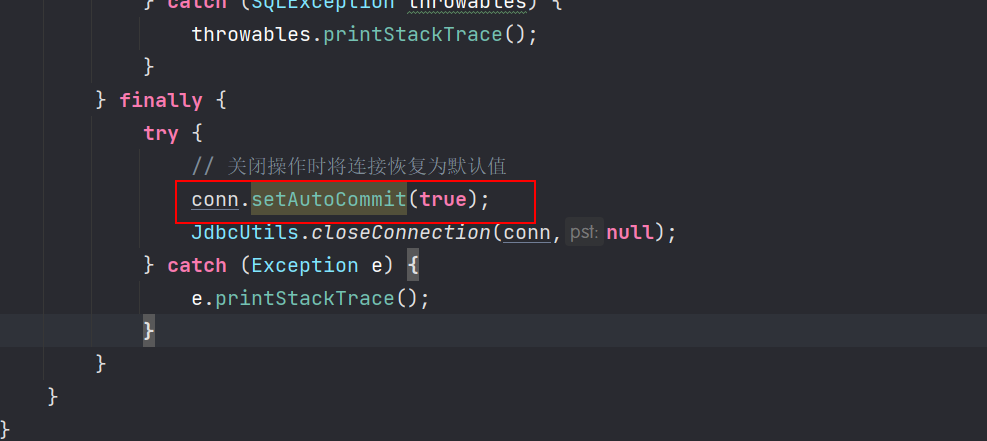
使用事务处理转账问题
首先封装一个考虑了事务的通用执行SQL方法
// 封装一个通用的执行SQL方法V2.0 考虑事务问题,连接由外部传递进来,并且在外部关闭
public static int executeSql(Connection conn,String sql,Object ...arg) throws Exception {
    // 预编译sql
    PreparedStatement pst = conn.prepareStatement(sql);
    // 遍历参数
    for (int i = 0; i < arg.length; i++) {
        pst.setObject(i+1,arg[i]);
    }
    // 执行sql方法
    int res =  pst.executeUpdate();
    // 关闭
    JdbcUtils.closeConnection(null,pst);
    return  res;
}
编写代码处理转账问题
public static void main(String[] args){
    Connection conn = null;
    try {
        // 获取连接
        conn = JdbcUtils.getConnection();
        // 关闭自动提交
        conn.setAutoCommit(false);
        // 设置AA账户转出100
        String sql1 = "UPDATE user_table SET balance = balance - 100 WHERE `user` = ?";
        JdbcUtils.executeSql(conn,sql1,"AA");

        // 模拟SQL之间存在程序异常
        System.out.println(10 / 0);

        // 设置BB账户收到100
        String sql2 = "UPDATE user_table SET balance = balance + 100 WHERE `user` = ?";
        JdbcUtils.executeSql(conn,sql2,"BB");

        // 最后提交
        conn.commit();
    } catch (Exception e) {
        e.printStackTrace();
        try {
            // 如果执行失败则进行回滚操作
            conn.rollback();
        } catch (SQLException throwables) {
            throwables.printStackTrace();
        }
    } finally {
        try {
            // 最后关闭连接
            JdbcUtils.closeConnection(conn,null);
        } catch (Exception e) {
            e.printStackTrace();
        }
    }
}
执行上面的代码后,再来查看数据库是否发生变化
可以看到数据没有发生改变,说明我们事务生效
关闭连接时将连接恢复为默认值
事务的ACID属性
- 原子性
- 原子性是指事务是一个不可分割的工作单位,事务中的操作要么都发生,要么都不发生
- 一致性
- 事务必须是数据库从一个一致性变换到另外一个一致性
- 隔离性
- 事务的隔离性是指一个事务的执行不能被其他事务干扰,即一个事务内部的操作及使用的数据对并发的其他事务是隔离的,并发执行的各个事务之间不能互相干扰
- 持久性
- 持久性是指一个事务一旦被提交,他对数据库中的变化就是永久的,接下来的其他操作和数据库故障不应该对其有任何影响
四种隔离机制
- 四种并发问题
- 脏读:对于两个事务T1,T2,T1 读取了已经被T2更新但是还未提交的数据字段。之后,若T2回滚,T1读取的内容就是无效且临时的
- 不可重复读:对于两个事务T1,T2,T1读取了一个字段,然后T2更新了该字段。之后T1再次读取了同一个字段,两次读取的值不同
- 幻读:对于两个事务T1,T2。T1从一个表中读取了一个字段,T2在这个表中插入了一些新的行,之后,如果T1再读取这个表就会多出几行
- 数据库事务的隔离性:数据库系统必须具有隔离并发运行各个事务的能力,使他们不会互相影响,避免各种并发问题
- 一个事务与其他事务的隔离程度称为隔离级别,数据库规定了多种隔离级别,不同的隔离级别对应不同的干扰程度,隔离级别越高,数据的一致性就越好,但是并发性越弱。
数据库的四种隔离级别
| 隔离级别 | 描述 |
|---|---|
| READ UNCOMMTTED(读取未提交数据) | 允许事务读取未被其他事务提交的变更,脏读,不可重读和幻读问题都会出现 |
| READ COMMITED(读已提交的数据) | 只允许事务读取已被其他事务提交的变更,可以避免脏读,但不可重读和幻读问题都会出现 |
| REPEATABLE READ(可重复读) | 确保事务可以多次从一个字段中读取相同的值,在这个事务持续之间,禁止其他事务对这个字段进行更新,可以避免脏读和不可重复读,但是幻读问题仍会存在 |
| SERIALLIZABLE(串行化) | 确保事务可以从一个表中读取相同的行,在这个事务持续期间,禁止其他事务对该表执行插入,更新和删除操作,所有并发问题都会得到解决,但是性能十分低下 |
通过Java代码体会隔离机制
读取未提交数据
首先新建一个查询方法,查询方法中我们手动的将隔离等级设置为读取未提交数据
@Test
public void testSelect() throws Exception {
    // 获取连接
    Connection conn = JdbcUtils.getConnection();
    // 获取当前的隔离级别
    int transactionIsolation = conn.getTransactionIsolation();
    System.out.println(transactionIsolation); //=> 4 默认是可重复读

    // 手动修改隔离级别为读取未提交数据,在下面的代码等待期间去读取会读取到5000
    // 等待下面的代码执行结束后又会读取到3000
    // 修改为1,读取未提交
    conn.setTransactionIsolation(Connection.TRANSACTION_READ_UNCOMMITTED);

    // 取消自动提交
    conn.setAutoCommit(false);
    // 预编译sql
    String sql = "select * from user_table where user = ?";
    // 执行查询方法
    ArrayList<UserTable> cc = JdbcUtils.executQuery(conn, UserTable.class, sql, "CC");
    // 显示数据
    System.out.println(cc);
    // 关闭连接
    conn.close();
}
接着新建一个更新方法,更新方法里面添加一个15秒的睡眠
@Test
public void testUpdate() throws Exception {
    Connection conn = JdbcUtils.getConnection();
    conn.setAutoCommit(false);
    String sql = "update user_table set balance = ? where user = ?";
    JdbcUtils.executeSql(conn, sql, 5000, "CC");
    // 等待5秒提交
    Thread.sleep(15000);
    System.out.println("修改成功");
}
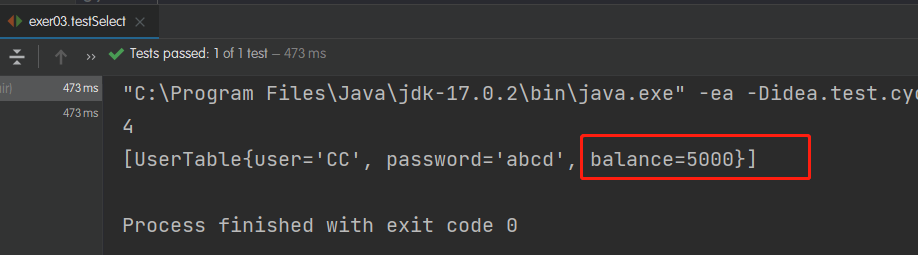
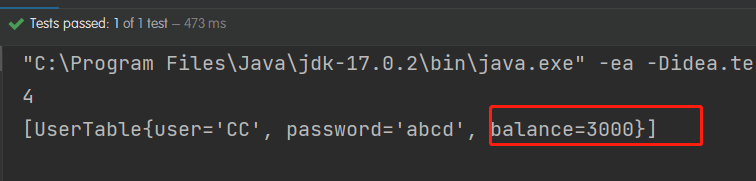
然后首先运行查询方法,查询到的用户CC的balance的值等于3000
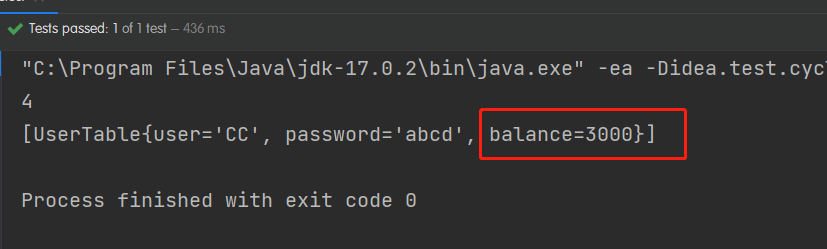
然后运行更新方法,更新方法取消了自动提交,所以更新数据不会被提交到数据库中,执行之后进入15秒的睡眠
在更新方法的睡眠期间再次执行查询方法,此时可以看到查询到的结果变成5000,体现了隔离等级为读取未提交数据
当更新方法睡眠结束后再次执行查询方法,结果又变回了3000
读取已提交
接着上面的代码修改
首先修改更新方法,设置修改后立即提交数据
@Test
public void testUpdate() throws Exception {
    Connection conn = JdbcUtils.getConnection();
    conn.setAutoCommit(false);
    String sql = "update user_table set balance = ? where user = ?";
    JdbcUtils.executeSql(conn, sql, 5000, "CC");
    // 设置更新后立即提交数据
    conn.commit();
    System.out.println("修改成功");
}
然后再查询方法中添加一个10秒中的睡眠,睡眠结束后再次查询数据,实现在一个事务中执行两次查询操作。
同时将隔离等级设置为 读取已提交数据
@Test
public void testSelect() throws Exception {
    // 获取连接
    Connection conn = JdbcUtils.getConnection();
    // 获取当前的隔离级别
    int transactionIsolation = conn.getTransactionIsolation();
    System.out.println(transactionIsolation); //=> 4 默认是可重复读

    // 手动修改隔离级别为读取未提交数据,在下面的代码等待期间去读取会读取到5000
    // 等待下面的代码执行结束后又会读取到3000
    // 修改为1,读取未提交
    conn.setTransactionIsolation(Connection.TRANSACTION_READ_COMMITTED);

    // 取消自动提交
    conn.setAutoCommit(false);
    // 预编译sql
    String sql = "select * from user_table where user = ?";
    // 执行查询方法
    ArrayList<UserTable> cc = JdbcUtils.executQuery(conn, UserTable.class, sql, "CC");
    // 显示数据
    System.out.println(cc);

    // 睡眠15秒
    System.out.println("开始睡眠");
    Thread.sleep(15000);
    System.out.println("睡眠结束");

    // 执行查询方法
    ArrayList<UserTable> cc1 = JdbcUtils.executQuery(conn, UserTable.class, sql, "CC");
    // 显示数据
    System.out.println(cc1);

    // 关闭连接
    conn.close();
}
接着首先执行查询方法,在查询方法执行期间再次执行一下更新方法,观察运行结果
[外链图片转存失败,源站可能有防盗链机制,建议将图片保存下来直接上传(img-3Ya7sMDB-1647415848398)(https://cdn.jsdelivr.net/gh/SongZX0106/pictures/images/1.gif)]
通过结果可以看到在一次查询事务中,两次查询到的结果不同,这种现象称之为幻读
不可重复读(MySQL默认)
接着上面的代码修改,在查询方法中将隔离等级设置为 TRANSACTION_REPEATABLE_READ,MySQL默认是这个等级
conn.setTransactionIsolation(Connection.TRANSACTION_REPEATABLE_READ);
然后观察运行结果
[外链图片转存失败,源站可能有防盗链机制,建议将图片保存下来直接上传(img-jFvwasgL-1647415848399)(https://cdn.jsdelivr.net/gh/SongZX0106/pictures/images/jdbc2.gif)]
通过结果可以看到虽然修改了数据库中的值,但是在一个事务中两次查询到的值是一样的。这种称为不可重复读
封装查询方法和测试
BaseDao
package com.songzx.dao;

import com.songzx.util.JdbcUtils;

import java.lang.reflect.Field;
import java.sql.*;
import java.util.ArrayList;

/**
 * 创建一个数据表操作的BaseDao
 * @author songzx
 * @create 2022-03-14 11:41
 */
public class BaseDao {
    // 封装一个通用的执行SQL方法V2.0 考虑事务问题,连接由外部传递进来,并且在外部关闭
    public  int executeSql(Connection conn, String sql, Object ...arg) throws Exception {
        // 预编译sql
        PreparedStatement pst = conn.prepareStatement(sql);
        // 遍历参数
        for (int i = 0; i < arg.length; i++) {
            pst.setObject(i+1,arg[i]);
        }
        // 执行sql方法
        int res =  pst.executeUpdate();
        // 关闭
        JdbcUtils.closeConnection(null,pst);
        return  res;
    }

    /**
     * 返回单条数据方法
     * @param conn
     * @param clazz
     * @param sql
     * @param arg
     * @throws SQLException
     * @return
     */
    public <T> T returnOneData(Connection conn, Class<T> clazz, String sql, Object ...arg){
        PreparedStatement pst = null;
        ResultSet resultSet = null;
        try {
            pst = conn.prepareStatement(sql);
            for (int i = 0; i < arg.length; i++) {
                pst.setObject(i+1,arg[i]);
            }
            resultSet = pst.executeQuery();
            ResultSetMetaData metaData = resultSet.getMetaData();
            int count = metaData.getColumnCount();
            if(resultSet.next()){
                T t = clazz.newInstance();
                for (int i = 0; i < count; i++) {
                    Object value = resultSet.getObject(i + 1);
                    String label = metaData.getColumnLabel(i + 1);
                    Field field = clazz.getDeclaredField(label);
                    field.setAccessible(true);
                    field.set(t,value);
                }
                return t;
            }
        }  catch (Exception e) {
            e.printStackTrace();
        } finally {
            try {
                JdbcUtils.closeConnection(null,pst,resultSet);
            } catch (SQLException throwables) {
                throwables.printStackTrace();
            }
        }
        return null;
    }


    // 封装一个通用表的查询方法并返回数据 考虑事务问题,连接由外部传递进来,并且在外部关闭
    public  <T> ArrayList<T> executQuery(Connection conn,Class<T> clazz,String sql,Object ...arg) throws SQLException {
        PreparedStatement pst = null;
        ResultSet resultSet = null;
        ArrayList<T> ts = new ArrayList<>();
        try {
            // 编译sql
            pst = conn.prepareStatement(sql);
            // 填充占位符
            for (int i = 0; i < arg.length; i++) {
                pst.setObject(i+1,arg[i]);
            }
            // 获取结果集
            resultSet = pst.executeQuery();
            // 获取元数据
            ResultSetMetaData metaData = resultSet.getMetaData();
            // 获取列数
            int columnCount = metaData.getColumnCount();
            // 获取每一行数据
            while (resultSet.next()){
                // 获取一个运行时对象
                T t = clazz.newInstance();
                // 获取当前行的每一列
                for (int i = 0; i < columnCount; i++) {
                    // 获取列值
                    Object value = resultSet.getObject(i + 1);
                    // 获取列名
                    String label = metaData.getColumnLabel(i + 1);
                    // 获取对象的属性
                    Field field = clazz.getDeclaredField(label);
                    field.setAccessible(true);
                    field.set(t,value);
                }
                // 将对象添加到集合中
                ts.add(t);
            }
            // 返回集合
            return ts;
        } catch (Exception e) {
            e.printStackTrace();
        } finally {
            JdbcUtils.closeConnection(null,pst,resultSet);
        }
        return null;
    }


    // 通过一个返回单个数据的方法
    public  <E> E getValue(Connection conn, String sql, Object ...arg){
        PreparedStatement pst = null;
        ResultSet resultSet = null;
        try {
            pst = conn.prepareStatement(sql);
            for (int i = 0; i < arg.length; i++) {
                pst.setObject(i+1,arg[i]);
            }
            resultSet = pst.executeQuery();
            if(resultSet.next()){
                return (E) resultSet.getObject(1);
            }
        } catch (SQLException throwables) {
            throwables.printStackTrace();
        } finally {
            try {
                JdbcUtils.closeConnection(null,pst,resultSet);
            } catch (SQLException throwables) {
                throwables.printStackTrace();
            }
        }
        return null;
    }
}
CustomerDao
package com.songzx.dao;

import com.songzx.bean.Customers;

import java.sql.Connection;
import java.sql.Date;
import java.sql.SQLException;
import java.util.List;

/**
 * @author songzx
 * @create 2022-03-14 13:20
 */
public interface CustomerDao {
    /**
     * 插入cus对象数据到数据库中
     * @param conn
     * @param cus
     */
    void inset(Connection conn, Customers cus) throws Exception;

    /**
     * 根据id删除数据
     * @param conn
     * @param id
     */
    void deleteById(Connection conn,int id) throws Exception;

    /**
     * 根据id修改数据
     * @param conn
     * @param cus
     */
    void updateCusById(Connection conn,Customers cus) throws Exception;

    /**
     * 根据id查询数据单条数据
     * @param conn
     * @param id
     */
    Customers selectCusById(Connection conn,int id);

    /**
     * 查询所有数据
     * @param conn
     * @return
     */
    List<Customers> selectAllCus(Connection conn) throws SQLException;

    /**
     * 返回数据中的条数
     * @param conn
     * @return
     */
    long getCount(Connection conn);

    /**
     * 返回数据中的最大生日
     * @param conn
     * @return
     */
    Date getMaxBirth(Connection conn);
}
CustomerImpDao
package com.songzx.dao;

import com.songzx.bean.Customers;
import java.sql.Connection;
import java.sql.Date;
import java.sql.SQLException;
import java.util.ArrayList;
import java.util.List;

/**
 * @author songzx
 * @create 2022-03-14 13:32
 */
public class CustomerImpDao extends BaseDao implements CustomerDao{
    @Override
    public void inset(Connection conn, Customers cus) throws Exception {
        String sql = "insert into customers(name,email,birth) values(?,?,?)";
        executeSql(conn,sql,cus.getName(),cus.getEmail(),cus.getBirth());
    }

    @Override
    public void deleteById(Connection conn, int id) throws Exception {
        String sql = "delete from customers where id = ?";
        executeSql(conn,sql,id);
    }

    @Override
    public void updateCusById(Connection conn, Customers cus) throws Exception {
        String sql = "update customers set name = ?,email = ?,birth = ? where id = ?";
        executeSql(conn,sql,cus.getName(),cus.getEmail(),cus.getBirth(),cus.getId());
    }

    @Override
    public Customers selectCusById(Connection conn, int id) {
        String sql = "select id,name,email,birth from customers where id = ?";
        Customers customers = returnOneData(conn, Customers.class, sql, id);
        return customers;
    }

    @Override
    public List<Customers> selectAllCus(Connection conn) throws SQLException {
        String sql = "select name,email,birth from customers";
        ArrayList<Customers> customers = executQuery(conn, Customers.class, sql);
        return customers;
    }

    @Override
    public long getCount(Connection conn) {
        String sql = "select count(*) from customers";
        long count = (Long) getValue(conn, sql);
        return count;
    }

    @Override
    public Date getMaxBirth(Connection conn) {
        String sql = "select max(birth) from customers";
        Date date = (Date) getValue(conn, sql);
        return date;
    }
}
CustomerDaoTest
添加测试方法
package com.songzx.daotest;

import com.songzx.bean.Customers;
import com.songzx.dao.CustomerImpDao;
import com.songzx.util.JdbcUtils;

import java.sql.Connection;
import java.sql.Date;
import java.text.SimpleDateFormat;
import java.util.List;

/**
 * @author songzx
 * @create 2022-03-14 14:13
 */
public class CustomerDaoTest {
    public static void main(String[] args) throws Exception {
        Connection conn = JdbcUtils.getConnection();
        CustomerImpDao dao = new CustomerImpDao();

        // 查询单个数据
        Customers customers = dao.selectCusById(conn, 6);
        System.out.println(customers); //=> Customers{id=0, name='王菲', email='wangf@163.com', birth=1988-12-26}

        System.out.println("******");

        // 查询所有数据
        List<Customers> customers1 = dao.selectAllCus(conn);
        System.out.println(customers1);

        System.out.println("******");

        // 查询数据条数
        long count = dao.getCount(conn);
        System.out.println(count); //=> 17

        System.out.println("******");

        // 查询最大生日
        Date maxBirth = dao.getMaxBirth(conn);
        System.out.println(maxBirth); //=> 2014-01-17

        System.out.println("******");

        // 修改某条数据
        customers.setName("王菲");
        System.out.println(customers);
        dao.updateCusById(conn,customers);

        System.out.println("******");

        // 删除数据
        // dao.deleteById(conn,2);

        // 新增数据
        SimpleDateFormat sdf = new SimpleDateFormat("yyyy-HH-dd");
        java.util.Date parse = sdf.parse("2012-05-06");
        Date yybirth = new Date(parse.getTime());
        Customers yscus = new Customers(30, "易烊千玺", "yyqx@163.com", yybirth);
        dao.inset(conn,yscus);


        conn.close();
    }
}
数据库连接池
- 为解决传统开发中数据库连接问题,可以采用数据库连接池技术
- 数据库连接池的基本思想:就是为数据库连接建立一个缓冲池,预先在缓冲池中放入一定数量的连接,当需要建立数据库连接时,只需要从池子中取出一个用,使用完毕后放回去
- 数据库连接池负责分配,管理和释放数据库连接,它允许应用程序重复使用一个现有的数据库连接,而不是重新新建一个
c3p0
首先添加驱动
连接方式一
@Test
public void c3p0test1() throws PropertyVetoException, SQLException {
    ComboPooledDataSource cpds = new ComboPooledDataSource();
    cpds.setDriverClass( "com.mysql.cj.jdbc.Driver" ); //loads the jdbc driver
    cpds.setJdbcUrl( "jdbc:mysql://localhost:3306/jdbc_learn" );
    cpds.setUser("root");
    cpds.setPassword("abc123");
    // 初始化连接个数
    cpds.setInitialPoolSize(15);
    Connection conn = cpds.getConnection();
    System.out.println(conn);
}
[外链图片转存失败,源站可能有防盗链机制,建议将图片保存下来直接上传(img-4VQ4yjqz-1647415848401)(https://cdn.jsdelivr.net/gh/SongZX0106/pictures/images/%E5%BE%AE%E4%BF%A1%E6%88%AA%E5%9B%BE_20220314170520.png)]
连接方式二
首先新建xml格式的配置文件,文件名必须为:c3p0-config.xml
<?xml version="1.0" encoding="UTF-8" ?>
<c3p0-config>

    <!-- This app is massive! -->
    <named-config name="intergalactoApp">
        <!-- 配置数据库连接的四个基本要素 -->
        <property name="driverClass">com.mysql.cj.jdbc.Driver</property>
        <property name="jdbcUrl">jdbc:mysql://localhost:3306/jdbc_learn</property>
        <property name="user">root</property>
        <property name="password">abc123</property>

        <!-- 进行数据库连接池管理的基本信息 -->
        <!-- 当数据库连接池中的连接不够时,c3p0一次性向数据库服务器申请的连接数量 -->
        <property name="acquireIncrement">50</property>
        <!-- c3p0数据库连接池中初始化的连接数 -->
        <property name="initialPoolSize">100</property>
        <!-- c3p0数据库连接池维护的最少连接数 -->
        <property name="minPoolSize">50</property>
        <!-- c3p0数据库连接池维护的最多连接数 -->
        <property name="maxPoolSize">1000</property>
        <!-- c3p0数据库连接池最多维护的Statement的个数 -->
        <property name="maxStatements">0</property>
        <!-- 每个连接中最多可使用的Statement个数 -->
        <property name="maxStatementsPerConnection">5</property>
    </named-config>
</c3p0-config>
编写代码连接
@Test
public void c3p0test2(){
    ComboPooledDataSource cpds = new ComboPooledDataSource("intergalactoApp");
    try {
        Connection conn = cpds.getConnection();
        System.out.println(conn);
    } catch (SQLException throwables) {
        throwables.printStackTrace();
    }
}
dbcp
首先导入两个包
- Commons-dbcp.jar:连接池的实现
- Commons-pool.jar:连接池实现的依赖库
配置文件说明
| 属性 | 默认值 | 说明 |
|---|---|---|
| initialSize | 0 | 连接池启动时创建的初始化连接数量 |
| maxActive | 8 | 连接池中可同时连接的最大的连接数 |
| maxIdle | 8 | 连接池中最大的空闲的连接数,超过的空闲连接将被释放,如果设置为负数表示不限制 |
| minIdle | 0 | 连接池中最小的空闲的连接数,低于这个数量会被创建新的连接。该参数越接近maxIdle,性能越好,因为连接的创建和销毁,都是需要消耗资源的;但是不能太大。 |
| maxWait | 无限制 | 最大等待时间,当没有可用连接时,连接池等待连接释放的最大时间,超过该时间限制会抛出异常,如果设置-1表示无限等待 |
| poolPreparedStatements | false | 开启池的Statement是否prepared |
| maxOpenPreparedStatements | 无限制 | 开启池的prepared 后的同时最大连接数 |
| minEvictableIdleTimeMillis | 连接池中连接,在时间段内一直空闲, 被逐出连接池的时间 | |
| removeAbandonedTimeout | 300 | 超过时间限制,回收没有用(废弃)的连接 |
| removeAbandoned | false | 超过removeAbandonedTimeout时间后,是否进 行没用连接(废弃)的回收 |
连接方式一:
@Test
public void test1() throws SQLException {
    BasicDataSource source = new BasicDataSource();
    source.setDriverClassName("com.mysql.cj.jdbc.Driver");
    source.setUrl("jdbc:mysql://127.0.0.1:3306/jdbc_learn");
    source.setUsername("root");
    source.setPassword("abc123");

    source.setInitialSize(10);

    Connection conn = source.getConnection();
    System.out.println(conn);
}
连接方式二:
private static DataSource source = null;
static {
    try {
        Properties props = new Properties();
        FileInputStream fis = new FileInputStream("main/lib/dbcp.properties");
        props.load(fis);
        source = BasicDataSourceFactory.createDataSource(props);
    } catch (Exception e) {
        e.printStackTrace();
    }
}
// 获取dbcp的连接
public static Connection getDbcpConnection() throws SQLException {
    Connection conn = source.getConnection();
    return conn;
}
dbcp.properties 配置文件如下:
username=root
password=abc123
url=jdbc:mysql://127.0.0.1:3306/jdbc_learn?rewriteBatchedStatements=true
driverClassName=com.mysql.cj.jdbc.Driver
Druid (常用的连接池技术)
首先导入配置文件
- druid-1.1.10.jar
配置信息
| 配置 | 缺省 | 说明 |
|---|---|---|
| name | 配置这个属性的意义在于,如果存在多个数据源,监控的时候可以通过名字来区分开来。 如果没有配置,将会生成一个名字,格式是:”DataSource-” + System.identityHashCode(this) | |
| url | 连接数据库的url,不同数据库不一样。例如:mysql : jdbc:mysql://10.20.153.104:3306/druid2 oracle : jdbc:oracle:thin:@10.20.149.85:1521:ocnauto | |
| username | 连接数据库的用户名 | |
| password | 连接数据库的密码。如果你不希望密码直接写在配置文件中,可以使用ConfigFilter。详细看这里:https://github.com/alibaba/druid/wiki/使用ConfigFilter | |
| driverClassName | 根据url自动识别 这一项可配可不配,如果不配置druid会根据url自动识别dbType,然后选择相应的driverClassName(建议配置下) | |
| initialSize | 0 | 初始化时建立物理连接的个数。初始化发生在显示调用init方法,或者第一次getConnection时 |
| maxActive | 8 | 最大连接池数量 |
| maxIdle | 8 | 已经不再使用,配置了也没效果 |
| minIdle | 最小连接池数量 | |
| maxWait | 获取连接时最大等待时间,单位毫秒。配置了maxWait之后,缺省启用公平锁,并发效率会有所下降,如果需要可以通过配置useUnfairLock属性为true使用非公平锁。 | |
| poolPreparedStatements | false | 是否缓存preparedStatement,也就是PSCache。PSCache对支持游标的数据库性能提升巨大,比如说oracle。在mysql下建议关闭。 |
| maxOpenPreparedStatements | -1 | 要启用PSCache,必须配置大于0,当大于0时,poolPreparedStatements自动触发修改为true。在Druid中,不会存在Oracle下PSCache占用内存过多的问题,可以把这个数值配置大一些,比如说100 |
| validationQuery | 用来检测连接是否有效的sql,要求是一个查询语句。如果validationQuery为null,testOnBorrow、testOnReturn、testWhileIdle都不会其作用。 | |
| testOnBorrow | true | 申请连接时执行validationQuery检测连接是否有效,做了这个配置会降低性能。 |
| testOnReturn | false | 归还连接时执行validationQuery检测连接是否有效,做了这个配置会降低性能 |
| testWhileIdle | false | 建议配置为true,不影响性能,并且保证安全性。申请连接的时候检测,如果空闲时间大于timeBetweenEvictionRunsMillis,执行validationQuery检测连接是否有效。 |
| timeBetweenEvictionRunsMillis | 有两个含义: 1)Destroy线程会检测连接的间隔时间2)testWhileIdle的判断依据,详细看testWhileIdle属性的说明 | |
| numTestsPerEvictionRun | 不再使用,一个DruidDataSource只支持一个EvictionRun | |
| minEvictableIdleTimeMillis | ||
| connectionInitSqls | 物理连接初始化的时候执行的sql | |
| exceptionSorter | 根据dbType自动识别 当数据库抛出一些不可恢复的异常时,抛弃连接 | |
| filters | 属性类型是字符串,通过别名的方式配置扩展插件,常用的插件有: 监控统计用的filter:stat日志用的filter:log4j防御sql注入的filter:wall | |
| proxyFilters | 类型是List,如果同时配置了filters和proxyFilters,是组合关系,并非替换关系 |
使用方式
public static DataSource druidSource = null;
static {
    try {
        Properties props = new Properties();
        FileInputStream fis = new FileInputStream("main/lib/Druid.properties");
        props.load(fis);
        druidSource = DruidDataSourceFactory.createDataSource(props);
    } catch (Exception e) {
        e.printStackTrace();
    }
}
// 获取druid连接
public static Connection getDruidConnection() throws Exception{
    Connection conn = druidSource.getConnection();
    return conn;
}
Druid.properties 配置文件
username=root
password=abc123
url=jdbc:mysql://127.0.0.1:3306/jdbc_learn
driverClassName=com.mysql.cj.jdbc.Driver
Apache-DBUtils实现CRUD操作
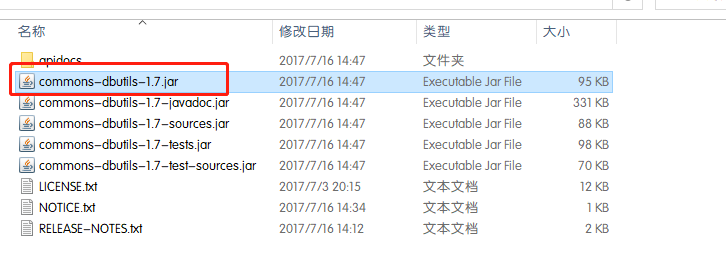
导入包
进入官网:https://commons.apache.org/proper/commons-dbutils/download_dbutils.cgi
选择相关文件进行下载
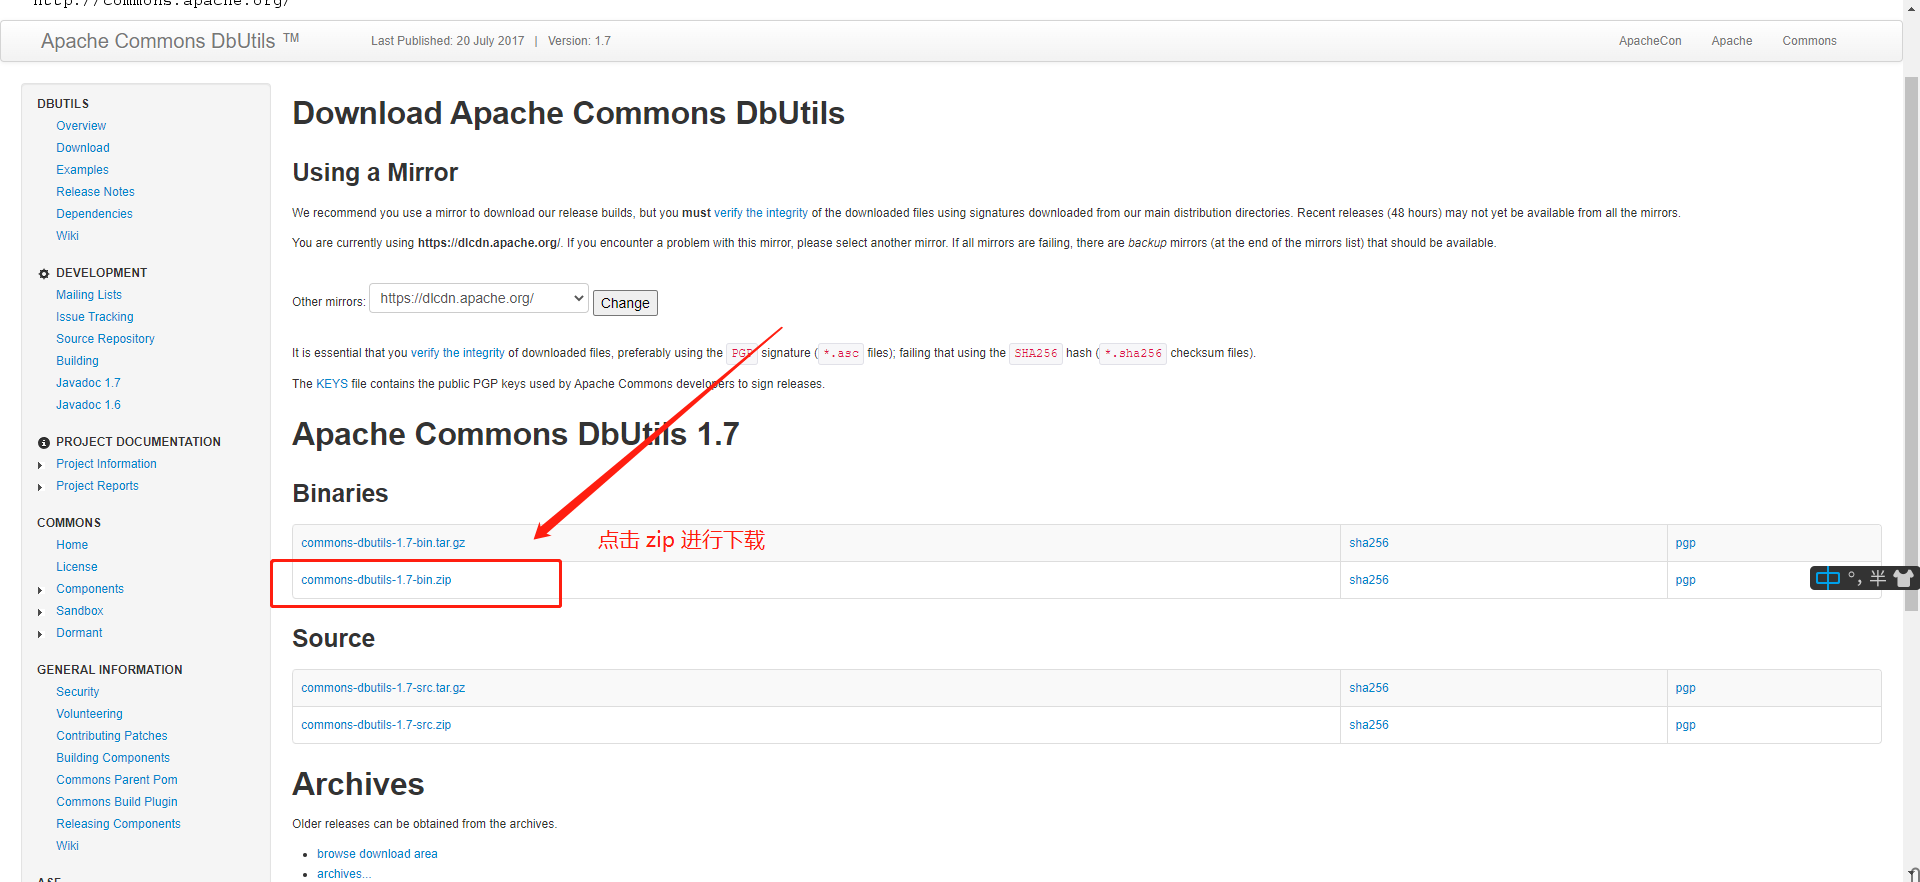
下载后解压打开,复制 commons-dbutils-1.7.jar 文件导入到项目中
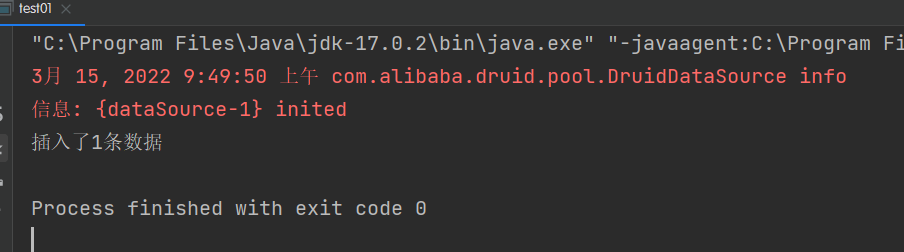
使用 QueryRunner 完成插入操作
使用 runner.update 方法完成增、删、改 操作
public static void main(String[] args) {
    Connection conn = null;
    try {
        QueryRunner runner = new QueryRunner();
        conn = JdbcUtils.getDruidConnection();
        String sql = "insert into customers(name,email,birth) values (?,?,?)";
        int update = runner.update(conn, sql, "蔡旭混", "caixukun@163.com", "2000-05-06");
        if(update > 0){
            System.out.println("插入了" + update + "条数据");
        }else{
            System.out.println("插入失败");
        }
    } catch (Exception e) {
        e.printStackTrace();
    } finally {
        try {
            JdbcUtils.closeConnection(conn,null);
        } catch (SQLException throwables) {
            throwables.printStackTrace();
        }
    }
}
ResultSetHandler接口及实现类
-
该接口用于处理 java.sql.ResultSet,将数据按要求转换为另一种形式。
-
ResultSetHandler 接口提供了一个单独的方法:Object handle (java.sql.ResultSet .rs)。
-
接口的主要实现类:
- ArrayHandler:把结果集中的第一行数据转成对象数组。
- ArrayListHandler:把结果集中的每一行数据都转成一个数组,再存放到List中。
- **BeanHandler:**将结果集中的第一行数据封装到一个对应的JavaBean实例中。
- **BeanListHandler:**将结果集中的每一行数据都封装到一个对应的JavaBean实例中,存放到List里。
- ColumnListHandler:将结果集中某一列的数据存放到List中。
- KeyedHandler(name):将结果集中的每一行数据都封装到一个Map里,再把这些map再存到一个map里,其key为指定的key。
- **MapHandler:**将结果集中的第一行数据封装到一个Map里,key是列名,value就是对应的值。
- **MapListHandler:**将结果集中的每一行数据都封装到一个Map里,然后再存放到List
- **ScalarHandler:**查询单个值对象
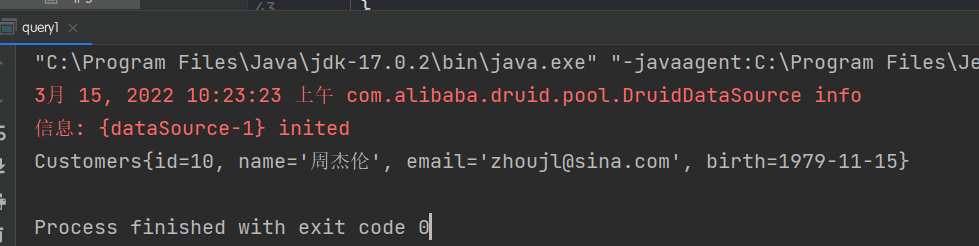
查询方法,返回 BeanHandler
BeanHandler 实现类返回单个对象
查询 id 等于 10 的数据:
public static void main(String[] args){
    Connection conn = null;
    try {
        QueryRunner runner = new QueryRunner();
        // 获取连接
        conn = JdbcUtils.getDruidConnection();
        // 编写sql
        String sql = "select id,`name`,email,birth from customers where id = ?";
        // 实例化一个 Handler 的实现类
        BeanHandler<Customers> cushandler = new BeanHandler<Customers>(Customers.class);
        // 执行查询方法,返回 customers 对象
        Customers cus = runner.query(conn, sql, cushandler, 10);
        System.out.println(cus);
    } catch (Exception e) {
        e.printStackTrace();
    } finally {
        try {
            JdbcUtils.closeConnection(conn,null);
        } catch (SQLException throwables) {
            throwables.printStackTrace();
        }
    }
}
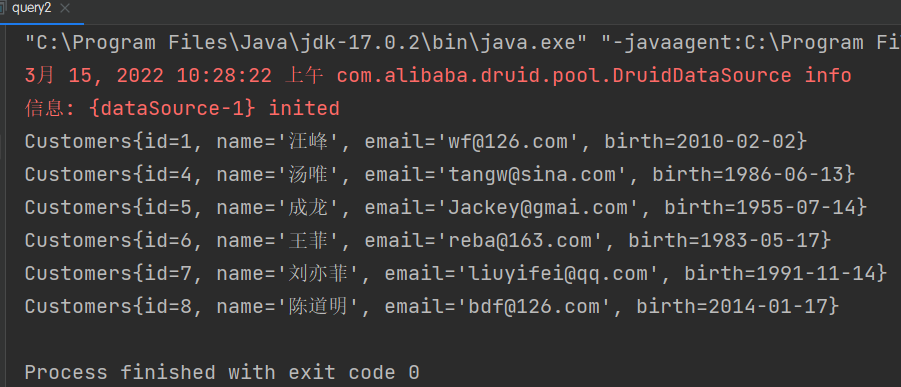
查询方法,返回 BeanListHandler
BeanListHandler 返回由对象组成的一个集合
查询 id 小于 10 的数据:
public static void main(String[] args) {
    Connection conn = null;
    try {
        QueryRunner runner = new QueryRunner();
        // 获取连接
        conn = JdbcUtils.getDruidConnection();
        // 编写sql
        String sql = "select id,`name`,email,birth from customers where id < ?";
        // 实例化一个 BeanListHandler 的实现类
        BeanListHandler<Customers> beanlist = new BeanListHandler<Customers>(Customers.class);
        // 执行查询方法,返回 customers 对象
        List<Customers> customersList = runner.query(conn, sql, beanlist, 10);
        // 遍历结果集
        customersList.forEach(System.out::println);
    } catch (Exception e) {
        e.printStackTrace();
    } finally {
        try {
            JdbcUtils.closeConnection(conn,null);
        } catch (SQLException throwables) {
            throwables.printStackTrace();
        }
    }
}
查询方法,返回 MapHandler
public static void main(String[] args){
    Connection conn = null;
    try {
        QueryRunner runner = new QueryRunner();
        conn = JdbcUtils.getDruidConnection();
        MapHandler mapHandler = new MapHandler();
        String sql = "select id,`name`,email,birth from customers where id = ?";
        Map<String, Object> query = runner.query(conn, sql, mapHandler, 10);
        System.out.println(query);
    } catch (Exception e) {
        e.printStackTrace();
    } finally {
        try {
            JdbcUtils.closeConnection(conn,null);
        } catch (SQLException throwables) {
            throwables.printStackTrace();
        }
    }
}

查询方法,返回 MapListHandler
public static void main(String[] args) throws Exception {
    QueryRunner runner = new QueryRunner();
    Connection conn = JdbcUtils.getDruidConnection();
    String sql = "select id,`name`,email,birth from customers where id < ?";
    MapListHandler mapListHandler = new MapListHandler();
    List<Map<String, Object>> mapList = runner.query(conn, sql, mapListHandler, 10);
    mapList.forEach(System.out::println);
}
查询表中的特殊值
使用 ScalarHandler 查询表中数据总和
public static void main(String[] args) throws Exception {
    Connection conn = JdbcUtils.getConnection();
    QueryRunner runner = new QueryRunner();
    String sql = "select count(*) from customers";
    // 实例化一个 ScalarHandler
    ScalarHandler<Long> handler = new ScalarHandler<>();
    Long count = runner.query(conn, sql, handler);
    System.out.println(count);
}
使用 ScalarHandler 查询表中最大的生日
public static void main(String[] args) throws Exception {
    QueryRunner runner = new QueryRunner();
    Connection conn = JdbcUtils.getDruidConnection();
    ScalarHandler<Date> handler = new ScalarHandler<>();
    String sql = "select max(birth) from customers";
    Date maxbirth = runner.query(conn, sql, handler);
    System.out.println(maxbirth);
}
使用DbUtils工具类关闭连接
closeQuietly 方法帮我们处理了异常和非空判断
public static void dbUtilsClose(Connection conn, Statement pst){
    DbUtils.closeQuietly(conn);
    DbUtils.closeQuietly(pst);
}


 2855
2855


 被折叠的 条评论
为什么被折叠?
被折叠的 条评论
为什么被折叠?
 到【灌水乐园】发言


