


框架搭建的注意点
怎样设置cell的左右有间距 ->自定义cell中修改cell的frame
- 重写cell的setFrameL:方法
- (void)setFrame:(CGRect)frame{
    frame.origin.x += 5;
    frame.size.width -= 10;
    frame.size.height -= 1;

    [super setFrame:frame];
}
自定义NavigationController,拦截所有push进来的控制器
- 自定义NavigationController,重写pushViewController:animated:方法
- (void)pushViewController:(UIViewController *)viewController animated:(BOOL)animated
{
    if (self.childViewControllers.count > 0) { // 如果push进来的不是第一个控制器
        UIButton *button = [UIButton buttonWithType:UIButtonTypeCustom];
        [button setTitle:@"返回" forState:UIControlStateNormal];
        [button setImage:[UIImage imageNamed:@"navigationButtonReturn"] forState:UIControlStateNormal];
        [button setImage:[UIImage imageNamed:@"navigationButtonReturnClick"] forState:UIControlStateHighlighted];
        button.size = CGSizeMake(70, 30);
        // 让按钮内部的所有内容左对齐
        button.contentHorizontalAlignment = UIControlContentHorizontalAlignmentLeft;
//        [button sizeToFit];
        // 让按钮的内容往左边偏移10
        button.contentEdgeInsets = UIEdgeInsetsMake(0, -10, 0, 0);
        [button setTitleColor:[UIColor blackColor] forState:UIControlStateNormal];
        [button setTitleColor:[UIColor redColor] forState:UIControlStateHighlighted];
        [button addTarget:self action:@selector(back) forControlEvents:UIControlEventTouchUpInside];

        // 修改导航栏左边的item
        viewController.navigationItem.leftBarButtonItem = [[UIBarButtonItem alloc] initWithCustomView:button];

        // 隐藏tabbar
        viewController.hidesBottomBarWhenPushed = YES;
    }

    // 这句super的push要放在后面, 让viewController可以覆盖上面设置的leftBarButtonItem
    [super pushViewController:viewController animated:animated];

}
在自定义的UITabBarController中,通过appearance统一设置所有UITabBarItem的属性
+ (void)initialize
{
    // 通过appearance统一设置所有UITabBarItem的文字属性
    // 后面带有UI_APPEARANCE_SELECTOR的方法, 都可以通过appearance对象来统一设置
    NSMutableDictionary *attrs = [NSMutableDictionary dictionary];
    attrs[NSFontAttributeName] = [UIFont systemFontOfSize:12];
    attrs[NSForegroundColorAttributeName] = [UIColor grayColor];

    NSMutableDictionary *selectedAttrs = [NSMutableDictionary dictionary];
    selectedAttrs[NSFontAttributeName] = attrs[NSFontAttributeName];
    selectedAttrs[NSForegroundColorAttributeName] = [UIColor darkGrayColor];

    UITabBarItem *item = [UITabBarItem appearance];
    [item setTitleTextAttributes:attrs forState:UIControlStateNormal];
    [item setTitleTextAttributes:selectedAttrs forState:UIControlStateSelected];
}
设置UITabBarItem的图片时,UITabBarItem选中时的图标(selectedImage)对应的图片会被xcode自动渲染成蓝色样式,如何取消图片的自动渲染效果?
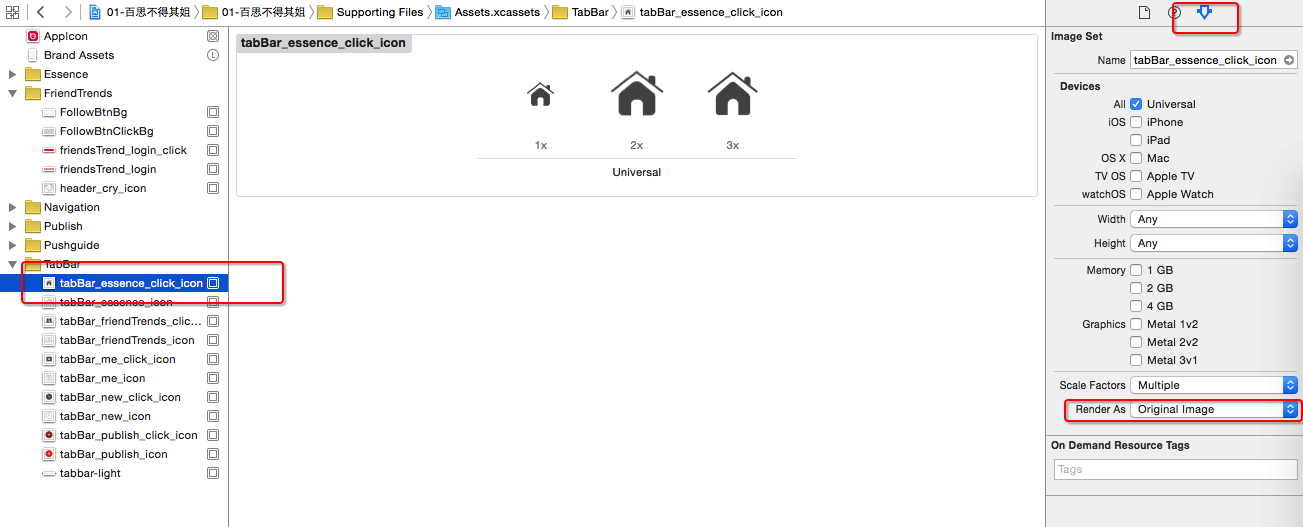
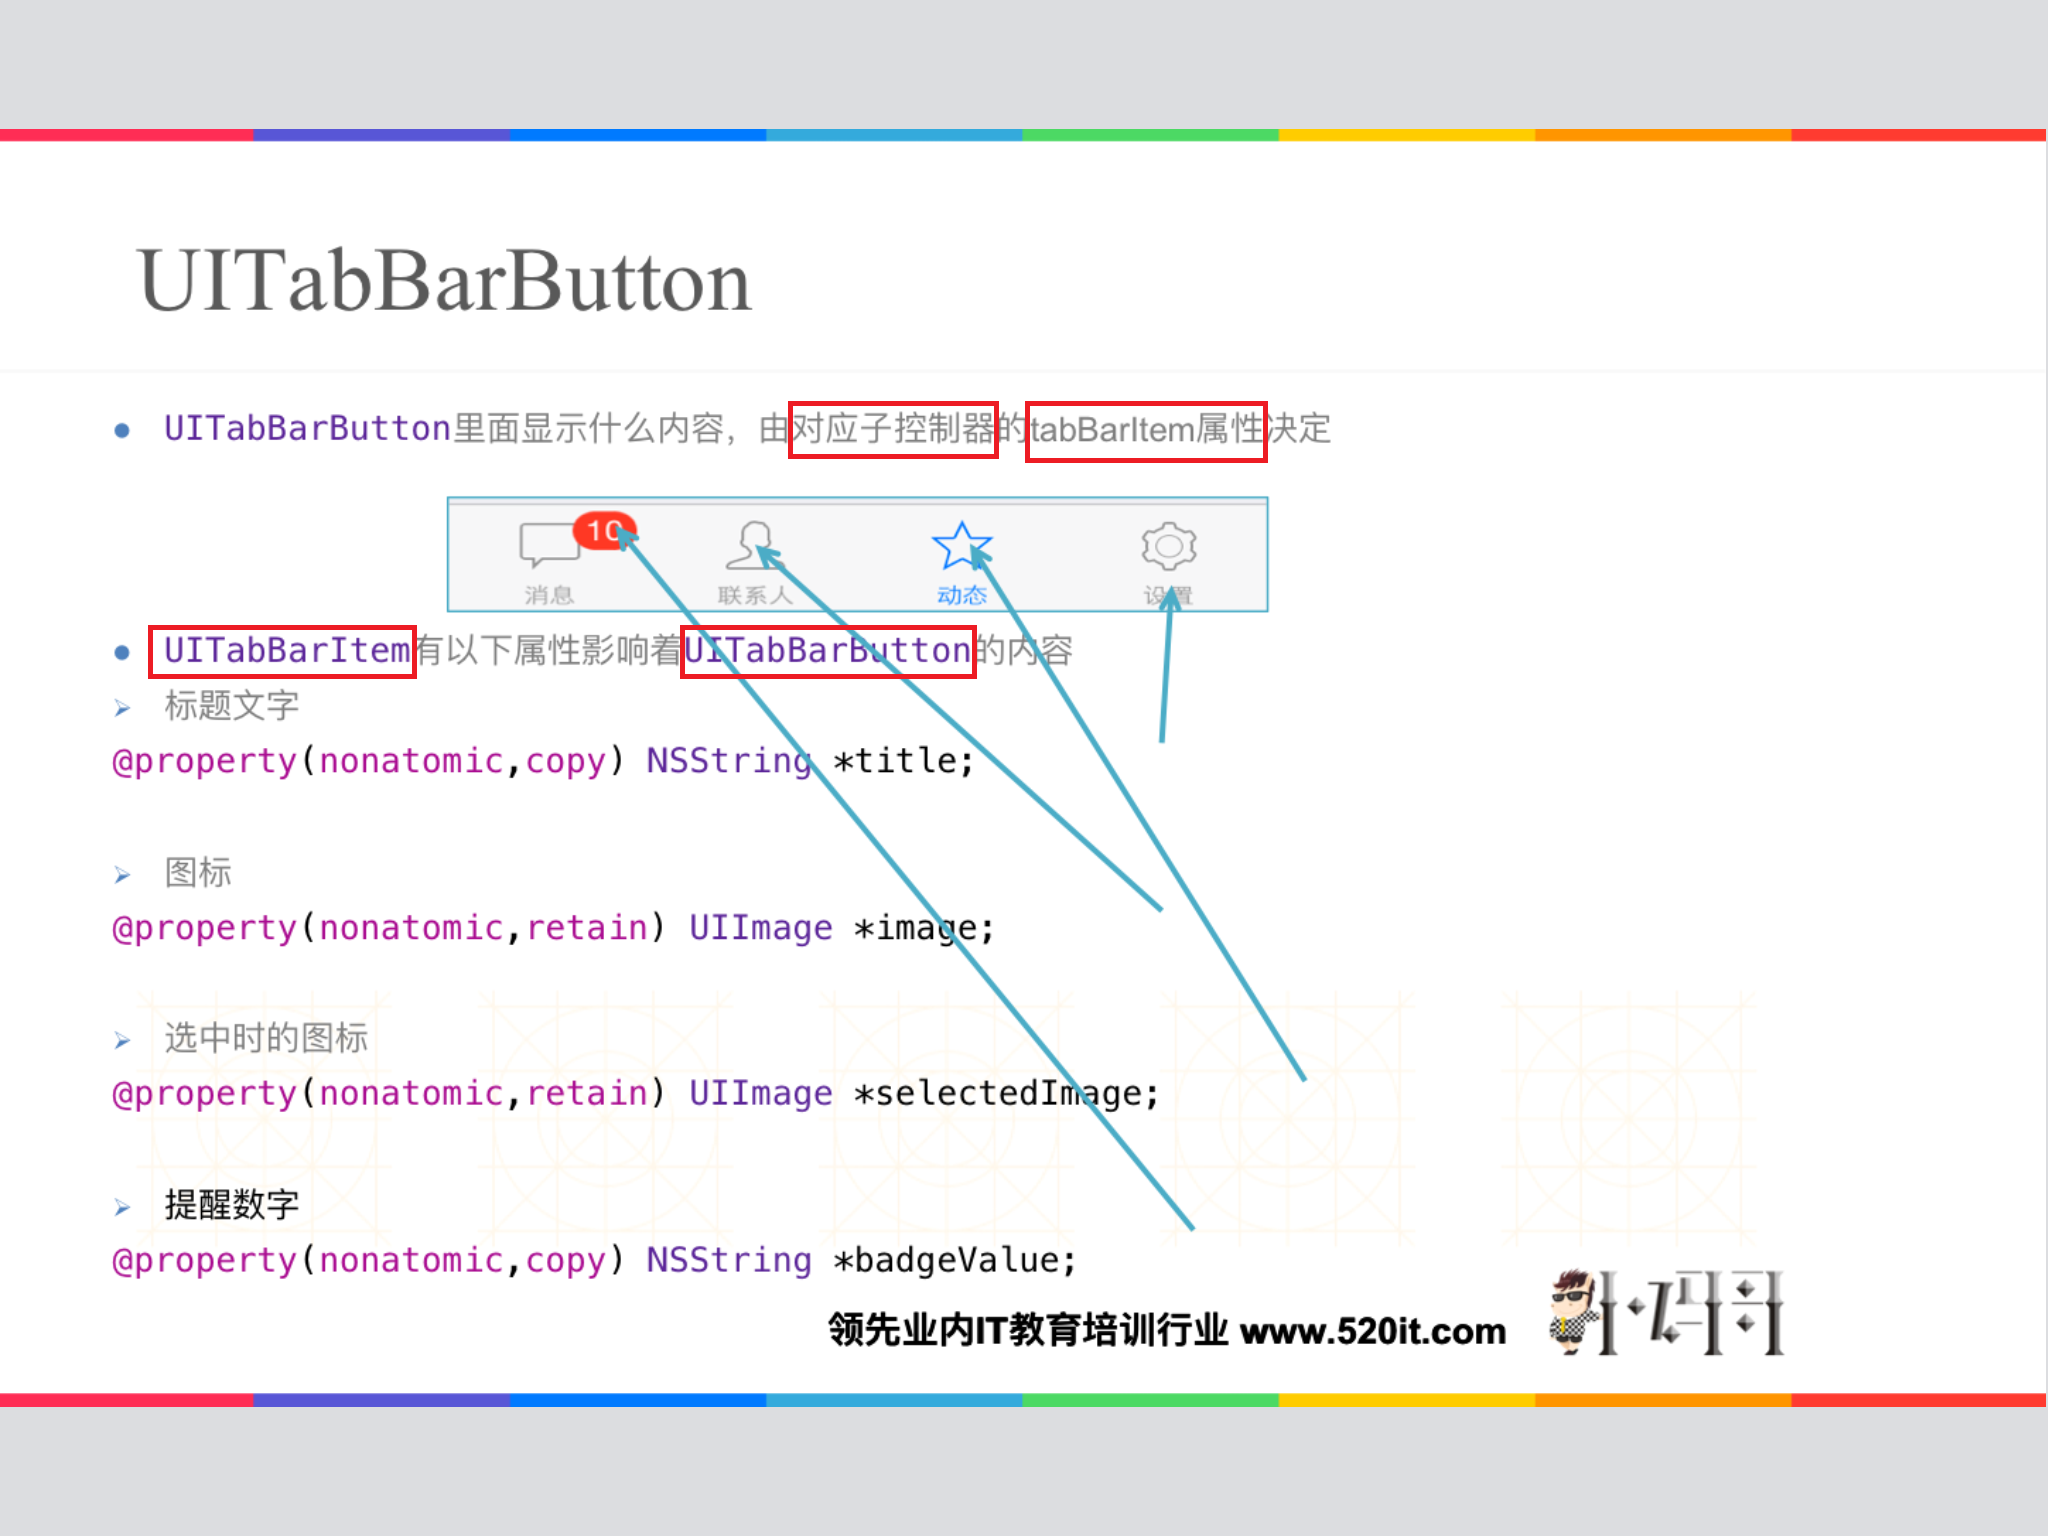
vc.tabBarItem.title = title;
vc.tabBarItem.image = [UIImage imageNamed:image];
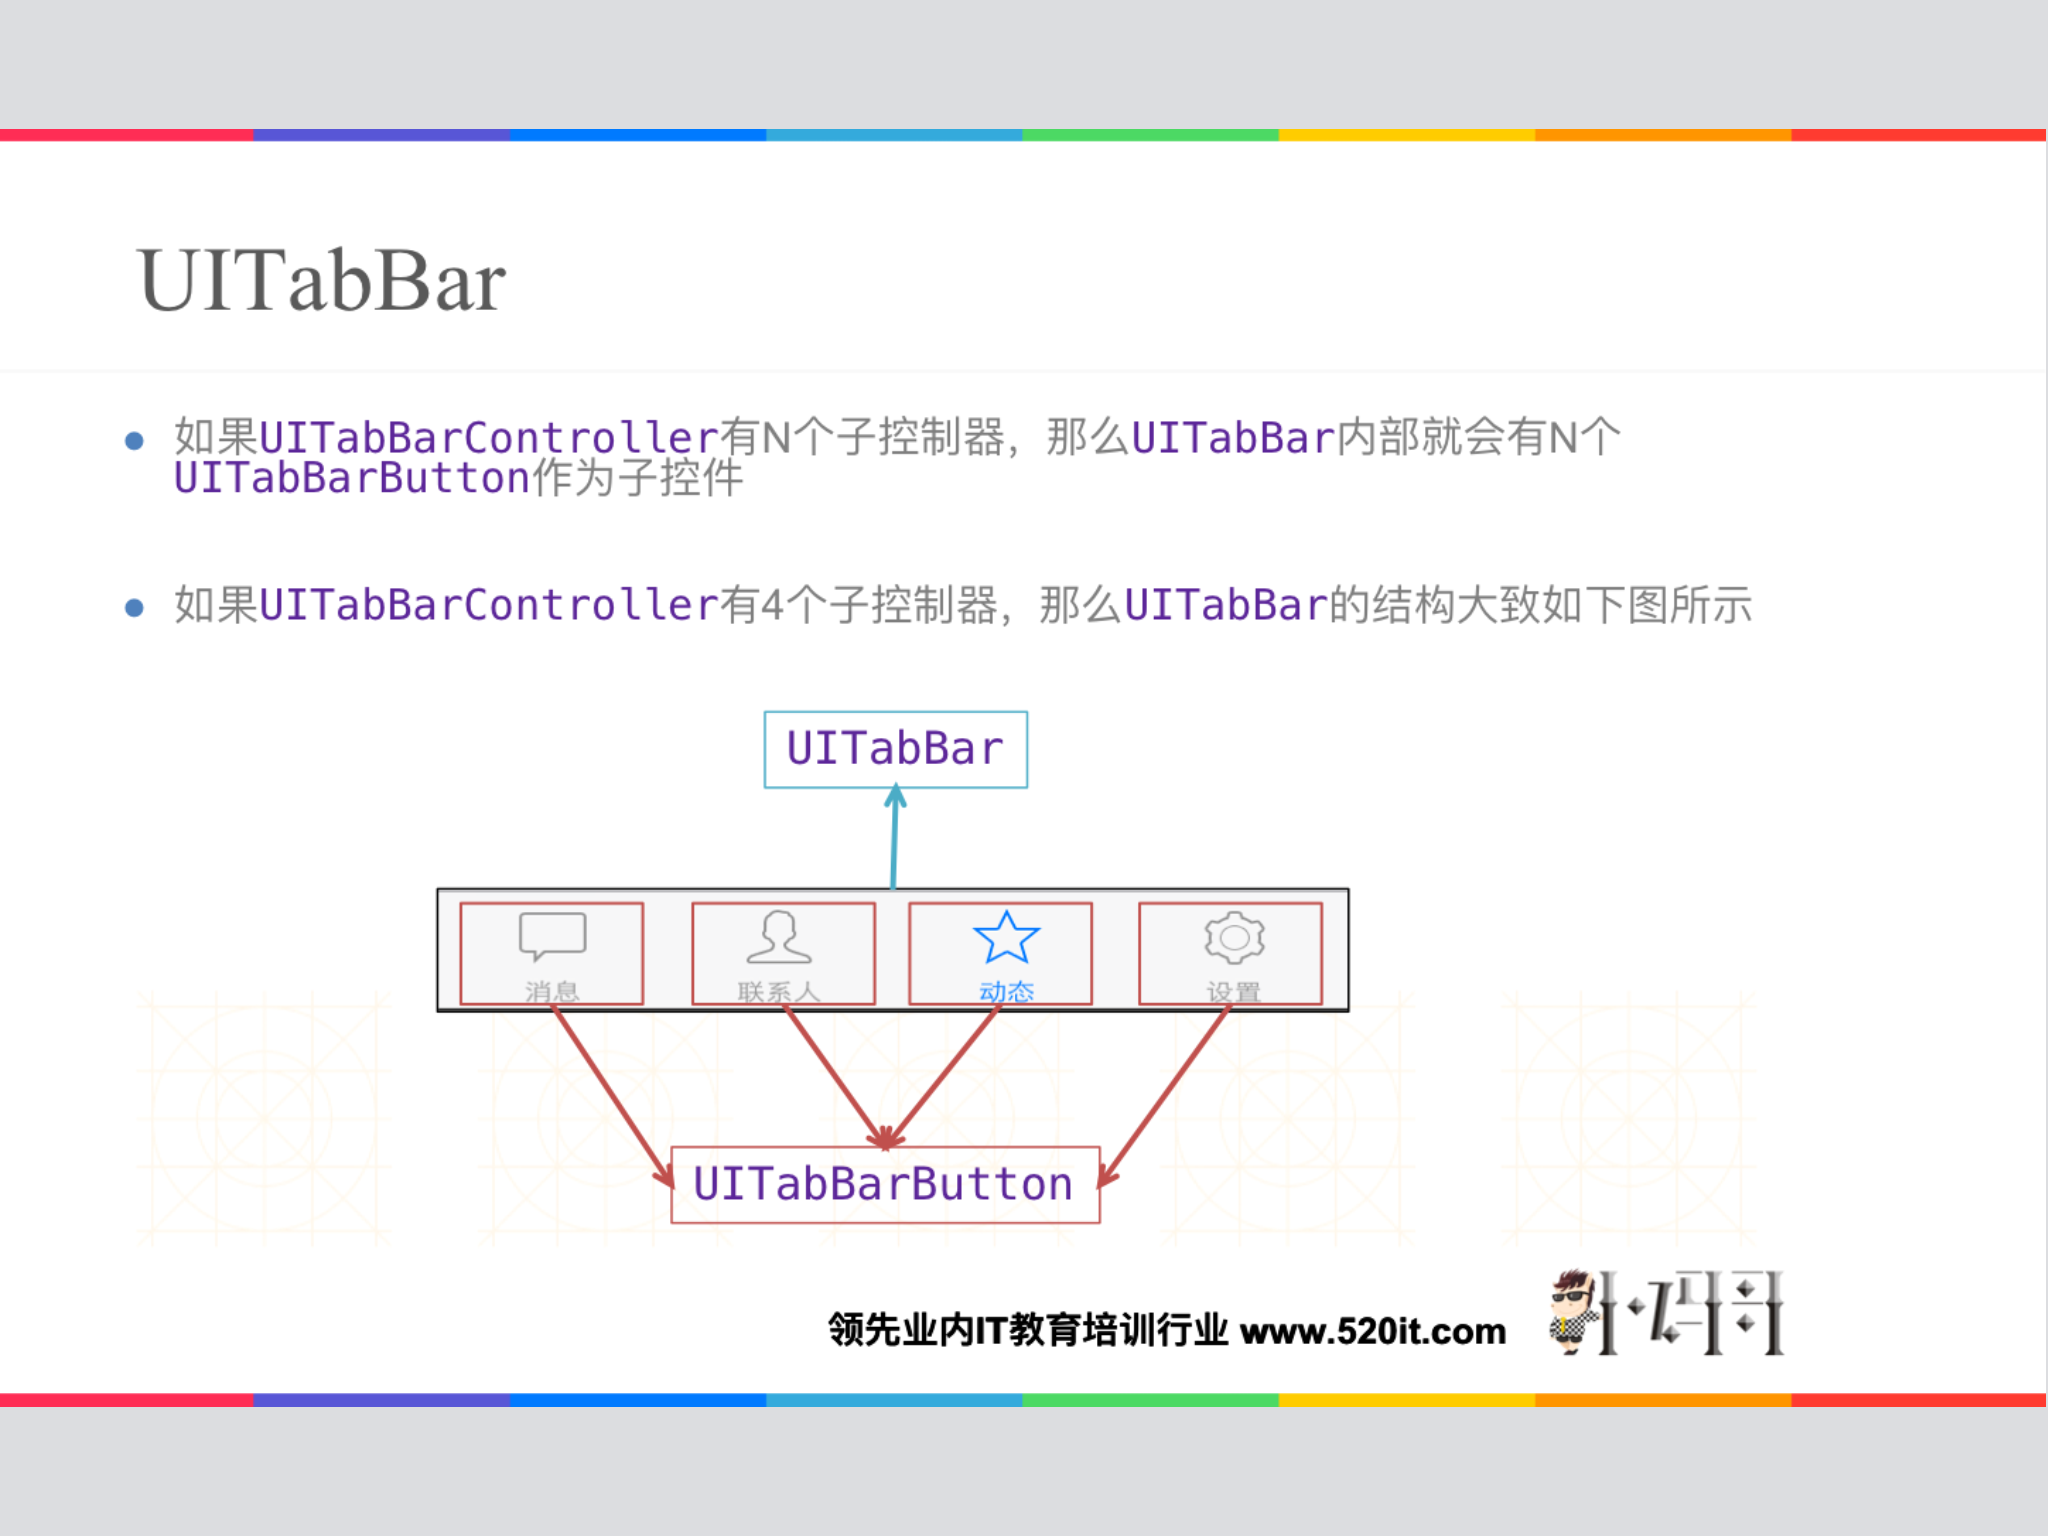
vc.tabBarItem.selectedImage = [UIImage imageNamed:selectedImage];如何自定义UITabBarController的UITabBar
- 自定义一个UITabBar
- 在TabBarController中更换tabBar
- (void)viewDidLoad
{
    [super viewDidLoad];

    // 更换tabBar
    [self setValue:[[AHTabBar alloc] init] forKeyPath:@"tabBar"];
}
在自定义的UINavigationController中,通过appearance统一设置UINavigationBar
/**
 * 当第一次使用这个类的时候会调用一次UINavigationBar的属性
 */
+ (void)initialize
{
    // 当导航栏用在AHNavigationController中, appearance设置才会生效
    // UINavigationBar *bar = [UINavigationBar appearanceWhenContainedIn:[self class], nil];
    UINavigationBar *bar = [UINavigationBar appearance];
    [bar setBackgroundImage:[UIImage imageNamed:@"navigationbarBackgroundWhite"] forBarMetrics:UIBarMetricsDefault];
}
如何修改导航栏的内容
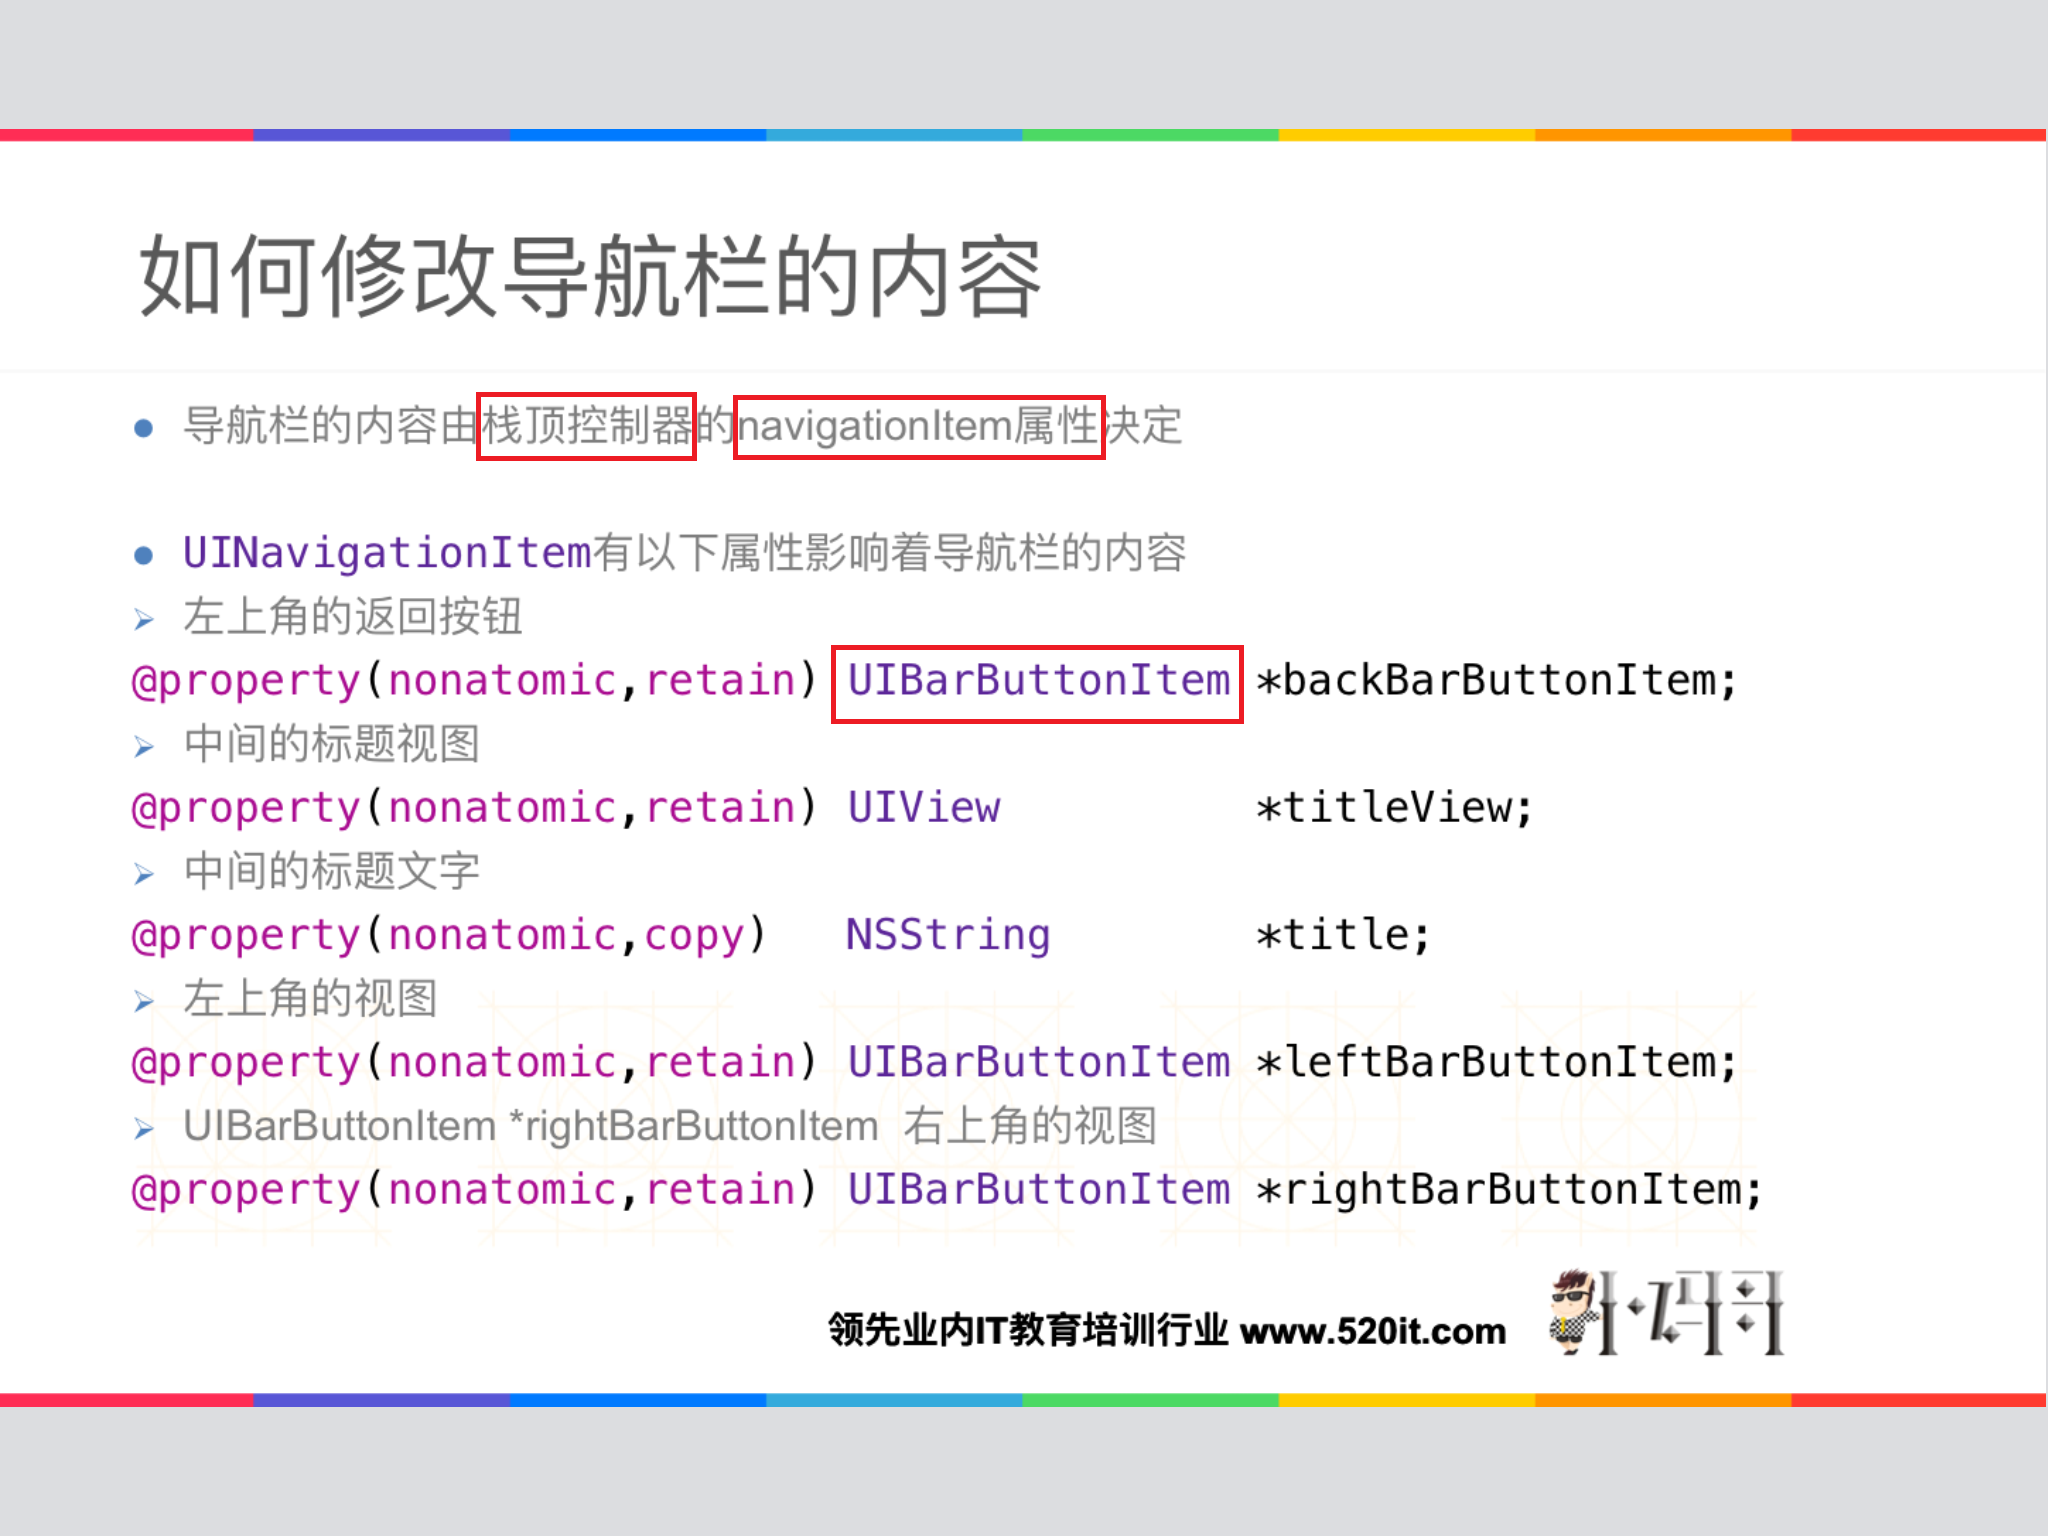
- 修改导航栏上的
leftBarButtoniItem和rightBarButtoniItem可以写一个分类
#import <UIKit/UIKit.h>

@interface UIBarButtonItem (AHExtension)
+ (instancetype)itemWithImage:(NSString *)image highImage:(NSString *)highImage target:(id)target action:(SEL)action;
@end
#import "UIBarButtonItem+AHExtension.h"
@implementation UIBarButtonItem (AHExtension)
+ (instancetype)itemWithImage:(NSString *)image highImage:(NSString *)highImage
target:(id)target action:(SEL)action
{
UIButton *button = [UIButton buttonWithType:UIButtonTypeCustom];
[button setBackgroundImage:[UIImage imageNamed:image] forState:UIControlStateNormal];
[button setBackgroundImage:[UIImage imageNamed:highImage] forState:UIControlStateHighlighted];
button.size = button.currentBackgroundImage.size;
[button addTarget:target action:action forControlEvents:UIControlEventTouchUpInside];
return [[self alloc] initWithCustomView:button];
}
@end- (void)viewDidLoad
{
[super viewDidLoad];
// 设置导航栏标题
self.navigationItem.title = @"我的关注";
// 设置导航栏左边的按钮
self.navigationItem.leftBarButtonItem = [UIBarButtonItem itemWithImage:@"friendsRecommentIcon"
highImage:@"friendsRecommentIcon-click" target:self action:@selector(friendsClick)];
// 设置背景色
self.view.backgroundColor = [UIColor blockColor];
}登录注册界面的注意点
状态栏颜色的更改
/**
 * 让当前控制器对应的状态栏是白色
 */
- (UIStatusBarStyle)preferredStatusBarStyle{
    return UIStatusBarStyleLightContent;
}
修改文本框占位文字的颜色
- 设置文本框的
attributedPlaceholder属性
@property(nullable, nonatomic,copy) NSAttributedString *attributedPlaceholderNSAttributedString带有属性的文字
    // 文字属性
    NSMutableDictionary *attrs = [NSMutableDictionary dictionary];
    attrs[NSForegroundColorAttributeName] = [UIColor grayColor];

    // NSAttributedString : 带有属性的文字(富文本技术)
    NSAttributedString *placeholder = [[NSAttributedString alloc] initWithString:@"手机号" attributes:attrs];
    self.phoneField.attributedPlaceholder = placeholder;
NSMutableAttributedString *placehoder = [[NSMutableAttributedString alloc] initWithString:@"手机号"];
[placehoder setAttributes:@{NSForegroundColorAttributeName : [UIColor whiteColor]} range:NSMakeRange(0, 1)];
[placehoder setAttributes:@{
NSForegroundColorAttributeName : [UIColor yellowColor],
NSFontAttributeName : [UIFont systemFontOfSize:30]
} range:NSMakeRange(1, 1)];
[placehoder setAttributes:@{NSForegroundColorAttributeName : [UIColor redColor]} range:NSMakeRange(2, 1)];
self.phoneField.attributedPlaceholder = placehoder;
- 自定义TextField,重写
drawPlaceholderInRect:方法
- (void)drawPlaceholderInRect:(CGRect)rect
{
    [self.placeholder drawInRect:CGRectMake(0, 10, rect.size.width, 25) withAttributes:@{
                                                 NSForegroundColorAttributeName : [UIColor grayColor],
                                                 NSFontAttributeName : self.font}];
}- 使用KVC
- 运行时(Runtime)找到_placeholderLabel.textColor,使用KVC更改颜色
[self setValue:[UIColor grayColor] forKeyPath:@"_placeholderLabel.textColor"]; - 完整代码实现,自定义一个TextField,实现一下方法
- 运行时(Runtime)找到_placeholderLabel.textColor,使用KVC更改颜色
- (void)awakeFromNib{
    // 设置光标颜色和文字颜色一致
    self.tintColor = self.textColor;

    // 不成为第一响应者
    [self resignFirstResponder];
}

/**
 * 当前文本框聚焦时就会调用
 */
- (BOOL)becomeFirstResponder{
    // 修改占位文字颜色
    [self setValue:self.textColor forKeyPath:@"_placeholderLabel.textColor"];
    return [super becomeFirstResponder];
}

/**
 * 当前文本框失去焦点时就会调用
 */
- (BOOL)resignFirstResponder{
    // 修改占位文字颜色
    [self setValue:[UIColor grayColor] forKeyPath:@"_placeholderLabel.textColor"];
    return [super resignFirstResponder];
}
运行时(Runtime)
- 苹果官方一套C语言库
- 能做很多底层操作(比如访问隐藏的一些成员变量\成员方法….)
- 访问成员变量举例
unsigned int count = 0;

// 拷贝出所有的成员变量列表
//(类似于这样的就是属性@property(nonatomic, strong) UIView *view)
Ivar *ivars = class_copyIvarList([UITextField class], &count);

for (int i = 0; i<count; i++) {
    // 取出成员变量
    // Ivar ivar = *(ivars + i);
    Ivar ivar = ivars[i];

    // 打印成员变量名字
    XMGLog(@"%s", ivar_getName(ivar));
}

// 释放
free(ivars);
// 拷贝出所有的属性列表
unsigned int count = 0;
objc_property_t *properties = class_copyPropertyList([UITextField class], &count);
for (int i = 0; i<count; i++) {
// 取出属性
objc_property_t property = properties[i];
// 打印属性名字, 属性类型
XMGLog(@"%s <----> %s", property_getName(property), property_getAttributes(property));
}
free(properties);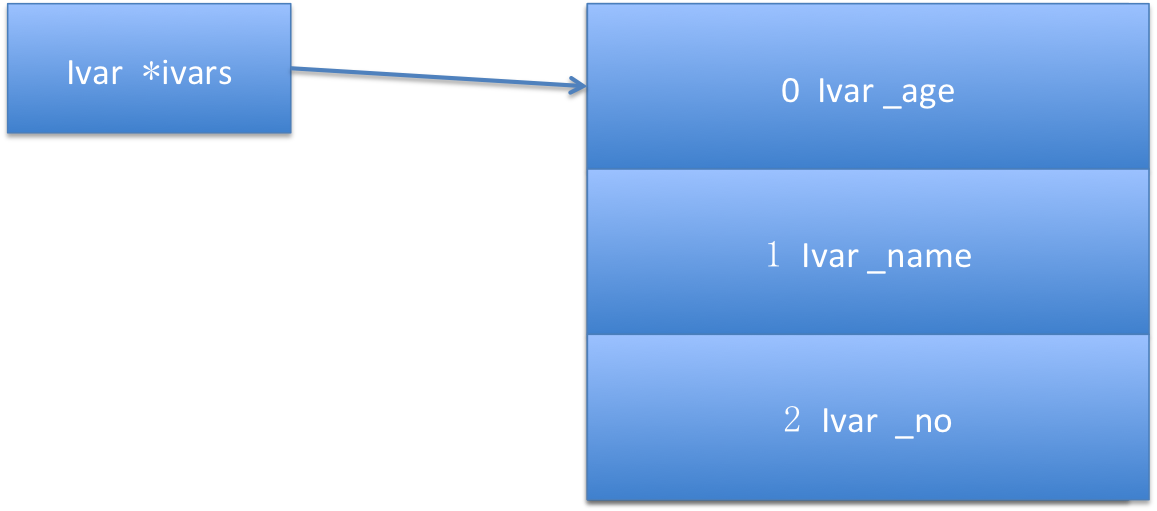
注册框,登陆框的切换
- 注册框的约束
- 左边约束设置为紧挨着登陆框的右边
- 顶部约束设置为和登陆框的顶部同高
- 宽度约束设置为和登录框的约束同高.
- 让控制器拥有登录框左边的约束属性
- 点击按钮时,根据情况更改登录框的左边的约束 的
constant
    // 退出键盘
    [self.view endEditing:YES];

    if (self.loginViewLeftMargin.constant == 0) { // 显示注册界面
        self.loginViewLeftMargin.constant = - self.view.width;
        // 还可以在xib中设置 selected 样式下的文字为已有账号?
        // 通过设置按钮selected的值,控制按钮的文字
        // button.selected = YES;
        [button setTitle:@"已有账号?" forState:UIControlStateNormal];
    } else { // 显示登录界面
        self.loginViewLeftMargin.constant = 0;
        // button.selected = NO;
        [button setTitle:@"注册账号" forState:UIControlStateNormal];
    }

    [UIView animateWithDuration:0.25 animations:^{
        [self.view layoutIfNeeded];
    }];
推送引导
- 取出当前的版本号,再获得沙盒中存储的版本号
- 当前的版本号不等于沙盒中存储的版本号,自定义一个View作为推送引导界面,添加到window上面
- 存储当前的版本号
NSString *key = @"CFBundleShortVersionString";

// 获得当前软件的版本号
NSString *currentVersion = [NSBundle mainBundle].infoDictionary[key];
// 获得沙盒中存储的版本号
NSString *sanboxVersion = [[NSUserDefaults standardUserDefaults] stringForKey:key];

if (![currentVersion isEqualToString:sanboxVersion]) {
    UIWindow *window = [UIApplication sharedApplication].keyWindow;

    XMGPushGuideView *guideView = [XMGPushGuideView guideView];
    guideView.frame = window.bounds;
    [window addSubview:guideView];

    // 存储版本号
    [[NSUserDefaults standardUserDefaults] setObject:currentVersion forKey:key];
    [[NSUserDefaults standardUserDefaults] synchronize];
}
精华模块
计算两个日期(NSDate)的时间差值
- 基本方法
// 当前时间
NSDate *now = [NSDate date];

// 创建日期格式化类
NSDateFormatter *fmt = [[NSDateFormatter alloc] init];
// 设置日期格式(y:年,M:月,d:日,H:时,m:分,s:秒)
fmt.dateFormat = @"yyyy-MM-dd HH:mm:ss";
// 发帖时间
NSDate *create = [fmt dateFromString:create_time];

// 当前时间和发帖时间的差值(按秒计算)
NSTimeInterval delta = [now timeIntervalSinceDate:create];- NSCalendar
- 获得NSDate的每一个元素
- 比较时间
// 获得NSDate的每一个元素
NSDate *now = [NSDate date];
// 日历
NSCalendar *calendar = [NSCalendar currentCalendar];

// 获得NSDate的每一个元素
NSInteger year = [calendar component:NSCalendarUnitYear fromDate:now];
NSInteger month = [calendar component:NSCalendarUnitMonth fromDate:now];
NSInteger day = [calendar component:NSCalendarUnitDay fromDate:now];
NSDateComponents *cmps = [calendar components:NSCalendarUnitDay | NSCalendarUnitMonth | NSCalendarUnitYear fromDate:now];
NSLog(@"%zd %zd %zd", cmps.year, cmps.month, cmps.day);
// 计算两个日期(NSDate)的时间差值
// 日期格式化类
NSDateFormatter *fmt = [[NSDateFormatter alloc] init];
// 设置日期格式(y:年,M:月,d:日,H:时,m:分,s:秒)
fmt.dateFormat = @"yyyy-MM-dd HH:mm:ss";
// 当前时间
NSDate *now = [NSDate date];
// 发帖时间
NSDate *create = [fmt dateFromString:create_time];
// 日历
NSCalendar *calendar = [NSCalendar currentCalendar];
// 比较时间
NSCalendarUnit unit = NSCalendarUnitDay | NSCalendarUnitMonth | NSCalendarUnitYear | NSCalendarUnitHour | NSCalendarUnitMinute | NSCalendarUnitSecond;
NSDateComponents *cmps = [calendar components:unit fromDate:create toDate:now options:0];
NSLog(@"%@ %@", create, now);
NSLog(@"%zd %zd %zd %zd %zd %zd", cmps.year, cmps.month, cmps.day, cmps.hour, cmps.minute, cmps.second);- 写一个SNDate的分类
#import <Foundation/Foundation.h>

@interface NSDate (AHExtension)
/**
 * 比较from和self的时间差值
 */
- (NSDateComponents *)deltaFrom:(NSDate *)from;

/**
 * 是否为今年
 */
- (BOOL)isThisYear;

/**
 * 是否为今天
 */
- (BOOL)isToday;

/**
 * 是否为昨天
 */
- (BOOL)isYesterday;
@end
#import "NSDate+AHExtension.h"
@implementation NSDate (AHExtension)
- (NSDateComponents *)deltaFrom:(NSDate *)from{
// 日历
NSCalendar *calendar = [NSCalendar currentCalendar];
// 比较时间
NSCalendarUnit unit = NSCalendarUnitDay | NSCalendarUnitMonth | NSCalendarUnitYear | NSCalendarUnitHour | NSCalendarUnitMinute | NSCalendarUnitSecond;
return [calendar components:unit fromDate:from];
}
- (BOOL)isThisYear
{
// 日历
NSCalendar *calendar = [NSCalendar currentCalendar];
NSInteger nowYear = [calendar component:NSCalendarUnitYear fromDate:[NSDate date]];
NSInteger selfYear = [calendar component:NSCalendarUnitYear fromDate:self];
return nowYear == selfYear;
}
//- (BOOL)isToday
//{
// // 日历
// NSCalendar *calendar = [NSCalendar currentCalendar];
//
// NSCalendarUnit unit = NSCalendarUnitYear | NSCalendarUnitMonth | NSCalendarUnitDay;
//
// NSDateComponents *nowCmps = [calendar components:unit fromDate:[NSDate date]];
// NSDateComponents *selfCmps = [calendar components:unit fromDate:self];
//
// return nowCmps.year == selfCmps.year
// && nowCmps.month == selfCmps.month
// && nowCmps.day == selfCmps.day;
//}
- (BOOL)isToday
{
NSDateFormatter *fmt = [[NSDateFormatter alloc] init];
fmt.dateFormat = @"yyyy-MM-dd";
NSString *nowString = [fmt stringFromDate:[NSDate date]];
NSString *selfString = [fmt stringFromDate:self];
return [nowString isEqualToString:selfString];
}
- (BOOL)isYesterday
{
// 2014-12-31 23:59:59 -> 2014-12-31
// 2015-01-01 00:00:01 -> 2015-01-01
// 日期格式化类
NSDateFormatter *fmt = [[NSDateFormatter alloc] init];
fmt.dateFormat = @"yyyy-MM-dd";
NSDate *nowDate = [fmt dateFromString:[fmt stringFromDate:[NSDate date]]];
NSDate *selfDate = [fmt dateFromString:[fmt stringFromDate:self]];
NSCalendar *calendar = [NSCalendar currentCalendar];
NSDateComponents *cmps = [calendar components:NSCalendarUnitDay | NSCalendarUnitMonth | NSCalendarUnitYear fromDate:selfDate toDate:nowDate options:0];
return cmps.year == 0
&& cmps.month == 0
&& cmps.day == 1;
}
时间的格式化
- 今年
- 今天
- 一分钟内:刚刚
- 一小时内:XX分钟前
- 其他:XX小时前
- 昨天
- 昨天 19:20:30
- 其他
- 02-28 19:20:30
- 今天
- 非今年
- 2015-05-08 18:45:30
在AHTopic模型中,重写create_time get方法
- 2015-05-08 18:45:30
- (NSString *)create_time{
    // 日期格式化类
    NSDateFormatter *fmt = [[NSDateFormatter alloc] init];
    // 设置日期格式(y:年,M:月,d:日,H:时,m:分,s:秒)
    fmt.dateFormat = @"yyyy-MM-dd HH:mm:ss";
    // 帖子的创建时间
    NSDate *create = [fmt dateFromString:_create_time];

    if (create.isThisYear) { // 今年
        if (create.isToday) { // 今天
            NSDateComponents *cmps = [[NSDate date] deltaFrom:create];

            if (cmps.hour >= 1) { // 时间差距 >= 1小时
                return [NSString stringWithFormat:@"%zd小时前", cmps.hour];
            } else if (cmps.minute >= 1) { // 1小时 > 时间差距 >= 1分钟
                return [NSString stringWithFormat:@"%zd分钟前", cmps.minute];
            } else { // 1分钟 > 时间差距
                return @"刚刚";
            }
        } else if (create.isYesterday) { // 昨天
            fmt.dateFormat = @"昨天 HH:mm:ss";
            return [fmt stringFromDate:create];
        } else { // 其他
            fmt.dateFormat = @"MM-dd HH:mm:ss";
            return [fmt stringFromDate:create];
        }
    } else { // 非今年
        return _create_time;
    }
}


 561
561


 被折叠的 条评论
为什么被折叠?
被折叠的 条评论
为什么被折叠?
 到【灌水乐园】发言


