


这篇博客道长给大家说一下快速索引的实现,这都是道长以前积攒的自定义view,之前没整理。现在抽空整理出来和小伙伴们分享一下。
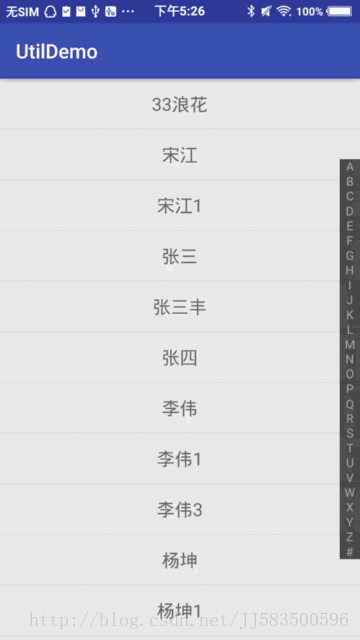
先看一下效果图:
一、绘制View
- 构造方法
    /**
     * 构造方法
     *
     * @param context
     * @param attrs
     * @param defStyle
     */
    public QuickIndexBar(Context context, AttributeSet attrs, int defStyle) {
        super(context, attrs, defStyle);
        init(context, attrs, defStyle);
    }

    public QuickIndexBar(Context context, AttributeSet attrs) {
        super(context, attrs);
        init(context, attrs, 0);
    }

    public QuickIndexBar(Context context) {
        super(context);
        init(context, null, 0);
    }
我们在构造方法中对View进行初始化,代码如下:
    /**
     * 初始化属性
     *
     * @param context
     * @param attrs
     * @param defStyle
     */
    private void init(Context context, AttributeSet attrs, int defStyle) {
        // 默认属性
        defaultData(context);

        // 读取xml中设置的属性
        if (attrs != null) {

            TypedArray typedArray = context.obtainStyledAttributes(attrs, R.styleable.QuickIndexBar);
            textSize = (int) typedArray.getDimension(R.styleable.QuickIndexBar_barTextSize, textSize);
            textColor = typedArray.getColor(R.styleable.QuickIndexBar_barTextColor, textColor);
        }

        // 出事化画笔
        paint = new Paint();
        // 设置抗锯齿
        paint.setAntiAlias(true);
        paint.setColor(textColor);
        paint.setTextSize(textSize);
        // 画笔绘制文本默认的起点是文本的左下角,将文本的起点设置为文本底边的中心
        paint.setTextAlign(Paint.Align.CENTER);
}我们看到这里有默认属性和从xml中读取的属性值,当然这个是自定义属性,关于自定义属性道长就不多说了,不知道如何使用自定义属性的小伙伴可以看一下道长以前的博客:自定义View:自定义属性(自定义按钮实现)。这篇博客中也提供了另外一种读取自定义属性值的方法。
然后,我们还可以通过代码动态设置属性值,代码如下:
    /**
     * 设置索引字体的大小
     *
     * @param size
     */
    public void setTextSize(int size) {
        textSize = size;
        paint.setTextSize(textSize);
        invalidate();
    }

    /**
     * 设置索引字体的颜色
     *
     * @param color
     */
    public void setTextColor(int color) {
        textColor = color;
        paint.setTextSize(textColor);
        invalidate();
}- 绘制文字
绘制文字之前需要计算每个字母所在的位置,代码如下:
    /**
     * 绘制字母
     *
     * @param canvas:
     */
    @Override
    protected void onDraw(Canvas canvas) {
        super.onDraw(canvas);
        for (int i = 0; i < indexArr.length; i++) {
            float x = width / 2;
            float y = cellHeight / 2 + getTextHeight(indexArr[i]) / 2 + i * cellHeight;
            // 判断触摸的和正在绘制的是否是同一个字母
            paint.setColor(lastIndex == i ? Color.DKGRAY : textColor);
            canvas.drawText(indexArr[i], x, y, paint);
        }
    }

    @Override
    protected void onSizeChanged(int w, int h, int oldw, int oldh) {
        super.onSizeChanged(w, h, oldw, oldh);
        width = getMeasuredWidth();
        // 计算格子的高度
        cellHeight = getMeasuredHeight() * 1f / indexArr.length;
    }

    /**
     * 获取文本的高度
     *
     * @return :
     */
    private int getTextHeight(String text) {
        Rect bounds = new Rect();
        // 只要下面的方法功能一执行,则bound就有值了
        paint.getTextBounds(text, 0, text.length(), bounds);
        return bounds.height();
}- 回调方法的调用
在点击相应字母时,回调该方法。这样使用者可以根据返回值跳转到相应的条目,代码如下:
    @Override
    public boolean onTouchEvent(MotionEvent event) {
        switch (event.getAction()) {
            case MotionEvent.ACTION_DOWN:
            case MotionEvent.ACTION_MOVE:
                // 获取当前触摸字母索引
                int index = (int) (event.getY() / cellHeight);
                // 增强代码的健壮性
                if (index >= 0 && index < indexArr.length) {
                    // 如果当前触摸的和上一次触摸的不是同一个则打印
                    if (index != lastIndex) {
                        Log.i("tag", indexArr[index]);
                        if (listener != null) {
                            listener.onLetterChange(indexArr[index]);
                        }
                    }
                }
                lastIndex = index;
                break;
            case MotionEvent.ACTION_UP:
                // 抬起的时候重置lastIndex
                lastIndex = -1;
                break;
        }
        // 重绘
        postInvalidate();
        return true;
    }

    private OnLetterChangeListener listener;

    public void setOnLetterChangeListener(OnLetterChangeListener listener) {
        this.listener = listener;
    }

    /**
     * 回调接口
     */
    public interface OnLetterChangeListener {
        void onLetterChange(String letter);
}- 根据相应的回调返回值跳转到相应的条目
有的小伙伴发现了这里集合的排序有问题(但是这些不是重点啦 ^_^)。实现代码如下:
    private void initView() {
        listview = (ListView) findViewById(R.id.listview);
        currentWord = (TextView) findViewById(R.id.currentWord);

        quickIndexBar = (QuickIndexBar) findViewById(R.id.quickIndexBar);
        quickIndexBar.setOnLetterChangeListener(new QuickIndexBar.OnLetterChangeListener() {
            @Override
            public void onLetterChange(String letter) {
                //根据触摸的字母去集合中找首字母和letter相同的条目,然后将条目置顶
                for (int i = 0; i < friends.size(); i++) {
                    String word = PinYinUtil.getPinYin(friends.get(i)).charAt(0) + "";
                    if (word.equals(letter)) {
                        //说明当前的i就是需要的,则直接置顶
                        listview.setSelection(i);
                        //由于只需要找到第一个就行了,所以要中断
                        quickIndexBar.showCurrentWord(currentWord, letter);
                        break;
                    }
                }
            }
        });
    }
关于快速索引的实现就到这里,希望这篇博客能够为小伙伴提供一些帮助。这个控件功能比较简单。如果小伙伴们有什么好的想法,可以告诉道长。


 901
901

 被折叠的 条评论
为什么被折叠?
被折叠的 条评论
为什么被折叠?
 到【灌水乐园】发言


