


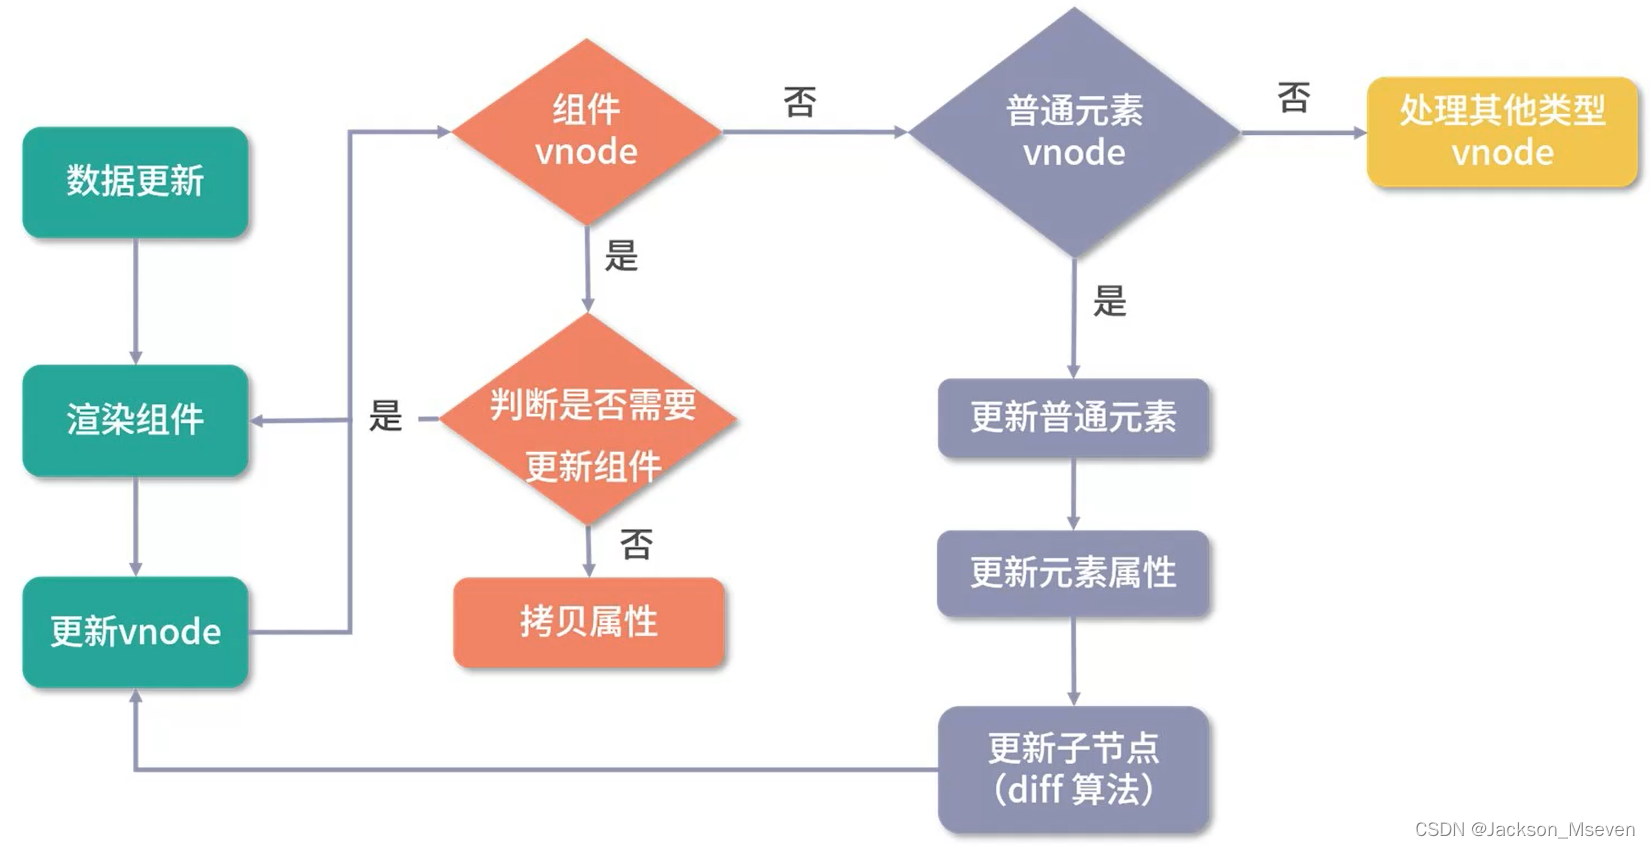
组件更新
组件更新流程:
-
从头部开始同步
-
从尾部开始同步
-
挂载剩余的新节点
-
删除多余的旧节点
-
处理未知的子序列
- 当两个节点类型相同时,执行更新操作
- 当新子节点中没有旧子节点中的某些节点时,执行删除操作
- 当新子节点中多了旧子节点中没有的节点时,执行添加操作
相对来说,这些操作中最麻烦的就是移动,既要判断哪些节点需要移动,也要清除如何移动。
移动子节点(如何以最小的时间复杂度移动子节点才是重点)
-
在新旧子节点序列中找出相同节点并更新
找出多余的节点删除,找出新的节点添加。
找出需要移动的节点,需要遍历对应的序列,如果在遍历旧子序列的过程中需要判断某个节点是否在新子序列中存在,这就需要双重循环,双重循环的复杂度是 O(n2),为了优化这个复杂度,建立索引图,把时间复杂度降低到 O(n)。
-
建立索引图(空间换时间)
在开发过程中,会给
v-for生成的列表中的每一项分配唯一 key 作为项的唯一 ID。对比新旧子序列中的节点,key 相同的就是同一个节点,执行执行 patch 更新即可。
-
移动和挂载新节点
Vue3 是通过获取最长递增子序列来进行移动的,动态规划解法的时间复杂度为 O(n2),而 Vue3 采用了 ”贪心+二分查找“ 来实现,贪心的时间复杂度为 O(n),二分查找的时间复杂度 O(logn),总时间复杂度为 O(nlogn)。
/**
 * 比较节点
 */
const patchKeyedChildren = (c1, c2, container, parentAnchor, parentComponent, parentSuspense, isSVG, optimized) => {
  let i = 0 // 新、旧子序列的头部索引
  const l2 = c2.length
  let e1 = c1.length - 1 // 旧子节点的尾部索引
  let e2 = l2 - 1 // 新子节点的尾部索引

  // 1、从头部开始同步
  while (i <= e1 && i <= e2) {
    const n1 = c1[i] // 旧节点
    const n2 = c2[i] // 新节点
    // 相同类型的节点,递归执行 patch 更新节点
    if (isSameVNodeType(n1, n2)) {
      patch(n1, n2, container, parentAnchor, parentComponent, parentSuspense, isSVG, optimized)
    }
    // 节点类型不同 或 不存在新 | 旧节点,则退出
    else {
      break
    }
    i++
  }

  // 2、从尾部开始同步
  while (i <= e1 && i <= e2) {
    const n1 = c1[e1] // 旧节点
    const n2 = c2[e2] // 新节点
    // 相同类型的节点,递归执行 patch 更新节点
    if (isSameVNodeType(n1, n2)) {
      patch(n1, n2, container, parentAnchor, parentComponent, parentSuspense, isSVG, optimized)
    }
    // 节点类型不同 或 不存在新 | 旧节点,则退出
    else {
      break
    }
    e1--
    e2--
  }

  // 3、挂载剩余的新节点
  if (i > e1) {
    if (i <= e2) {
      const nextPos = e2 + 1
      const anchor = nextPos < l2 ? c2[nextPos].el : parentAnchor
      while (i <= e2) {
        // 挂载新节点
        patch(null, c2[i], container, anchor, parentComponent, parentSuspense, isSVG)
        i++
      }
    }
  }

  // 4、删除多余的旧节点
  else if (i > e2) {
    while (i <= e1) {
      // 删除节点
      unmount(c1[i], parentComponent, parentSuspense, true)
      i++
    }
  }

  // 5、处理未知的子序列
  // 5.1、根据 key 建立新子序列的索引图
  const s1 = i // 旧子序列开始索引,从 i 开始记录
  const s2 = i // 新子序列开始索引,从 i 开始记录
  const keyToNewIndexMap = new Map() // 新子序列节点的 key -> index 的索引表
  // 遍历新子序列,记录索引表
  for (i = s2; i <= e2; i++) {
    const nextChild = c2[i]
    keyToNewIndexMap.set(nextChild.key, i)
  }

  // 5.2、正序遍历旧子序列,找到匹配的节点更新,删除不在新子序列中的节点,判断是否有移动节点
  let patched = 0 // 新子序列已更新节点的数量
  const toBePatched = e2 - s2 + 1 // 新子序列待更新节点的数量,等于新子序列的长度
  let moved = false // 是否存在要移动的节点
  let maxNewIndexSoFar = 0 // 用于跟踪判断是否有节点移动
  const newIndexToOldIndexMap = new Array(toBePatched) // 存储新子序列中的节点在旧子序列中的索引,用于确定最长递增子序列
  // 初始化数组,每个元素的只都是 0
  // 0 是一个特殊的值,如果遍历完了仍有元素的值为 0,则说明这个新节点没有对应的旧节点
  for (i = 0; i < toBePatched; i++) {
    newIndexToOldIndexMap[i] = 0
  }
  // 正序遍历旧子序列
  for (i = s1; i <= e1; i++) {
    const prevChild = c1[i]
    // 所有新的子序列节点都已经更新,删除剩余的节点
    if (patched >= toBePatched) {
      unmount(prevChild, parentComponent, parentSuspense, true)
      continue
    }
    let newIndex = keyToNewIndexMap.get(prevChild.key) // 查找旧子序列中的节点在新子序列中的索引
    // 找不到说明旧子序列已经不存在于新子序列中,则删除该节点
    if (newIndex === undefined) {
      unmount(prevChild, parentComponent, parentSuspense, true)
    }
    // 否则更新新子序列中的元素在旧子序列中的索引
    else {
      // 这里加 1 偏移,是为了避免 i 为 0 的特殊情况,影响对后续最长递增子序列的求解
      newIndexToOldIndexMap[newIndex - s2] = i + 1
      // maxNewIndexSoFar 始终存储的是上次求值的 newIndex,如果不是一直递增,则说明有移动
      if (newIndex >= maxNewIndexSoFar) {
        maxNewIndexSoFar = newIndex
      } else {
        moved = true
      }
      // 更新新旧子序列中匹配的节点
      patch(prevChild, c2[newIndex], container, null, parentComponent, parentSuspense, isSVG, optimized)
      patched++
    }
  }

  // 5.3、移动和挂载新节点
  // 仅当节点移动时生成最长递增子序列
  const increasingNewIndexSequence = moved ? getSequence(newIndexToOldIndexMap) : EMPTY_ARR
  let j = increasingNewIndexSequence.length - 1
  // 倒序遍历以便我们可以使用最后更新的节点作为锚点
  for (i = toBePatched - 1; i >= 0; i--) {
    const nextIndex = s2 + 1
    const nextChild = c2[nextIndex]
    // 锚点指向上一个更新的节点,如果 nextIndex 超过新子节点的长度,则指向 parentAnchor
    const anchor = nextIndex + 1 < l2 ? c2[nextIndex + 1].el : parentAnchor
    // 挂载新的子节点
    if (newIndexToOldIndexMap[i] === 0) {
      patch(null, nextChild, container, anchor, parentComponent, parentSuspense, isSVG)
    }
    // 没有最长递增子序列(reverse 的场景)或者当前的节点索引不在最长递增子序列中,需要移动
    else if (moved) {
      if (j < 0 || i !== increasingNewIndexSequence[j]) {
        move(nextChild, container, anchor, 2)
      } else {
        // 倒序递增子序列
        j--
      }
    }
  }
}

/**
 * 获取最长递增子序列,实际求的是最长递增子序列各项的索引
 */
function getSequence(arr) {
  const p = arr.slice()
  const result = [0] // 长度为 i 的最长递增子序列各项的索引
  let i, j, u, v, c
  const len = arr.length
  // 对数组遍历,依次求解长度为 i 时的最长递增子序列
  for (i = 0; i < len; i++) {
    const arrI = arr[i]
    if (arrI !== 0) {
      j = result[result.length - 1]
      // 当 i 元素大于 i-1 的元素时,添加 i 元素并更新最长子序列
      if (arr[j] < arrI) {
        // 存储在 result 更新前的最后一个索引的值
        p[i] = j
        result.push(i)
        continue
      }
      // 否则往前查找直到找到一个比 i 小的元素,然后插在该元素后面并更新对应的最长递增子序列
      u = 0
      v = result.length - 1
      // 二分搜索,查找比 arrI 小的节点,更新 result 的值
      while (u < v) {
        c = ((u + v) / 2) | 0
        if (arr[result[c]] < arrI) {
          u = c + 1
        } else {
          v = c
        }
      }
      if (arrI < arr[result[u]]) {
        if (u > 0) {
          p[i] = result[u - 1]
        }
        result[u] = i
      }
    }
  }
  u = result.length
  v = result[u - 1]

  // 回溯数组 p,找到最终的索引
  while (u-- > 0) {
    result[u] = v
    v = p[v]
  }
  return result
}
问题:
v-for时能否用 index 作为 key?答:如果列表只是用于展示的化没有问题,如果列表涉及增、删、改就一定要用唯一标识。


 476
476


 被折叠的 条评论
为什么被折叠?
被折叠的 条评论
为什么被折叠?
 到【灌水乐园】发言


