


🚀作者:CAccept
🎂专栏:Qt Quick
前言
欢迎来到Qt Quick系列的第六篇!在前几篇教程中,我们已经学习了Qt Quick的基础知识和常用控件的使用方法。本篇博客将带领你进入Qt Quick动画的世界,探索如何使用动画来提升应用程序的用户体验和视觉吸引力。
动画是现代应用程序中重要的交互元素,它能够为用户提供流畅、生动的界面效果,使应用程序更具吸引力。Qt Quick提供了强大的动画框架,使得创建各种动画效果变得简单而灵活。
在本篇教程中,我们将学习如何使用Qt Quick的动画组件,包括属性动画、过渡动画和关键帧动画等。我们将了解动画的基本概念、属性插值和缓动函数的应用,以及如何结合Qt Quick的控件和状态机来实现更复杂的动画效果。
无论你是想为应用程序添加简单的过渡效果,还是想创建复杂的动画序列,本篇教程都将为你提供详细的指导和实例代码。希望通过学习本文,你能够掌握Qt Quick动画的核心概念和技巧,并能够运用它们在你的应用程序中创造出令人惊艳的动态效果。
1、简单动画
我们要知道动画的几个基础的元素或者说是一些参数,现在我们来认识一下它们吧
常用的动画类型元素动画:
- PropertyAnimation:属性值改变播放动画
- NumberAnimation:qreal-type值改变播放动画
- ColorAnimation: 颜色值改变播放动画
- RotationAnimation: 旋转值改变播放的动画
动画中的基本元素
- to:终点的位置
- duration:到终点的耗时
- running:是否开始(false/true)
代码示例
import QtQuick 2.9
import QtQuick.Window 2.3

Image
{
    id:root
    source:"../images/background.png"
    width: 1000
    height: 800
    property int padding: 40
    //通过root下的running来决定是否运行,避免没计算完全就开始动画
    property bool running: false
    Image
    {
        id:panda
        source:"../images/qq.png"
        x:root.padding;y:(root.height-height)/2
        //改变x位置
        NumberAnimation on x{
            //对x的移动,移动到root.width-panda.width
            to:root.width-panda.width
            //耗时3秒到
            duration:3000
            //别直接true,因为我们这个移动涉及到计算,
            //如果直接true的话,可能还没开始计算就开始移动,这样会有问题
            running:root.running
        }
        //翻转
        RotationAnimation on rotation {
            to:360
            duration: 3000
            running:root.running
        }
        //改变透明度
        PropertyAnimation on opacity{
            to:0
            duration:3000
            running:root.running
        }

    }


    MouseArea
    {
        anchors.fill:parent
        onClicked: root.running=true
    }

}
运行效果:

2、应用动画
可以通过多种方式执行动画:
- 属性上的动画:在元素完全加载后自动运行
- 属性上的行为:属性值更改时自动运行Behavior
- 独立动画:使用start()显式启动动画或将running设置为true时运行
代码示例
现在我们设计一个界面,里面有三张图片,而第一张和第二张实现的效果都是点击图片以后会开始向上移动,只是实现的方法不同,而第三张图片也是通过点击以后图片就会往上移动,但是再次点击的时候图片就又回重新回到原点再次向上运动
实现步骤:
1、创建一个componen名字叫CliableImageV2,里面是对于图片的一些通用设计(包括文字以及点击信号的设置)
2、在main文件中调用3次CliableImageV2组件生成3个图片并对动画方式进行设计
CliableImageV2.qml
import QtQuick 2.0

Item {
    id:root
    width: containter.childrenRect.width
    height: containter.childrenRect.height
    //取别名,这样是为了外部更方便对内部元素进行访问和设置
    property alias text: label.text
    property alias source: image.source
    signal clicked
    Column{
        id:containter
        Image
        {
            id:image
        }
        Text
        {
            id:label
            width:image.width
            //超过宽度就会自动换行
            wrapMode:Text.WordWrap
            //水平居中
            horizontalAlignment:Text.AlignHCenter
            color:"#ececec"
        }
    }

    MouseArea
    {
        anchors.fill:parent
        onClicked: root.clicked()
    }
}
main.qml
import QtQuick 2.9
import QtQuick.Window 2.3

Window {
    id:root
    visible: true
    width: 640
    height: 480
    title: qsTr("应用动画")
    color:"gray"
    property bool running: false
    CliableImageV2
    {
        id:panda1
        focus: true
        x:40;y:root.height-height
        source:"../images/qq.png"
        text:"animation on property"
        //running为true的时候就会开始动画效果,向上移动
        NumberAnimation on y{
            to:40
            duration: 3000
            running:root.running
        }
        onClicked:
        {
            root.running = true
        }
    }
    CliableImageV2
    {
        id:panda2
        focus: true
        x:40+panda1.width+20;y:root.height-height
        source:"../images/qq.png"
        text:"animation on property"
        //y数值变化就会执行NumberAnimation,就变成to:y变化的值
        Behavior on y{
            NumberAnimation{duration: 3000}
        }
        onClicked:
        {
            y = 40
        }
    }

    CliableImageV2
    {
        id:panda3
        focus: true
        x:panda2.width+panda1.width+80;y:root.height-height
        source:"../images/qq.png"
        text:"animation on property"
      	//点击效果出发触发以后就会触发restart,进行反复运动
        onClicked: anim.restart()
        NumberAnimation{
            id:anim
            target: panda3
            //再次点击就又会回来的位置
            from:root.height-panda3.height
            //到终点的位置
            to:40
            duration: 3000
            //目标属性是y
            property:"y"
        }
    }
}
运行效果:

相关知识点
1、在设计动画开始的时候,running别直接设计成true,因为有时候我们的计算过程需要时间如果还没计算完全就开始运行动画,那么就会出现问题,我们一般都是采用点击进行触发,这样也就可以有给应用程序计算各个变量的时间就像👇
NumberAnimation on y{
            to:40
            duration: 3000
            //在root下创建一个running,使running和root的running进行绑定
            running:root.running
        }
        onClicked:
        {
        	//如果点击了就将root下的running进行修改,从而触发动画
            root.running = true
        }
 }
2、如果想要通过值的改变来触发动画,那么就使用Behavior就可以,解释在代码的注释里面可以去看看,运行玩玩
CliableImageV2
    {
        id:panda2
        focus: true
        x:40+panda1.width+20;y:root.height-height
        source:"../images/qq.png"
        text:"animation on property"
        //y数值变化就会执行NumberAnimation,就变成to:y变化的值
        Behavior on y{
            NumberAnimation{duration: 3000}
        }
        //点击时,y的值进行改变,触发动画
        onClicked:
        {
            y = 40
        }
    }
3、缓动曲线
在 Qt Quick 中,可以使用缓动曲线(Easing Curve)来定义动画的变化速度。缓动曲线可以使动画更加平滑、自然,并增加动画的视觉效果。Qt Quick 提供了几种预定义的缓动曲线,您可以在动画中使用这些曲线,也可以自定义自己的缓动曲线。
以下是一些常用的预定义缓动曲线:
- Linear
- InExpo
- OutExpo
- InOutExpo
- InOoutCubic
- …
代码示例
我现在想要实现一个界面:上面部分有10个缓动曲线矩形框可以进行点击选择,而下面有一个方块,通过上方的缓动曲线的选择,下方的方块以相应的方式移动到另外一端。
实现步骤:
1、设计EasingType组件,用来实现缓动曲线矩形框的公共部分
2、在主方法中创建10个EasingType组件实例
3、在主方法中创建下方用来移动的方块
4、将方块的移动方式与上面的缓动曲线矩形框的选择进行关联,用于更新方块的easing.type进行移动
EasingType.qml
import QtQuick 2.0

Item {
    id:root
    width: 100;height: 100
    property alias title: label.text
    property alias source:image.source
    property var easingType;
    signal clicked
    Image{
        id:image
        anchors.fill:parent
        //各个缓动曲线都有自己的图片表示(如果没有图片的话可以直接画一个矩形表示也是可以的)
        source: "../images/curves/"+title+".png"

        Text {
            id: label
            text: qsTr("text")
            anchors.horizontalCenter: parent.horizontalCenter
            anchors.bottom: parent.bottom
            color:'white'
        }
    }

    MouseArea{
        anchors.fill: parent
        onClicked: root.clicked()
    }
}
main.qml
import QtQuick 2.0
import QtQuick.Layouts 1.0
Rectangle{
    id:root
    width: childrenRect.width
    height: childrenRect.height

    color:'gray'
    gradient: Gradient{
        GradientStop{position:0.0;color:root.color}
        GradientStop{position:1.0;color:Qt.lighter(root.color,1.5)}
    }
    //进行布局
    ColumnLayout{
        spacing: 20
        Grid{
            spacing: 10
            columns:5
            EasingType{
                title:'Linear'
                easingType: Easing.Linear
                onClicked: {
                    animation.easing.type=easingType
                    box.toggle=!box.toggle
                }
            }
            EasingType{
                title:'InExpo'
                easingType: Easing.InExpo
                onClicked: {
                    animation.easing.type=easingType
                    box.toggle=!box.toggle
                }
            }
            EasingType{
                title:'OutExpo'
                easingType: Easing.OutExpo
                onClicked: {
                    animation.easing.type=easingType
                    box.toggle=!box.toggle
                }
            }
            EasingType{
                title:'InOutExpo'
                easingType: Easing.InOutExpo
                onClicked: {
                    animation.easing.type=easingType
                    box.toggle=!box.toggle
                }
            }
            EasingType{
                title:'InOutCubic'
                easingType: Easing.InOutCubic
                onClicked: {
                    animation.easing.type=easingType
                    box.toggle=!box.toggle
                }
            }
            EasingType{
                title:'SineCurve'
                easingType: Easing.SineCurve
                onClicked: {
                    animation.easing.type=easingType
                    box.toggle=!box.toggle
                }
            }
            EasingType{
                title:'InOutCirc'
                easingType: Easing.InOutCirc
                onClicked: {
                    animation.easing.type=easingType
                    box.toggle=!box.toggle
                }
            }
            EasingType{
                title:'InOutElastic'
                easingType: Easing.InOutElastic
                onClicked: {
                    animation.easing.type=easingType
                    box.toggle=!box.toggle
                }
            }
            EasingType{
                title:'InOutBack'
                easingType: Easing.InOutBack
                onClicked: {
                    animation.easing.type=easingType

                    box.toggle=!box.toggle
                }
            }
            EasingType{
                title:'InOutBounce'
                easingType: Easing.InOutBounce
                onClicked: {
                    animation.easing.type=easingType
                    box.toggle=!box.toggle
                }
            }
        }
        Rectangle{
            height:100
            Layout.fillWidth: true
            gradient: Gradient{
                GradientStop{position:0.0;color:'gray'}
                GradientStop{position:1.0;color:'green'}
            }
            Rectangle{
                id:box
                property  bool toggle
                anchors.verticalCenter: parent.verticalCenter
                width: 80;height:80
                //渐变色
                gradient: Gradient{
                    GradientStop{position:0.0;color:'red'}
                    GradientStop{position:1.0;color:'yellow'}
                }

                x:toggle?20:root.width-width-20
                Behavior on x{
                    NumberAnimation{
                        id:animation
                        duration:1000
                    }
                }
            }
        }
    }
}
运行结果:

相关知识点
对于缓动曲线的设置,其实最终还是作用于动画上,其实只是改变了动画的样式,能够让轨迹更加酷炫或者说是更顺滑就像👇
//当x发生变化时,开始以easing.type的样式进行移动
Behavior on x{
   NumberAnimation{
   	   //在这替换成你想要的缓动曲线类型就可以了
   	   easing.type="xxxxx"
       id:animation
       duration:1000
   }
}
4、动画分组
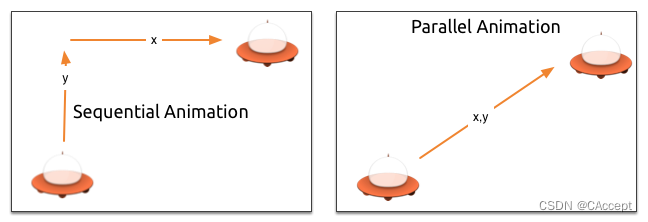
分组有两种方式:并行或顺序
可以使用SequentialAnimation(顺序)或ParallelAnimation(并行)元素,它们充当其他动画元素的动画容器。这些分组动画本身就是动画。
代码示例
现在要创建一个工程,是将一个飞碟从左下角移动到右上角,通过两种方式对移动进行描述,分别是顺序和并行。
组件ClickableImageV3.qml
import QtQuick 2.0

Item {
    id:root
    width: container.childrenRect.width
    height: container.childrenRect.height
    property alias source: image.source
    property alias text: label.text
    signal clicked

    Column{
        id:container
        Image{
            id:image
        }

        Text {
            id: label
            width: image.width
            horizontalAlignment: Text.AlignHCenter
            wrapMode: Text.WordWrap
            color:'white'
        }
    }


    MouseArea{
        anchors.fill: parent
        onClicked: root.clicked()
    }
}
顺序执行代码main.qml
import QtQuick 2.0
import QtQuick.Window 2.0
Window {
    id:root
    width: 640
    height: 480
    visible: true
    title: qsTr("UFO")
    property int duration: 3000

    Image {
        source: "../images/background.png"
        anchors.fill: parent
    }

    ClickableImageV3{
        id:ufo
        x:20;y:root.height-height
        source: "../images/ufo.png"
        text:'UFO'
        onClicked: anim.restart()
    }
    //顺序的执行
    SequentialAnimation{
        id:anim
        NumberAnimation{
            target:ufo
            properties: "y"
            from:root.height-ufo.height
            to:20
            duration: root.duration
        }

        NumberAnimation{
            target:ufo
            properties: "x"
            from:20
            to:500
            duration: root.duration
        }
    }
}
运行效果:

并行执行代码main.qml
import QtQuick 2.0
import QtQuick.Window 2.0
Window {
    id:root
    width: 640
    height: 480
    visible: true
    title: qsTr("UFO")
    property int duration: 3000

    Image {
        source: "../images/background.png"
        anchors.fill: parent
    }

    ClickableImageV3{
        id:ufo
        x:20;y:root.height-height
        source: "../images/ufo.png"
        text:'UFO'
        onClicked: anim.restart()
    }
    //并行的执行
    ParallelAnimation/*SequentialAnimation*/{
        id:anim
        NumberAnimation{
            target:ufo
            properties: "y"
            from:root.height-ufo.height
            to:20
            duration: root.duration
        }

        NumberAnimation{
            target:ufo
            properties: "x"
            from:20
            to:500
            duration: root.duration
        }
    }
}
运行结果:

5、嵌套动画
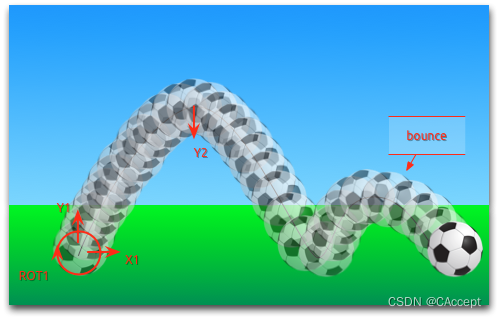
分组动画也可以嵌套。例如,一个连续动画可以有两个并行动画作为子动画。我们可以通过一个足球示例:
- 从左到右的x平移(X1)
- 从下到上的y平移(Y1),然后是从上到下的平移(Y2),带有一些弹跳
- 在动画的整个持续时间内旋转360度(ROT1)
代码示例
实现的功能就和上图差不多,模拟一个足球给踢上去,又掉下地面的效果
main.qml
import QtQuick 2.9
import QtQuick.Window 2.3

Item {
    id:root
    visible: true
    width: 480
    height: 300
    property int duration: 3000
    Rectangle
    {
        id:sky
        width:parent.width
        height: 200
        gradient: Gradient
        {
            GradientStop{position: 0.0;color:"#0080FF"}
            GradientStop{position: 1.0;color:"#66CCFF"}
        }
    }
    Rectangle
    {
        id:ground
        anchors.top:sky.bottom
        anchors.bottom: root.bottom
        width:parent.width
        height: 100
        //渐变色效果
        gradient: Gradient
        {
            GradientStop{position: 0.0;color:"#00FF00"}
            GradientStop{position: 1.0;color:"#00803F"}
        }
    }
    Image{
        id:ball
        source:"../images/soccer_ball.png"
        scale:0.5
        x:0;
        y:root.height-height

        MouseArea{
            anchors.fill:parent
            onClicked:
            {
                //回归原位
                ball.x=0
                ball.y = root.height-ball.height
                ball.rotation = 0
                anim.restart()
            }
        }

        ParallelAnimation
        {
            id:anim
            SequentialAnimation
            {
                NumberAnimation
                {
                    properties: "y"
                    target: ball
                    to:20
                    duration:root.duration*0.4
                    //加上EasingType属性,让变化更生动
                    easing.type:Easing.outCirc
                }
                NumberAnimation
                {
                    properties: "y"
                    target: ball
                    to:root.height-ball.height
                    duration:root.duration*0.6
                    //加上EasingType属性,让变化更生动
                    easing.type:Easing.OutBounce
                }


            }
            //球上去+下去的事件和球到右边的时间要相等
            NumberAnimation
            {
                properties: "x"
                target: ball
                to:380
                duration:root.duration
            }
            RotationAnimation
            {
                properties: "rotation"
                target: ball
                to:720
                duration:root.duration
            }

        }


    }

}
运行结果:

6、状态转换
状态State定义了一组属性的更改,可以由特定条件触发。状态State开关可以附加一个转换,该转换定义了这些更改对应的动画,或执行附加的行为。- 进入
状态State时也可以执行行为。
代码示例
现在要实现一个工程:一个红绿灯,当点击页面的时候,会进行红绿灯的转换(通过State改变进行切换)
main.qml
import QtQuick 2.9
import QtQuick.Window 2.3

Item
{
    id:root
    width:150;
    height:300;
    property color black: "black"
    property color red: "red"
    property color green: "green"

    Rectangle
    {
        anchors.fill:parent
        color:"#333333"

    }
    state:"stop"
    states:
    [
        State {
            name: "stop"
            PropertyChanges {target: light1;color:root.red}
            PropertyChanges {target: light2;color:root.black}
        },
        State {
            name: "go"
            PropertyChanges {target: light1;color:root.black}
            PropertyChanges {target: light2;color:root.green}
        }
    ]

    Rectangle
    {
        id:light1
        x:25;y:15;
        width: 100
        height: 100
        //将radius设置成width/2就是圆形了
        radius: width/2
        color: root.black
        border.color:Qt.lighter(color,1.1)
    }

    Rectangle
    {
        id:light2
        x:25;y:130;
        width: 100
        height: 100
        radius: width/2
        color: root.black
        border.color:Qt.lighter(color,1.1)
    }
    MouseArea{
        anchors.fill:parent
        onClicked: parent.state=(parent.state=="stop"?"go":"stop")
    }

}
运行效果:

我们还可以加上transitions进行过渡,让变化进行的地更自然:
main.qml
import QtQuick 2.9
import QtQuick.Window 2.3

Item
{
    id:root
    width:150;
    height:300;
    property color black: "black"
    property color red: "red"
    property color green: "green"

    Rectangle
    {
        anchors.fill:parent
        color:"#333333"

    }
    state:"stop"
    states:
    [
        State {
            name: "stop"
            PropertyChanges {target: light1;color:root.red}
            PropertyChanges {target: light2;color:root.black}
        },
        State {
            name: "go"
            PropertyChanges {target: light1;color:root.black}
            PropertyChanges {target: light2;color:root.green}
        }
    ]

    //会让转换更加的柔和
    transitions: [
        Transition {
            from:"*";to:"*"

            ColorAnimation {
                target:light1;properties: "color";duration:1000
            }
            ColorAnimation {
                target:light2;properties: "color";duration:1000
            }

        }
    ]

    Rectangle
    {
        id:light1
        x:25;y:15;
        width: 100
        height: 100
        //将radius设置成width/2就是圆形了
        radius: width/2
        color: root.black
        border.color:Qt.lighter(color,1.1)
    }

    Rectangle
    {
        id:light2
        x:25;y:130;
        width: 100
        height: 100
        radius: width/2
        color: root.black
        border.color:Qt.lighter(color,1.1)
    }
    MouseArea{
        anchors.fill:parent
        onClicked: parent.state=(parent.state=="stop"?"go":"stop")
    }

}
运行效果

相关知识点
- 可以在transitions对状态的转变进行过渡设置,让状态的改变能够更加的自然
transitions: [
	Transition {
		from: "stop"; to: "go"
		//从任何状态到任何状态用*to*
		// from: "*"; to: "*"
		ColorAnimation { target: light1; properties: "color"; duration: 2000 }
		ColorAnimation { target: light2; properties: "color"; duration: 2000 }
	}
]
- 将矩形的height和width设置成一样,并且将radius设置为width/2,那就是圆形
Rectangle
{
     id:light2
     x:25;y:130;
     width: 100
     height: 100
     radius: width/2
     color: root.black
     border.color:Qt.lighter(color,1.1)
 }
结语
通过本篇博客,我们深入探索了Qt Quick中的应用动画、缓动曲线、动画分组、嵌套动画以及状态转换。动画作为现代应用程序中重要的交互元素,能够为用户带来更流畅、生动的界面体验,提升应用程序的吸引力和用户满意度。
希望本篇博客对你理解和应用Qt Quick中的动画功能有所帮助。如果你在学习过程中有任何问题或疑惑,欢迎在评论区提问。祝愿你在使用Qt Quick的动画能力时能够创造出令人赞叹的应用程序!感谢阅读本篇教程,期待与你在下一篇教程再次相见!(*^_^*)(*^_^*)


 1042
1042


 被折叠的 条评论
为什么被折叠?
被折叠的 条评论
为什么被折叠?
 到【灌水乐园】发言


