


🚀作者:CAccept
🎂专栏:Qt Quick

前言
画布元素的基本思想是使用上下文2D对象(ctx)渲染路径。上下文2D对象包含必要的图形功能,而画布充当绘图画布。
在QML中,画布元素(canvas element)充当了绘制的容器。2D绘制对象(ctx)提供了实际绘制的方法。绘制需要在onPaint中完成,接下来将通过两个代码示例来说明画布元素应该怎么用👇
本博客中工程使用的环境为:qt6 + Qt Creator10.0.1
代码示例1
在这个代码中主要是讲解怎么进行对画布的基本操作:获取上下文、设置画笔的各种属性、画笔的移动、绘制图片以及渐变色的使用。可以先看下代码,代码中的注释也已经很清楚了,后续也有对一些知识点的总结。
源码
import QtQuick 2.12
import QtQuick.Window 2.12

//画布
Canvas
{
    id:root
    width: 200;
    height: 200;
    onPaint:
    {
        //获取上下文对象
        var ctx = getContext("2d")
        //设置线条宽度
        ctx.lineWidth = 4
        //边框颜色
        ctx.strokeStyle="blue"
        //内部颜色
        ctx.fillStyle = "steelblue"
        //对上面的设置进行保存
        ctx.save()
        ctx.fillStyle = "red"
        //开始第一个阶段的绘制
        ctx.beginPath()
        //将笔移动到(50,50)位置
        ctx.moveTo(50,50);
        //画线
        ctx.lineTo(150,50);
        ctx.lineTo(150,150);
        ctx.lineTo(50,150);
        //将上面画的线围成一篇区域变成一个正方形进行绘制
        ctx.fill()
        ctx.closePath();
        ctx.beginPath();
        //轮廓线的颜色改为“红色”
        //画起点20,20,宽高各80的矩形
        ctx.fillRect(20,20,80,80);
        //起点30,30宽高60的区域内进行镂空
        ctx.clearRect(30,30,60,60);
        //用笔尖描出来的矩形
        ctx.strokeRect(20,20,40,40);
        ctx.closePath()

        //将保存的信息进行加载
        ctx.restore()
        ctx.fillRect(10,10,20,20);

        //创建线性渐变,从(0,0)开始到(0,height)进行渐变(其实就是整个画布的区域)
        var gradient = ctx.createLinearGradient(0,0,0,root.height)
        gradient.addColorStop(0,"blue");
        gradient.addColorStop(1,"lightblue");
        ctx.fillStyle=gradient
        ctx.fillRect(50,50,100,100);
        ctx.fillRect(100,0,100,100);
        ctx.fillRect(0,100,100,100);

        //对创建好的路径进行填充操作,将路径内部的区域填充上指定的颜色或样式。
        ctx.fill()
        //对创建好的路径进行填充操作,将路径内部的区域填充上指定的颜色或样式。
        ctx.stroke();
    }

}
运行效果:
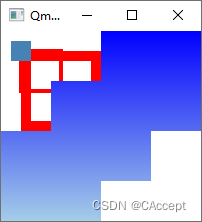
关键知识点
1、在进行位置设置(moveTo)或者是线条(lineTo)设置时,可以采用beginPath和closePath进行分段,在内部设置
ctx.beginPath()
//将笔移动到(50,50)位置
ctx.moveTo(50,50);
//画线
ctx.lineTo(150,50);
ctx.lineTo(150,150);
ctx.lineTo(50,150);
//将上面画的线围成一篇区域变成一个正方形进行绘制
ctx.fill()
ctx.closePath();
2、保存设置和恢复保存的设置使用save和restore
//保存前面的设置
ctx.save()
...
...
//恢复设置
ctx.restore()
3、ctx.fill()的作用是对创建好的路径进行填充操作,将路径内部的区域填充上指定的颜色或样式,ctx.stroke()是对外部轮廓填充上制定的颜色和样式,分别使用ctx.fillStyle和ctx.strokeStyle进行设置。
代码示例2
在这个代码中主要实现的功能是实现类似画图软件的选择颜色画线功能,选择指定的颜色,画笔的颜色就会发生改变。
源码
ColorSquare.qml
import QtQuick 2.0
import QtQuick.Controls 2.0
Button
{
    width: 100;
    height: 100
    property alias color: bg.color
    Rectangle
    {
        id:bg
        width: 80
        height: 80
        opacity:0.7
        anchors.centerIn: parent
    }
}
main.qml
import QtQuick 2.12
import QtQuick.Window 2.12
import QtQuick.Controls 2.0
Rectangle
{
    width:500
    height:500

    Row{
        id:colorTools
        anchors
        {
            horizontalCenter:parent.horizontalCenter
            top:parent.top
            topMargin:8
        }
        property color paintColor: "blue"
        Repeater
        {
            model:['blue','gray','yellow','green']
            ColorSquare{
                color:modelData
                //看它是否为color来决定是否要放下去
                down:parent.paintColor===color
                onClicked: parent.paintColor=color
            }
        }

    }

    Canvas{
        id:canvas
        anchors
        {
            left:parent.left
            right:parent.right
            top:colorTools.bottom
            bottom:parent.bottom
            margins:8
        }
        property real lastY
        property real lastX
        property color color:colorTools.paintColor
        onPaint:
        {
            var ctx = getContext("2d")
            ctx.lineWidth = 1.5
            ctx.strokeStyle=canvas.color
            ctx.beginPath()
            ctx.moveTo(lastX,lastY)
            lastX = area.mouseX
            lastY=area.mouseY
            ctx.lineTo(lastX,lastY)
            ctx.stroke()
        }


        MouseArea{
            id:area
            anchors.fill:parent
            onPressed:
            {
                canvas.lastX=mouseX;
                canvas.lastY=mouseY;
            }
            //当鼠标位置发生改变就重新绘制一遍(再次执行onPaint)
            onPositionChanged:canvas.requestPaint();
        }
    }
}
运行效果:
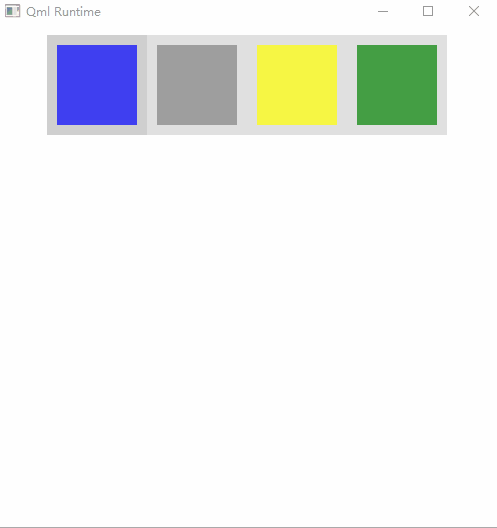
关键知识点
1、使用canvas.requestPaint()的话,就会重新触发一次onPaint
MouseArea{
    id:area
    anchors.fill:parent
    onPressed:
    {
        canvas.lastX=mouseX;
        canvas.lastY=mouseY;
    }
    //当鼠标位置发生改变就重新绘制一遍(再次执行onPaint)
    onPositionChanged:canvas.requestPaint();
}
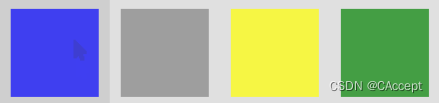
2、Button有down方法,这样颜色会加深一些,可以区别于那些没有down的按钮,以下就是第一个按钮有down的情况👇
总结
本篇博客到此结束,感谢您看到这,希望本篇文章对您能够有所帮助,有疑问或者是文章本身存在问题的话请在评论区中提出来,谢谢(*^_^*)


 9007
9007


 被折叠的 条评论
为什么被折叠?
被折叠的 条评论
为什么被折叠?
 到【灌水乐园】发言


