


1、开发环境
系统:

数据库:

编程语言:

框架:

IDE:
PyCharm 4.5
2、新建Django工程,配置
新建Django工程:
|
1
|
django-admin startproject Django_Test
|
目录结构:

官网介绍:
-
The outer Django_Test/ root directory is just a container for your project. Its name doesn’t matter to Django; you can rename it to anything you like.
-
manage.py: A command-line utility that lets you interact with this Django project in various ways. You can read all the details about manage.py in django-admin and manage.py.
-
The inner Django_Test/ directory is the actual Python package for your project. Its name is the Python package name you’ll need to use to import anything inside it .
-
Django_Test/__init__.py: An empty file that tells Python that this directory should be considered a Python package. (Read more about packages in the official Python docs if you’re a Python beginner.)
-
Django_Test/settings.py: Settings/configuration for this Django project. Django settings will tell you all about how settings work.
-
Django_Test/urls.py: The URL declarations for this Django project; a “table of contents” of your Django-powered site. You can read more about URLs in URL dispatcher.
-
Django_Test/wsgi.py: An entry-point for WSGI-compatible web servers to serve your project. See How to deploy with WSGI for more details.
启动工程:
|
1
|
python3 manage.py runserver
|
输入:http://localhost:8000

说明你已经正确启动了Django工程!
配置Django对Mysql操作:
关于python3.4连接mysql请看这篇文章:http://my.oschina.net/tdd/blog/466466
默认情况下,Django连接的是SqlLite,现在我们需要配置Mysql:
现在我们用PyMySQL: 官网地址:https://github.com/PyMySQL/PyMySQL/
|
1
|
sudo pip3 install PyMySQL
|
配置Django工程:
1.在__init__.py文件中,添加这句话
|
1
2
|
import
pymysql
pymysql.install_as_MySQLdb()
|
2.修改settings.py文件
|
1
2
3
4
5
6
7
8
9
10
|
DATABASES = {
'default'
: {
'ENGINE'
:
'django.db.backends.mysql'
,
'NAME'
:
'django_test'
,
'USER'
:
'root'
,
'PASSWORD'
:
'root'
,
'HOST'
:
''
, #默认:
127.0
.
0.1
'PORT'
:
''
, #默认:
3306
}
}
|
3、自动生成数据库表
Django项目是按照模块来开发的,我们先建立一个.
|
1
|
python3 manage.py startapp user
|
结构:
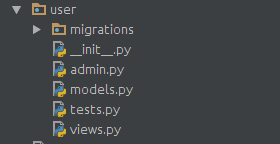
-
user/migrations: 数据库迁移用文件夹,创建的migrate会存在这个文件夹里。
-
user/_init_.py: 初始化数据信息。
-
user/admin.py:当前应用在Django管理界面的设置。
-
user/models.py:模型文件,用 Python 类来描述数据表。
-
user.tests.py:单元测试文件。
-
user.views.py:视图展示部分。
配置:
user/models.py(表结构从网上资源活取得到,实际使用根据具体情况):
|
1
2
3
4
5
6
7
8
9
10
11
12
13
14
15
16
17
18
19
20
21
22
23
24
|
from django.db
import
models
class
Publisher(models.Model):
name = models.CharField(max_length=
30
)
address = models.CharField(max_length=
50
)
city = models.CharField(max_length=
60
)
state_province = models.CharField(max_length=
30
)
country = models.CharField(max_length=
50
)
website = models.URLField()
class
Author(models.Model):
salutation = models.CharField(max_length=
10
)
first_name = models.CharField(max_length=
30
)
last_name = models.CharField(max_length=
40
)
email = models.EmailField()
headshot = models.ImageField(upload_to=
'/tmp'
)
class
Book(models.Model):
title = models.CharField(max_length=
100
)
authors = models.ManyToManyField(Author)
publisher = models.ForeignKey(Publisher)
publication_date = models.DateField()
|
settings.py:
|
1
2
3
4
5
6
7
8
9
10
11
12
13
14
15
16
17
18
19
20
21
22
23
24
25
26
27
28
29
30
31
32
33
34
35
36
37
38
39
40
41
42
43
44
45
46
47
48
49
50
51
52
53
54
55
56
57
58
59
60
61
62
63
64
65
66
67
68
69
70
71
72
73
74
75
76
77
78
79
80
81
82
83
84
85
86
87
88
89
90
91
92
93
94
95
96
97
98
99
100
101
102
103
104
105
106
107
108
109
110
111
112
113
|
""
"
Django settings
for
Django_Test project.
Generated by
'django-admin startproject'
using Django
1.8
.
2
.
For more information on
this
file, see
https:
//docs.djangoproject.com/en/1.8/topics/settings/
For the full list of settings and their values, see
https:
//docs.djangoproject.com/en/1.8/ref/settings/
""
"
# Build paths inside the project like
this
: os.path.join(BASE_DIR, ...)
import
os
BASE_DIR = os.path.dirname(os.path.dirname(os.path.abspath(__file__)))
# Quick-start development settings - unsuitable
for
production
# See https:
//docs.djangoproject.com/en/1.8/howto/deployment/checklist/
# SECURITY WARNING: keep the secret key used in production secret!
SECRET_KEY =
'=uet#f68=px2foi)b(kxficu-k_%fho%)a+mi=i(yo2$9m=ruk'
# SECURITY WARNING: don't run with debug turned on in production!
DEBUG = True
ALLOWED_HOSTS = []
# Application definition
INSTALLED_APPS = (
'django.contrib.admin'
,
'django.contrib.auth'
,
'django.contrib.contenttypes'
,
'django.contrib.sessions'
,
'django.contrib.messages'
,
'django.contrib.staticfiles'
,
'user'
)
MIDDLEWARE_CLASSES = (
'django.contrib.sessions.middleware.SessionMiddleware'
,
'django.middleware.common.CommonMiddleware'
,
'django.middleware.csrf.CsrfViewMiddleware'
,
'django.contrib.auth.middleware.AuthenticationMiddleware'
,
'django.contrib.auth.middleware.SessionAuthenticationMiddleware'
,
'django.contrib.messages.middleware.MessageMiddleware'
,
'django.middleware.clickjacking.XFrameOptionsMiddleware'
,
'django.middleware.security.SecurityMiddleware'
,
'user.models.Author'
,
'user.models.Book'
,
'user.models.Publisher'
)
ROOT_URLCONF =
'Django_Test.urls'
TEMPLATES = [
{
'BACKEND'
:
'django.template.backends.django.DjangoTemplates'
,
'DIRS'
: [],
'APP_DIRS'
: True,
'OPTIONS'
: {
'context_processors'
: [
'django.template.context_processors.debug'
,
'django.template.context_processors.request'
,
'django.contrib.auth.context_processors.auth'
,
'django.contrib.messages.context_processors.messages'
,
],
},
},
]
WSGI_APPLICATION =
'Django_Test.wsgi.application'
# Database
# https:
//docs.djangoproject.com/en/1.8/ref/settings/#databases
DATABASES = {
'default'
: {
'ENGINE'
:
'django.db.backends.mysql'
,
'NAME'
:
'django_test'
,
'USER'
:
'root'
,
'PASSWORD'
:
'root'
,
'HOST'
:
''
,
'PORT'
:
''
,
}
}
# Internationalization
# https:
//docs.djangoproject.com/en/1.8/topics/i18n/
LANGUAGE_CODE =
'en-us'
TIME_ZONE =
'UTC'
USE_I18N = True
USE_L10N = True
USE_TZ = True
# Static files (CSS, JavaScript, Images)
# https:
//docs.djangoproject.com/en/1.8/howto/static-files/
STATIC_URL =
'/static/'
TEMPLATE_DIRS = (
os.path.join(BASE_DIR,
'templates'
),
)
|
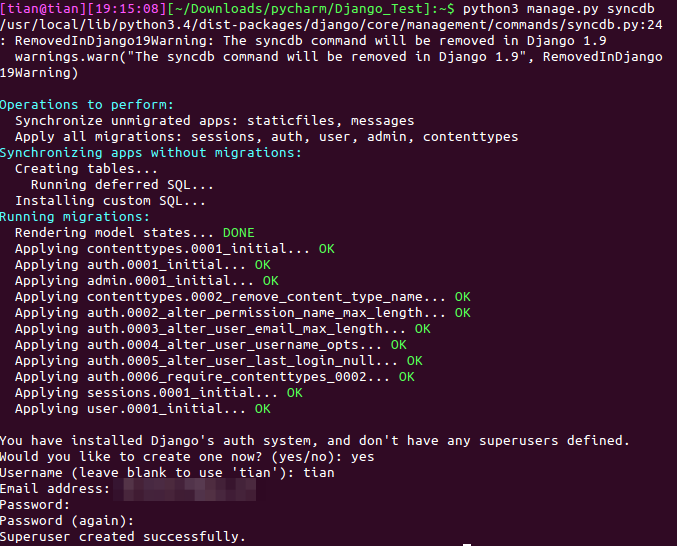
运行:
检查配置文件

生成数据库表:
数据库表:
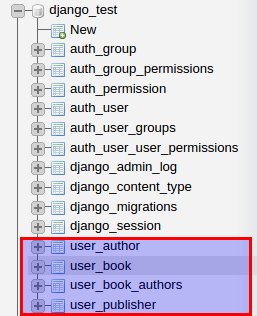
有了这些,我们就可以在此基础堆积代码了。


 396
396


 被折叠的 条评论
为什么被折叠?
被折叠的 条评论
为什么被折叠?
 到【灌水乐园】发言


