


多线程并发
在多核CPU中,利用多线程并发编程,可以更加充分地利用每个核的资源
在Java中,一个应用程序对应着一个JVM实例(也有地方称为JVM进程),如果程序没有主动创建线程,则只会创建一个主线程。但这不代表JVM中只有一个线程,JVM实例在创建的时候,同时会创建很多其他的线程(比如垃圾收集器线程)。
线程创建
线程有三种创建方式:
<pre class="hljs nginx" style="padding: 0.5em; font-family: Menlo, Monaco, Consolas, "Courier New", monospace; color: rgb(68, 68, 68); border-radius: 4px; display: block; margin: 0px 0px 0.75em; font-size: 14px; line-height: 1.5em; word-break: break-all; overflow-wrap: break-word; white-space: pre; background-color: rgb(246, 246, 246); border: none; overflow-x: auto;">Thread
Runnable
Callable
对比:Runnable接口解决了Thread单继承的局限性。而Callable解决了Runnable无法抛异常给调用方的局限性。
<pre class="prettyprint hljs java" style="padding: 0.5em; font-family: Menlo, Monaco, Consolas, "Courier New", monospace; color: rgb(68, 68, 68); border-radius: 4px; display: block; margin: 0px 0px 1.5em; font-size: 14px; line-height: 1.5em; word-break: break-all; overflow-wrap: break-word; white-space: pre; background-color: rgb(246, 246, 246); border: none; overflow-x: auto;">class T extends Thread {
@Override
public void run() {
println("我是继承Thread的任务");
}
}
class R implements Runnable { //解决了单继承问题
@Override
public void run() {
println("我是实现Runnable的任务");
}
}
class C implements Callable<String> {
@Override
public String call() throws Exception { //可以抛异常
println("我是实现Callable的任务");
return "success"; //任务有返回值
}
}
线程启动
- 调用线程的start()方法,这里要注意, 只有Thread方法可以调用start(),因此需要为其他类型的线程创建方式实例分配Thread实例。
<pre class="prettyprint hljs scala" style="padding: 0.5em; font-family: Menlo, Monaco, Consolas, "Courier New", monospace; color: rgb(68, 68, 68); border-radius: 4px; display: block; margin: 0px 0px 1.5em; font-size: 14px; line-height: 1.5em; word-break: break-all; overflow-wrap: break-word; white-space: pre; background-color: rgb(246, 246, 246); border: none; overflow-x: auto;">// 启动继承Thread类的任务
Thread MyThread = new MyThread();
MyThread.start();
class MyThread extends Thread {
@Override
public void run() {
System.out.println("hello myThread" + Thread.currentThread().getName());
}
}
// 启动实现Runnable接口的任务
MyRunnable myRunnable = new MyRunnable();
Thread thread = new Thread(myRunnable); //要给实现Runnable的实例分配新的对象
thread.start();
class MyRunnable implements Runnable{
@Override
public void run(){
System.out.println("hello myRunnable" + Thread.currentThread().getName());
}
}
// 启动实现了Callable接口的任务 结合FutureTask 可以获取线程执行的结果
FutureTask<String> target = new FutureTask<>(new C()); //C是实现了Callable接口的类
new Thread(target).start();
log.info(target.get());
各线程类图

常用方法
| 方法 | 说明 |
|---|---|
| setName("String"); | 给线程设置名称 |
| getName(); | 获取线程的名称 |
| Thread.currentThread(); | 获取当前执行的线程对象 |
| Thread.sleep(ms); | 线程休眠(以ms为单位) |
线程同步
多个线程同时 操作 某个临界资源可能出现业务安全问题。采用 互斥访问
加锁:把临界资源进行上锁,每次只允许一个线程进入访问完成后才解锁,允许其他进程进入
同步代码块
对代码块上锁
快捷键: CTRL+ALT+T
关于锁对象的选择
最好不要用任意唯一的锁对象,因为这会影响其他无关线程的执行。
规范上:建议使用临界资源作为锁对象
对于 实例方法 建议使用 this 作为锁对象
对于 静态方法 建议使用 字节码(类名.class) 作为锁对象
<pre class="prettyprint hljs less" style="padding: 0.5em; font-family: Menlo, Monaco, Consolas, "Courier New", monospace; color: rgb(68, 68, 68); border-radius: 4px; display: block; margin: 0px 0px 1.5em; font-size: 14px; line-height: 1.5em; word-break: break-all; overflow-wrap: break-word; white-space: pre; background-color: rgb(246, 246, 246); border: none; overflow-x: auto;">synchronized(同步锁对象) { //synchronized(this) 只锁自己的临界资源
//操作系统资源的代码(出现安全问题的核心代码)
}
同步方法
对方法上锁
在方法定义时加上synchronized关键字即可
同步方法底层有 隐式锁对象
如果方法是实例方法:同步方法默认使用 this 作为锁对象
如果方法是静态方法:同步方法默认使用 类名.class 作为锁对象
<pre class="prettyprint hljs less" style="padding: 0.5em; font-family: Menlo, Monaco, Consolas, "Courier New", monospace; color: rgb(68, 68, 68); border-radius: 4px; display: block; margin: 0px 0px 1.5em; font-size: 14px; line-height: 1.5em; word-break: break-all; overflow-wrap: break-word; white-space: pre; background-color: rgb(246, 246, 246); border: none; overflow-x: auto;">修饰符 synchronized 返回值类型 方法名称(形参列表) {
//操作系统资源的代码
}
Lock锁
<pre class="prettyprint hljs cs" style="padding: 0.5em; font-family: Menlo, Monaco, Consolas, "Courier New", monospace; color: rgb(68, 68, 68); border-radius: 4px; display: block; margin: 0px 0px 1.5em; font-size: 14px; line-height: 1.5em; word-break: break-all; overflow-wrap: break-word; white-space: pre; background-color: rgb(246, 246, 246); border: none; overflow-x: auto;">//创建锁
private final Lock lock = new ReentranLock();
lock.lock(); //加锁
try {
//锁住的内容
} finally {
lock.unlock(); //解锁
}
线程通信
典型应用:生产者-消费者模型
实现方法:使用一个共享变量实现线程通信
| 方法名称 | 功能 |
|---|---|
| 锁.wait() | 让当前线程等待并释放所占锁,直到另一个线程调用notify()方法或notifyAll()方法 |
| 锁.notify() | 唤醒正在等待的单个线程 |
| 锁.notifyAll() | 唤醒正在等待的所有线程 |
线程池
一个可以复用线程的技术,当请求过多时用于降低系统开销
ExecutorService代表线程池接口
如何得到线程池对象
方式一:使用ExecutorService的实现类ThreadPoolExecutor创建线程池对象

创建临时线程的条件:①核心线程全忙 ②任务队列满
拒绝任务的条件:临时线程和核心线程全忙
线程池处理Runnable任务的方法:
<pre class="prettyprint hljs java" style="padding: 0.5em; font-family: Menlo, Monaco, Consolas, "Courier New", monospace; color: rgb(68, 68, 68); border-radius: 4px; display: block; margin: 0px 0px 1.5em; font-size: 14px; line-height: 1.5em; word-break: break-all; overflow-wrap: break-word; white-space: pre; background-color: rgb(246, 246, 246); border: none; overflow-x: auto;">public class Communication {
public static void main(String[] args) {
//线程池创建
ExecutorService pool = new ThreadPoolExecutor(3,5,2, TimeUnit.MINUTES, new ArrayBlockingQueue<>(5),new ThreadPoolExecutor.AbortPolicy());
Runnable myRunnable = new myRunnable();
//线程池产生Runnable线程对象
pool.execute(myRunnable);
pool.execute(myRunnable);
pool.execute(myRunnable);
pool.execute(myRunnable);
pool.execute(myRunnable);
pool.execute(myRunnable);
pool.execute(myRunnable);
pool.execute(myRunnable);
//开始创建临时线程
pool.execute(myRunnable);
pool.execute(myRunnable);
//抛出异常
pool.execute(myRunnable);
}
}
/**
* 功能:用线程池实现Runnable对象
*/
class myRunnable implements Runnable {
@Override
public void run() {
for (int i = 0; i < 5; i++) {
System.out.println(Thread.currentThread().getName() + "正在打印hello ==>" + i);
}
try {
System.out.println(Thread.currentThread().getName() + "开始睡眠");
Thread.sleep(1000000);
} catch (Exception e) {
e.printStackTrace();
}
}
}
线程池处理Callable任务的方法
<pre class="prettyprint hljs dart" style="padding: 0.5em; font-family: Menlo, Monaco, Consolas, "Courier New", monospace; color: rgb(68, 68, 68); border-radius: 4px; display: block; margin: 0px 0px 1.5em; font-size: 14px; line-height: 1.5em; word-break: break-all; overflow-wrap: break-word; white-space: pre; background-color: rgb(246, 246, 246); border: none; overflow-x: auto;">public class Communication {
public static void main(String[] args) throws ExecutionException, InterruptedException {
//线程池创建(不变)
ExecutorService pool = new ThreadPoolExecutor(3,5,2,
TimeUnit.MINUTES, new ArrayBlockingQueue<>(5),new ThreadPoolExecutor.AbortPolicy());
//调用线程池的submit方法处理myCallable对象,并用Future Task的父类Future继承
Future<String> f1 = pool.submit(new myCallable(100));
Future<String> f2 = pool.submit(new myCallable(200));
Future<String> f3 = pool.submit(new myCallable(300));
Future<String> f4 = pool.submit(new myCallable(400));
Future<String> f5 = pool.submit(new myCallable(500));
//调用get方法返回内容
System.out.println(f1.get());
System.out.println(f2.get());
System.out.println(f3.get());
System.out.println(f4.get());
System.out.println(f5.get());
}
}
/**
* 功能:用线程池实现Callable线程对象
*/
class myCallable implements Callable<String> {
private int n;
public myCallable(int n) {
this.n = n;
}
@Override
public String call() throws Exception {
int sum = 0;
for (int i = 0; i < n; i++) {
sum += i;
}
return Thread.currentThread().getName() + "计算的1-" + n + "结果为" + sum;
}
}
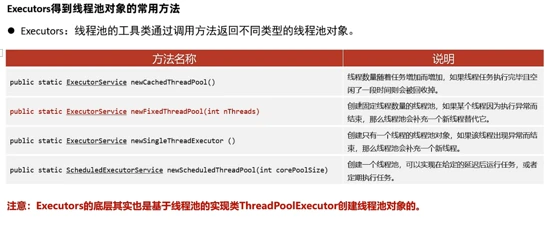
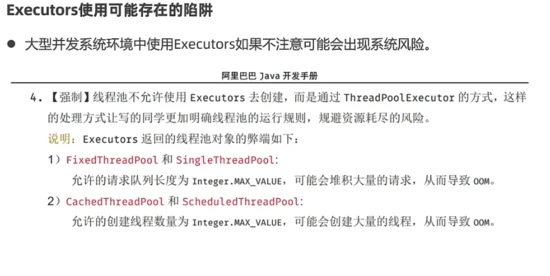
方式二:使用Executors(线程池的工具类)调用方法返回不同线程池对象【非重点】
Executors工具类底层是ThreadPoolExecutor,但在大型并发系统环境使用Executors可能出现系统风险
<pre class="prettyprint hljs nginx" style="padding: 0.5em; font-family: Menlo, Monaco, Consolas, "Courier New", monospace; color: rgb(68, 68, 68); border-radius: 4px; display: block; margin: 0px 0px 1.5em; font-size: 14px; line-height: 1.5em; word-break: break-all; overflow-wrap: break-word; white-space: pre; background-color: rgb(246, 246, 246); border: none; overflow-x: auto;">ExecutorService pool = Executors.newFixedThreadPool(固定线程个数)
//底层调用ThreadPoolExecutor,仅有核心线程
定时器
一种控制任务延时调用,或者周期调用的技术
实现方式::①Timer ②ScheduledExecutorService定时器
Timer定时器
<pre class="prettyprint hljs java" style="padding: 0.5em; font-family: Menlo, Monaco, Consolas, "Courier New", monospace; color: rgb(68, 68, 68); border-radius: 4px; display: block; margin: 0px 0px 1.5em; font-size: 14px; line-height: 1.5em; word-break: break-all; overflow-wrap: break-word; white-space: pre; background-color: rgb(246, 246, 246); border: none; overflow-x: auto;">Timer timer = new Timer();
//schedule还有其他几种重载方式,见jdk
timer.schedule(new TimerTask() {
@Override
public void run() {
//线程内容1
}
},0,2000);
timer.schedule(new TimerTask() {
@Override
public void run() {
//线程内容2
}
},0,2000);
Timer定时器存在的问题
1、Timer定时器是单线程,处理多个任务顺序执行,存在延时问题
2、因为是单线程,若Timer线程死掉,会影响后续任务执行
ScheduledExecutorService定时器
ScheduledExecutorService内部是一个线程池,一个任务不会干扰其他任务
ScheduledExecutorService在日常开发中更加常用
<pre class="prettyprint hljs java" style="padding: 0.5em; font-family: Menlo, Monaco, Consolas, "Courier New", monospace; color: rgb(68, 68, 68); border-radius: 4px; display: block; margin: 0px 0px 1.5em; font-size: 14px; line-height: 1.5em; word-break: break-all; overflow-wrap: break-word; white-space: pre; background-color: rgb(246, 246, 246); border: none; overflow-x: auto;">public static void main(String[] args) {
//
ScheduledExecutorService timer = new ScheduledThreadPoolExecutor(3);
//scheduleAtFixedRate表示以固定频率定时
timer.scheduleAtFixedRate(new Runnable() {
@Override
public void run() {
System.out.println("定时1" + new Date());
}
},0,2,TimeUnit.SECONDS);
timer.scheduleAtFixedRate(new Runnable() {
@Override
public void run() {
System.out.println("定时2" + new Date());
}
},0,3,TimeUnit.SECONDS);
}
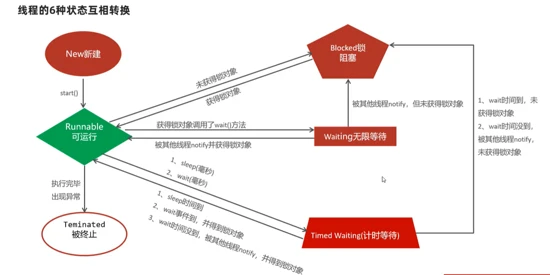
线程生命周期


 7884
7884


 被折叠的 条评论
为什么被折叠?
被折叠的 条评论
为什么被折叠?
 到【灌水乐园】发言


