


React 基础 - day01
React介绍
React由Meta公司开发,是一个用于 构建Web和原生交互界面的库

React的优势
相较于传统基于DOM开发的优势
- 组件化的开发方式
- 不错的性能
相较于其它前端框架的优势
- 丰富的生态
- 跨平台支持
React的市场情况
全球最流行,大厂必备

开发环境创建
create-react-app是一个快速创建React开发环境的工具,底层由Webpack构件,封装了配置细节,开箱即用
执行命令:
npx create-react-app react-basic
- npx - Node.js工具命令,查找并执行后续的包命令
- create-react-app - 核心包(固定写法),用于创建React项目
- react-basic React项目的名称(可以自定义)
:::warning
创建React项目的更多方式
https://zh-hans.react.dev/learn/start-a-new-react-project
:::
JSX基础
什么是JSX
概念:JSX是JavaScript和XMl(HTML)的缩写,表示在JS代码中编写HTML模版结构,它是React中构建UI的方式
const message = 'this is message'

function App(){
  return (
    <div>
      <h1>this is title</h1>
      {message}
    </div>
  )
}
优势:
- HTML的声明式模版写法
- JavaScript的可编程能力
JSX的本质
JSX并不是标准的JS语法,它是 JS的语法扩展,浏览器本身不能识别,需要通过解析工具做解析之后才能在浏览器中使用

JSX高频场景-JS表达式
在JSX中可以通过
大括号语法{}识别JavaScript中的表达式,比如常见的变量、函数调用、方法调用等等
- 使用引号传递字符串
- 使用JS变量
- 函数调用和方法调用
- 使用JavaScript对象
:::warning
注意:if语句、switch语句、变量声明不属于表达式,不能出现在{}中
:::
const message = 'this is message'

function getAge(){
  return 18
}

function App(){
  return (
    <div>
      <h1>this is title</h1>
      {/* 字符串识别 */}
      {'this is str'}
      {/* 变量识别 */}
      {message}
      {/* 变量识别 */}
      {message}
      {/* 函数调用 渲染为函数的返回值 */}
      {getAge()}
    </div>
  )
}
JSX高频场景-列表渲染

在JSX中可以使用原生js种的
map方法实现列表渲染
const list = [
  {id:1001, name:'Vue'},
  {id:1002, name: 'React'},
  {id:1003, name: 'Angular'}
]

function App(){
  return (
    <ul>
      {list.map(item=><li key={item.id}>{item}</li>)}
    </ul>
  )
}
JSX高频场景-条件渲染

在React中,可以通过逻辑与运算符&&、三元表达式(?😃 实现基础的条件渲染
const flag = true
const loading = false

function App(){
  return (
    <>
      {flag && <span>this is span</span>}
      {loading ? <span>loading...</span>:<span>this is span</span>}
    </>
  )
}
JSX高频场景-复杂条件渲染

需求:列表中需要根据文章的状态适配
解决方案:自定义函数 + 判断语句
const type = 1  // 0|1|3

function getArticleJSX(){
  if(type === 0){
    return <div>无图模式模版</div>
  }else if(type === 1){
    return <div>单图模式模版</div>
  }else(type === 3){
    return <div>三图模式模版</div>
  }
}

function App(){
  return (
    <>
      { getArticleJSX() }
    </>
  )
}
React的事件绑定
基础实现
React中的事件绑定,通过语法
on + 事件名称 = { 事件处理程序 },整体上遵循驼峰命名法
function App(){
  const clickHandler = ()=>{
    console.log('button按钮点击了')
  }
  return (
    <button onClick={clickHandler}>click me</button>
  )
}
使用事件参数
在事件回调函数中设置形参e即可
function App(){
  const clickHandler = (e)=>{
    console.log('button按钮点击了', e)
  }
  return (
    <button onClick={clickHandler}>click me</button>
  )
}
传递自定义参数
语法:事件绑定的位置改造成箭头函数的写法,在执行clickHandler实际处理业务函数的时候传递实参
function App(){
  const clickHandler = (name)=>{
    console.log('button按钮点击了', name)
  }
  return (
    <button onClick={()=>clickHandler('jack')}>click me</button>
  )
}
:::warning
注意:不能直接写函数调用,这里事件绑定需要一个函数引用
:::
同时传递事件对象和自定义参数
语法:在事件绑定的位置传递事件实参e和自定义参数,clickHandler中声明形参,注意顺序对应
function App(){
  const clickHandler = (name,e)=>{
    console.log('button按钮点击了', name,e)
  }
  return (
    <button onClick={(e)=>clickHandler('jack',e)}>click me</button>
  )
}
React组件基础使用
组件是什么
概念:一个组件就是一个用户界面的一部分,它可以有自己的逻辑和外观,组件之间可以互相嵌套,也可以服用多次

组件基础使用
在React中,一个组件就是首字母大写的函数,内部存放了组件的逻辑和视图UI, 渲染组件只需要把组件当成标签书写即可
// 1. 定义组件
function Button(){
  return <button>click me</button>
}

// 2. 使用组件
function App(){
  return (
    <div>
      {/* 自闭和 */}
      <Button/>
      {/* 成对标签 */}
      <Button></Button>
    </div>
  )
}
组件状态管理-useState
基础使用
useState 是一个 React Hook(函数),它允许我们向组件添加一个
状态变量, 从而控制影响组件的渲染结果
和普通JS变量不同的是,状态变量一旦发生变化组件的视图UI也会跟着变化(数据驱动视图)

function App(){
  const [ count, setCount ] = React.useState(0)
  return (
    <div>
      <button onClick={()=>setCount(count+1)}>{ count }</button>
    </div>
  )
}
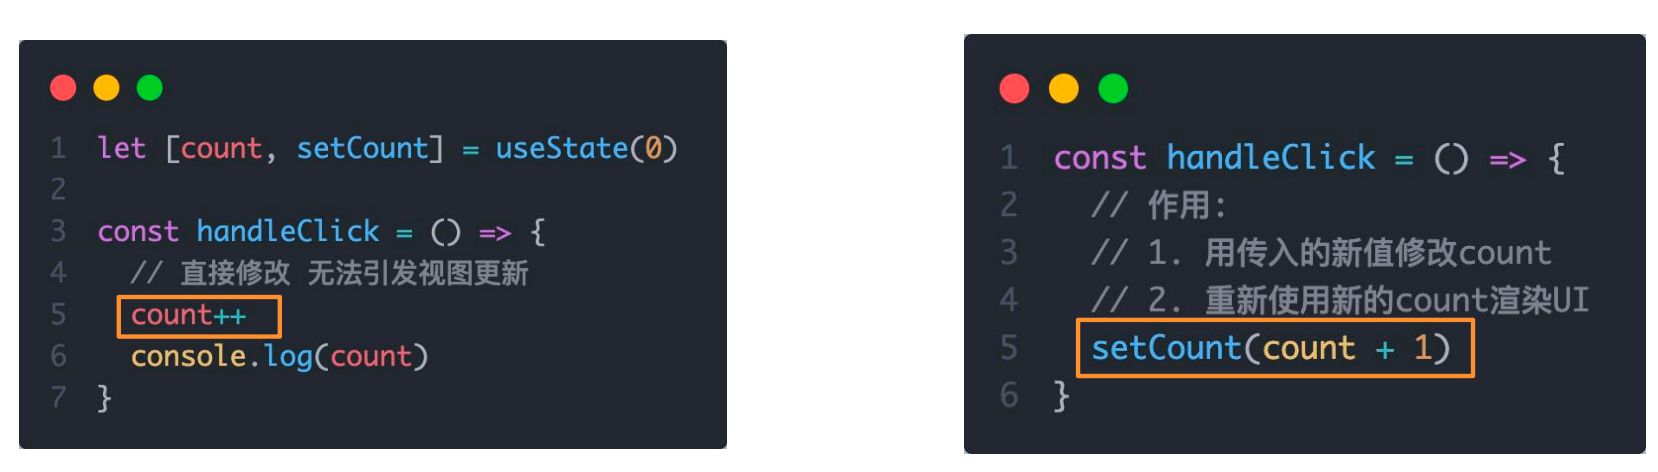
状态的修改规则
在React中状态被认为是只读的,我们应该始终
替换它而不是修改它, 直接修改状态不能引发视图更新
修改对象状态
对于对象类型的状态变量,应该始终给set方法一个
全新的对象来进行修改

组件的基础样式处理
React组件基础的样式控制有俩种方式,行内样式和class类名控制
<div style={{ color:'red'}}>this is div</div>
.foo{
  color: red;
}
import './index.css'

function App(){
  return (
    <div>
      <span className="foo">this is span</span>
    </div>
  )
}
B站评论案例
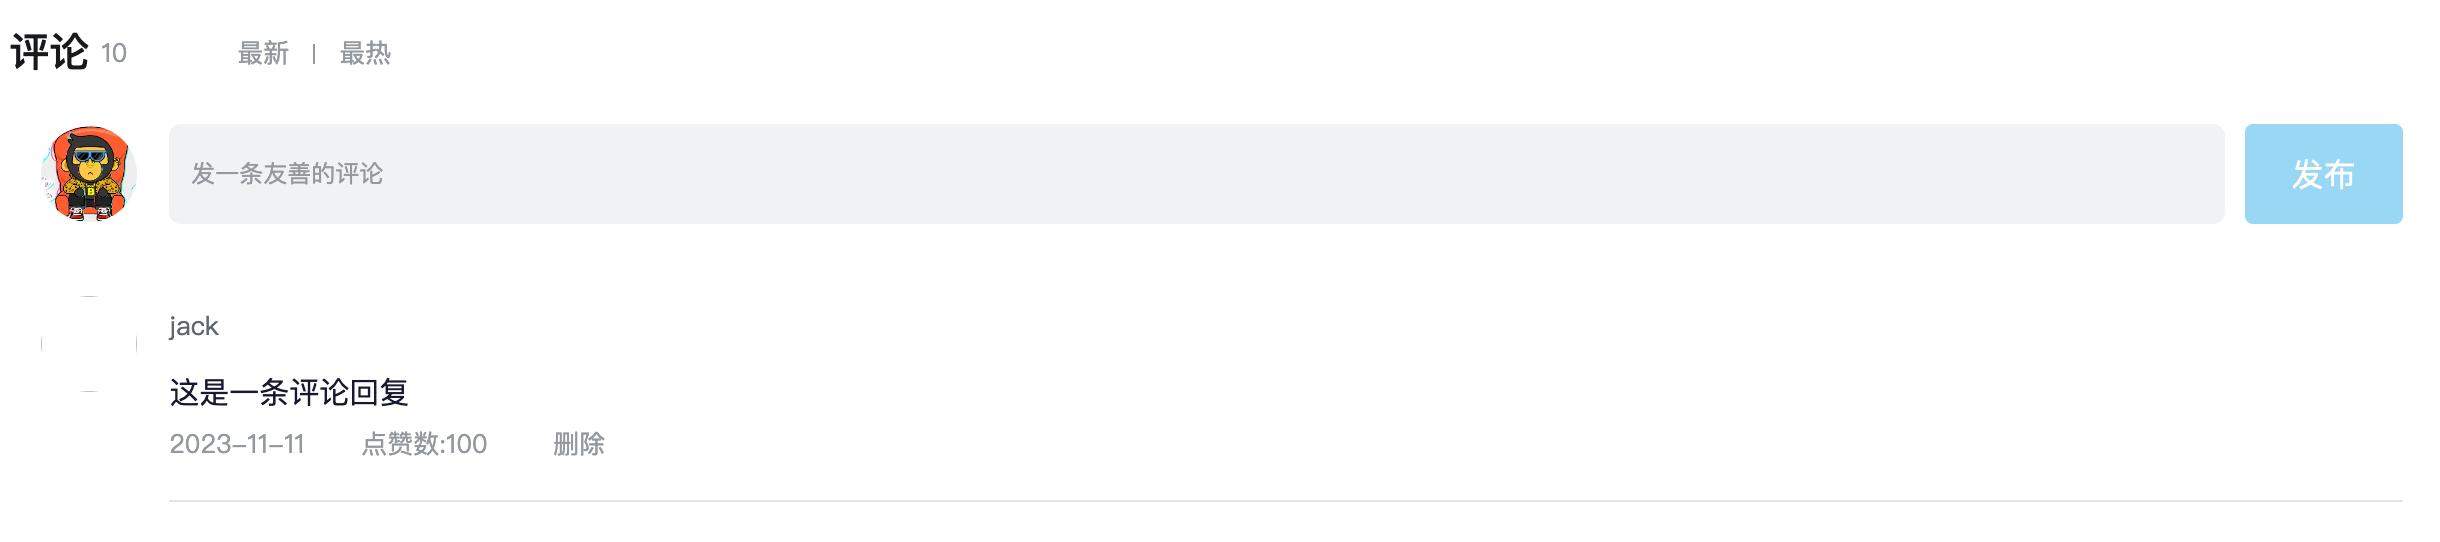
- 渲染评论列表
- 删除评论实现
- 渲染导航Tab和高亮实现
- 评论列表排序功能实现
基础模版
import { useState } from 'react'
import './App.scss'
import avatar from './images/bozai.png'

/**
 * 评论列表的渲染和操作
 *
 * 1. 根据状态渲染评论列表
 * 2. 删除评论
 */

// 评论列表数据
const defaultList = [
  {
    // 评论id
    rpid: 3,
    // 用户信息
    user: {
      uid: '13258165',
      avatar: '',
      uname: '周杰伦',
    },
    // 评论内容
    content: '哎哟,不错哦',
    // 评论时间
    ctime: '10-18 08:15',
    like: 88,
  },
  {
    rpid: 2,
    user: {
      uid: '36080105',
      avatar: '',
      uname: '许嵩',
    },
    content: '我寻你千百度 日出到迟暮',
    ctime: '11-13 11:29',
    like: 88,
  },
  {
    rpid: 1,
    user: {
      uid: '30009257',
      avatar,
      uname: '黑马前端',
    },
    content: '学前端就来黑马',
    ctime: '10-19 09:00',
    like: 66,
  },
]
// 当前登录用户信息
const user = {
  // 用户id
  uid: '30009257',
  // 用户头像
  avatar,
  // 用户昵称
  uname: '黑马前端',
}

/**
 * 导航 Tab 的渲染和操作
 *
 * 1. 渲染导航 Tab 和高亮
 * 2. 评论列表排序
 *  最热 => 喜欢数量降序
 *  最新 => 创建时间降序
 */

// 导航 Tab 数组
const tabs = [
  { type: 'hot', text: '最热' },
  { type: 'time', text: '最新' },
]

const App = () => {
  return (
    <div className="app">
      {/* 导航 Tab */}
      <div className="reply-navigation">
        <ul className="nav-bar">
          <li className="nav-title">
            <span className="nav-title-text">评论</span>
            {/* 评论数量 */}
            <span className="total-reply">{10}</span>
          </li>
          <li className="nav-sort">
            {/* 高亮类名: active */}
            <span className='nav-item'>最新</span>
            <span className='nav-item'>最热</span>
          </li>
        </ul>
      </div>

      <div className="reply-wrap">
        {/* 发表评论 */}
        <div className="box-normal">
          {/* 当前用户头像 */}
          <div className="reply-box-avatar">
            <div className="bili-avatar">
              <img className="bili-avatar-img" src={avatar} alt="用户头像" />
            </div>
          </div>
          <div className="reply-box-wrap">
            {/* 评论框 */}
            <textarea
              className="reply-box-textarea"
              placeholder="发一条友善的评论"
            />
            {/* 发布按钮 */}
            <div className="reply-box-send">
              <div className="send-text">发布</div>
            </div>
          </div>
        </div>
        {/* 评论列表 */}
        <div className="reply-list">
          {/* 评论项 */}
          <div className="reply-item">
            {/* 头像 */}
            <div className="root-reply-avatar">
              <div className="bili-avatar">
                <img
                  className="bili-avatar-img"
                  alt=""
                />
              </div>
            </div>

            <div className="content-wrap">
              {/* 用户名 */}
              <div className="user-info">
                <div className="user-name">jack</div>
              </div>
              {/* 评论内容 */}
              <div className="root-reply">
                <span className="reply-content">这是一条评论回复</span>
                <div className="reply-info">
                  {/* 评论时间 */}
                  <span className="reply-time">{'2023-11-11'}</span>
                  {/* 评论数量 */}
                  <span className="reply-time">点赞数:{100}</span>
                  <span className="delete-btn">
                    删除
                  </span>

                </div>
              </div>
            </div>
          </div>
        </div>
      </div>
    </div>
  )
}

export default App
.app {
  width: 80%;
  margin: 50px auto;
}

.reply-navigation {
  margin-bottom: 22px;

  .nav-bar {
    display: flex;
    align-items: center;
    margin: 0;
    padding: 0;
    list-style: none;

    .nav-title {
      display: flex;
      align-items: center;
      width: 114px;
      font-size: 20px;

      .nav-title-text {
        color: #18191c;
        font-weight: 500;
      }
      .total-reply {
        margin: 0 36px 0 6px;
        color: #9499a0;
        font-weight: normal;
        font-size: 13px;
      }
    }

    .nav-sort {
      display: flex;
      align-items: center;
      color: #9499a0;
      font-size: 13px;

      .nav-item {
        cursor: pointer;

        &:hover {
          color: #00aeec;
        }

        &:last-child::after {
          display: none;
        }
        &::after {
          content: ' ';
          display: inline-block;
          height: 10px;
          width: 1px;
          margin: -1px 12px;
          background-color: #9499a0;
        }
      }

      .nav-item.active {
        color: #18191c;
      }
    }
  }
}

.reply-wrap {
  position: relative;
}
.box-normal {
  display: flex;
  transition: 0.2s;

  .reply-box-avatar {
    display: flex;
    align-items: center;
    justify-content: center;
    width: 80px;
    height: 50px;
  }

  .reply-box-wrap {
    display: flex;
    position: relative;
    flex: 1;

    .reply-box-textarea {
      width: 100%;
      height: 50px;
      padding: 5px 10px;
      box-sizing: border-box;
      color: #181931;
      font-family: inherit;
      line-height: 38px;
      background-color: #f1f2f3;
      border: 1px solid #f1f2f3;
      border-radius: 6px;
      outline: none;
      resize: none;
      transition: 0.2s;

      &::placeholder {
        color: #9499a0;
        font-size: 12px;
      }
      &:focus {
        height: 60px;
        background-color: #fff;
        border-color: #c9ccd0;
      }
    }
  }

  .reply-box-send {
    position: relative;
    display: flex;
    flex-basis: 86px;
    align-items: center;
    justify-content: center;
    margin-left: 10px;
    border-radius: 4px;
    cursor: pointer;
    transition: 0.2s;

    & .send-text {
      position: absolute;
      z-index: 1;
      color: #fff;
      font-size: 16px;
    }
    &::after {
      position: absolute;
      width: 100%;
      height: 100%;
      background-color: #00aeec;
      border-radius: 4px;
      opacity: 0.5;
      content: '';
    }
    &:hover::after {
      opacity: 1;
    }
  }
}
.bili-avatar {
  position: relative;
  display: block;
  width: 48px;
  height: 48px;
  margin: 0;
  padding: 0;
  border-radius: 50%;
}
.bili-avatar-img {
  position: absolute;
  top: 50%;
  left: 50%;
  display: block;
  width: 48px;
  height: 48px;
  object-fit: cover;
  border: none;
  border-radius: 50%;
  image-rendering: -webkit-optimize-contrast;
  transform: translate(-50%, -50%);
}

// 评论列表
.reply-list {
  margin-top: 14px;
}
.reply-item {
  padding: 22px 0 0 80px;
  .root-reply-avatar {
    position: absolute;
    left: 0;
    display: flex;
    justify-content: center;
    width: 80px;
    cursor: pointer;
  }

  .content-wrap {
    position: relative;
    flex: 1;

    &::after {
      content: ' ';
      display: block;
      height: 1px;
      width: 100%;
      margin-top: 14px;
      background-color: #e3e5e7;
    }

    .user-info {
      display: flex;
      align-items: center;
      margin-bottom: 4px;

      .user-name {
        height: 30px;
        margin-right: 5px;
        color: #61666d;
        font-size: 13px;
        line-height: 30px;
        cursor: pointer;
      }
    }

    .root-reply {
      position: relative;
      padding: 2px 0;
      color: #181931;
      font-size: 15px;
      line-height: 24px;
      .reply-info {
        position: relative;
        display: flex;
        align-items: center;
        margin-top: 2px;
        color: #9499a0;
        font-size: 13px;

        .reply-time {
          width: 76px;
          margin-right: 20px;
        }
        .reply-like {
          display: flex;
          align-items: center;
          margin-right: 19px;

          .like-icon {
            width: 14px;
            height: 14px;
            margin-right: 5px;
            color: #9499a0;
            background-position: -153px -25px;
            &:hover {
              background-position: -218px -25px;
            }
          }
          .like-icon.liked {
            background-position: -154px -89px;
          }
        }
        .reply-dislike {
          display: flex;
          align-items: center;
          margin-right: 19px;
          .dislike-icon {
            width: 16px;
            height: 16px;
            background-position: -153px -153px;
            &:hover {
              background-position: -217px -153px;
            }
          }
          .dislike-icon.disliked {
            background-position: -154px -217px;
          }
        }
        .delete-btn {
          cursor: pointer;
          &:hover {
            color: #00aeec;
          }
        }
      }
    }
  }
}

.reply-none {
  height: 64px;
  margin-bottom: 80px;
  color: #99a2aa;
  font-size: 13px;
  line-height: 64px;
  text-align: center;
}
完成版本
 import { useState } from 'react'
import './App.scss'
import avatar from './images/bozai.png'
import orderBy from 'lodash/orderBy'

/**
 * 评论列表的渲染和操作
 *
 * 1. 根据状态渲染评论列表
 * 2. 删除评论
 */

// 评论列表数据
const defaultList = [
  {
    // 评论id
    rpid: 3,
    // 用户信息
    user: {
      uid: '13258165',
      avatar: '',
      uname: '周杰伦',
    },
    // 评论内容
    content: '哎哟,不错哦',
    // 评论时间
    ctime: '10-18 08:15',
    like: 88,
  },
  {
    rpid: 2,
    user: {
      uid: '36080105',
      avatar: '',
      uname: '许嵩',
    },
    content: '我寻你千百度 日出到迟暮',
    ctime: '11-13 11:29',
    like: 88,
  },
  {
    rpid: 1,
    user: {
      uid: '30009257',
      avatar,
      uname: '黑马前端',
    },
    content: '学前端就来黑马',
    ctime: '10-19 09:00',
    like: 66,
  },
]
// 当前登录用户信息
const user = {
  // 用户id
  uid: '30009257',
  // 用户头像
  avatar,
  // 用户昵称
  uname: '黑马前端',
}

/**
 * 导航 Tab 的渲染和操作
 *
 * 1. 渲染导航 Tab 和高亮
 * 2. 评论列表排序
 *  最热 => 喜欢数量降序
 *  最新 => 创建时间降序
 */

// 导航 Tab 数组
const tabs = [
  { type: 'hot', text: '最热' },
  { type: 'time', text: '最新' },
]

const App = () => {
  // 导航 Tab 高亮的状态
  const [activeTab, setActiveTab] = useState('hot')
  const [list, setList] = useState(defaultList)

  // 删除评论
  const onDelete = rpid => {
    // 如果要删除数组中的元素,需要调用 filter 方法,并且一定要调用 setList 才能更新状态
    setList(list.filter(item => item.rpid !== rpid))
  }

  // tab 高亮切换
  const onToggle = type => {
    setActiveTab(type)
    let newList
    if (type === 'time') {
      // 按照时间降序排序
      // orderBy(对谁进行排序, 按照谁来排, 顺序)
      newList = orderBy(list, 'ctime', 'desc')
    } else {
      // 按照喜欢数量降序排序
      newList = orderBy(list, 'like', 'desc')
    }
    setList(newList)
  }

  return (
    <div className="app">
      {/* 导航 Tab */}
      <div className="reply-navigation">
        <ul className="nav-bar">
          <li className="nav-title">
            <span className="nav-title-text">评论</span>
            {/* 评论数量 */}
            <span className="total-reply">{list.length}</span>
          </li>
          <li className="nav-sort">
            {/* 高亮类名: active */}
            {tabs.map(item => {
              return (
                <div
                  key={item.type}
                  className={
                    item.type === activeTab ? 'nav-item active' : 'nav-item'
                  }
                  onClick={() => onToggle(item.type)}
                >
                  {item.text}
                </div>
              )
            })}
          </li>
        </ul>
      </div>

      <div className="reply-wrap">
        {/* 发表评论 */}
        <div className="box-normal">
          {/* 当前用户头像 */}
          <div className="reply-box-avatar">
            <div className="bili-avatar">
              <img className="bili-avatar-img" src={avatar} alt="用户头像" />
            </div>
          </div>
          <div className="reply-box-wrap">
            {/* 评论框 */}
            <textarea
              className="reply-box-textarea"
              placeholder="发一条友善的评论"
            />
            {/* 发布按钮 */}
            <div className="reply-box-send">
              <div className="send-text">发布</div>
            </div>
          </div>
        </div>
        {/* 评论列表 */}
        <div className="reply-list">
          {/* 评论项 */}
          {list.map(item => {
            return (
              <div key={item.rpid} className="reply-item">
                {/* 头像 */}
                <div className="root-reply-avatar">
                  <div className="bili-avatar">
                    <img
                      className="bili-avatar-img"
                      src={item.user.avatar}
                      alt=""
                    />
                  </div>
                </div>

                <div className="content-wrap">
                  {/* 用户名 */}
                  <div className="user-info">
                    <div className="user-name">{item.user.uname}</div>
                  </div>
                  {/* 评论内容 */}
                  <div className="root-reply">
                    <span className="reply-content">{item.content}</span>
                    <div className="reply-info">
                      {/* 评论时间 */}
                      <span className="reply-time">{item.ctime}</span>
                      {/* 评论数量 */}
                      <span className="reply-time">点赞数:{item.like}</span>
                      {user.uid === item.user.uid && (
                        <span
                          className="delete-btn"
                          onClick={() => onDelete(item.rpid)}
                        >
                          删除
                        </span>
                      )}
                    </div>
                  </div>
                </div>
              </div>
            )
          })}
        </div>
      </div>
    </div>
  )
}

export default App
React 基础 - day02
React表单控制
受控绑定
概念:使用React组件的状态(useState)控制表单的状态

function App(){
  const [value, setValue] = useState('')
  return (
    <input
      type="text"
      value={value}
      onChange={e => setValue(e.target.value)}
    />
  )
}
非受控绑定
概念:通过获取DOM的方式获取表单的输入数据
function App(){
  const inputRef = useRef(null)

  const onChange = ()=>{
    console.log(inputRef.current.value)
  }

  return (
    <input
      type="text"
      ref={inputRef}
      onChange={onChange}
    />
  )
}
案例-B站评论案例

- 手机输入框评论内容,并发布评论
- id处理和时间处理(uuid 和 day.js)
React组件通信
概念:组件通信就是
组件之间的数据传递, 根据组件嵌套关系的不同,有不同的通信手段和方法

- A-B 父子通信
- B-C 兄弟通信
- A-E 跨层通信
父子通信-父传子
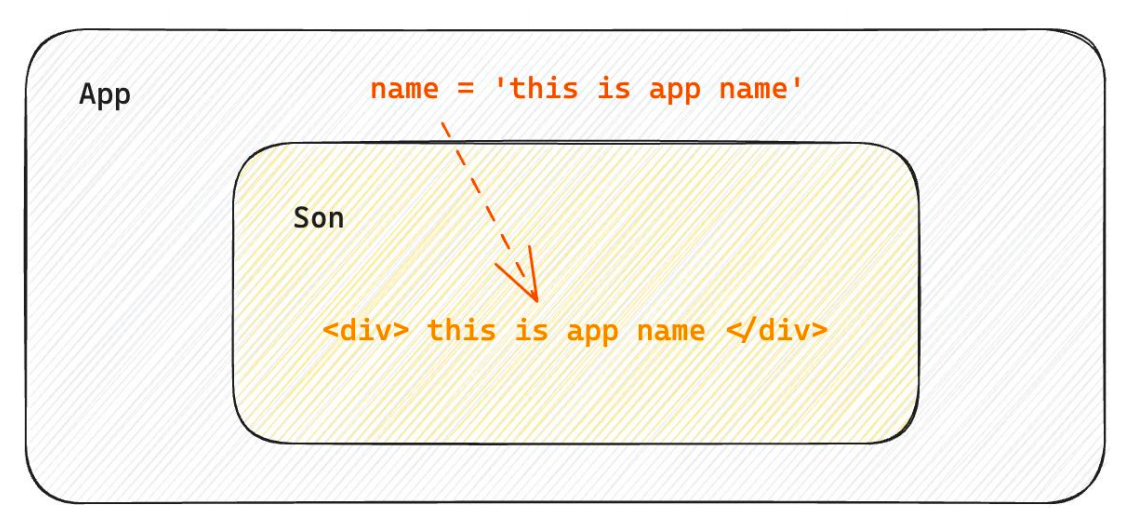
基础实现
**实现步骤 **
- 父组件传递数据 - 在子组件标签上绑定属性
- 子组件接收数据 - 子组件通过props参数接收数据
function Son(props){
  return <div>{ props.name }</div>
}


function App(){
  const name = 'this is app name'
  return (
    <div>
       <Son name={name}/>
    </div>
  )
}
props说明
props可以传递任意的合法数据,比如数字、字符串、布尔值、数组、对象、函数、JSX

props是只读对象
子组件只能读取props中的数据,不能直接进行修改, 父组件的数据只能由父组件修改
特殊的prop-chilren
场景:当我们把内容嵌套在组件的标签内部时,组件会自动在名为children的prop属性中接收该内容

父子通信-子传父

核心思路:在子组件中调用父组件中的函数并传递参数
function Son({ onGetMsg }){
  const sonMsg = 'this is son msg'
  return (
    <div>
      {/* 在子组件中执行父组件传递过来的函数 */}
      <button onClick={()=>onGetMsg(sonMsg)}>send</button>
    </div>
  )
}


function App(){
  const getMsg = (msg)=>console.log(msg)

  return (
    <div>
      {/* 传递父组件中的函数到子组件 */}
       <Son onGetMsg={ getMsg }/>
    </div>
  )
}
兄弟组件通信
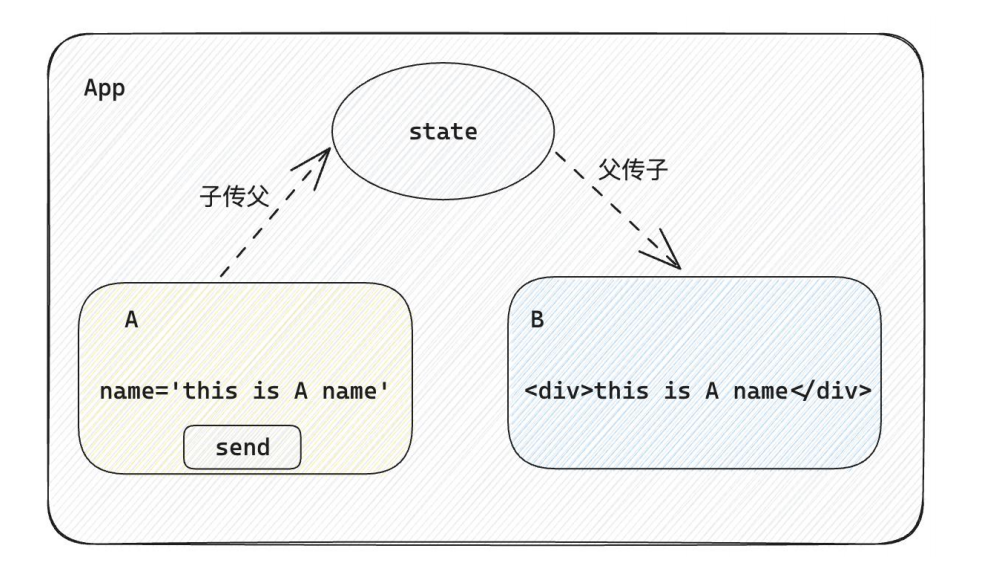
实现思路: 借助
状态提升机制,通过共同的父组件进行兄弟之间的数据传递
- A组件先通过子传父的方式把数据传递给父组件App
- App拿到数据之后通过父传子的方式再传递给B组件
// 1. 通过子传父 A -> App
// 2. 通过父传子 App -> B

import { useState } from "react"

function A ({ onGetAName }) {
  // Son组件中的数据
  const name = 'this is A name'
  return (
    <div>
      this is A compnent,
      <button onClick={() => onGetAName(name)}>send</button>
    </div>
  )
}

function B ({ name }) {
  return (
    <div>
      this is B compnent,
      {name}
    </div>
  )
}

function App () {
  const [name, setName] = useState('')
  const getAName = (name) => {
    setName(name)
  }
  return (
    <div>
      this is App
      <A onGetAName={getAName} />
      <B name={name} />
    </div>
  )
}

export default App
跨层组件通信

实现步骤:
- 使用
createContext方法创建一个上下文对象Ctx - 在顶层组件(App)中通过
Ctx.Provider组件提供数据 - 在底层组件(B)中通过
useContext钩子函数获取消费数据
// App -> A -> B

import { createContext, useContext } from "react"

// 1. createContext方法创建一个上下文对象

const MsgContext = createContext()

function A () {
  return (
    <div>
      this is A component
      <B />
    </div>
  )
}

function B () {
  // 3. 在底层组件 通过useContext钩子函数使用数据
  const msg = useContext(MsgContext)
  return (
    <div>
      this is B compnent,{msg}
    </div>
  )
}

function App () {
  const msg = 'this is app msg'
  return (
    <div>
      {/* 2. 在顶层组件 通过Provider组件提供数据 */}
      <MsgContext.Provider value={msg}>
        this is App
        <A />
      </MsgContext.Provider>
    </div>
  )
}

export default App
React副作用管理-useEffect
概念理解
useEffect是一个React Hook函数,用于在React组件中创建不是由事件引起而是由渲染本身引起的操作(副作用), 比 如发送AJAX请求,更改DOM等等

:::warning
说明:上面的组件中没有发生任何的用户事件,组件渲染完毕之后就需要和服务器要数据,整个过程属于“只由渲染引起的操作”
:::
基础使用
需求:在组件渲染完毕之后,立刻从服务端获取平道列表数据并显示到页面中

说明:
- 参数1是一个函数,可以把它叫做副作用函数,在函数内部可以放置要执行的操作
- 参数2是一个数组(可选参),在数组里放置依赖项,不同依赖项会影响第一个参数函数的执行,当是一个空数组的时候,副作用函数只会在组件渲染完毕之后执行一次
:::warning
接口地址:http://geek.itheima.net/v1_0/channels
:::
useEffect依赖说明
useEffect副作用函数的执行时机存在多种情况,根据传入依赖项的不同,会有不同的执行表现
| 依赖项 | 副作用功函数的执行时机 |
|---|---|
| 没有依赖项 | 组件初始渲染 + 组件更新时执行 |
| 空数组依赖 | 只在初始渲染时执行一次 |
| 添加特定依赖项 | 组件初始渲染 + 依赖项变化时执行 |
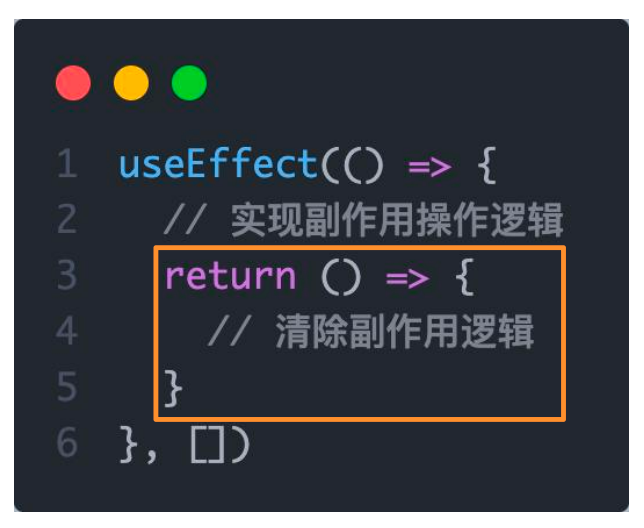
清除副作用
概念:在useEffect中编写的由渲染本身引起的对接组件外部的操作,社区也经常把它叫做副作用操作,比如在useEffect中开启了一个定时器,我们想在组件卸载时把这个定时器再清理掉,这个过程就是清理副作用
:::warning
说明:清除副作用的函数最常见的执行时机是在组件卸载时自动执行
:::
import { useEffect, useState } from "react"

function Son () {
  // 1. 渲染时开启一个定时器
  useEffect(() => {
    const timer = setInterval(() => {
      console.log('定时器执行中...')
    }, 1000)

    return () => {
      // 清除副作用(组件卸载时)
      clearInterval(timer)
    }
  }, [])
  return <div>this is son</div>
}

function App () {
  // 通过条件渲染模拟组件卸载
  const [show, setShow] = useState(true)
  return (
    <div>
      {show && <Son />}
      <button onClick={() => setShow(false)}>卸载Son组件</button>
    </div>
  )
}

export default App
自定义Hook实现
概念:自定义Hook是以
use打头的函数,通过自定义Hook函数可以用来实现逻辑的封装和复用

// 封装自定义Hook

// 问题: 布尔切换的逻辑 当前组件耦合在一起的 不方便复用

// 解决思路: 自定义hook

import { useState } from "react"

function useToggle () {
  // 可复用的逻辑代码
  const [value, setValue] = useState(true)

  const toggle = () => setValue(!value)

  // 哪些状态和回调函数需要在其他组件中使用 return
  return {
    value,
    toggle
  }
}

// 封装自定义hook通用思路

// 1. 声明一个以use打头的函数
// 2. 在函数体内封装可复用的逻辑(只要是可复用的逻辑)
// 3. 把组件中用到的状态或者回调return出去(以对象或者数组)
// 4. 在哪个组件中要用到这个逻辑,就执行这个函数,解构出来状态和回调进行使用


function App () {
  const { value, toggle } = useToggle()
  return (
    <div>
      {value && <div>this is div</div>}
      <button onClick={toggle}>toggle</button>
    </div>
  )
}

export default App
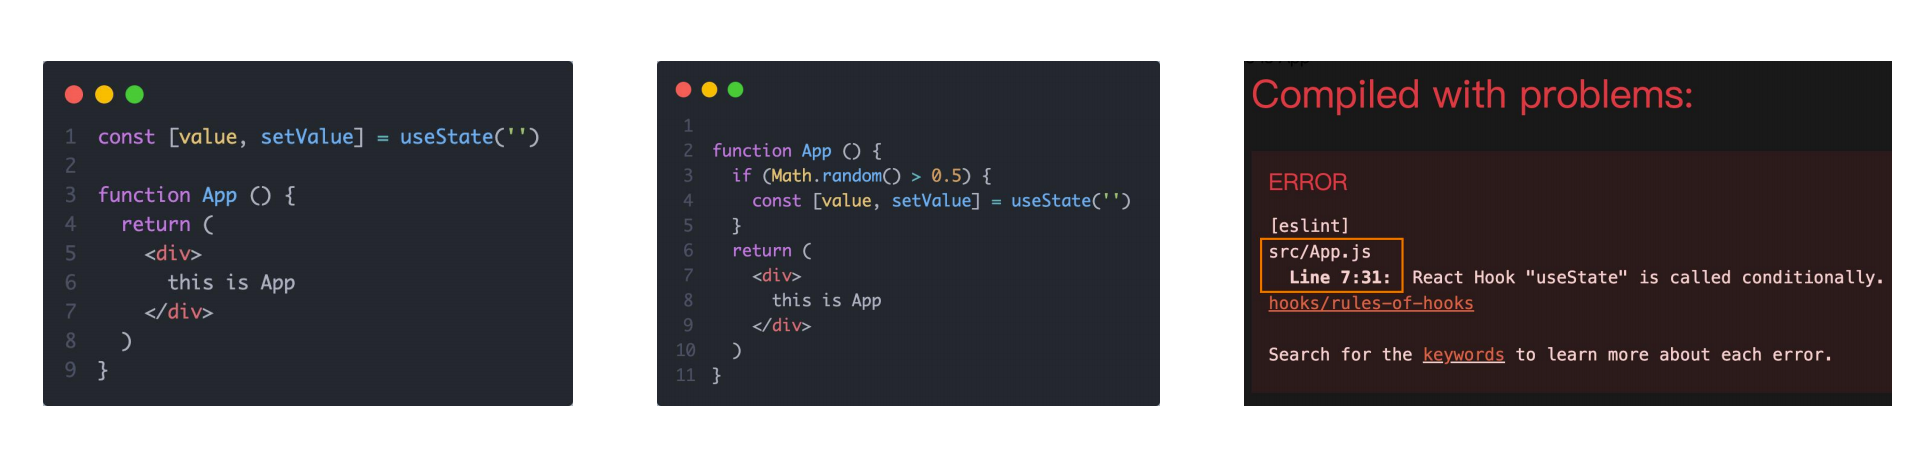
React Hooks使用规则
- 只能在组件中或者其他自定义Hook函数中调用
- 只能在组件的顶层调用,不能嵌套在if、for、其它的函数中
案例-优化B站评论案例

- 使用请求接口的方式获取评论列表并渲染
- 使用自定义Hook函数封装数据请求的逻辑
- 把评论中的每一项抽象成一个独立的组件实现渲染
React 基础 - day03-Redux
Redux介绍
Redux 是React最常用的集中状态管理工具,类似于Vue中的Pinia(Vuex),可以独立于框架运行
作用:通过集中管理的方式管理应用的状态

为什么要使用Redux?
- 独立于组件,无视组件之间的层级关系,简化通信问题
- 单项数据流清晰,易于定位bug
- 调试工具配套良好,方便调试
Redux快速体验
1. 实现计数器
需求:不和任何框架绑定,不使用任何构建工具,使用纯Redux实现计数器

使用步骤:
- 定义一个 reducer 函数 (根据当前想要做的修改返回一个新的状态)
- 使用createStore方法传入 reducer函数 生成一个store实例对象
- 使用store实例的 subscribe方法 订阅数据的变化(数据一旦变化,可以得到通知)
- 使用store实例的 dispatch方法提交action对象 触发数据变化(告诉reducer你想怎么改数据)
- 使用store实例的 getState方法 获取最新的状态数据更新到视图中
代码实现:
<button id="decrement">-</button>
<span id="count">0</span>
<button id="increment">+</button>

<script src="https://unpkg.com/redux@latest/dist/redux.min.js"></script>

<script>
  // 定义reducer函数
  // 内部主要的工作是根据不同的action 返回不同的state
  function counterReducer (state = { count: 0 }, action) {
    switch (action.type) {
      case 'INCREMENT':
        return { count: state.count + 1 }
      case 'DECREMENT':
        return { count: state.count - 1 }
      default:
        return state
    }
  }
  // 使用reducer函数生成store实例
  const store = Redux.createStore(counterReducer)

  // 订阅数据变化
  store.subscribe(() => {
    console.log(store.getState())
    document.getElementById('count').innerText = store.getState().count

  })
  // 增
  const inBtn = document.getElementById('increment')
  inBtn.addEventListener('click', () => {
    store.dispatch({
      type: 'INCREMENT'
    })
  })
  // 减
  const dBtn = document.getElementById('decrement')
  dBtn.addEventListener('click', () => {
    store.dispatch({
      type: 'DECREMENT'
    })
  })
</script>
2. Redux数据流架构
Redux的难点是理解它对于数据修改的规则, 下图动态展示了在整个数据的修改中,数据的流向

为了职责清晰,Redux代码被分为三个核心的概念,我们学redux,其实就是学这三个核心概念之间的配合,三个概念分别是:
- state: 一个对象 存放着我们管理的数据
- action: 一个对象 用来描述你想怎么改数据
- reducer: 一个函数 根据action的描述更新state
Redux与React - 环境准备
Redux虽然是一个框架无关可以独立运行的插件,但是社区通常还是把它与React绑定在一起使用,以一个计数器案例体验一下Redux + React 的基础使用
1. 配套工具
在React中使用redux,官方要求安装俩个其他插件 - Redux Toolkit 和 react-redux
-
Redux Toolkit(RTK)- 官方推荐编写Redux逻辑的方式,是一套工具的集合集,简化书写方式
-
react-redux - 用来 链接 Redux 和 React组件 的中间件

2. 配置基础环境
- 使用 CRA 快速创建 React 项目
npx create-react-app react-redux
- 安装配套工具
npm i @reduxjs/toolkit react-redux
- 启动项目
npm run start
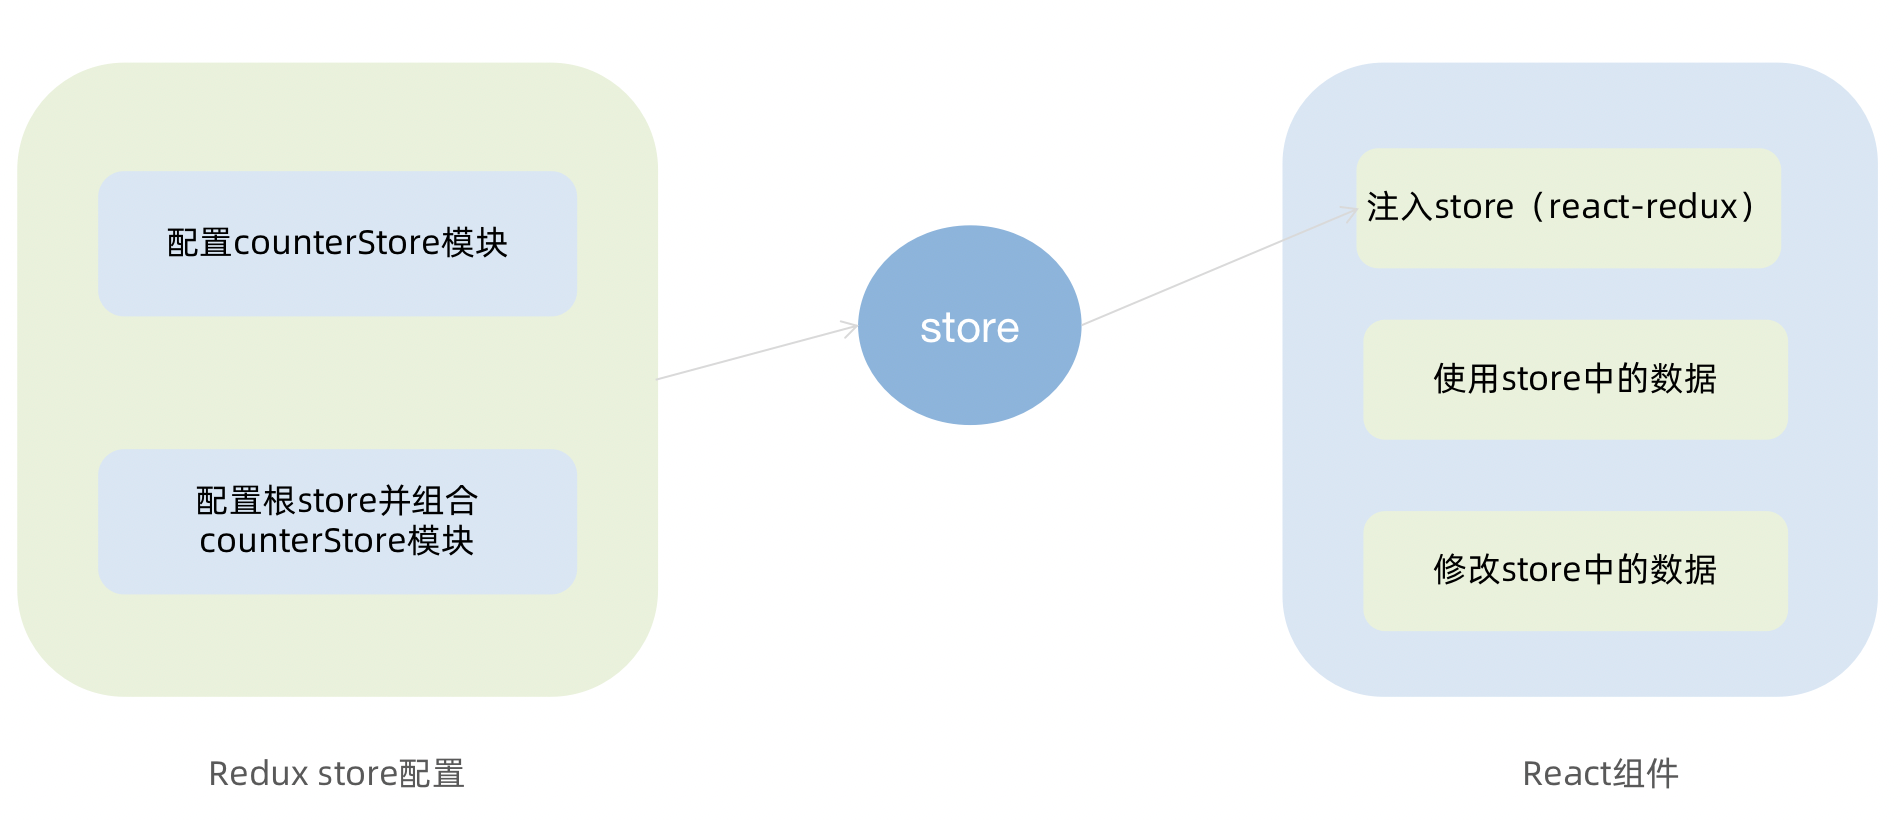
3. store目录结构设计

-
通常集中状态管理的部分都会单独创建一个单独的
store目录 -
应用通常会有很多个子store模块,所以创建一个
modules目录,在内部编写业务分类的子store -
store中的入口文件 index.js 的作用是组合modules中所有的子模块,并导出store
Redux与React - 实现counter
1. 整体路径熟悉
2. 使用React Toolkit 创建 counterStore
import { createSlice } from '@reduxjs/toolkit'

const counterStore = createSlice({
  // 模块名称独一无二
  name: 'counter',
  // 初始数据
  initialState: {
    count: 1
  },
  // 修改数据的同步方法
  reducers: {
    increment (state) {
      state.count++
    },
    decrement(state){
      state.count--
    }
  }
})
// 结构出actionCreater
const { increment,decrement } = counter.actions

// 获取reducer函数
const counterReducer = counterStore.reducer

// 导出
export { increment, decrement }
export default counterReducer
import { configureStore } from '@reduxjs/toolkit'

import counterReducer from './modules/counterStore'

export default configureStore({
  reducer: {
    // 注册子模块
    counter: counterReducer
  }
})
3. 为React注入store
react-redux负责把Redux和React 链接 起来,内置 Provider组件 通过 store 参数把创建好的store实例注入到应用中,链接正式建立
import React from 'react'
import ReactDOM from 'react-dom/client'
import App from './App'
// 导入store
import store from './store'
// 导入store提供组件Provider
import { Provider } from 'react-redux'

ReactDOM.createRoot(document.getElementById('root')).render(
  // 提供store数据
  <Provider store={store}>
    <App />
  </Provider>
)
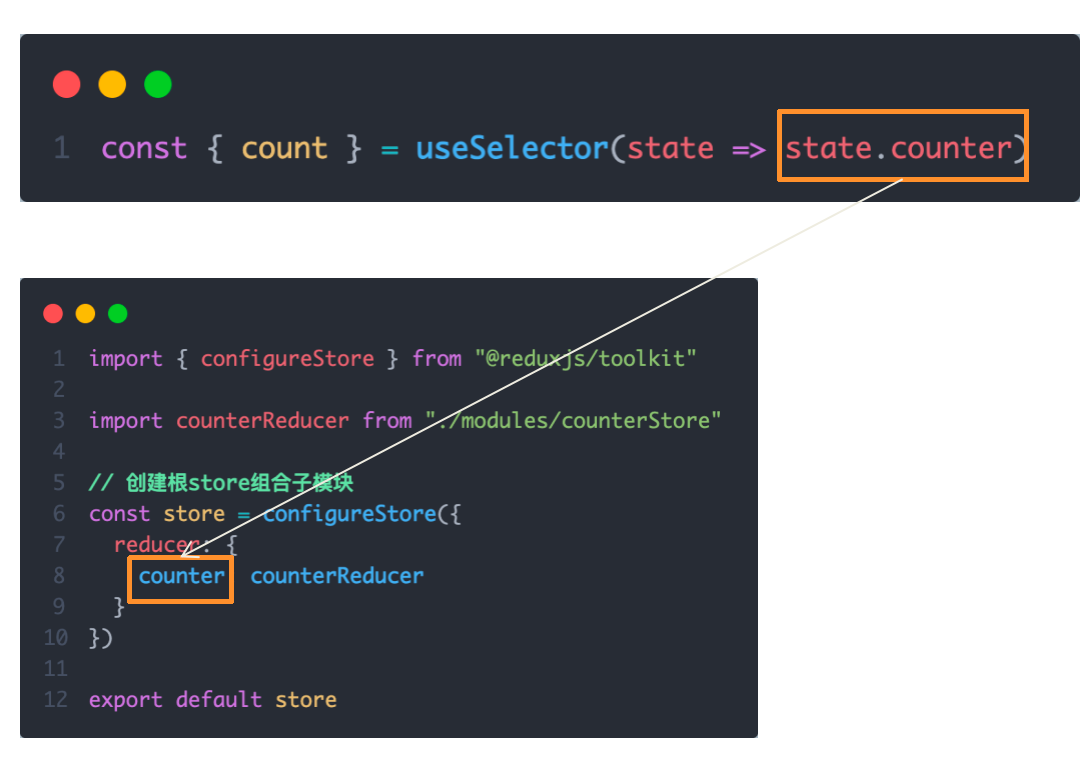
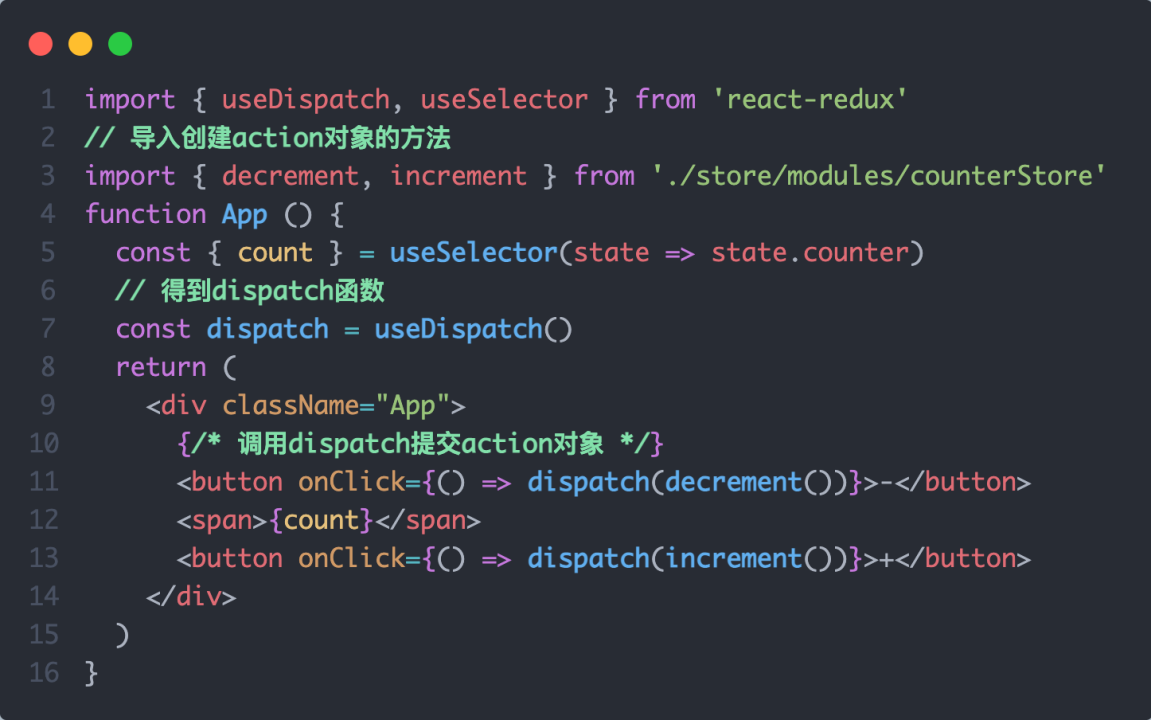
4. React组件使用store中的数据
在React组件中使用store中的数据,需要用到一个钩子函数 - useSelector,它的作用是把store中的数据映射到组件中,使用样例如下:
5. React组件修改store中的数据
React组件中修改store中的数据需要借助另外一个hook函数 - useDispatch,它的作用是生成提交action对象的dispatch函数,使用样例如下:
Redux与React - 提交action传参
需求:组件中有俩个按钮
add to 10和add to 20可以直接把count值修改到对应的数字,目标count值是在组件中传递过去的,需要在提交action的时候传递参数

实现方式:在reducers的同步修改方法中添加action对象参数,在调用actionCreater的时候传递参数,参数会被传递到action对象payload属性上

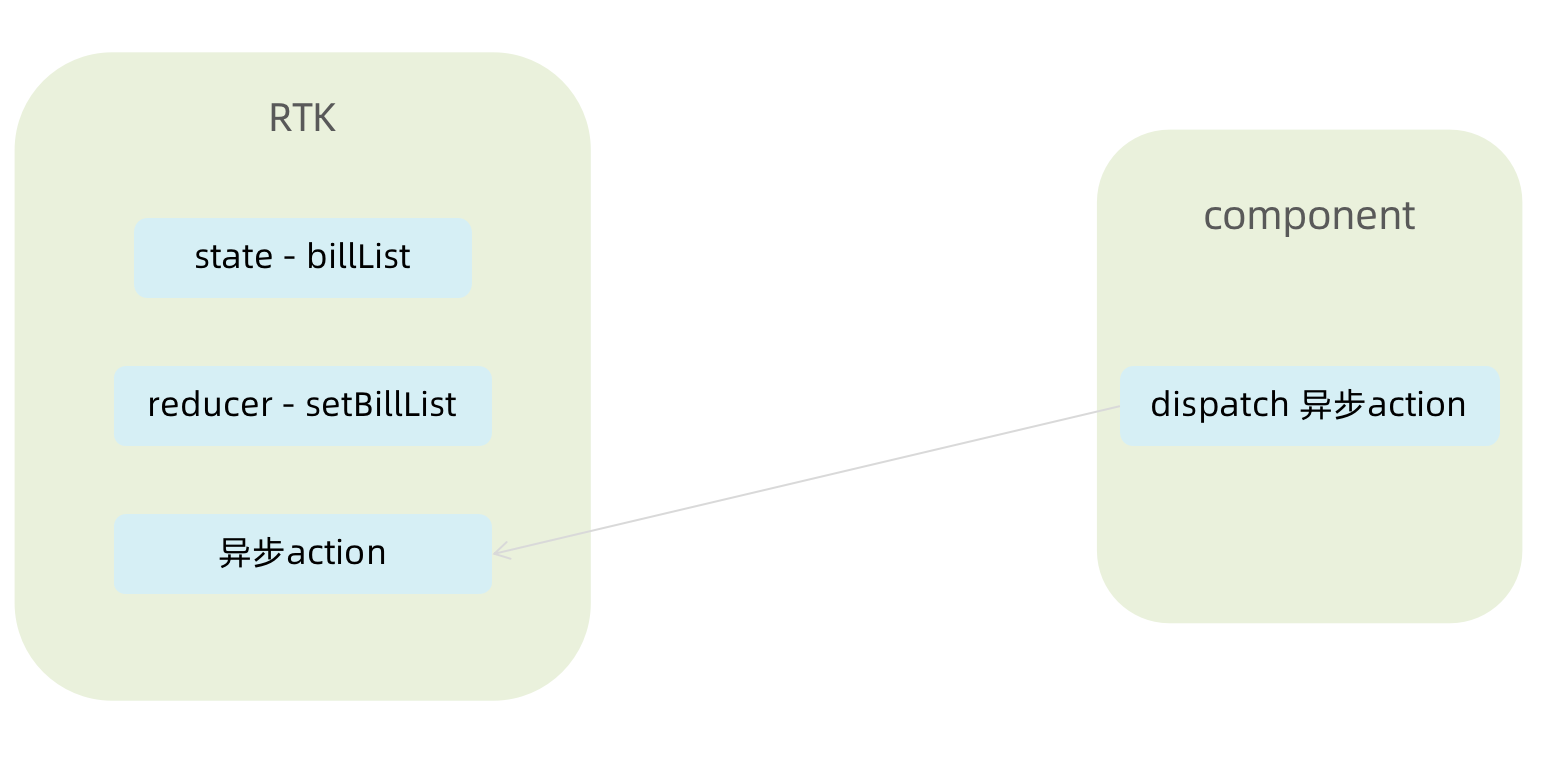
Redux与React - 异步action处理
需求理解

实现步骤
- 创建store的写法保持不变,配置好同步修改状态的方法
- 单独封装一个函数,在函数内部return一个新函数,在新函数中
2.1 封装异步请求获取数据
2.2 调用同步actionCreater传入异步数据生成一个action对象,并使用dispatch提交 - 组件中dispatch的写法保持不变
代码实现
import { createSlice } from '@reduxjs/toolkit'
import axios from 'axios'

const channelStore = createSlice({
  name: 'channel',
  initialState: {
    channelList: []
  },
  reducers: {
    setChannelList (state, action) {
      state.channelList = action.payload
    }
  }
})


// 创建异步
const { setChannelList } = channelStore.actions
const url = 'http://geek.itheima.net/v1_0/channels'
// 封装一个函数 在函数中return一个新函数 在新函数中封装异步
// 得到数据之后通过dispatch函数 触发修改
const fetchChannelList = () => {
  return async (dispatch) => {
    const res = await axios.get(url)
    dispatch(setChannelList(res.data.data.channels))
  }
}

export { fetchChannelList }

const channelReducer = channelStore.reducer
export default channelReducer
import { useEffect } from 'react'
import { useSelector, useDispatch } from 'react-redux'
import { fetchChannelList } from './store/channelStore'

function App () {
  // 使用数据
  const { channelList } = useSelector(state => state.channel)
  useEffect(() => {
    dispatch(fetchChannelList())
  }, [dispatch])

  return (
    <div className="App">
      <ul>
        {channelList.map(task => <li key={task.id}>{task.name}</li>)}
      </ul>
    </div>
  )
}

export default App
Redux调试 - devtools
Redux官方提供了针对于Redux的调试工具,支持实时state信息展示,action提交信息查看等

美团小案例
1. 案例演示

基本开发思路:使用 RTK(Redux Toolkit)来管理应用状态, 组件负责 数据渲染 和 dispatch action
2. 准备并熟悉环境
- 克隆项目到本地(内置了基础静态组件和模版)
git clone http://git.itcast.cn/heimaqianduan/redux-meituan.git
- 安装所有依赖
npm i
- 启动mock服务(内置了json-server)
npm run serve
- 启动前端服务
npm run start
3. 分类和商品列表渲染

1- 编写store逻辑
// 编写store
import { createSlice } from "@reduxjs/toolkit"
import axios from "axios"

const foodsStore = createSlice({
  name: 'foods',
  initialState: {
    // 商品列表
    foodsList: []
  },
  reducers: {
    // 更改商品列表
    setFoodsList (state, action) {
      state.foodsList = action.payload
    }
  }
})

// 异步获取部分
const { setFoodsList } = foodsStore.actions
const fetchFoodsList = () => {
  return async (dispatch) => {
    // 编写异步逻辑
    const res = await axios.get('http://localhost:3004/takeaway')
    // 调用dispatch函数提交action
    dispatch(setFoodsList(res.data))
  }
}

export { fetchFoodsList }

const reducer = foodsStore.reducer

export default reducer
2- 组件使用store数据
// 省略部分代码
import { useDispatch, useSelector } from 'react-redux'
import { fetchFoodsList } from './store/modules/takeaway'
import { useEffect } from 'react'

const App = () => {
  // 触发action执行
  // 1. useDispatch -> dispatch 2. actionCreater导入进来 3.useEffect
  const dispatch = useDispatch()
  useEffect(() => {
    dispatch(fetchFoodsList())
  }, [dispatch])

  return (
    <div className="home">
      {/* 导航 */}
      <NavBar />

      {/* 内容 */}
      <div className="content-wrap">
        <div className="content">
          <Menu />
          <div className="list-content">
            <div className="goods-list">
              {/* 外卖商品列表 */}
              {foodsList.map(item => {
                return (
                  <FoodsCategory
                    key={item.tag}
                    // 列表标题
                    name={item.name}
                    // 列表商品
                    foods={item.foods}
                  />
                )
              })}
            </div>
          </div>
        </div>
      </div>
      {/* 购物车 */}
      <Cart />
    </div>
  )
}

export default App
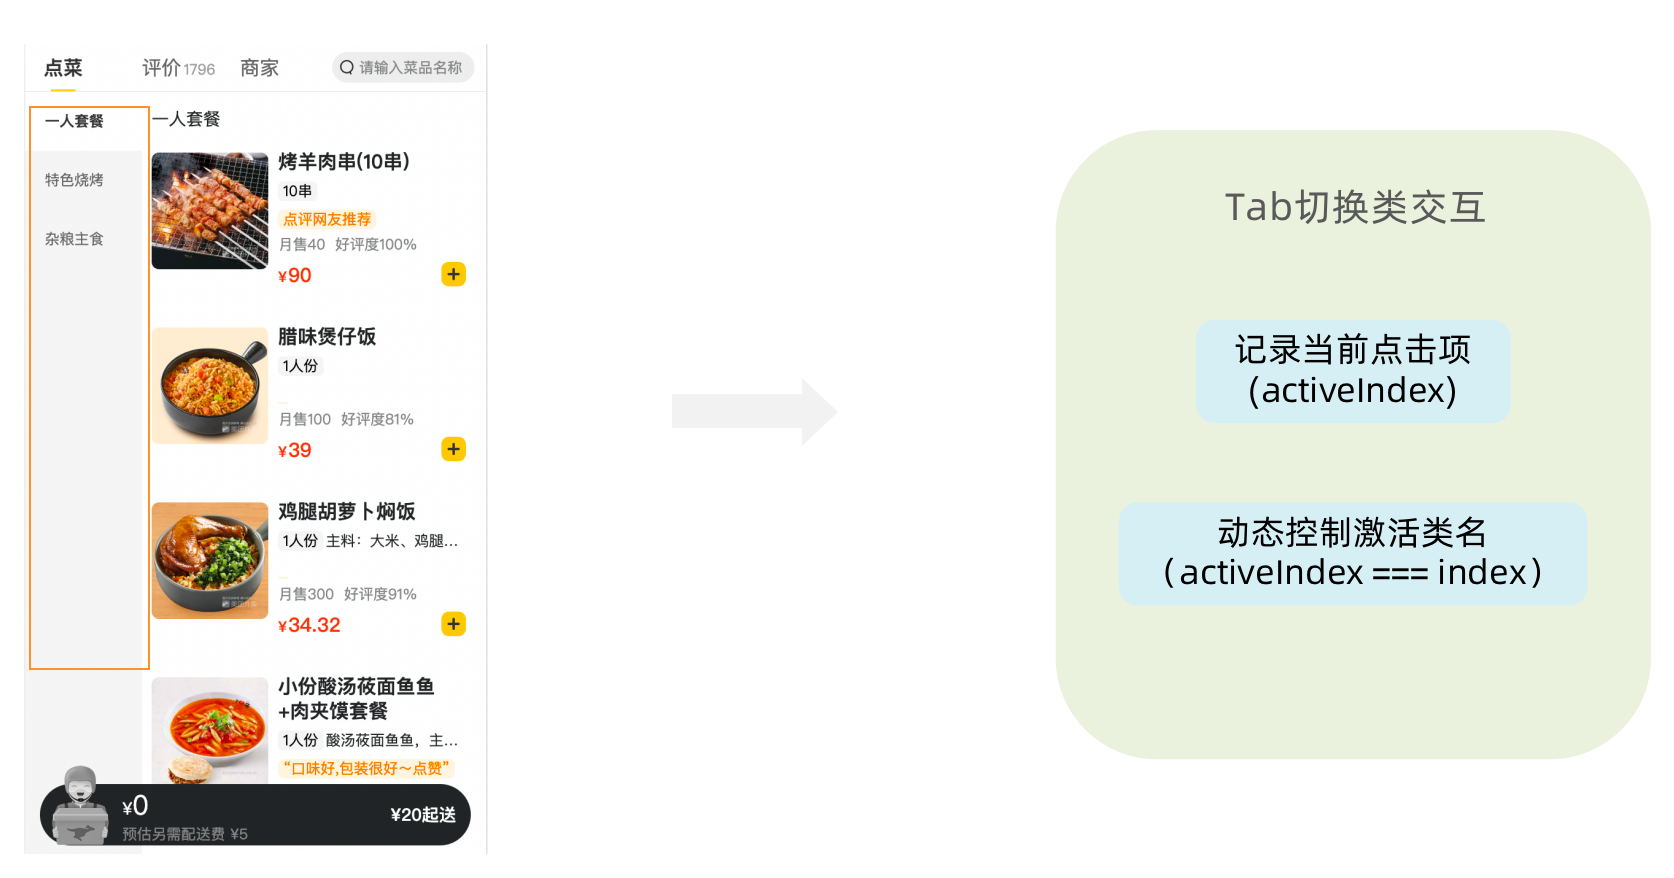
4. 点击分类激活交互实现
1- 编写store逻辑
// 编写store

import { createSlice } from "@reduxjs/toolkit"
import axios from "axios"

const foodsStore = createSlice({
  name: 'foods',
  initialState: {
    // 菜单激活下标值
    activeIndex: 0
  },
  reducers: {
    // 更改activeIndex
    changeActiveIndex (state, action) {
      state.activeIndex = action.payload
    }
  }
})

// 导出
const { changeActiveIndex } = foodsStore.actions

export { changeActiveIndex }

const reducer = foodsStore.reducer

export default reducer
2- 编写组件逻辑
const Menu = () => {
  const { foodsList, activeIndex } = useSelector(state => state.foods)
  const dispatch = useDispatch()
  const menus = foodsList.map(item => ({ tag: item.tag, name: item.name }))
  return (
    <nav className="list-menu">
      {/* 添加active类名会变成激活状态 */}
      {menus.map((item, index) => {
      return (
        <div
          // 提交action切换激活index
          onClick={() => dispatch(changeActiveIndex(index))}
          key={item.tag}
          // 动态控制active显示
          className={classNames(
            'list-menu-item',
            activeIndex === index && 'active'
          )}
          >
          {item.name}
        </div>
      )
    })}
    </nav>
  )
}
5. 商品列表切换显示
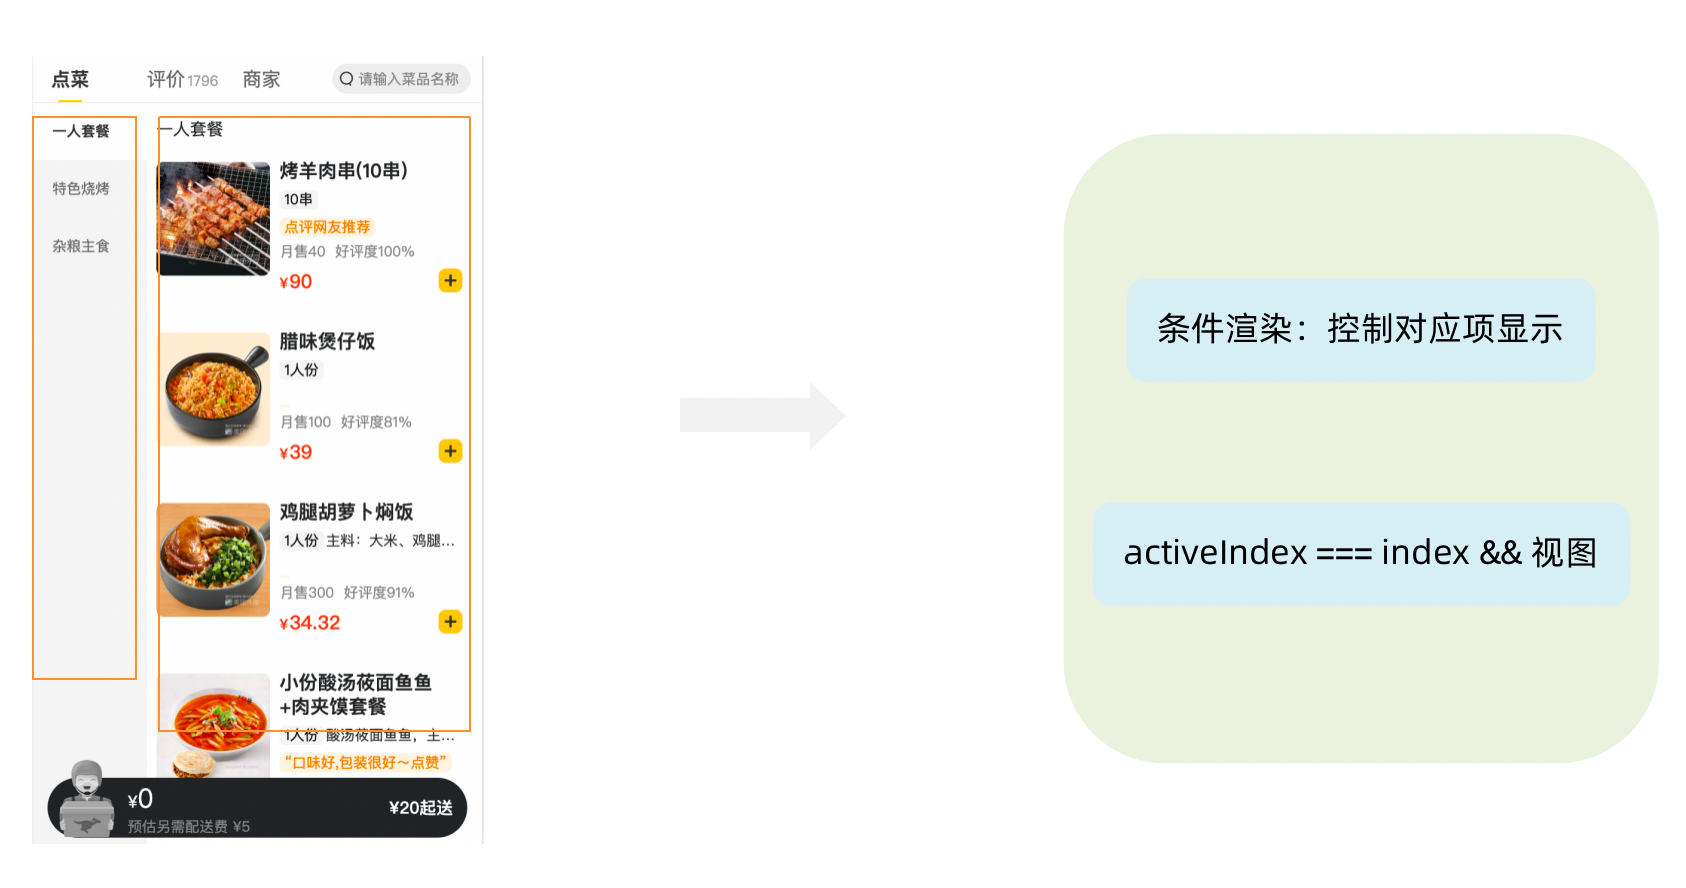
<div className="list-content">
  <div className="goods-list">
    {/* 外卖商品列表 */}
    {foodsList.map((item, index) => {
      return (
        activeIndex === index && <FoodsCategory
          key={item.tag}
          // 列表标题
          name={item.name}
          // 列表商品
          foods={item.foods}
        />
      )
    })}
  </div>
</div>
6. 添加购物车实现

1- 编写store逻辑
// 编写store

import { createSlice } from "@reduxjs/toolkit"
import axios from "axios"

const foodsStore = createSlice({
  name: 'foods',
  reducers: {
    // 添加购物车
    addCart (state, action) {
      // 是否添加过?以action.payload.id去cartList中匹配 匹配到了 添加过
      const item = state.cartList.find(item => item.id === action.payload.id)
      if (item) {
        item.count++
      } else {
        state.cartList.push(action.payload)
      }
    }
  }
})

// 导出actionCreater
const { addCart } = foodsStore.actions

export { addCart }

const reducer = foodsStore.reducer

export default reducer
2- 编写组件逻辑
<div className="goods-count">
  {/* 添加商品 */}
  <span
    className="plus"
    onClick={() => dispatch(addCart({
    id,
    picture,
    name,
    unit,
    description,
    food_tag_list,
    month_saled,
    like_ratio_desc,
    price,
    tag,
    count
  }))}></span>
</div>
7. 统计区域实现

实现思路
- 基于store中的cartList的length渲染数量
- 基于store中的cartList累加price * count
- 购物车cartList的length不为零则高亮
// 计算总价
const totalPrice = cartList.reduce((a, c) => a + c.price * c.count, 0)

{/* fill 添加fill类名购物车高亮*/}
{/* 购物车数量 */}
<div onClick={onShow} className={classNames('icon', cartList.length > 0 && 'fill')}>
  {cartList.length > 0 && <div className="cartCornerMark">{cartList.length}</div>}
</div>
8. 购物车列表功能实现

1-控制列表渲染
const Cart = () => {
  return (
    <div className="cartContainer">
      {/* 添加visible类名 div会显示出来 */}
      <div className={classNames('cartPanel', 'visible')}>
        {/* 购物车列表 */}
        <div className="scrollArea">
          {cartList.map(item => {
            return (
              <div className="cartItem" key={item.id}>
                <img className="shopPic" src={item.picture} alt="" />
                <div className="main">
                  <div className="skuInfo">
                    <div className="name">{item.name}</div>
                  </div>
                  <div className="payableAmount">
                    <span className="yuan">¥</span>
                    <span className="price">{item.price}</span>
                  </div>
                </div>
                <div className="skuBtnWrapper btnGroup">
                  {/* 数量组件 */}
                  <Count
                    count={item.count}
                  />
                </div>
              </div>
            )
          })}
        </div>
      </div>
    </div>
  )
}

export default Cart
2- 购物车增减逻辑实现
// count增
increCount (state, action) {
  // 关键点:找到当前要修改谁的count id
  const item = state.cartList.find(item => item.id === action.payload.id)
  item.count++
},
// count减
decreCount (state, action) {
  // 关键点:找到当前要修改谁的count id
  const item = state.cartList.find(item => item.id === action.payload.id)
  if (item.count === 0) {
    return
  }
  item.count--
}
<div className="skuBtnWrapper btnGroup">
  {/* 数量组件 */}
  <Count
    count={item.count}
    onPlus={() => dispatch(increCount({ id: item.id }))}
    onMinus={() => dispatch(decreCount({ id: item.id }))}
    />
</div>
3-清空购物车实现
// 清除购物车
clearCart (state) {
  state.cartList = []
}
<div className="header">
  <span className="text">购物车</span>
  <span
    className="clearCart"
    onClick={() => dispatch(clearCart())}>
    清空购物车
  </span>
</div>
9. 控制购物车显示和隐藏

// 控制购物车打开关闭的状态
const [visible, setVisible] = useState(false)

const onShow = () => {
  if (cartList.length > 0) {
    setVisible(true)
  }
}


{/* 遮罩层 添加visible类名可以显示出来 */}
<div
	className={
     classNames('cartOverlay', visible && 'visible')
  }
	onClick={() => setVisible(false)}
/>
React 基础 - day04-ReactRouter基础
路由快速上手
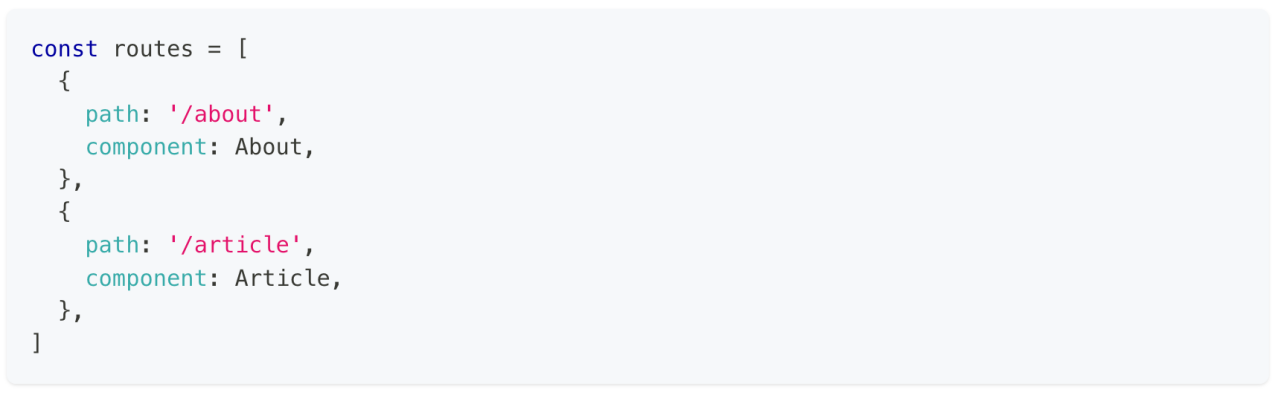
1. 什么是前端路由
一个路径 path 对应一个组件 component 当我们在浏览器中访问一个 path 的时候,path 对应的组件会在页面中进行渲染
2. 创建路由开发环境
## 使用CRA创建项目
npm create-react-app react-router-pro

## 安装最新的ReactRouter包
npm i react-router-dom

## 启动项目
npm run start
3. 快速开始

import React from 'react'
import ReactDOM from 'react-dom/client'

const router = createBrowserRouter([
  {
    path:'/login',
    element: <div>登录</div>
  },
  {
    path:'/article',
    element: <div>文章</div>
  }
])

ReactDOM.createRoot(document.getElementById('root')).render(
  <RouterProvider router={router}/>
)
抽象路由模块

路由导航
1. 什么是路由导航
路由系统中的多个路由之间需要进行路由跳转,并且在跳转的同时有可能需要传递参数进行通信

2. 声明式导航
声明式导航是指通过在模版中通过
<Link/>组件描述出要跳转到哪里去,比如后台管理系统的左侧菜单通常使用这种方式进行

语法说明:通过给组件的to属性指定要跳转到路由path,组件会被渲染为浏览器支持的a链接,如果需要传参直接通过字符串拼接的方式拼接参数即可
3. 编程式导航
编程式导航是指通过 useNavigate 钩子得到导航方法,然后通过调用方法以命令式的形式进行路由跳转,比如想在登录请求完毕之后跳转就可以选择这种方式,更加灵活

语法说明:通过调用navigate方法传入地址path实现跳转
导航传参

嵌套路由配置
1. 什么是嵌套路由
在一级路由中又内嵌了其他路由,这种关系就叫做嵌套路由,嵌套至一级路由内的路由又称作二级路由,例如:

2. 嵌套路由配置
实现步骤
- 使用
children属性配置路由嵌套关系- 使用
<Outlet/>组件配置二级路由渲染位置

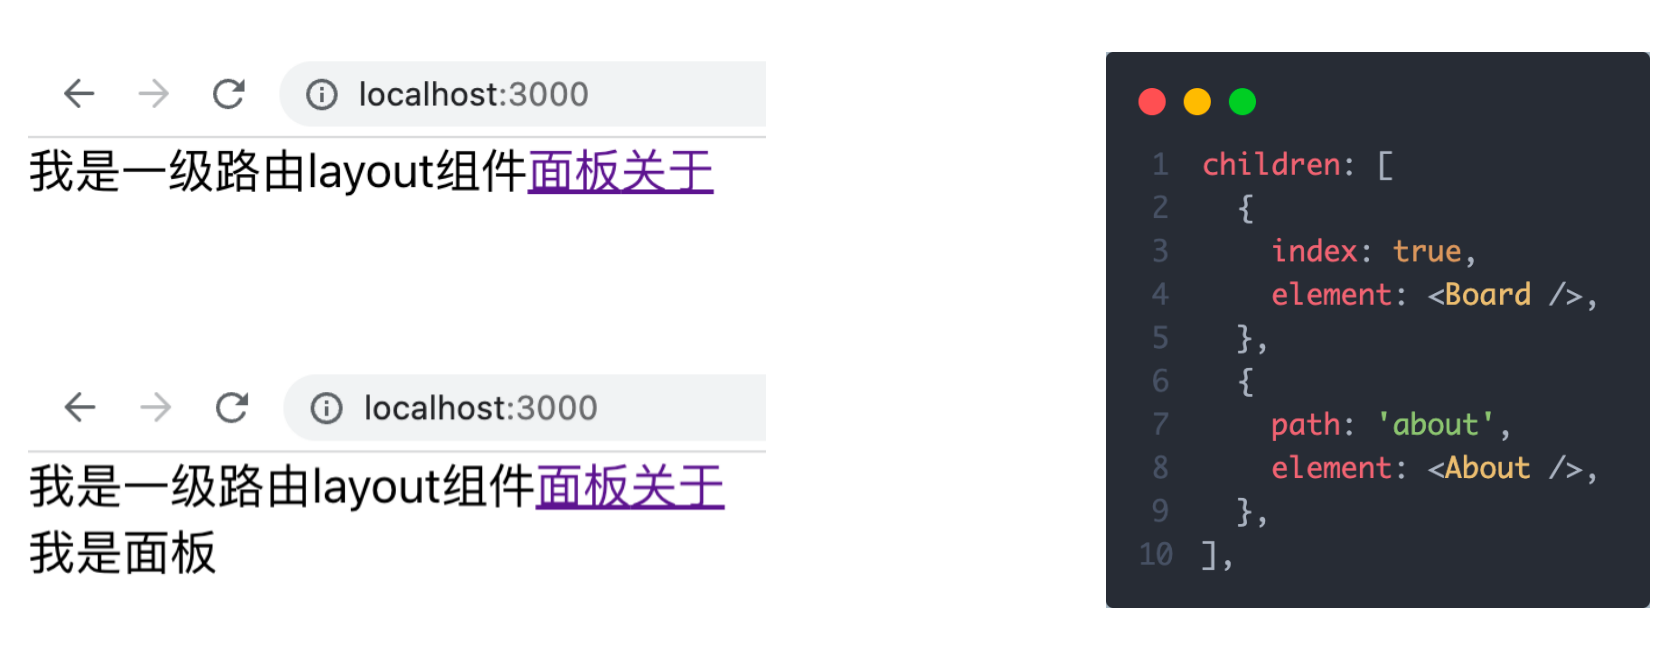
3. 默认二级路由
当访问的是一级路由时,默认的二级路由组件可以得到渲染,只需要在二级路由的位置去掉path,设置index属性为true
4. 404路由配置
场景:当浏览器输入url的路径在整个路由配置中都找不到对应的 path,为了用户体验,可以使用 404 兜底组件进行渲染
实现步骤:
- 准备一个NotFound组件
- 在路由表数组的末尾,以*号作为路由path配置路由

5. 俩种路由模式
各个主流框架的路由常用的路由模式有俩种,history模式和hash模式, ReactRouter分别由 createBrowerRouter 和 createHashRouter 函数负责创建
| 路由模式 | url表现 | 底层原理 | 是否需要后端支持 |
|---|---|---|---|
| history | url/login | history对象 + pushState事件 | 需要 |
| hash | url/#/login | 监听hashChange事件 | 不需要 |
React 基础 - day05-ReactRouter记账本
环境搭建
使用CRA创建项目,并安装必要依赖,包括下列基础包
- Redux状态管理 - @reduxjs/toolkit 、 react-redux
- 路由 - react-router-dom
- 时间处理 - dayjs
- class类名处理 - classnames
- 移动端组件库 - antd-mobile
- 请求插件 - axios
配置别名路径
1. 背景知识
- 路径解析配置(webpack),把 @/ 解析为 src/
- 路径联想配置(VsCode),VsCode 在输入 @/ 时,自动联想出来对应的 src/下的子级目录

2. 路径解析配置
配置步骤:
- 安装craco
npm i -D @craco/craco - 项目根目录下创建配置文件
craco.config.js - 配置文件中添加路径解析配置
- 包文件中配置启动和打包命令

3. 联想路径配置
配置步骤:
- 根目录下新增配置文件 - jsconfig.json
- 添加路径提示配置
{
  "compilerOptions":{
    "baseUrl":"./",
    "paths":{
      "@/*":[
        "src/*"
      ]
    }
  }
}
数据Mock实现
在前后端分类的开发模式下,前端可以在没有实际后端接口的支持下先进行接口数据的模拟,进行正常的业务功能开发
1. 常见的Mock方式
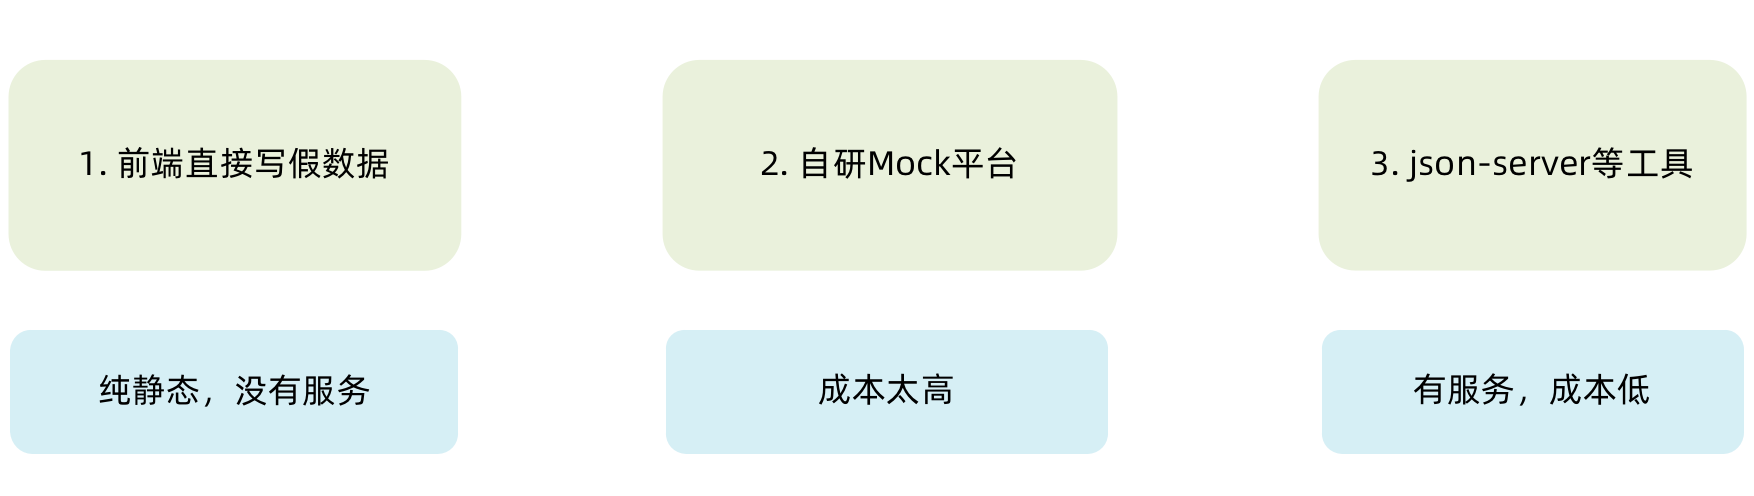
2. json-server实现Mock
实现步骤:
- 项目中安装json-server
npm i -D json-server - 准备一个json文件 (素材里获取)
- 添加启动命令

- 访问接口进行测试
整体路由设计
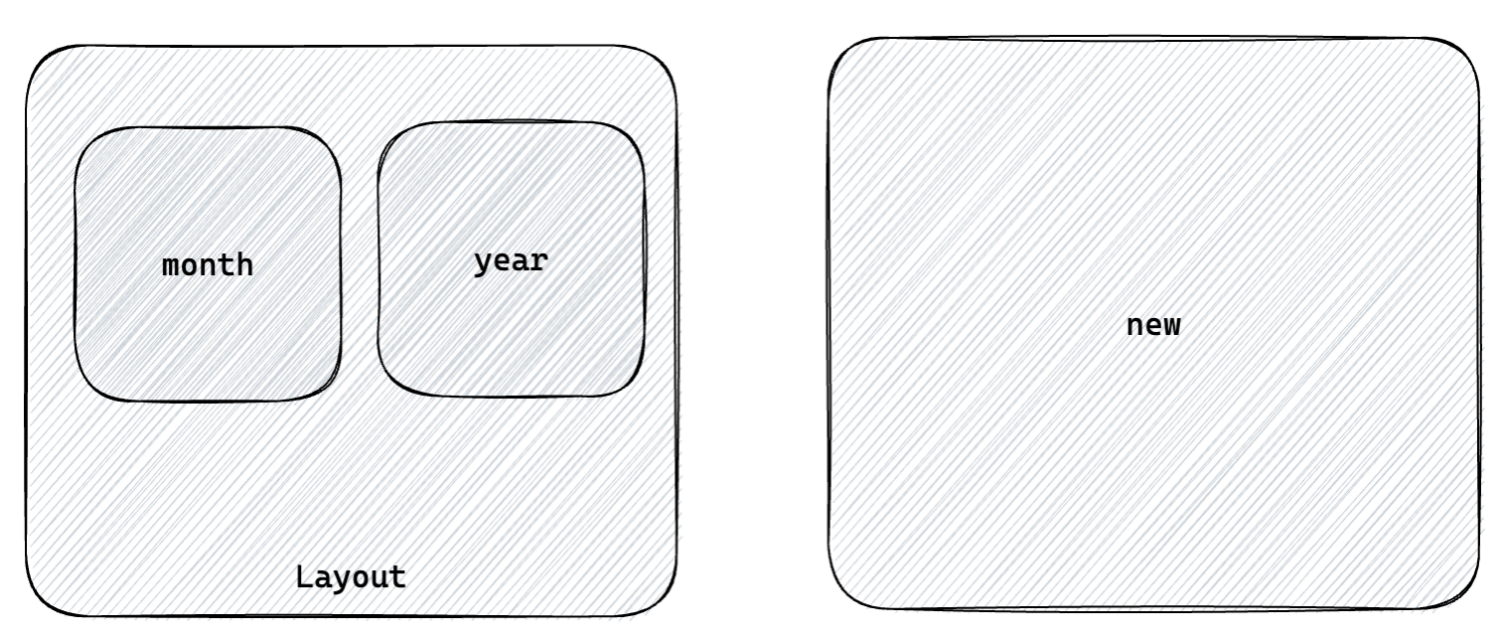
- 俩个一级路由 (Layout / new)2. 俩个二级路由 (Layout - mouth/year)
antD主题定制
1. 定制方案
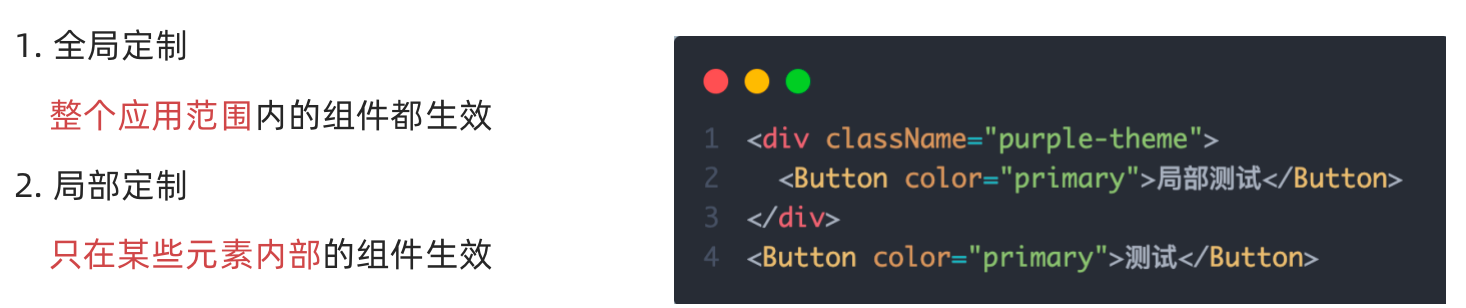
2. 实现方式
- 全局定制
- 局部定制

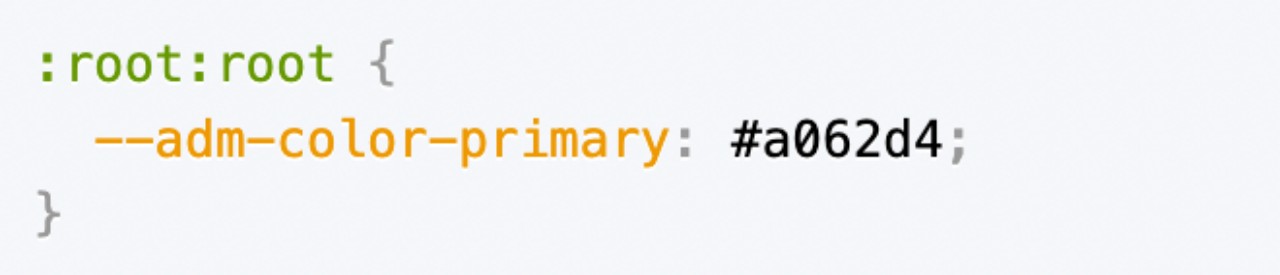
3. 记账本主题色
:root:root {
  --adm-color-primary: rgb(105, 174, 120);
}
Redux管理账目列表
// 账单列表相关store

import { createSlice } from '@reduxjs/toolkit'
import axios from 'axios'

const billStore = createSlice({
  name: 'bill',
  // 数据状态state
  initialState: {
    billList: []
  },
  reducers: {
    // 同步修改方法
    setBillList (state, action) {
      state.billList = action.payload
    }
  }
})

// 解构actionCreater函数
const { setBillList } = billStore.actions
// 编写异步
const getBillList = () => {
  return async (dispatch) => {
    // 编写异步请求
    const res = await axios.get('http://localhost:8888/ka')
    // 触发同步reducer
    dispatch(setBillList(res.data))
  }
}

export { getBillList }
// 导出reducer
const reducer = billStore.reducer

export default reducer
// 组合子模块 导出store实例

import { configureStore } from '@reduxjs/toolkit'
import billReducer from './modules/billStore'

const store = configureStore({
  reducer: {
    bill: billReducer
  }
})

export default store
import router from './router'
import { Provider } from 'react-redux'

const root = ReactDOM.createRoot(document.getElementById('root'))
root.render(
  <Provider store={store}>
    <RouterProvider router={router} />
  </Provider>
)
TabBar功能实现

1. 静态布局实现
配套静态模版和样式文件
import { TabBar } from "antd-mobile"
import { useEffect } from "react"
import { Outlet } from "react-router-dom"
import { useDispatch } from 'react-redux'
import { getBillList } from "@/store/modules/billStore"
import './index.scss'
import {
  BillOutline,
  CalculatorOutline,
  AddCircleOutline
} from 'antd-mobile-icons'

const tabs = [
  {
    key: '/month',
    title: '月度账单',
    icon: <BillOutline />,
  },
  {
    key: '/new',
    title: '记账',
    icon: <AddCircleOutline />,
  },
  {
    key: '/year',
    title: '年度账单',
    icon: <CalculatorOutline />,
  },
]

const Layout = () => {
  const dispatch = useDispatch()
  useEffect(() => {
    dispatch(getBillList())
  }, [dispatch])
  return (
    <div className="layout">
      <div className="container">
        <Outlet />
      </div>
      <div className="footer">
        <TabBar>
          {tabs.map(item => (
            <TabBar.Item key={item.key} icon={item.icon} title={item.title} />
          ))}
        </TabBar>
      </div>
    </div>
  )
}

export default Layout
.layout {
  .container {
    position: fixed;
    top: 0;
    bottom: 50px;
  }
  .footer {
    position: fixed;
    bottom: 0;
    width: 100%;
  }
}
2. 切换路由实现
监听change事件,在事件回调中调用路由跳转方法
 // 切换菜单跳转路由
  const navigate = useNavigate()
  const swithRoute = (path) => {
    console.log(path)
    navigate(path)
  }

  return (
    <div className="layout">
      <div className="footer">
        <TabBar onChange={swithRoute}>
          {/* 省略... */}
        </TabBar>
      </div>
    </div>
  )
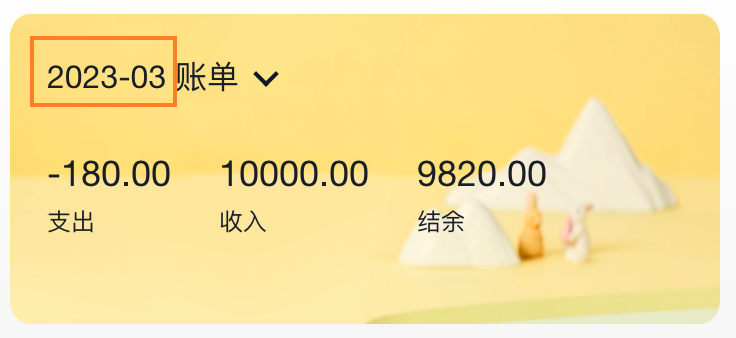
月度账单-统计区域

1. 准备静态结构
import { NavBar, DatePicker } from 'antd-mobile'
import './index.scss'

const Month = () => {
  return (
    <div className="monthlyBill">
      <NavBar className="nav" backArrow={false}>
        月度收支
      </NavBar>
      <div className="content">
        <div className="header">
          {/* 时间切换区域 */}
          <div className="date">
            <span className="text">
              2023 | 3月账单
            </span>
            <span className='arrow expand'></span>
          </div>
          {/* 统计区域 */}
          <div className='twoLineOverview'>
            <div className="item">
              <span className="money">{100}</span>
              <span className="type">支出</span>
            </div>
            <div className="item">
              <span className="money">{200}</span>
              <span className="type">收入</span>
            </div>
            <div className="item">
              <span className="money">{200}</span>
              <span className="type">结余</span>
            </div>
          </div>
          {/* 时间选择器 */}
          <DatePicker
            className="kaDate"
            title="记账日期"
            precision="month"
            visible={false}
            max={new Date()}
          />
        </div>
      </div>
    </div >
  )
}

export default Month
.monthlyBill {
  --ka-text-color: #191d26;
  height: 100%;
  background: linear-gradient(180deg, #ffffff, #f5f5f5 100%);
  background-size: 100% 240px;
  background-repeat: no-repeat;
  background-color: rgba(245, 245, 245, 0.9);
  color: var(--ka-text-color);

  .nav {
    --adm-font-size-10: 16px;
    color: #121826;
    background-color: transparent;
    .adm-nav-bar-back-arrow {
      font-size: 20px;
    }
  }

  .content {
    height: 573px;
    padding: 0 10px;
    overflow-y: scroll;
    -ms-overflow-style: none; /* Internet Explorer 10+ */
    scrollbar-width: none; /* Firefox */
    &::-webkit-scrollbar {
      display: none; /* Safari and Chrome */
    }

    > .header {
      height: 135px;
      padding: 20px 20px 0px 18.5px;
      margin-bottom: 10px;
      background-image: url(https://zqran.gitee.io/images/ka/month-bg.png);
      background-size: 100% 100%;

      .date {
        display: flex;
        align-items: center;
        margin-bottom: 25px;
        font-size: 16px;

        .arrow {
          display: inline-block;
          width: 7px;
          height: 7px;
          margin-top: -3px;
          margin-left: 9px;
          border-top: 2px solid #121826;
          border-left: 2px solid #121826;
          transform: rotate(225deg);
          transform-origin: center;
          transition: all 0.3s;
        }
        .arrow.expand {
          transform: translate(0, 2px) rotate(45deg);
        }
      }
    }
  }
  .twoLineOverview {
    display: flex;
    justify-content: space-between;
    width: 250px;

    .item {
      display: flex;
      flex-direction: column;

      .money {
        height: 24px;
        line-height: 24px;
        margin-bottom: 5px;
        font-size: 18px;
      }
      .type {
        height: 14px;
        line-height: 14px;
        font-size: 12px;
      }
    }
  }
}
2. 点击切换时间选择框
实现思路:
- 准备一个状态数据
- 点击切换状态
- 根据状态控制弹框打开关闭以及箭头样式
import { NavBar, DatePicker } from 'antd-mobile'
import './index.scss'
import {  useState } from "react"
import classNames from "classnames"

const Month = () => {
  // 控制时间选择器打开关闭
  const [dateVisible, setDateVisible] = useState(false)
  // 时间选择框确实事件
  const dateConfirm = (date) => {
    // 关闭弹框
    setDateVisible(false)
  }

  return (
    <div className="monthlyBill">
      <NavBar className="nav" backArrow={false}>
        月度收支
      </NavBar>
      <div className="content">
        <div className="header">
          {/* 时间切换区域 */}
          <div className="date" onClick={() => setDateVisible(true)}>
            {/* 省略.. */}
            <span className={classNames('arrow', dateVisible && 'expand')}></span>
          </div>
          {/* 统计区域 */}

          {/* 时间选择器 */}
          <DatePicker
            className="kaDate"
            title="记账日期"
            precision="month"
            visible={dateVisible}
            max={new Date()}
            onConfirm={dateConfirm}
          />
        </div>
      </div>
    </div >
  )
}

export default Month
3. 切换时间显示
实现思路:
- 以当前时间作为默认值
- 在时间切换时完成时间修改
import dayjs from "dayjs"

const [currentMonth, setCurrentMonth] = useState(() => {
    return dayjs().format('YYYY-MM')
})

const dateConfirm = (date) => {
  setDateVisible(false)
  const month = dayjs(date).format('YYYY-MM')
  setCurrentMonth(month)
}
4. 统计功能实现
实现思路:
- 按月分组
- 根据获取到的时间作为key取当月的账单数组
- 根据当月的账单数组计算支出、收入、总计
// 按月分组
const billList = useSelector(state => state.bill.billList)
const monthGroup = useMemo(() => {
  return _.groupBy(billList, item => dayjs(item.date).format('YYYY-MM'))
}, [billList])

// 根据获取到的时间作为key取当月的账单数组
const dateConfirm = (date) => {
  const monthKey = dayjs(date).format('YYYY-MM')
  setMonthList(monthGroup[monthKey])
}

// 计算统计
const overview = useMemo(() => {
  const income = currentMonthList.filter(item => item.type === 'income')
    .reduce((a, c) => a + c.money, 0)
  const pay = currentMonthList.filter(item => item.type === 'pay')
    .reduce((a, c) => a + c.money, 0)
  return {
    income,
    pay,
    total: income + pay
  }
}, [currentMonthList])
5. 完整代码
import { useSelector } from "react-redux"
import { NavBar, DatePicker } from 'antd-mobile'
import './index.scss'
import _ from 'lodash'
import dayjs from "dayjs"
import { useMemo, useState } from "react"
import { useEffect } from "react"
import classNames from "classnames"

const Month = () => {
  // 按月分组
  const billList = useSelector(state => state.bill.billList)
  const monthGroup = useMemo(() => {
    return _.groupBy(billList, item => dayjs(item.date).format('YYYY-MM'))
  }, [billList])

  // 控制时间选择器打开关闭
  const [dateVisible, setDateVisible] = useState(false)
  const [currentMonthList, setMonthList] = useState([])
  const [currentMonth, setCurrentMonth] = useState(() => {
    return dayjs().format('YYYY-MM')
  })

  const dateConfirm = (date) => {
    setDateVisible(false)
    const monthKey = dayjs(date).format('YYYY-MM')
    setCurrentMonth(monthKey)
    setMonthList(monthGroup[monthKey])
  }

  // 首次加载
  useEffect(() => {
    const list = monthGroup[dayjs().format('YYYY-MM')]
    if(list){
      setMonthList(list)
    }
  }, [monthGroup])

  // 计算统计
  const overview = useMemo(() => {
    if (!currentMonthList) return { income: 0, pay: 0, total: 0 }
    const income = currentMonthList.filter(item => item.type === 'income')
      .reduce((a, c) => a + c.money, 0)
    const pay = currentMonthList.filter(item => item.type === 'pay')
      .reduce((a, c) => a + c.money, 0)
    return {
      income,
      pay,
      total: income + pay
    }
  }, [currentMonthList])

  return (
    <div className="monthlyBill">
      <NavBar className="nav" backArrow={false}>
        月度收支
      </NavBar>
      <div className="content">
        <div className="header">
          {/* 时间切换区域 */}
          <div className="date" onClick={() => setDateVisible(true)}>
            <span className="text">
              {currentMonth} 账单
            </span>
            <span className={classNames('arrow', dateVisible && 'expand')}></span>
          </div>
          {/* 统计区域 */}
          <div className='twoLineOverview'>
            <div className="item">
              <span className="money">{overview.pay.toFixed(2)}</span>
              <span className="type">支出</span>
            </div>
            <div className="item">
              <span className="money">{overview.income.toFixed(2)}</span>
              <span className="type">收入</span>
            </div>
            <div className="item">
              <span className="money">{(overview.total).toFixed(2)}</span>
              <span className="type">结余</span>
            </div>
          </div>
          {/* 时间选择器 */}
          <DatePicker
            className="kaDate"
            title="记账日期"
            precision="month"
            visible={dateVisible}
            max={new Date()}
            onConfirm={dateConfirm}
          />
        </div>
      </div>
    </div >
  )
}

export default Month
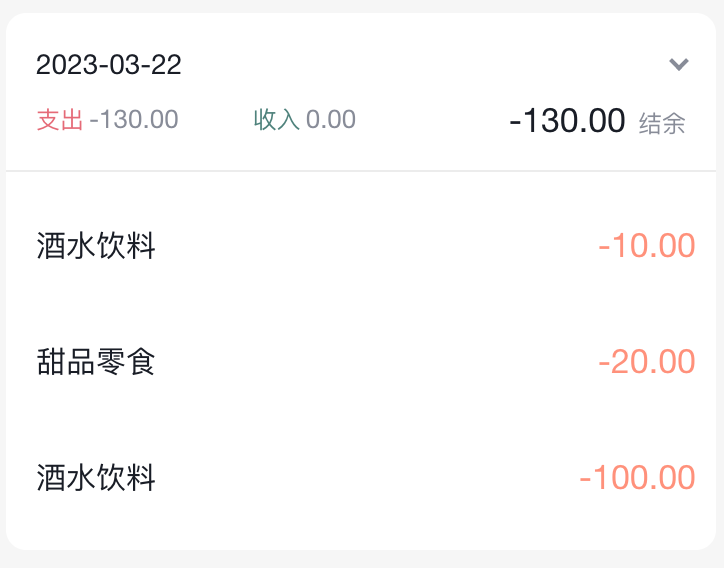
月度账单-单日统计列表实现

1. 准备组件和配套样式
import classNames from 'classnames'
import './index.scss'

const DailyBill = () => {
  return (
    <div className={classNames('dailyBill')}>
      <div className="header">
        <div className="dateIcon">
          <span className="date">{'03月23日'}</span>
          <span className={classNames('arrow')}></span>
        </div>
        <div className="oneLineOverview">
          <div className="pay">
            <span className="type">支出</span>
            <span className="money">{100}</span>
          </div>
          <div className="income">
            <span className="type">收入</span>
            <span className="money">{200}</span>
          </div>
          <div className="balance">
            <span className="money">{100}</span>
            <span className="type">结余</span>
          </div>
        </div>
      </div>
    </div>
  )
}
export default DailyBill
配套样式
.dailyBill {
  margin-bottom: 10px;
  border-radius: 10px;
  background: #ffffff;

  .header {
    --ka-text-color: #888c98;
    padding: 15px 15px 10px 15px;

    .dateIcon {
      display: flex;
      justify-content: space-between;
      align-items: center;
      height: 21px;
      margin-bottom: 9px;
      .arrow {
        display: inline-block;
        width: 5px;
        height: 5px;
        margin-top: -3px;
        margin-left: 9px;
        border-top: 2px solid #888c98;
        border-left: 2px solid #888c98;
        transform: rotate(225deg);
        transform-origin: center;
        transition: all 0.3s;
      }
      .arrow.expand {
        transform: translate(0, 2px) rotate(45deg);
      }

      .date {
        font-size: 14px;
      }
    }
  }
  .oneLineOverview {
    display: flex;
    justify-content: space-between;

    .pay {
      flex: 1;
      .type {
        font-size: 10px;
        margin-right: 2.5px;
        color: #e56a77;
      }
      .money {
        color: var(--ka-text-color);
        font-size: 13px;
      }
    }

    .income {
      flex: 1;
      .type {
        font-size: 10px;
        margin-right: 2.5px;
        color: #4f827c;
      }
      .money {
        color: var(--ka-text-color);
        font-size: 13px;
      }
    }

    .balance {
      flex: 1;
      margin-bottom: 5px;
      text-align: right;

      .money {
        line-height: 17px;
        margin-right: 6px;
        font-size: 17px;
      }
      .type {
        font-size: 10px;
        color: var(--ka-text-color);
      }
    }
  }

  .billList {
    padding: 15px 10px 15px 15px;
    border-top: 1px solid #ececec;
    .bill {
      display: flex;
      justify-content: space-between;
      align-items: center;
      height: 43px;
      margin-bottom: 15px;

      &:last-child {
        margin-bottom: 0;
      }

      .icon {
        margin-right: 10px;
        font-size: 25px;
      }
      .detail {
        flex: 1;
        padding: 4px 0;
        .billType {
          display: flex;
          align-items: center;
          height: 17px;
          line-height: 17px;
          font-size: 14px;
          padding-left: 4px;
        }
      }
      .money {
        font-size: 17px;

        &.pay {
          color: #ff917b;
        }
        &.income {
          color: #4f827c;
        }
      }
    }
  }
}
.dailyBill.expand {
  .header {
    border-bottom: 1px solid #ececec;
  }
  .billList {
    display: block;
  }
}
2. 按日分组账单数据

// 把当前月按日分组账单数据
  const dayGroup = useMemo(() => {
    const group = _.groupBy(currentMonthList, (item) => dayjs(item.date).format('YYYY-MM-DD'))
    return {
      dayKeys: Object.keys(group),
      group
    }
  }, [currentMonthList])
  console.log(dayGroup)
3. 遍历日账单组件并传入参数
 {/* 日账单 */}
{dayGroup.dayKeys.map(dayKey => (
  <DailyBill key={dayKey} date={dayKey} billList={dayGroup.group[dayKey]} />
))}
4. 接收数据计算统计渲染页面
const DailyBill = ({ date, billList }) => {
  const dayResult = useMemo(() => {
    // 支出  /  收入  / 结余
    const pay = billList.filter(item => item.type === 'pay').reduce((a, c) => a + c.money, 0)
    const income = billList.filter(item => item.type === 'income').reduce((a, c) => a + c.money, 0)
    return {
      pay,
      income,
      total: pay + income
    }
  }, [billList])
  return (
    <div className={classNames('dailyBill')}>
      <div className="header">
        <div className="dateIcon">
          <span className="date">{date}</span>
        </div>
        <div className="oneLineOverview">
          <div className="pay">
            <span className="type">支出</span>
            <span className="money">{dayResult.pay.toFixed(2)}</span>
          </div>
          <div className="income">
            <span className="type">收入</span>
            <span className="money">{dayResult.income.toFixed(2)}</span>
          </div>
          <div className="balance">
            <span className="money">{dayResult.total.toFixed(2)}</span>
            <span className="type">结余</span>
          </div>
        </div>
      </div>
    </div>
  )
}

export default DailyBill
月度账单-单日账单列表展示

1. 渲染基础列表
{/* 单日列表 */}
<div className="billList">
  {billList.map(item => {
    return (
      <div className="bill" key={item.id}>
        <div className="detail">
          <div className="billType">{item.useFor}</div>
        </div>
        <div className={classNames('money', item.type)}>
          {item.money.toFixed(2)}
        </div>
      </div>
    )
  })}
</div>
2. 适配Type
1-准备静态数据
export const billListData = {
  pay: [
    {
      type: 'foods',
      name: '餐饮',
      list: [
        { type: 'food', name: '餐费' },
        { type: 'drinks', name: '酒水饮料' },
        { type: 'dessert', name: '甜品零食' },
      ],
    },
    {
      type: 'taxi',
      name: '出行交通',
      list: [
        { type: 'taxi', name: '打车租车' },
        { type: 'longdistance', name: '旅行票费' },
      ],
    },
    {
      type: 'recreation',
      name: '休闲娱乐',
      list: [
        { type: 'bodybuilding', name: '运动健身' },
        { type: 'game', name: '休闲玩乐' },
        { type: 'audio', name: '媒体影音' },
        { type: 'travel', name: '旅游度假' },
      ],
    },
    {
      type: 'daily',
      name: '日常支出',
      list: [
        { type: 'clothes', name: '衣服裤子' },
        { type: 'bag', name: '鞋帽包包' },
        { type: 'book', name: '知识学习' },
        { type: 'promote', name: '能力提升' },
        { type: 'home', name: '家装布置' },
      ],
    },
    {
      type: 'other',
      name: '其他支出',
      list: [{ type: 'community', name: '社区缴费' }],
    },
  ],
  income: [
    {
      type: 'professional',
      name: '其他支出',
      list: [
        { type: 'salary', name: '工资' },
        { type: 'overtimepay', name: '加班' },
        { type: 'bonus', name: '奖金' },
      ],
    },
    {
      type: 'other',
      name: '其他收入',
      list: [
        { type: 'financial', name: '理财收入' },
        { type: 'cashgift', name: '礼金收入' },
      ],
    },
  ],
}

export const billTypeToName = Object.keys(billListData).reduce((prev, key) => {
  billListData[key].forEach(bill => {
    bill.list.forEach(item => {
      prev[item.type] = item.name
    })
  })
  return prev
}, {})
2-适配type
<div className="billType">{billTypeToName[item.useFor]}</div>
月度账单-切换打开关闭

// 声明状态
const [visible, setVisible] = useState(false)

// 控制箭头
 <span
   className={classNames('arrow', !visible && 'expand')}
   onClick={() => setVisible(!visible)}></span>

// 控制列表显示
<div className="billList" style={{ display: !visible && 'none' }}></div>
月度账单-Icon组件封装
1. 准备静态结构
const Icon = () => {
  return (
    <img
      src={`https://yjy-teach-oss.oss-cn-beijing.aliyuncs.com/reactbase/ka/food.svg`}
      alt="icon"
      style={{
        width: 20,
        height: 20,
      }}
      />
  )
}

export default Icon
2. 设计参数
const BASE_URL = 'https://yjy-teach-oss.oss-cn-beijing.aliyuncs.com/reactbase/ka/'

const Icon = ({ type }) => {
  return (
    <img
      src={`${BASE_URL + type}.svg`}
      alt="icon"
      style={{
        width: 20,
        height: 20,
      }}
    />
  )
}

export default Icon
3. 使用组件
<div className="billList" style={{ display: visible ? 'block' : 'none' }}>
    {billList.map(item => {
      return (
        <div className="bill" key={item.id}>
          <Icon type={item.useFor} />
        </div>
      )
    })}
  </div>
记账功能
记账 - 结构渲染
import { Button, DatePicker, Input, NavBar } from 'antd-mobile'
import Icon from '@/components/Icon'
import './index.scss'
import classNames from 'classnames'
import { billListData } from '@/contants'
import { useNavigate } from 'react-router-dom'

const New = () => {
  const navigate = useNavigate()
  return (
    <div className="keepAccounts">
      <NavBar className="nav" onBack={() => navigate(-1)}>
        记一笔
      </NavBar>

      <div className="header">
        <div className="kaType">
          <Button
            shape="rounded"
            className={classNames('selected')}
          >
            支出
          </Button>
          <Button
            className={classNames('')}
            shape="rounded"
          >
            收入
          </Button>
        </div>

        <div className="kaFormWrapper">
          <div className="kaForm">
            <div className="date">
              <Icon type="calendar" className="icon" />
              <span className="text">{'今天'}</span>
              <DatePicker
                className="kaDate"
                title="记账日期"
                max={new Date()}
              />
            </div>
            <div className="kaInput">
              <Input
                className="input"
                placeholder="0.00"
                type="number"
              />
              <span className="iconYuan">¥</span>
            </div>
          </div>
        </div>
      </div>

      <div className="kaTypeList">
        {billListData['pay'].map(item => {
          return (
            <div className="kaType" key={item.type}>
              <div className="title">{item.name}</div>
              <div className="list">
                {item.list.map(item => {
                  return (
                    <div
                      className={classNames(
                        'item',
                        ''
                      )}
                      key={item.type}

                    >
                      <div className="icon">
                        <Icon type={item.type} />
                      </div>
                      <div className="text">{item.name}</div>
                    </div>
                  )
                })}
              </div>
            </div>
          )
        })}
      </div>

      <div className="btns">
        <Button className="btn save">
          保 存
        </Button>
      </div>
    </div>
  )
}

export default New
配套样式
.keepAccounts {
  --ka-bg-color: #daf2e1;
  --ka-color: #69ae78;
  --ka-border-color: #191d26;

  height: 100%;
  background-color: var(--ka-bg-color);

  .nav {
    --adm-font-size-10: 16px;
    color: #121826;
    background-color: transparent;
    &::after {
      height: 0;
    }

    .adm-nav-bar-back-arrow {
      font-size: 20px;
    }
  }

  .header {
    height: 132px;

    .kaType {
      padding: 9px 0;
      text-align: center;

      .adm-button {
        --adm-font-size-9: 13px;

        &:first-child {
          margin-right: 10px;
        }
      }
      .selected {
        color: #fff;
        --background-color: var(--ka-border-color);
      }
    }

    .kaFormWrapper {
      padding: 10px 22.5px 20px;

      .kaForm {
        display: flex;
        padding: 11px 15px 11px 12px;
        border: 0.5px solid var(--ka-border-color);
        border-radius: 9px;
        background-color: #fff;

        .date {
          display: flex;
          align-items: center;
          height: 28px;
          padding: 5.5px 5px;
          border-radius: 4px;
          // color: #4f825e;
          color: var(--ka-color);
          background-color: var(--ka-bg-color);

          .icon {
            margin-right: 6px;
            font-size: 17px;
          }
          .text {
            font-size: 16px;
          }
        }

        .kaInput {
          flex: 1;
          display: flex;
          align-items: center;

          .input {
            flex: 1;
            margin-right: 10px;
            --text-align: right;
            --font-size: 24px;
            --color: var(--ka-color);
            --placeholder-color: #d1d1d1;
          }

          .iconYuan {
            font-size: 24px;
          }
        }
      }
    }
  }

  .container {
  }
  .kaTypeList {
    height: 490px;
    padding: 20px 11px;
    padding-bottom: 70px;
    overflow-y: scroll;
    background: #ffffff;
    border-radius: 20px 20px 0 0;
    -ms-overflow-style: none; /* Internet Explorer 10+ */
    scrollbar-width: none; /* Firefox */
    &::-webkit-scrollbar {
      display: none; /* Safari and Chrome */
    }

    .kaType {
      margin-bottom: 25px;
      font-size: 12px;
      color: #333;

      .title {
        padding-left: 5px;
        margin-bottom: 5px;
        font-size: 13px;
        color: #808080;
      }
      .list {
        display: flex;

        .item {
          width: 65px;
          height: 65px;
          padding: 9px 0;
          margin-right: 7px;
          text-align: center;
          border: 0.5px solid #fff;
          &:last-child {
            margin-right: 0;
          }

          .icon {
            height: 25px;
            line-height: 25px;
            margin-bottom: 5px;
            font-size: 25px;
          }
        }
        .item.selected {
          border: 0.5px solid var(--ka-border-color);
          border-radius: 5px;
          background: var(--ka-bg-color);
        }
      }
    }
  }

  .btns {
    position: fixed;
    bottom: 15px;
    width: 100%;
    text-align: center;

    .btn {
    width: 200px;
    --border-width: 0;
    --background-color: #fafafa;
    --text-color: #616161;
    &:first-child {
    margin-right: 15px;
    }
    }
    .btn.save {
    --background-color: var(--ka-bg-color);
    --text-color: var(--ka-color);
    }
    }
  }
记账 - 支出和收入切换
const new = ()=>{
  // 1. 区分账单状态
  const [billType, setBillType] = useState('income')
  return (
     <div className="keepAccounts">
      <div className="kaType">
        {/* 2. 点击切换状态 */}
        <Button
          shape="rounded"
          className={classNames(billType==='pay'?'selected':'')}
          onClick={() => setBillType('pay')}
        >
          支出
        </Button>
        <Button
          className={classNames(billType==='income'?'selected':'')}
          onClick={() => setBillType('income')}
          shape="rounded"
        >
          收入
        </Button>
      </div>
      {/* 2. 适配数据 */}
      <div className="kaTypeList">
          {billListData[billType].map(item => {

          })}
      </div>
    </div>
  )
}
记账 - 新增一笔
import { useDispatch } from 'react-redux'

const New = () => {
  // 收集金额
  const [money, setMoney] = useState(0)
  const moneyChange = (value) => {
    setMoney(value)
  }

  // 收集账单类型
  const [useFor, setUseFor] = useState('')
  const dispatch = useDispatch()
  // 保存账单
  const saveBill = () => {
    // 收集表单数据
    const data = {
      type: billType,
      money: billType === 'pay' ? -money : +money,
      date: new Date(),
      useFor: useFor
    }
    console.log(data)
    dispatch(addBillList(data))
  }
  return (
    <div className="keepAccounts">
      <NavBar className="nav" onBack={() => navigate(-1)}>
        记一笔
      </NavBar>

      <div className="header">
        <div className="kaType">
          <Button
            shape="rounded"
            className={classNames(billType === 'pay' ? 'selected' : '')}
            onClick={() => setBillType('pay')}
          >
            支出
          </Button>
          <Button
            className={classNames(billType === 'income' ? 'selected' : '')}
            shape="rounded"
            onClick={() => setBillType('income')}
          >
            收入
          </Button>
        </div>

        <div className="kaFormWrapper">
          <div className="kaForm">
            <div className="date">
              <Icon type="calendar" className="icon" />
              <span className="text">{'今天'}</span>
              <DatePicker
                className="kaDate"
                title="记账日期"
                max={new Date()}
              />
            </div>
            <div className="kaInput">
              <Input
                className="input"
                placeholder="0.00"
                type="number"
                value={money}
                onChange={moneyChange}
              />
              <span className="iconYuan">¥</span>
            </div>
          </div>
        </div>
      </div>

      <div className="kaTypeList">
        {/* 数据区域 */}
        {billListData[billType].map(item => {
          return (
            <div className="kaType" key={item.type}>
              <div className="title">{item.name}</div>
              <div className="list">
                {item.list.map(item => {
                  return (
                    <div
                      className={classNames(
                        'item',
                        ''
                      )}
                      key={item.type}
                      onClick={() => setUseFor(item.type)}
                    >
                      <div className="icon">
                        <Icon type={item.type} />
                      </div>
                      <div className="text">{item.name}</div>
                    </div>
                  )
                })}
              </div>
            </div>
          )
        })}
      </div>

      <div className="btns">
        <Button className="btn save" onClick={saveBill}>
          保 存
        </Button>
      </div>
    </div>
  )
}

export default New


 3090
3090


 被折叠的 条评论
为什么被折叠?
被折叠的 条评论
为什么被折叠?
 到【灌水乐园】发言


