


一、简介
以前我们在网页登录的时候,经常会看到需要输入图形验证码的功能,也是防止暴力破解进行登录,但是现在好多的网站已经使用了手机短信验证码进行登录验证,但是在管理员进行登录的后台系统中,很多时候没有必要使用短信验证码节能开源,今天就Springboot使用Graphics类实现图形验证码功能进行记录。
二、实现
1.创建新的Springboot项目,我引用之前已经创建过的项目hello-rabbit
2.导入核心依赖pom.xml
pom.xml
<?xml version="1.0" encoding="UTF-8"?>
<project xmlns="http://maven.apache.org/POM/4.0.0" xmlns:xsi="http://www.w3.org/2001/XMLSchema-instance"
	xsi:schemaLocation="http://maven.apache.org/POM/4.0.0 https://maven.apache.org/xsd/maven-4.0.0.xsd">
	<modelVersion>4.0.0</modelVersion>
	<parent>
		<groupId>org.springframework.boot</groupId>
		<artifactId>spring-boot-starter-parent</artifactId>
		<version>2.2.2.RELEASE</version>
		<relativePath/> <!-- lookup parent from repository -->
	</parent>
	<groupId>com.basic</groupId>
	<artifactId>hello-rabbit</artifactId>
	<version>0.0.1-SNAPSHOT</version>
	<packaging>jar</packaging>

	<name>hello-rabbit</name>
	<description>Demo project for Spring Boot</description>

	<properties>
		<project.builde.sourceEncoding>UTF-8</project.builde.sourceEncoding>
		<project.reporting.outputEncoding>UTF-8</project.reporting.outputEncoding>
		<java.version>1.8</java.version>
	</properties>
	<dependencies>
        <!--spring boot web的依赖-->
		<dependency>
			<groupId>org.springframework.boot</groupId>
			<artifactId>spring-boot-starter-web</artifactId>
		</dependency>
        <!--thymeleaf模版依赖-->
		<dependency>
			<groupId>org.springframework.boot</groupId>
			<artifactId>spring-boot-starter-thymeleaf</artifactId>
		</dependency>
		<dependency>
			<groupId>org.springframework.boot</groupId>
			<artifactId>spring-boot-starter-test</artifactId>
			<scope>test</scope>
		</dependency>
	</dependencies>

	<build>
		<plugins>
			<plugin>
				<groupId>org.springframework.boot</groupId>
				<artifactId>spring-boot-maven-plugin</artifactId>
			</plugin>
		</plugins>
	</build>

</project>
3.在资源文件resources下新建文件夹templates并且新建image.html页面
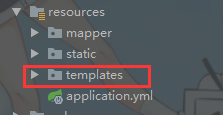
image.html
<!DOCTYPE html>
<html lang="en" xmlns:th="http://www.w3.org/1999/xhtml">
<head>
    <meta charset="UTF-8">
    <title>图形验证</title>
</head>
<body>
<center>
    <h3>图形验证</h3>
    <span th:text="${message}" style="color: blue"></span>
    <form action="/codes/ycode" method="post">
        <img src="/codes/getcode"><br>
        <input type="text" name="code"/>
        <input type="submit">
    </form>

</center>
</body>
</html>
4.新增controller包,并且新增类ImageController.java
注意:生成随机验证码工具类VerificationCode.java:java实现随机生成验证码工具类
ImageController.java
package com.basic.hellorabbit.controller;
import com.basic.hellorabbit.util.VerificationCode;
import lombok.extern.slf4j.Slf4j;
import org.springframework.stereotype.Controller;
import org.springframework.ui.Model;
import org.springframework.web.bind.annotation.RequestMapping;
import org.springframework.web.bind.annotation.RequestMethod;
import javax.imageio.ImageIO;
import javax.servlet.http.HttpServletRequest;
import javax.servlet.http.HttpServletResponse;
import java.awt.*;
import java.awt.image.BufferedImage;
import java.util.Random;
/**
* @Description: 图形验证码
* @Author: Joe
* @CreateDate: 2020/5/8 14:28
*/
@Controller
@RequestMapping(value = "/codes")
@Slf4j
public class ImageController {
@RequestMapping(value = "/getcode",method = RequestMethod.GET,name = "获取图形验证码")
public void getCode(HttpServletRequest request, HttpServletResponse response) throws Exception {
request.setCharacterEncoding("utf-8");
response.setCharacterEncoding("utf-8");
//声明图片类型为RGB
BufferedImage bufferedImage = new BufferedImage(120,40,BufferedImage.TYPE_INT_RGB);
//引入画笔
Graphics graphics = bufferedImage.getGraphics();
//设置画布背景颜色
Color color = new Color(240,240,140);
graphics.setColor(color);
//填充画布
graphics.fillRect(0,0,120,40);
//获取验证码字符串
String numeral = VerificationCode.getNumeral();
log.info("numeral:{}",numeral);
char[] chars = numeral.toCharArray();
Random r = new Random();
//JAVA中的Font有三种属性决定(1.字体名:(familyName),2.风格:(style),3.大小:(size))
Font axesFont = new Font("宋体", Font.BOLD,32);
for (int i = 0; i < chars.length; i++) {
graphics.setFont(axesFont);
//设置文本字符的颜色:setColor(color)
graphics.setColor(new Color(r.nextInt(255),r.nextInt(255),r.nextInt(255)));
//设置文本字符的位置:drawString(String str , int x , int y),x与y属于str的左下角的坐标
graphics.drawString(chars[i]+"",i*20,20+r.nextInt(20));
//[干扰线]设置线条的位置:drawLine(int x1 , int y1, int x2 , int y2),x1与y1属于线条起点坐标,x2与y2属于线条终点坐标
graphics.drawLine(r.nextInt(120), r.nextInt(40), r.nextInt(120), r.nextInt(40));
}
//放入session,进行验证
request.getSession().setAttribute("code",numeral);
//输入图片
ImageIO.write(bufferedImage,"JPG",response.getOutputStream());
}
@RequestMapping(value = "/ycode",method = RequestMethod.POST,name = "验证图形验证码")
public String yCode(Model model,String code,HttpServletRequest request) {
String result="";
if (code==null||code.equals("")){
result="输入的验证码为空";
}
log.info("输入的code:{}",code);
String codes = request.getSession().getAttribute("code").toString();
log.info("session拿到的codes:{}",codes);
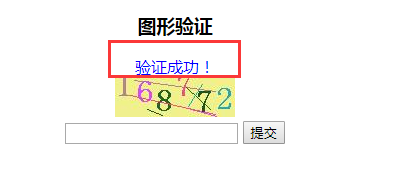
if (code.equals(codes)){
result="验证成功!";
}else if (!code.equals(codes)&&!code.equals("")){
result="验证失败,请输入正确的验证码!";
}
model.addAttribute("message",result);
return "image";
}
@RequestMapping(value = "/index",method = RequestMethod.GET,name = "跳到验证页面")
public String index(){
return "image";
}
}
三、启动测试
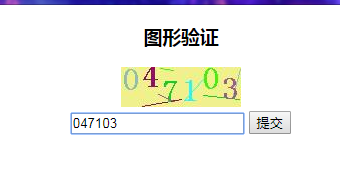
1.启动项目后访问
http://localhost:8080/codes/index
2.输入验证码后点击提交,如图
注意
代码初步测试通过,至于其中涉及到的验证成功业务逻辑请自行处理设计。


 650
650


 被折叠的 条评论
为什么被折叠?
被折叠的 条评论
为什么被折叠?
 到【灌水乐园】发言


