


近几天需要实现了一个需求,需要存取不定长度的数组。
Android的文件存取是可以实现的,但是有点麻烦,方便使用的话就只能一个数组存取在一个文件里面,万一数组多了起来,同样的文件也多了起来。再者文件的名称也不好管理。
于是乎就想到了sqlite,但是之前学习的sqlite数据库并没有存储类型适合存取不定长的数组的。后来一查,结果还有一个Blob类型,Blob类型是二进制大对象,是一个可以存储二进制文件的容器。有兴趣的可以自行去查。
由于有这个Blob类型,那么sqlite就可以存取图片(图片转换成byte数组)、对象(对象序列化之后)和各种byte数组了。
不会使用sqlite参考之前的博客
Android数据存储(二)—Sqlite数据库(上)
Android数据存储(二)—Sqlite数据库(下)
这里就不多说sqlite的使用了,直接演示一个简单的byte存取的案例。
创建一个Android项目,然后新建一个DataSQLiteHelper继承SQLiteOpenHelper:
import android.content.Context;
import android.database.sqlite.SQLiteDatabase;
import android.database.sqlite.SQLiteDatabase.CursorFactory;
import android.database.sqlite.SQLiteOpenHelper;

/**
 * Created by Layne_Yao on 2017-8-16
 * CSDN:http://blog.csdn.net/Jsagacity
 */
public class DataSQLiteHelper extends SQLiteOpenHelper {

    public DataSQLiteHelper(Context context, String name,
            CursorFactory factory, int version) {
        super(context, name, factory, version);
    }

    public DataSQLiteHelper(Context context) {
        super(context, "control_info.db", null, 1);
    }

    /**
     * 当数据库创建时回调的函数
     *
     * @param db
     */
    @Override
    public void onCreate(SQLiteDatabase db) {
        String table_one_sql = "create table database_test (bc_id Integer primary key,msg Blob)";
        db.execSQL(table_one_sql);// 执行sql语句
    }

    /**
     * 当数据库版本更新时回调的函数
     *
     * @param db
     * @param oldVersion
     * @param newVersion
     */
    @Override
    public void onUpgrade(SQLiteDatabase db, int oldVersion, int newVersion) {
    }

    /**
     * 当数据库打开是回调的函数
     *
     * @param db
     */
    @Override
    public void onOpen(SQLiteDatabase db) {
        super.onOpen(db);
    }

}
再来一个数据库的管理类:
import android.content.ContentValues;
import android.database.Cursor;
import android.database.sqlite.SQLiteDatabase;

import java.util.ArrayList;
import java.util.List;

import com.itman.savebytedemo.ByteData;

/**
 * Created by Layne_Yao on 2017-8-16
 * CSDN:http://blog.csdn.net/Jsagacity
 */
public class DbManger {
    private static SQLiteDatabase db;

    public static void setDb(SQLiteDatabase db) {
        DbManger.db = db;
    }

    public static void closeSQLiteDatabase() {
        db.close();
    }

    /**
     * 将Cursor内的数据转换成对象存放在List中
     */
    public static List<ByteData> cursorToList(Cursor cursor) {
        List<ByteData> list = new ArrayList<>();
        ByteData byteData;
        while (cursor.moveToNext()) {
            int bc_id = cursor.getInt(cursor.getColumnIndex("bc_id"));
            byte[] msg = cursor.getBlob(cursor.getColumnIndex("msg"));

            byteData = new ByteData(bc_id, msg);
            list.add(byteData);
        }
        return list;
    }

    public static boolean addData(int bc_id, byte[] msg) {
        ContentValues values = new ContentValues();
        values.put("bc_id", bc_id);
        values.put("msg", msg);
        long result = db.insert("database_test", null, values);
        if (result > 0) {
            return true;
        } else {
            return false;
        }
    }

    /**
     * 查询所有
     *
     * @return
     */
    public static List<ByteData> selectAllData() {
        Cursor cursor = db.query("database_test", null, null, null, null, null,
                null);
        List<ByteData> list = cursorToList(cursor);
        return list;
    }

    /**
     * 根据Id查询数据
     *
     * @return
     */
    public static byte[] selectData(int bc_id) {
        /**
         * api查询方式 query(String table, String[] columns, String selection,String[] selectionArgs, String groupBy, String having,String orderBy)
         * String table 表示查询的表名
         * String[] columns表示查询表中的字段名称 null查询所有
         * String selection 表示查询条件
         * where 子句
         * String[] selectionArgs 表示查询条件的占位符取值
         * String groupBy 表示分组条件
         * group by 子句
         * String having 表示筛选条件
         * having 子句
         * String orderBy 表示排序条件
         * order by 子句
         */
        Cursor cursor = db.query("database_test", null, "bc_id = ?",
                new String[] { bc_id + "" }, null, null, null, null);
        cursor.moveToNext();
        byte[] msg = cursor.getBlob(cursor.getColumnIndex("msg"));
        return msg;
    }

}
数据库管理类中使用了一个bean对象,这里给补上:
import java.util.Arrays;

/**
 * Created by Layne_Yao on 2017-12-14 上午10:03:02.
 * CSDN:http://blog.csdn.net/Jsagacity
 */
public class ByteData {
    private int bc_id;
    private byte[] msg;

    public ByteData(int bc_id, byte[] msg) {
        this.bc_id = bc_id;
        this.msg = msg;
    }

    public int getBc_id() {
        return bc_id;
    }

    public void setBc_id(int bc_id) {
        this.bc_id = bc_id;
    }

    public byte[] getMsg() {
        return msg;
    }

    public void setMsg(byte[] msg) {
        this.msg = msg;
    }

    @Override
    public String toString() {
        return "ByteData [bc_id=" + bc_id + ", msg=" + Arrays.toString(msg)
                + "]";
    }

}
布局文件三个按钮就够了:
<RelativeLayout xmlns:android="http://schemas.android.com/apk/res/android"
    xmlns:tools="http://schemas.android.com/tools"
    android:layout_width="match_parent"
    android:layout_height="match_parent"
    tools:context="com.itman.savebytedemo.MainActivity" >

    <Button
        android:id="@+id/bt_save"
        android:layout_width="wrap_content"
        android:layout_height="wrap_content"
        android:layout_alignParentTop="true"
        android:layout_centerHorizontal="true"
        android:layout_marginTop="81dp"
        android:text="保存数据" />

    <Button
        android:id="@+id/bt_get"
        android:layout_width="wrap_content"
        android:layout_height="wrap_content"
        android:layout_below="@+id/bt_save"
        android:layout_centerHorizontal="true"
        android:layout_marginTop="24dp"
        android:text="取出单条数据" />

    <Button
        android:id="@+id/bt_get_all"
        android:layout_width="wrap_content"
        android:layout_height="wrap_content"
        android:layout_centerHorizontal="true"
        android:layout_centerVertical="true"
        android:text="取出全部数据" />

</RelativeLayout>
最后就是MainActivity类了:
public class MainActivity extends ActionBarActivity implements OnClickListener {
    private Button bt_save, bt_get, bt_get_all;

    @Override
    protected void onCreate(Bundle savedInstanceState) {
        super.onCreate(savedInstanceState);
        setContentView(R.layout.activity_main);
        InitView();
        InitSQLiteDatabase();

    }

    private void InitView() {
        bt_save = (Button) findViewById(R.id.bt_save);
        bt_get = (Button) findViewById(R.id.bt_get);
        bt_get_all = (Button) findViewById(R.id.bt_get_all);

        bt_save.setOnClickListener(this);
        bt_get.setOnClickListener(this);
        bt_get_all.setOnClickListener(this);

    }

    /**
     * 实例化一个数据库操作对象传递给DbManger
     */
    private void InitSQLiteDatabase() {
        DataSQLiteHelper helper = new DataSQLiteHelper(MainActivity.this);
        SQLiteDatabase db = helper.getWritableDatabase();
        DbManger.setDb(db);
    }

    @Override
    public void onClick(View v) {
        switch (v.getId()) {
        case R.id.bt_save:
            byte[] msg;
            for (int i = 1; i < 11; i++) {
                msg = new byte[] { (byte) 0xf1, (byte) 0xf2, (byte) 0xf3,
                        (byte) i };
                DbManger.addData(i, msg);
            }

            break;

        case R.id.bt_get:
            byte[] msg_byte = DbManger.selectData(1);
            Toast.makeText(this, Arrays.toString(msg_byte), Toast.LENGTH_SHORT)
                    .show();
            break;
        case R.id.bt_get_all:
            List<ByteData> list_byteData = DbManger.selectAllData();
            for (int i = 0; i < list_byteData.size(); i++) {
                Log.e("MainActivity", list_byteData.get(i).toString());
            }
            break;
        }

    }
}
运行结果,先点击保存数据,取出单条数据:
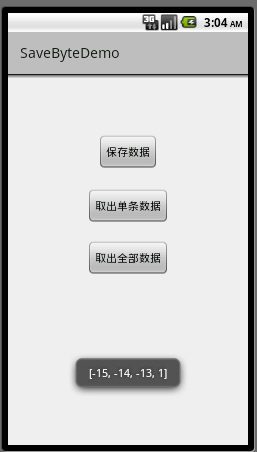
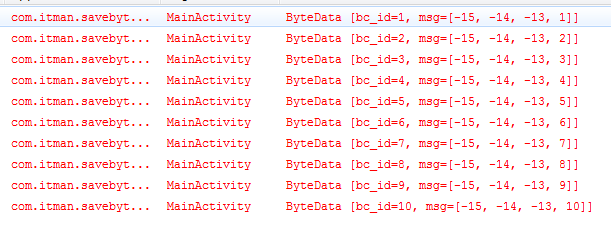
取出全部数据:
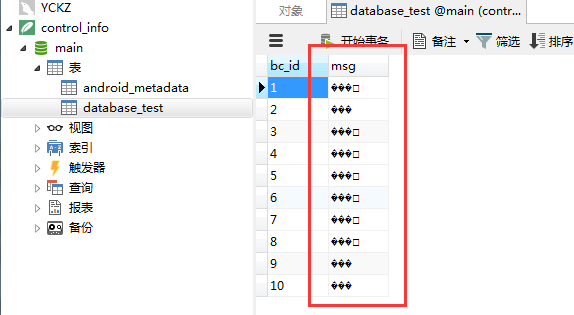
再将项目里面的数据库导出来,放在Navicat中查看,存储byte数组列看起来是乱码,很正常,它没办法给你形象的显示数组数据,所以最简单的就是乱码显示。我们能够正常的进行存取就行了:
文件存储byte数组
接下来实现将byte数组存储到文件里面,也是非常简单的,就直接演示代码,管理文件类代码:
/**
 * Created by Layne_Yao on 2017-12-19 下午5:17:22.
 * CSDN:http://blog.csdn.net/Jsagacity
 */
public class FileUtils {
    /**
     * 创建文件并存储数据
     * byte[] bytes     要存储的数据
     * StringBuilder str    文件名称
     */
    public static void createFileWithByte(Context context,byte[] bytes, StringBuilder str) {
        /**
         * 创建File对象,其中包含文件所在的目录以及文件的命名
         */
        File file = new File(context.getFilesDir(), str.append(".txt").toString());
        // 创建FileOutputStream对象
        FileOutputStream outputStream = null;
        try {
            // 如果文件存在则删除
            if (file.exists()) {
                file.delete();
            }
            // 获取FileOutputStream对象
            outputStream = new FileOutputStream(file);
            // 获取BufferedOutputStream对象
            // 往文件所在的缓冲输出流中写byte数据
            outputStream.write(bytes);
            // 刷出缓冲输出流,该步很关键,要是不执行flush()方法,那么文件的内容是空的。
        } catch (Exception e) {
            // 打印异常信息
            e.printStackTrace();
        } finally {
            // 关闭创建的流对象
            if (outputStream != null) {
                try {
                    outputStream.close();
                } catch (IOException e) {
                    e.printStackTrace();
                }
            }
        }
    }

    /**
     * 取出制定文件的数据
     */
    public static byte[] readFileWithByte(Context context,StringBuilder str) {
        byte[] light = new byte[10];

        File file = new File(context.getFilesDir(), str.append(".txt").toString());
        // 创建FileOutputStream对象
        FileInputStream inputStream = null;
        try {
            inputStream = new FileInputStream(file);

            inputStream.read(light);
        } catch (FileNotFoundException e) {
            e.printStackTrace();
        } catch (IOException e) {
            e.printStackTrace();
        } finally {
            // 关闭创建的流对象
            if (inputStream != null) {
                try {
                    inputStream.close();
                } catch (IOException e) {
                    e.printStackTrace();
                }
            }
        }
        return light;
    }

}
布局同样的三个按钮的事:
<RelativeLayout xmlns:android="http://schemas.android.com/apk/res/android"
    xmlns:tools="http://schemas.android.com/tools"
    android:layout_width="match_parent"
    android:layout_height="match_parent"
    tools:context="com.itman.filedemo.MainActivity" >

        <Button
            android:id="@+id/bt_save"
            android:layout_width="wrap_content"
            android:layout_height="wrap_content"
            android:layout_alignLeft="@+id/bt_show"
            android:layout_alignParentTop="true"
            android:text="保存" />

        <Button
            android:id="@+id/bt_show"
            android:layout_width="wrap_content"
            android:layout_height="wrap_content"
            android:layout_below="@+id/bt_show_dou"
            android:layout_centerHorizontal="true"
            android:text="取出" />

        <Button
            android:id="@+id/bt_show_dou"
            android:layout_width="wrap_content"
            android:layout_height="wrap_content"
            android:layout_alignLeft="@+id/bt_save"
            android:layout_below="@+id/bt_save"
            android:text="文件" />

</RelativeLayout>
MainActivity的代码:
import java.io.File;
import java.util.Arrays;

import android.os.Bundle;
import android.support.v7.app.ActionBarActivity;
import android.view.View;
import android.view.View.OnClickListener;
import android.widget.Button;
import android.widget.Toast;

public class MainActivity extends ActionBarActivity implements OnClickListener {
    private Button bt_save;
    private Button bt_show;
    private Button bt_show_dou;

    @Override
    protected void onCreate(Bundle savedInstanceState) {
        super.onCreate(savedInstanceState);
        setContentView(R.layout.activity_main);
        bt_save = (Button) findViewById(R.id.bt_save);
        bt_show = (Button) findViewById(R.id.bt_show);
        bt_show_dou = (Button) findViewById(R.id.bt_show_dou);

        bt_save.setOnClickListener(this);
        bt_show.setOnClickListener(this);
        bt_show_dou.setOnClickListener(this);


    }

    @Override
    public void onClick(View v) {
        switch (v.getId()) {
        case R.id.bt_save:
            byte[] light_code = new byte[] { 1, 2, 3, 4, 5, 6, 7, 8, 9, 10 };
            FileUtils.createFileWithByte(this,light_code, new StringBuilder("file"));
            break;

        case R.id.bt_show:
            Toast.makeText(
                    this,
                    Arrays.toString(FileUtils.readFileWithByte(this,new StringBuilder("file"))),
                    Toast.LENGTH_SHORT).show();
            break;

        case R.id.bt_show_dou:
            //显示文件名
            show();
            break;
        }

    }

    private void show() {
        File file = new File(getBaseContext().getFilesDir().toString());
        String[] name = file.list();
        Toast.makeText(this, Arrays.toString(name), Toast.LENGTH_SHORT).show();

    }

}
运行结果:
如果取出存储的文件,查看文件里面的数据也是乱码的。
这样的需求sqlite可以实现,那么MySQL也是可以实现的。同样的文件也可以存储byte数组,以上就是全部的代码了,没必要提供源代码了。很简单的。


 6599
6599

 被折叠的 条评论
为什么被折叠?
被折叠的 条评论
为什么被折叠?
 到【灌水乐园】发言


