Spring
- IoC:容器
- AOP:事务处理
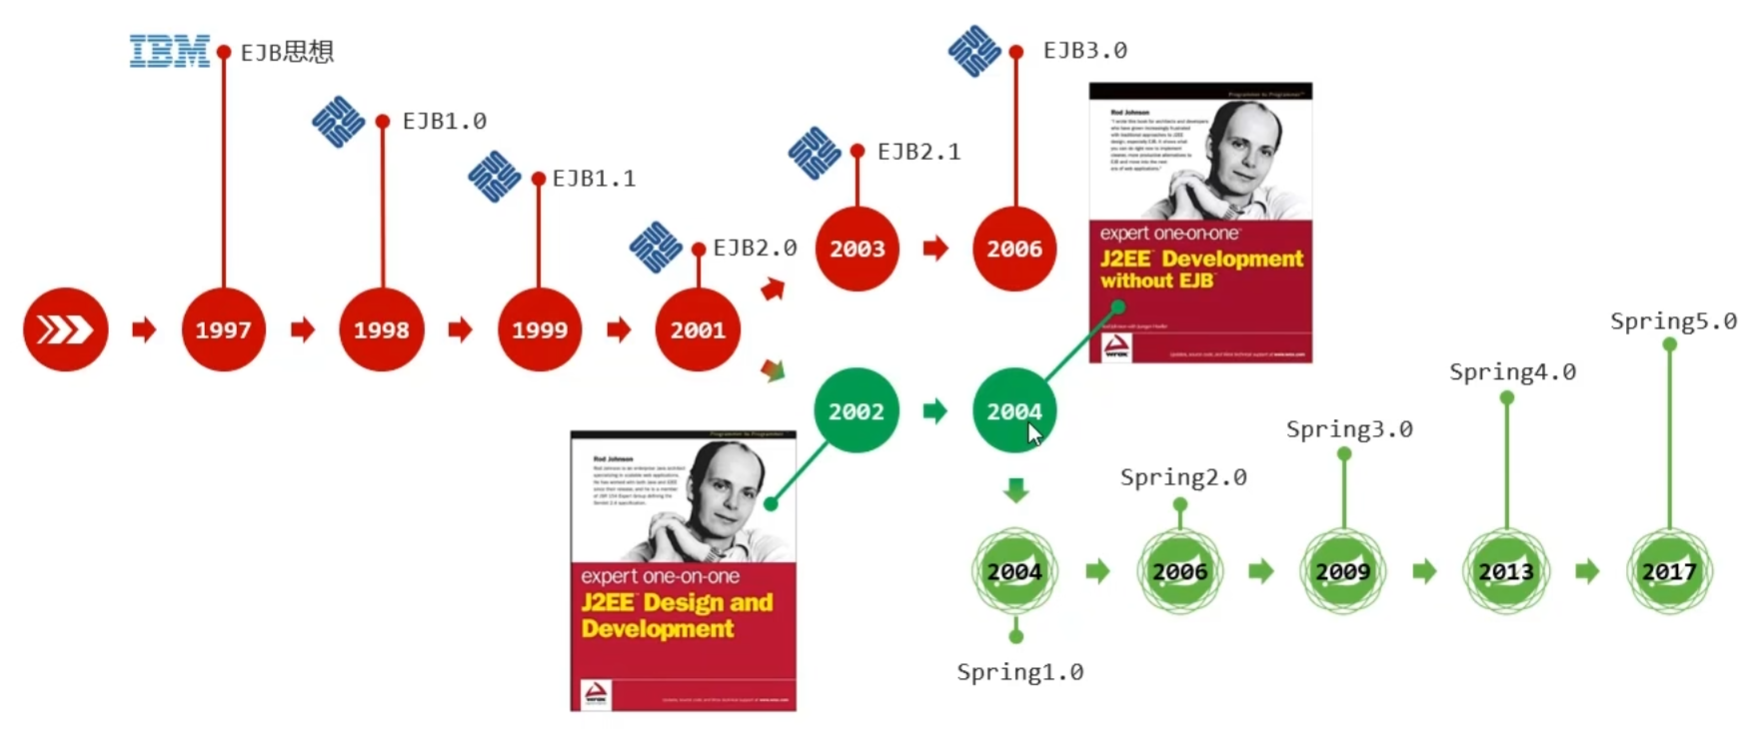
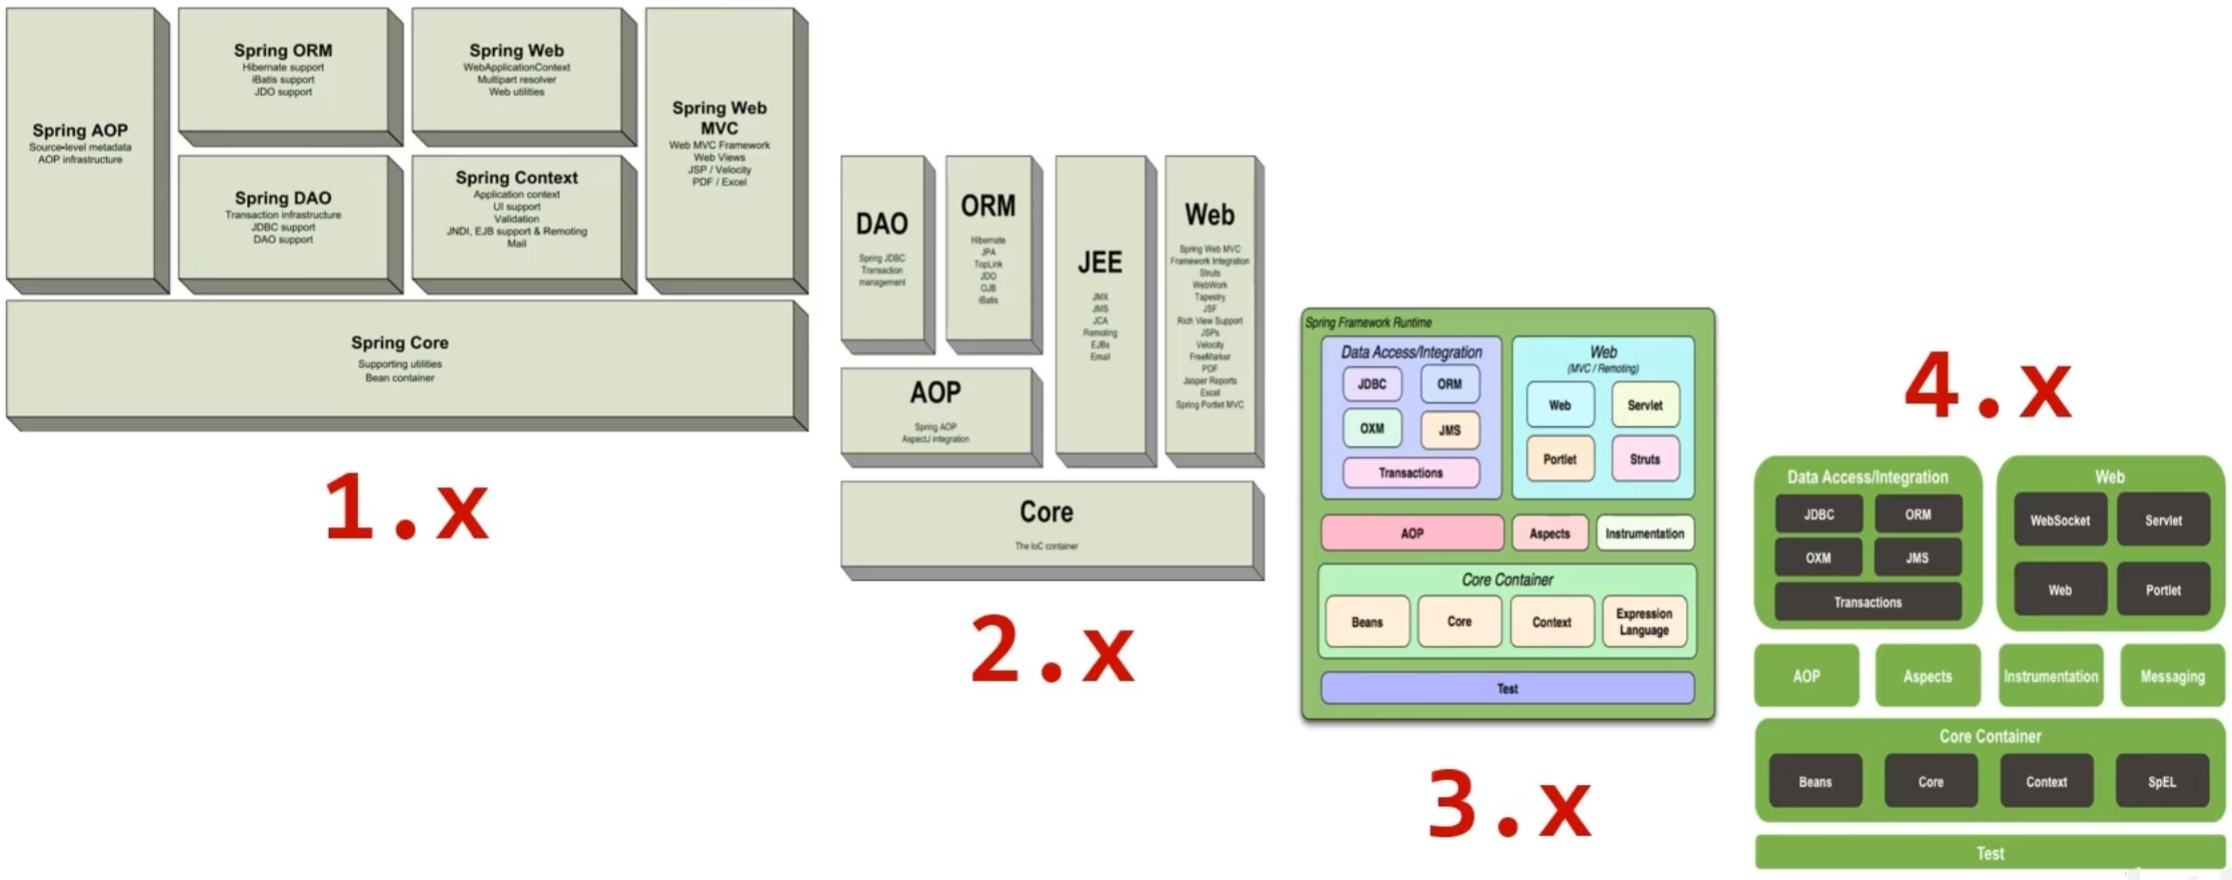
Spring发展至今已经形成了一种开发的生态圈,Spring提供了若干个项目,每个项目用户完成特定的功能。

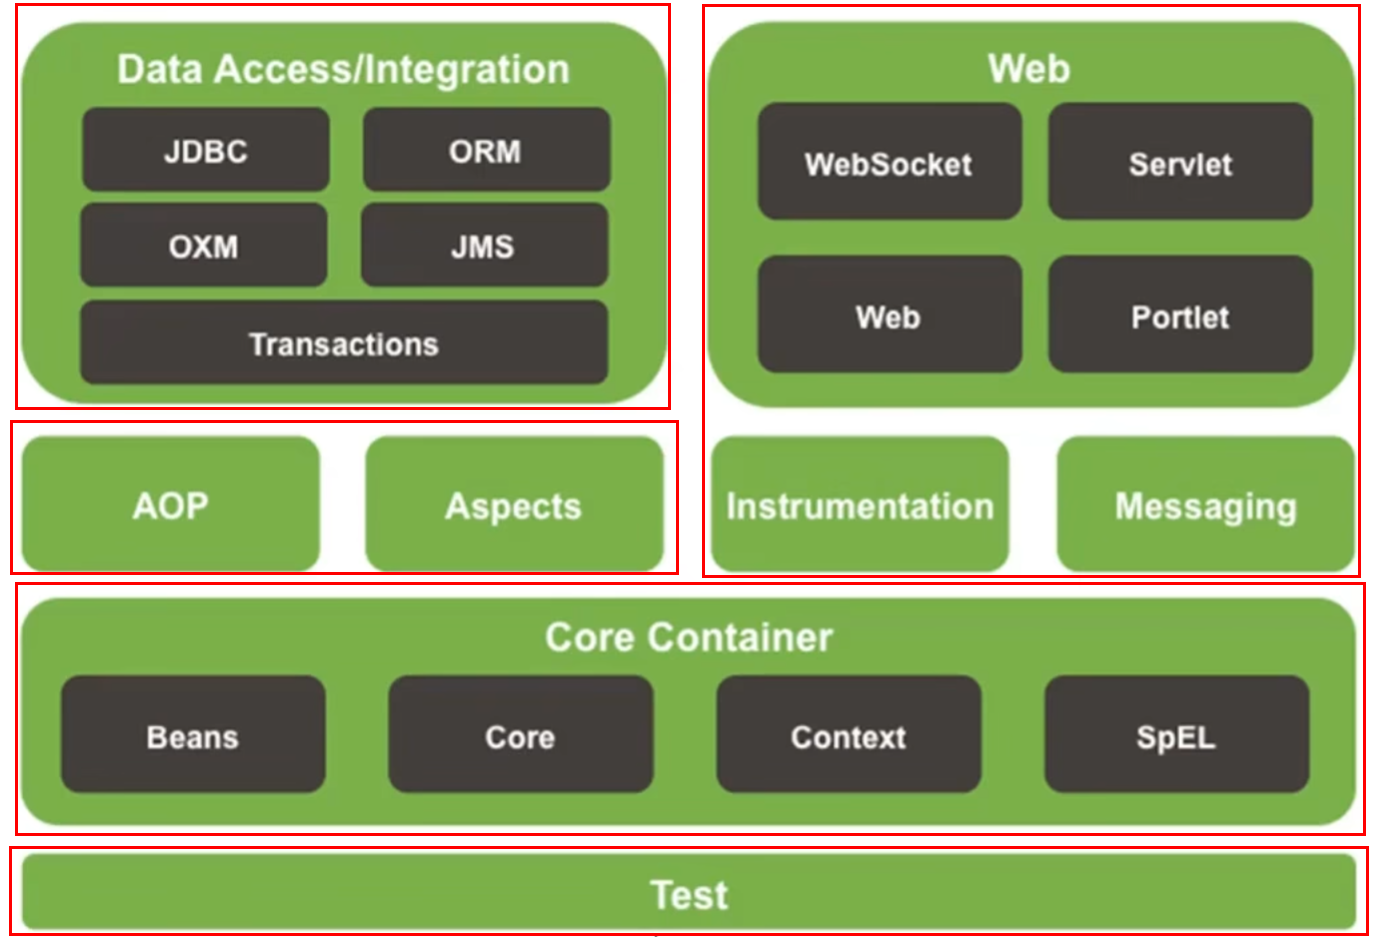
Spring Framework 系统架构
Spring Framework是Spring生态圈中最基础的项目,也是其他项目的根基。


| 系统架构 | 说明 |
|---|---|
| Core Contianer | 核心容器 |
| AOP | 面向切面编程 |
| Aspects | AOP思想实现 |
| Data Access | 数据访问 |
| Data Integration | 数据集成 |
| Web | Web开发 |
| Test | 单元测试与集成测试 |
核心容器
传统代码书写业务层实现与数据层实现耦合度偏高,因为使用对象时主动靠new产生。如何解决这个问题?只要转换为由外部提供对象,就可以达到解耦的目的。
IoC(Inversion of Control)控制反转,其核心思想是将对象创建的控制权由程序内部转移到外部。使用对象时由原来主动new产生对象的方式,转换为由外部提供对象,此过程中对象创建的控制权就由程序内部转移到外部。
Spring技术对IoC思想进行了实现,Spring提供了一个容器(IoC容器),用来充当IoC思想中的“外部”。
IoC容器负责对象的创建、初始化等一系列工作,被创建或被管理的对象在IoC容器称为Bean。
DI(Dependency Injection)依赖注入,在容器中建立Bean与Bean之间的依赖关系的整个过程称为注入。

为了充分解耦,使用IoC容器管理Bean,在IoC容器内将具有依赖关系的Bean进行关系绑定(DI)。最终达到效果是使用对象时不仅可以直接从IoC容器中获取,而且获取到的Bean已经绑定了所有依赖关系。
案例:XML版的IoC快速入门
- 导入SpringFramework的坐标
spring-context
$ vim pom.xml<?xml version="1.0" encoding="UTF-8"?>
<project xmlns="http://maven.apache.org/POM/4.0.0"
xmlns:xsi="http://www.w3.org/2001/XMLSchema-instance"
xsi:schemaLocation="http://maven.apache.org/POM/4.0.0 https://maven.apache.org/xsd/maven-4.0.0.xsd">
<modelVersion>4.0.0</modelVersion>
<groupId>com.jc</groupId>
<artifactId>sl</artifactId>
<version>1.0-SNAPSHOT</version>
<dependencies>
<dependency>
<groupId>org.springframework</groupId>
<artifactId>spring-context</artifactId>
<version>5.2.10.RELEASE</version>
</dependency>
</dependencies>
</project>
- 创建Spring配置文件,配置指定类作为Spring管理的Bean。
$ vim resources/applicationContext.xml<?xml version="1.0" encoding="UTF-8"?>
<beans xmlns="http://www.springframework.org/schema/beans"
xmlns:xsi="http://www.w3.org/2001/XMLSchema-instance"
xsi:schemaLocation="http://www.springframework.org/schema/beans http://www.springframework.org/schema/beans/spring-beans.xsd">
<bean id="baseDao" class="com.jc.dao.impl.BaseDaoImpl" />
<bean id="baseService" class="com.jc.service.impl.BaseServiceImpl" />
</beans>
Bean配置格式:
<bean id="baseDao" class="com.jc.dao.impl.BaseDaoImpl" />
| 属性 | 说明 |
|---|---|
| id | 表示为Bean起名字,同一个上下文中禁止同名。 |
| class | 表示为Bean定义类型 |
注意:需要提前创建IoC容器要管理的对象
- 初始化IoC容器,通过容器获取指定Bean。
$ vim src/App.javapackage com.jc;
import com.jc.dao.BaseDao;
import org.springframework.context.ApplicationContext;
import org.springframework.context.support.ClassPathXmlApplicationContext;
public class App {
public static void main(String[] args) {
ApplicationContext ctx = new ClassPathXmlApplicationContext("applicationContext.xml");
BaseDao bd = (BaseDao)ctx.getBean("baseDao");
System.out.println(bd);
}
}
-
ClassPathXmlApplicationContext()方法用于加载配置文件以得到上下文对象(容器对象) -
getBean()方法用于获取资源
案例:DI入门案例
配置Service与DAO之间的关系
$ vim resource/applicationContext.xml<?xml version="1.0" encoding="UTF-8"?>
<beans xmlns="http://www.springframework.org/schema/beans"
xmlns:xsi="http://www.w3.org/2001/XMLSchema-instance"
xsi:schemaLocation="http://www.springframework.org/schema/beans http://www.springframework.org/schema/beans/spring-beans.xsd">
<bean id="baseDao" class="com.jc.dao.impl.BaseDaoImpl" />
<bean id="baseService" class="com.jc.service.impl.BaseServiceImpl">
<property name="baseDao" ref="baseDao" />
</bean>
</beans>
property属性标签用于配置当前Bean的属性
<property name="baseDao" ref="baseDao" />
| 属性 | 说明 |
|---|---|
| name | 表示配置具体哪个属性,baseDao对应的是com.jc.dao.impl.BaseDaoImpl类中的名为private BaseDaoImpl baseDao;的属性。 |
| ref | 表示参照那个Bean,baseDao对应的是<bean id="baseDao" class="com.jc.dao.impl.BaseDaoImpl" /> |
删除以往使用new的方式创建对象,提供依赖对象userDao对应的setter方法,配置Service与DAO之间的关系。
$ vim jc/com/service/impl/BaseServiceImpl.javapackage com.jc.service.impl;
import com.jc.dao.impl.BaseDaoImpl;
import com.jc.service.BaseService;
public class BaseServiceImpl implements BaseService {
private BaseDaoImpl baseDao;
public void setBaseDao(BaseDaoImpl baseDao) {
this.baseDao = baseDao;
}
}
Bean的配置
- Bean基础配置
- Bean别名配置
- Bean的作用范围
| 类别 | 说明 |
|---|---|
| 标签 | <bean> |
| 所属 | <beans> |
| 功能 | 定义Spring核心容器管理的对象 |
| 格式 | <beans><bean></bean></beans> |
| 属性 | 说明 |
|---|---|
| id | Bean的id,使用容器时可通过Bean的id获取对应的Bean,在一个容器中id值唯一。 |
| name | Bean的别名,支持多个,支持逗号/分号/空格分割。功能和id相同。 |
| class | Bean的类型,配置Bean的全路径类名。 |
获取Bean时无论是采用id还是name属性,无法获取时都会抛出异常NoSuchBeanDefinitionException。
默认IoC创建的Bean是单例的singleton
ApplicationContext ctx = new ClassPathXmlApplicationContext("applicationContext.xml");
BaseDao bd1 = (BaseDao)ctx.getBean("baseDao");
BaseDao bd2 = (BaseDao)ctx.getBean("baseDao");
System.out.println(bd1);//com.jc.dao.impl.BaseDaoImpl@2f686d1f
System.out.println(bd2);//com.jc.dao.impl.BaseDaoImpl@2f686d1f
System.out.println(bd1==bd2);//true
若需要IoC创建的Bean不是单例的则需要在配置Bean时添加并修改scope属性,默认scope不写其值是singleton单例的。
<bean id="baseDao" class="com.jc.dao.impl.BaseDaoImpl" scope="prototype" />
| 类别 | 说明 |
|---|---|
| 属性 | scope |
| 所属 | <bean> |
| 功能 | 定义Bean的作用范围 |
scope的取值范围
| scope | 说明 |
|---|---|
| singleton | 默认值,单例模式 |
| prototype | 非单例,原生值。 |
ApplicationContext ctx = new ClassPathXmlApplicationContext("applicationContext.xml");
BaseDao bd1 = (BaseDao)ctx.getBean("baseDao");
BaseDao bd2 = (BaseDao)ctx.getBean("baseDao");
System.out.println(bd1);//com.jc.dao.impl.BaseDaoImpl@2f686d1f
System.out.println(bd2);//com.jc.dao.impl.BaseDaoImpl@3fee9989
System.out.println(bd1==bd2);//false
为什么Bean默认是单例的呢?
Spring的IoC管理的Bean是会重复使用的,因此默认采用的单例。因此适合交给容器管理的Bean主要包括以下几种:表现层对象(Servlet)、业务层对象(Service)、数据层对象(DAO)、工具对象(Util)。不适合交给容器管理的Bean主要是有状态信息记录的对象,比如:封装实体的域对象。
Bean的创建(实例化)
- 使用构造方法来创建
- 使用静态工厂来创建
- 使用实例工厂来创建
- 使用FactoryBean来创建
Bean本质上是对象,创建Bean也就是创建对象,创建对象一般采用的是【new+构造方法】的方式来完成的。
- Spring创建对象采用的是反射机制
例如:私有构造方法能被调用是由于采用了反射机制来创建对象
public class BaseDaoImpl implements BaseDao {
    private BaseDaoImpl(){
        System.out.println("BASE DAO CONSTRUTOR IS RUNNING...");
    }
}
- Spring创建对象时调用的是无参的构造方法
public class BaseDaoImpl implements BaseDao {
    public BaseDaoImpl(int i){
        System.out.println("BASE DAO CONSTRUTOR IS RUNNING...");
    }
}
出现异常
BeanCreationException: Error creating bean with name 'baseDao' defined in class path resource [applicationContext.xml]...
BeanInstantiationException: Failed to instantiate [com.jc.dao.impl.BaseDaoImpl]: No default constructor found;
Caused by: java.lang.NoSuchMethodException: com.jc.dao.impl.BaseDaoImpl.<init>()
实例化Bean的方式
- 提供可访问的构造方法
使用构造方法创建的对象如何交给容器来管理呢?
<bean id="baseDao" class="com.jc.dao.impl.BaseDaoImpl" />
- 使用静态工厂创建对象如何交给Spring的IoC来管理呢?
此种方式主要是为了兼容早期遗留下的系统的使用方式
<bean id="baseDao" class="com.jc.factory.BaseFactory" factory-method="createBaseDao" />
创建静态工厂类
$ vim factory/BaseFactory.javapackage com.jc.factory;
import com.jc.dao.BaseDao;
import com.jc.dao.impl.BaseDaoImpl;
public class BaseFactory {
public static BaseDao createBaseDao(){
System.out.println("BASE FACTORY SETUP...");
return new BaseDaoImpl();
}
}
- 使用实例工厂实例化Bean
创建实例工厂
$ vim /factory/BaseFactory.javapublic class BaseFactory {
public BaseDao createBaseDao(){
System.out.println("BASE FACTORY SETUP...");
return new BaseDaoImpl();
}
}
配置实例工厂
$ vim resources/applicationContext.xml<bean id="baseFactory" class="com.jc.factory.BaseFactory" />
<bean id="baseDao" factory-bean="baseFactory" factory-method="createBaseDao"></bean>
Spring为简化实例工厂编写的复杂性,创建了一个名为FactoryBean的泛型接口。
- 使用FactoryBean方式实例化Bean
创建实例工厂同时实现FactoryBean接口
$ vim factory/BeaseFactory.javapublic class BaseFactory implements FactoryBean<BaseDao> {
//代替原始实例工厂中创建对象的方法,统一采用相同的名称都为getObject。
@Override
public BaseDao getObject() throws Exception {
return new BaseDaoImpl();
}
@Override
public Class<?> getObjectType() {
return BaseDao.class;
}
@Override
public boolean isSingleton(){
return true;
}
}
默认创建是工厂实例对象是单例的,此时可不写isSingleton()方法,若需禁用则需重写isSingleton()方法。
配置实例工厂
$ vim resources/applicationContext.xml<bean id="baseDao" class="com.jc.factory.BaseFactory" />
Bean的生命周期
生命周期指的是从创建到消亡的完整过程,Bean的生命周期也就是从Bean的创建到销毁的完整过程,而Bean生命周期控制指的是在Bean创建后到销毁前做的一些事情。
初始化容器:创建对象(内存分配)-> 执行构造方法 -> 执行属性注入(set操作)-> 执行Bean初始化方法
Bean生命周期控制可采用两种方式
- 提供生命周期控制方法,配置生命周期控制方法。
- 实现InitializingBean和DisposableBean接口
例如:为Bean配置初始化执行方法和销毁时执行方法
<bean id="baseDao" class="com.jc.dao.impl.BaseDaoImpl" init-method="init" destroy-method="destroy" />
为对应的类添加配置的方法
public class BaseDaoImpl implements BaseDao {
    public void init(){
        System.out.println("BASE DAO IMPL INIT...");
    }
    public void destroy(){
        System.out.println("BASE DAO IMPL DESTROY...");
    }
}
Bean正常销毁需要在容器关闭是才会触发
ApplicationContext ctx = new ClassPathXmlApplicationContext("applicationContext.xml");
然而ApplicationContext类中并没有提供关闭容器的方法,ClassPathXmlApplicationContext类中提供了用于关闭容器的close方法(暴力方式)。
ClassPathXmlApplicationContext ctx = new ClassPathXmlApplicationContext("applicationContext.xml");
BaseDao bd1 = (BaseDao)ctx.getBean("baseDao");
BaseDao bd2 = (BaseDao)ctx.getBean("baseDao");
System.out.println(bd1);//com.jc.dao.impl.BaseDaoImpl@2f686d1f
System.out.println(bd2);//com.jc.dao.impl.BaseDaoImpl@3fee9989
System.out.println(bd1==bd2);//false
ctx.close();
此时查看打印信息
BASE DAO IMPL INIT...
com.jc.dao.impl.BaseDaoImpl@7085bdee
com.jc.dao.impl.BaseDaoImpl@7085bdee
true
BASE DAO IMPL DESTROY...直接使用close()方法关闭容器相对比较暴力,优雅地做法的采用关闭钩子的方式。
设置registerShutdownHook容器关闭钩子,容器启动后添加一个标记,当虚拟机退出时根据标记判断是否关闭容器。
ClassPathXmlApplicationContext ctx = new ClassPathXmlApplicationContext("applicationContext.xml");
ctx.registerShutdownHook();
BaseDao bd1 = (BaseDao)ctx.getBean("baseDao");
BaseDao bd2 = (BaseDao)ctx.getBean("baseDao");
System.out.println(bd1);//com.jc.dao.impl.BaseDaoImpl@2f686d1f
System.out.println(bd2);//com.jc.dao.impl.BaseDaoImpl@3fee9989
System.out.println(bd1==bd2);//false
Spring为简化并统一Bean生命周期的控制,若不生工指定init-method和destroy-method数量。可直接在对应Bean的类中实现Spring接口:InitializingBean, DisposableBean来完成Bean生命周期的控制。
-
InitializingBean接口提供了afterPropertiesSet方法 -
DisposableBean接口提供了destroy方法
$ vim service/impl/BaseServiceImpl.javapublic class BaseServiceImpl implements BaseService, InitializingBean, DisposableBean {
private BaseDaoImpl baseDao;
public void setBaseDao(BaseDaoImpl baseDao) {
this.baseDao = baseDao;
}
@Override
public void afterPropertiesSet() throws Exception {
System.out.println("BASE SERVICE IMPL START PROPERTIES SET...");
}
@Override
public void destroy() throws Exception {
System.out.println("BASE SERVICE IMPL DESTROY...");
}
}
运行测试
ClassPathXmlApplicationContext ctx = new ClassPathXmlApplicationContext("applicationContext.xml");
ctx.registerShutdownHook();
BaseService bs = (BaseService) ctx.getBean("baseService");
System.out.println(bs);
BASE DAO IMPL INIT...
BASE SERVICE IMPL START PROPERTIES SET...
com.jc.service.impl.BaseServiceImpl@6fd02e5
BASE SERVICE IMPL DESTROY...
BASE DAO IMPL DESTROY...
依赖注入(DI)
如何向一个类中传递数据呢?只有一种方式就是通过方法参数来传递数据。使用方法参数时根据方法可分为两种:一种是普通方法即采用setter方法来传递,另一种是采用构造方法来传递数据。
依赖注入描述了在容器中建立Bean与Bean之间依赖关系的过程,如果Bean运行需要的是数字或字符串,该怎么办呢?因此依赖注入时根据传递数据类型的不同可划分为两种:一种是引用类型、一种是简单类型(包含基础数据类型和String)
综上所述,依赖注入最终可分为4种方式
| 依赖注入 | 普通方法(setter方法) | 构造方法(构造器) |
|---|---|---|
| 简单数据类型 | 使用setter方法传递简单类型 | 使用构造方法传递简单类型 |
| 引用数据类型 | 使用setter方法传递引用类型 | 使用构造方法传递引用类型 |
依赖注入方法的选择
- 强制依赖:采用构造器注入(严谨)
- 可选依赖:采用Setter注入灵活性强,使用Setter注入有概率发生无法注入将导致null对象出现。
Spring框架推荐使用构造器注入,第三方框架内部大多采用构造器注入的方式实现数据初始化。
若有必要两者可同时使用,使用构造器注入强制依赖,使用Setter注入可选依赖。
自己开发模块推荐使用Setter注入,别人开发的模块若受控对象没有提供Setter方法就只能使用构造器注入。
setter注入引用类型
- 在Bean中定义引用类型属性并提供可访问的Setter方法
public class BaseServiceImpl implements BaseService {
    private BaseDaoImpl baseDao; // ref="baseDao"
    public void setBaseDao(BaseDaoImpl baseDao) {
        this.baseDao = baseDao;
    }
}
- 使用时在Bean配置中是用
<property>标签的ref属性来注入引用类型对象
<bean id="baseDao" class="com.jc.dao.impl.BaseDaoImpl" />
<bean id="baseService" class="com.jc.service.impl.BaseServiceImpl">
        <property name="baseDao" ref="baseDao" />
</bean>
setter注入简单类型
- 在Bean中定义简单类型属性并提供可访问的Setter方法
public class BaseDaoImpl implements BaseDao {
    private Long appId;
    private String appKey;
    public void setAppId(Long appId){
        this.appId = appId;
    }
    public void setAppKey(String appKey){
        this.appKey = appKey;
    }
}
配置中是用<property>标签的value属性来注入简单类型数据
<bean id="baseDao" class="com.jc.dao.impl.BaseDaoImpl">
        <property name="appId" value="741852963" />
        <property name="appKey" value="b64f1a77b1b317d347f5cb79332c86d2" />
</bean>
构造器注入
配置构造器注入标签<constructor-arg>,其中name属性对应构造器形参名称,value对应参数值。
<bean id="baseDao" class="com.jc.dao.impl.BaseDaoImpl" init-method="init" destroy-method="destroy">
        <constructor-arg name="appId" value="741852963" />
        <constructor-arg name="appKey" value="b64f1a77b1b317d347f5cb79332c86d2" />
</bean>
<bean id="baseService" class="com.jc.service.impl.BaseServiceImpl">
        <constructor-arg name="baseDao" ref="baseDao"/>
</bean>
构造器注入简单类型
public class BaseDaoImpl implements BaseDao {
    private Long appId;
    private String appKey;
    public BaseDaoImpl(Long appId, String appKey){
        this.appId = appId;
        this.appKey = appKey;
    }
}
构造器注入引用类型
public class BaseServiceImpl implements BaseService {
    private BaseDao baseDao;
    public BaseServiceImpl(BaseDao baseDao){
        this.baseDao = baseDao;
    }
}
问题:由于<constructor-arg>标签中name属性必须与构造器中形参名称保持一致,相当于紧耦合,不便于修改调整。为了解决形参名称耦合问题,可去掉name属性替换为type属性,即根据指定的数据类型来识别出形参。
<bean id="baseDao" class="com.jc.dao.impl.BaseDaoImpl" init-method="init" destroy-method="destroy">
        <constructor-arg type="java.lang.Long" value="741852963" />
        <constructor-arg type="java.lang.String" value="b64f1a77b1b317d347f5cb79332c86d2" />
</bean>
<bean id="baseService" class="com.jc.service.impl.BaseServiceImpl">
        <constructor-arg type="com.jc.dao.BaseDao" ref="baseDao"/>
</bean>
使用type属性虽然能解决name属性带来的耦合问题,但如果出现相同类型的形参,该怎么办呢?为了解决这种问题,可使用index属性即指定形参的索引位置,这样上面问题都可以得到解决。
<bean id="baseDao" class="com.jc.dao.impl.BaseDaoImpl" init-method="init" destroy-method="destroy">
        <constructor-arg index="0" value="741852963" />
        <constructor-arg index="1" value="b64f1a77b1b317d347f5cb79332c86d2" />
</bean>
<bean id="baseService" class="com.jc.service.impl.BaseServiceImpl">
        <constructor-arg index="0" ref="baseDao"/>
</bean>
依赖自动装配(autowire)
IoC容器根据Bean所依赖的资源,在容器内自动查找并注入到Bean中的过程,称为自动装配。
| 自动装配方式 | 说明 |
|---|---|
| 按类型 | autowire="byType" |
| 按名称 | autowire="byName" |
| 按构造方法 | autowire="contructor" |
| 禁用 | autowire="no" |
自动装配只需在Bean标签上添加autowire属性来设置自动装配的类型
<bean id="baseService" class="com.jc.service.impl.BaseServiceImpl" autowire="byType" />
<bean id="baseService" class="com.jc.service.impl.BaseServiceImpl" autowire="byName />
依赖自动装配的特征
- 自动装配只能用于引用类型依赖注入,不能对简单类型进行操作。
- 使用
byType按类型装配时,必须保障容器中相同类型的Bean唯一,推荐使用。 - 使用
byName按名称装配时,必须保证容器中具有指定名称的Bean,这种方式变量名和配置项会产生耦合,不推荐使用。 - 自动装配优先级低于Setter注入和构造器注入,同时出现时自动装配配置会失效。
集合注入
public class BaseServiceImpl implements BaseService {
    private int[] array;
    public void setArray(int[] array){
        this.array = array;
    }

    private List<String> list;
    public void setList(List<String> list){
        this.list = list;
    }

    private Set<String> set;
    public void setSet(Set<String> set){
        this.set = set;
    }

    private Map<String, String> map;
    public void setMap(Map<String, String> map){
        this.map = map;
    }

    private Properties propertis;
    public void setProperties(Properties propertis){
        this.propertis = propertis;
    }
}
配置
<bean id="baseService" class="com.jc.service.impl.BaseServiceImpl" autowire="byName">
        <property name="array">
                <array>
                        <value>1</value>
                        <value>2</value>
                        <value>3</value>
                </array>
        </property>
        <property name="list">
                <list>
                        <value>v1</value>
                        <value>v2</value>
                        <value>v3</value>
                </list>
        </property>
        <property name="set">
                <set>
                        <value>s1</value>
                        <value>s2</value>
                        <value>s3</value>
                </set>
        </property>
        <property name="map">
                <map>
                        <entry key="k1" value="v1" />
                        <entry key="k2" value="v2" />
                        <entry key="k3" value="v3" />
                </map>
        </property>
        <property name="properties">
                <props>
                        <prop key="k1">v1</prop>
                        <prop key="k2">v2</prop>
                        <prop key="k3">v3</prop>
                </props>
        </property>
</bean>
管理数据源对象(连接池对象)
示例:管理阿里的Druid数据源对象
添加依赖并加载
$ vim pom.xml<dependency>
<groupId>com.alibaba</groupId>
<artifactId>druid</artifactId>
<version>1.2.8</version>
</dependency>
在Bean配置文件中管理DruidDataSource对象
<bean id="dataSource" class="com.alibaba.druid.pool.DruidDataSource">
        <property name="driverClassName" value="com.mysql.cj.jdbc.Driver"></property>
        <property name="url" value="jdbc:mysql://127.0.0.1:3306/fw"></property>
        <property name="username" value="root"></property>
        <property name="password" value="root"></property>
</bean>
从容器中读取
ClassPathXmlApplicationContext ctx = new ClassPathXmlApplicationContext("applicationContext.xml");
ctx.registerShutdownHook();
DataSource ds = (DataSource) ctx.getBean("dataSource");
System.out.println(ds);
示例:管理C3PO数据源对象
访问 https://mvnrepository.com/ 查找C3P0 库的坐标参数,添加到pom.xml中。
<dependency>
    <groupId>mysql</groupId>
    <artifactId>mysql-connector-java</artifactId>
    <version>8.0.30</version>
</dependency>
<dependency>
    <groupId>c3p0</groupId>
    <artifactId>c3p0</artifactId>
    <version>0.9.1.2</version>
</dependency>
查找到c3p0的数据源对象名称后配置Bean
<bean id="comboPooledDataSource" class="com.mchange.v2.c3p0.ComboPooledDataSource">
        <property name="driverClass" value="com.mysql.cj.jdbc.Driver"></property>
        <property name="jdbcUrl" value="jdbc:mysql://127.0.0.1:3306/fw"></property>
        <property name="user" value="root"></property>
        <property name="password" value="root"></property>
</bean>
从容器中获取Bean
ClassPathXmlApplicationContext ctx = new ClassPathXmlApplicationContext("applicationContext.xml");
ctx.registerShutdownHook();
DataSource ds = (DataSource) ctx.getBean("comboPooledDataSource");
System.out.println(ds);
加载Properties文件
Spring加载外部Properties文件之前,要开启一个全新的命名空间context。
<?xml version="1.0" encoding="UTF-8"?>
<beans xmlns="http://www.springframework.org/schema/beans"
       xmlns:xsi="http://www.w3.org/2001/XMLSchema-instance"
       xmlns:context="http://www.springframework.org/schema/context"
       xsi:schemaLocation="
               http://www.springframework.org/schema/beans
               http://www.springframework.org/schema/beans/spring-beans.xsd
               http://www.springframework.org/schema/context
               http://www.springframework.org/schema/context/spring-context.xsd
        ">
</beans>
添加context命名空间
xmlns:context="http://www.springframework.org/schema/context"
xsi:schemaLocation="
       http://www.springframework.org/schema/context
       http://www.springframework.org/schema/context/spring-context.xsd
"
创建Properties属性配置文件
$ vim resources/jdbc.propertiesjdbc.driver=com.mysql.cj.jdbc.Driver
jdbc.url=jdbc:mysql://127.0.0.1:3306/fw
jdbc.user=root
jdbc.password=root使用context命名空间加载Properties配置文件
<context:property-placeholder location="jdbc.properties" />
为避免加载的配置文件与系统配置同名造成自定义配置加载失败的问题,添加system-properties-mode="NEVER"属性来解决。
<context:property-placeholder location="jdbc.properties" system-properties-mode="NEVER" />
若自定义属性配置文件存在多个,可在location属性中使用逗号分割后加载多个。
<context:property-placeholder location="jdbc.properties,app.properties" system-properties-mode="NEVER" />
可使用*.properties加载所有的后缀为.properties的配置文件
<context:property-placeholder location="*.properties" system-properties-mode="NEVER" />
标准写法
<context:property-placeholder location="classpath:*.properties" system-properties-mode="NEVER" />
使用classpath:*.properties写法只能从当前工程读取到自定义配置文件,若当前项目中添加的第三方jar包包含了自定义配置文件,则需要采用classpath*:*.properties写法。classpath*:*.properties表示不仅可以从当前项目中读取,也可以从所依赖的第三方jar中读取自定义的属性配置文件。
<context:property-placeholder location="classpath*:*.properties" system-properties-mode="NEVER" />
使用属性占位符${}读取properties文件中的属性
<bean id="dataSource" class="com.alibaba.druid.pool.DruidDataSource">
        <property name="driverClassName" value="${jdbc.driver}"></property>
        <property name="url" value="${jdbc.url}"></property>
        <property name="username" value="${jdbc.user}"></property>
        <property name="password" value="${jdbc.password}"></property>
</bean>
容器
创建容器
加载类路径下的配置 ,ClassPathXmlApplicationContext支持同时加载多个配置。
ClassPathXmlApplicationContext ctx = new ClassPathXmlApplicationContext("applicationContext.xml");
也可以采用从文件系统下加载配置文件,这种方式需要采用配置文件的完整路径。
ApplicationContext ctx = new FileSystemXmlApplicationContext("E:\\java\\sl\\src\\main\\resources\\applicationContext.xml");
早期的创建容器也可采用BeanFactory来实现,BeanFactory创建完毕后所有Bean都是延迟加载的。
Resource r = new ClassPathResource("applicationContext.xml");
BeanFactory ctx = new XmlBeanFactory(r);
获取Bean
- 使用Bean的名称获取
DataSource ds = (DataSource) ctx.getBean("comboPooledDataSource");
- 使用Bean名称获取并指定类型
DataSource ds = ctx.getBean("comboPooledDataSource", DataSource.class);
- 使用Bean类型获取
DataSource ds = ctx.getBean(DataSource.class);
总结
- BeanFactory是IoC容器的顶层接口,初始化BeanFactory对象时加载的Bean采用的是延迟加载。
- ApplicationContext接口是Spring容器的核心接口,初始化时Bean采用的立即加载。
- ApplicationContext接口提供了基础的Bean操作方法,通过其他接口扩展其功能。
- ApplicationContext接口常用初始化类包括:ClassPathXmlApplicationContext、FileSystemXmlApplicationContext
注解开发
注解开发定义Bean
- 使用
@Component注解来定义Bean
@Component("baseDao")
public class BaseDaoImpl implements BaseDao {
}
- 核心配置文件中通过组件扫描来加载Bean
<context:component-scan base-package="com.jc.dao.impl" />
Spring为@Component注解提供了三个衍生注解
| @Component衍生 | 说明 |
|---|---|
| @Controller | 用于表现层Bean定义 |
| @Service | 用于业务层Bean定义 |
| @Repository | 用于数据层Bean定义 |
纯注解开发
Spring3.0升级了纯注解开发模式,使用Java类替代配置文件开启了Spring快速开发赛道。
使用Java类代替Spring核心配置文件
$ vim config/SpringConfig.java@Configuration
@ComponentScan("com.jc")
public class SpringConfig {
}
-
Configuration注解用于设定当前类为配置类 -
ComponentScan注解用于设定扫描路径,它只能添加一次,支持多个数据(数组格式)。
使用纯注解开发后,读取Spring核心配置文件初始化容器对象,需切换为读取Java配置类初始化容器对象。
ApplicationContext ctx = new AnnotationConfigApplicationContext(SpringConfig.class);
BaseDao bd = ctx.getBean(BaseDao.class);
System.out.println(bd);
Bean管理
- Bean作用范围:使用
@Scope定义Bean的作用范围 - Bean生命周期:使用
@PostConstruct和@PreDestroy定义Bean的生命周期
例如:
@Repository("baseDao")
@Scope("singleton")
public class BaseDaoImpl implements BaseDao {
    @PostConstruct
    public void init(){
        System.out.println("BASE DAO IMPL INIT...");
    }
    @PreDestroy
    public void destroy(){
        System.out.println("BASE DAO IMPL DESTROY...");
    }
}
测试运行结果
AnnotationConfigApplicationContext ctx = new AnnotationConfigApplicationContext(SpringConfig.class);
//ctx.registerShutdownHook();
BaseDao bd1 = ctx.getBean(BaseDao.class);
BaseDao bd2 = ctx.getBean(BaseDao.class);
System.out.println(bd1);
System.out.println(bd2);
System.out.println(bd1 == bd2);
ctx.close();
依赖注入
自动装配
- 使用
@Autowired注解开启自动装配模式,默认采用的按类型注入(byType)。 -
@Autowired自动装配是基于反射设计创建对象,并暴力反射对应属性为私有属性来初始化数据,因此无需提供Setter方法。 -
@Autowired自动装配建议默认使用无参构造方法创建对象,若没有提供对应的构造方法则需提供唯一的构造方法。
@Service("baseService")
public class BaseServiceImpl implements BaseService {
    @Autowired
    private BaseDao baseDao;
}
- 使用
@Qualifier注解开启指定名称装配Bean,@Qualifier注解无法单独使用必须配合@Autowired注解使用。
@Service("baseService")
public class BaseServiceImpl implements BaseService {
    @Autowired
    @Qualifier("baseDao")
    private BaseDao baseDao;
}
@Repository("baseDao")
@Scope("singleton")
public class BaseDaoImpl implements BaseDao {
    @PostConstruct
    public void init(){
        System.out.println("BASE DAO IMPL INIT...");
    }
    @PreDestroy
    public void destroy(){
        System.out.println("BASE DAO IMPL DESTROY...");
    }
}
- 可使用
@Value注解实现简单类型注入
public class BaseDaoImpl implements BaseDao {
    @Value("test")
    private String name;
}
使用使用外部配置文件作为值设置到@Value注解中呢?
- 加载Properties文件
使用@PropertySource注解加载外部属性文件,@PropertySource路径仅支持单一文件配置,多文件需使用数组格式配置,禁止使用通配符*。
@Configuration
@ComponentScan("com.jc")
@PropertySource("jdbc.properties")
public class SpringConfig {

}
外部属性文件加载成功后,即可在@Value中直接使用指定属性值。
@Repository("baseDao")
@Scope("singleton")
public class BaseDaoImpl implements BaseDao {
    @Value("${jdbc.driver}")
    private String name;
}
管理第三方Bean
使用@Bean配置第三方Bean
$ vim config/SpringConfig.java@Configuration
public class SpringConfig {
@Bean
public DataSource dataSource(){
DruidDataSource ds = new DruidDataSource();
//ds.setDriverClassName();
//ds.setUrl();
//ds.setUsername();
//ds.setPassword();
return ds;
}
}
退浆将第三方配置类独立封装后载入到主配置文件中
$ vim config/JdbcConfig.javapublic class JdbcConfig {
@Bean
public DataSource dataSource(){
DruidDataSource ds = new DruidDataSource();
//ds.setDriverClassName();
//ds.setUrl();
//ds.setUsername();
//ds.setPassword();
return ds;
}
}
在主配置文件内通过@import标注手工导入到配置类的核心配置中,@import注解只能添加一次,若存在多个待导入项目则需使用数组格式。
$ vim config/SpringConfig.java@Configuration
@Import({JdbcConfig.class})
public class SpringConfig {
}
将独立的配置类加入到核心配置,也可以使用@ComponentScan({"com.jc.config"})注解扫描配置类所在的包,来加载对应的配置类信息。此种方法不推荐。
独立的配置类中对简单类型,可直接采用@Value注解获取注入。
$ vim config/JdbcConfig.java@PropertySource("jdbc.properties")
public class JdbcConfig {
@Value("${jdbc.driver}")
private String driverClassName;
@Value("${jdbc.url}")
private String url;
@Value("${jdbc.username}")
private String username;
@Value("${jdbc.password}")
private String password;
@Bean
public DataSource dataSource(){
DruidDataSource ds = new DruidDataSource();
ds.setDriverClassName(driverClassName);
ds.setUrl(url);
ds.setUsername(username);
ds.setPassword(password);
return ds;
}
}
独立配置类中若存在引用类型,主要为Bean定义的方法设置形参即可,容器会根据类型自动装载对象。
Spring整合MyBatis
Spring整合MyBatis核心在于两个Bean,分别是SqlSessionFactoryBean和MapperScannerConfigurer。
MyBatis程序核心对象分析
| 步骤 | 说明 |
|---|---|
| 1 | 加载MyBatis配置文件 |
| 2 | 创建SqlSessionFactoryBuilder对象 |
| 3 | 创建SqlSessionFactory对象 |
| 4 | 获取SqlSession对象 |
| 5 | SqlSession对象执行查询获取结果集 |
| 6 | 释放资源 |
// 加载MyBatis配置文件
InputStream is = null;
try {
    is = Resources.getResourceAsStream("mybatis-config.xml");
} catch (IOException e) {
    e.printStackTrace();
}
//创建SqlSessionFactoryBuilder对象
SqlSessionFactoryBuilder ssfb = new SqlSessionFactoryBuilder();
//创建SqlSessionFactory对象
SqlSessionFactory ssf = ssfb.build(is);
//获取SqlSession对象
SqlSession ss = ssf.openSession();
//SqlSession对象执行查询获取结果集
SysUserMapper m = ss.getMapper(SysUserMapper.class);
List<SysUser> l = m.list();
System.out.println(l);
//释放资源
ss.close();
Spring整合MyBatis时是围绕着核心对象SqlSessionFactory展开的
$ vim resources/jdbc.propertiesjdbc.driver=com.mysql.cj.jdbc.Driver
jdbc.url=jdbc:mysql://127.0.0.1:3306/fw
jdbc.username=root
jdbc.password=root$ vim resources/mybatis-config.xml<?xml version="1.0" encoding="UTF-8" ?>
<!DOCTYPE configuration PUBLIC "-//mybatis.org//DTD Config 3.0//EN" "https://mybatis.org/dtd/mybatis-3-config.dtd">
<configuration>
<!--初始化属性数据-->
<properties resource="jdbc.properties" />
<!--初始化类型别名-->
<typeAliases>
<package name="com.jc.domain" />
</typeAliases>
<!--初始化数据源配置-->
<environments default="development">
<environment id="development">
<transactionManager type="JDBC"/>
<dataSource type="POOLED">
<property name="driver" value="${jdbc.driver}" />
<property name="url" value="${jdbc.url}" />
<property name="username" value="${jdbc.username}" />
<property name="password" value="${jdbc.password}" />
</dataSource>
</environment>
</environments>
<!--初始化映射配置-->
<mappers>
<package name="com.jc.mapper" />
</mappers>
</configuration>
Spring整合MyBatis需添加两个依赖分别是spring-jdbc和mybatis-spring
<dependency>
    <groupId>org.springframework</groupId>
    <artifactId>spring-jdbc</artifactId>
    <version>5.3.23</version>
</dependency>
<dependency>
    <groupId>org.mybatis</groupId>
    <artifactId>mybatis-spring</artifactId>
    <version>2.0.7</version>
</dependency>
使用注解的方式开发,替换掉原来的mybatis-config.xml文件。
创建Spring核心配置,并导入JDBC与MyBatis配置。
$ vim config/SpringConfig.java@Configuration
@ComponentScan("com.jc")
@PropertySource("classpath:jdbc.properties")
@Import({JdbcConfig.class, MybatisConfig.class})
public class SpringConfig {
}
创建JDBC配置文件,并添加Druid数据源配置项目。
$ vim config/JdbcConfig.javapublic class JdbcConfig {
@Value("${jdbc.driver}")
private String driverClassName;
@Value("${jdbc.url}")
private String url;
@Value("${jdbc.username}")
private String username;
@Value("${jdbc.password}")
private String password;
@Bean
public DataSource dataSource(){
DruidDataSource ds = new DruidDataSource();
ds.setDriverClassName(driverClassName);
ds.setUrl(url);
ds.setUsername(username);
ds.setPassword(password);
return ds;
}
}
创建MyBatis配置文件,使用sqlSessionFactory和mapperScannerConfigurer替换mybatis-config.xml中的内容。
$ vim config/MybatisConfig.javapublic class MybatisConfig{
@Bean
public SqlSessionFactoryBean sqlSessionFactory(DataSource ds){
SqlSessionFactoryBean ssfb = new SqlSessionFactoryBean();
ssfb.setTypeAliasesPackage("com.jc.domain");
ssfb.setDataSource(ds);
return ssfb;
}
@Bean
public MapperScannerConfigurer mapperScannerConfigurer() {
MapperScannerConfigurer msc = new MapperScannerConfigurer();
msc.setBasePackage("com.jc.mapper");
return msc;
}
}
Spring整合JUnit
- 关键点:配置
@RunWith(SpringJUnit4ClassRunner.class)和@ContextConfiguration(classes = SpringConfig.class)
配置junit和spring-test两个依赖
<dependency>
    <groupId>junit</groupId>
    <artifactId>junit</artifactId>
    <version>4.12</version>
    <scope>test</scope>
</dependency>
<dependency>
    <groupId>org.springframework</groupId>
    <artifactId>spring-test</artifactId>
    <version>5.3.23</version>
</dependency>
在测试包下创建测试文件
$ vim AccountServiceTest.java@RunWith(SpringJUnit4ClassRunner.class)
@ContextConfiguration(classes = SpringConfig.class)
public class AccountServiceTest {
@Autowired
private AccountService accountService;
@Test
public void testGetById(){
System.out.println(accountService.getById(11));
}
}


 264
264

 被折叠的 条评论
为什么被折叠?


