 一键转换HTML至MD


 介绍了一款工具,可自动抓取HTML内容并转换为Markdown格式,支持多种技术平台的同步发布,包括代码块显示、图片链接转换等功能。
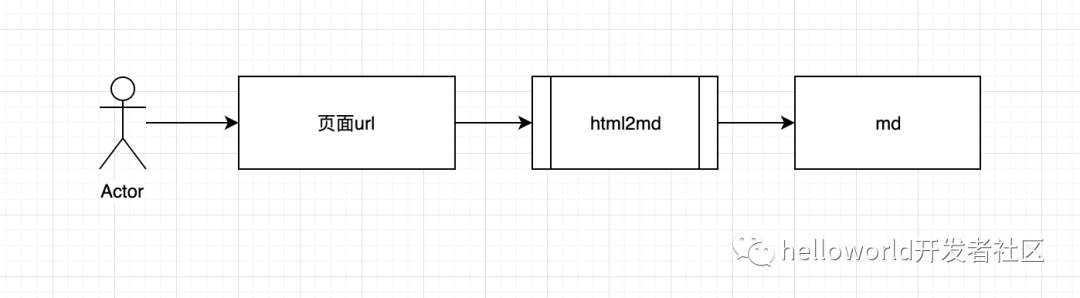
最近几年涌现出了很多技术博客和技术社区, 也有很多技术同仁开始打造自己的博客, 我们可以把自己的博客同步到不同的技术平台, 但是随着技术平台的增多, 我们文章同步所花费的时间会越来越多, 那么有没有一个工具能快速的将博客发布到不同的平台呢? 或者有没有一个工具, 可以把html直接转化为技术平台能够识别的“语言”直接发布呢?
我们都知道程序员最爱的写博客的“语言”就是makedown, 并且目前大部分的技术社区都支持makedown语法, 所以说只要有makedown, 我们就能快速的同步到不同的技术平台.
也许有人会说, 我们写博客直接用makedown语法写不就好了? 的确这样做可以满足需求, 但缺点就是我们本地必须要保存一份makedown文件, 如果博客内容涉及到图片, 我们还需要维护一个img目录, 这样每次在不同技术社区发布文章还是会很麻烦, 所以综上我们开发了一款自动爬取html内容并一键转换为makedown的工具, 这样我们就可以“肆无忌惮的”发布博客了.
你将收获
turndown的使用技巧vue + nuxt项目开发方式nodejs爬虫相关应用
github地址笔者将在文末附上, 感兴趣的朋友可以一起共建, 学习和探索.
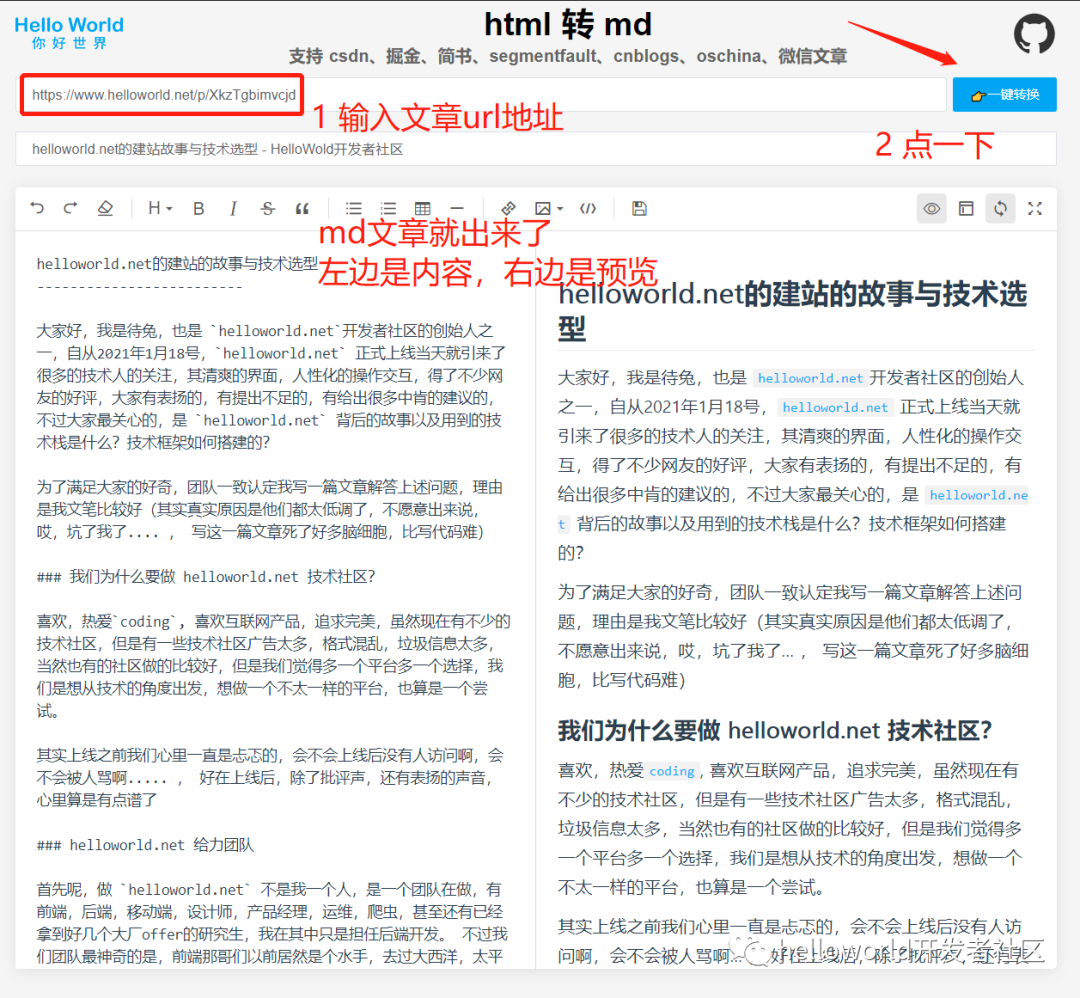
效果演示
客户端
思路
先理一下思路:
输入一个链接地址
获取服务端返回的
html串将
html串 转换为md串同步显示预览到编辑器中
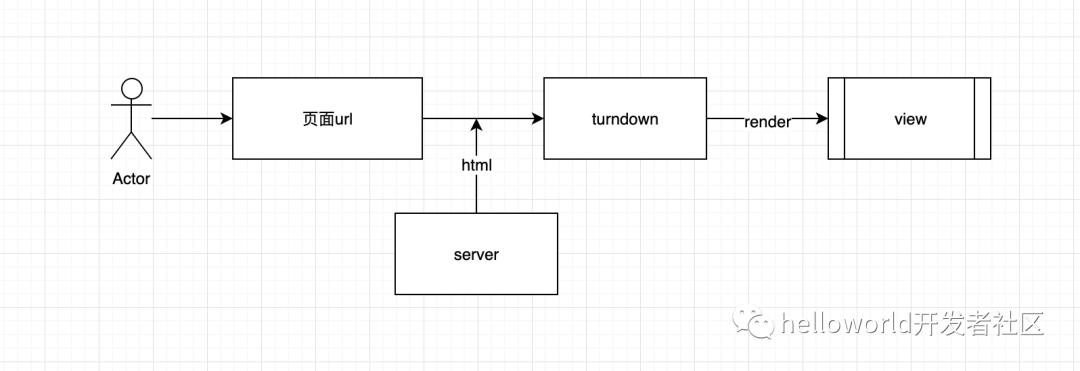
为什么选择 turndown
客户端最重要的一步是 html 转 md,这里我们使用的 turndown。
为什么使用 turndown 呢,原因如下:
Talk is cheap, Show me the code. 做技术文章很关键的一个功能是
代码块,没有代码的文章是没有灵魂的。比较过几个html2md插件,turndown的代码块显示效果和兼容性最好。turndown也支持自定义规则,灵活可变,可自定义各种语法标签和匹配规则。turndown还支持第三方插件turndown-plugin-gfm,支持集成GFM(MD的超集GitHub Flavored Markdown)、table、strikethrough等语法。
具体实现
  // 引入第三方插件
  import { gfm, tables, strikethrough } from 'turndown-plugin-gfm'

  const turndownService = new TurndownService({ codeBlockStyle: 'fenced' })
  // Use the gfm plugin
  turndownService.use(gfm)

  // Use the table and strikethrough plugins only
  turndownService.use([tables, strikethrough])

  /**
   * 自定义配置(rule名不能重复)
   * 这里我们指定 `pre` 标签为代码块,并在代码块的前后加个换行,防止显示异常
   */
  turndownService.addRule('pre2Code', {
    filter: ['pre'],
    replacement (content) {
      return '```\n' + content + '\n```'
    }
  })
额外功能
支持自动获取链接文章标题,无需手动去原文复制。
服务端
这里我们使用的服务端是 node.js,用前端的框架写服务端,体验杠杠的。
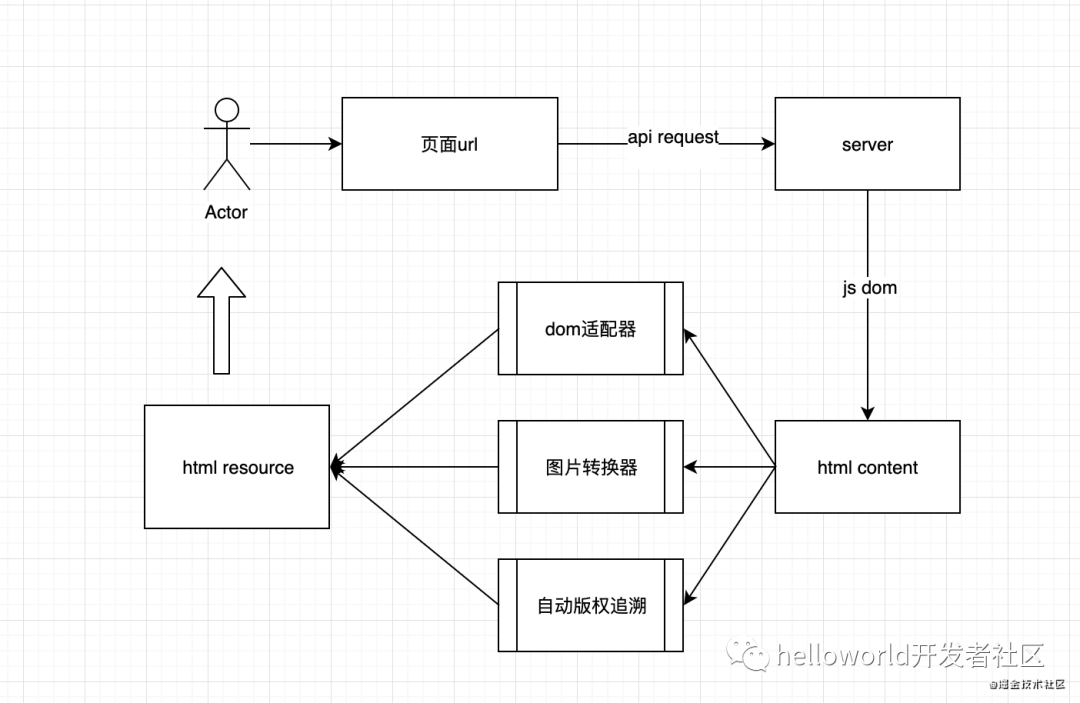
思路
先理一下思路:
获取前端传递的链接地址
通过请求获取
html串根据不同平台域名获取不同的
dom转换图片和链接的相对路径为绝对路径
html底部添加转载来源声明获取文章的标题
title返回
title和html给前端
具体实现
获取前端传递的链接地址
这里直接使用
node的自带语法,我们采用的是get形式传递,用query即可const qUrl = req.query.url通过请求获取
html串这里我们是用
request进行请求request({ url: qUrl }, (error, response, body) => { if (error) { res.status(404).send('Url Error') return } // 这里的 body 就是文章的 `html` console.log(body) })根据不同平台域名获取不同的
dom由于技术平台众多,每个平台的文章内容标签、样式名或 id 会有差异,需要针对兼容。
首先先用
js-dom去模拟操作dom,封装一个方法/** * 获取准确的文章内容 * @param {string} html html串 * @param {string} selector css选择器 * @return {string} htmlContent */ const getDom = (html, selector) => { const dom = new JSDOM(html) const htmlContent = dom.window.document.querySelector(selector) return htmlContent }兼容不同的平台,应用不同的 css 选择器
 // 比如掘金,内容块的样式名为 .markdown-body,内容里会有 style 标签样式和一些多余的复制代码文字,通过原生 dom 操作删掉
 if (qUrl.includes('juejin.cn')) {
   const htmlContent = getBySelector('.markdown-body')
   const extraDom = htmlContent.querySelector('style')
   const extraDomArr = htmlContent.querySelectorAll('.copy-code-btn')
   extraDom && extraDom.remove()
   extraDomArr.length > 0 && extraDomArr.forEach((v) => { v.remove() })
   return htmlContent
 }

 // 再比如 oschina,内容块的样式名为 .article-detail,内容里会有多余的 .ad-wrap 内容,照样删掉
 if (qUrl.includes('oschina.net')) {
   const htmlContent = getBySelector('.article-detail')
   const extraDom = htmlContent.querySelector('.ad-wrap')
   extraDom && extraDom.remove()
   return htmlContent
 }

 // 最后匹配通用标签。优先适配 article 标签,没有再用 body 标签
 const htmlArticle = getBySelector('article')
 if (htmlArticle) { return htmlArticle }

 const htmlBody = getBySelector('body')
 if (htmlBody) { return htmlBody }
转换图片和链接的相对路径为绝对路径,方便以后查找源路径
 // 通过原生api - URL 获取链接的源域名
 const qOrigin = new URL(qUrl).origin || ''

 // 获取图片、链接的绝对路径。通过 URL 将 `路径+源域名` 转换为绝对路径,不熟悉的同学请自行了解
 const getAbsoluteUrl = p => new URL(p, qOrigin).href

 // 转换图片、链接的相对路径,不同平台的图片懒加载属性名不一样,需要做特定兼容
 const changeRelativeUrl = (dom) => {
   if (!dom) { return '<div>内容出错~</div>' }
   const copyDom = dom
   // 获取所有图片
   const imgs = copyDom.querySelectorAll('img')
   // 获取所有链接
   const links = copyDom.querySelectorAll('a')
   // 替换完所有路径返回新 dom
   imgs.length > 0 && imgs.forEach((v) => {
     /**
     * 处理懒加载路径
     * 简书:data-original-src
     * 掘金:src
     * segmentfault:src
     */
     const src = v.src || v.getAttribute('src') || v.getAttribute('data-original-src') || ''
     v.src = getAbsoluteUrl(src)
   })
   links.length > 0 && links.forEach((v) => {
     const href = v.href || qUrl
     v.href = getAbsoluteUrl(href)
   })
   return copyDom
 }

 // 在获取不同平台的文章内容 getBody 方法里,应用 changeRelativeUrl 方法
 const getBody = (content) => {
   ...
   ...
   return changeRelativeUrl(htmlContent)
 }
底部添加转载来源声明,以防侵权
这个就不多做解释了,很简单。
 // 底部添加转载来源声明
 const addOriginText = (dom) => {
   const html = dom.innerHTML
   const resHtml = html + `<br/><div>本文转自 <a href="${qUrl}" target="_blank">${qUrl}</a>,如有侵权,请联系删除。</div>`
   return resHtml
 }

 // 在获取不同平台的文章内容 getBody 方法里,应用 addOriginText 方法
 const getBody = (content) => {
   ...
   ...
   return addOriginText(changeRelativeUrl(htmlContent))
 }
获取文章的标题
title// 获取文章的 title const getTitle = (content) => { const title = getDom(content, 'title') if (title) { return title.textContent } return '获取标题失败~' }返回
title和html给前端request({ url: qUrl, headers: {} }, (error, response, body) => { if (error) { res.status(404).send('Url Error') return } // 设置 json 响应类型 res.type('text/json') const json = { code: 1, title: getTitle(body), html: getBody(body) } res.status(200).send(json) })
实际应用
这个开源工具的应用场景非常广泛, 我们几乎可以将任何网页链接转换为md内容, 同步到自己的博客或者内容管理平台, 但是大家需要有版权意识, 做一个遵纪守法的好“网民”.
支持环境
现代浏览器及 IE11。
 IE / Edge |  Firefox |  Chrome |  Safari |  Opera |
|---|---|---|---|---|
| IE11, Edge | last 2 versions | last 2 versions | last 2 versions | last 2 versions |
参与贡献
我们非常欢迎你的贡献,你可以通过以下方式和我们一起共建 ????
通过 Issue 报告 bug。
提交 Pull Request 一起改进。
github地址: 传送门
点个在看你最好看


 1万+
1万+

 被折叠的 条评论
为什么被折叠?
被折叠的 条评论
为什么被折叠?
 到【灌水乐园】发言


