


最近一直在研发AI+数字化办公产品,对文档编辑器的底层实现做了大量的研究,所以最近抽空花时间写了一款轻量级的电子病历编辑器:
技术栈我采用目前目前比较就行的Vite + Vue3实现,帮助大家用一杯咖啡的钱(19.9元)解锁新技能。文末我会提供完整的教程和源码,如果大家有需求可以参考一下。
项目介绍
电子病历编辑器是一个基于Vue 3的富文本编辑器,专为医疗行业设计,用于创建、编辑和管理电子病历文档。本项目采用组件化设计,实现了文本编辑、表格操作、图片插入、模板管理等功能,并支持导出为PDF和图片格式。
主要功能
富文本编辑(加粗、斜体、下划线等)
表格创建与编辑
图片插入与管理
医疗模板管理
文档导出(PDF、图片)
自动保存
技术栈
- 前端框架 Vue3 + Composition API
- 构建工具 Vite
- 数据存储 IndexedDB (通用idb库)
- 文档导出 jsPDF、html2canvas
- 文件处理 file-saver
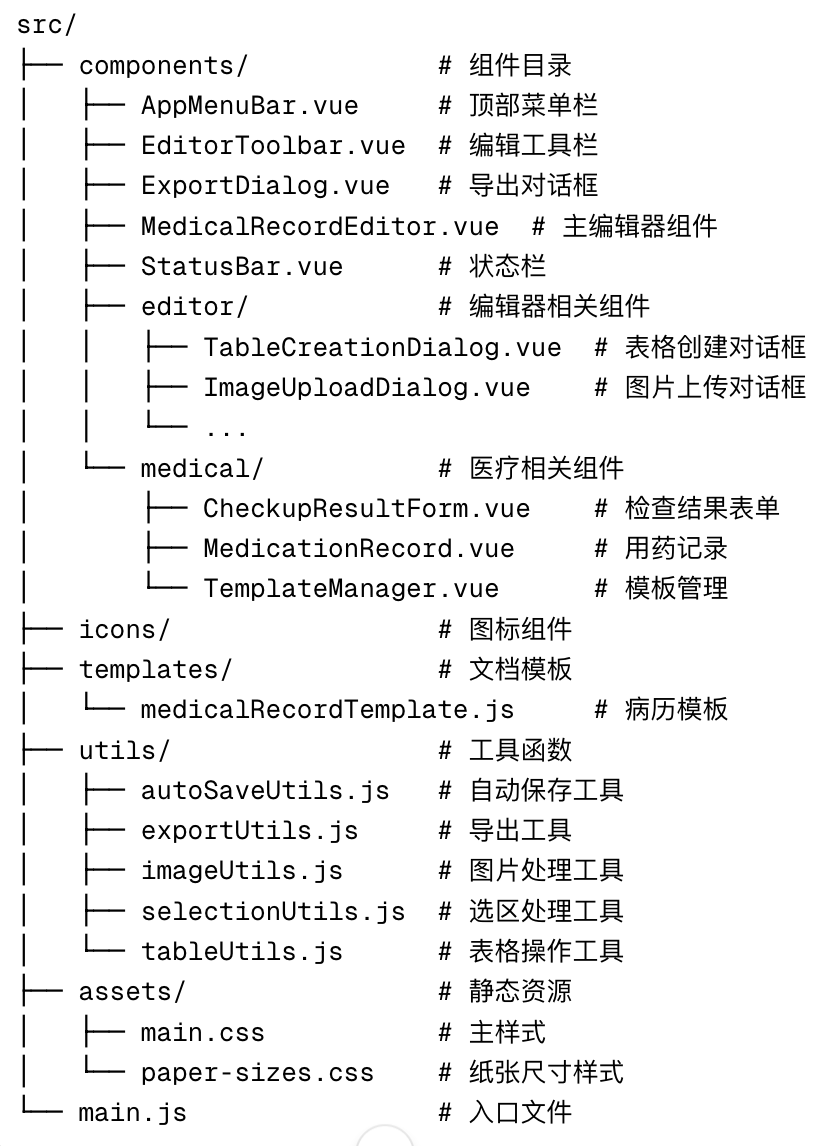
项目结构
核心功能实现
3.1 富文本编辑器实现
电子病历编辑器的核心是基于浏览器原生的 contenteditable 属性和 document.execCommand API 实现的。
基本原理
// 设置内容可编辑<div   class="editor-content"   contenteditable="true"  ref="editorContent"  @input="updateContent"  @click="checkTableFocus"></div>
// 执行编辑命令const execCommand = (command, value = null) => {  try {    document.execCommand(command, false, value);  } catch (error) {    console.error(`执行命令 ${command} 时出错:`, error);  }};
编辑器接口
为了方便子组件调用编辑器功能,我创建了一个统一的编辑器接口:
const editorInterface = { execCommand: (command, showUI, value) => { saveSelection(); document.execCommand(command, showUI, value); restoreSelection(); updateContent(); }, getContent: () => { return editorContent.value ? editorContent.value.innerHTML : ''; }, setContent: (content) => { if (editorContent.value) { editorContent.value.innerHTML = content; updateContent(); } }, focus: () => { if (editorContent.value) { editorContent.value.focus(); } }, isActive: (command) => { try { return document.queryCommandState(command); } catch (error) { console.error(`检查命令状态 ${command} 时出错:`, error); return false; } }};选区管理
在富文本编辑中,正确管理选区是确保编辑操作准确执行的关键。接下来分享一下我设计的选取管理功能:
// 保存当前选区const saveSelection = () => {  const selection = window.getSelection();  if (selection.rangeCount > 0) {    savedSelection.value = selection.getRangeAt(0).cloneRange();  }};
// 恢复保存的选区const restoreSelection = () => {  if (savedSelection.value) {    const selection = window.getSelection();    selection.removeAllRanges();    selection.addRange(savedSelection.value);    return true;  }  return false;};
表格操作功能
表格操作是电子病历编辑器的重要功能,包括创建表格、插入/删除行列、合并/拆分单元格等。表格实现的核心代码介绍:
const handleCreateTable = ({ rows, cols, style, hasHeader }) => {  try {    // 创建表格HTML    let tableHTML = '<table border="1" style="width: 100%; border-collapse: collapse;">';
    // 添加表头    if (hasHeader) {      tableHTML += '<thead><tr>';      for (let j = 0; j < cols; j++) {        tableHTML += '<th style="background-color: #f5f5f5; font-weight: bold; padding: 8px;">表头</th>';      }      tableHTML += '</tr></thead>';    }
    // 添加表格内容    tableHTML += '<tbody>';    for (let i = 0; i < (hasHeader ? rows - 1 : rows); i++) {      tableHTML += '<tr>';      for (let j = 0; j < cols; j++) {        tableHTML += '<td style="padding: 8px;">单元格</td>';      }      tableHTML += '</tr>';    }    tableHTML += '</tbody></table><p><br></p>';
    // 插入表格    document.execCommand('insertHTML', false, tableHTML);  } catch (error) {    console.error('插入表格时出错:', error);  }};
表格行列操作:
// 插入行const insertRow = (table, rowIndex) => {  try {    // 确定要插入行的位置    let tbody = table.querySelector('tbody');    if (!tbody) {      tbody = table;    }
    // 创建新行    const newRow = document.createElement('tr');
    // 获取列数    const columnCount = table.rows[0].cells.length;
    // 添加单元格    for (let i = 0; i < columnCount; i++) {      const newCell = document.createElement('td');      newCell.innerHTML = '单元格';      newCell.style.padding = '8px';      newRow.appendChild(newCell);    }
    // 插入新行    if (rowIndex < tbody.rows.length) {      tbody.insertBefore(newRow, tbody.rows[rowIndex]);    } else {      tbody.appendChild(newRow);    }  } catch (error) {    console.error('插入行失败:', error);    throw error;  }};
// 插入列const insertColumn = (table, columnIndex) => {  try {    for (let i = 0; i < table.rows.length; i++) {      const row = table.rows[i];      const newCell = document.createElement(row.cells[0].nodeName);      newCell.innerHTML = '单元格';      newCell.style.padding = '8px';
      if (columnIndex < row.cells.length) {        row.insertBefore(newCell, row.cells[columnIndex]);      } else {        row.appendChild(newCell);      }    }  } catch (error) {    console.error('插入列失败:', error);    throw error;  }};
图片插入功能
图片插入功能支持从URL插入和本地上传两种方式。具体实现如下:
const handleInsertImage = (imgSrc) => {  try {    if (!imgSrc) return;
    // 创建图片HTML    const imgHtml = `<div style="text-align: center; margin: 10px 0;"><img src="${imgSrc}" alt="插入的图片" style="max-width: 100%; height: auto;"></div><p><br></p>`;
    // 确保编辑器有焦点并恢复选区    editorContent.value.focus();    restoreSelection();
    // 使用document.execCommand插入HTML    document.execCommand('insertHTML', false, imgHtml);  } catch (error) {    console.error('插入图片时出错:', error);  }};
自动保存功能
自动保存功能使用IndexedDB存储编辑器内容,确保用户不会丢失工作。我实现了一个自动保存管理器来管理:
// 创建自动保存管理器const autoSaveManager = createAutoSaveManager(saveCurrentContent, 30000);
// 自动保存当前内容const saveCurrentContent = async () => {  try {    if (!editorContent.value) return;
    const content = editorContent.value.innerHTML;    currentRecordId.value = await saveRecord(content, currentRecordId.value || 'current-record');    autoSaveStatus.value = `已保存 (${new Date().toLocaleTimeString()})`;  } catch (error) {    console.error('自动保存失败:', error);    autoSaveStatus.value = '保存失败';  }};
文档导出功能
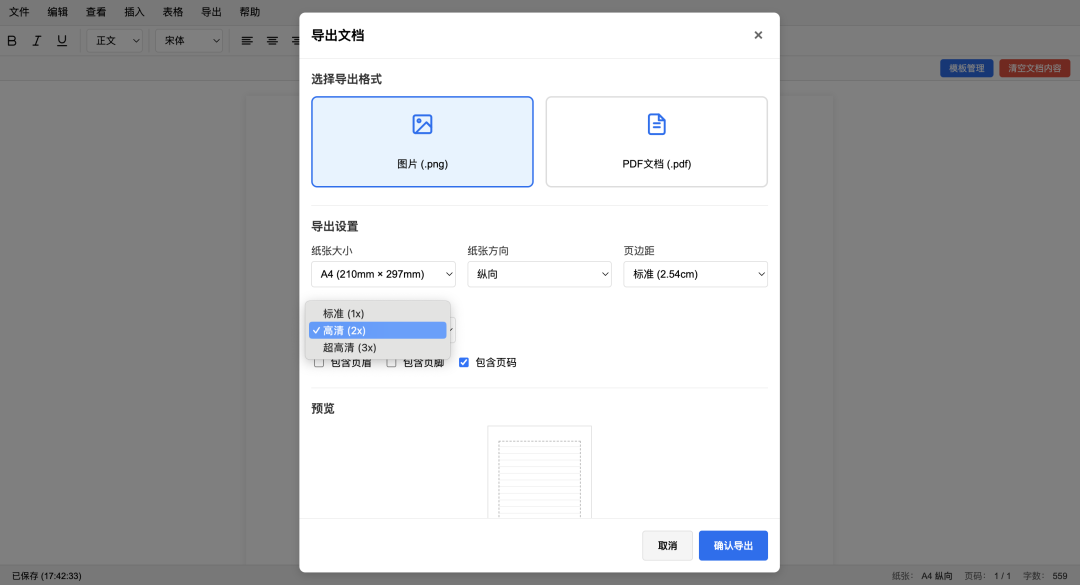
编辑器支持将文档导出为PDF和图片格式。这个功能是我设计的核心功能之一,也涉及到一些解析方案,并支持不同分辨率图片的导出。代码实现框架如下:


 883
883

 被折叠的 条评论
为什么被折叠?
被折叠的 条评论
为什么被折叠?
 到【灌水乐园】发言


