


转自:http://blog.csdn.net/me10net/article/details/7937560
UIAlertView中加入UITextField
这个简单的教程将介绍怎样在UIAlertView中加入UITextField。它只包括几行代码。你将学到CGAffineTransform和UITextField编程。

我们开始吧…
1. 建立一个新的View Based项目。
你可以随意为其取名,我为其命名为TextFieldInAlert。
2. 代码
在viewcontroller.m或TextFieldInAlert.m(如果你命名为TextFieldInAlert的话),然后找到-(void)viewDidLoad 方法。取消其注释加入代码。
| 1 2 3 4 5 6 7 8 9 10 11 12 13 14 15 16 17 18 19 20 21 |
- (void)viewDidLoad {
[super viewDidLoad]; UIAlertView *alert = [[UIAlertView alloc] initWithTitle:@”Enter Name Here” message:@”this gets covered!” delegate:self cancelButtonTitle:@”Dismiss” otherButtonTitles:@”OK!”, nil]; UITextField *myTextField = [[UITextField alloc] initWithFrame:CGRectMake(12, 45, 260, 25)]; [myTextField setBackgroundColor:[UIColor whiteColor]]; [alert addSubview:myTextField]; [alert show]; [alert release]; [myTextField release]; } |
我们做的是调用UIAlertView然后添加一个UITextField。 你可能注意到了UIAlertView的message部分,我们为其赋值为“this gets covered!”,如果我们不为其加上这个语句,那么alert的按钮会更靠上而弄乱UITextField。你可以试一下拿掉这一行看看会发生什么。 现在UITextField 出现在UIAlertView中间了。试一下在UITextField输入点什么。噢,为什么键盘盖住了UIAlertView?有一个简单的修正方法。 只需加入两行代码就可修正这个问题。加入代码:
| 1 2 3 |
CGAffineTransform myTransform = CGAffineTransformMakeTranslation(0, 60);
[alert setTransform:myTransform]; |
完整代码如下:
| 1 2 3 4 5 6 7 8 9 10 11 12 13 14 15 16 17 18 19 |
UIAlertView *alert = [[UIAlertView alloc] initWithTitle:@”Enter Name Here”
message:@”this gets covered!” delegate:self cancelButtonTitle:@”Dismiss” otherButtonTitles:@”OK!”, nil]; UITextField *myTextField = [[UITextField alloc] initWithFrame:CGRectMake(12, 45, 260, 25)]; CGAffineTransform myTransform = CGAffineTransformMakeTranslation(0, 60); [alert setTransform:myTransform]; [myTextField setBackgroundColor:[UIColor whiteColor]]; [alert addSubview:myTextField]; [alert show]; [alert release]; [myTextField release]; |
现在你按下“Build and Run”,你会注意到UITextField将在显示略高一点的位置,当你在UITextField输入时,键盘不会再盖住。这就是CGAffineTransform的作用。
Username/Password彈跳視窗(UIAlertView)
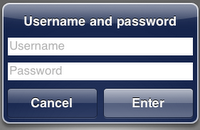
- 首先,你要初始化一個UIAlertView物件。然後你必須將message的參數值設為@”\n\n\n”,這是用來多留幾行空白以便擺放輸入框欄位。
- 建立兩個UITextField物件,將他們加至UIAlertView裡成為subview。別忘了設定輸入框的背景色(setBackgroundColor)、預設文字(setPlaceholder)、安全表示(setSecureTextEntry,輸入文字時會變成星號,用於密碼欄)。
- 最後,在呈現UIAlertView時,在垂直位移加上一點Shift值並且有需要的話將之設定為FirstResponder。
Source Code:
01.
UITextField *textField;
02.
UITextField *textField2;
03.
04.
UIAlertView *prompt = [[UIAlertView alloc] initWithTitle:@"Username and password"
05.
message:@"\n\n\n" // IMPORTANT
06.
delegate:nil
07.
cancelButtonTitle:@"Cancel"
08.
otherButtonTitles:@"Enter", nil];
09.
10.
textField = [[UITextField alloc] initWithFrame:CGRectMake(12.0, 50.0, 260.0, 25.0)];
11.
[textField setBackgroundColor:[UIColor whiteColor]];
12.
[textField setPlaceholder:@"username"];
13.
[prompt addSubview:textField];
14.
15.
textField2 = [[UITextField alloc] initWithFrame:CGRectMake(12.0, 85.0, 260.0, 25.0)];
16.
[textField2 setBackgroundColor:[UIColor whiteColor]];
17.
[textField2 setPlaceholder:@"password"];
18.
[textField2 setSecureTextEntry:YES];
19.
[prompt addSubview:textField2];
20.
21.
// set place
22.
[prompt setTransform:CGAffineTransformMakeTranslation(0.0, 110.0)];
23.
[prompt show];
24.
[prompt release];
25.
26.
// set cursor and show keyboard
27.
[textField becomeFirstResponder];


 7406
7406

 被折叠的 条评论
为什么被折叠?
被折叠的 条评论
为什么被折叠?
 到【灌水乐园】发言


