


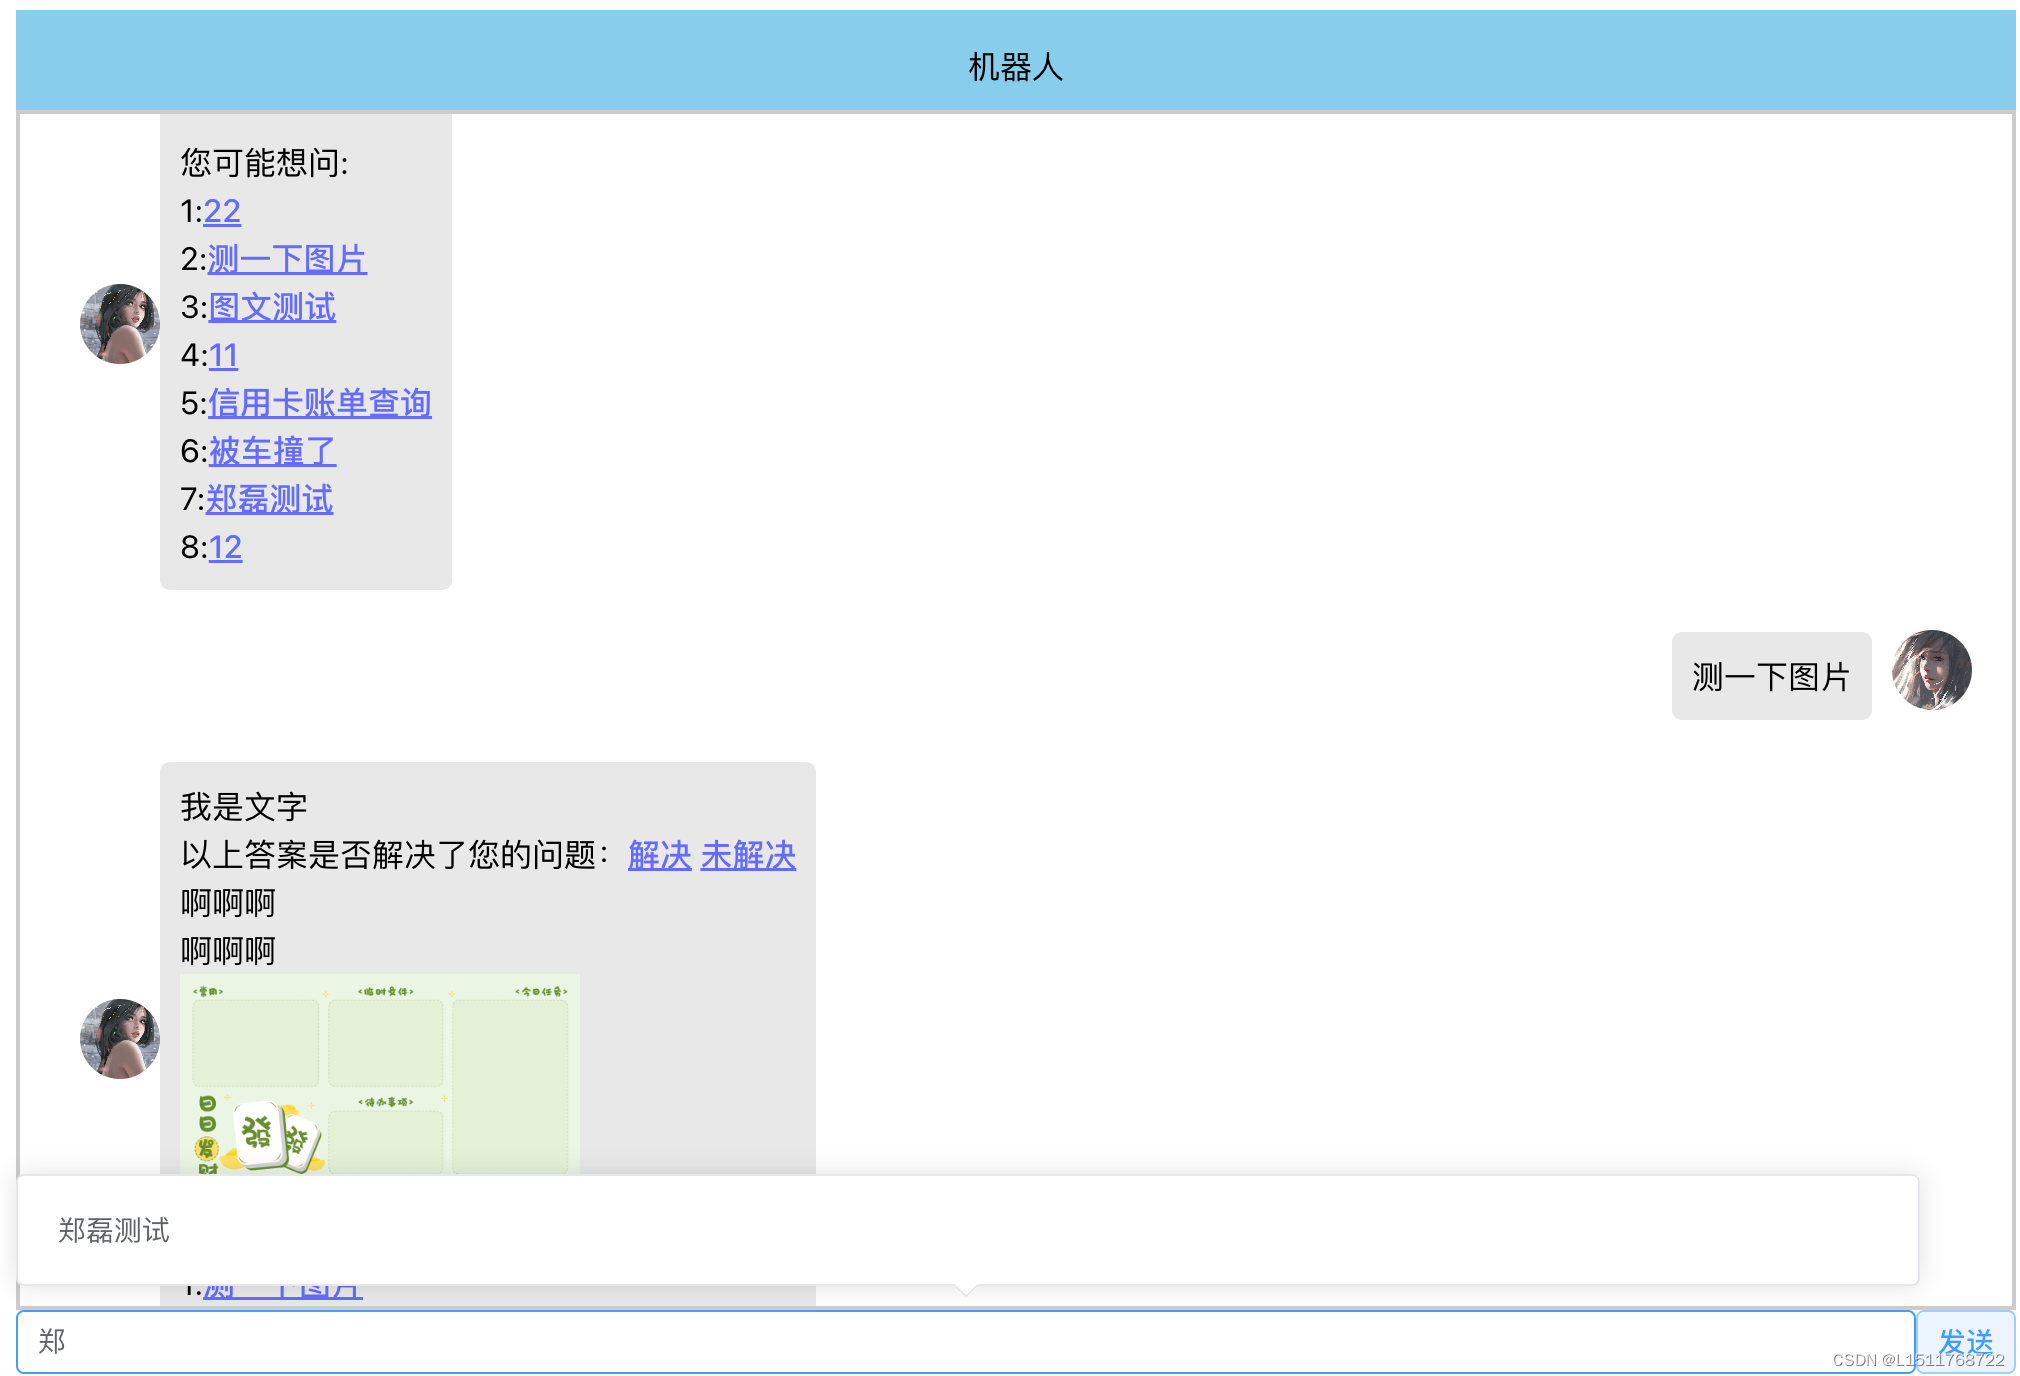
搭建的页面比价简单废话不多说先看效果图(页面功能包括了进入页面会首先请求后端热点问题显示,输入时提示可能会问的问题,点击超粘接会直接向机器人发送点击的问题,点击图片放大展示功能)
就不做其他讲解,直接上代码了
<template>
  <div class="common-layout">
    <el-container>
      <el-header :style="{ height: '50px', width: '1000px' ,backgroundColor: '#87CEEB'}">
        <p class="centered-text">机器人</p></el-header>
      <el-main :style="{ height: '600px', width: '1000px' ,border: '2px solid #ccc' }">
        <div class="message-container" v-for="(message, index) in messages" :key="index"
             :class="getMessageClass(message.isSent)">
          <div v-if="message.isSent" class="message-container">
            <div class="bubble">
              <div class="message" v-html="message.content"></div>
            </div>
            <div class="avatar">
              <img src="./my.jpg" alt="Avatar" class="avatar-image"/>
            </div>
          </div>
          <div v-if="!message.isSent" class="message-container">
            <div class="avatar">
              <img src="./a.jpg" alt="Avatar" class="avatar-image"/>
            </div>
            <div class="bubble">
              <div class="message" v-html="message.content"
                   @click.prevent="handleMessageClick($event)"></div>
            </div>
          </div>
        </div>
      </el-main>
      <el-row :style="{ width: '1000px' }">
        <AutomaticPrompt @keydown.enter="handleButtonClick" @updateState="getState"
                         ref="automaticPromptRef"></AutomaticPrompt>
        <el-button type="primary" plain style="width: 50px;" @click="handleButtonClick">发送</el-button>
      </el-row>
    </el-container>
  </div>
</template>

<style>

.centered-text {
  text-align: center;
  color: black;
}

.underline-link {
  text-decoration: underline;
}

.message-container {
  display: flex;
  align-items: center;
  margin-bottom: 10px;
}

.avatar {
  margin-left: 10px; /* 修改这里将头像放在消息框的右边 */
}

.avatar-image {
  width: 40px;
  height: 40px;
  border-radius: 50%;
  object-fit: cover;
}

.bubble {
  background-color: #e8e8e8;
  color: #000;
  padding: 10px;
  border-radius: 5px;
}

.message {
  text-align: left;
  margin: 0;
}

.message-container-right {
  justify-content: flex-end;
}

.message-container-left {
  justify-content: flex-start;
}
</style>

<script lang="ts" setup>
import {ref, onMounted} from 'vue';
import AutomaticPrompt from './AutomaticPrompt.vue'
import axios from 'axios';
import ImageViewer from "@luohc92/vue3-image-viewer";
import '@luohc92/vue3-image-viewer/dist/style.css';


const automaticPromptRef = ref('');

let msg: string = '';
const messages = ref([]);
//获取子组件中state的值,这个好像是写多余了,可以直接使用automaticPromptRef.value.setState('');获取state值
const getState = (v) => {
  msg = v;
};

//对机器人回复的【link】标签进行渲染(替换字符串)
const formatString = (str) => {
  str = str.replace(/(\[link submit="faqvote.*?\])/g, '<a class="underline-link" href="">');
  const replacedStr1 = str.replace(/(\[link.*?\])/g, '<br><a class="underline-link" href="">');
  const replacedStr2 = replacedStr1.replace(/\[\/link\]/g, `</a>`)
  const replacedStr3 = replacedStr2.replace(/\\r\\n/g, `<br>`)
  const replacedStr4 = replacedStr3.replace(/\\\\r\\\\n/g, ``)
  return replacedStr4;
}
//发送按钮
const handleButtonClick = () => {
  messages.value.push({content: msg, isSent: true});
  sendMsg(msg);
  automaticPromptRef.value.setState('');
};
//向后端发送请求逻辑
const sendMsg = async (msg: string) => {
  let responseMsg = '';
  try {
    //请求后端问题答案,并对问题答案进行封装,这里需要各位对各自的后端返回格式进行解析
    const response = await axios.get(`http://localhost:8080/question/` + msg);
    //正常情况的文本处理
    if (response.data.content !== undefined) {
      responseMsg = formatString(response.data.content);
      console.log(responseMsg)
    }
    //图片处理
    let mark = false;
    let imageTxt = '';
    let imageUrl = '';
    for (let i = 0; i < response.data.commands.length; i++) {
      if (response.data.commands[i].name === 'imgmsg' || response.data.commands[i].name === 'txtimage') {
        mark = true;
        for (let j = 0; j < response.data.commands[i].args.length; j++) {
          if (response.data.commands[i].args[j].includes('http://')) {
            imageUrl += response.data.commands[i].args[j];
          } else {
            imageTxt += response.data.commands[i].args[j] + '<br>'
          }
        }
      }
    }
    if (mark) {
      responseMsg = responseMsg + '<br>' + imageTxt + '<img src="' + imageUrl + '" alt="Image" style="width: 200px; height: auto;">'
    }
    if (response.data.relatedQuestions !== undefined && response.data.relatedQuestions.length !== 0) {
      responseMsg = responseMsg + '<br>您可能想问:'
      for (let i = 0; i < response.data.relatedQuestions.length; i++) {
        let responseIndex = i + 1
        responseMsg = responseMsg + '<br>' + responseIndex + ':' + '<a class="underline-link" href="">' + response.data.relatedQuestions[i] + '</a>'
      }
    }
  } catch (error) {
    console.error(error);
    responseMsg = '网络异常';
  }
  messages.value.push({content: responseMsg, isSent: false});
}

const handleMessageClick = (event) => {
  const target = event.target;
  if (target.tagName === 'A') {
    // 点击的是超链接
    // 执行相应的操作
    if (target.innerHTML === '解决') {
      alert('感谢您的使用')
    } else if (target.innerHTML === '未解决') {
      alert('很抱歉未能解决你的问题')
    } else {
      handleLinkClick(target.innerHTML);
    }
  } else if (target.tagName === 'IMG') {
    // 点击的图片进行放大操作
    ImageViewer({
        //切记额images这个参数是数组,我的target.valueof().src值是一个http的图片地址
      images: [target.valueOf().src],
      curIndex: 0,
      zIndex: 2000,
      showDownload: true,
      showThumbnail: true,
      handlePosition: "bottom",
      maskBgColor: "rgba(0,0,0,0.7)",
      onClose: () => {
        console.log("close");
      },
    });

  } else {

  }
}

const handleLinkClick = (msg) => {
  messages.value.push({content: msg, isSent: true})
  sendMsg(msg);
}
//消息框样式动态选择
const getMessageClass = (isSent) => {
  return isSent ? 'message-container-right' : 'message-container-left';
};
//进入页面直接发送请求从后端获取热点数据
onMounted(async () => {
  let responseMsg = '';
  try {
    const response = await axios.get(`http://localhost:8080/getHotAsk`);
    responseMsg = responseMsg + '<br>您可能想问:'
    for (let i = 0; i < response.data.length; i++) {
      let responseIndex = i + 1
      responseMsg = responseMsg + '<br>' + responseIndex + ':' + '<a class="underline-link" href="">' + response.data[i] + '</a>'
    }
  } catch (error) {
    console.error(error);
    responseMsg = '网络异常,暂时无法加载出热点问题';
  }
  messages.value.push({content: responseMsg, isSent: false})
})
</script>
上面代码中使用到了vue3-image-viewer,请自行下载,运行命令npm install --save @luohc92/vue3-image-viewer,同时代码中automaticPromptRef.value.setState('');的setState会爆红不影响使用,可以正常的去将子组件的值清除。下面是父组件中引用的子组件代码
<template>
  <el-autocomplete :style="{ width: '950px' }" v-model="state" :fetch-suggestions="querySearchAsync"
                   placeholder="请输入问题" @select="handleSelect" ref="automaticPromptRef"/>
</template>

<script lang="ts" setup>
import { ref, watch, defineEmits ,defineExpose} from 'vue';
import axios from 'axios';
const state = ref('');

interface LinkItem {
  value: string;
  link: string;
}

const links = ref<LinkItem[]>([]);

const loadFromBackend = async (value: string) => {
  try {
//输入时候请求后端根据输入值得到提示。    后端返回集合,集合里面对象属性为value和link都是string类型
    const response = await axios.get(`http://localhost:8080/getAutoMsg/${value}`);
    links.value = response.data;
  } catch (error) {
    console.error(error);
  }
};

const querySearchAsync = (queryString: string, cb: (arg: any) => void) => {
  const results = queryString ? links.value.filter(createFilter(queryString)) : links.value;
  cb(results);
};

const createFilter = (queryString: string) => {
  return (link: LinkItem) => {
    return link.value.toLowerCase().indexOf(queryString.toLowerCase()) === 0;
  };
};

const handleSelect = (value: string) => {

};

const emit = defineEmits(['updateState']);

watch(state, async (newValue) => {
  emit('updateState',newValue)
  if (newValue) {
    await loadFromBackend(newValue);
  } else {
    links.value = [];
  }
});

defineExpose({
  setState(res){
    state.value = res
  },
  getState(){
    return state.value
  }
})
</script>
对参数的解析需要各位去对照自己的去修改,后端就不展示给大家了,后端基本就几行代码都是调用公司的api。


 479
479


 被折叠的 条评论
为什么被折叠?
被折叠的 条评论
为什么被折叠?
 到【灌水乐园】发言


