| | ↳ | android.graphics.drawable.VectorDrawable
简单了解SVG的一些命令
| 命令 | 名称 | 参数 | | M | moveto 移动到 | (x y)+ | | Z | closepath 关闭路径 | (none) | | L | lineto 画线到 | (x y)+ | | H | horizontal lineto 水平线到 | x+ | | V | vertical lineto 垂直线到 | y+ | | C | curveto 三次贝塞尔曲线到 | (x1 y1 x2 y2 x y)+ | | S | smooth curveto 光滑三次贝塞尔曲线到 | (x2 y2 x y)+ | | Q | quadratic Bézier curveto 二次贝塞尔曲线到 | (x1 y1 x y)+ | | T | smooth quadratic Bézier curveto 光滑二次贝塞尔曲线到 | (x y)+ | | A | elliptical arc 椭圆弧 | (rx ry x-axis-rotation large-arc-flag sweep-flag x y)+ |
注意:如果指令字母是大写的,例如M, 则表示坐标位置是绝对位置,参照全局坐标系;如果指令字母小写的,例如m, 参照父容器坐标系。
M、H、V、Z、L指令都很简单,我们看看其他指令
1. C指令

<?xml version="1.0" standalone="no"?>
<!DOCTYPE svg PUBLIC "-//W3C//DTD SVG 1.1//EN"
"http://www.w3.org/Graphics/SVG/1.1/DTD/svg11.dtd">
<svg width="500" height="500" version="1.1" xmlns="http://www.w3.org/2000/svg">
   <path style="fill:white;stroke:red;stroke-width:2"
    d="M50,50 C100,100 400,100 450,50
    M50,50 L100,100
    M400,100 L450,50"
   />
</svg>
2.S指令

<?xml version="1.0" standalone="no"?>
<!DOCTYPE svg PUBLIC "-//W3C//DTD SVG 1.1//EN"
"http://www.w3.org/Graphics/SVG/1.1/DTD/svg11.dtd">
<svg width="500" height="500" version="1.1"
xmlns="http://www.w3.org/2000/svg">
<path style="fill:white;stroke:red;stroke-width:2"
   d="M50,50 S250,250 450,50
</svg>
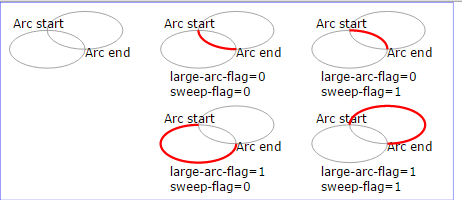
3.A指令(7个参数)
rx ry x-axis-rotation large-arc-flag sweep-flag x y rx,ry指所在椭圆的半轴大小。
x-axis-rotation指椭圆的X轴与水平方向顺时针方向夹角,可以想像成一个水平的椭圆绕中心点顺时针旋转 x-axis-rotation的角度。
large-arc-flag只有两个值,1表示大角度弧线,0为小角度弧线。
sweep-flag只有两个值,确定从起点至终点的方向,1为顺时针,0为逆时针。
x,y为终点坐标。
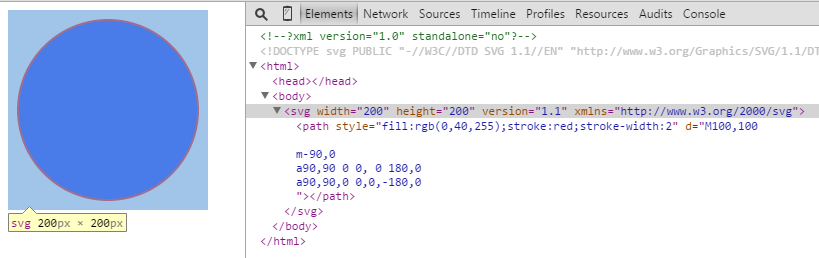
先定义一个200x200的画布,注意坐标系,原点是左上角的点。先移动点到(100,100),
再移动到(10,0),长短轴都是90,椭圆顺时针转0
度,由于没有图形与它相交,第二个参数0,无所谓。
第三个参数0表示逆时针画出。最后2个参数是终点坐标。

这个图与上面的图是一样的,但是指令的区别在于大小写,我们用小写的指令“a”,表示相对。
最后的180,0,与前面的a指令表示正向移动180距离,以前在(10,0)点,
x点坐标移动180就是190,。所以和上面的一样。


先看效果图

VectorDrawable
我们用svg画出一个心形
<?xml version="1.0" encoding="utf-8"?>
<vector xmlns:android="http://schemas.android.com/apk/res/android"
    android:height="100dp"
    android:width="100dp"
    android:viewportWidth="32"
    android:viewportHeight="32">

    <path
    android:fillColor="#ff5d15"
    android:pathData="M20.5,9.5
                        c-1.955,0,-3.83,1.268,-4.5,3
                        c-0.67,-1.732,-2.547,-3,-4.5,-3
                        C8.957,9.5,7,11.432,7,14
                        c0,3.53,3.793,6.257,9,11.5
                        c5.207,-5.242,9,-7.97,9,-11.5
                        C25,11.432,23.043,9.5,20.5,9.5z" />
</vector>
height与width表示大小,与View的大小是一样的,viewportwidth与viewportheight表示一块画布,这样里面的path在绘制的时候,坐标空间的大小就是前面的viewportheight和viewportwidth,
上面的100dp与32有什么关系呢,32只是映射100dp。
AnimatedVectorDrawable
一些字符串资源
<span style="font-size:18px;"><string name="path_circle">
    M 50,50
    m -48,0
    a 48,48 0 1,0 96,0
    a 48,48 0 1,0,-96,0
  </string>
  <string name="path_face_left_eye">
    M 35,40
    m -7,0
    a 7,7 0 1,0 14,0
    a 7,7 0 1,0 -14,0
  </string>
  <string name="path_face_right_eye">
    M 65,40
    m -7,0
    a 7,7 0 1,0 14,0
    a 7,7 0 1,0 -14,0
  </string>
  <string name="path_face_mouth_sad">
    M 30,75
    Q 50,55 70,75
  </string>
  <string name="path_face_mouth_happy">
    M 30,65
    Q 50,85 70,65
  </string>
  <string name="heart">
    M25.119,2.564c12.434,0.023,18.68,5.892,24.88,17.612  c6.2-11.721,12.446-17.589,24.877-17.612c13.81-0.025,25.035,10.575,25.061,23.66c0.033,23.708-24.952,47.46-49.938,71.212  C25.016,73.685,0.03,49.932,0.064,26.224C0.085,13.14,11.309,2.539,25.119,2.564z
  </string>


     <string name="cross">
       M25,25L10,25 M25,25L40,25 M25,25L25,10 M25,25L25,40
    </string>

    <string name="rect">
        M10,10L40,10 M40,10L40,40 M40,40L10,40 M10,40L10,10
    </string></span>
让VectorDrawable动起来
<animated-vector
    xmlns:android="http://schemas.android.com/apk/res/android"
    android:drawable="@drawable/clock" >
  <target
      android:name="hours"
      android:animation="@anim/hours_rotation" />
  <target
      android:name="minutes"
      android:animation="@anim/minutes_rotation" />
</animated-vector>
里面的drawable表示一个VectorDrawable资源
然后我们指定一个target,name就是VectorDrawable资源里节点的名字(path、group等),接着给该节点一个动画资源
res/drawable/clock.xml
<vector
    xmlns:android="http://schemas.android.com/apk/res/android"
    android:height="100dp"
    android:width="100dp"
    android:viewportHeight="100"
    android:viewportWidth="100" >
  <group
      android:name="minutes"
      android:pivotX="50"
      android:pivotY="50"
      android:rotation="0">
    <path
        android:strokeColor="@android:color/holo_green_dark"
        android:strokeWidth="@integer/stroke_width"
        android:strokeLineCap="round"
        android:pathData="M 50,50 L 50,12"/>
  </group>
  <group
      android:name="hours"
      android:pivotX="50"
      android:pivotY="50"
      android:rotation="0">
    <path
        android:strokeColor="@android:color/holo_blue_dark"
        android:strokeWidth="@integer/stroke_width"
        android:strokeLineCap="round"
        android:pathData="M 50,50 L 24,50"/>
  </group>
  <path
      android:strokeColor="@android:color/holo_red_dark"
      android:strokeWidth="@integer/stroke_width"
      android:pathData="@string/path_circle"/>
</vector>
res/anim/hours_rotation
<objectAnimator
    xmlns:android="http://schemas.android.com/apk/res/android"
    android:duration="8000"
    android:propertyName="rotation"
    android:valueFrom="0"
    android:valueTo="240"
    android:interpolator="@android:anim/linear_interpolator"/>
res/anim/minutes_rotation
<objectAnimator
    xmlns:android="http://schemas.android.com/apk/res/android"
    android:duration="1000"
    android:propertyName="rotation"
    android:valueFrom="0"
    android:valueTo="360"
    android:repeatCount="7"
    android:interpolator="@android:anim/linear_interpolator"/>
最后我们必须手动启动动画
 private void animate(ImageView imageView) {
        Drawable drawable = imageView.getDrawable();
        if (drawable instanceof Animatable) {
            ((Animatable) drawable).start();
        }
    }
看看笑脸的动画是怎么做到的
<?xml version="1.0" encoding="utf-8"?>
<animated-vector xmlns:android="http://schemas.android.com/apk/res/android"
                 android:drawable="@drawable/face" >
  <target
      android:name="mouth"
      android:animation="@anim/smile" />
</animated-vector>
res/drawable/face
<vector
    xmlns:android="http://schemas.android.com/apk/res/android"
    android:height="100dp"
    android:width="100dp"
    android:viewportHeight="100"
    android:viewportWidth="100" >
  <path
      android:fillColor="@color/yellow"
      android:pathData="@string/path_circle"/>
  <path
      android:fillColor="@android:color/black"
      android:pathData="@string/path_face_left_eye"/>
  <path
      android:fillColor="@android:color/black"
      android:pathData="@string/path_face_right_eye"/>
  <path
      android:name="mouth"
      android:strokeColor="@android:color/black"
      android:strokeWidth="@integer/stroke_width"
      android:strokeLineCap="round"
      android:pathData="@string/path_face_mouth_sad"/>
</vector>
res/anim/smile
<objectAnimator
  xmlns:android="http://schemas.android.com/apk/res/android"
  android:duration="3000"
  android:propertyName="pathData"
  android:valueFrom="@string/path_face_mouth_sad"
  android:valueTo="@string/path_face_mouth_happy"
  android:valueType="pathType"
  android:interpolator="@android:anim/accelerate_interpolator"/>
注意:drawable的path元素从一个形状转变到另一个形状。
这两个形状必须满足一定的条件:必须要有一致的命令(command)个数(逗号分割开的为命令),
并且每个命令的参数个数也必须一致。
最后我们看看心从小变大的效果,直接指定一个View的src是AnimatedVectorDrawable
<?xml version="1.0" encoding="utf-8"?>
<animated-vector xmlns:android="http://schemas.android.com/apk/res/android"

    android:drawable="@drawable/vector_double_heart">

    <target
        android:name="like"
        android:animation="@anim/nulike_to_like"></target>

</animated-vector>
res/drawable/vector_double_heart
<?xml version="1.0" encoding="utf-8"?>
<vector xmlns:android="http://schemas.android.com/apk/res/android"
    android:width="100dp"
    android:height="100dp"
    android:viewportHeight="32"
    android:viewportWidth="32">


    <path
        android:name="unlike"
        android:fillColor="#666"
        android:pathData="M20.5,9.5
                        c-1.955,0,-3.83,1.268,-4.5,3
                        c-0.67,-1.732,-2.547,-3,-4.5,-3
                        C8.957,9.5,7,11.432,7,14
                        c0,3.53,3.793,6.257,9,11.5
                        c5.207,-5.242,9,-7.97,9,-11.5
                        C25,11.432,23.043,9.5,20.5,9.5z" />

    <group
        android:name="like"
        android:pivotX="16"
        android:pivotY="16"
        android:scaleX="0"
        android:scaleY="0">
        <path

            android:fillColor="#ff5d15"
            android:pathData="M20.5,9.5
                        c-1.955,0,-3.83,1.268,-4.5,3
                        c-0.67,-1.732,-2.547,-3,-4.5,-3
                        C8.957,9.5,7,11.432,7,14
                        c0,3.53,3.793,6.257,9,11.5
                        c5.207,-5.242,9,-7.97,9,-11.5
                        C25,11.432,23.043,9.5,20.5,9.5z" />
    </group>


</vector>
定义了2个心。把最上面的缩放到0,这样你就可以看到最下面的心了。
res/anim/nulike_to_like
<?xml version="1.0" encoding="utf-8"?>

<set xmlns:android="http://schemas.android.com/apk/res/android"
    android:fillAfter="true"
    android:repeatMode="reverse"
    android:repeatCount="0"
    android:duration="900"
    android:shareInterpolator="true"
    android:startOffset="0"
    >
    <objectAnimator
        android:interpolator="@android:anim/accelerate_interpolator"
        android:propertyName="scaleX"
        android:valueFrom="0"
        android:valueTo="1.0"></objectAnimator>
    <objectAnimator
        android:interpolator="@android:anim/accelerate_interpolator"
        android:propertyName="scaleY"
        android:valueFrom="0"
        android:valueTo="1.0"></objectAnimator>
</set>
参考:http://www.w3school.com.cn/svg/index.asp http://www.zhangxinxu.com/wordpress/2014/06/deep-understand-svg-path-bezier-curves-command/ http://mobile.51cto.com/news-478709.htm
|


 459
459

 被折叠的 条评论
为什么被折叠?
被折叠的 条评论
为什么被折叠?
 到【灌水乐园】发言


