


Android在3.0版本引中入了Fragment,作用与Activity类似,可以包含布局。Fragment一般是嵌套在Activity中使用,对一个Activity中的布局进行模块化管理。
Fragment的生命周期
在Android中讲一个组件,首先要讲的必然是他的生命周期,然后才是这个组件的用法,Fragment的生命周期与Activity的相似,如下图。
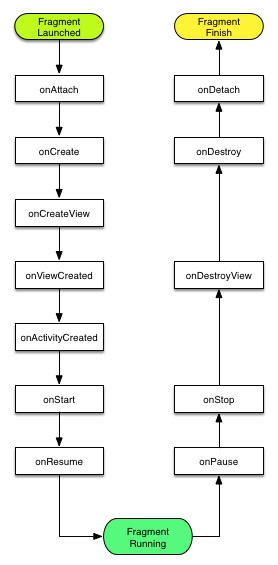
onAttach:Fragment和Activity建立关联的时候调用。
onCreateView:Fragment加载布局时调用。
onActivityCreated:当Activity中的onCreate方法执行完后调用。
onDestroyView:Fragment中的布局被移除时调用。
onDetach方法:Fragment和Activity解除关联的时候调用。
onActivityCreated:当Activity中的onCreate方法执行完后调用。
onDestroyView:Fragment中的布局被移除时调用。
onDetach方法:Fragment和Activity解除关联的时候调用。
使用Fragment
静态使用
静态使用Fragment很简单,与新建一个Activity类似。
fragment.xml
<span style="font-size:18px;"><LinearLayout xmlns:android="http://schemas.android.com/apk/res/android"
    android:layout_width="match_parent"
    android:layout_height="match_parent"
    android:background="#00ff00" >

    <TextView
        android:layout_width="wrap_content"
        android:layout_height="wrap_content"
/>

</LinearLayout></span>
Fragment.java
public class Fragment extends Fragment {

	@Override
	public View onCreateView(LayoutInflater inflater, ViewGroup container, Bundle savedInstanceState) {
		return inflater.inflate(R.layout.fragment, container, false);
	}

}
activity_main.xml
<LinearLayout xmlns:android="http://schemas.android.com/apk/res/android"
    android:layout_width="match_parent"
    android:layout_height="match_parent" >
    <fragment
        android:id="@+id/fragment"
        <strong>android:name="com.example.Fragment"</strong>
        android:layout_width="match_parent"
        android:layout_height="match_parent"
        />
</LinearLayout>public class MainActivity extends Activity {
@Override
protected void onCreate(Bundle savedInstanceState) {
super.onCreate(savedInstanceState);
setContentView(R.layout.activity_main);
}
}动态添加Fragment
Fragment的强大之处在于可以动态的添加和删除,我想这才是Google要添加Fragment的真正原因吧。
MainActivity
package com.example.daniel.test;

import android.support.v4.app.Fragment;
import android.support.v7.app.ActionBarActivity;
import android.os.Bundle;
import android.util.Log;
import android.view.Display;
import android.view.Menu;
import android.view.MenuItem;

public class MainActivity extends ActionBarActivity {

    @Override
    protected void onCreate(Bundle savedInstanceState) {
        super.onCreate(savedInstanceState);
        setContentView(R.layout.activity_main);
        Display display = getWindowManager().getDefaultDisplay();

        if(display.getWidth()>display.getHeight()){
            WidthFragment fragmentWidth = new WidthFragment();
            getSupportFragmentManager().beginTransaction().replace(R.id.main_layout,fragmentWidth).commit();

        }
        else
        {
            HeightFragment heightFragment = new HeightFragment();
            getSupportFragmentManager().beginTransaction().replace(R.id.main_layout,heightFragment).commit();
            Log.d("debug","heightFragment commit");
        }
    }
    @Override
    public boolean onCreateOptionsMenu(Menu menu) {
        // Inflate the menu; this adds items to the action bar if it is present.
        getMenuInflater().inflate(R.menu.menu_main, menu);
        return true;
    }
    @Override
    public boolean onOptionsItemSelected(MenuItem item) {
        // Handle action bar item clicks here. The action bar will
        // automatically handle clicks on the Home/Up button, so long
        // as you specify a parent activity in AndroidManifest.xml.
        int id = item.getItemId();

        //noinspection SimplifiableIfStatement
        if (id == R.id.action_settings) {
            return true;
        }

        return super.onOptionsItemSelected(item);
    }
}
<RelativeLayout xmlns:android="http://schemas.android.com/apk/res/android" xmlns:tools="http://schemas.android.com/tools" android:layout_width="match_parent" android:layout_height="match_parent" android:paddingLeft="@dimen/activity_horizontal_margin" android:paddingRight="@dimen/activity_horizontal_margin" android:paddingTop="@dimen/activity_vertical_margin" android:paddingBottom="@dimen/activity_vertical_margin" tools:context=".MainActivity" <strong>android:id="@+id/main_layout"</strong> > </RelativeLayout>
WidthFragment
public class WidthFragment extends android.support.v4.app.Fragment {
    public WidthFragment() {
        // Required empty public constructor
    }
    @Override
    public View onCreateView(LayoutInflater inflater, ViewGroup container,
                             Bundle savedInstanceState) {
        // Inflate the layout for this fragment
        return inflater.inflate(R.layout.fragment_width, container, false);
    }
}<FrameLayout xmlns:android="http://schemas.android.com/apk/res/android"
    xmlns:tools="http://schemas.android.com/tools" android:layout_width="match_parent"
    android:layout_height="match_parent" tools:context="com.example.daniel.test.WidthFragment">

    <!-- TODO: Update blank fragment layout -->
    <TextView android:layout_width="match_parent" android:layout_height="match_parent"
        android:text="This is Width Fragment" />

</FrameLayout>


HeightFragment
public class HeightFragment extends android.support.v4.app.Fragment { public HeightFragment() { // Required empty public constructor } @Override public View onCreateView(LayoutInflater inflater, ViewGroup container, Bundle savedInstanceState) { // Inflate the layout for this fragment return inflater.inflate(R.layout.fragment_height, container, false); } }这个例子实现的效果是,在手机横屏和竖屏时显示不同的Fragment。<FrameLayout xmlns:android="http://schemas.android.com/apk/res/android" xmlns:tools="http://schemas.android.com/tools" android:layout_width="match_parent" android:layout_height="match_parent" tools:context="com.example.daniel.test.HeightFragment"> <!-- TODO: Update blank fragment layout --> <TextView android:layout_width="match_parent" android:layout_height="match_parent" android:text="This is Height Fragment" /> </FrameLayout>
竖屏时
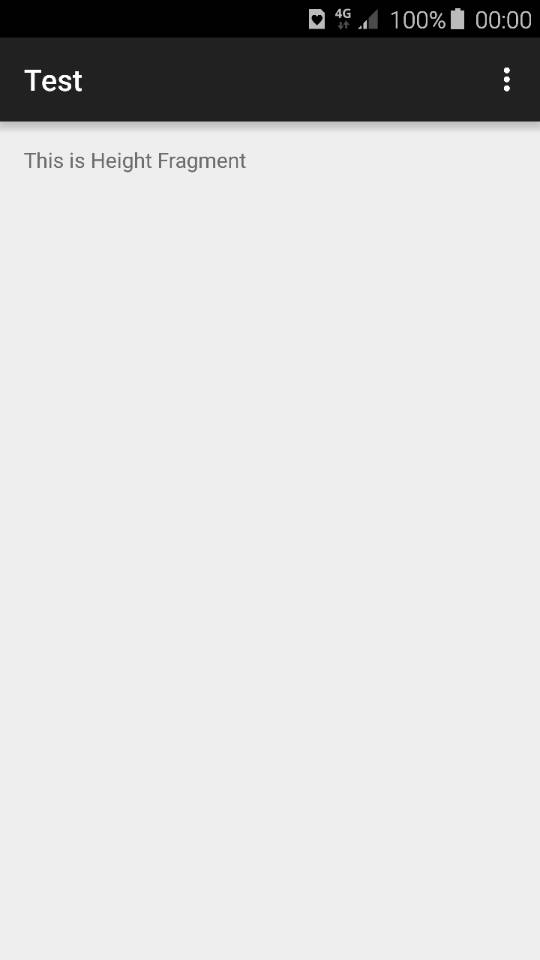
横屏时
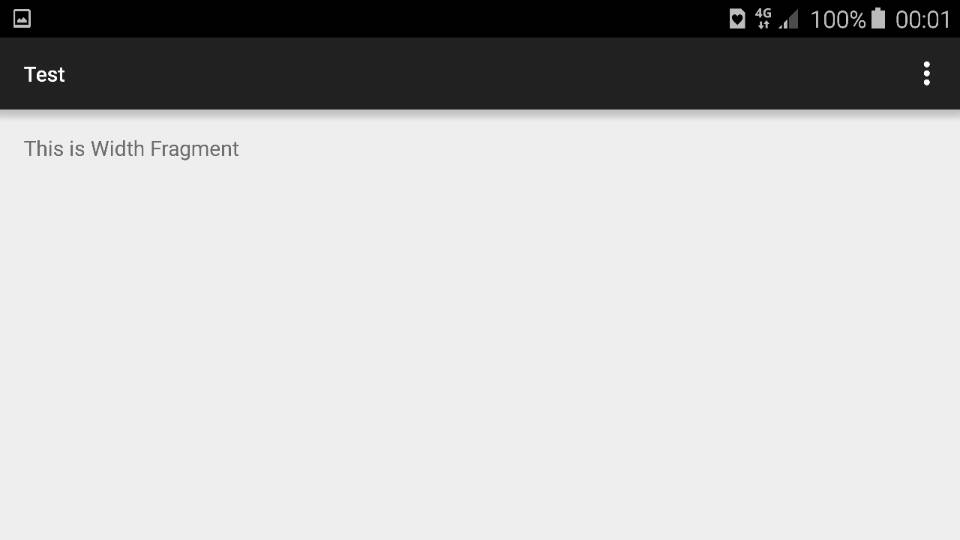
动态添加Fragment步骤
1. getSupportFragmentManager().beginTransaction()获得FragmentManager,并开始一个Transcation
2. 调用replace()方法,注意,第一个参数必须是Fragment的containerView的Id
3. 调用commit()方法


 2万+
2万+

 被折叠的 条评论
为什么被折叠?
被折叠的 条评论
为什么被折叠?
 到【灌水乐园】发言


