


 本文介绍了对9GAG开源项目的Material Design改造,包括ListView使用CursorAdapter,FoldingDrawerLayout替换为DrawerLayout,PhotoView的运用,以及ProgressWheel和LoadingFooter的简化。分析了项目目录结构,强调UI、网络数据交换和数据缓存是学习的重点。
简介
9GAG是一个以图片为主的搞笑网站,网友自发投稿,网络全球笑料,内容以英文,尤其美国文化为主。之前官方提供了一个开源的Android项目,不过目前官方的项目不再开源了,不过我们仍能在网上找到这个项目的源码。
官方项目源码
Material后的项目源码
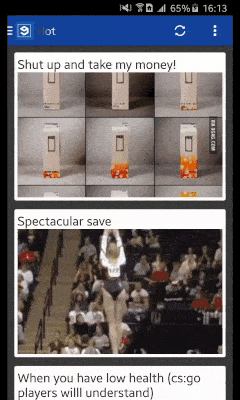
效果
原始效果
Material之后的效果
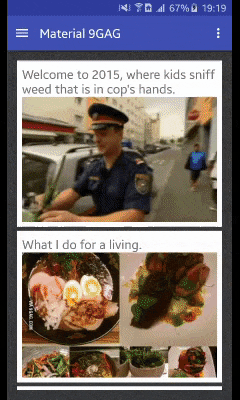
注:以上两个只是部分效果,受CSDN对上传图片大小的限制没有把所有的功能都录制下来
分析
原项目的目录结构
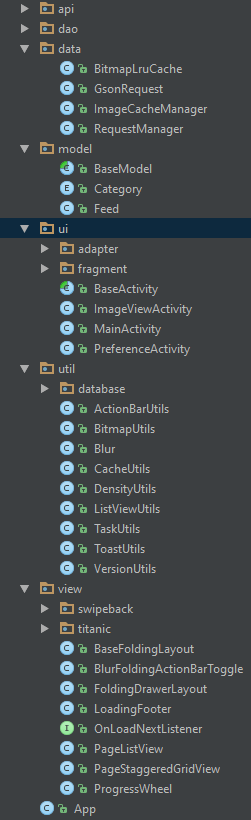
从项目的演示效果来看好像并不复杂,但是看一下目录结构感觉还.java还挺多的,麻雀虽小五脏俱全,该有的都有了。所以本项目很适合新手学习一个完整项目的开发过程。整个项目的源码解析主要可以分为以下几个部分
- UI
- 网络数据交换
- 数据缓存
UI
整个讲解将分为三篇文章,本文主要讲解的是UI的部分。
ListView
原项目中使用的是StaggeredGridView,是个开源项目,但是目前的这个项目的作者已经把这个项目Deprecated,推荐我们使用官方的RecyclerView,但是RecyclerView目前不支持CursorAdapter,Google官方也没有提供解决方案,所以在Material的过程中直接使用了ListView,并用CursorAdapter作为适配器。
CursorAdapter
CursorAdapter使用起来很简单,主要重写newView()和bindView()这两个方法。需要注意的一点是,cursor的必须要有个命名为”_id”的列。比如Contacts._ID就为”_id”
newView返回的是一个用于装载ListView中item的View。
public View newView(Context context, Cursor cursor, ViewGroup viewGroup) {
        return mLayoutInflater.inflate(R.layout.listitem_feed, null);
    }
bindView()的目的就是把view中的元素给附上值。
public abstract void bindView (View view, Context context, Cursor cursor)
Bind an existing view to the data pointed to by cursorParameters
view Existing view, returned earlier by newView
context Interface to application’s global information
cursor The cursor from which to get the data. The cursor is already moved to the correct position.
  @Override
    public void bindView(View view, Context context, Cursor cursor) {

        ViewHolder holder = (ViewHolder) view.getTag();
        if (holder == null) {
            holder = new ViewHolder(view);
            view.setTag(holder);
        }
        Feed feed = Feed.fromCursor(cursor);
        view.setEnabled(!mListView.isItemChecked(cursor.getPosition()
                + mListView.getHeaderViewsCount()));
        holder.imageRequest = ImageCacheManager.loadImage(feed.getImages().normal, ImageCacheManager
                .getImageListener(holder.imageView, mDefaultImageDrawable, mDefaultImageDrawable), 0, DensityUtils.dip2px(context, IMAGE_MAX_HEIGHT));
        holder.caption.setText(feed.getCaption());
    }

     class ViewHolder{
        @Bind(R.id.iv_normal)
        ImageView imageView;
        @Bind(R.id.tv_caption)
        TextView caption;

        public ImageLoader.ImageContainer imageRequest;

        public ViewHolder(View view){
            ButterKnife.bind(this, view);
        }
    }
FoldingDrawerLayout
FoldingDrawerLayout是继承自DrawerLayout的一个类,用来实现折叠效果的Drawer,在Material的过程中,使用android.support.v4.widget.DrawerLayout和android.support.design.widget.NavigationView代替。
PhotoView
一个很好的开源项目,实现了对于ImageView我们常用的操作,比如放大、缩小、旋转等效果。
一个简单的示例
ImageView mImageView;
PhotoViewAttacher mAttacher;

@Override
public void onCreate(Bundle savedInstanceState) {
    super.onCreate(savedInstanceState);
    setContentView(R.layout.activity_main);

    // Any implementation of ImageView can be used!
    mImageView = (ImageView) findViewById(R.id.iv_photo);

    // Set the Drawable displayed
    Drawable bitmap = getResources().getDrawable(R.drawable.wallpaper);
    mImageView.setImageDrawable(bitmap);

    // Attach a PhotoViewAttacher, which takes care of all of the zooming functionality.
    mAttacher = new PhotoViewAttacher(mImageView);
}


// If you later call mImageView.setImageDrawable/setImageBitmap/setImageResource/etc then you just need to call
mAttacher.update();具体用法参考PhotoView
ProgressWhell和LoadingFooter
原项目中这两个都是自定义的View,还借助了Titanic实现一些效果,在Material中都使用了ProgressBar代替(追求全面Material~~)
总结
还有一些其他的UI组件,我就不一一介绍了,毕竟学习这个项目的重点并不是关于UI的学习,项目的架构,网络数据的交换,缓存的设置才是主要要学习的地方。下面两篇文章将重点对这两个部分进行讲解。


 被折叠的 条评论
为什么被折叠?
被折叠的 条评论
为什么被折叠?
 到【灌水乐园】发言


