


往期回顾:
【QT入门】 Qt代码创建布局之多重布局变换与布局删除技巧
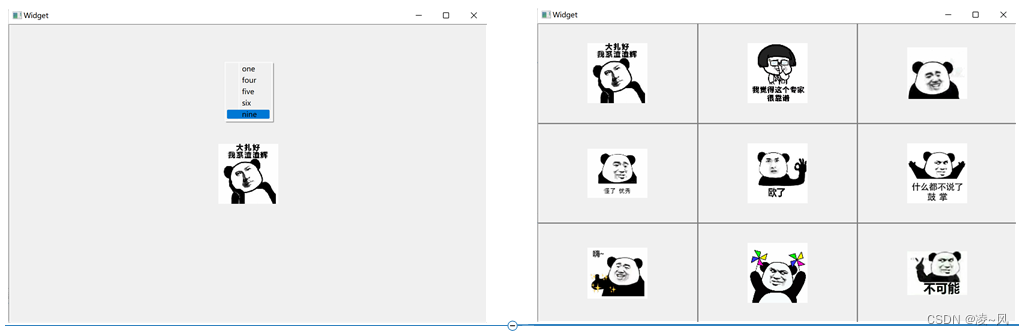
一、最终效果
我们先看最终要实现的效果
界面默认为一布局,在窗口右键单击弹出菜单栏,选择对应布局,界面就会变成对应布局类型,每次选择后窗口都会先清空原有布局。
比如这里,我单击右键,在弹出的菜单里选择了九布局,从而出现下图右边所示效果。
二、如何在窗口创建菜单
由于示例会用到菜单,所以先看一下菜单的创建
1、先在widget.h里定义菜单事件处理函数
public:
    Widget(QWidget *parent = nullptr);
    ~Widget();
    void  contextMenuEvent(QContextMenuEvent * event) override;
在Widget类中重写了菜单事件处理函数contextMenuEvent。当用户在窗口中右击鼠标时,会触发这个事件处理函数,可以在该函数中实现对右击菜单的自定义操作。
2、定义一个初始化菜单函数和QMenu类型的指针
private:
    Ui::Widget *ui;
    void  initMenu();
    QMenu * m_pmenu=nullptr;
3、重写菜单事件处理函数和创建菜单
void  Widget::contextMenuEvent(QContextMenuEvent * event)
{
     //调用exec函数在鼠标当前位置弹出m_switchMenu右键菜单。
    //通过QCursor::pos()函数获取当前鼠标的位置,确保右键菜单在鼠标位置上显示
     m_pmenu->exec(QCursor::pos());
}
重写的contextMenuEvent函数,当用户在窗口中右击鼠标时会触发该函数。在函数中,使用m_pmenu(QMenu对象)调用exec函数,在鼠标当前位置(QCursor::pos())显示菜单。exec函数会在指定位置显示菜单,并阻塞程序直到用户选择一个菜单项或关闭菜单。
3.1QMenu与QAction类
QMenu类用于创建菜单,而QAction类用于创建菜单里的一个个选项,最后用addAction方法把选项加入到菜单即可
void  Widget::initMenu()
{
    m_pmenu = new QMenu(this);
    QAction *pAce1 = new QAction("ace1");
    QAction *pAce2 = new QAction("ace2");
    QAction *pAce3 = new QAction("ace3");
    QAction *pAce4 = new QAction("ace4");
    QAction *pAce5 = new QAction("ace5");

    m_pmenu->addAction(pAce1);
    m_pmenu->addAction(pAce2);
    m_pmenu->addAction(pAce3);
    m_pmenu->addAction(pAce4);
    m_pmenu->addAction(pAce5);

    connect(pAce1,&QAction::triggered,[=]{
       QMessageBox::information(this,"title","ace1");
    });

}
4、设置菜单策略和调用初始化函数
Widget::Widget(QWidget *parent)
    : QWidget(parent)
    , ui(new Ui::Widget)
{
    ui->setupUi(this);

    //设置菜单策略
    this->setContextMenuPolicy(Qt::DefaultContextMenu);

    initMenu();
}
这里设置了窗口的菜单策略为默认菜单,即当用户在窗口中右击鼠标时,会显示默认的上下文菜单。
4.1拓展菜单策略
实际上的参数有这几个:
enum ContextMenuPolicy {
NoContextMenu,
DefaultContextMenu,
ActionsContextMenu,
CustomContextMenu,
PreventContextMenu
};
| NoContextMenu: | 表示没有上下文菜单,即不显示任何右击菜单。 |
| DefaultContextMenu: | 表示默认上下文菜单,即显示系统默认的右击菜单。 |
| ActionsContextMenu: | 表示动作上下文菜单,可能是指显示与操作相关的右击菜单。 |
| CustomContextMenu: | 表示自定义上下文菜单,即显示开发者自定义的右击菜单。 |
| PreventContextMenu: | 表示阻止上下文菜单,即禁止显示右击菜单。 |
三、实现多重布局与布局删除
1、多重布局
首先在widget.h文件里定义了几大布局类型:
enum VideoLayoutType
{
OneVideo = 0,
TwoVideo,
ThreeVideo,
FourVideo,
FiveVideo,
SixVideo,
SeventVideo,
EightVideo,
NineVideo,
};
然后用了一个QMap来存放布局类型,由于map存的是键值对,所以另外存了一个值来判断选择的类型,在connect里链接菜单值和对应布局方式
QMap<QString,int> strTypeMap;
    strTypeMap["one"] = VideoLayoutType::OneVideo;
    strTypeMap["four"] = VideoLayoutType::FourVideo;
    strTypeMap["five"] = VideoLayoutType::FiveVideo;
    strTypeMap["six"] = VideoLayoutType::SixVideo;
    strTypeMap["nine"] = VideoLayoutType::NineVideo;

    connect(m_switchMenu,&QMenu::triggered,[=](QAction *action)
    {
        QString strText = action->text();
        VideoLayoutType type = VideoLayoutType(strTypeMap[strText]);
        switchLayout(type);
    });
最后用一个switch方法来判断链接的类型,并实现对应布局
 // 根据不同的视频布局类型创建不同的布局
        switch (type)
        {
        //创建一格布局
        case OneVideo:

        {
            //直接就是一个简单的栅格布局
            QGridLayout* gLayout = new QGridLayout(this);
            gLayout->addWidget(m_videoLabelList[0]);
            gLayout->setMargin(0);
        }
        break;

        // 创建四格布局
        case FourVideo:
        {
            //也是一个简单的栅格布局
            QGridLayout* gLayout = new QGridLayout(this);
            gLayout->setSpacing(0);
            gLayout->setMargin(0);

            //用for循环把四个布局一一加进去
            for (int i = 0; i < 4; i++)
            {
                gLayout->addWidget(m_videoLabelList[i], i / 2, i % 2);
            }
        }
        break;

        // 创建五格布局
        case FiveVideo:
        {
            //五格布局是上面三个,下面两个,分别用两个水平布局做,最后用一个垂直布局加进去
            QVBoxLayout* pVLay = new QVBoxLayout(this);
            pVLay->setSpacing(0);

            QHBoxLayout* pHTopLay = new QHBoxLayout(this);
            pHTopLay->setSpacing(0);
            for (int i = 0; i < 3; i++)
            {
                pHTopLay->addWidget(m_videoLabelList[i]);
            }

            QHBoxLayout* pHBottomLay = new QHBoxLayout(this);
            pHBottomLay->setSpacing(0);
            for (int i = 3; i < 5; i++)
            {
                pHBottomLay->addWidget(m_videoLabelList[i]);
            }

            pVLay->addLayout(pHTopLay);
            pVLay->addLayout(pHBottomLay);

        }
        break;

        // 创建六格布局
        case SixVideo:
        {
            //是一个简单的栅格布局,用for循环
            QGridLayout* gLayout = new QGridLayout(this);
            gLayout->addWidget(m_videoLabelList[0], 0, 0, 2, 2);
            gLayout->addWidget(m_videoLabelList[1], 0, 2);
            gLayout->addWidget(m_videoLabelList[2], 1, 2);
            gLayout->addWidget(m_videoLabelList[3], 2, 0);
            gLayout->addWidget(m_videoLabelList[4], 2, 1);
            gLayout->addWidget(m_videoLabelList[5], 2, 2);
            gLayout->setSpacing(0);
            gLayout->setMargin(0);
        }
        break;

        // 创建九格布局
        case NineVideo:
        {
            //是一个简单的栅格布局,用for循环
            QGridLayout* gLayout = new QGridLayout(this);
            gLayout->setSpacing(0);
            gLayout->setMargin(0);

            for (int i = 0; i < 9; i++)
            {
                gLayout->addWidget(m_videoLabelList[i], i / 3, i % 3);
            }
        }
        break;
可以看到,偶数布局很方便用格栅布局就能实现,而单数往往需要多个水平布局和垂直布局一起使用,创建布局的逻辑就不再细说,大家看代码
2、布局删除
梳理一下顺序,最开始先初始化窗口,在初始化窗口方法里初始化菜单,然后才是看调用布局方法,而且布局方法里首先要清空布局,因为每次选择一个新的布局,都需要先清空原有布局,再重新进行布局。
if (layout)
        {
            QLayoutItem* child;
        //使用takeAt(0)逐个获取布局中的子项,并将其从布局中移除
            while ((child = layout->takeAt(0)) != 0)
            {
                //如果子项是一个窗口,则将其从父级移除,并释放内存
                if (child->widget())
                {
                    child->widget()->setParent(NULL);
                }

                delete child;
            }

        //最后删除整个布局对象,确保清空操作完成
            delete layout;
        }
四、完整示例代码
1、Widget.h
#ifndef WIDGET_H
#define WIDGET_H

#include <QtWidgets/QWidget>
#include <QLabel>
#include <QMenu>

QT_BEGIN_NAMESPACE
namespace Ui { class Widget; }
QT_END_NAMESPACE

enum VideoLayoutType
{
    OneVideo = 0,
    TwoVideo,
    ThreeVideo,
    FourVideo,
    FiveVideo,
    SixVideo,
    SeventVideo,
    EightVideo,
    NineVideo,
};

class Widget : public QWidget
{
    Q_OBJECT

public:
    Widget(QWidget *parent = nullptr);
    ~Widget();

private:
    void  initMenu();
    void  initWidget();

private:
    //菜单事件
    void  contextMenuEvent(QContextMenuEvent *event);

    //切换不同布局
    void  switchLayout(VideoLayoutType type);

private:
    //保存视频区域
    QList<QLabel*> m_videoLabelList;
    QMenu * m_switchMenu;

private:
    Ui::Widget *ui;
};
#endif // WIDGET_H
2、Widget.cpp
#include "widget.h"
#include "ui_widget.h"
#include <QAction>
#include <QMap>
#include <QLayoutItem>
#include <QGridLayout>

Widget::Widget(QWidget *parent)
    : QWidget(parent)
    , ui(new Ui::Widget)
{
    ui->setupUi(this);

   // setWindowTitle("布局切换器");

    initWidget();

    this->resize(QSize(800,500));

    //设置了窗口的上下文菜单策略为Qt::DefaultContextMenu,表示使用默认的上下文菜单
    //当用户右键单击窗口时,将会显示默认的上下文菜单
    this->setContextMenuPolicy(Qt::DefaultContextMenu);
}

Widget::~Widget()
{
    delete ui;
}

//处理右键菜单事件
void  Widget::contextMenuEvent(QContextMenuEvent *event)
{
    //调用exec函数在鼠标当前位置弹出m_switchMenu右键菜单。
    //通过QCursor::pos()函数获取当前鼠标的位置,确保右键菜单在鼠标位置上显示
    m_switchMenu->exec(QCursor::pos());
}

//初始化窗口界面
void  Widget::initWidget()
{
    initMenu();

    //用循环创建了9个QLabel对象,并为每个QLabel设置了不同的背景图片样式
        for (int i = 0; i < 9; i++)
        {
        //每次循环都创建一个新的QLabel对象,并将其指针保存在label变量中
            QLabel* label = new QLabel;

            //设置了label的样式表,包括背景图片、边框等样式
            //使用arg(QString::number(i + 1))将i的值加1后作为占位符 %1 的值,
            //从而在每次循环中加载不同的背景图片文件(例如1.png、2.png等)
            label->setStyleSheet(QString("QLabel{background-image:url(:/new/prefix1/res/%1.png); \
                border:1px solid gray; \
                background-position:center; \
                background-repeat:no-repeat; \
                }").arg(QString::number(i + 1)));

            //将每次循环创建的label对象添加到m_videoLabelList列表中
            m_videoLabelList.append(label);
        }

        switchLayout(VideoLayoutType::OneVideo);

}

//初始化菜单,实现右键单击弹出菜单
void  Widget::initMenu()
{
    m_switchMenu = new QMenu(this);
    //傻逼玩意儿的中文乱码问题
//    QAction *one = new QAction("one");
//    QAction *four = new QAction("four");
//    QAction *five = new QAction("five");
//    QAction *six = new QAction("six");
//    QAction *nine = new QAction("nine");

    m_switchMenu->addAction("one");
    m_switchMenu->addAction("four");
    m_switchMenu->addAction("five");
    m_switchMenu->addAction("six");
    m_switchMenu->addAction("nine");

    QMap<QString,int> strTypeMap;
    strTypeMap["one"] = VideoLayoutType::OneVideo;
    strTypeMap["four"] = VideoLayoutType::FourVideo;
    strTypeMap["five"] = VideoLayoutType::FiveVideo;
    strTypeMap["six"] = VideoLayoutType::SixVideo;
    strTypeMap["nine"] = VideoLayoutType::NineVideo;

    connect(m_switchMenu,&QMenu::triggered,[=](QAction *action)
    {
        QString strText = action->text();
        VideoLayoutType type = VideoLayoutType(strTypeMap[strText]);
        switchLayout(type);
    });

}


//函数根据不同的视频布局类型切换布局。
void  Widget::switchLayout(VideoLayoutType type)
{
    //获取当前窗口的布局,将其保存在layout变量中。
    //如果窗口有布局,那么layout将指向该布局;
    //如果窗口没有布局,layout将为nullptr
    QLayout* layout = this->layout();


    //对当前窗口的布局进行清空操作
    //这是因为,每次在用户选择新的布局界面前,都应该先进行当前布局的清空操作
    if (layout)
        {
            QLayoutItem* child;
        //使用takeAt(0)逐个获取布局中的子项,并将其从布局中移除
            while ((child = layout->takeAt(0)) != 0)
            {
                //如果子项是一个窗口,则将其从父级移除,并释放内存
                if (child->widget())
                {
                    child->widget()->setParent(NULL);
                }

                delete child;
            }

        //最后删除整个布局对象,确保清空操作完成
            delete layout;
        }

        // 根据不同的视频布局类型创建不同的布局
        switch (type)
        {
        //创建一格布局
        case OneVideo:

        {
            //直接就是一个简单的栅格布局
            QGridLayout* gLayout = new QGridLayout(this);
            gLayout->addWidget(m_videoLabelList[0]);
            gLayout->setMargin(0);
        }
        break;

        // 创建四格布局
        case FourVideo:
        {
            //也是一个简单的栅格布局
            QGridLayout* gLayout = new QGridLayout(this);
            gLayout->setSpacing(0);
            gLayout->setMargin(0);

            //用for循环把四个布局一一加进去
            for (int i = 0; i < 4; i++)
            {
                gLayout->addWidget(m_videoLabelList[i], i / 2, i % 2);
            }
        }
        break;

        // 创建五格布局
        case FiveVideo:
        {
            //五格布局是上面三个,下面两个,分别用两个水平布局做,最后用一个垂直布局加进去
            QVBoxLayout* pVLay = new QVBoxLayout(this);
            pVLay->setSpacing(0);

            QHBoxLayout* pHTopLay = new QHBoxLayout(this);
            pHTopLay->setSpacing(0);
            for (int i = 0; i < 3; i++)
            {
                pHTopLay->addWidget(m_videoLabelList[i]);
            }

            QHBoxLayout* pHBottomLay = new QHBoxLayout(this);
            pHBottomLay->setSpacing(0);
            for (int i = 3; i < 5; i++)
            {
                pHBottomLay->addWidget(m_videoLabelList[i]);
            }

            pVLay->addLayout(pHTopLay);
            pVLay->addLayout(pHBottomLay);

        }
        break;

        // 创建六格布局
        case SixVideo:
        {
            //是一个简单的栅格布局,用for循环
            QGridLayout* gLayout = new QGridLayout(this);
            gLayout->addWidget(m_videoLabelList[0], 0, 0, 2, 2);
            gLayout->addWidget(m_videoLabelList[1], 0, 2);
            gLayout->addWidget(m_videoLabelList[2], 1, 2);
            gLayout->addWidget(m_videoLabelList[3], 2, 0);
            gLayout->addWidget(m_videoLabelList[4], 2, 1);
            gLayout->addWidget(m_videoLabelList[5], 2, 2);
            gLayout->setSpacing(0);
            gLayout->setMargin(0);
        }
        break;

        // 创建九格布局
        case NineVideo:
        {
            //是一个简单的栅格布局,用for循环
            QGridLayout* gLayout = new QGridLayout(this);
            gLayout->setSpacing(0);
            gLayout->setMargin(0);

            for (int i = 0; i < 9; i++)
            {
                gLayout->addWidget(m_videoLabelList[i], i / 3, i % 3);
            }
        }
        break;

        default:
            break;
        }

}
都看到这里了,点个赞再走呗朋友~
加油吧,预祝大家变得更强!


 185
185


 被折叠的 条评论
为什么被折叠?
被折叠的 条评论
为什么被折叠?
 到【灌水乐园】发言


