


 本文介绍了如何在QT中实现无边框窗口,自定义标题栏并添加阴影效果,包括设置窗口透明度、底层和顶层类的设计,以及鼠标拖拽事件的处理。
往期回顾:
【QT入门】 无边框窗口设计之实现窗口阴影
一共用了两个类,一个类放底层实现透明效果,一个类放顶层写控件实现整体布局,主要是添加一些基本属性来实现,同时注意区分,鼠标拖拽事件是在底层类实现,而不是在控件布局类。
一、最终效果
这里的阴影颜色是可以随意调换,用绿色单纯是因为比较显眼
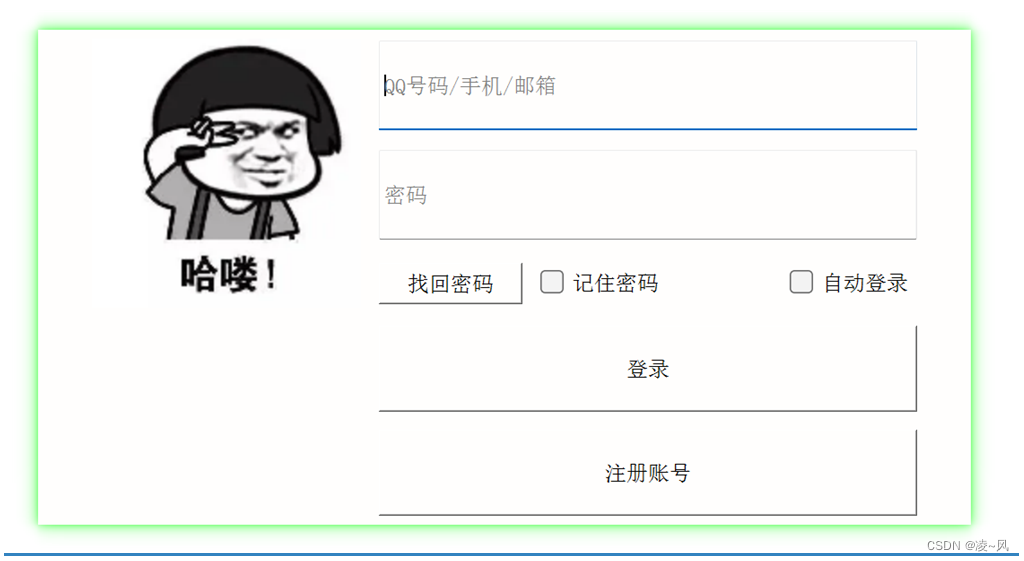
二、顶层类界面设计
纯写布局,用了一个栅格布局来实现登录窗口,整体布局很简单,依旧是用无边框窗口。
1、需要注意的方法
1.1setPlaceholderText()
这里用到一个方法setPlaceholderText,是用于设置控件的占位文本,在用户输入前提供一些提示性文字,告诉用户该输入框的预期内容或用途。当用户开始输入内容时,占位文本会自动消失。
 //用户名
 QLineEdit* pUserNameLineEdit = new QLineEdit(this);
 pUserNameLineEdit->setFixedSize(300, 50);
 pUserNameLineEdit->setPlaceholderText(QStringLiteral("QQ号码/手机/邮箱"));
1.2 QStringLiteral
后面又用了一个QStringLiteral,这是Qt中的一个宏,用于创建一个编译时的不可变的QString对象。相比于普通的字符串字面值,使用QStringLiteral可以提高字符串的效率和性能,因为它会在编译时将字符串转换为不可变的QString对象,而不是在运行时进行转换。
2、代码实现
#include "CLoginRealWidget.h"
#include <QLabel>
#include <QLineEdit>
#include <QCheckBox>
#include <QPushButton>
#include <QHBoxLayout>
#include <QGridLayout>

CLoginRealWidget::CLoginRealWidget(QWidget* p)
	:QWidget(p)
{
	//禁止父窗口影响子窗口样式
	setAttribute(Qt::WA_StyledBackground);
	setWindowFlags(Qt::FramelessWindowHint);

	//头像
	QLabel* pImageLabel = new QLabel(this);
	QPixmap pixmap(":/CLoginDig/resource/user_image.png");
	pImageLabel->setFixedSize(150, 150);
	pImageLabel->setPixmap(pixmap);
	pImageLabel->setScaledContents(true);

	//用户名
	QLineEdit* pUserNameLineEdit = new QLineEdit(this);
	pUserNameLineEdit->setFixedSize(300, 50);
	pUserNameLineEdit->setPlaceholderText(QStringLiteral("QQ号码/手机/邮箱"));

	//密码
	QLineEdit* pPasswordLineEdit = new QLineEdit(this);
	pPasswordLineEdit->setFixedSize(300, 50);
	pPasswordLineEdit->setPlaceholderText(QStringLiteral("密码"));
	pPasswordLineEdit->setEchoMode(QLineEdit::Password);//输入设置成密码输入,这样会自动不显示

	QPushButton* pForgotButton = new QPushButton(this);
	pForgotButton->setText(QStringLiteral("找回密码"));
	pForgotButton->setFixedWidth(80);

	QCheckBox* pRememberCheckBox = new QCheckBox(this);
	pRememberCheckBox->setText(QStringLiteral("记住密码"));

	QCheckBox* pAutoLoginCheckBox = new QCheckBox(this);
	pAutoLoginCheckBox->setText(QStringLiteral("自动登录"));

	QPushButton* pLoginButton = new QPushButton(this);
	pLoginButton->setFixedHeight(48);
	pLoginButton->setText(QStringLiteral("登录"));

	QPushButton* pRegisterButton = new QPushButton(this);
	pRegisterButton->setFixedHeight(48);
	pRegisterButton->setText(QStringLiteral("注册账号"));

	QHBoxLayout* pMainLay = new QHBoxLayout(this);

	QSpacerItem* pHSpacer = new QSpacerItem(25, 20, QSizePolicy::Fixed, QSizePolicy::Fixed);
	pMainLay->addSpacerItem(pHSpacer);

	QGridLayout* pGridLayout = new QGridLayout(this);

	// 头像 第0行,第0列开始,占3行1列
	pGridLayout->addWidget(pImageLabel, 0, 0, 3, 1);

	// 用户名输入框 第0行,第1列开始,占1行2列
	pGridLayout->addWidget(pUserNameLineEdit, 0, 1, 1, 2);

	// 密码输入框 第1行,第1列开始,占1行2列
	pGridLayout->addWidget(pPasswordLineEdit, 1, 1, 1, 2);

	// 忘记密码 第2行,第1列开始,占1行1列
	pGridLayout->addWidget(pForgotButton, 2, 1, 1, 1);

	// 记住密码 第2行,第2列开始,占1行1列 水平居中 垂直居中
	pGridLayout->addWidget(pRememberCheckBox, 2, 2, 1, 1, Qt::AlignLeft | Qt::AlignVCenter);

	// 自动登录 第2行,第2列开始,占1行1列 水平居右 垂直居中
	pGridLayout->addWidget(pAutoLoginCheckBox, 2, 2, 1, 1, Qt::AlignRight | Qt::AlignVCenter);

	// 登录按钮 第3行,第1列开始,占1行2列
	pGridLayout->addWidget(pLoginButton, 3, 1, 1, 2);

	// 注册按钮 第4行,第1列开始,占1行2列
	pGridLayout->addWidget(pRegisterButton, 4, 1, 1, 2);

	// 设置水平间距
	pGridLayout->setHorizontalSpacing(10);

	// 设置垂直间距
	pGridLayout->setVerticalSpacing(10);

	pMainLay->addLayout(pGridLayout);
	pMainLay->addSpacerItem(pHSpacer);

	pMainLay->setContentsMargins(5, 5, 5, 5);
	setLayout(pMainLay);
}

CLoginRealWidget::~CLoginRealWidget()
{
}
三、底层类阴影实现
1、顺序梳理
逻辑不难,按照顺序来做就ok:
| 1、设置窗口透明 |
| 2、设置无边框 |
| 3、给顶层widget设置背景颜色 |
| 4、设置阴影距离 |
| 5、设置阴影颜色 |
| 6、设置阴影区域 |
| 7、给顶层QWidget设置阴影 |
2、代码实现
#include "CLoginDig.h"
#include "CLoginRealWidget.h"
#include <QGraphicsDropShadowEffect>
#include <QVboxLayout>
#include <QMouseEvent>

CLoginDig::CLoginDig(QWidget *parent)
    : QDialog(parent)
{
    //设置窗体透明
    this->setAttribute(Qt::WA_TranslucentBackground, true);

    //设置无边框
    this->setWindowFlags(Qt::Window | Qt::FramelessWindowHint | Qt::WindowMinMaxButtonsHint);

    QVBoxLayout* pMainLay = new QVBoxLayout(this);
    CLoginRealWidget* pRealWidget = new CLoginRealWidget(this);
    pMainLay->addWidget(pRealWidget);
    pMainLay->setContentsMargins(30, 30, 30, 30);
    setLayout(pMainLay);

    //给顶层widget设置背景颜色,不然看不见,因为底层widget已经透明了
    pRealWidget->setStyleSheet("background-color:rgb(255, 254, 253)");

    QGraphicsDropShadowEffect* shadow = new QGraphicsDropShadowEffect(this);

    //设置阴影距离
    shadow->setOffset(0, 0);

    //设置阴影颜色  686868
    shadow->setColor(QColor("#00FF00"));

    //设置阴影区域
    shadow->setBlurRadius(30);

    //给顶层QWidget设置阴影
    pRealWidget->setGraphicsEffect(shadow);
}

CLoginDig::~CLoginDig()
{}
注意设置窗口透明的
this->setAttribute(Qt::WA_TranslucentBackground, true);阴影部分专门用了一个宏
QGraphicsDropShadowEffect* shadow = new QGraphicsDropShadowEffect(this);四、鼠标拖拽事件
底层类负责鼠标拖拽事件,区分之前的写一个函数实现鼠标拖拽标题栏,只用一个函数写在标题栏类里面,就是只有拖拽标题栏才行,这样写是整体随便哪个区域都可以拖拽。
void CLoginDig::mousePressEvent(QMouseEvent* event)
{
    this->windowPos = this->pos();       // 获得部件当前位置
    this->mousePos = event->globalPos(); // 获得鼠标位置
    this->dPos = mousePos - windowPos;   // 移动后部件所在的位置
}

void CLoginDig::mouseMoveEvent(QMouseEvent* event)
{
    this->move(event->globalPos() - this->dPos);
}
都看到这里了,点个赞再走呗朋友~
加油吧,预祝大家变得更强!


 384
384

 被折叠的 条评论
为什么被折叠?
被折叠的 条评论
为什么被折叠?
 到【灌水乐园】发言


