


thymeleaf
一、几个基本概念
物理视图和逻辑视图
在Servlet中,将请求转发到一个HTML页面文件时,使用的完整的转发路径就是物理视图。
/pages/user/login_success.html
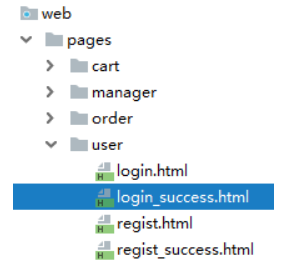
如果我们把所有的HTML页面都放在某个统一的目录下,那么转发地址就会呈现出明显的规律:
/pages/user/login.html /pages/user/login_success.html /pages/user/regist.html /pages/user/regist_success.html
路径的开头都是:/pages/user/
路径的结尾都是:.html
所以,路径开头的部分我们称之为视图前缀,路径结尾的部分我们称之为视图后缀。
逻辑视图
物理视图=视图前缀+逻辑视图+视图后缀
上面的例子中:
| 视图前缀 | 逻辑视图 | 视图后缀 | 物理视图 |
|---|---|---|---|
| /pages/user/ | login | .html | /pages/user/login.html |
| /pages/user/ | login_success | .html | /pages/user/login_success.html |
二、thymeleaf配置
在web.xml中配置试图前缀和试图后缀
<context-param>
    <param-name>view-prefix</param-name>
    <param-value>/WEB-INF/view/</param-value>
</context-param>
<context-param>
    <param-name>view-suffix</param-name>
    <param-value>.html</param-value>
</context-param>
为什么要放在WEB-INF目录下?
原因:WEB-INF目录不允许浏览器直接访问,所以我们的视图模板文件放在这个目录下,是一种保护。以免外界可以随意访问视图模板文件。
访问WEB-INF目录下的页面,都必须通过Servlet转发过来,简单说就是:不经过Servlet访问不了。
这样就方便我们在Servlet中检查当前用户是否有权限访问。
那放在WEB-INF目录下之后,重定向进不去怎么办?
重定向到Servlet,再通过Servlet转发到WEB-INF下。
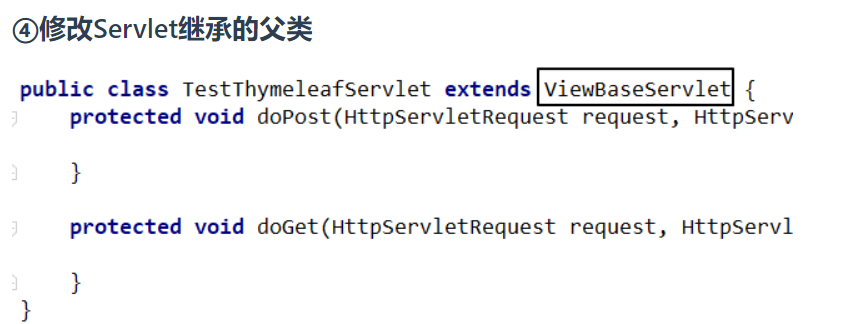
创建Servlet基类
复制粘贴即可
import org.thymeleaf.TemplateEngine;
import org.thymeleaf.context.WebContext;
import org.thymeleaf.templatemode.TemplateMode;
import org.thymeleaf.templateresolver.ServletContextTemplateResolver;

import javax.servlet.ServletContext;
import javax.servlet.ServletException;
import javax.servlet.http.HttpServlet;
import javax.servlet.http.HttpServletRequest;
import javax.servlet.http.HttpServletResponse;
import java.io.IOException;

public class ViewBaseServlet extends HttpServlet {

    private TemplateEngine templateEngine;

    @Override
    public void init() throws ServletException {

        // 1.获取ServletContext对象
        ServletContext servletContext = this.getServletContext();

        // 2.创建Thymeleaf解析器对象
        ServletContextTemplateResolver templateResolver = new ServletContextTemplateResolver(servletContext);

        // 3.给解析器对象设置参数
        // ①HTML是默认模式,明确设置是为了代码更容易理解
        templateResolver.setTemplateMode(TemplateMode.HTML);

        // ②设置前缀
        String viewPrefix = servletContext.getInitParameter("view-prefix");

        templateResolver.setPrefix(viewPrefix);

        // ③设置后缀
        String viewSuffix = servletContext.getInitParameter("view-suffix");

        templateResolver.setSuffix(viewSuffix);

        // ④设置缓存过期时间(毫秒)
        templateResolver.setCacheTTLMs(60000L);

        // ⑤设置是否缓存
        templateResolver.setCacheable(true);

        // ⑥设置服务器端编码方式
        templateResolver.setCharacterEncoding("utf-8");

        // 4.创建模板引擎对象
        templateEngine = new TemplateEngine();

        // 5.给模板引擎对象设置模板解析器
        templateEngine.setTemplateResolver(templateResolver);

    }

    protected void processTemplate(String templateName, HttpServletRequest req, HttpServletResponse resp) throws IOException {
        // 1.设置响应体内容类型和字符集
        resp.setContentType("text/html;charset=UTF-8");

        // 2.创建WebContext对象
        WebContext webContext = new WebContext(req, resp, getServletContext());

        // 3.处理模板数据
        templateEngine.process(templateName, webContext, resp.getWriter());
    }
}
Thymeleaf页面
<!DOCTYPE html>

<!-- 在html标签内加入Thymeleaf名称空间的声明 -->
<html lang="en" xmlns:th="http://www.thymeleaf.org">
<head>
    <meta charset="UTF-8">
    <title>Title</title>
</head>
<body>

    <!-- 在p标签的基础上,使用Thymeleaf的表达式,解析了一个URL地址 -->
    <p th:text="@{'/aaa/bbb/ccc'}">Thymeleaf将在这里显示一个解析出来的URL地址</p>

</body>
</html>
protected void doGet(HttpServletRequest request, HttpServletResponse response) throws ServletException, IOException {

    // 1.声明当前请求要前往的视图名称
    String viewName = "target";

    // 2.调用ViewBaseServlet父类中的解析视图模板的方法
    super.processTemplate(viewName, request, response);

}
三、thymeleaf基本语法
1.示例代码
<p th:text="@{/aaa/bbb/ccc}">标签体原始值</p>
经解析后:/view/aaa/bbb/ccc
servlet程序

html
<p>有转义效果:[[${reqAttrName}]]</p>
<p>无转义效果:[(${reqAttrName})]</p>
request.setAttribute("reqAttrName", "<span>hello-value</span>");
<p>有转义效果:<span>hello-value</span></p>
<p>无转义效果:<span>hello-value</span></p>
请求域:HttpServletRequest对象内部给我们提供的存储空间
会话域: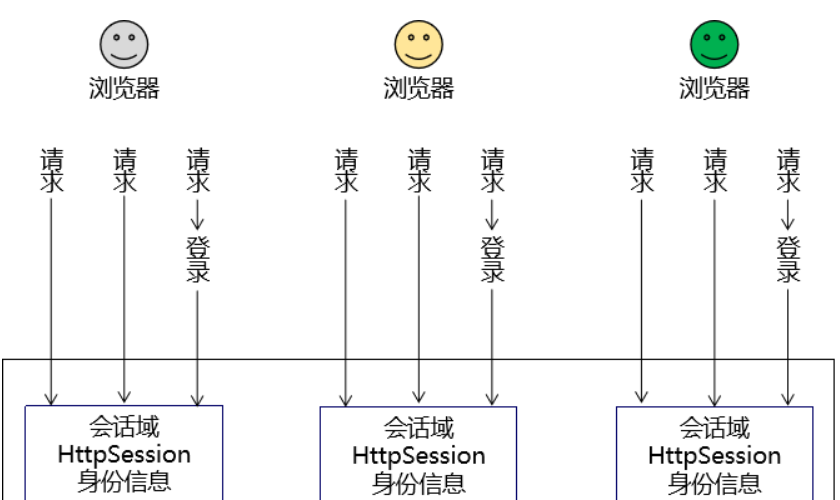
应用域:
PS:在我们使用的视图是JSP的时候,域对象有4个
- pageContext
- request:请求域
- session:会话域
- application:应用域
所以在JSP的使用背景下,我们可以说域对象有4个,现在使用Thymeleaf了,没有pageContext
2.servlet中将数据存入属性域
①操作请求域
Servlet中代码:
String requestAttrName = "helloRequestAttr";
String requestAttrValue = "helloRequestAttr-VALUE";

request.setAttribute(requestAttrName, requestAttrValue);
Thymeleaf表达式:
<p th:text="${helloRequestAttr}">request field value</p>
②操作会话域
Servlet中代码:
// ①通过request对象获取session对象
HttpSession session = request.getSession();

// ②存入数据
session.setAttribute("helloSessionAttr", "helloSessionAttr-VALUE");
Thymeleaf表达式:
<p th:text="${session.helloSessionAttr}">这里显示会话域数据</p>
③操作应用域
Servlet中代码:
// ①通过调用父类的方法获取ServletContext对象
ServletContext servletContext = getServletContext();

// ②存入数据
servletContext.setAttribute("helloAppAttr", "helloAppAttr-VALUE");
Thymeleaf表达式:
<p th:text="${application.helloAppAttr}">这里显示应用域数据</p>
3.获取请求参数
①一个名字一个值
页面代码:
<p th:text="${param.username}">这里替换为请求参数的值</p>
页面显示效果:

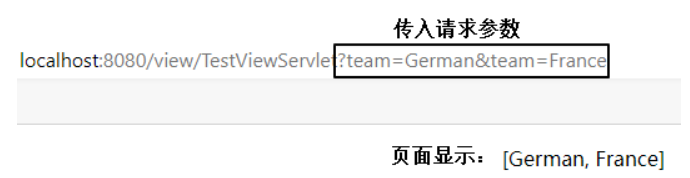
②一个名字多个值
页面代码:
<p th:text="${param.team}">这里替换为请求参数的值</p>
页面显示效果:
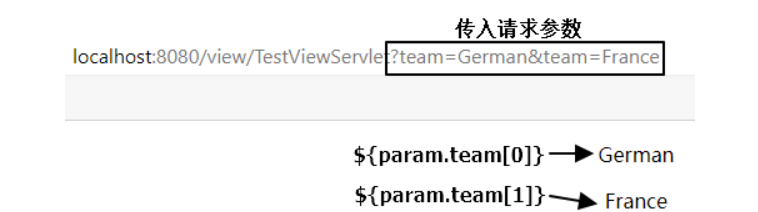
如果想要精确获取某一个值,可以使用数组下标。页面代码:
<p th:text="${param.team[0]}">这里替换为请求参数的值</p>
<p th:text="${param.team[1]}">这里替换为请求参数的值</p>
页面显示效果:
4.内置对象
<h3>表达式的基本内置对象</h3>
<p th:text="${#request.getClass().getName()}">这里显示#request对象的全类名</p>
<p th:text="${#request.getContextPath()}">调用#request对象的getContextPath()方法</p>
<p th:text="${#request.getAttribute('helloRequestAttr')}">调用#request对象的getAttribute()方法,读取属性域</p>
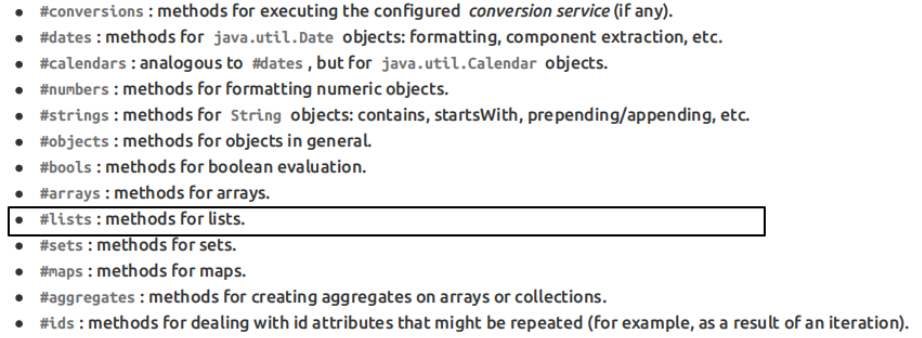
基本内置对象
Servlet中将List集合数据存入请求域:
request.setAttribute("aNotEmptyList", Arrays.asList("aaa","bbb","ccc"));
request.setAttribute("anEmptyList", new ArrayList<>());
页面代码:
<p>#list对象isEmpty方法判断集合整体是否为空aNotEmptyList:<span th:text="${#lists.isEmpty(aNotEmptyList)}">测试#lists</span></p>
<p>#list对象isEmpty方法判断集合整体是否为空anEmptyList:<span th:text="${#lists.isEmpty(anEmptyList)}">测试#lists</span></p>
①起点
在Thymeleaf环境下,${}中的表达式可以从下列元素开始:
- 访问属性域的起点
- 请求域属性名
- session
- application
- param
- 内置对象
- #request
- #session
- #lists
- #strings
②属性访问语法
- 访问对象属性:使用getXxx()、setXxx()方法定义的属性
- 对象.属性名
- 访问List集合或数组
- 集合或数组[下标]
- 访问Map集合
- Map集合.key
- Map集合[‘key’]
四、迭代与分支
1、分支
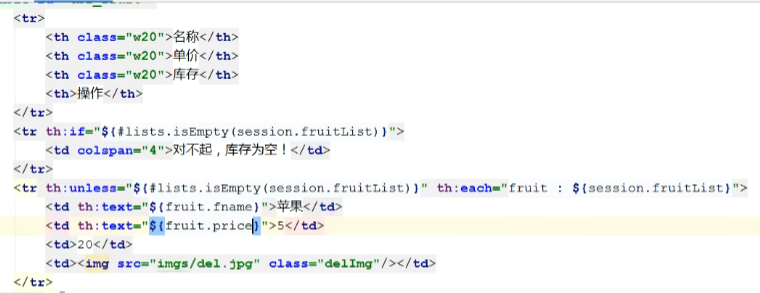
①if和unless
让标记了th:if、th:unless的标签根据条件决定是否显示。
示例的实体类:
public class Employee {
    private Integer empId;
    private String empName;
    private Double empSalary;
}
示例的Servlet代码:
protected void doGet(HttpServletRequest request, HttpServletResponse response) throws ServletException, IOException {

    // 1.创建ArrayList对象并填充
    List<Employee> employeeList = new ArrayList<>();

    employeeList.add(new Employee(1, "tom", 500.00));
    employeeList.add(new Employee(2, "jerry", 600.00));
    employeeList.add(new Employee(3, "harry", 700.00));

    // 2.将集合数据存入请求域
    request.setAttribute("employeeList", employeeList);

    // 3.调用父类方法渲染视图
    super.processTemplate("list", request, response);
}
示例的HTML代码:
<table>
    <tr>
        <th>员工编号</th>
        <th>员工姓名</th>
        <th>员工工资</th>
    </tr>
    <tr th:if="${#lists.isEmpty(employeeList)}">
        <td colspan="3">抱歉!没有查询到你搜索的数据!</td>
    </tr>
    <tr th:if="${not #lists.isEmpty(employeeList)}">
        <td colspan="3">有数据!</td>
    </tr>
    <tr th:unless="${#lists.isEmpty(employeeList)}">
        <td colspan="3">有数据!</td>
    </tr>
</table>
if配合not关键词和unless配合原表达式效果是一样的,看自己的喜好。
②switch
<h3>测试switch</h3>
<div th:switch="${user.memberLevel}">
    <p th:case="level-1">银牌会员</p>
    <p th:case="level-2">金牌会员</p>
    <p th:case="level-3">白金会员</p>
    <p th:case="level-4">钻石会员</p>
</div>
2、迭代
<h3>测试each</h3>
<table>
    <thead>
        <tr>
            <th>员工编号</th>
            <th>员工姓名</th>
            <th>员工工资</th>
        </tr>
    </thead>
    <tbody th:if="${#lists.isEmpty(employeeList)}">
        <tr>
            <td colspan="3">抱歉!没有查询到你搜索的数据!</td>
        </tr>
    </tbody>
    <tbody th:if="${not #lists.isEmpty(employeeList)}">
        <!-- 遍历出来的每一个元素的名字 : ${要遍历的集合} -->
        <tr th:each="employee : ${employeeList}">
            <td th:text="${employee.empId}">empId</td>
            <td th:text="${employee.empName}">empName</td>
            <td th:text="${employee.empSalary}">empSalary</td>
        </tr>
    </tbody>
</table>
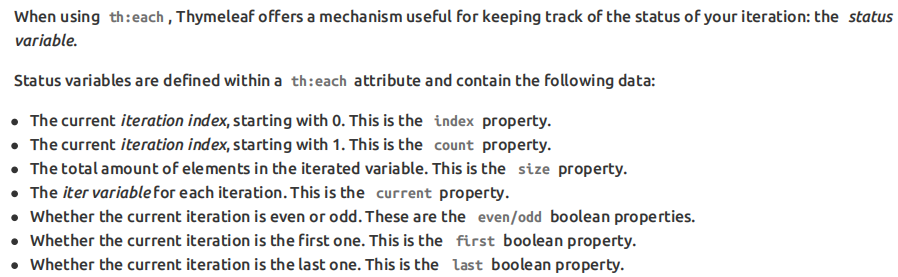
在迭代过程中,可以参考下面的说明使用迭代状态:
<h3>测试each</h3>
<table>
    <thead>
        <tr>
            <th>员工编号</th>
            <th>员工姓名</th>
            <th>员工工资</th>
            <th>迭代状态</th>
        </tr>
    </thead>
    <tbody th:if="${#lists.isEmpty(employeeList)}">
        <tr>
            <td colspan="3">抱歉!没有查询到你搜索的数据!</td>
        </tr>
    </tbody>
    <tbody th:if="${not #lists.isEmpty(employeeList)}">
        <!-- 遍历出来的每一个元素的名字 : ${要遍历的集合} -->
        <tr th:each="employee,empStatus : ${employeeList}">
            <td th:text="${employee.empId}">empId</td>
            <td th:text="${employee.empName}">empName</td>
            <td th:text="${employee.empSalary}">empSalary</td>
            <td th:text="${empStatus.count}">count</td>
        </tr>
    </tbody>
</table>
五、其他语法
| 语法 | 效果 |
|---|---|
| th:insert | 把目标的代码片段整个插入到当前标签内部 |
| th:replace | 用目标的代码替换当前标签 |
| th:include | 把目标的代码片段去除最外层标签,然后再插入到当前标签内部 |
页面代码举例:
<!-- 代码片段所在页面的逻辑视图 :: 代码片段的名称 -->
<div id="badBoy" th:insert="segment :: header">
    div标签的原始内容
</div>

<div id="worseBoy" th:replace="segment :: header">
    div标签的原始内容
</div>

<div id="worstBoy" th:include="segment :: header">
    div标签的原始内容
</div>
-------------------------------------------------------- |
| th:insert | 把目标的代码片段整个插入到当前标签内部 |
| th:replace | 用目标的代码替换当前标签 |
| th:include | 把目标的代码片段去除最外层标签,然后再插入到当前标签内部 |
页面代码举例:
<!-- 代码片段所在页面的逻辑视图 :: 代码片段的名称 -->
<div id="badBoy" th:insert="segment :: header">
    div标签的原始内容
</div>

<div id="worseBoy" th:replace="segment :: header">
    div标签的原始内容
</div>

<div id="worstBoy" th:include="segment :: header">
    div标签的原始内容
</div>


 570
570


 被折叠的 条评论
为什么被折叠?
被折叠的 条评论
为什么被折叠?
 到【灌水乐园】发言


