


Thymeleaf讲解
简介
简介:
Thymeleaf 是新一代 Java 模板引擎,与 Velocity、FreeMarker 等传统 Java 模板引擎不同,Thymeleaf 支持 HTML 原型,其文件后缀为“.html”,因此它可以直接被浏览器打开,此时浏览器会忽略未定义的 Thymeleaf 标签属性,展示 thymeleaf 模板的静态页面效果;当通过 Web 应用程序访问时,Thymeleaf 会动态地替换掉静态内容,使页面动态显示。
创建项目
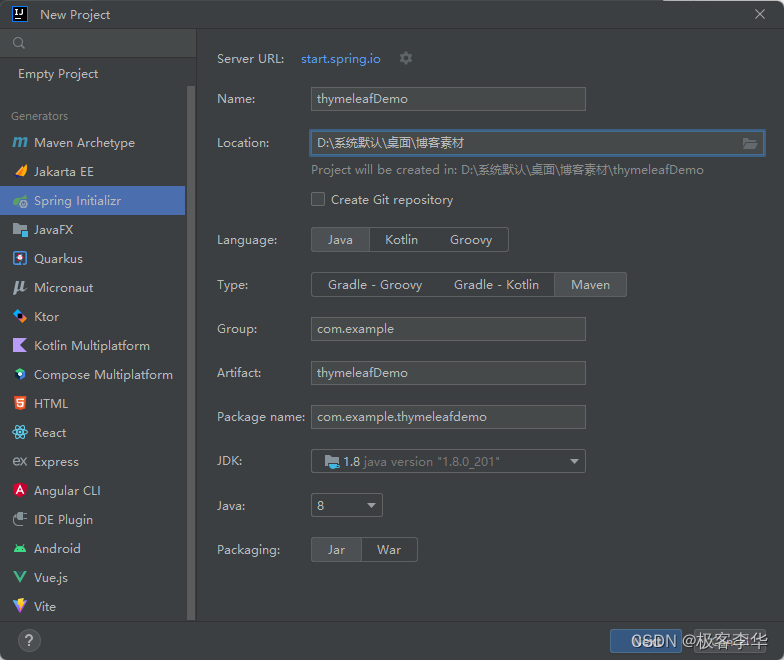
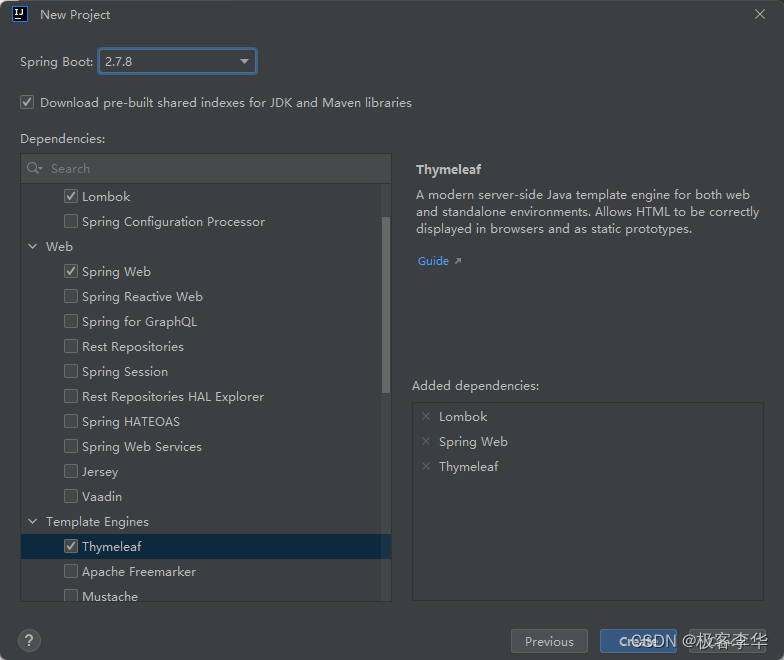
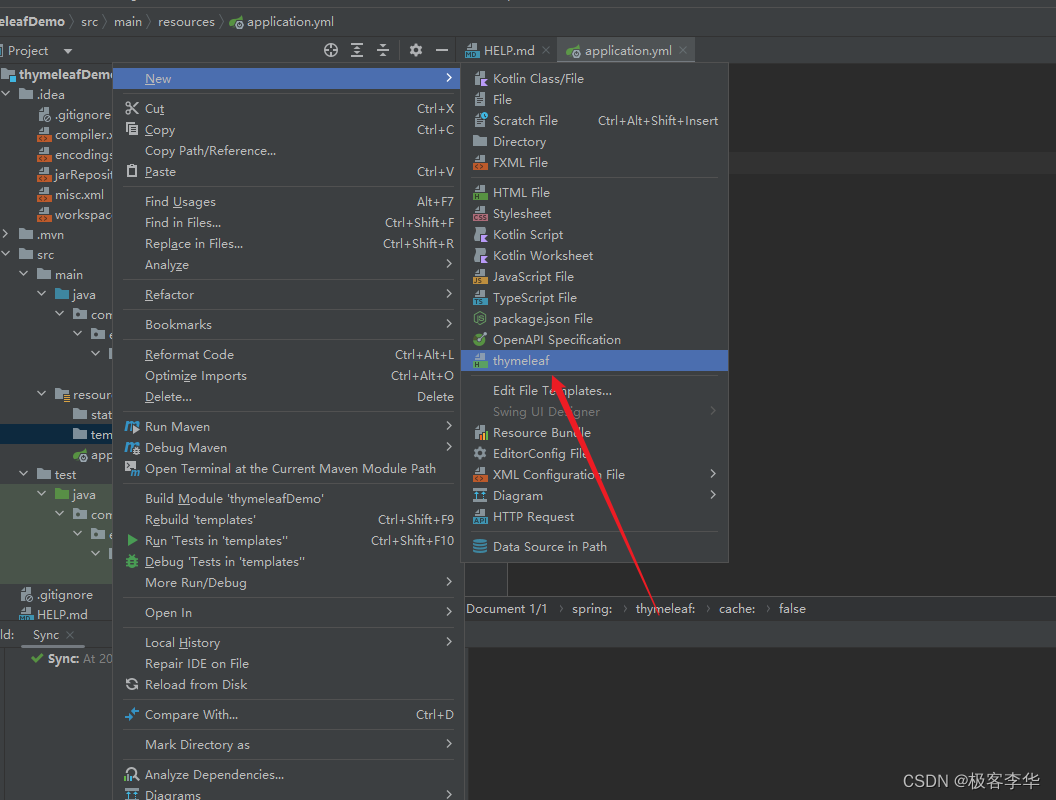
再setting的Editor中的File and code Templates中创建,thymeleaf模板,方便以后的调用。
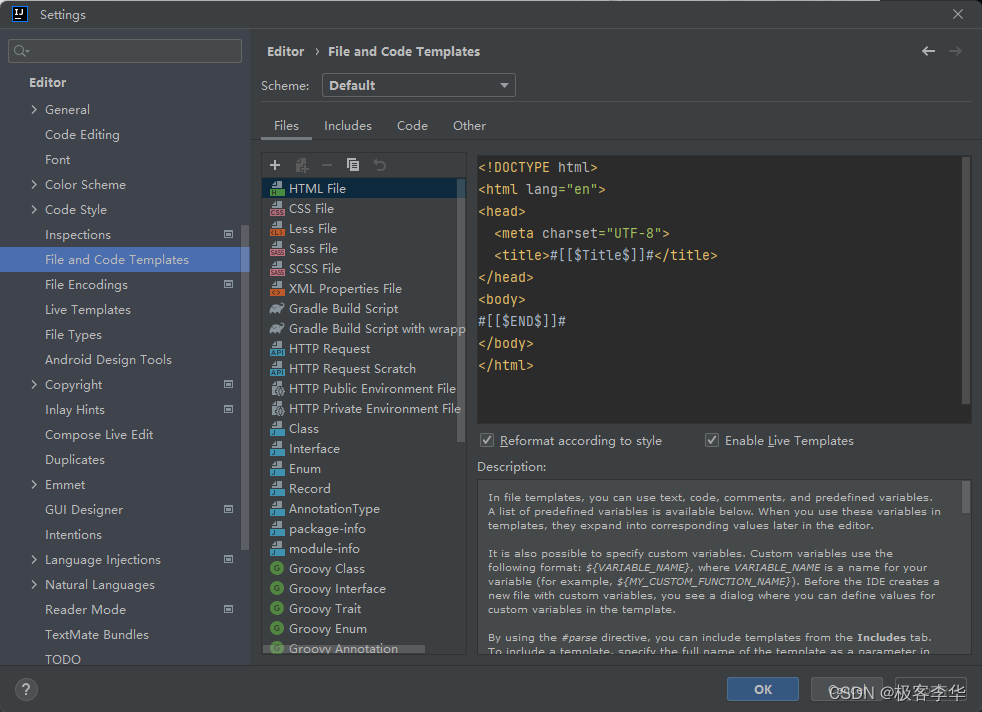
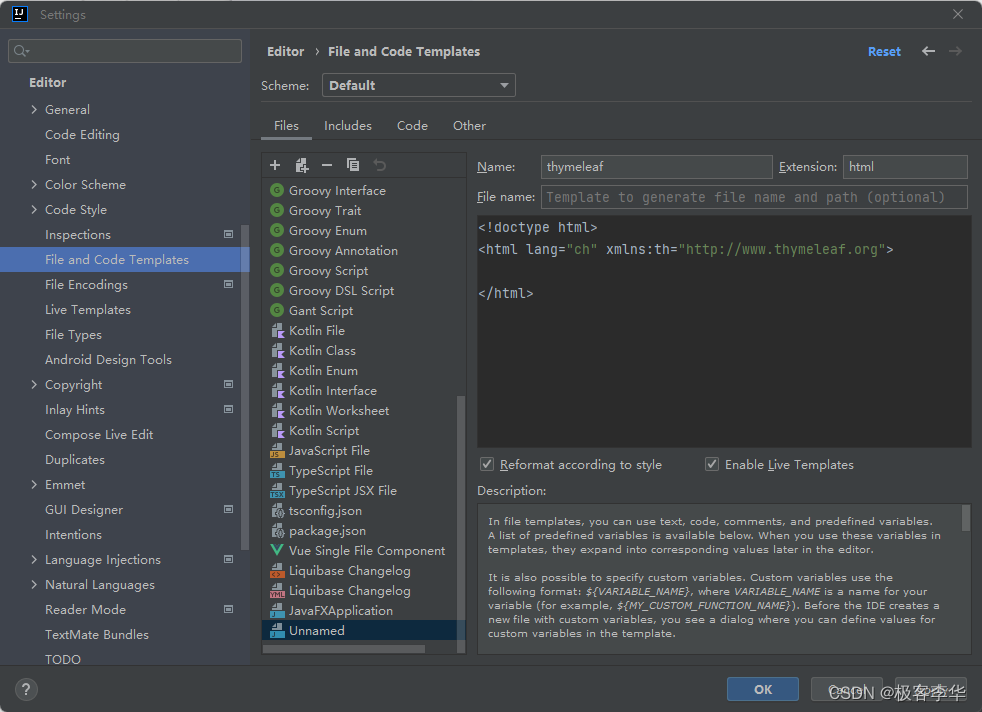
我们再点击新建的时候,就有了这个thymeleaf选项。
编码
基础使用
代码一(th:text)
第一个语法通过,运行结果进行讲解。
<!doctype html>
<html lang="ch" xmlns:th="http://www.thymeleaf.org">
<head>
<meta charset="UTF-8">
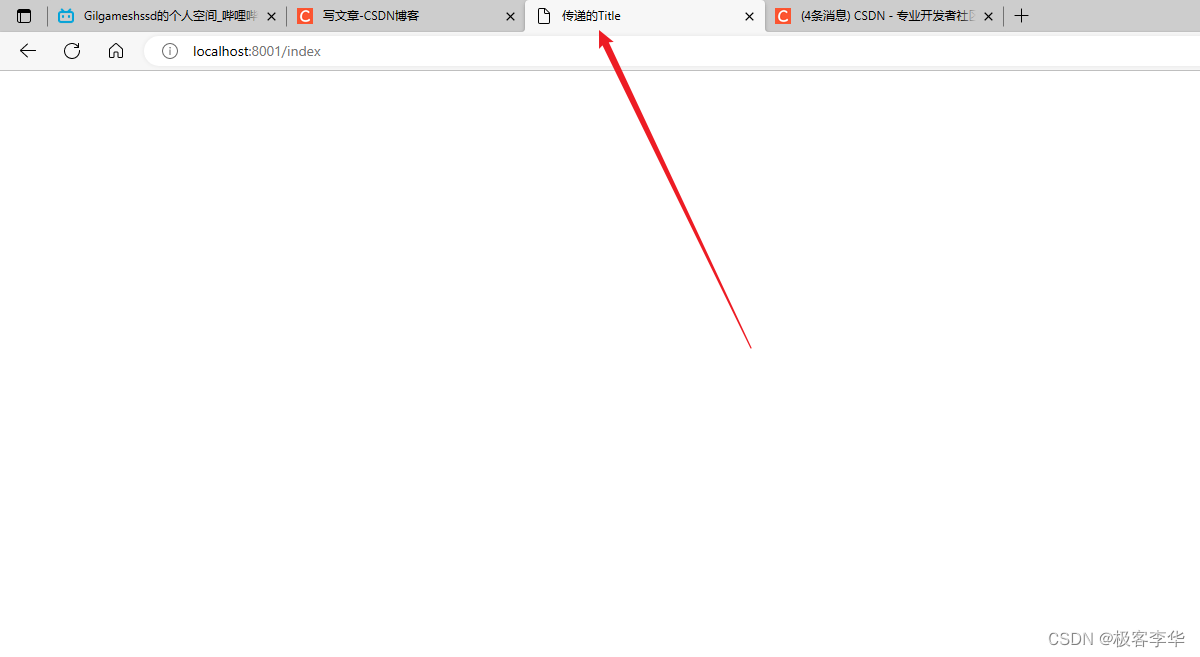
<title th:text="${title}">默认的title</title>
</head>
</html>
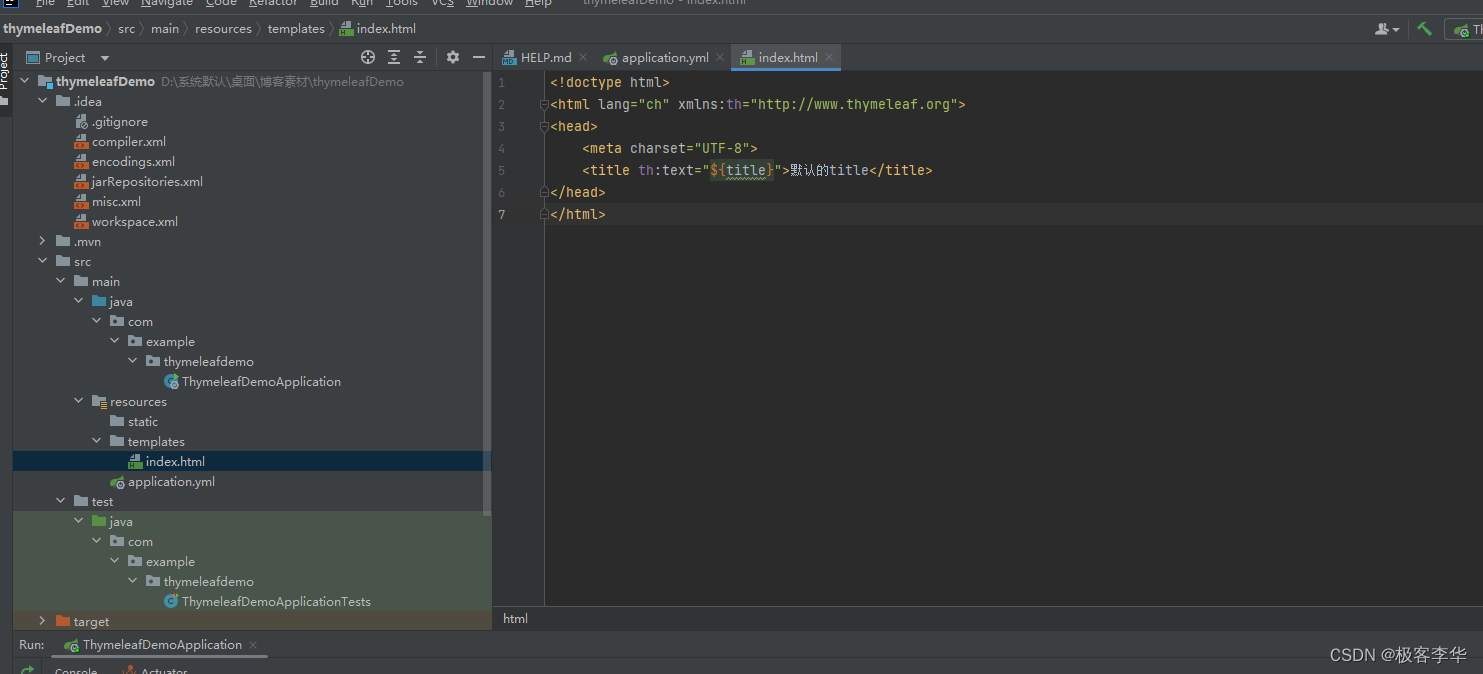
通过运行结果可以看出,当没有后端给前端发送数据的时候,这个前端显示的信息就是规定的默认信息。

现在加一个后端IndexController
package com.example.thymeleafdemo.controller;

import org.springframework.stereotype.Controller;
import org.springframework.ui.Model;
import org.springframework.web.bind.annotation.GetMapping;

@Controller
public class IndexController {
    @GetMapping("/index")
    public String index(Model model){
        model.addAttribute("title", "传递的Title");
        return "index";
    }
}
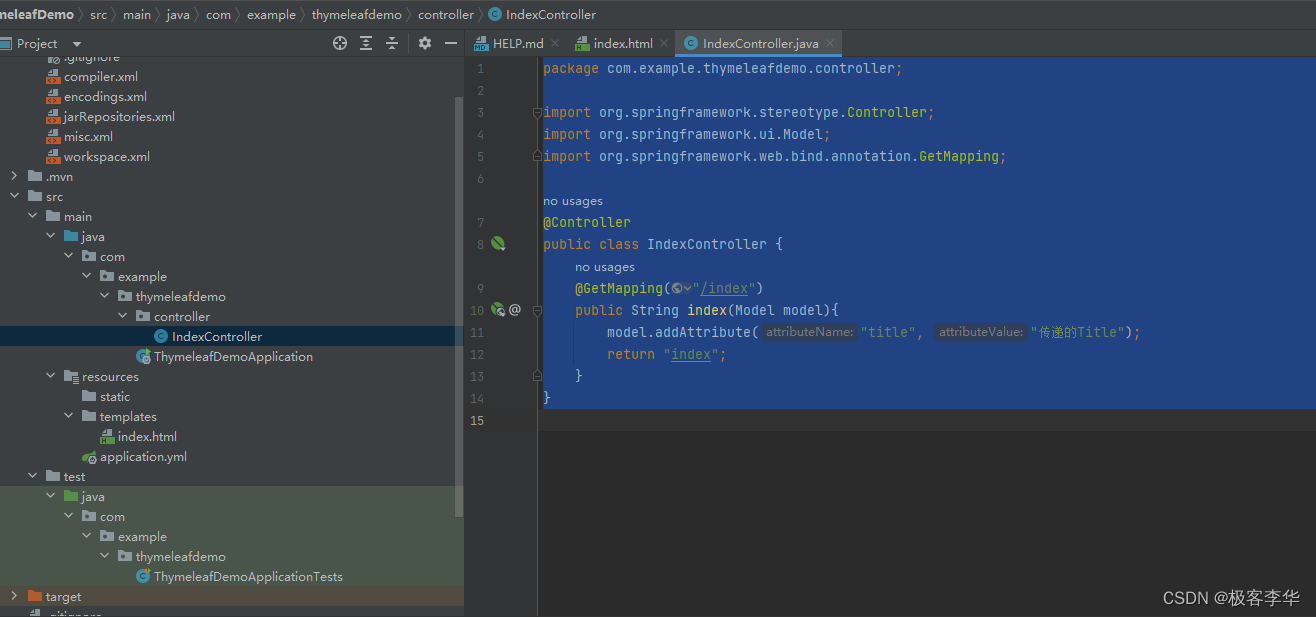
运行结果
通过运行的结果和观察源码,我们都可以发现,这个后端传递给前端的值,在前端生效了。

代码二(th:content)
index.html
<!doctype html>
<html lang="ch" xmlns:th="http://www.thymeleaf.org">
<head>
<meta charset="UTF-8">
<title th:text="${title}">默认的title</title>
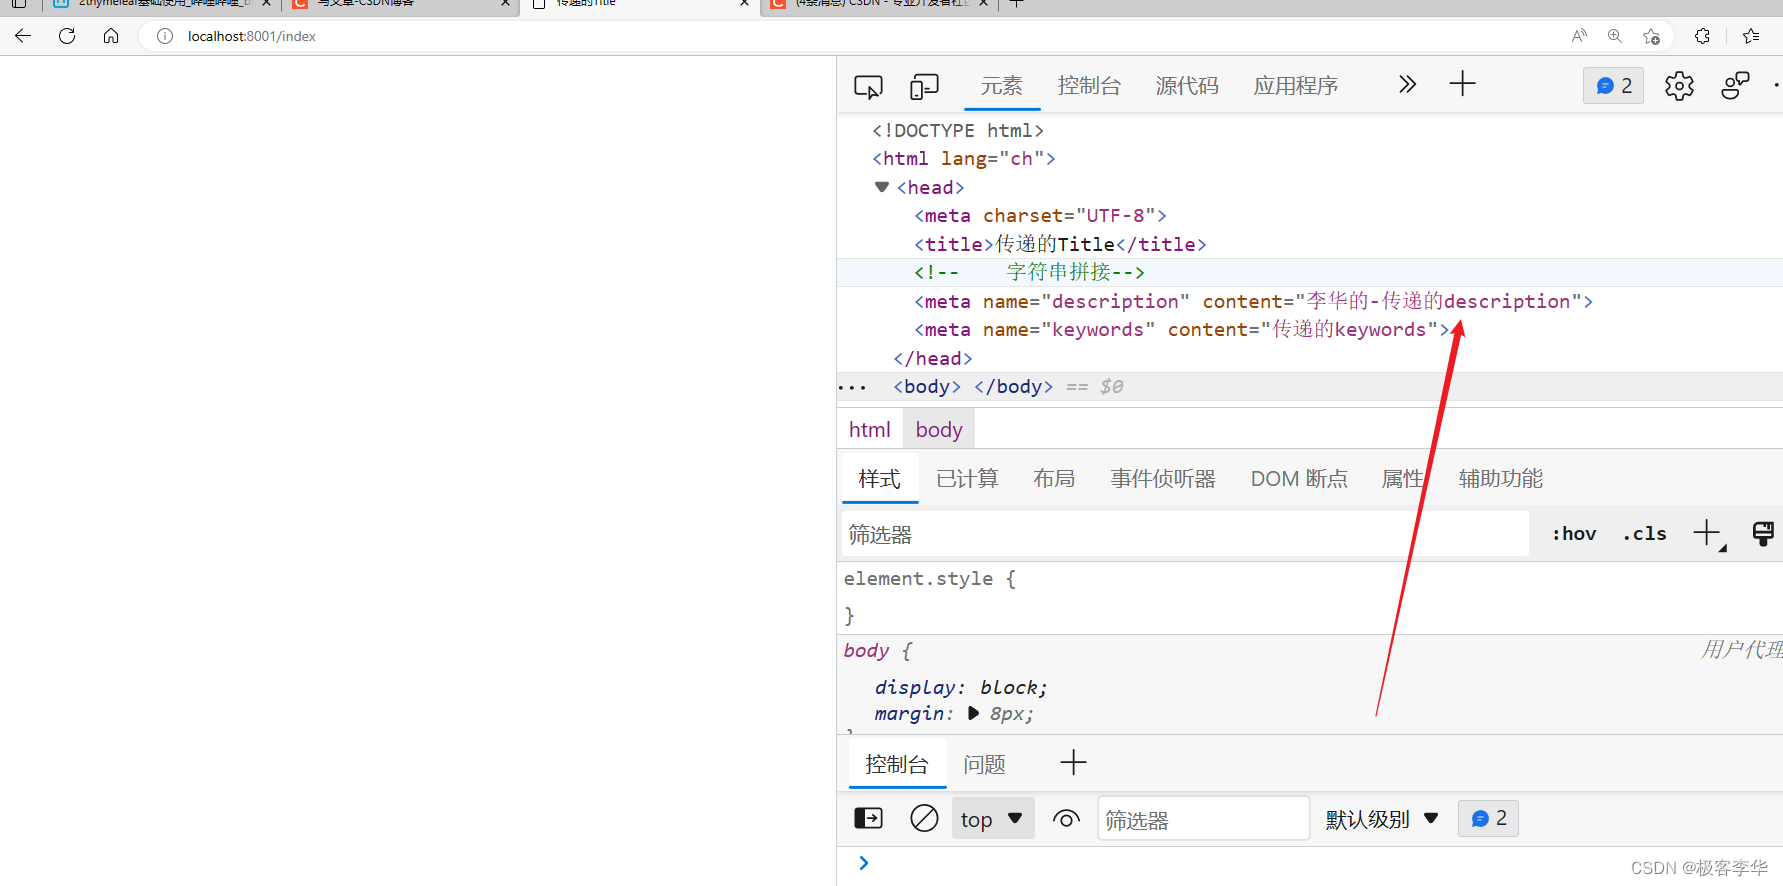
<!-- 字符串拼接-->
<meta th:content="|李华的-${description}|" name="description" content="默认的description">
<meta th:content="${keywords}" name="keywords" content="默认的keywords">
</head>
</html>
IndexController
package com.example.thymeleafdemo.controller;

import org.springframework.stereotype.Controller;
import org.springframework.ui.Model;
import org.springframework.web.bind.annotation.GetMapping;

@Controller
public class IndexController {
    @GetMapping("/index")
    public String index(Model model){
        model.addAttribute("title", "传递的Title");
        model.addAttribute("description", "传递的description");
        model.addAttribute("keywords", "传递的keywords");
        return "index"; // 对于html文件可以不写后缀名
    }
}
运行结果
通过这个运行结果,我们可以发现,这个content中的内容也更改了。
常用方法
这里会演示下面这几个的用法
- th:text
- th:if
- th:object
- th:each
- th:switch
User
package com.example.thymeleafdemo.Bean;

import lombok.Data;

import java.util.Date;
import java.util.List;

@Data
public class User {
    private String username;
    private String password;
    private Integer sex;
    private Boolean isVip;
    private Date birthday;
    private List<String> hobbys;
}
IndexController
package com.example.thymeleafdemo.controller;

import com.example.thymeleafdemo.Bean.User;
import org.springframework.stereotype.Controller;
import org.springframework.ui.Model;
import org.springframework.web.bind.annotation.GetMapping;

import java.util.ArrayList;
import java.util.Arrays;
import java.util.Date;

@Controller
public class IndexController {
    @GetMapping("/index")
    public String index(Model model){
        model.addAttribute("title", "传递的Title");
        model.addAttribute("description", "传递的description");
        model.addAttribute("keywords", "传递的keywords");
        return "index"; // 对于html文件可以不写后缀名
    }

    @GetMapping("/UserDemo")
    public String UserDemo(Model model){
        User user = new User();
        user.setUsername("LIHUA");
        user.setUsername("123456");
        user.setSex(1);
        user.setIsVip(true);
        user.setBirthday(new Date());
        user.setHobbys(Arrays.asList("PHP", "Java", "C++"));
        model.addAttribute("user", user);
        return "UserDemo";
    }
}
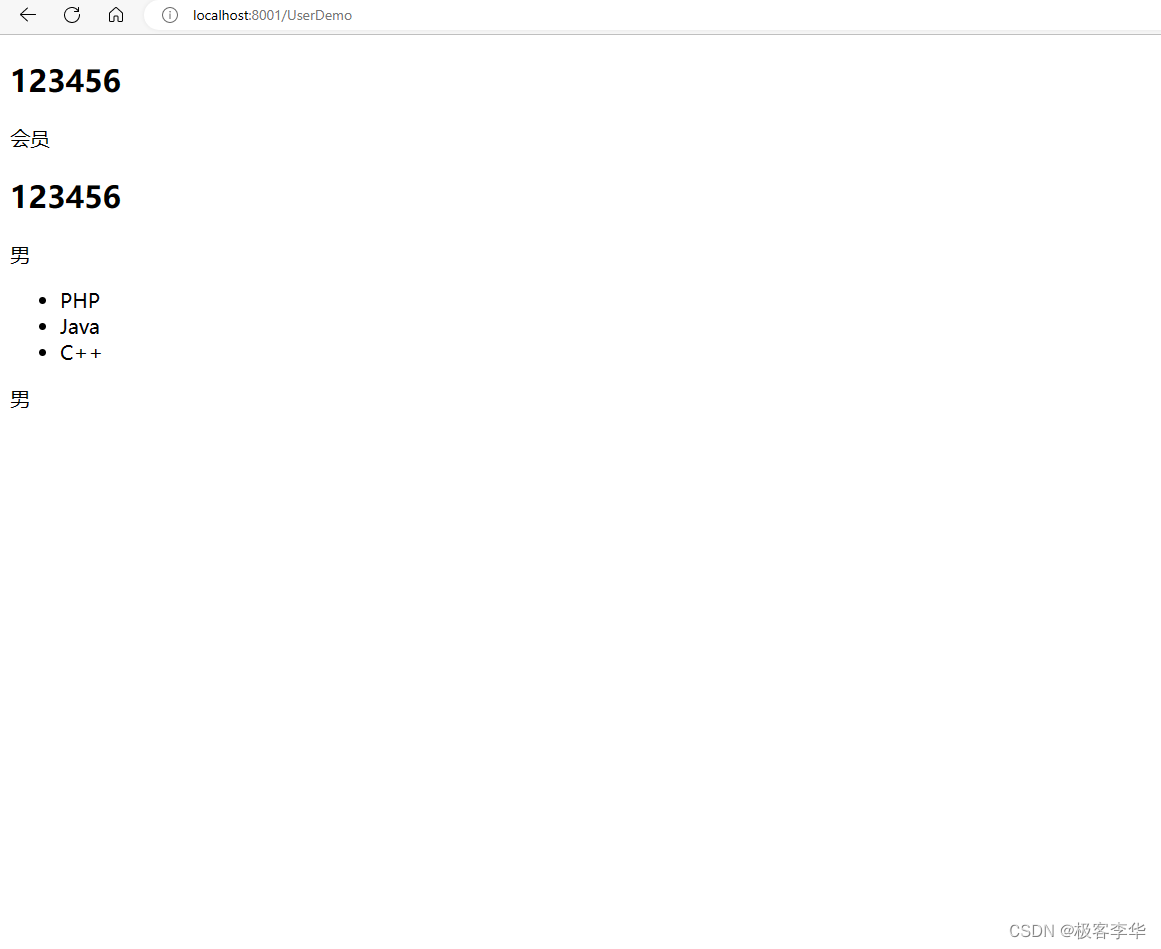
UserDemo.html
<!doctype html>
<html lang="ch" xmlns:th="http://www.thymeleaf.org">
<!--    第一种写法-->
    <h2 th:text="${user.username}"></h2>
    <p th:text="${user.password}"></p>
    <p th:if="${user.isVip}">会员</p>

<!--    第二种写法-->
    <div th:object="${user}">
        <h2 th:text="*{username}"></h2>
        <p th:if="*{isVip}">男</p>
    </div>
<!--th:each-->
    <ul>
    <!--注意这tag变量的命名位置-->
        <li th:each="tag:${user.hobbys}" th:text="${tag}"></li>
    </ul>
<!--th:switch-->
    <div th:switch="${user.sex}">
        <p th:case="1">男</p>
        <p th:case="2">女</p>
        <p th:case="*">机器人</p>
    </div>
</html>
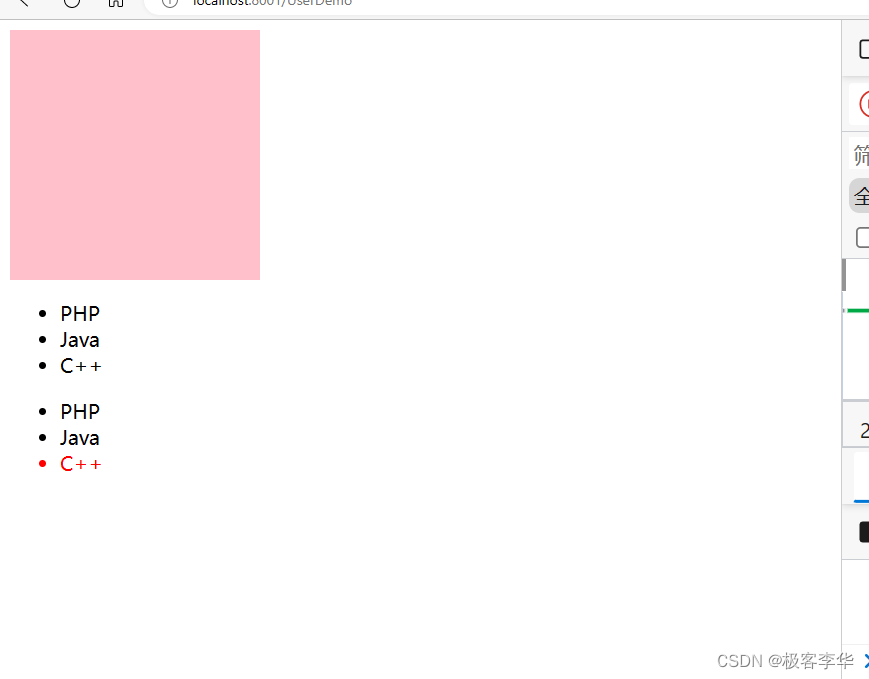
运行结果
通过运行结果可以知道,这些用法的具体效果展示。
thymeleaf中js与css的使用
创建一个css文件
style.css
.box{
    height: 200px;
    width:200px;
    background-color: pink;
}
UserDemo.html
<!doctype html>
<html lang="ch" xmlns:th="http://www.thymeleaf.org">
<link rel="stylesheet" th:href="@{style.css}">
<div class="box"></div>
<script th:inline="javascript">
    // 后面的{}里面如果没有内容,就会填充注释里面的内容
    const user = /*[[${user}]]*/{};
    console.log(user)
</script>
</html>

其他效果,让最后一个列表变成红色。
index.html
<!doctype html>
<html lang="ch" xmlns:th="http://www.thymeleaf.org">
<link rel="stylesheet" th:href="@{style.css}">
<style>
    .active{
        color:red;
    }
</style>
<div class="box"></div>
<!--th:each-->
<ul>
    <li th:each="tag:${user.hobbys}" th:text="${tag}"></li>
</ul>
<ul>
<!--    classappend是追加属性的意思-->
<!--    然后这是演示如何在把最后一个元素编程active-->
    <li th:each="tag, state:${user.hobbys}"
        th:text="${tag}"
        th:classappend="${state.last}?active"
        >
    </li>
</ul>
<script th:inline="javascript">
    // 后面的{}里面如果没有内容,就会填充注释里面的内容
    const user = /*[[${user}]]*/{};
    console.log(user)
</script>
</html>
thymeleaf组件的使用
第一部分 replace insert id
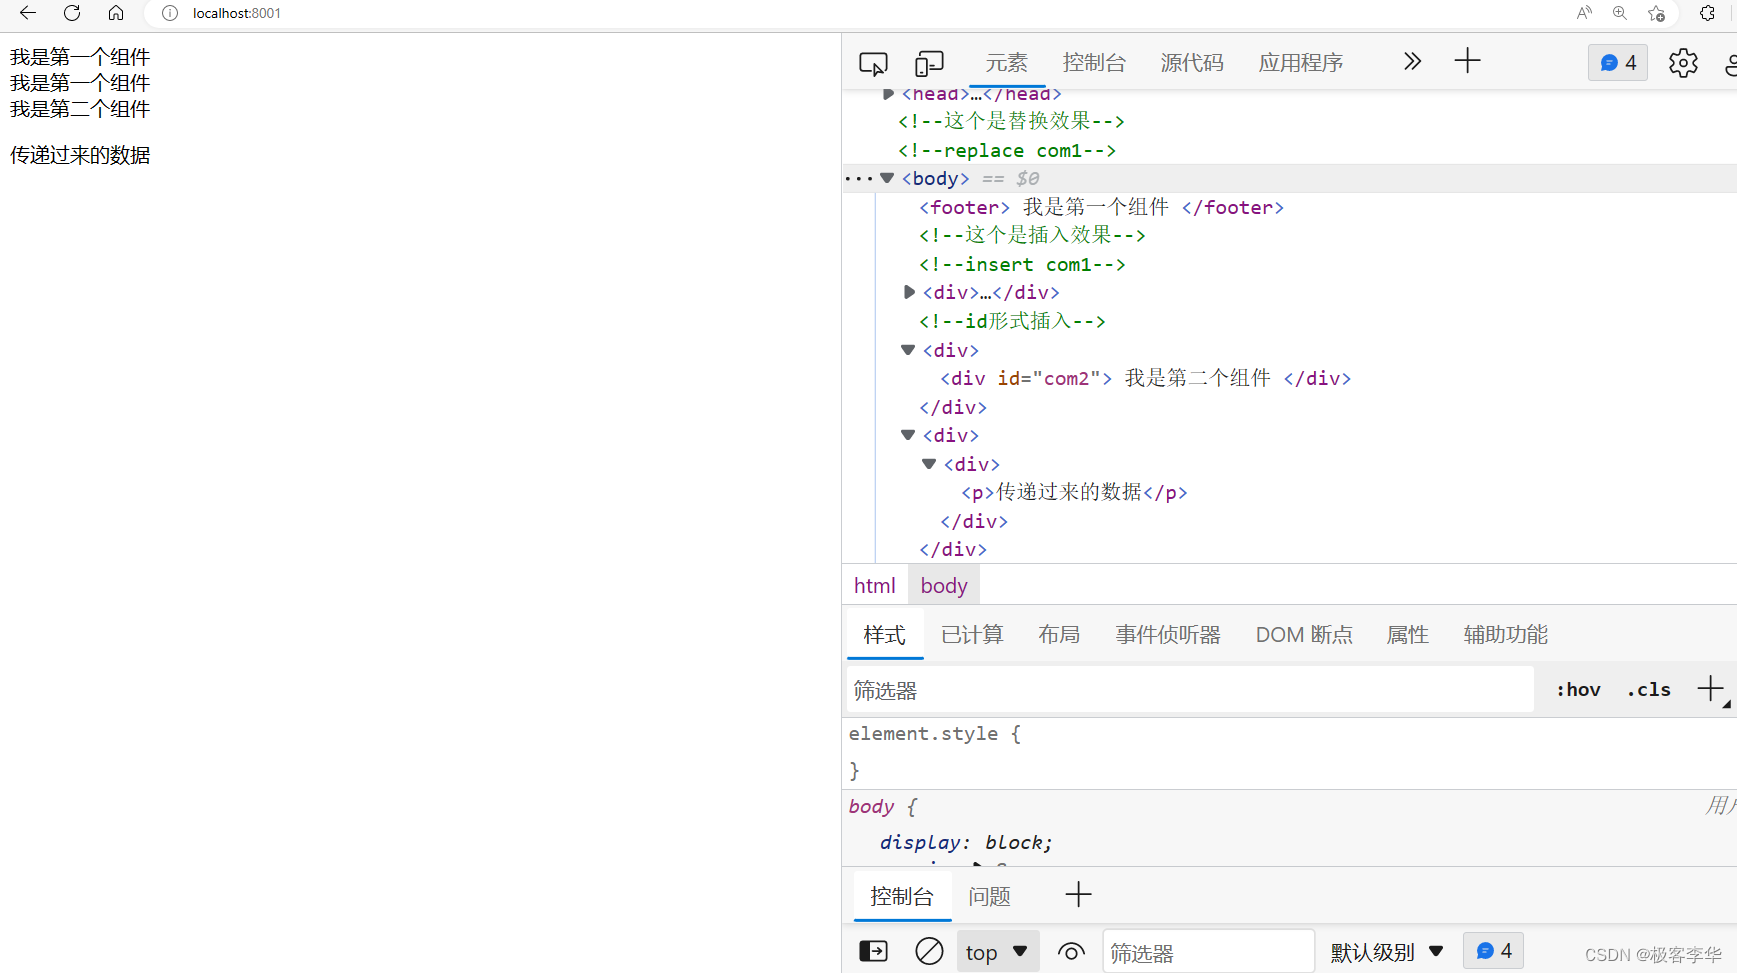
这里演示了thymeleaf中组件的replace与insert的用法,还提到了另一种方式,就是用id替换fragment。
演示代码
component1.html
<!doctype html>
<html lang="ch" xmlns:th="http://www.thymeleaf.org">
<footer th:fragment="com1">
    我是第一个组件
</footer>
<div id="com2">
    我是第二个组件
</div>
</html>
index.html
<!doctype html>
<html lang="ch" xmlns:th="http://www.thymeleaf.org">
<head>
    <meta charset="UTF-8">
    <title th:text="${title}">默认的title</title>
<!--    字符串拼接-->
    <meta th:content="|李华的-${description}|" name="description" content="默认的description">
    <meta th:content="${keywords}" name="keywords" content="默认的keywords">
    <link rel="stylesheet" th:href="@{style.css}">
</head>
<!--这个是替换效果-->
<!--replace com1-->
<div th:replace="~{components/component1::com1}">
</div>
<!--这个是插入效果-->
<!--insert com1-->
<div th:insert="~{components/component1::com1}"></div>
<!--id形式插入-->
<div th:insert="~{components/component1::#com2}"></div>
</html>
运行结果
从结果可以看出来,第一个是采取的replace的方式,这个方式之下,是直接用组件的内容,替换原来位子的内容的,然后另一个是insert的方式,在这个方式之下,是在原来的组件的前提之下,内部插入一个组件,然后还有一个id的方式,效果和第一个差不多。

传值
第一种
组件中也可以使用原来文本中数据对象。
代码演示
component1.html
<!doctype html>
<html lang="ch" xmlns:th="http://www.thymeleaf.org">
<footer th:fragment="com1">
    我是第一个组件
</footer>
<div id="com2">
    我是第二个组件
</div>

<div th:fragment="com3(message)">
    <p th:text="${message}"></p>
</div>
</html>
index.html
<!doctype html>
<html lang="ch" xmlns:th="http://www.thymeleaf.org">
<head>
    <meta charset="UTF-8">
    <title th:text="${title}">默认的title</title>
<!--    字符串拼接-->
    <meta th:content="|李华的-${description}|" name="description" content="默认的description">
    <meta th:content="${keywords}" name="keywords" content="默认的keywords">
    <link rel="stylesheet" th:href="@{style.css}">
</head>
<!--这个是替换效果-->
<!--replace com1-->
<div th:replace="~{components/component1::com1}">
</div>
<!--这个是插入效果-->
<!--insert com1-->
<div th:insert="~{components/component1::com1}"></div>
<!--id形式插入-->
<div th:insert="~{components/component1::#com2}"></div>

<div th:insert="~{components/component1::com3('传递过来的数据')}"></div>
</html>
运行结果
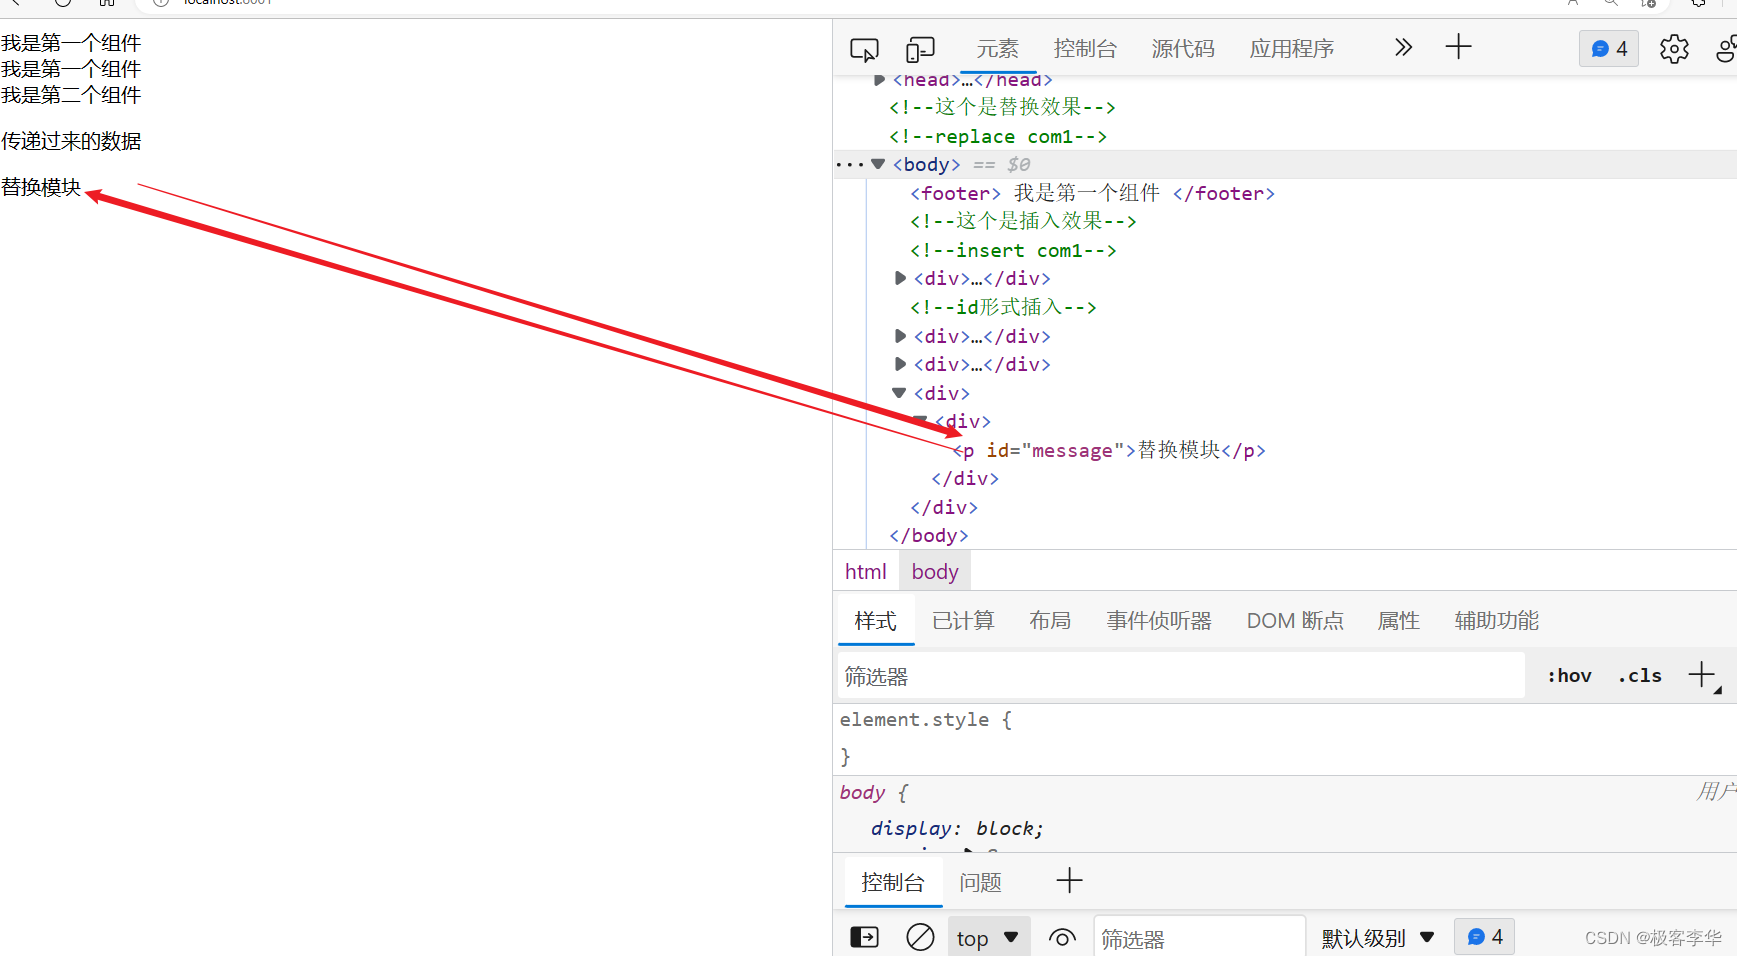
第二种
index.html
<!doctype html>
<html lang="ch" xmlns:th="http://www.thymeleaf.org">
<head>
    <meta charset="UTF-8">
    <title th:text="${title}">默认的title</title>
<!--    字符串拼接-->
    <meta th:content="|李华的-${description}|" name="description" content="默认的description">
    <meta th:content="${keywords}" name="keywords" content="默认的keywords">
    <link rel="stylesheet" th:href="@{style.css}">
</head>
<!--这个是替换效果-->
<!--replace com1-->
<div th:replace="~{components/component1::com1}">
</div>
<!--这个是插入效果-->
<!--insert com1-->
<div th:insert="~{components/component1::com1}"></div>
<!--id形式插入-->
<div th:insert="~{components/component1::#com2}"></div>

<div th:insert="~{components/component1::com3('传递过来的数据')}"></div>

<div th:insert="~{components/component1::com4(~{::#message})}">
    <p id="message">替换模块</p>
</div>
</html>
component1.html
<!doctype html>
<html lang="ch" xmlns:th="http://www.thymeleaf.org">
<footer th:fragment="com1">
    我是第一个组件
</footer>
<div id="com2">
    我是第二个组件
</div>

<div th:fragment="com3(message)">
    <p th:text="${message}"></p>
</div>

<div th:fragment="com4(message)">
    <div th:replace="${message}"></div>
</div>
</html>
运行结果
第三种
这种方式需要的是,写一行注释,不然的话会报错的
<!doctype html>
<html lang="ch" xmlns:th="http://www.thymeleaf.org">
<footer th:fragment="com1">

    <!--/*@thymesVar id="user" type="com.example.thymeleafdemo.Bean.User"*/-->
    <h2 th:text="${user.username}"></h2>
</footer>
<div id="com2">
    我是第二个组件
</div>

<div th:fragment="com3(message)">
    <p th:text="${message}"></p>
</div>

<div th:fragment="com4(message)">
    <div th:replace="${message}"></div>
</div>
</html>


 1780
1780


 被折叠的 条评论
为什么被折叠?
被折叠的 条评论
为什么被折叠?
 到【灌水乐园】发言


