


我们项目中都有一部分是公共的吧
以我的为例,像司机注册DriverServiceImpl里面的获取微信id这种公共业务,还有像文件上传,发短信这种业务都属于公共业务,我们就可以对其进行抽取代码,我们可以进行封装starter依赖
    @Override
    public Boolean register(WxDriverDto wxDriverDto) {
        //1.前端wx.log方法传数据过来
        //2.后端:根据appid,appsecret,code拼接一个URI,
        //appid,密钥,code
        String wxurl = String.format(Constants.WeCharUrl.WX_OPENID_URL, APPID, SECRET, wxDriverDto.getWxCode());
        //3.发送请求获取OpenId(微信ID)
        ResponseEntity<String> forEntity = restTemplate.getForEntity(wxurl, String.class);
        //判断状态解码
        AssertUtil.isEquals(forEntity.getStatusCodeValue(), HttpStatus.HTTP_OK,"openId获取失败");

        String body = forEntity.getBody();
        OpenIdResult openIdResult = JSON.parseObject(body, OpenIdResult.class);
怎么进行封装starter呢?
在这之前先了解一下springboot的自动配置原理
我们在springboot启动类上都会有一个注解@SpringBootApplication这里面有三个子注解:
-
@ComponentScan注解:开启ioc自动扫描注解,默认扫描当前包及其子包中@Controller,@Service等,并把这些bean加载到ioc器中
-
@EnableAutoConfiguration注解:启用springboot自动配置,自动所有扫描classpath目录下面所有jar中的spring.factories文件实现配置类批量注册
-
@SpringBootConfiguration注解:标志该类为springboot配置类
然后@EnableAutoConfiguration开启自动配置这个注解上有一个这个注解👇:
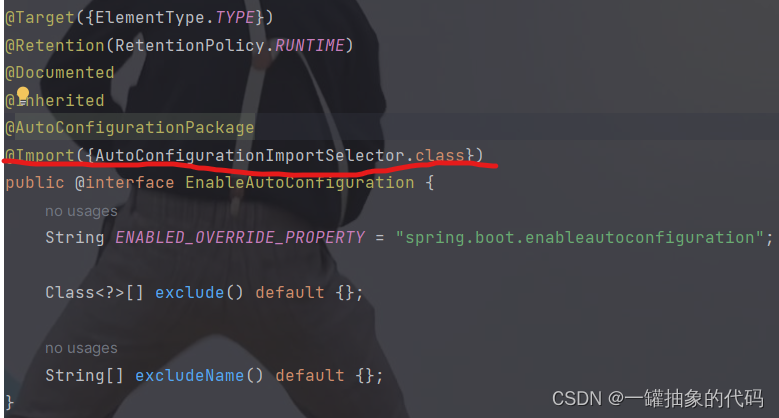
这个注解就是通过import去导入了一个自动配置的选择器这么一个类AutoConfigurationImportSelector.class这个类也会交给spring进行管理(这个类也实现了一个导入选择器ImportSelector的接口)
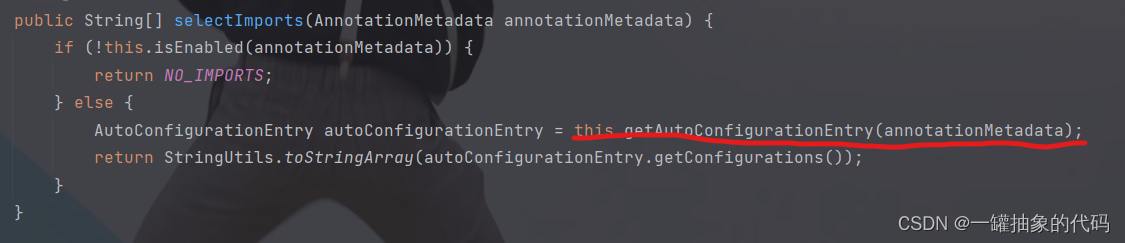
然后这个选择器里面有一个方法,这个方法是AutoConfigurationImportSelector实现导入选择器ImportSelector这个接口过来的,它的作用呢就是返回一些类的类名(这里的类名指的是类的全限定名),然后就会把这些类自动交给spring容器管理(这个方法其实就是批量注册Bean的一个方法)
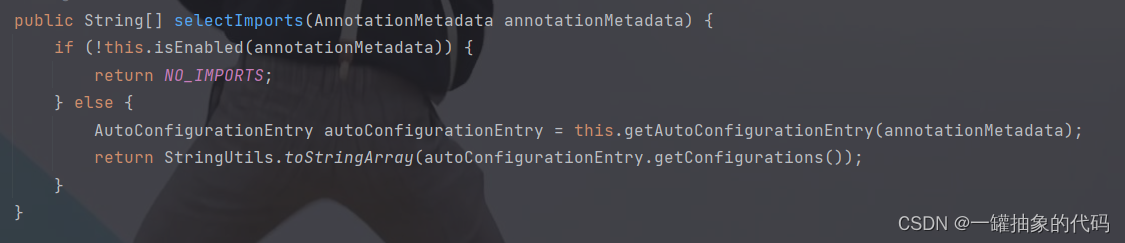
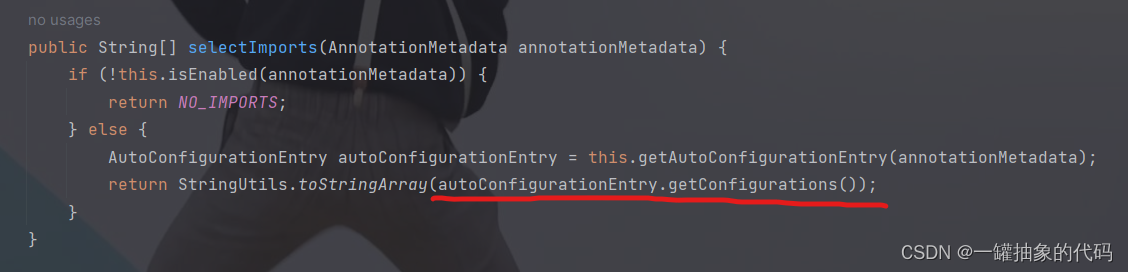
selectImports方法里StringUtils.toStringArray这个只是用工具转成Array
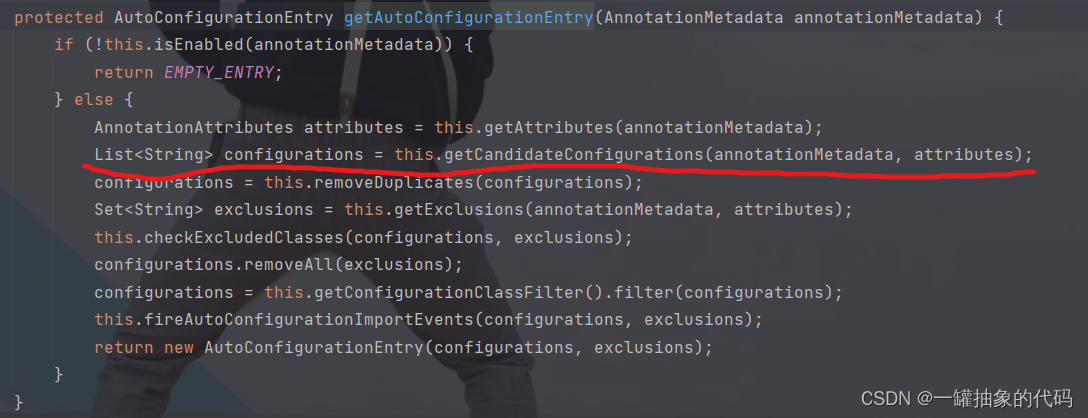
selectImports方法里getAutoConfigurationEntry(annotationMetadata)这个就是获取自动配置类的实体
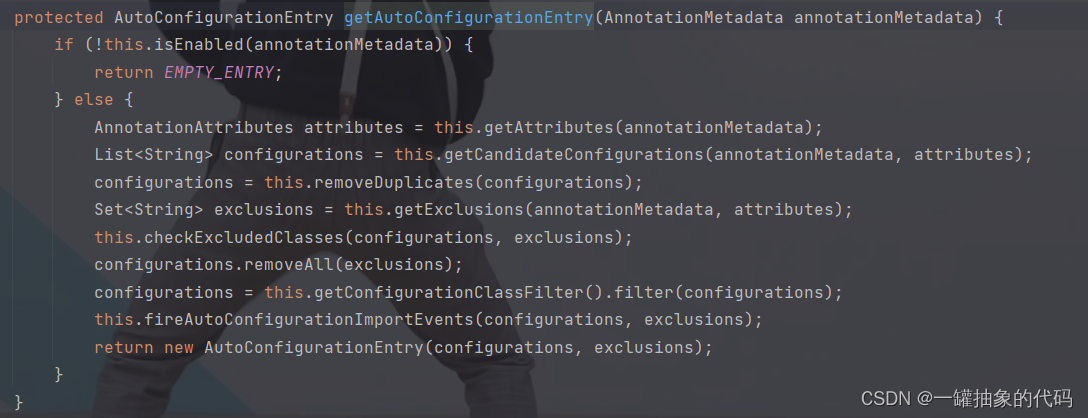
getAutoConfigurationEntry方法里的:List<String> configurations = getCandidateConfigurations(annotationMetadata, attributes);才是真正获取自动配置类的
selectImports方法里autoConfigurationEntry.getConfigurations():这个getConfigurations()就是去获取到很多配置类的全限定名
这个方法selectImports说白了就是在找自动配置类的全限定名,然后返回,返回后这些自动配置类就批量注册到spring容器里交给spring容器管理了
现在回到怎么进行封装starter的问题,以微信的starter依赖封装 为例,目的就是为了把获取openId的代码封装一下
第一步:在resource文件下建一个META-INF的文件夹
第二步:在META-INF文件夹里创建一个spring.factories文件👇
# Auto Configure
org.springframework.boot.autoconfigure.EnableAutoConfiguration=这里就是自己的自动配置类的全限定名
第三步:以我的为例在java文件下创建一个包cn.org.autoconfigure然后在这个包里面创建一个自己的自动配置类
//微信的自动配置类
public class WeChatAutoConfigure {
}
然后把这个类👆的全限定名写到spring.factories文件里
# Auto Configure
org.springframework.boot.autoconfigure.EnableAutoConfiguration=\
	cn.org.autoconfigure.WeChatAutoConfigure
WeChatAutoConfigure自动配置类还需要注册一个微信的工具类
//微信的自动配置类
@Configuration
//开启配置对象
@EnableConfigurationProperties(WechatProperties.class)//这是读取这个配置类然后有这个类下面的代码才会生效,没有这个类则不会生效
public class WeChatAutoConfigure {
    //注册:微信的工具类
    @Bean
    public WeChatTemplate weChatTemplate(WechatProperties properties,RestTemplate restTemplate){
        return new WeChatTemplate(properties, restTemplate);
    }


    @Bean
    public RestTemplate restTemplate(){
        return new RestTemplate();
    }
}
微信的工具类,在这个工具类里面获取openId
//微信的工具类
public class WeChatTemplate {

    private WechatProperties properties;
    private RestTemplate restTemplate;
    public WeChatTemplate(WechatProperties properties, RestTemplate restTemplate) {
        this.properties = properties;
        this.restTemplate = restTemplate;
    }

    public OpenIdResult getOpenId(String WxCode){
        //1.前端wx.log方法传数据过来
        //2.后端:根据appid,appsecret,code拼接一个URI,
        //appid,密钥,code
        String wxurl = String.format(Constants.WeCharUrl.WX_OPENID_URL, properties.getAPPID(), properties.getSECRET(),
                WxCode);
        //3.发送请求获取OpenId(微信ID)
        ResponseEntity<String> forEntity = restTemplate.getForEntity(wxurl, String.class);
        //判断状态解码
        AssertUtil.isEquals(forEntity.getStatusCodeValue(), HttpStatus.HTTP_OK,"openId获取失败");

        String body = forEntity.getBody();
        OpenIdResult openIdResult = JSON.parseObject(body, OpenIdResult.class);

        return openIdResult;
    }
}
还需要bo和OpenIdResult
@Data
public class OpenIdResult {
    private String openid;
    private String errmsg;
    private Integer errcode;
    private String unionid;
    private String session_key;
}
@Data
//它会根据前缀去yaml读取配置,然后设置到该对象的字段上
@ConfigurationProperties(prefix = "wechat")
public class WechatProperties {
private String APPID;
private String SECRET;
}然后以我的项目中的司机的注册为例,在DriverServiceImpl司机的register就这样修改
@Override
    public Boolean register(WxDriverDto wxDriverDto) {
        OpenIdResult openIdResult = weChatTemplate.getOpenId(wxDriverDto.getWxCode());

        //* 4.根据微信ID查询数据库的Driver数据有没有被注册
        String openid = openIdResult.getOpenid();
        Driver one = super.getOne(new LambdaQueryWrapper<Driver>().eq(Driver::getOpenId, openid));

        AssertUtil.isNull(one,"用户已经注册");
        //5.没有被注册直接保存数据
        Driver driver = saveDriver(openid);
        driverSettingService.create(driver.getId());

        driverSummaryService.create(driver.getId());

        driverWalletService.create(driver.getId());

        return true;
    }


 820
820


 被折叠的 条评论
为什么被折叠?
被折叠的 条评论
为什么被折叠?
 到【灌水乐园】发言


