


文章目录
1.非单组件和组件嵌套
总结:关于组件名
- 一个单词组成可以全部小写或者首字母大写
- 多个单词组成可以全部小写用-隔开(my-app)或者首字母大写其他全部小写(需要vue脚手架支持)
- 组件名称尽可能回避html预存的关键名
- 可以使用name配置项指定组件在开发者工具中呈现的名字
总结:关于组件标签
- 第一种写法:< school>< /school >
- 第二种写法:< school />这种必须要使用脚手架才能被渲染
总结:关于创建组件简写方式
- 可以不适用Vue.extend直接写一个对象,对象里面再写配置项
<!DOCTYPE html>
<body>
    <div id="app">
        <app></app>
    </div>
    <script>
        // 创建组件hello在组件students里用components注册,
        // 然后再template使用出来就完成了嵌套
        const hello = Vue.extend({
            template:`
            <div id="app">
                <h1>{{say}}</h1>
            </div>
            `,
            data:function(){
                return {
                    say:'hello'
                }
            }
        })
        // 创建school组件
        const school = Vue.extend({
            template:`
            <div>
                <h1>学校名:{{name}}</h1>
                <h1>学校地址:{{address}}</h1>
            </div>
            `,
            data:function(){
                return {
                    name:'三河',
                    address:'泸州'
                }
            }
        })
        // 创建students组件
        const students = Vue.extend({
            template:`
            <div>
                <h1>学生名:{{name}}</h1>
                <h1>学生年龄{{age}}</h1>
                <hello></hello>
            </div>
            `,
            data:function(){
                return {
                    name:'张三',
                    age:'18'
                }
            },
            components:{
                hello
            }
        })
        // 创建管理组件的app组件所有组件在app里注册
        const app = Vue.extend({
            template:`
            <div id="app">
                <school></school>
                <students></students>
            </div>
            `,
            components:{
                school,
                students
            }
        })
        new Vue({
            el:'#app',
            // 把管理组件的app组件注册到vm实例上,就可以使用了
            components:{
                app,
            }
        })
    </script>
</body>
</html>
2.单组件,需要安装脚手架使用
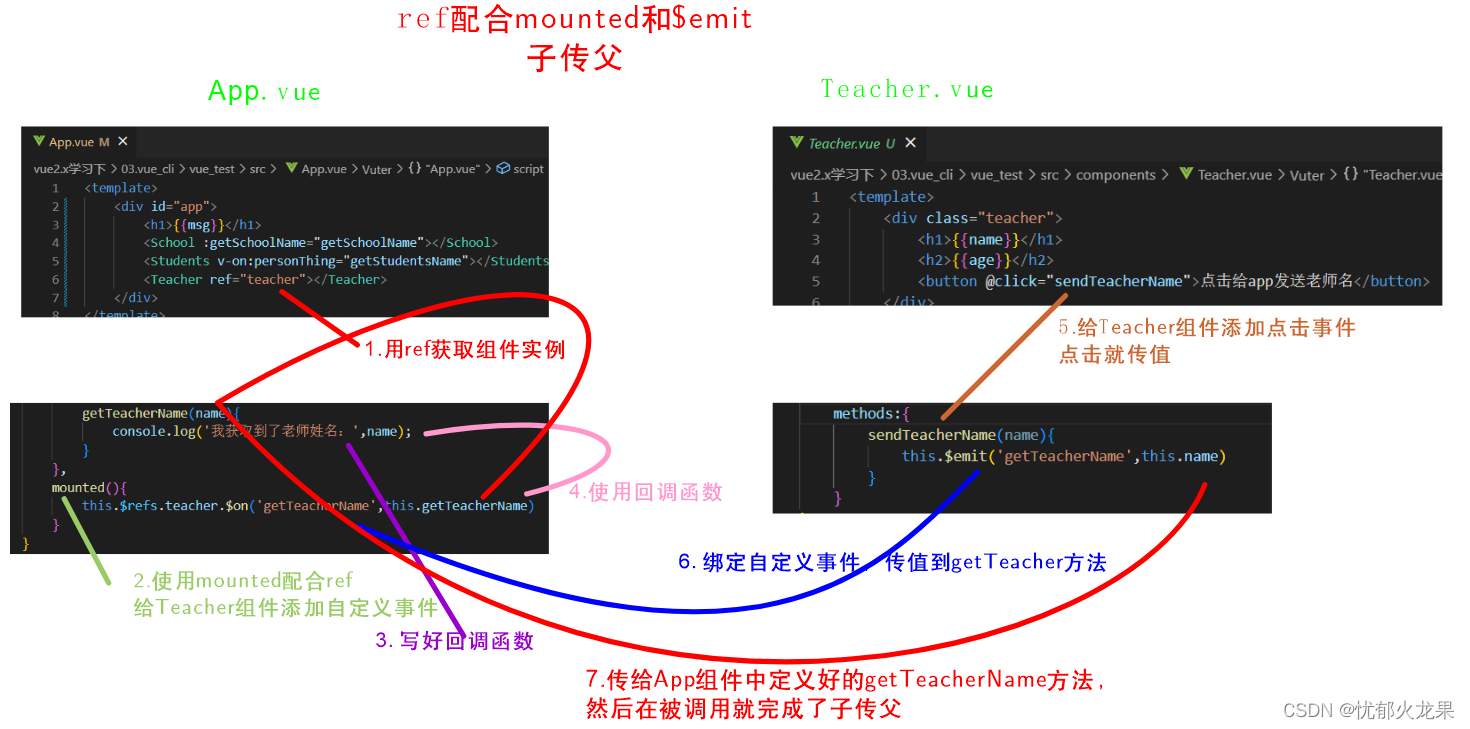
3.ref属性
- 被用来给元素或子组件注册引用信息(id的替代者)
- 应用在html标签上获取的是真实的dom元素
- 应用在组件标签上是组件的实例对象
使用方式:
组件上:
<School ref="vc"></School>
html标签上
<h1 ref="title">{{ name }}</h1>
获取:
this.$refs.xxx
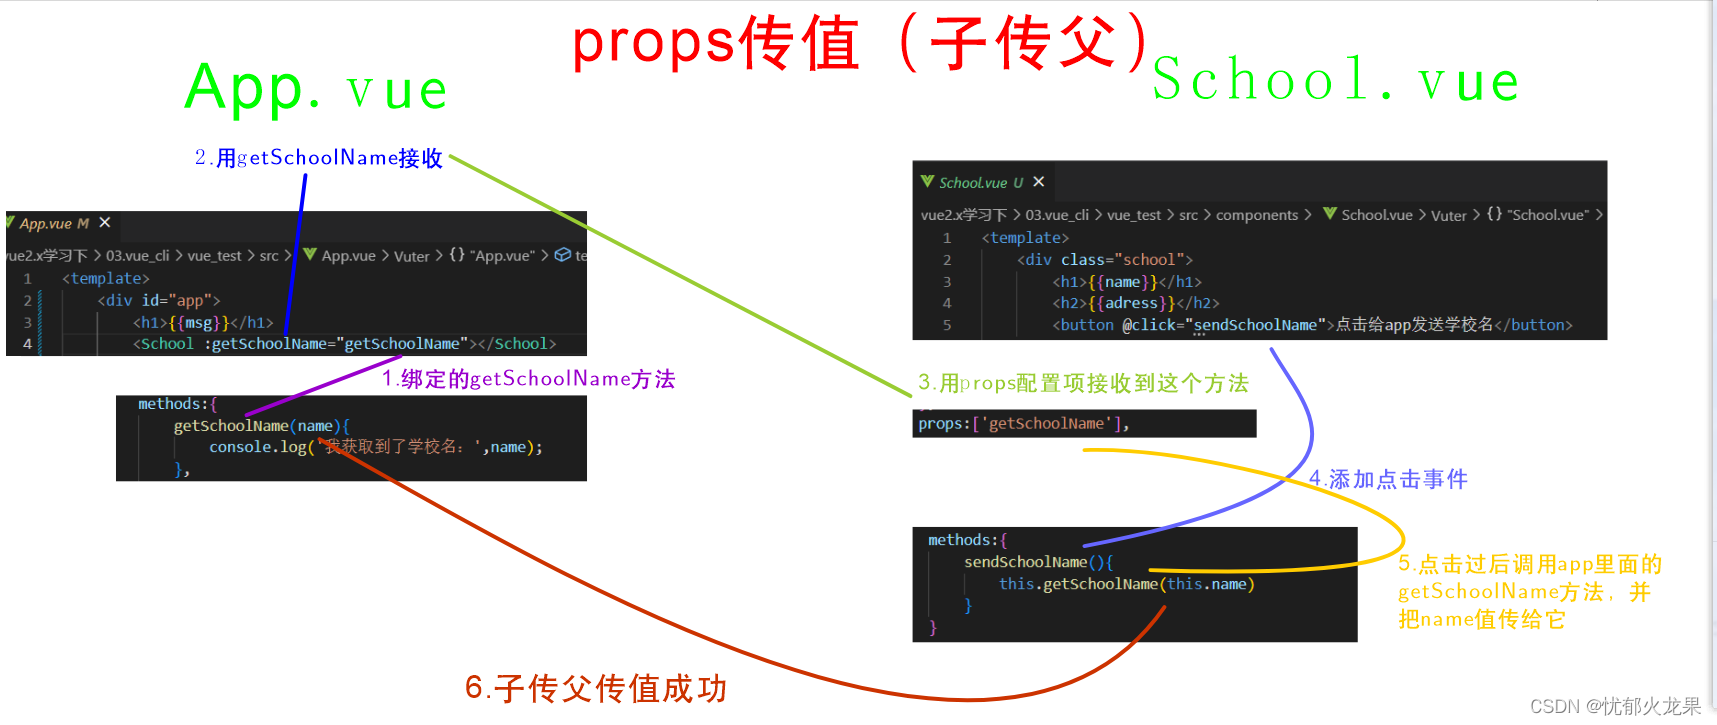
4.props属性
功能:让组件接收外部传过来的数据
- 传递数据
<hr>
    <Students name="张三" age=18 sex='男'></Students>
    <hr>
    <Students name="李四" age=19 sex='女'></Students>
    <hr>
    <Students name="李四"  sex='女'></Students>
- 接收数据
// 第一种写法接收数据,直接收
        // props :['name','age','sex']

        // 第二种写法,限制类型
        // props:{
        //     name:String,
        //     age:String,
        //     sex:String
        // }

        // 第三种写法,限制类型 限定必要性和指定默认值
        props:{
            name:{
                type:String,
                required:true,
            },
            age:{
                type:String,
                default:'21'
            },
            sex:{
                type:String,
                required:true,
            }
        }
- **注意:**props是只读的,vue底层会检测你对props的修改,如果进行了修改,就会发出警告,那么可以复制props的内容到data里面,然后去修改data中的数据
5.mixin属性
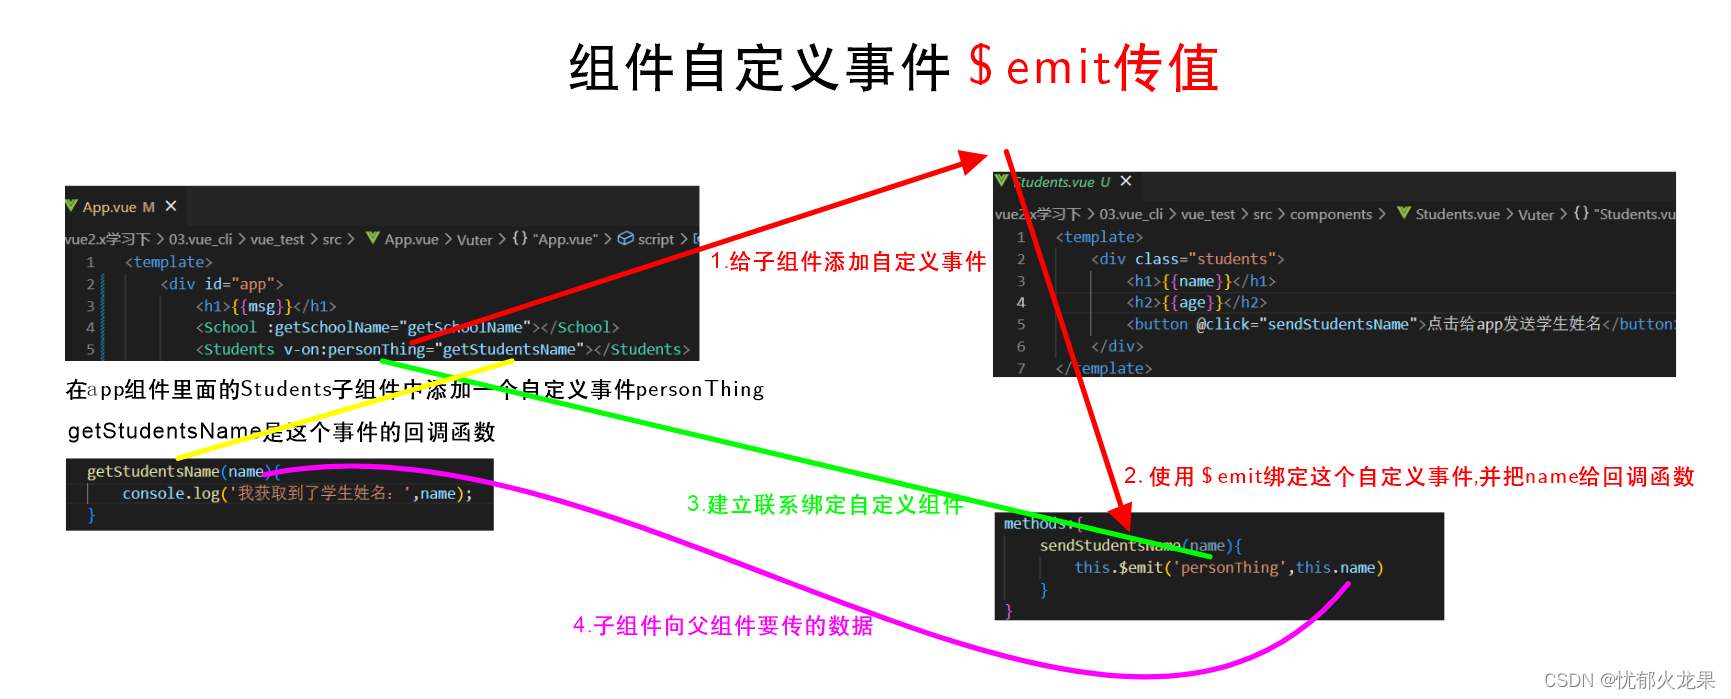
6.组件自定义事件(子传父)
6-1.$emit
6-2.props传值
6-3.ref配合mounted和$emit
6-4.解绑自定义事件
- this.$off(‘解绑的自定义事件名称’) ----- 解绑一个
- this.$off( [ ‘自定义事件名1’,‘自定义事件名2’]) ----- 解绑多个
- this.$off( ) ----- 解绑全部
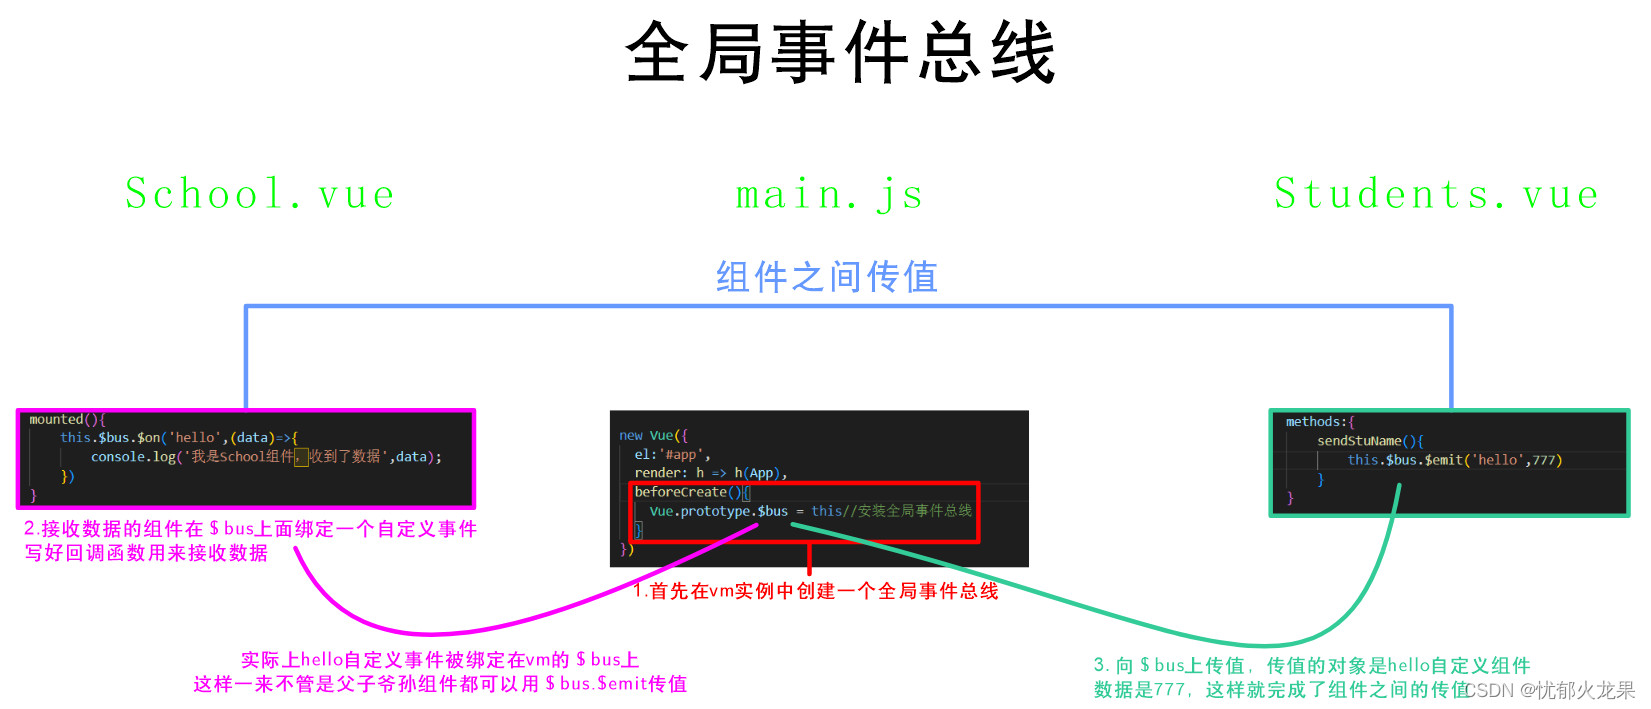
7.全局事件总线
8.消息订阅与发布(pubsub)
1.一种组件间通信的方式,适用于任意组件间通信
2.使用步骤:
- 安装pubsub
npm i pubsub
- 引入
import pubsub from 'pubsub-js'
- 接收数据:A组件想要接收数据,则在A组件中订阅消息,订阅回调留在A组件自身
mounted(){
	this.pid = pubsub.subscribe ('xxx', (订阅名,接收的数据)=>{
	函数体
	})
}
- 提供数据
pubsub.publish('订阅名',发送的数据)
- 最好在beforDestroy钩子中,用PubSub.unsubscribe(pid)去取消订阅
beforDestroy(){
PubSub.unsubscribe(pid)
}
9.动画与过度
9-1.动画
<template>
    <div>
        <button @click="isShow = !isShow">显示/隐藏</button>
        <transition>
            <h1 class="test1" v-show="isShow" >你好啊</h1>
        </transition>
    </div>
</template>

<script>

export default{
    name:'Test1',
    data(){
        return {
            isShow:true
        }
    }
}
</script>
<style>
    .test1{
        background: gold;
        width: 300px;
    }
    .v-enter-active{
        animation: animate 1s ;
    }
    .v-leave-active{
        animation: animate 1s reverse;
    }
    @keyframes animate{
        from{
            transform:translateX(-100%) ;
        }
        to{
            transform:translateX(0px) ;
        }
    }
</style>
9-2.过渡
总结:
- 用transition标签包裹起来,就可以默认的使用写好的动画、
- 若多个元素需要使用,必须使用transition-group把元素包裹起来,并且要给每个元素设置key值
<template>
    <div>
        <button @click="isShow = !isShow">显示/隐藏</button>
        <transition-group name="hello" appear>
            <h1 class="test2" key="1" v-show="isShow" >你好啊</h1>
            <h1 class="test2" key="2" v-show="isShow" >张三</h1>
        </transition-group>
    </div>
</template>

<script>

export default{
    name:'Test2',
    data(){
        return {
            isShow:true
        }
    }
}
</script>
<style>
    .test2{
        background: gold;
        width: 300px;
    }
    /* 进入的起点 */
    .hello-enter{
        transform:translateX(-100%) ;
    }
    /* 进入的终点 */
    .hello-enter-to{
        transform:translateX(0px) ;
    }
    /* 离开的起点 */
    .hello-leave{
        transform:translateX(0) ;
    }
    /* 离开的终点 */
    .hello-leave-to{
        transform:translateX(-100%) ;
    }
    .hello-enter-active , .hello-leave-active{
        transition: 0.5s linear;
    }
</style>
9-3.第三方库
10.github案例
10-1App.vue
<template>
    <div id="app">
        <div class="container">
            <Search></Search>
            <List></List>
        </div>
    </div>
</template>
<script>
    import Search from './components/Search.vue'
    import List from './components/List.vue'
import Vue from 'vue';
export default{
    name:'App',
    components:{
        Search,
        List
    },
    beforeCreate(){
        Vue.prototype.$bus = this
    }
}
</script>
<style>
</style>
10-2.Search.vue
<template>
    <div class="search">
        <div class="searchMain">
            <h3>Search Github Users</h3>
            <input class="serachIpt"
            placeholder="enter the name you search"
            type="text"
            v-model="keyWord">
            <button @click="searchUsers">Search</button>
        </div>
    </div>
</template>

<script>
    import axios from 'axios';
export default{
    name:'Search',
    data(){
        return {
            keyWord:''
        }
    },
    methods:{
        searchUsers(){
            axios.get(`https://api.github.com/search/users?q=${this.keyWord}`).then(
                response=>{
                    console.log('请求成功了');
                    this.$bus.$emit('getUsers',response.data.items)
                },
                error=>{
                    console.log('请求失败了',error.message);
                }
            )
        }
    }
}
</script>
<style>
    .search{
        width: 100%;
        height: 200px;
        background: #ccc;
    }
    .searchMain{
        width: 250px;
        height: 100px;
        background: rgb(200, 64, 64);
        position: absolute;
        margin-top: 50px;
        margin-left: 20px;
        text-align: center;
    }
    .searchMain h3{
        margin-top: 10px;

    }
</style>
10-3.List.vue
<template>
    <div class="list row">
        <div class="listMain col-lg-4 col-md-4 col-sm-4"
        v-for="user in users" :key="user.login">
            <a href="user.html_url">
                <img :src="user.avatar_url" style="width:130px">
            </a>
            <p>{{user.login}}</p>
        </div>
    </div>
</template>

<script>

export default{
    name:'List',
    data(){
        return {
            users:[]
        }
    },
    mounted(){
        this.$bus.$on('getUsers',(users)=>{
            console.log('收到了',users);
            this.users = users
        })
    }
}
</script>
<style>
    .list{
        width: 100%;
        height: auto;

    }
    .row{
    margin-right: 0;
    margin-left:0%;
    }
    .listMain{
        width: 33.3%;
        height: 220px;
        background: #ccc;
        border: 1px solid red;
        text-align: center;
        padding-top:30px ;
    }
</style>
10-4.main.js
import Vue from 'vue'
import App from './App.vue'

Vue.config.productionTip = false

new Vue({
  el:'#app',
  render: h => h(App),
})
10-5.index.html
<!DOCTYPE html>
<html lang="">
  <head>
    <meta charset="utf-8">
    <meta http-equiv="X-UA-Compatible" content="IE=edge">
    <meta name="viewport" content="width=device-width,initial-scale=1.0">
    <link rel="icon" href="<%= BASE_URL %>favicon.ico">
    <!-- 引入bootstrap -->
    <link rel="stylesheet" href="<%= BASE_URL %>css/bootstrap.css">
    <title><%= htmlWebpackPlugin.options.title %></title>
  </head>
  <style>
    *{
      padding: 0%;
      margin: 0%;
    }
  </style>
  <body>
    <noscript>
      <strong>We're sorry but <%= htmlWebpackPlugin.options.title %> doesn't work properly without JavaScript enabled. Please enable it to continue.</strong>
    </noscript>
    <div id="app">

    </div>
    <!-- built files will be auto injected -->
  </body>
</html>
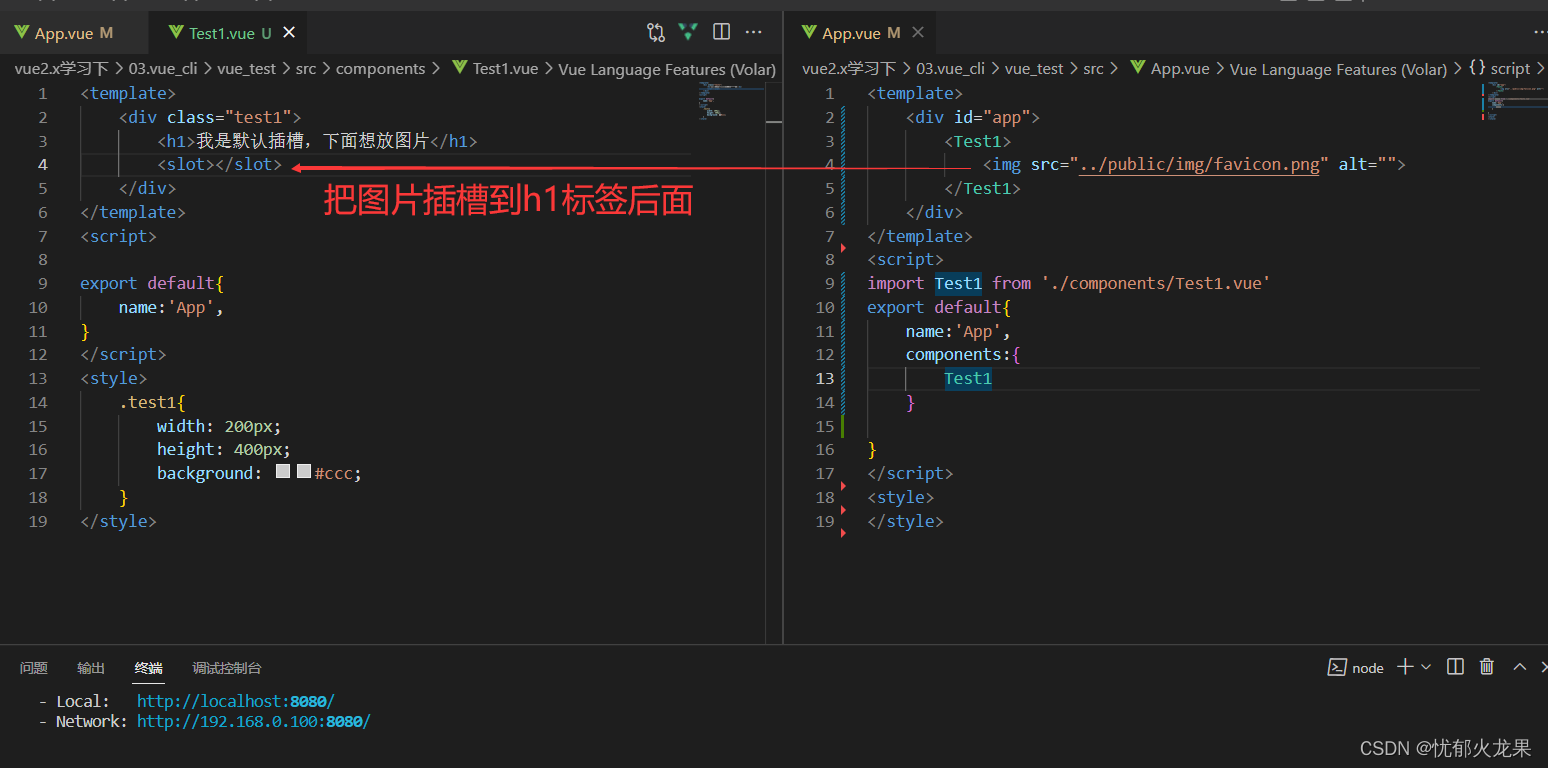
11.默认插槽
12.具名插槽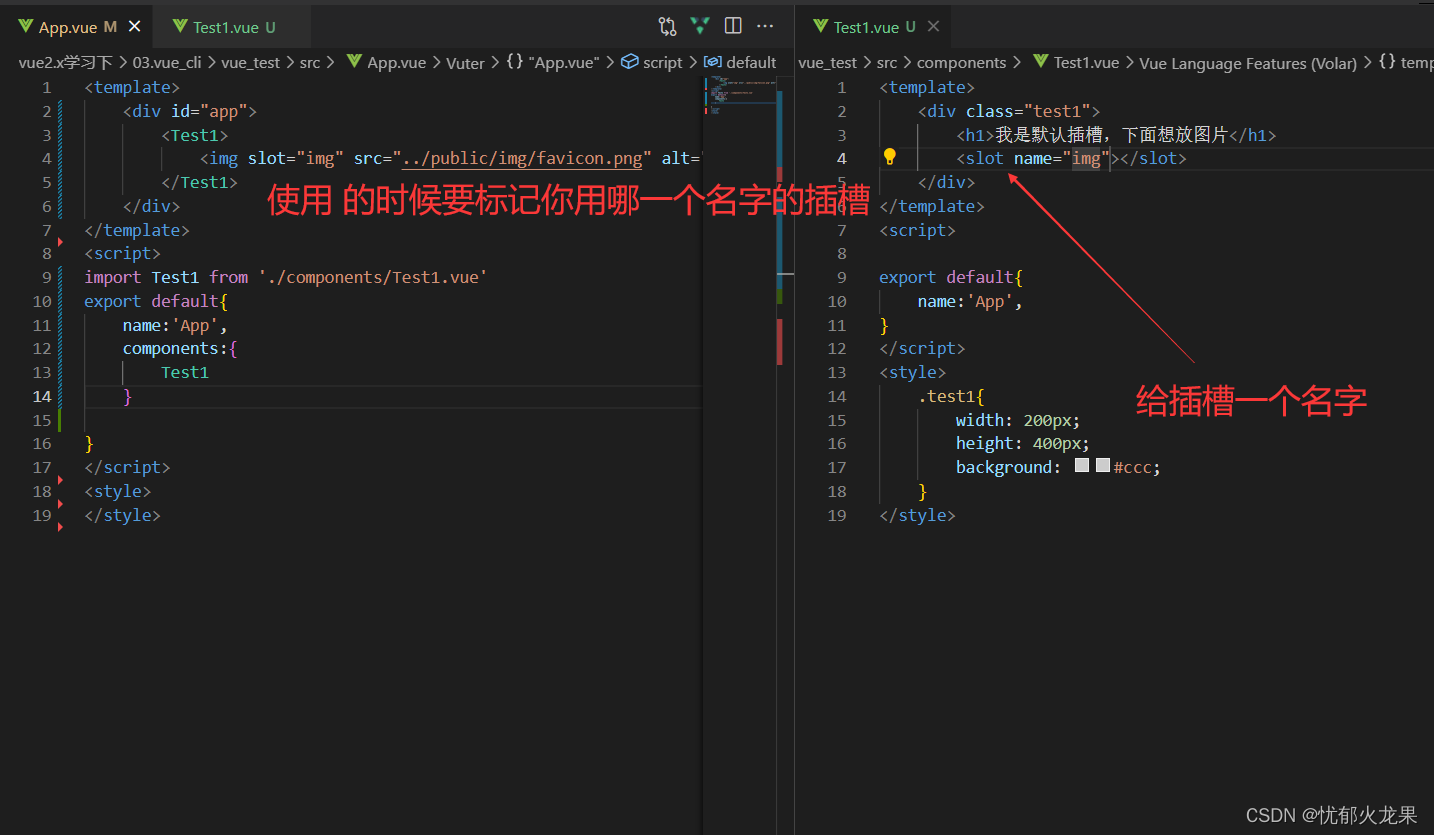
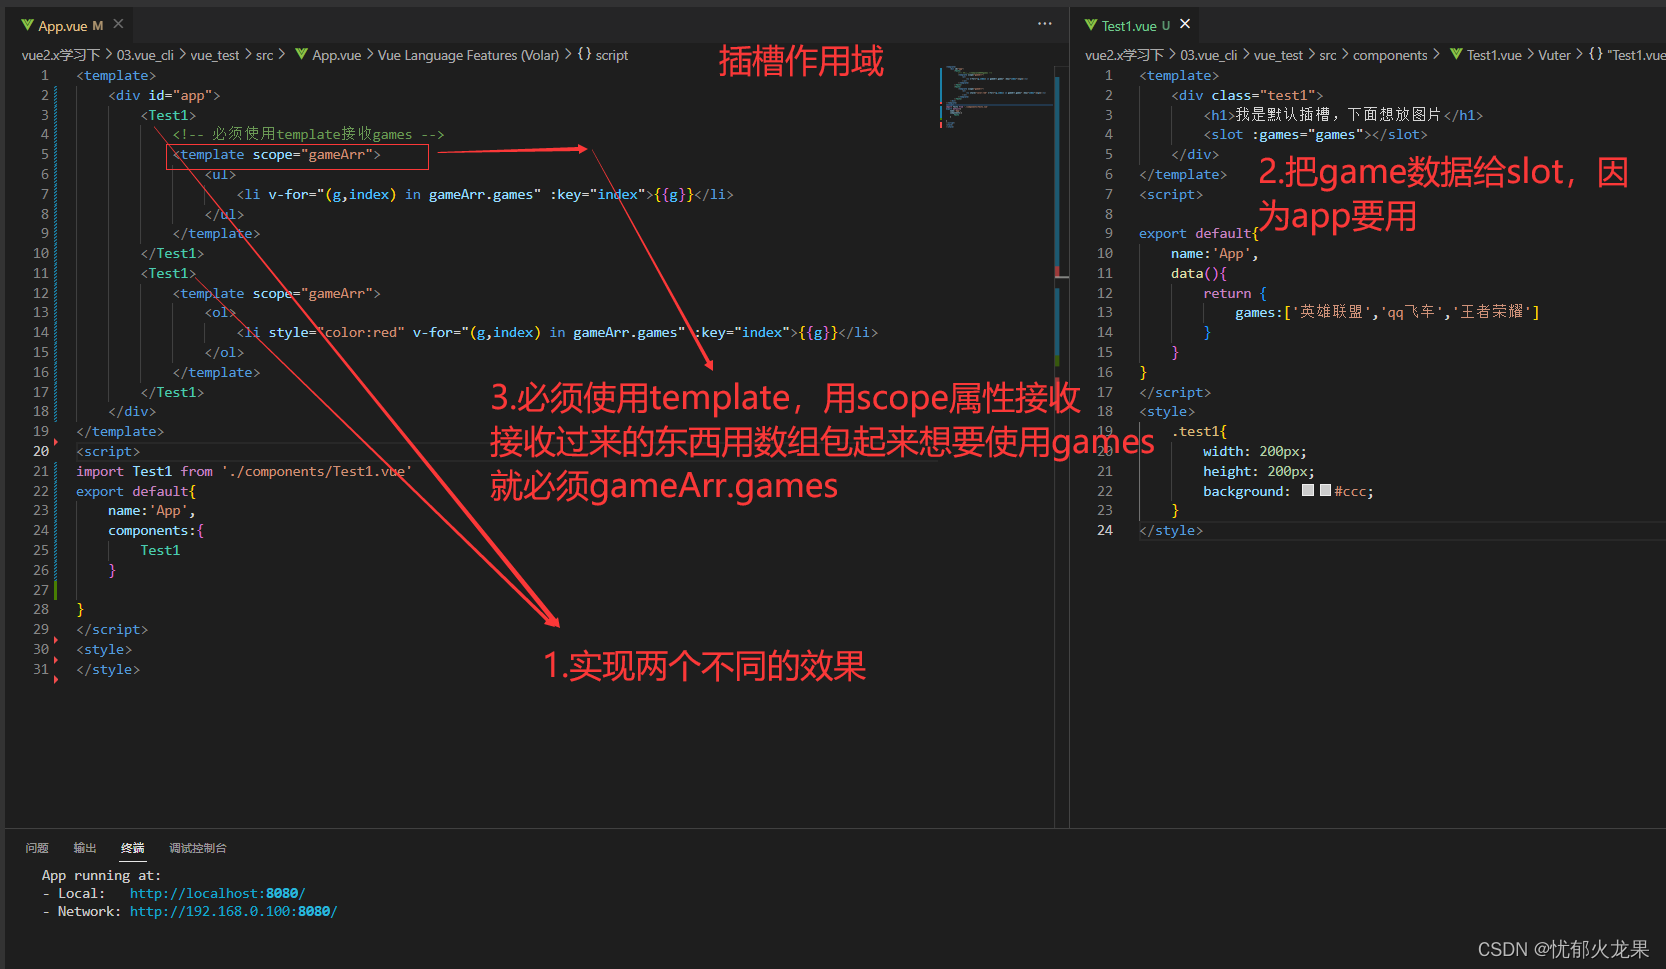
13.作用域插槽


 2750
2750


 被折叠的 条评论
为什么被折叠?
被折叠的 条评论
为什么被折叠?
 到【灌水乐园】发言


