


1.Fragment 产生
2.Fragment 生命周期
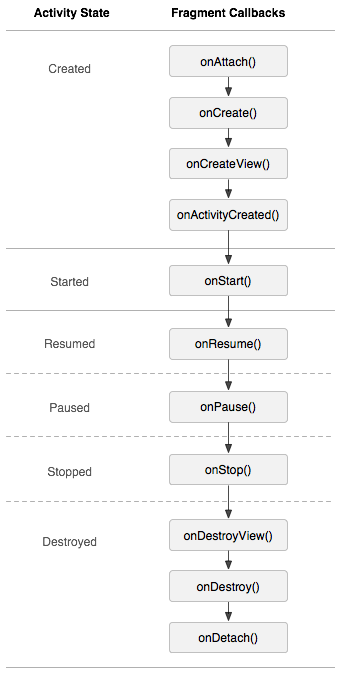
onAttach(Activity) 当Fragment与Activity发生关联时调用。
onCreateView(LayoutInflater, ViewGroup,Bundle) //Fragment第一次绘制他的用户界面时候回调用此方法,为了绘制Fragment的UI,必须返回 一个view ,如果不显示UI则返回null。
onDestoryView()//与onCreateView想对应,当该Fragment的视图被移除时调用
onDetach() //与onAttach相对应,当Fragment与Activity关联被取消时调用
注意:除了onCreateView,其他的所有方法如果你重写了,必须调用父类对于该方法的实现。
3.Fragment 的特点
4.Fragment 静态加载
<LinearLayout xmlns:android="http://schemas.android.com/apk/res/android"
    xmlns:tools="http://schemas.android.com/tools"
    android:layout_width="match_parent"
    android:layout_height="match_parent"
    android:orientation="vertical"
    android:paddingBottom="@dimen/activity_vertical_margin"
    android:paddingLeft="@dimen/activity_horizontal_margin"
    android:paddingRight="@dimen/activity_horizontal_margin"
    android:paddingTop="@dimen/activity_vertical_margin"
    tools:context=".MainActivity" >


    <fragment
        <strong>android:id="@+id/fragment"    //id 一定要写 否则会报错</strong>
        android:layout_width="wrap_content"
        android:layout_height="wrap_content"
        <strong>android:name="com.example.fragment.myFragment" /> // 是具体的类名</strong>
    <fragment
        android:id="@+id/fragment2"
        android:layout_width="wrap_content"
        android:layout_height="wrap_content"
        android:name="com.example.fragment.myFragment2" />

</LinearLayout>import android.app.Activity;
import android.os.Bundle;
import android.view.View;
import android.view.View.OnClickListener;
import android.widget.Button;
import android.widget.TextView;
public class MainActivity2 extends Activity implements OnClickListener{
private Button button ,but11;
private TextView textView ,tv11;
@Override
protected void onCreate(Bundle savedInstanceState) {
// TODO Auto-generated method stub
super.onCreate(savedInstanceState);
setContentView(R.layout.activity_main2);
button=(Button) findViewById(R.id.but);
textView=(TextView) findViewById(R.id.tv);
button.setOnClickListener(this);
but11=(Button) findViewById(R.id.but11);
but11.setOnClickListener(this);
tv11=(TextView) findViewById(R.id.tv11);
}
@Override
public void onClick(View v) {
// TODO Auto-generated method stub
switch(v.getId()){
case R.id.but:
textView.setText("ltg");
break;
case R.id.but11:
tv11.setText("ltg");
break;
}
}
}<LinearLayout xmlns:android="http://schemas.android.com/apk/res/android"
xmlns:tools="http://schemas.android.com/tools"
android:layout_width="match_parent"
android:layout_height="match_parent"
android:orientation="vertical"
android:paddingBottom="@dimen/activity_vertical_margin"
android:paddingLeft="@dimen/activity_horizontal_margin"
android:paddingRight="@dimen/activity_horizontal_margin"
android:paddingTop="@dimen/activity_vertical_margin"
tools:context=".MainActivity" >
<TextView
android:id="@+id/tv"
android:layout_width="wrap_content"
android:layout_height="wrap_content"
android:text="" />
<Button
android:id="@+id/but"
android:layout_width="wrap_content"
android:layout_height="wrap_content"
android:text="chang" />
</LinearLayout>import android.annotation.TargetApi;
import android.app.Fragment;
import android.os.Build;
import android.os.Bundle;
import android.view.LayoutInflater;
import android.view.View;
import android.view.ViewGroup;
import android.widget.TextView;
@TargetApi(Build.VERSION_CODES.HONEYCOMB)
public class myFragment extends Fragment {
@Override
public View onCreateView(LayoutInflater inflater, ViewGroup container,
Bundle savedInstanceState) {
// TODO Auto-generated method stub
// inflater.inflate(resource, root, attachToRoot);
// resource 是Fragment要加载的布局文件
// root 加载Fragment的父ViewGroup
// attachToRoot :false 不返回父ViewGroup
View view = inflater.inflate(R.layout.fragment, container, false);
TextView textView = (TextView) view.findViewById(R.id.tv);
textView.setText("静态加载Fragment");
return view;
}
}<LinearLayout xmlns:android="http://schemas.android.com/apk/res/android"
xmlns:tools="http://schemas.android.com/tools"
android:layout_width="match_parent"
android:layout_height="match_parent"
android:orientation="vertical"
android:paddingBottom="@dimen/activity_vertical_margin"
android:paddingLeft="@dimen/activity_horizontal_margin"
android:paddingRight="@dimen/activity_horizontal_margin"
android:paddingTop="@dimen/activity_vertical_margin"
tools:context=".MainActivity" >
<TextView
android:id="@+id/tv11"
android:layout_width="wrap_content"
android:layout_height="wrap_content"
android:text="" />
<Button
android:id="@+id/but11"
android:layout_width="wrap_content"
android:layout_height="wrap_content"
android:text="点击" />
</LinearLayout>import android.annotation.TargetApi;
import android.app.Fragment;
import android.os.Build;
import android.os.Bundle;
import android.view.LayoutInflater;
import android.view.View;
import android.view.ViewGroup;
import android.widget.TextView;
@TargetApi(Build.VERSION_CODES.HONEYCOMB) public class myFragment2 extends Fragment{
@Override
public View onCreateView(LayoutInflater inflater, ViewGroup container,
Bundle savedInstanceState) {
// TODO Auto-generated method stub
//inflater.inflate(resource, root, attachToRoot);
//resource 是Fragment要加载的布局文件
//root 加载Fragment的父ViewGroup
//attachToRoot :false 不返回父ViewGroup
View view=inflater.inflate(R.layout.fragment2, container, false);
TextView textView=(TextView) view.findViewById(R.id.tv11);
textView.setText("电子科技大学");
return view;
}
}
5.Fragment 动态加载
第一个是resource ID,指明了当前的Fragment对应的资源文件;
第二个参数是父容器控件;
第三个布尔值参数表明是否连接该布局和其父容器控件,在这里的情况设置为false,因为系统已经插入了这个布局到父控件,设置为true将会产生多余的一个View Group。
<LinearLayout xmlns:android="http://schemas.android.com/apk/res/android"
xmlns:tools="http://schemas.android.com/tools"
android:layout_width="match_parent"
android:layout_height="match_parent"
android:orientation="vertical"
android:paddingBottom="@dimen/activity_vertical_margin"
android:paddingLeft="@dimen/activity_horizontal_margin"
android:paddingRight="@dimen/activity_horizontal_margin"
android:paddingTop="@dimen/activity_vertical_margin"
tools:context=".MainActivity" >
<LinearLayout
android:layout_width="match_parent"
android:layout_height="wrap_content" >
<Button
android:id="@+id/but2"
android:layout_width="wrap_content"
android:layout_height="wrap_content"
android:text="动态加载"
android:textSize="15sp" />
<Button
android:id="@+id/but3"
android:layout_width="wrap_content"
android:layout_height="wrap_content"
android:text="动态加载1"
android:textSize="15sp" />
</LinearLayout>
<strong><LinearLayout </strong>
android:id="@+id/<strong>frag</strong>"
android:orientation="vertical"
android:layout_width="wrap_content"
android:layout_height="wrap_content"
>
</LinearLayout>
</LinearLayout>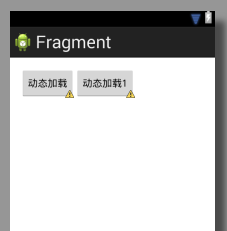
后面加载的fragement 就会在 布局文件中 linearlayout 中显示;
java 代码如下
import android.os.Build;
import android.os.Bundle;
import android.annotation.SuppressLint;
import android.annotation.TargetApi;
import android.app.Activity;
import android.app.FragmentManager;
import android.app.FragmentTransaction;
import android.view.View;
import android.widget.Button;
@TargetApi(Build.VERSION_CODES.HONEYCOMB)
@SuppressLint("NewApi")
public class MainActivity extends Activity implements
android.view.View.OnClickListener {
private Button but2, but3;
@Override
protected void onCreate(Bundle savedInstanceState) {
super.onCreate(savedInstanceState);
setContentView(R.layout.activity_main);
but2 = (Button) findViewById(R.id.but2);
but3 = (Button) findViewById(R.id.but3);
but1.setOnClickListener(this);
but2.setOnClickListener(this);
but3.setOnClickListener(this);
but4.setOnClickListener(this);
}
@TargetApi(Build.VERSION_CODES.HONEYCOMB)
@SuppressLint("NewApi")
@Override
public void onClick(View arg0) {
// TODO Auto-generated method stub
switch (arg0.getId()) {
case R.id.but2:
myFragment2 m = new myFragment2();
FragmentManager f = getFragmentManager();
FragmentTransaction fragmentTransaction = f.beginTransaction();
fragmentTransaction.replace(R.id.<strong>frag</strong>, m);
fragmentTransaction.addToBackStack(null);
fragmentTransaction.commit();
break;
case R.id.but3:
myFragment m1 = new myFragment();
FragmentManager f1 = getFragmentManager();
FragmentTransaction fragmentTransaction1 = f1.beginTransaction();
fragmentTransaction1.replace(R.id.<strong>frag</strong>, m1);
fragmentTransaction1.addToBackStack(null);
fragmentTransaction1.commit();
break;
}
}
}
<LinearLayout xmlns:android="http://schemas.android.com/apk/res/android"
xmlns:tools="http://schemas.android.com/tools"
android:layout_width="match_parent"
android:layout_height="match_parent"
android:orientation="vertical"
android:paddingBottom="@dimen/activity_vertical_margin"
android:paddingLeft="@dimen/activity_horizontal_margin"
android:paddingRight="@dimen/activity_horizontal_margin"
android:paddingTop="@dimen/activity_vertical_margin"
tools:context=".MainActivity" >
<TextView
android:id="@+id/tv11"
android:layout_width="wrap_content"
android:layout_height="wrap_content"
android:text="" />
<Button
android:id="@+id/but11"
android:layout_width="wrap_content"
android:layout_height="wrap_content"
android:text="点击" />
</LinearLayout>import android.annotation.TargetApi;
import android.app.Fragment;
import android.os.Build;
import android.os.Bundle;
import android.view.LayoutInflater;
import android.view.View;
import android.view.View.OnClickListener;
import android.view.ViewGroup;
import android.widget.Button;
import android.widget.TextView;
@TargetApi(Build.VERSION_CODES.HONEYCOMB) public class myFragment2 extends Fragment {
TextView textView;
@Override
public View onCreateView(LayoutInflater inflater, ViewGroup container,
Bundle savedInstanceState) {
// TODO Auto-generated method stub
//inflater.inflate(resource, root, attachToRoot);
//resource 是Fragment要加载的布局文件
//root 加载Fragment的父ViewGroup
//attachToRoot :false 不返回父ViewGroup
View view=<strong>inflater.inflate(R.layout.fragment2, container, false);</strong>
textView=(TextView) view.findViewById(R.id.tv11);
textView.setText("电子科技大学");
Button button=(Button) view.findViewById(R.id.but11);
button.setOnClickListener(new OnClickListener() {
@Override
public void onClick(View arg0) {
// TODO Auto-generated method stub
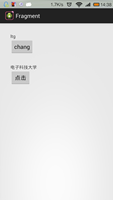
textView.setText("你好");
}
});
return view;
}
}
fragment1.xml中的代码和上面的fragment.xml一样
<LinearLayout xmlns:android="http://schemas.android.com/apk/res/android"
    xmlns:tools="http://schemas.android.com/tools"
    android:layout_width="match_parent"
    android:layout_height="match_parent"
    android:orientation="vertical"
    android:paddingBottom="@dimen/activity_vertical_margin"
    android:paddingLeft="@dimen/activity_horizontal_margin"
    android:paddingRight="@dimen/activity_horizontal_margin"
    android:paddingTop="@dimen/activity_vertical_margin"
    tools:context=".MainActivity" >


    <TextView
        android:id="@+id/tv"
        android:layout_width="wrap_content"
        android:layout_height="wrap_content"
        android:text="" />
    <Button
        android:id="@+id/but"
        android:layout_width="wrap_content"
        android:layout_height="wrap_content"
        android:text="chang" />

</LinearLayout>
对应的java代码 这里面没加点击事件所以点击按键没反应
import android.annotation.TargetApi;
import android.app.Fragment;
import android.os.Build;
import android.os.Bundle;
import android.view.LayoutInflater;
import android.view.View;
import android.view.ViewGroup;
import android.widget.TextView;

@TargetApi(Build.VERSION_CODES.HONEYCOMB)
public class myFragment extends Fragment {

	@Override
	public View onCreateView(LayoutInflater inflater, ViewGroup container,
			Bundle savedInstanceState) {
		// TODO Auto-generated method stub
		// inflater.inflate(resource, root, attachToRoot);
		// resource 是Fragment要加载的布局文件
		// root 加载Fragment的父ViewGroup
		// attachToRoot :false 不返回父ViewGroup
		View view = inflater.inflate(R.layout.fragment, container, false);
		TextView textView = (TextView) view.findViewById(R.id.tv);
		textView.setText("静态加载Fragment");
		return view;
	}
}6.Fragment 常用的API
Fragment常用的三个类:
android.app.Fragment 主要用于定义Fragment
android.app.FragmentManager 主要用于在Activity中操作Fragment
android.app.FragmentTransaction 保证一些列Fragment操作的原子性,熟悉事务这个词,一定能明白~
a、获取FragmentManage的方式:
getFragmentManager() // v4中,getSupportFragmentManager
b、主要的操作都是FragmentTransaction的方法
FragmentTransaction transaction = fm.benginTransatcion();//开启一个事务
transaction.add()
往Activity中添加一个Fragment
transaction.remove()
从Activity中移除一个Fragment,如果被移除的Fragment没有添加到回退栈(回退栈后面会详细说),这个Fragment实例将会被销毁。
transaction.replace()
使用另一个Fragment替换当前的,实际上就是remove()然后add()的合体~
transaction.hide()
隐藏当前的Fragment,仅仅是设为不可见,并不会销毁
transaction.show()
显示之前隐藏的Fragment
detach()
会将view从UI中移除,和remove()不同,此时fragment的状态依然由FragmentManager维护。
attach()
重建view视图,附加到UI上并显示。
transatcion.commit()//提交一个事务
注意:常用Fragment的哥们,可能会经常遇到这样Activity状态不一致:State loss这样的错误。主要是因为:commit方法一定要在Activity.onSaveInstance()之前调用。
上述,基本是操作Fragment的所有的方式了,在一个事务开启到提交可以进行多个的添加、移除、替换等操作。
值得注意的是:如果你喜欢使用Fragment,一定要清楚这些方法,哪个会销毁视图,哪个会销毁实例,哪个仅仅只是隐藏,这样才能更好的使用它们。
a、比如:我在FragmentA中的EditText填了一些数据,当切换到FragmentB时,如果希望会到A还能看到数据,则适合你的就是hide和show;也就是说,希望保留用户操作的面板,你可以使用hide和show,当然了不要使劲在那new实例,进行下非null判断。
b、再比如:我不希望保留用户操作,你可以使用remove(),然后add();或者使用replace()这个和remove,add是相同的效果。
c、remove和detach有一点细微的区别,在不考虑回退栈的情况下,remove会销毁整个Fragment实例,而detach则只是销毁其视图结构,实例并不会被销毁。那么二者怎么取舍使用呢?如果你的当前Activity一直存在,那么在不希望保留用户操作的时候,你可以优先使用detach。


 654
654

 被折叠的 条评论
为什么被折叠?
被折叠的 条评论
为什么被折叠?
 到【灌水乐园】发言


