springBoot如何快速发布webService接口?(含测试工具)

文章目录

  1. 引入maven依赖

org.apache.cxf cxf-rt-frontend-jaxws 3.4.5 org.apache.cxf cxf-rt-transports-http 3.4.5 org.apache.cxf cxf-spring-boot-starter-jaxws 3.4.5 ```
  1. 新建webService接口
    注意接口要添加注释@WebService,且要添加name和targetNamespace属性

    import javax.jws.WebMethod;
    import javax.jws.WebParam;
    import javax.jws.WebService;
    
    @WebService(name = "likuWmsWsService",targetNamespace = "http://impl.service.system.ruoyi.com/")
    public interface IWmsTestService {
    
        @WebMethod
        public String queryStock(@WebParam(name = "param") String param);
    }
    
  2. 增加接口实现类

    @WebService
    @Configuration
    public class WmsTestServiceImpl implements IWmsTestService {
    
        @Override
        public String queryStock(String param) {
            System.out.printf("接收的参数:"+param);
            Map<String, Object> returnMap = new HashMap<String, Object>();
            returnMap.put("data",new ArrayList<>());
            returnMap.put("MSGTY","S");
            returnMap.put("MSGTX","失败原因");
            return JSONObject.toJSONString(returnMap);
        }
    }
    
  3. 增加发布webService的类

    import com.ruoyi.system.service.IWmsTestService;
    import org.apache.cxf.Bus;
    import org.apache.cxf.bus.spring.SpringBus;
    import org.apache.cxf.jaxws.EndpointImpl;
    import org.apache.cxf.transport.servlet.CXFServlet;
    import org.springframework.beans.factory.annotation.Autowired;
    import org.springframework.boot.web.servlet.ServletRegistrationBean;
    import org.springframework.context.annotation.Bean;
    import org.springframework.context.annotation.Configuration;
    import javax.xml.ws.Endpoint;
    
    @Configuration
    public class WebServicePublish {
        @Autowired
        private Bus bus;
        @Autowired
        private IWmsTestService wmsTestServiceImpl;
    
        /**
         * 用于注册CXFServlet的
         * 地址/webservice/*
         * * 通配符 更上接口地址
         *
         */
        @Bean("cxfServletRegistration")
        public ServletRegistrationBean dispatcherServlet() {
            // 这里就是发布服务的跟路径,后面 * 是通配符,表示跟什么都行
            return new ServletRegistrationBean<>(new CXFServlet(), "/webservice/*");
        }
    
        @Bean(name = Bus.DEFAULT_BUS_ID)
        public SpringBus springBus() {
            return new SpringBus();
        }
    
        @Bean
        public Endpoint endpoint() {
            // 建立一个端点 ,第一个参数是 springBus 对象,第二个参数是刚才的接口实现类(因为在实现类中用了@service,所以这里可以自动注入)
            // PS: 要是有多个service,这个方法对象多写几个就行
            EndpointImpl endpoint = new EndpointImpl(bus, wmsTestServiceImpl);
            // 这里就是发布的这个接口的地址
            endpoint.publish("/wmsWs");
            return endpoint;
        }
    }
    
  4. 服务启动成功后,通过浏览器访问wsdl地址

    localhost:8083/webservice/wmsWs?wsdl

    <wsdl:definitions xmlns:xsd="http://www.w3.org/2001/XMLSchema" xmlns:wsdl="http://schemas.xmlsoap.org/wsdl/" xmlns:tns="http://impl.service.system.ruoyi.com/" xmlns:soap="http://schemas.xmlsoap.org/wsdl/soap/" xmlns:ns1="http://schemas.xmlsoap.org/soap/http" name="WmsTestServiceImplService" targetNamespace="http://impl.service.system.ruoyi.com/">
    <wsdl:types>
    <xs:schema xmlns:xs="http://www.w3.org/2001/XMLSchema" xmlns:tns="http://impl.service.system.ruoyi.com/" elementFormDefault="unqualified" targetNamespace="http://impl.service.system.ruoyi.com/" version="1.0">
    <xs:element name="queryStock" type="tns:queryStock"/>
    <xs:element name="queryStockResponse" type="tns:queryStockResponse"/>
    <xs:complexType name="queryStock">
    <xs:sequence>
    <xs:element minOccurs="0" name="param" type="xs:string"/>
    </xs:sequence>
    </xs:complexType>
    <xs:complexType name="queryStockResponse">
    <xs:sequence>
    <xs:element minOccurs="0" name="return" type="xs:string"/>
    </xs:sequence>
    </xs:complexType>
    </xs:schema>
    </wsdl:types>
    <wsdl:message name="queryStock">
    <wsdl:part element="tns:queryStock" name="parameters"> </wsdl:part>
    </wsdl:message>
    <wsdl:message name="queryStockResponse">
    <wsdl:part element="tns:queryStockResponse" name="parameters"> </wsdl:part>
    </wsdl:message>
    <wsdl:portType name="likuWmsWsService">
    <wsdl:operation name="queryStock">
    <wsdl:input message="tns:queryStock" name="queryStock"> </wsdl:input>
    <wsdl:output message="tns:queryStockResponse" name="queryStockResponse"> </wsdl:output>
    </wsdl:operation>
    </wsdl:portType>
    <wsdl:binding name="WmsTestServiceImplServiceSoapBinding" type="tns:likuWmsWsService">
    <soap:binding style="document" transport="http://schemas.xmlsoap.org/soap/http"/>
    <wsdl:operation name="queryStock">
    <soap:operation soapAction="" style="document"/>
    <wsdl:input name="queryStock">
    <soap:body use="literal"/>
    </wsdl:input>
    <wsdl:output name="queryStockResponse">
    <soap:body use="literal"/>
    </wsdl:output>
    </wsdl:operation>
    </wsdl:binding>
    <wsdl:service name="WmsTestServiceImplService">
    <wsdl:port binding="tns:WmsTestServiceImplServiceSoapBinding" name="WmsTestServiceImplPort">
    <soap:address location="http://localhost:8083/webservice/wmsWs"/>
    </wsdl:port>
    </wsdl:service>
    </wsdl:definitions>
    
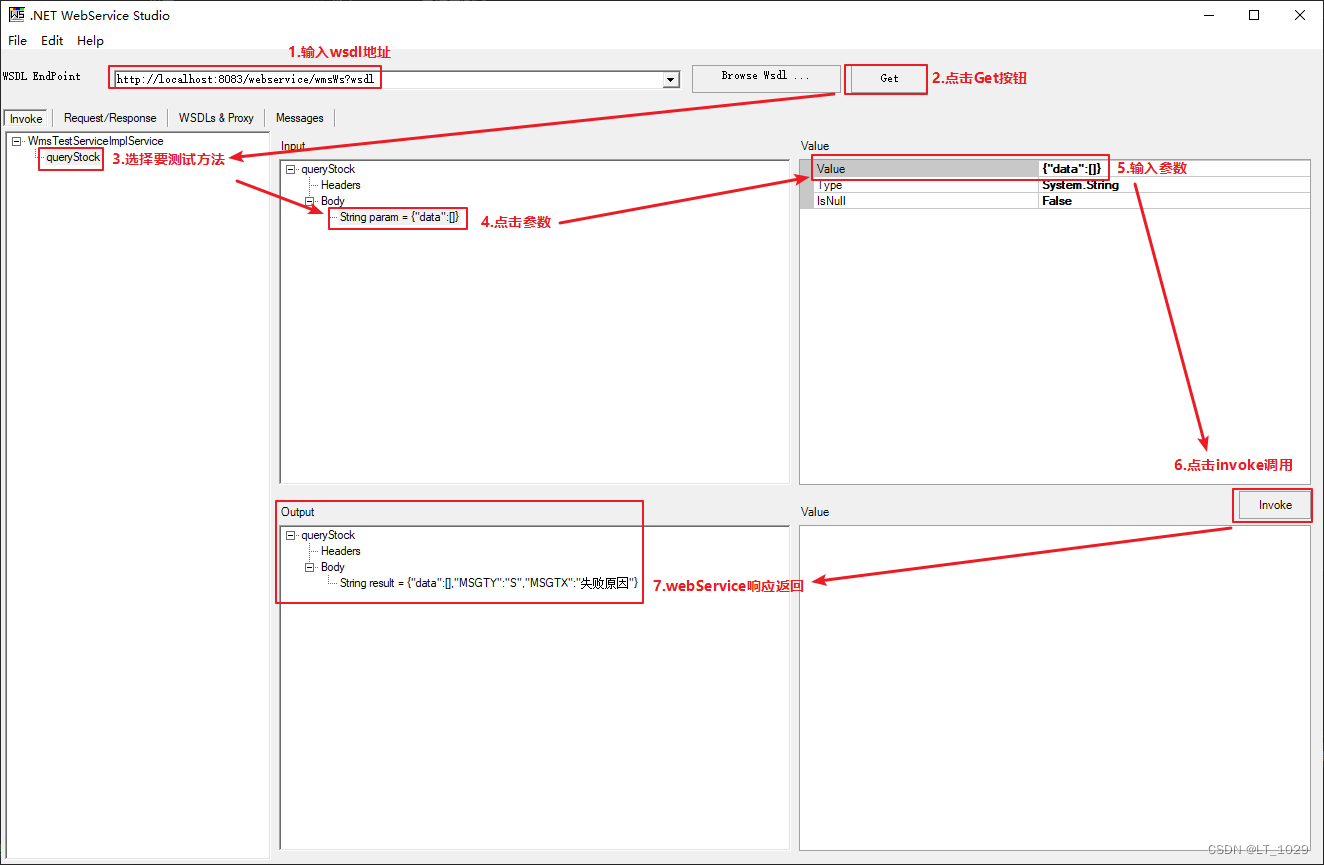
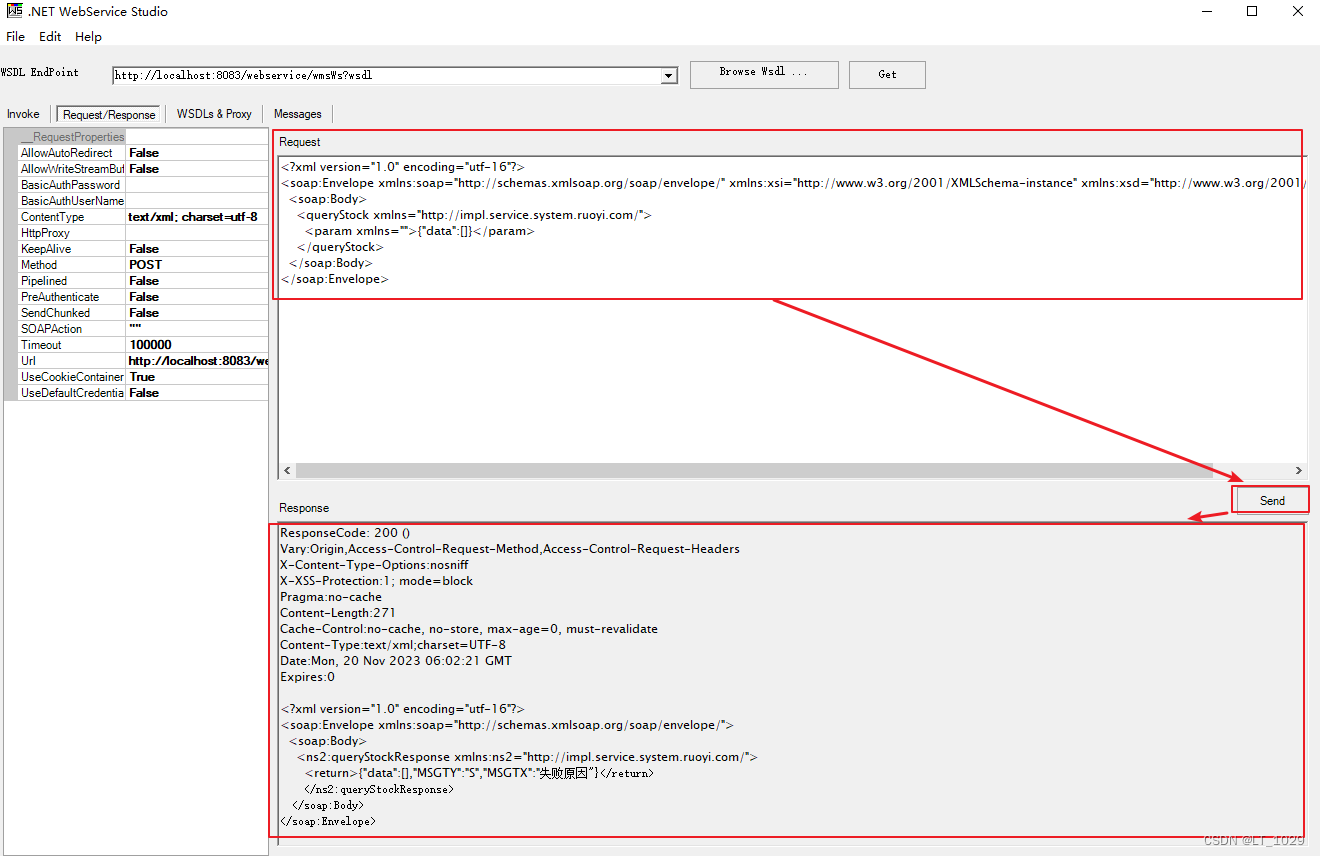
  5. 通过webServiceStudio工具进行调试

    工具下载地址:https://pan.baidu.com/s/1F5WgMPM3u4yY-xgYyskb8Q?pwd=yxao
    调用测试:
    在这里插入图片描述

在这里插入图片描述

  • 8
    点赞
  • 12
    收藏
    觉得还不错? 一键收藏
  • 0
    评论
### 回答1: Spring Boot可以通过使用Spring Web Services(Spring-WS)来发布Web服务接口。 以下是发布Web服务接口的步骤: 1. 添加Spring-WS依赖 在pom.xml文件中添加以下依赖: ``` <dependency> <groupId>org.springframework.boot</groupId> <artifactId>spring-boot-starter-web-services</artifactId> </dependency> ``` 2. 创建Endpoint 创建一个类,用于实现Web服务接口的业务逻辑。该类需要使用`@Endpoint`注解进行标注。 ``` @Endpoint public class MyEndpoint { @PayloadRoot(namespace = "http://example.com/my", localPart = "MyRequest") @ResponsePayload public MyResponse handleRequest(@RequestPayload MyRequest request) { // 处理请求 MyResponse response = new MyResponse(); response.setResult("Hello " + request.getName()); return response; } } ``` 3. 配置WebServiceSpring Boot的配置类中,添加以下配置: ``` @Bean public ServletRegistrationBean<MessageDispatcherServlet> messageDispatcherServlet() { MessageDispatcherServlet servlet = new MessageDispatcherServlet(); servlet.setApplicationContext(applicationContext); servlet.setTransformWsdlLocations(true); return new ServletRegistrationBean<>(servlet, "/ws/*"); } @Bean(name = "my") public DefaultWsdl11Definition defaultWsdl11Definition(XsdSchema mySchema) { DefaultWsdl11Definition wsdl11Definition = new DefaultWsdl11Definition(); wsdl11Definition.setPortTypeName("MyPort"); wsdl11Definition.setLocationUri("/ws"); wsdl11Definition.setTargetNamespace("http://example.com/my"); wsdl11Definition.setSchema(mySchema); return wsdl11Definition; } @Bean public XsdSchema mySchema() { return new SimpleXsdSchema(new ClassPathResource("my.xsd")); } ``` 4. 创建XSD文件 创建一个XSD文件,用于定义Web服务接口的请求和响应格式。 ``` <xs:schema xmlns:xs="http://www.w3.org/2001/XMLSchema" xmlns:tns="http://example.com/my" targetNamespace="http://example.com/my" elementFormDefault="qualified"> <xs:element name="MyRequest"> <xs:complexType> <xs:sequence> <xs:element name="name" type="xs:string"/> </xs:sequence> </xs:complexType> </xs:element> <xs:element name="MyResponse"> <xs:complexType> <xs:sequence> <xs:element name="result" type="xs:string"/> </xs:sequence> </xs:complexType> </xs:element> </xs:schema> ``` 5. 启动应用程序 使用Spring Boot的`SpringApplication.run()`方法启动应用程序。 6. 测试Web服务 使用SOAPUI等工具测试Web服务接口。请求的URL为`http://localhost:8080/ws`,SOAPAction为`http://example.com/my/MyRequest`。请求的内容应该符合XSD文件中定义的格式。 以上就是使用Spring Boot发布Web服务接口的步骤。 ### 回答2: Spring Boot是一个快速开发Spring应用程序的框架,其可以使我们更快速地创建基于Spring的应用程序,并大大简化了我们开发过程中的工作流程。而Web Service是一种通信协议,它是在Web上实现的应用程序之间的相互操作和交互的方法。在使用Spring Boot开发应用程序时,我们通常会需要用到Web Service接口,以便与其他应用程序进行通信和数据交换。本文将介绍如何使用Spring Boot发布Web Service接口。 首先,我们需要配置Spring Boot项目来支持Web Service,这可以通过引入Spring Web Services Starter来实现: ``` <dependency> <groupId>org.springframework.boot</groupId> <artifactId>spring-boot-starter-web-services</artifactId> </dependency> ``` 此外,我们还需要创建一个用于处理Web Service请求的Endpoint类,在该类中定义我们需要发布的Web Service接口及其相关方法: ``` @Endpoint public class HelloWorldEndpoint { private static final String NAMESPACE_URI = "http://springboot.webservice.example.com"; @PayloadRoot(namespace = NAMESPACE_URI, localPart = "sayHelloRequest") @ResponsePayload public SayHelloResponse sayHello(@RequestPayload SayHelloRequest request) { SayHelloResponse response = new SayHelloResponse(); response.setMessage("Hello, " + request.getName() + "!"); return response; } } ``` 在这个例子中,我们定义了一个名为“HelloWorldEndpoint”的Endpoint类,该类中包了名为“sayHello”的Web Service接口及其相关方法。在该方法中,我们通过使用@PayloadRoot和@ResponsePayload来指定我们的请求和响应负载的根元素,并在方法体中实现相应的业务逻辑。 接下来,我们需要通过配置类来进行端点注册: ``` @Configuration @EnableWs public class WebServiceConfig extends WsConfigurerAdapter { @Bean public ServletRegistrationBean messageDispatcherServlet(ApplicationContext applicationContext) { MessageDispatcherServlet servlet = new MessageDispatcherServlet(); servlet.setApplicationContext(applicationContext); servlet.setTransformWsdlLocations(true); return new ServletRegistrationBean(servlet, "/ws/*"); } @Bean(name = "helloWorld") public DefaultWsdl11Definition defaultWsdl11Definition(XsdSchema helloSchema) { DefaultWsdl11Definition wsdl11Definition = new DefaultWsdl11Definition(); wsdl11Definition.setPortTypeName("HelloWorldPort"); wsdl11Definition.setLocationUri("/ws"); wsdl11Definition.setTargetNamespace("http://springboot.webservice.example.com"); wsdl11Definition.setSchema(helloSchema); return wsdl11Definition; } @Bean public XsdSchema helloSchema() { return new SimpleXsdSchema(new ClassPathResource("hello.xsd")); } } ``` 在上述代码中,我们通过使用@Configuration和@EnableWs注解来启用Spring Web Services,并通过定义messageDispatcherServlet来注册我们的Web Service。我们还定义了一个名为“helloWorld”的DefaultWsdl11Definition bean,该bean用于导出我们的Web Service接口的WSDL文档。此外,我们还定义了一个用于验证请求/响应的XML数据的XSD模式。 最后,我们需要创建一个XSD模式文件和WSDL文件,以便在客户端应用程序中使用我们的Web Service接口。此文件的名称一定要与WebServiceConfig类中所指定的文件名相同,否则无法匹配: hello.xsd ``` <?xml version="1.0" encoding="UTF-8"?> <xs:schema xmlns:xs="http://www.w3.org/2001/XMLSchema" targetNamespace="http://springboot.webservice.example.com" xmlns:tns="http://springboot.webservice.example.com" elementFormDefault="qualified"> <xs:element name="sayHelloRequest"> <xs:complexType> <xs:sequence> <xs:element name="name" type="xs:string"/> </xs:sequence> </xs:complexType> </xs:element> <xs:element name="sayHelloResponse"> <xs:complexType> <xs:sequence> <xs:element name="message" type="xs:string"/> </xs:sequence> </xs:complexType> </xs:element> </xs:schema> ``` hello.wsdl ``` <?xml version="1.0" encoding="UTF-8"?> <wsdl:definitions xmlns:wsdl="http://schemas.xmlsoap.org/wsdl/" xmlns:sch="http://springboot.webservice.example.com" xmlns:soap="http://schemas.xmlsoap.org/wsdl/soap/" xmlns:tns="http://springboot.webservice.example.com" targetNamespace="http://springboot.webservice.example.com"> <wsdl:types> <xs:schema xmlns:xs="http://www.w3.org/2001/XMLSchema" targetNamespace="http://springboot.webservice.example.com" xmlns:tns="http://springboot.webservice.example.com" elementFormDefault="qualified"> <xs:import namespace="http://springboot.webservice.example.com" schemaLocation="hello.xsd"/> </xs:schema> </wsdl:types> <wsdl:message name="sayHelloRequest"> <wsdl:part element="sch:sayHelloRequest" name="parameters"/> </wsdl:message> <wsdl:message name="sayHelloResponse"> <wsdl:part element="sch:sayHelloResponse" name="parameters"/> </wsdl:message> <wsdl:portType name="HelloWorldPort"> <wsdl:operation name="sayHello"> <wsdl:input message="tns:sayHelloRequest"/> <wsdl:output message="tns:sayHelloResponse"/> </wsdl:operation> </wsdl:portType> <wsdl:binding name="HelloWorldBinding" type="tns:HelloWorldPort"> <soap:binding style="document" transport="http://schemas.xmlsoap.org/soap/http"/> <wsdl:operation name="sayHello"> <soap:operation soapAction=""/> <wsdl:input> <soap:body use="literal"/> </wsdl:input> <wsdl:output> <soap:body use="literal"/> </wsdl:output> </wsdl:operation> </wsdl:binding> <wsdl:service name="HelloWorldService"> <wsdl:port binding="tns:HelloWorldBinding" name="HelloWorldPort"> <soap:address location="http://localhost:8080/ws"/> </wsdl:port> </wsdl:service> </wsdl:definitions> ``` 最后,我们可以使用以下命令启动Web Service应用程序: ``` mvn spring-boot:run ``` 在启动完成后,我们可以通过在浏览器中打开以下URL来查看我们的WSDL文档: http://localhost:8080/ws/helloWorld.wsdl 现在我们的Web Service应用程序已经发布并可以供客户端应用程序调用了。 ### 回答3: 在springboot发布webservice接口,可以使用spring-boot-starter-web-services starter包。首先,我们需要在pom.xml文件中添加该依赖: ``` <dependency> <groupId>org.springframework.boot</groupId> <artifactId>spring-boot-starter-web-services</artifactId> </dependency> ``` 然后,我们需要创建一个Endpoint类,该类包我们要发布WebService接口。我们可以使用Spring的@Endpoint和@WebService注解来实现它。例如: ``` @Endpoint public class HelloWorldEndpoint { @PayloadRoot(namespace = "http://example.com/demo", localPart = "SayHelloRequest") @ResponsePayload public SayHelloResponse sayHello(@RequestPayload SayHelloRequest request) { SayHelloResponse response = new SayHelloResponse(); response.setGreeting("Hello, " + request.getName() + "!"); return response; } } ``` 在本例中,我们定义了一个名为HelloWorldEndpoint的类,并使用@Endpoint注解来标记它。我们还使用了@PayloadRoot和@ResponsePayload注解来指定我们的请求和响应负载的格式和内容。 接下来,我们需要将Endpoint类注册到Spring Boot应用程序中。我们可以使用Endpoint.publish()方法来实现。例如: ``` @Bean public Endpoint endpoint() { EndpointImpl endpoint = new EndpointImpl(springBus(), new HelloWorldEndpoint()); endpoint.publish("/hello"); return endpoint; } @Bean public SpringBus springBus() { return new SpringBus(); } ``` 在本例中,我们在@Bean方法中创建了一个Endpoint类实例,并使用publish()方法将其发布到Web服务中。我们还创建了一个SpringBus bean,它是CXF的核心组件之一,用于提供Spring集成和JAX-WS支持。 最后,我们需要在application.properties文件中添加以下配置,以定义WebService的名称空间和接口URL: ``` cxf.path=/webservice cxf.servlet.context-path=/hello cxf.jaxws.endpoint.publish=true cxf.jaxws.serviceClasses=com.example.demo.ws.HelloWorldEndpoint cxf.jaxws.address=/hello ``` 在上面的配置中,我们指定了WebService的名称空间和接口URL,并指定了要发布的Endpoint类。 现在我们就可以使用SpringBoot发布WebService接口了!我们可以通过浏览器或SOAP客户端来访问它。

“相关推荐”对你有帮助么?

  • 非常没帮助
  • 没帮助
  • 一般
  • 有帮助
  • 非常有帮助
提交
评论
添加红包

请填写红包祝福语或标题

红包个数最小为10个

红包金额最低5元

当前余额3.43前往充值 >
需支付:10.00
成就一亿技术人!
领取后你会自动成为博主和红包主的粉丝 规则
hope_wisdom
发出的红包
实付
使用余额支付
点击重新获取
扫码支付
钱包余额 0

抵扣说明:

1.余额是钱包充值的虚拟货币,按照1:1的比例进行支付金额的抵扣。
2.余额无法直接购买下载,可以购买VIP、付费专栏及课程。

余额充值