http://blog.csdn.net/massivestars/article/details/53510586
maven默认的运行环境是test,我打包的时候怎么样才能切换到生产环境

在实际开发项目中,常常有几种环境,一般情况下最少有三种环境:开发、测试、正式。
各个环境之间的参数各不相同,比如MySQL、Redis等不同环境的host不一样,若每个环境都手动替换环境很容易出错,这里我们利用maven的profile功能切换环境。
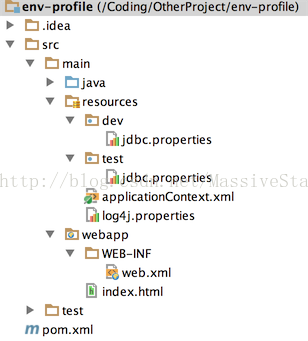
本文的项目结构图:
src/main/resources/dev 目录的properties是开发环境的配置项目
src/main/resources/test 目录的properties是测试环境的配置项目
在pom.xml定义环境的profile
- <profiles>
- <profile>
- <id>dev</id>
- <properties>
- <profiles.activation>dev</profiles.activation>
- </properties>
- <activation>
- <activeByDefault>true</activeByDefault>
- </activation>
- </profile>
- <profile>
- <id>test</id>
- <properties>
- <profiles.activation>test</profiles.activation>
- </properties>
- </profile>
- </profiles>
activeByDefault标签的值为true的话表示默认的profile,使用mvn install命令起作用的就是它,这里为dev
resources标签定义要包含的资源,在下面的配置下package阶段会把resources文件夹里的 ${profiles.activation}/* 文件打包
这里的${profiles.activation}由命令maven的-P选项指定,例:mvn install -Ptest 就是打包 test/* 即test目录下的所有文件
- <resources>
- <resource>
- <directory>src/main/resources</directory>
-
- <includes>
- <include>**/*.properties</include>
- <include>**/*.xml</include>
- </includes>
-
-
- <excludes>
- <exclude>dev/*</exclude>
- <exclude>test/*</exclude>
- </excludes>
- </resource>
- <resource>
- <directory>src/main/resources</directory>
-
- <includes>
- <include>${profiles.activation}/*</include>
- </includes>
- </resource>
- </resources>
applicationContext.xml文件如下
- <?xml version="1.0" encoding="UTF-8"?>
- <beans xmlns="http://www.springframework.org/schema/beans"
- xmlns:xsi="http://www.w3.org/2001/XMLSchema-instance"
- xmlns:context="http://www.springframework.org/schema/context"
- xsi:schemaLocation="http://www.springframework.org/schema/beans http://www.springframework.org/schema/beans/spring-beans-3.0.xsd
- http://www.springframework.org/schema/context http://www.springframework.org/schema/context/spring-context-3.0.xsd" default-autowire="byType">
-
-
- <context:annotation-config/>
-
-
-
- <bean id="propertyConfig"
- class="org.springframework.beans.factory.config.PropertyPlaceholderConfigurer">
- <property name="locations">
- <list>
- <value>classpath:${profiles.activation:dev}/jdbc.properties</value>
- </list>
- </property>
- </bean>
-
-
- <bean id="dataSource" class="com.alibaba.druid.pool.DruidDataSource" init-method="init" destroy-method="close">
-
- <property name="url" value="${jdbc.url}" />
- <property name="username" value="${jdbc.username}" />
- <property name="password" value="${jdbc.password}" />
-
-
- <property name="initialSize" value="1" />
- <property name="minIdle" value="1" />
- <property name="maxActive" value="20" />
-
-
- <property name="maxWait" value="60000" />
-
-
- <property name="timeBetweenEvictionRunsMillis" value="60000" />
-
-
- <property name="minEvictableIdleTimeMillis" value="300000" />
-
- </bean>
-
- </beans>
这里取${profiles.activation:dev}是取${profiles.activation}的值,若不存在,则默认为dev;
若值为dev,locations的值为
classpath:dev/jdbc.properties。
${profiles.activation}是在web.xml里的context-param取值
- <context-param>
- <param-name>profiles.activation</param-name>
- <param-value>${profiles.activation}</param-value>
- </context-param>
值得注意的是,${profiles.activation}由于有默认值的存在,applicationContext.xml不需要启动web容器去读取web.xml中的${profiles.activation},
这有效的保障了使用JUnit进行单元测试,也就是说在maven的test目录里的测试用例可以正常运行。
现在的问题就成了如何把maven里激活的profile值传进来,使用
maven-war-plugin能在maven install的时期会设置web.xml占位符值${}的值
- <plugin>
- <groupId>org.apache.maven.plugins</groupId>
- <artifactId>maven-war-plugin</artifactId>
- <configuration>
- <warName>${profiles.activation}</warName>
-
- <webResources>
- <resource>
- <filtering>true</filtering>
- <directory>src/main/webapp</directory>
- <includes>
- <include>**/web.xml</include>
- </includes>
- </resource>
- </webResources>
- <warSourceDirectory>src/main/webapp</warSourceDirectory>
- <webXml>src/main/webapp/WEB-INF/web.xml</webXml>
- </configuration>
- </plugin>
所有文件配置完毕,使用 mvn install -P{profile} 命令打包war
example:
1、mvn install 没有指定profile,默认为dev
2、mvn install -Ptest -Dmaven.test.skip=true 指定profile为test并跳过测试
在使用tomcat部署时,先使用maven的命令切换至目标环境,然后tomcat的目标目录设置为编译后的target/${project.actifact}目录(大多数IDE比如eclipse和IDEA都是这样)


 1202
1202

 被折叠的 条评论
为什么被折叠?
被折叠的 条评论
为什么被折叠?
 到【灌水乐园】发言


