


CFTM User Manual Version 1.0
Pulication date 2024.04.01
About
CFTM is a tool developed based on Agisoft Metashape Python API for high-precision registration of multi-epoch aerial images during photogrammetry. It is inspired by advanced co-alignment algorithms, and it improves the matching method and filtering optimization algorithms. It can recover the potential common tie points (CTPs) which may disabled during incremental SfM due to insufficient cross-epoch matches, and hence resolve the failure of co-alignment. Apart from that, the part iterative optimization of CFTM can improve the accuracy of co-alignment in most normal cases. The output of CFTM is the refined image poses, this means the later generated products(such as DEMs, DOMs, and 3D meshs) are directly located in the same reference coordinate system, enabling high-precision spatiotemporal analysis (such as surface deformation monitoring).
Download
The source code is available at https://github.com/lixinlong1998/CoSfM.
The English version of documentation is available at https://blog.csdn.net/LXLng/article/details/134613468.
The Chinese version of documentation is available at https://blog.csdn.net/LXLng/article/details/136598055.
1 Installation
CFTM v1.0 is developed using the Python API of Agisoft Metashape Pro v1.8.5 in a Windows environment. Since Metashape Pro v1.8.5 does not provide interfaces for feature point extraction and raw feature matching, the Feature Point Extraction Module utilizes the feature extraction function (SIFT-GPU) from the third-party open-source library COLMAP, and the Result Analysis Module utilizes the feature matching function from COLMAP. In addition, some functionalities depend on third-party library functions. Although Metashape Pro v1.8.5 comes with a pre-installed Python 3.8 environment with some third-party libraries, additional installation and/or upgrading of some third-party libraries are still required.
1.1 Installation of Agisoft Metashape Pro v1.8.5
If you are new to Metashape, please note that the software is paid and requires a license purchase. Agisoft offers an Educational License version, details of which can be found here.
Below are some related links to help you quickly understand and reference Metashape:
Official Website, Beginner’s Tutorial, Forum, Knowledge Base
- Visit the Agisoft official website and download the installer for Metashape Pro v1.8.5. Note that the official website may remove previous versions with version updates. It is recommended for users to search for historical versions through Google (for everyone’s convenience, I will post the download link for the installation package in the comments).
- Run the downloaded installer and follow the installation wizard instructions to complete the installation process.
- During the installation process, you may need to accept the license agreement, choose the installation path, and select other options.
1.2 Adding Metashape.exe to the Environment Variables
-
Right-click on
This PCand selectProperties, then findAdvanced system settingsand open the panel.

-
Open the Environment Variables panel, select
PathunderSystem variables, and clickEdit.

-
Click
New, then enter the installation path (the folder path containing Metashape.exe), and proceed toOKall panels to complete the environment variable setup.


1.3 Installing Third-Party Python Libraries
Metashape 1.8.5 comes with a Python 3.8 environment and some basic Python libraries. Our plugin is developed under the Python 3.8 environment provided by Metashape 1.8.5. However, since some complex functionalities require additional library functions to be implemented, it is necessary to install new third-party library functions in the existing Python 3.8 environment.
The official tutorial is available here: How to install external Python module to Metashape Professional package. We provide 2 methods to install third-party library functions in the specified Python environment on Windows, using numpy as an example:
Method 1: Automatic Download
- Press Win+R, type
cmd, and press Enter to open the command line cmd.exe. - Type
cd /d G:\UAV_SOFTWARE\Metashape\Metashape1.8.5\python(replace with your installation path). - Type
python -m pip install numpyto install the numpy library. - If the library is not found, you can try specifying the source URL afterward. For example, to use the Tsinghua source, type
python -m pip install numpy -i https://pypi.tuna.tsinghua.edu.cn/simple/.
Method 2: Manual Download
- Download the appropriate version of the wheel file from the source website in advance, e.g.,
numpy-1.24.2-cp38-cp38-win_amd64.whl. - Press Win+R, type
cmd, and press Enter to open the command line cmd.exe. - Type
cd /d G:\UAV_SOFTWARE\Metashape\Metashape1.8.5\python, replacing with your installation path. - Execute the command
python -m pip install <wheel_path>.
Below are the third-party library functions that need to be installed:
- The versions of these libraries have been tested to be suitable for Metashape Pro v1.8.5.
- It is recommended to manually download the wheel file for GDAL and then use Method 2 for installation.
| Library Name | Version or Wheel | Recommended Method |
|---|---|---|
| numpy | 1.23.5 | Automatic Download |
| scipy | 1.10.1 | Automatic Download |
| pandas | 2.0.0 | Automatic Download |
| networkx | 3.1 | Automatic Download |
| GDAL | GDAL-3.4.3-cp38-cp38-win_amd64.whl | Manual Download |
| opencv-python | 4.7 | Automatic Download |
| opencv-contrib-python | 4.7 | Automatic Download |
| matplotlib | 3.7.1 | Automatic Download |
| python-dateutil | 2.8.2 | Automatic Download |
| pytz | 2023.3 | Automatic Download |
Installation Process:
- First, download the GDAL installation package, and then execute the following commands line by line.
- If you encounter a corrupted pip issues during the installation process, you can follow this method 1.
cd /d <G:\UAV_SOFTWARE\Metashape\Metashape1.8.5\python>
python -m pip install --upgrade pip
python -m pip install numpy==1.23.5
python -m pip install scipy==1.10.1
python -m pip install pandas==2.0.0
python -m pip install matplotlib==3.7.1
python -m pip install networkx==3.1
python -m pip install python-dateutil==2.8.2
python -m pip install pytz==2023.3
python -m pip install opencv-python==4.7.0.72 -i https://pypi.tuna.tsinghua.edu.cn/simple/
python -m pip install opencv-contrib-python==4.7.0.72 -i https://pypi.tuna.tsinghua.edu.cn/simple/
python -m pip install G:\UAV_SOFTWARE\Metashape\Python3Module\GDAL-3.4.3-cp38-cp38-win_amd64.whl
- After installation, type the following commands line by line in the command prompt to view the libraries installed in the current Metashape Python environment. You can check against the reference library function list.
cd /d G:\UAV_SOFTWARE\Metashape\Metashape1.8.5\python
python -m pip list
| Library | Version | Library | Version |
|---|---|---|---|
| attrs | 23.1.0 | backcall | 0.2.0 |
| click | 8.1.3 | colorama | 0.4.3 |
| ConfigArgParse | 1.5.3 | contourpy | 1.0.7 |
| cycler | 0.11.0 | dash | 2.9.3 |
| dash-core-components | 2.0.0 | dash-html-components | 2.0.0 |
| dash-table | 5.0.0 | decorator | 4.4.2 |
| fastjsonschema | 2.16.3 | Flask | 2.2.3 |
| fonttools | 4.39.3 | GDAL | 3.4.3 |
| importlib-metadata | 6.5.0 | importlib-resources | 5.12.0 |
| ipykernel | 5.3.4 | ipython | 7.16.1 |
| ipython-genutils | 0.2.0 | ipywidgets | 8.0.6 |
| itsdangerous | 2.1.2 | jedi | 0.17.2 |
| Jinja2 | 3.1.2 | jsonschema | 4.17.3 |
| jupyter-client | 6.1.6 | jupyter-core | 4.6.3 |
| jupyterlab-widgets | 3.0.7 | kiwisolver | 1.4.4 |
| llvmlite | 0.39.1 | MarkupSafe | 2.1.2 |
| matplotlib | 3.7.1 | nbformat | 5.7.0 |
| networkx | 3.1 | numba | 0.56.4 |
| numpy | 1.23.5 | open3d | 0.17.0 |
| opencv-contrib-python | 4.7.0.72 | opencv-python | 4.7.0.72 |
| packaging | 23.1 | pandas | 2.0.0 |
| parso | 0.7.1 | pexpect | 4.8.0 |
| pickleshare | 0.7.5 | Pillow | 9.5.0 |
| pip | 24.0 | pkgutil_resolve_name | 1.3.10 |
| plotly | 5.14.1 | prompt-toolkit | 3.0.5 |
| ptyprocess | 0.6.0 | Pygments | 2.6.1 |
| pyparsing | 3.0.9 | pyrsistent | 0.19.3 |
| PySide2 | 5.15.2.1 | python-dateutil | 2.8.1 |
| pytz | 2023.3 | pywin32 | 228 |
| pyzmq | 19.0.1 | qtconsole | 4.7.5 |
| QtPy | 1.9.0 | scipy | 1.10.1 |
| setuptools | 49.2.0 | shiboken2 | 5.15.2.1 |
| shiboken2-generator | 5.15.2.1 | six | 1.15.0 |
| tenacity | 8.2.2 | tornado | 6.0.4 |
| traitlets | 4.3.3 | tzdata | 2023.3 |
| wcwidth | 0.2.5 | Werkzeug | 2.2.3 |
| wheel | 0.29.0 | widgetsnbextension | 4.0.7 |
| zipp | 3.15.0 |
1.4 Install COLMAP (Recommended)
This plugin uses COLMAP version 3.6, other versions have not been tested.
Official installation tutorial: Official Website, GitHub Releases
Other installation tutorials: Installation, Debugging, 3D Reconstruction Practice, and Intermediate Results Output of Colmap under Windows 10
2 Data
Assuming we have two sets of images of the same survery area collected at different epochs, denoted as epoch1 and epoch2, and the relevant POS data recorded by the onboard GPS positioning system, denoted as POS1 and POS2. Note that some drone manufacturers (such as DJI) directly embed POS information into the EXIF of the images, so there might only images.

3 Getting Started
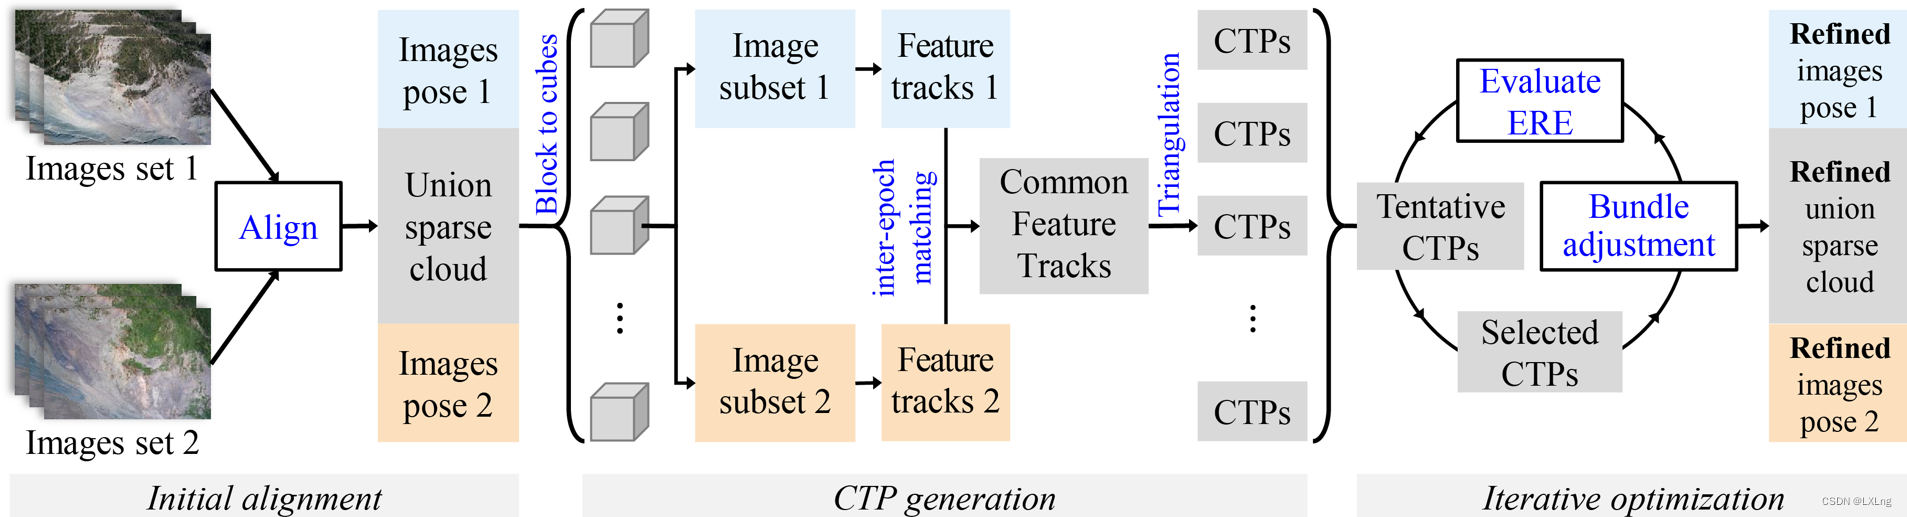
3.1 General view of algorithm
- Obtain multiple sets of images taken at different epochs.
- Perform coarse registration on the images from multiple epochs to obtain approximate image poses and a joint sparse point cloud.
- Divide the union sparse point cloud into grids with given size.
- Compute the bounding cube for each grid and project the bounding cube onto the corresponding images to obtain mask polygons, extracting subsets of feature points from the masked images.
- Construct feature tracks for different epochs within each grid based on the subset of feature points.
- Match feature tracks between two different epochs, selecting the feature track pair with closest matching feature as common feature track.
- Use triangulation to construct tie points from the common feature tracks.
- Calculate the Epoch Reprojection Error (ERE) of the common tie points (CTPs) and iterate until convergence to refine the image poses.
3.2 Usage Steps
- We provide a complete workflow from multi-temporal data input to terrain product output, including data import, parameter configuration, coarse co-alignment, CFTM fine co-alignment, dense reconstruction, and terrain product generation and export. As you can see, CFTM is embedded within the traditional workflow, taking input of image poses and joint sparse point clouds, and outputting optimized image poses and joint sparse point clouds. It runs as a registration optimization algorithm after SfM and before MVS.
- Creating project files, inputting images and POS data, and configuring relevant parameters need to be done manually, while the remaining parts can be automated by running a single command (considering the complexity of data formats, we did not create a complete end-to-end workflow; if you need a complete end-to-end automation process, you can refer to the automation scripts provided by the community).
- CFTM has checkpoint recording functionality. Generally, when running again, CFTM will resume from the last checkpoint; you can also control each step separately by manually modifying the
..\cftm\state.jsonfile; leveraging this, you can achieve manual step-by-step execution of CFTM.- CFTM supports using checkpoints to assess registration accuracy, but this requires manually creating and exporting checkpoints after coarse co-alignment, then running the CFTM algorithm for fine co-alignment, after which the algorithm will generate a registration accuracy assessment report.
Step 1: Create Project Files
-
Import image and POS data into the project file. Double-click on
chunk1in the workspace to select the chunk, click theAdd Photosbutton, navigate to your image folder in the file explorer, select all images from the first epoch, clickOpen, and wait for the photos to load. -
For the second epoch data, click the
Add Chunkbutton, then double-click onchunk2to select the chunk as the current chunk (the font will be bold after selection), and add the second epoch images following the same method.

-
If POS data is not embedded in the EXIF information of the images, you need to manually import the POS data. Switch to
Referencein theWorkspace, clickImport, select the corresponding POS data, and in the popup options box, choose the appropriatecoordinate system,angular system,delimiter,labels, andprecision.

-
If there are multiple flights in a single epoch that need to be added separately, you can first add the data of each flight to individual chunks, and then merge them into one chunk. The specific steps are to click on
Workflowin the main menu bar, selectMerge Chunks..., in the popup options box,selectthe chunks need to be merged, and then clickOK.
-
Save the project file (assuming the project file name is cftm_test_project.psx). We recommend storing it in a individual folder because the subsequent CFTM process files will be stored in a folder, namely “cftm”, with the same directory as the project file.
Step 2: Set Reference and Camera Models
-
Each chunk needs to set
reference coordinate system,camera model parameters, andprecision parametersseparately. In theWorkspace,double-clickon the chunk to select chunk. -
Convert the reference coordinates system of the images to the corresponding
projected coordinate system. For example, if the original positioning information collected by the onboard equipment is in the WGS-84 reference coordinate system, then the projected coordinate system would be WGS84 UTM zone 47N based on the geolocation.
-
Click on
Reference Settings, checkcamera reference, and setcamera accuracyaccording to the nominal positioning accuracy of the onboard GNSS; leave the other values as default.

-
Select
Toolsin the main menu, chooseCamera Calibration..., and configure the camera calibration parameters in the popup options box. It should be noted that if the chunk is obtained by merging multiple chunks, there will be multiple camera models here. You can select all of them, then right-click and chooseMerge Groupsfrom the menu, so that one chunk corresponds to only one camera model.
Step 3: Coarse Registration
-
Merge two chunks into one chunk (named “coalign” here), then select
Align Photos...from the Workflow in the main menu. Please refer to the official documentation for the meaning of parameters. We used the parameter settings shown in the figure below, which is the highest accuracy, enabled preselection, limited the number of key points to 60,000, with no tie point limit, and enabled adaptive camera model fitting. ClickOKto start the program. -
After the operation is completed, we achieve coarse registration of the data using co-alignment, resulting in a merged sparse point cloud and image poses.
-
If there are issues such as block drift, too many missing images, or misaligned images, it is recommended to check: Are the POS data correctly matched? Is the imaging quality good? Is the positioning system disturbed?

Step 4: Create and Export Checkpoints (Optional)
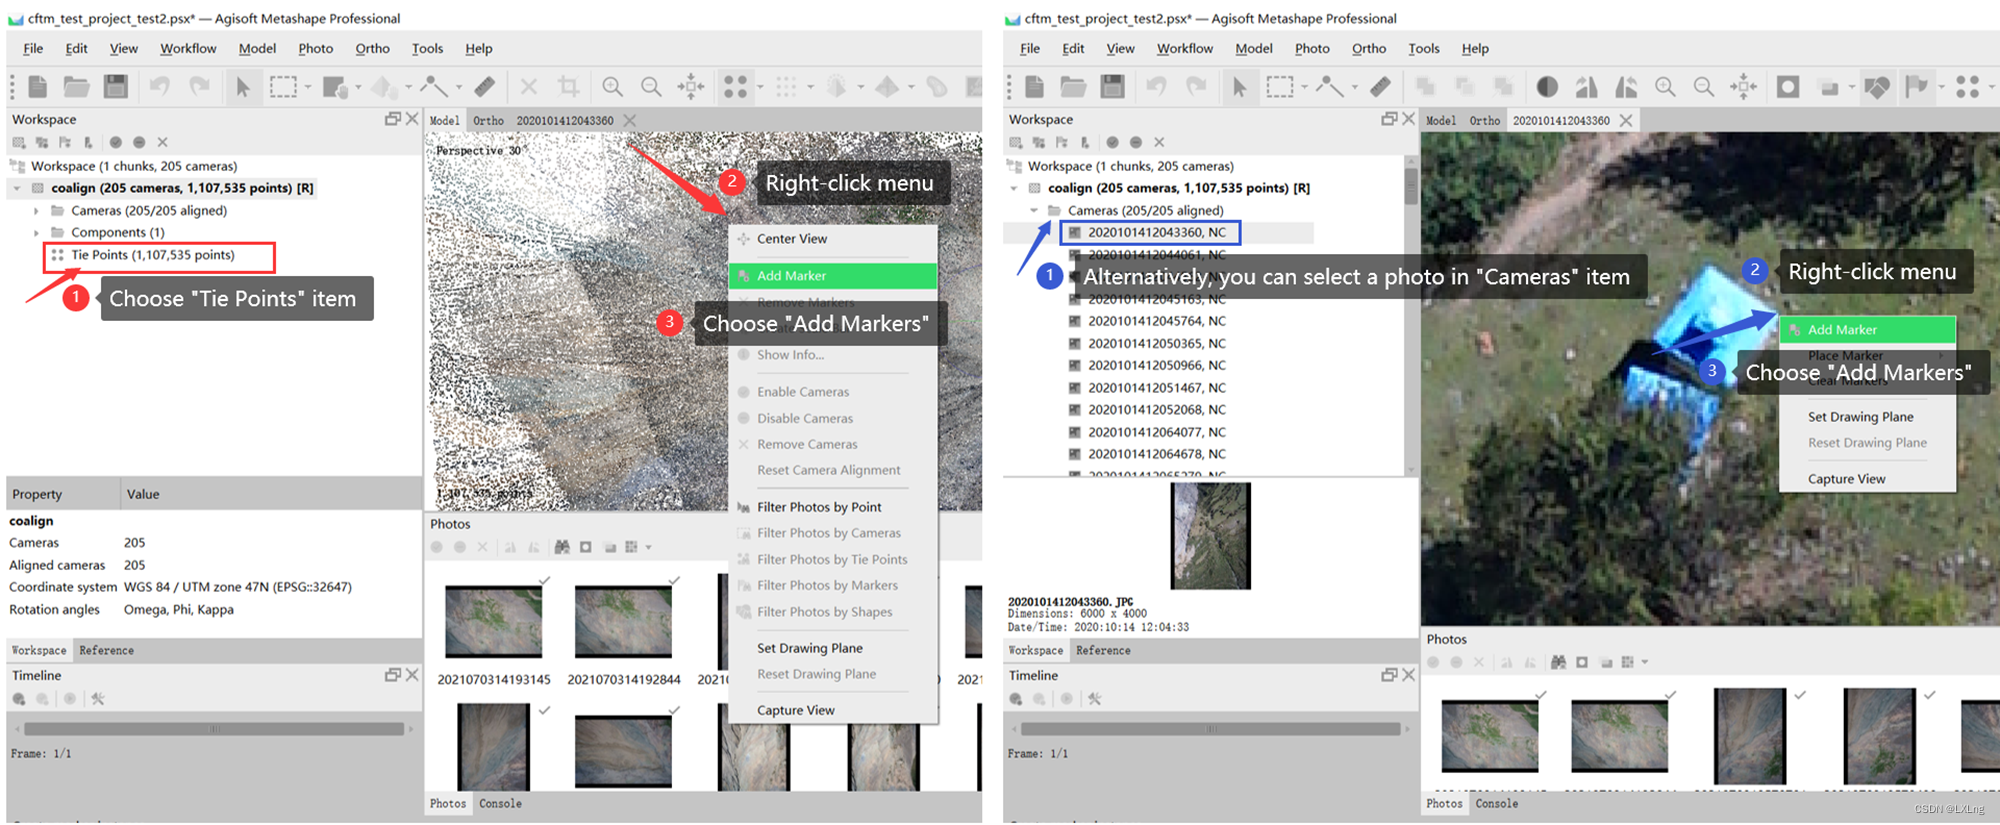
- Look for stable ground features in the sparse point cloud or image collection, right-click on the location of the feature point, and select
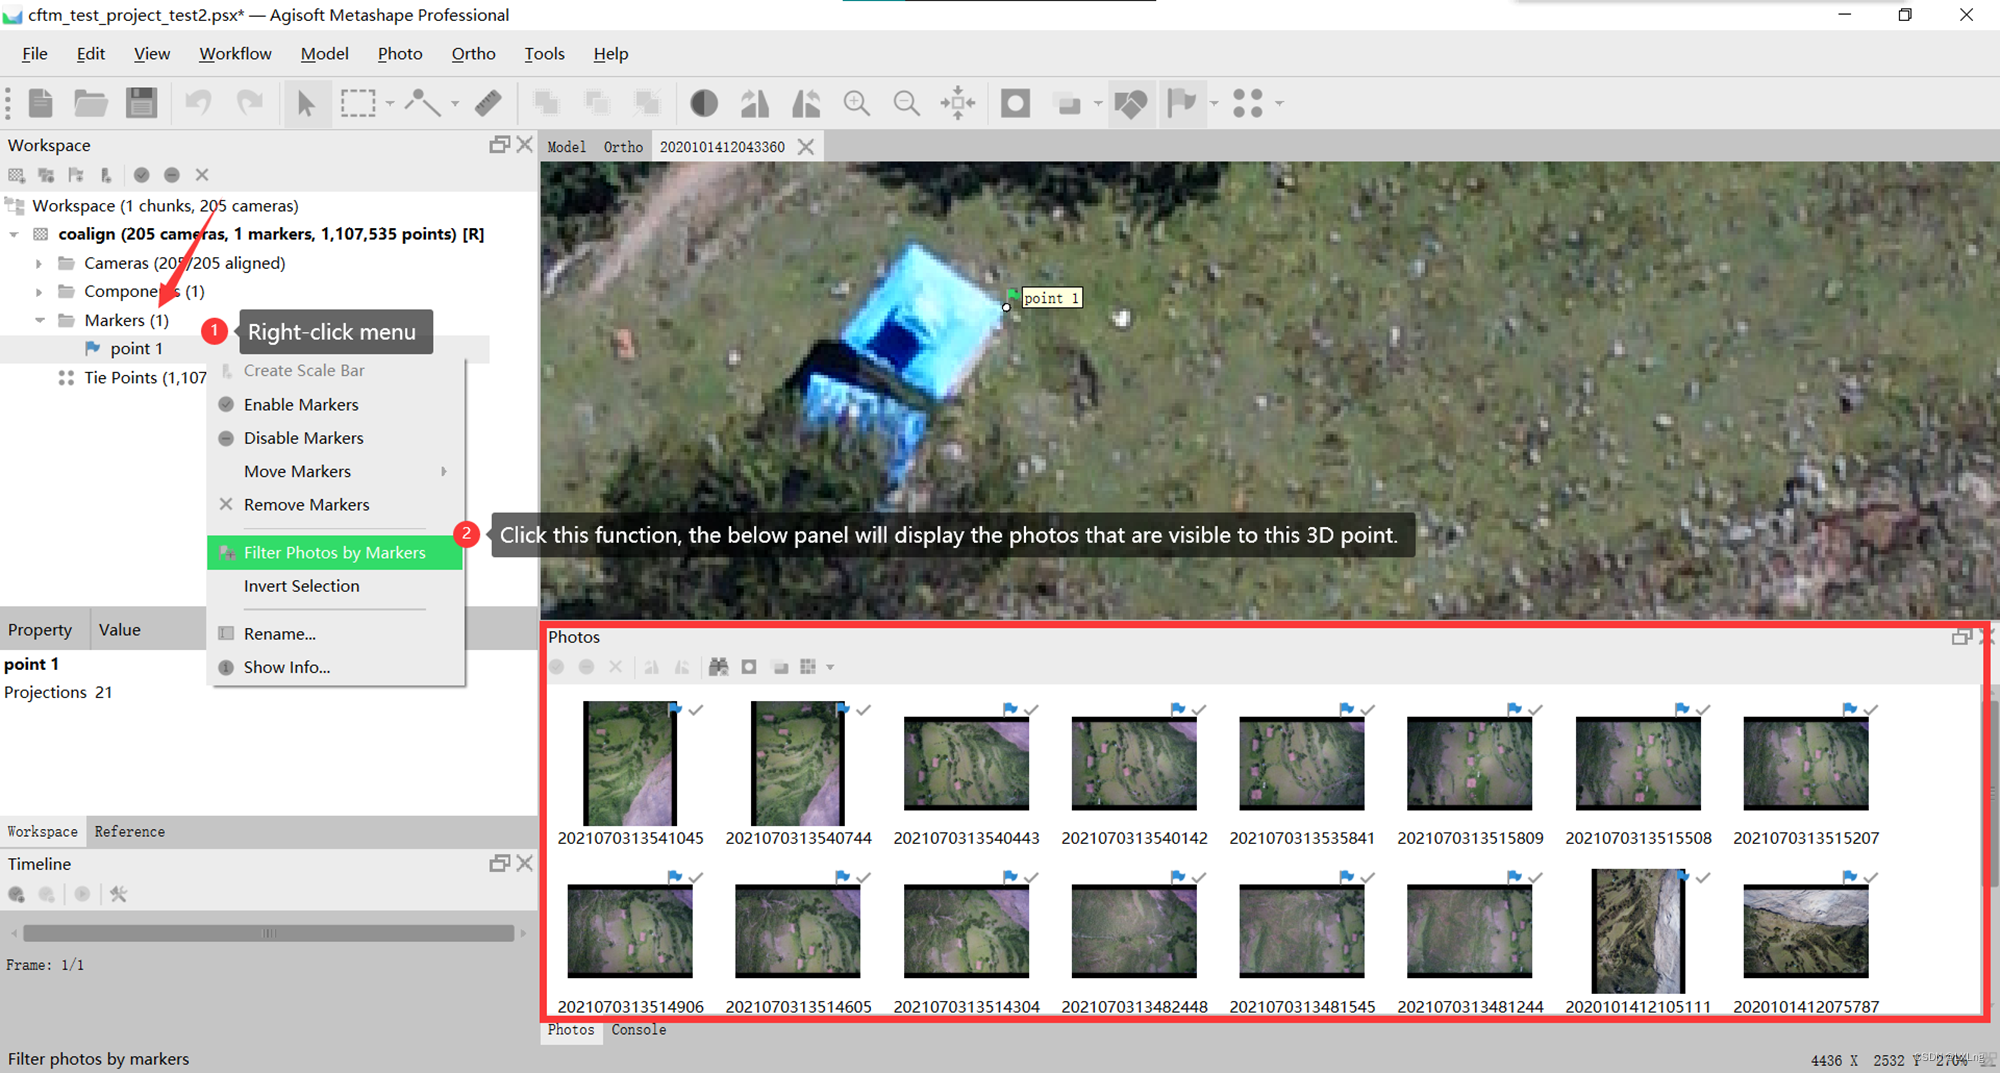
Add Markers. The added markers can be found in theMarkersgroup in the leftworkspacepanel. - We need to perform accurate marker placement. Select the newly added marker (e.g., named point 1), right-click and choose
Filter Photos by Markers, then the corresponding visible images for that point will appear in thePhotospanel. Double-click on the first image, then in the zoomed panel, drag the label to the accurate location of ground feature point. The color of the flag will change from blue to green (in Metashape, when a marker is used as a control point, green and blue respectively indicate whether the point is enabled or not during optimization; however, when used as a checkpoint, the point will only become invalid after selectingRemove Markerfrom theright-click menu, otherwise it will be considered as a valid point for calculation). Then continue to place markers on the next image. Please ensure that roughly equal numbers of images are marked in both epochs. - Repeat the above steps to create checkpoints until selecting at least 5 checkpoints evenly distributed in stable areas.
- Press Ctrl+R to bring up the
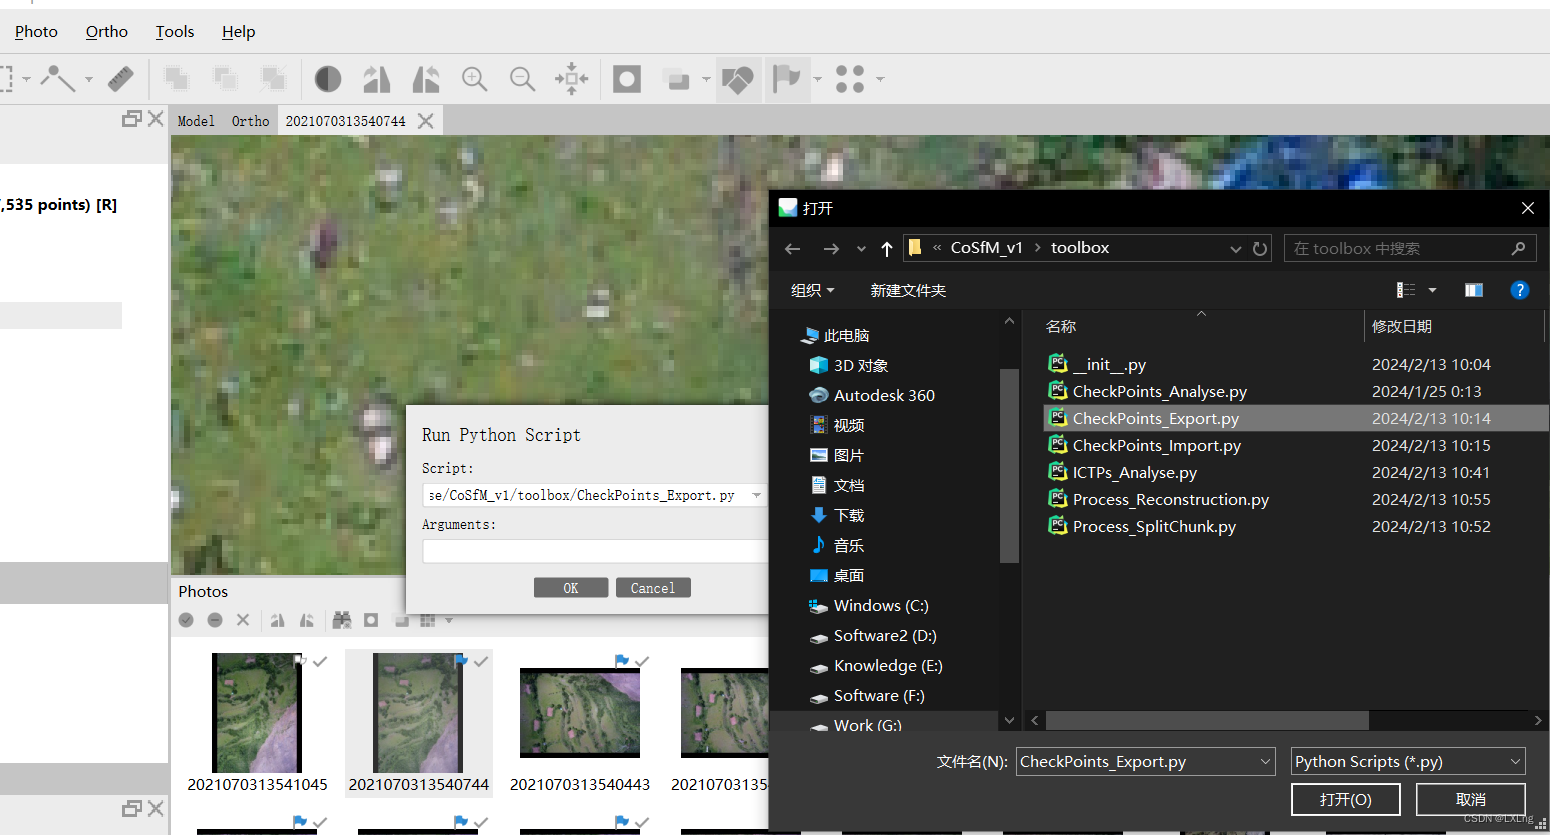
Run Python Scriptdialog box, select the script..\toolbox\CheckPoints_Export.pyfrom the CFTM code package, clickOK, and then the checkpoint data file will be exported in the same directory as the project file (for example, namedcftm_test_project_CPsdatabase.txt).
- Finally, since Markers in Metashape are considered as tie points during bundle adjustment, to avoid affecting the automatic registration results, we need to remove these checkpoints that were just created (don’t worry, we have saved the checkpoint to file, and you can later use the script
..\toolbox\CheckPoints_Import.pyto re-import these checkpoints back into the project).
Step 5: Configure Parameters
- There are a total of 2 files that require parameter configuration: config.py and Run.py in the CFTM code package.
- In config.py, you need to set the paths of the code package and COLMAP in the setup area.
PATH_CODE = r'D:\Research\20221223_CFTM\Release\CFTM_v1.0'
PATH_COLMAP_BAT = r'D:\Software\COLMAP\COLMAP-3.6-windows-cuda\COLMAP.bat'
- In Run.py, most parameters are kept default, while CFTM_args parameters need to be set according to the actual situation. In CFTM_args, key parameters to set include: grid_size_1, grid_size_2, num_nominated, num_selected, num_max_iterations, pool_size, threshold_Distance.
- grid_size refers to dividing the initial sparse point cloud into grids of this size. grid_size_1 sets grids to constrain the matching range and accelerate matching efficiency, so it shouldn’t be too large and can be kept default; grid_size_2 is for ensuring spatial uniformity but needs to prevent the algorithm from selecting low-quality points to satisfy spatial uniformity. It’s recommended that grid_size_2 be greater than grid_size_1.
- With m × n grids, the algorithm will first select num_nominated × m × n CTPs with the smallest ERE globally as candidate points, then for each grid, try to select num_selected CTPs with the smallest ERE from the candidate point set. Therefore, the final CTPs obtained will be less than num_selected × m × n.
- num_max_iterations is the maximum number of iterations. Based on our experience, if the coarse registration effect is relatively good, then the number of iterations may be in single digits. Generally, we recommend setting it to 30.
- pool_size needs to be set according to the number of CPU cores available; for example, Intel i7-10875H has 16 cores, then the pool_size can be set to a maximum of 16. (If there is insufficient memory or blocking of other programs, you can reduce the value of pool_size.)
- threshold_Distance refers to the threshold beyond which if the distance between the corresponding 3D points of a pair of cross-epoch feature tracks exceeds, the algorithm will ignore that pair of cross-epoch feature track, which is the estimated maximum offset of the initial registration. Based on our experience, threshold_Distance should be at least greater than the positioning accuracy of POS data (for example, if the positioning accuracy is 2m, then threshold_Distance should be at least 3m).
########################################################################################################################
################################################       SETUP       #####################################################
# Open a project file
workspace_path = r"K:\CoSfM_v1\project_with_cftm"    # Workspace path
project_name = "cftm_test_project.psx"    # Project file name
images_path = r'K:\CoSfM_v1\images'    # Path to the image collection
check_points_path = r"K:\CoSfM_v1/cftm_test_project_CPsdatabase.txt"    # Path to the checkpoint data (if not available, write "")

# Please make sure your major version is:
compatible_major_version = "1.8"    # Keep the default

# Process arguments
process_args = {
    # Choose the processing options for CFTM.
    "process_coalign": False,    # Co-alignment processing
    "process_feature_extraction": True,    # Feature extraction
    "process_CTPs_generation": True,    # Common Tie Points (CTP) generation
    "process_iterative_optimization": True,    # Iterative optimization
    "process_analysis": True,    # Registration evaluation analysis
    "process_analysis_matches": False,    # Analyze feature track matches (this option may be time-consuming)
    "process_compare_matches": False,    # Compare feature track matches before and after fine registration (this option can be very time-consuming)

    # Choose the processing options for reconstruction.
    "process_reconstruction": True,    # Perform dense reconstruction
    "process_build_DSM": True,    # Generate DSM
    "process_build_DOM": False,    # Generate DOM
    "process_build_TiledModel": False,    # Generate TiledModel
    "process_export_DSM": True,    # Export DSM
    "process_export_DOM": False,    # Export DOM
    "process_export_TiledModel": False,    # Export TiledModel
    "process_white_balance": False,    # White balance processing

    "save_project_each_step": True,    # Save the project file after each step
}

# Choose the way of defining epoch for images: "DATE" or "FOLDER"
epoch_mode = 'DATE'

# Which feature extraction mode do you want to use?
# 0: use OpenCV to extract SIFT feature without cuda (default but slow);
# 1: use OpenCV to extract SIFT-GPU feature with cuda (need additional manual compilation);
# 2: use COLMAP to extract SIFT-GPU feature (recommended).
feature_extraction_mode = 2

# Whether to continue the run from the last breakpoint?
begin_from_breakpoint = True

# Specify which chunk to process; leave empty will automatically select the chunk which has maximum images.
coalign_chunk_name = ''

# Generate CTPs for all grids or only for those grid without CTPs.
for_all_grids = True

# If CTPs are generated for all grids, do you what to reuse the CTPs generated from co-alignment?
reuse_ICTPs = True

# Whether to use *.shp to mask the unstable areas?
unstable_areas_mask_path = ''  # 'I:/20230418_CTPsGenerator/Adata/Region/UnstableRegion.shp'

# CFTM parameters
CFTM_args = {
    # Common Feature Track Matching settings
    "gird_size_1": 32,
    "gird_size_2": 64,
    "scoring": [0, 0, 0, 0, 0, 0, 2, 4, 8, 16],
    "num_nominated": 10,
    "num_selected": 5,
    "num_max_iterations": 20,
    "pool_size": 16,
    "criterias_1": [2, 3],
    "criterias_2": [1, 3],
    "ratio_inlier_init": 0.25,
    "confidence": 0.9,
    "threshold_RepError": 0.5,
    "threshold_Distance": 3,
    "skip_edge": False,
    "threshold_Termination": 0.001,
    "num_inertia": 3,
}

# Make sure the coordinates of the chunk are in the projected coordinate system;
# here is just an example, this should change to the EPSG code of your projected coordinate system.
reference_args = {
    "PJCS_EPSG": 32647,
    "camera_accuracy_m": 3.0,
    "camera_accuracy_deg": 10.0,
    "marker_accuracy_m": 20.0,
    "marker_accuracy_pix": 0.5,
    "tiepoint_accuracy_pix": 1,
    "camera_reference_enabled": True,
    "marker_reference_enabled": False,
    "rotation_system": 'opk'
}

# Bundle Adjustment Arguments
bundle_adjustment_args = {
    "fit_f": True,
    "fit_cx": True, "fit_cy": True,
    "fit_b1": False, "fit_b2": False,
    "fit_k1": True, "fit_k2": True,
    "fit_k3": True, "fit_k4": False,
    "fit_p1": True, "fit_p2": True,
    "fit_corrections": False,
    "adaptive_fitting": True,
    "tiepoint_covariance": True
}

# Photogrammetry arguments
photogrammetry_args = {
    # Align photos
    "quality_SPC": 1,    # 1(UltraHigh), 2(High), 4(Medium)
    "keypoint_limit": 60000,
    "keypoint_limit_Per_Megapixel": 1000,
    "tiepoint_limit": 0,

    # Error reduction
    "reprojection_error": 0.3,
    "reconstruction_uncertainty": 15,
    "projection_accuracy": 5,
    "max_ratio_remove_points": 0.3,

    # Dense matching
    "quality_DPC": 2,    # 1(UltraHigh), 2(High), 4(Medium)
    "dense_cloud_FileterMode": 'Mild',

    # Build tiled model
    "tiled_model_TiledModelFormat": 'Cesium',
    "tiled_model_pixel_size": 0.3,    # metres
    "tiled_model_face_count": 20000,
    "tiled_model_ModelFormat": 'None',
    "tiled_model_ImageFormat": 'JPEG',
}

# Packing arguments
args = {
    # The Common Feature Track Matching settings
    "CFTM_args": CFTM_args,

    # The process settings
    "process_args": process_args,

    # The photogrammetry settings
    "photogrammetry_args": photogrammetry_args,
    "reference_args": reference_args,
    "bundle_adjustment_args": bundle_adjustment_args,

    # The default settings
    "epoch_mode": epoch_mode,
    "feature_extraction_mode": feature_extraction_mode,
    "begin_from_breakpoint": begin_from_breakpoint,
    "for_all_grids": for_all_grids,
    "reuse_ICTPs": reuse_ICTPs,
    "coalign_chunk_name": coalign_chunk_name,

    # The default path (Recommended to keep the default)
    "code_path": PATH_CODE,
    "project_path": os.path.join(workspace_path, project_name),
    "workspace_path": workspace_path,
    "project_name": project_name,
    "images_path": images_path,
    "check_points_path": check_points_path,
    "unstable_areas_mask_path": unstable_areas_mask_path,
    "process_path": os.path.join(workspace_path, "cftm"),
    "data_package_path": os.path.join(os.path.join(workspace_path, "cftm"), "ProcessData"),
    "feature_path": os.path.join(os.path.join(workspace_path, "cftm"), "FeatureData"),
    "CTP_path": os.path.join(os.path.join(workspace_path, "cftm"), "CommonTiePoints"),
    "iterations_path": os.path.join(os.path.join(workspace_path, "cftm"), "Iterations"),
    "report_path": os.path.join(os.path.join(workspace_path, "cftm"), "Reports"),
    "state_path": os.path.join(os.path.join(workspace_path, "cftm"), "state.json"),
    "arguments_path": os.path.join(os.path.join(workspace_path, "cftm"), "Arguments.json"),
    "state_CFTM_path": os.path.join(os.path.join(workspace_path, "cftm"), "StateCFTM")
}
###################################################   END SETUP   ######################################################
########################################################################################################################
Step 6: Run the Script
- Press Win+R on your keyboard to open the Run dialog, type
cmd, and hit Enter to open the command prompt (cmd.exe). Enter the following command, note that replace the path to your Run.py file, and press Enter to start running CFTM:
metashape.exe -r G:\AResearchG\20231223_CoSfM\Release\CoSfM_v1\Run.py
- CFTM has a breakpoint recording feature. In case of unexpected situations, after correction, you can continue running CFTM using the above command, and it will resume from the last breakpoint. You can also manually control each step’s execution by modifying the
..\cftm\state.jsonfile.
Step 7: Evaluation Report
- You can find the generated GCTPs and their quality indicators in the
..\cftm\Reportsfolder._GCTPsQua.txtcontains the GCTPs data list, and_GCTPsQuaSta.txtprovides statistical indicators based on the GCTPs data. - If you created checkpoints earlier and configured the corresponding path, you can find CPs quality report in the
..\cftm\Reportsfolder, formatted similarly to quality report of GCTPs.
4 Analysis
4.1 Analysis Matches in CFTM
If you set process_analysis_matches to True in Run.py, CFTM will generate a file named MatchesReport_CFTM.txt in the ../cftm/Reports folder. Below is the structure of the file along with explanations:
[Epoch1_PairNum, Epoch2_PairNum, Epoch1_MatchNum, Epoch2_MatchNum]    # Number of image pairs in epoch e, number of matches in epoch e
[Epoch1_PairMatcNum_AVG, Epoch2_PairMatcNum_AVG]    # Average number of matches per image pair in epoch e
[Epoch1_PairInlierMatcRatio_AVG, Epoch2_PairInlierMatcRatio_AVG]    # Average number of effective matches per image pair in epoch e
[Common_PairNum, Common_MatchNum1, Common_MatchNum2, Common_MatchPortion, Common_PairMatcNum_AVG]    # Number of image pairs across epochs, number of matches across epochs, proportion of matches across epochs, average number of correct matches per image pair across epochs
[Epoch1_TrackNum, Epoch2_TrackNum, Epoch1_InlierTrackNum, Epoch2_InlierTrackNum]    # Number of feature tracks in epoch e, number of valid feature tracks in epoch e
[Common_TrackNum, Common_TrackCrosMatcNum_AVG]    # Number of feature tracks across epochs, average number of matches per feature track across epochs
4.2 Compare Matches before and after CFTM
If you set process_compare_matches to True in Run.py, CFTM will generate a file named MatchesReport_Coalign.txt in the ../cftm/Reports folder. Below is the structure of the file along with explanations:
[Epoch1_PairNum, Epoch2_PairNum, Common_PairNum]    # Number of image pairs
[Epoch1_MatchNum, Epoch2_MatchNum, Common_MatchNum]    # Number of matches
[Epoch1_PairMatchNum_AVG, Epoch2_PairMatchNum_AVG, Common_PairMatchNum_AVG]    # Average number of matches per image pair
[Epoch1_PairInlierMatchNum_AVG, Epoch2_PairInlierMatchNum_AVG, Common_PairInlierMatchNum_AVG]    # Average number of effective matches per image pair
[Epoch1_PairInlierMatchRatio_WAVG, Epoch2_PairInlierMatchRatio_WAVG, Common_PairInlierMatchRatio_WAVG]    # Weighted average number of effective matches per image pair
[Epoch1_PairInlierMatchRatio_AVG, Epoch2_PairInlierMatchRatio_AVG, Common_PairInlierMatchRatio_AVG]    # Average effective matching ratio per image pair (ignoring pairs with a matching ratio of 0)
[Epoch1_MatchPortion, Epoch2_MatchPortion, Common_MatchPortion]    # Proportion of matches in all matches for epoch 1, proportion of matches in all matches for epoch 2, proportion of matches in all matches across epochs
[Epoch1_InlierMatchPortion, Epoch2_InlierMatchPortion, Common_InlierMatchPortion]    # Average effective matching ratio per image pair
[Epoch1_TrackNum, Epoch2_TrackNum, Common_TrackNum]    # Number of feature tracks
[Epoch1_ValidTrackNum, Epoch2_ValidTrackNum, Common_ValidTrackNum]    # Number of valid feature tracks
[Epoch1_ERValidTrackNum, Epoch2_ERValidTrackNum, Common_ERValidTrackNum]    # Number of valid feature tracks remaining after error removal
[Epoch1_ValidTrackPortion, Epoch2_ValidTrackPortion, Common_ValidTrackPortion]    # Effective rate of feature tracks
[Epoch1_ERValidTrackPortion, Epoch2_ERValidTrackPortion, Common_ERValidTrackPortion]    # Effective rate of feature tracks after error removal
5 What do some error messages in CFTM mean?
-
ERROR: Database: {colmap_database_path} is not found!
SOLUTION: If the COLMAP database is not found, it means that during the “Compare Matches” step, the COLMAP files created during Feature Extraction were not found. It’s possible that you deleted or moved these files during the CFTM process. You can fix this by modifying “…/cftm/state.json” and changing “feature_extraction”: “DONE” to “feature_extraction”: “NO”, then rerunning CFTM. Alternatively, you can set “process_compare_matches” to False. -
ERROR: this script could only deal with pairwise co-align!
SOLUTION: CFTM currently only supports co-registration between two epochs of data. Please ensure that the input data comes from two epochs. Regarding the epoch mode (variable “epoch_mode”), if you choose “DATE”, check if the dates of the images in each epoch are from the same day. If you choose “FOLDER”, ensure that there are exactly two subfolders (corresponding to each epoch) under the “images_path” folder. -
ERROR: COLMAPindex should be ‘identifier’ or ‘image_path’!
SOLUTION: Please confirm whether the image paths stored in Metashape are consistent with those stored in COLMAP. This usually happens when the drive letter changes after reconnecting the hard disk.
6 Precautions
- Before running the script, ensure that all necessary paths and configurations are correctly set in the
Run.pyandconfig.pyfiles. - Make sure to replace the placeholders in the script with the actual file paths relevant to your project.
- If you encounter any unexpected issues during the execution of CFTM, you can manually control the execution of each step by modifying the
..\cftm\state.jsonfile.
7 License
Regarding the repair method for a broken pip in the Python environment bundled with Metashape:
Run the following commands line by line in the command line, making sure to replace the paths with your own:cd /d <G:\UAV_SOFTWARE\Metashape\Metashape1.8.5\python>,python <...CFTM_v1.0\toolbox\get-pip.py>,python -m pip install --upgrade pip, After executing these commands, pip should function properly. However, upon reopening Metashape, it will automatically update and restore the original pip. If you wish to prevent this, you can try turning off the automatic update option in Metashape (Tools → Preferences → Miscellaneous → Check for updates on program start). ↩︎


 被折叠的 条评论
为什么被折叠?
被折叠的 条评论
为什么被折叠?
 到【灌水乐园】发言


