


如果看过我最近发的博文的读者应该大概知道,我最近在做一套基于Apollo的数据写入schema校验的框架。
框架本身的结构和逻辑等后面看是否有机会可以单独写篇文章介绍,总体逻辑是基于Apollo源码做了深度的集成。
不过,现在的互联网应用基本要求都是不停机维护。这其实对企业服务治理能力提出了很高的要求。
关于服务治理,其实也是微服务架构的一个核心话题。没有强力的服务治理能力,强行转型微服务架构,带来的破坏性甚至会超过早期的预想!
既然要不停机维护,那必然需要应用时时刻刻可以将自己的运行状态记录下来。这样,一旦应用在处理部分场景时出现了不符合预期设想的情况,SRE人员可以通过各种手段,获取应用的实时状态,准确判断故障点,从而达到快速修复的目标。
Spring Boot为了达到上述效果,提供了actuator框架。如下这段,是Spring Boot官方文档中对actuator框架的介绍:
Spring Boot includes a number of additional features to help you monitor and manage your application when you push it to production. You can choose to manage and monitor your application by using HTTP endpoints or with JMX. Auditing, health, and metrics gathering can also be automatically applied to your application.
1. 我为什么需要用到它
前面提到的最近需要开发的基于Apollo的Schema校验框架的整体方案中,Schema的配置是存储在Apollo上的,配置利用了Apollo的namespace概念实现了分层管理和权限隔离。
越是优雅的设计,对外的部分应该越简单。下面是我设计的配置模型。如果读者看完之后能够快速理解模型的含义,那说明我的设计还不错。
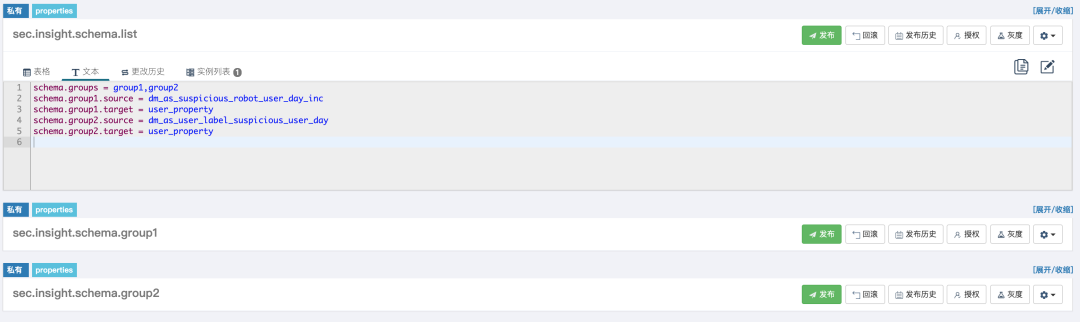
首先,创建了一个固定的namespace,用于保存schema配置的元数据信息。namespace的名称为sec.insight.schema.list,内容如下:
schema.groups = group1,group2
schema.group1.source = dm_as_suspicious_robot_user_day_inc
schema.group1.target = user_property
schema.group2.source = dm_as_user_label_suspicious_user_day
schema.group2.target = user_property
schema.groups定义了一共配置多少组schema。schema.[group_name].source定义的是同步数据的源端。schema.[group_name].target定义的是同步数据的目标端。
其次,对每一组schema,单独创建一个namespace,名称为sec.insight.schema.[group_name]。在这个namespace下的配置信息,是源数据到目标数据的列映射关系。下面的便是sec.insight.schema.group1文件的内容:
schema.platform = basic.registration.platform
schema.register_channel = basic.registration.channel
schema.device_id = basic.device.id
schema.device_model = basic.device.model
schema.spam_reason = ignore
schema.os_version = ignore
配置支持深层次嵌套结构,这是一个在源端和目标端都支持的特性。由于我们目前源端数据大多是扁平化的结构,所以在上面给的配置文件中没有体现出源端的嵌套配置特性。
另外,框架还定义了一个关键字ignore,该关键字表示源端的某个字段默认忽略不处理。如果有字段既没有配置映射关系,又没有显式声明ignore,则会在日志中打印一条warn级别的告警。
目前初始版本的框架,在Apollo上的配置情况大概是这样的:
好了,真心希望大家能看懂(这就说明我的设计还可以)^.^。
下面的问题,是我考虑使用actuator框架的核心因素。
Apollo是通过long polling的方式,由客户端(也就是我的业务系统)发起查询,从Apollo服务端拉取最新的配置信息的。
long polling的实现机制,在业界基本认同是可以达到准实时生效的效果的。这也是我采用Apollo作为配置端,摈弃传统的使用数据库表进行配置的一个核心选型标准。
为了保证数据的并发访问的安全性和效率,我将乐观锁的概念应用到了应用系统中实际执行schema判断的业务逻辑框架中,乐观锁作用的对象是Apollo配置数据在客户端(业务系统)上的本地数据副本。
这种场景下,使用AtomicReference存储配置信息是一个比较高效且安全的技术方案。Apollo本身也是通过使用AtomicReference,在客户端保存了服务器端的配置副本。
如果Apollo服务端的配置发生变更了,则Apollo客户端会一次性更新AtomicReference指向的配置集合,也就是对应的namespace的数据(AtomicReference的set方法是原子性的)。
上面这段冗长的解释,主要是为了说明:在应用运行过程中,Apollo服务器端的配置信息和实例本地缓存的配置信息并不是时时刻刻都相同的。
因此,我需要能够通过某种技术手段,可以在需要时准确获知应用本地的配置数据副本,而不是仅能通过Apollo的protal查看服务器端数据。
这就是我需要actuator的原因!
2. actuator初体验
我们来看看actuator具体是什么。
Spring Boot提供了名称为spring-boot-starter-actuator的starters。在官方文档中是这样介绍的:
Starter for using Spring Boot’s Actuator which provides production ready features to help you monitor and manage your application
嗯,production ready features...
其他的就不过多介绍了,我只简单使用mvn dependency:tree展示下该包的依赖关系:
[INFO] +- org.springframework.boot:spring-boot-starter-actuator:jar:2.1.6.RELEASE:compile
[INFO] |  \- org.springframework.boot:spring-boot-actuator-autoconfigure:jar:2.1.6.RELEASE:compile
[INFO] |     +- org.springframework.boot:spring-boot-actuator:jar:2.1.6.RELEASE:compile
[INFO] |     \- com.fasterxml.jackson.datatype:jackson-datatype-jsr310:jar:2.9.9:compile
然后,如果读者是使用IDEA的话,那么恭喜你,下面这段对你来说,应该比较亲切。
使用IDEA本地启动应用看下:
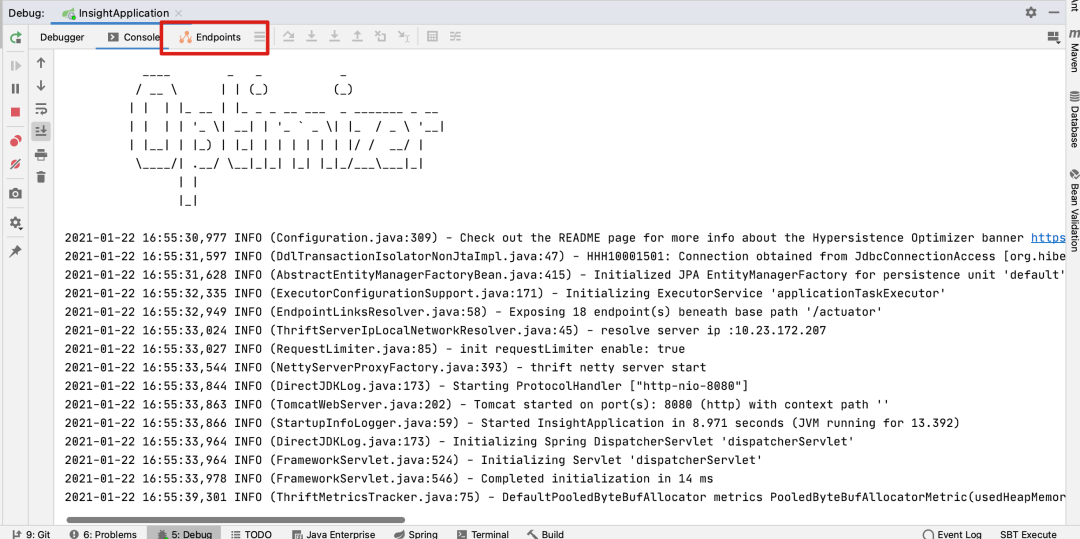
其实在本次定制化开发actutor之前,我是从来没有注意到使用IDEA启动的时候,会有图中红色圈出来的Endpoints页签的。
点开页签之后,会发现有三个子页签,分别是:Beans、Health、Mappings。
Beans大概是这样,展示了在Spring容器中实例化的所有bean对象:
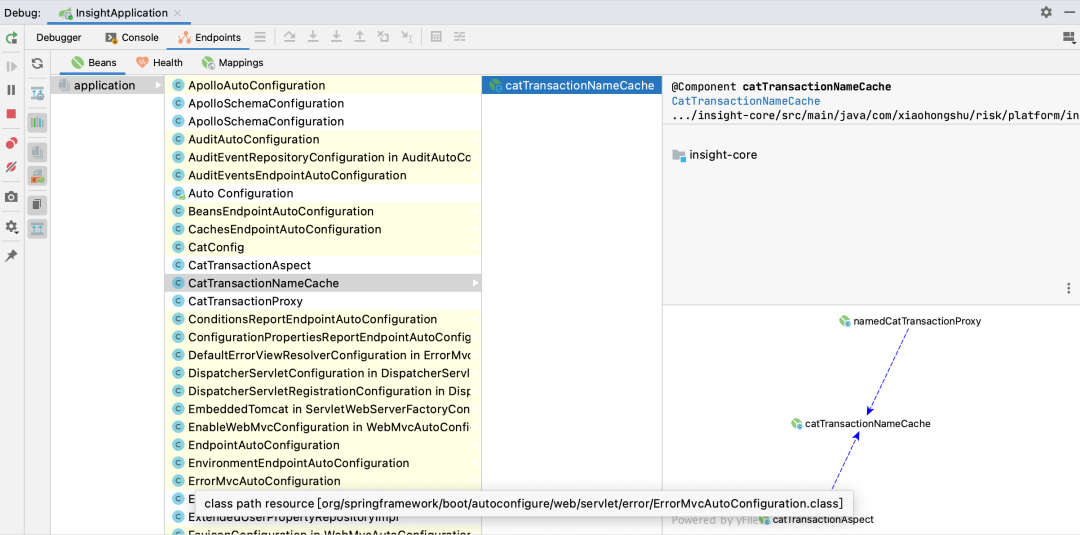
这个简直是基于Spring框架开发时,理解内部逻辑的神器啊!
Health是用来判断应用可用性的,不是本文的重点,不展开了(哈哈)。
Mappings则给出了actuator中提供的可以在应用运行时访问的地址列表,每个地址都会返回和应用运行相关的特定状态信息。
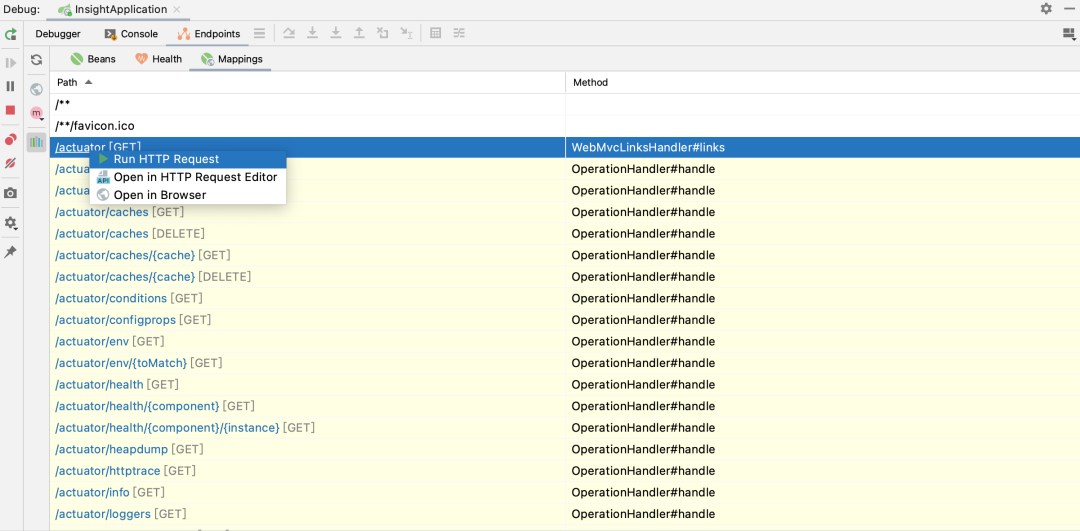
我们简单地访问下/actuator/env,获取应用运行状态下的环境信息:

返回的数据格式是JSON。实际使用过程中,SRE通常会通过命令查找自己感兴趣的配置属性。当然,也可以将内容复制下来,使用JSON格式化工具格式化,方便查阅。
对于我来讲,基于actuator开发一个地址为/actuator/schema的endpoint,可以将应用本地与schema配置相关的配置信息打印出来,应该是个不错的方案。
3. actuator魔法揭秘
写代码不能盲目乱写,在正式动手写代码之前,还是需要看看惯用套路是什么样子的。那么,首先我们对actuator框架在源码层面揭秘揭秘。
前面给出的包依赖关系的图中,有个spring-boot-actuator-autoconfigure的包:

看到这个包的时候就不用犹豫了,打开包内容,找spring.factories文件吧!
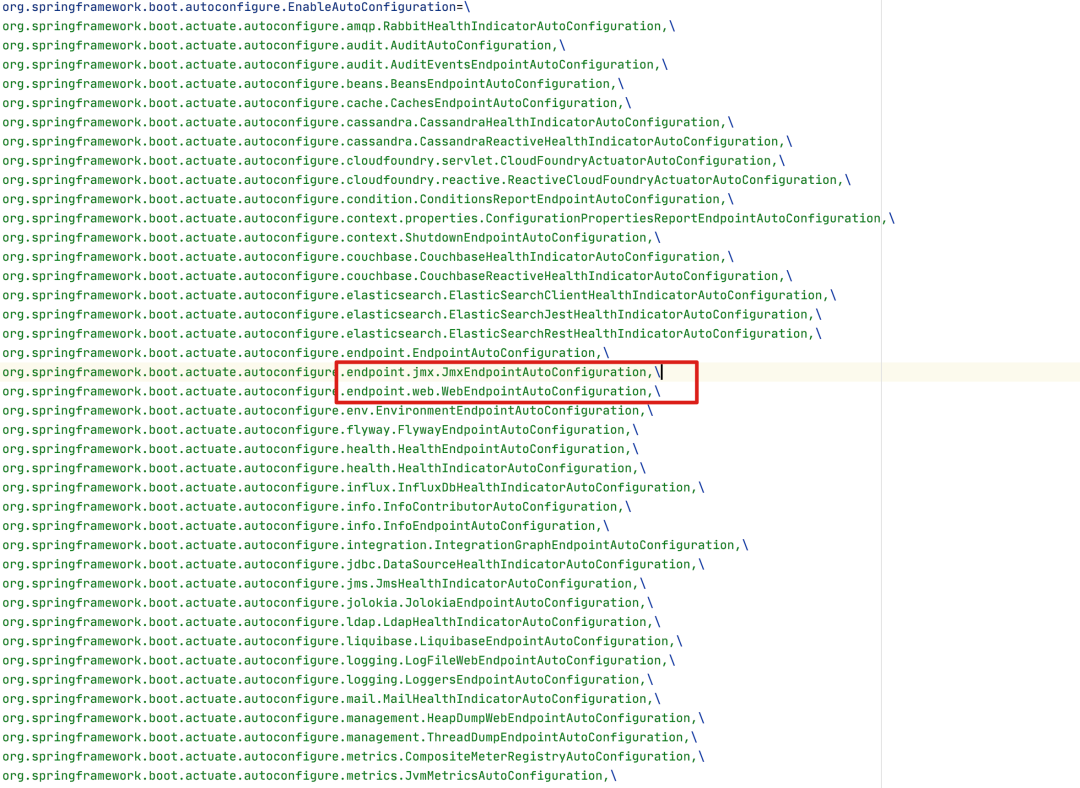
这个图中,红色圈圈圈出来的部分,是两个配置类,名字叫WebEndpointAutoConfiguration和JmxEndpointAutoConfiguration。actuator框架是同时支持使用jmx和web方式访问的。这两个配置类的作用就是这个。
由于我前面已经写了很多关于Spring框架介绍的文章了,这个地方我们就快一点,直接跳到最核心的部分。
在WebEndpointAutoConfiguration类中,创建了一个类型为WebEndpointDiscoverer的bean对象。看名称大概就猜到,这个bean的功能就是找到系统中所有endpoint对象。
 @Bean
 @ConditionalOnMissingBean(WebEndpointsSupplier.class)
 public WebEndpointDiscoverer webEndpointDiscoverer(ParameterValueMapper parameterValueMapper,
   EndpointMediaTypes endpointMediaTypes, ObjectProvider<PathMapper> endpointPathMappers,
   ObjectProvider<OperationInvokerAdvisor> invokerAdvisors,
   ObjectProvider<EndpointFilter<ExposableWebEndpoint>> filters) {
  return new WebEndpointDiscoverer(this.applicationContext, parameterValueMapper, endpointMediaTypes,
    endpointPathMappers.orderedStream().collect(Collectors.toList()),
    invokerAdvisors.orderedStream().collect(Collectors.toList()),
    filters.orderedStream().collect(Collectors.toList()));
 }
我们看一下WebEndpointDiscoverer类的继承链:
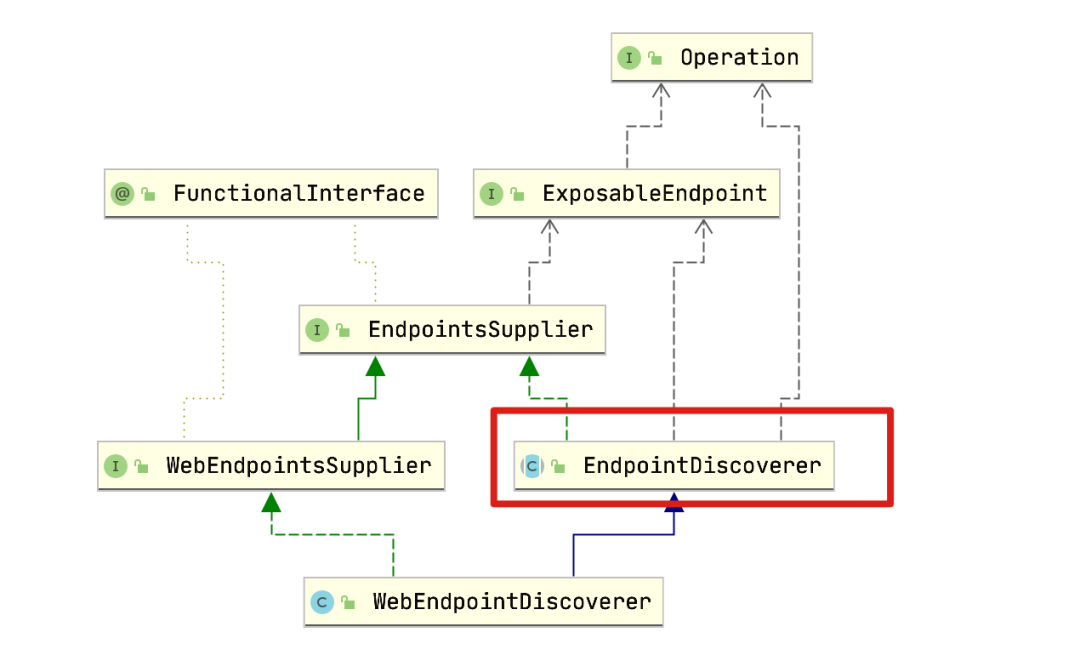
初步猜测,核心的逻辑应该在EndpointDiscoverer中。
在EndpointDiscoverer中,有一个getEndpoints方法,如下:
 @Override
 public final Collection<E> getEndpoints() {
  if (this.endpoints == null) {
   this.endpoints = discoverEndpoints();
  }
  return this.endpoints;
 }
猜测没错,看来就是它了,再看看discoverEndpoints的逻辑:
 private Collection<E> discoverEndpoints() {
  Collection<EndpointBean> endpointBeans = createEndpointBeans();
  addExtensionBeans(endpointBeans);
  return convertToEndpoints(endpointBeans);
 }
这简直就是俄罗斯套娃!好吧,继续看createEndpointBeans方法:
 private Collection<EndpointBean> createEndpointBeans() {
  Map<EndpointId, EndpointBean> byId = new LinkedHashMap<>();
  String[] beanNames = BeanFactoryUtils.beanNamesForAnnotationIncludingAncestors(this.applicationContext,
    Endpoint.class);
  for (String beanName : beanNames) {
   if (!ScopedProxyUtils.isScopedTarget(beanName)) {
    EndpointBean endpointBean = createEndpointBean(beanName);
    EndpointBean previous = byId.putIfAbsent(endpointBean.getId(), endpointBean);
    Assert.state(previous == null, () -> "Found two endpoints with the id '" + endpointBean.getId() + "': '"
      + endpointBean.getBeanName() + "' and '" + previous.getBeanName() + "'");
   }
  }
  return byId.values();
 }
逻辑已清晰,它扫描了所有使用@Endpoint注解标注的bean,根据这些bean的信息,创建了endpoint集合。
好了,下面到了借鉴(抄袭)别人代码的时候了,我们看看别人是怎么定义新的endpoint的。
前面我们曾使用/actuator/env查询了系统的环境信息,那这个地方我们不妨就以它为例:
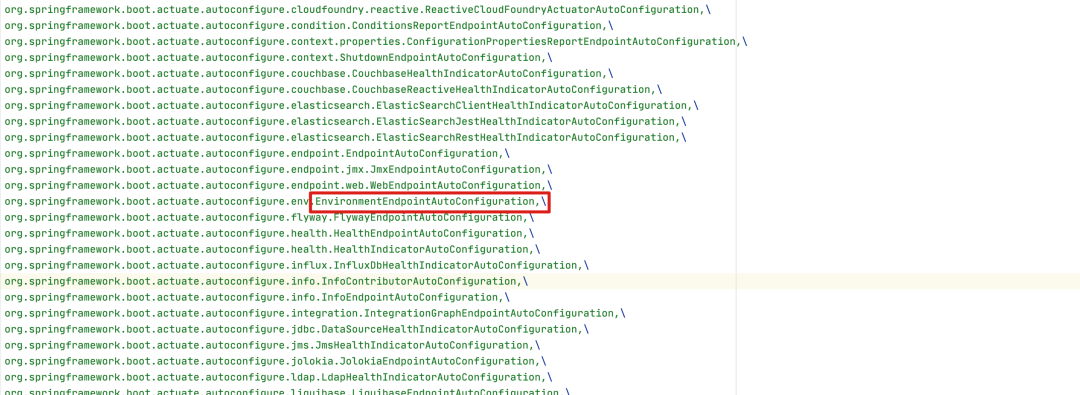
上图中,有个名称叫EnvironmentEndpointAutoConfiguration的类。看看它的逻辑,发现里面注册了这么个bean:
 @Bean
 @ConditionalOnMissingBean
 public EnvironmentEndpoint environmentEndpoint(Environment environment) {
  EnvironmentEndpoint endpoint = new EnvironmentEndpoint(environment);
  String[] keysToSanitize = this.properties.getKeysToSanitize();
  if (keysToSanitize != null) {
   endpoint.setKeysToSanitize(keysToSanitize);
  }
  return endpoint;
 }
这个EnvironmentEndpoint的声明,大致是这样:
@Endpoint(id = "env")
public class EnvironmentEndpoint {
里面有个方法,长这样:
 @ReadOperation
 public EnvironmentDescriptor environment(@Nullable String pattern) {
  if (StringUtils.hasText(pattern)) {
   return getEnvironmentDescriptor(Pattern.compile(pattern).asPredicate());
  }
  return getEnvironmentDescriptor((name) -> true);
 }
嗯,到此,老衲已胸有成竹...
4. 是时候展示真正的技术了
看懂了别人写的代码之后,感觉这个功能实现起来不要太简单。我们依葫芦画瓢,来一下。
首先,定义一个SchemaEndpoint类。当然,得用@Endpoint注解来标注这个类,还要再提供一个使用@ReadOperation标注的方法:
@Endpoint(id = "schema")
public class SchemaEndpoint {

    protected ApolloConverterFactory factory;

    public SchemaEndpoint(ApolloConverterFactory factory) {
        this.factory = factory;
    }

    @ReadOperation
    public SchemaDescriptor schema() {
        return new SchemaDescriptor(factory.getSchemaList(), factory.getGroups());
    }

    public static final class SchemaDescriptor {
        protected Properties schemaList;

        protected Map<String, Properties> groups;

        public SchemaDescriptor(@Nullable Properties schemaList, Map<String, Properties> groups) {
            this.schemaList = schemaList;
            this.groups = groups;
        }

        @Nullable public Properties getSchemaList() {
            return this.schemaList;
        }

        @Nullable public Map<String, Properties> getGroups() {
            return this.groups;
        }
    }
}
这里面的ApolloConverterFactory是我编写的基于Apollo本地缓存的配置信息创建数据转换器的工厂类。它的getSchemaList方法,返回的是sec.insight.schema.list这个namespace的本地缓存数据;getGroups返回的是每一组schema的配置集合清单。
其余的代码,嗯,就不过多解释了!
然后,再来编写一个配置类:
@Configuration
@ConditionalOnExpression("${apollo.boostrap.enabled:true} && ${spring.apollo.schema.enabled:true}")
public class ApolloSchemaConfiguration {
    @Bean
    public ApolloConverterFactory apolloConverterFactory() {
        return new ApolloConverterFactory();
    }

    @Bean
    @ConditionalOnMissingBean
    @ConditionalOnEnabledEndpoint(endpoint = SchemaEndpoint.class)
    public SchemaEndpoint schemaEndpoint(ApolloConverterFactory factory) {
        return new SchemaEndpoint(factory);
    }
}
如果看懂了前一个章节的内容,这个类的代码应该很好理解。
下面就是测试的时候了,本地启动应用,在浏览器上访问/actuator/schema,会得到如下结果:
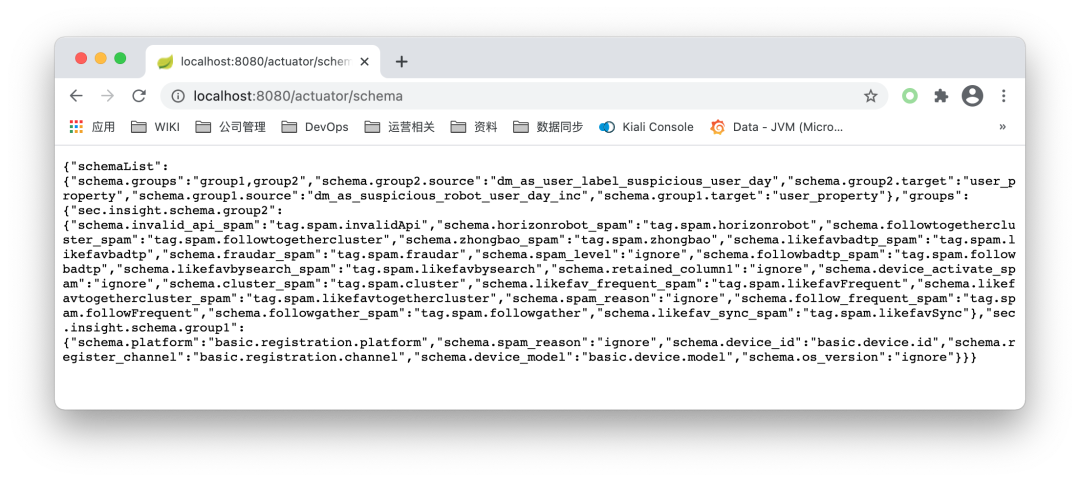
完美~


 1021
1021


 被折叠的 条评论
为什么被折叠?
被折叠的 条评论
为什么被折叠?
 到【灌水乐园】发言


