


“记住我”几乎在登陆的时候都会被用户勾选,因为它方便地帮助用户减少了输入用户名和密码的次数,本文将从三个方面介绍“记住我”功能,首先介绍“记住我”功能基本原理,然后对“记住我”功能进行实现,最后简单解析Spring Security的“记住我”功能的源码。
一、Spring Security的记住我功能基本原理
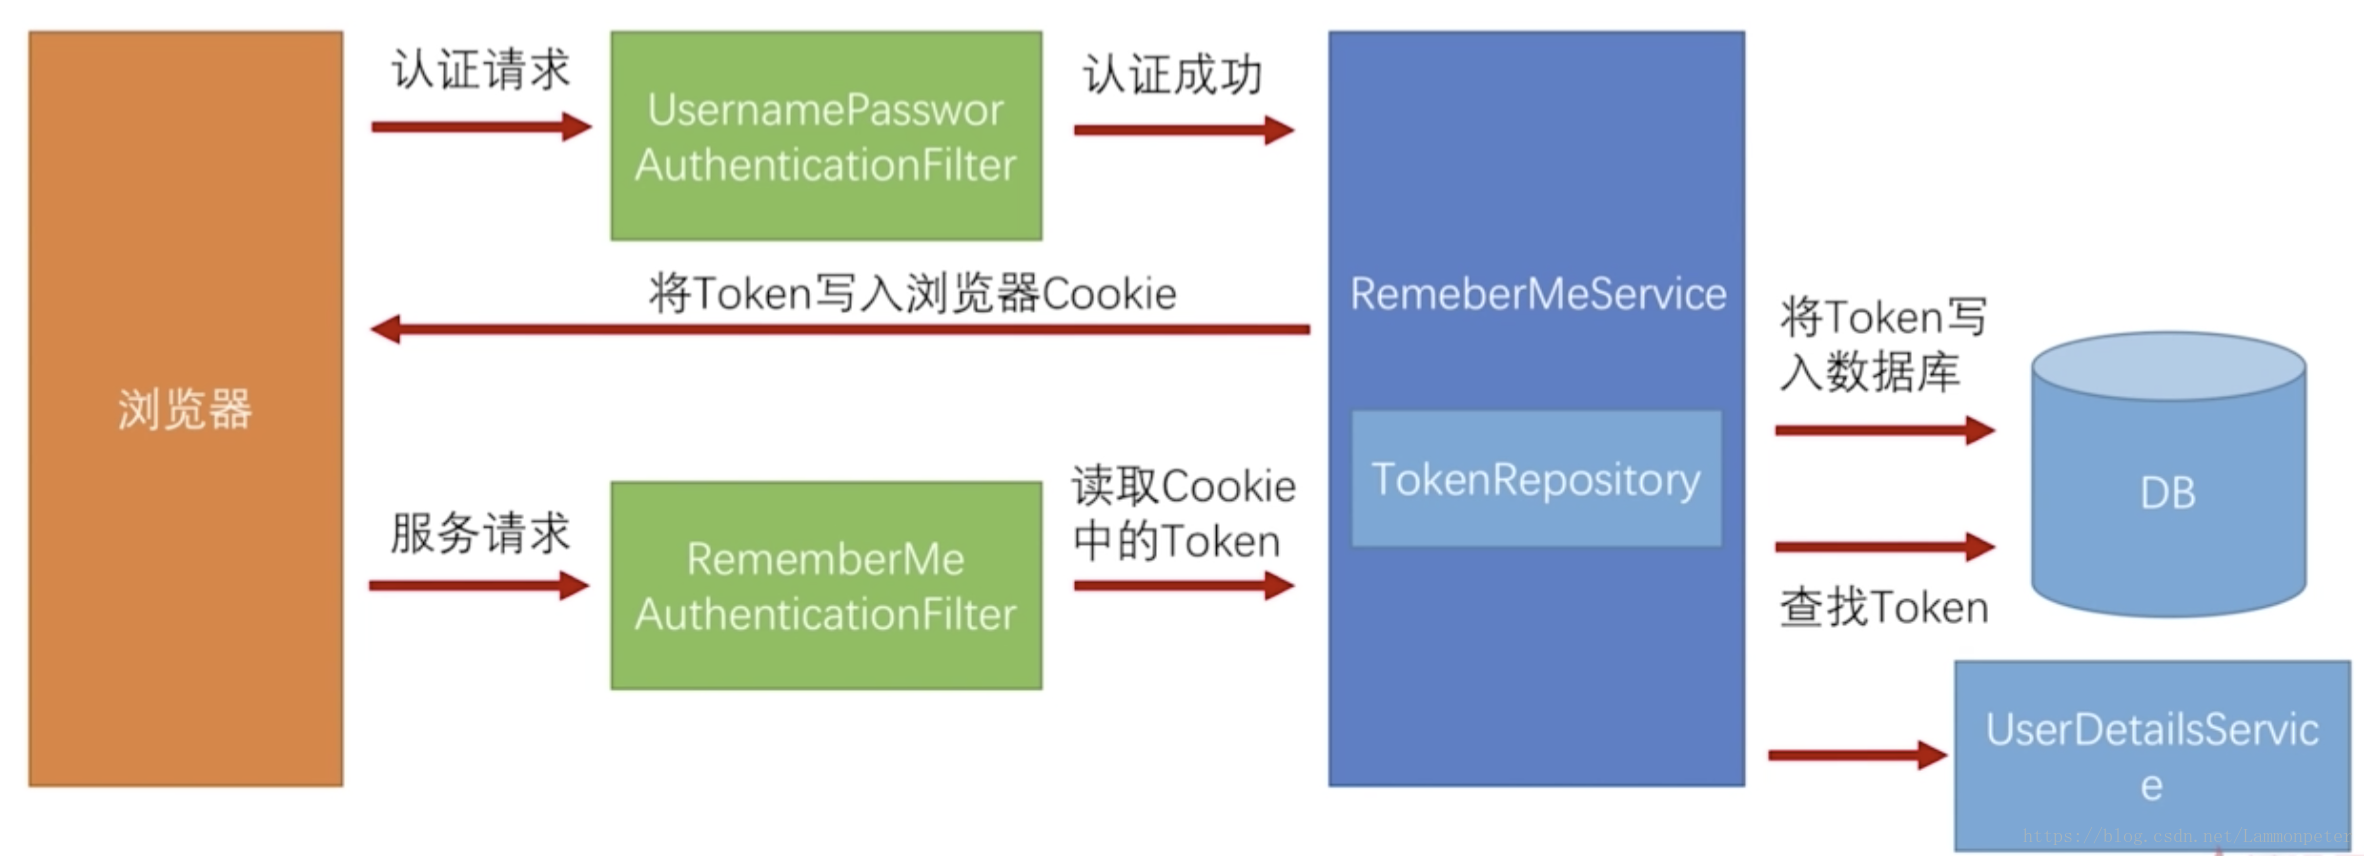
Spring Security的“记住我”功能的基本原理流程图如下所示:
对上面的原理图进行简单说明:
-
首先浏览器发送登录请求,也就是认证的请求,首先会进入到
UsernamePasswordAuthenticationFilter过滤器中进行验证操作,验证完成之后,这个过滤器还有一项额外的操作,那就是调用RememberMeService服务,这个服务中包含一个TokenRepository,它会生成一个Token,并且会将Token写回到浏览器的Cookie中,并使用TokenRepository将用户名和Token写入到数据库中,也就是说,用户名和Token是一一对应的。 -
当用户再次请求的时候,将不会携带用户名和密码,这时候由
RememberMeAuthenticationFilter读取Cookie中的Token来进行验证操作,这时候会使用TokenRepository从数据库中根据Token来查询相关信息,最后调用UserDetailsService来登录验证操作。 -
这里仅仅是简单介绍,后面将通过打断点的方式进入源码进行分析。
二、Spring Security的记住我功能的实现
首先我们在浏览器的属性类BrowserProperties中添加一个字段rememberMeSeconds,这个字段用来描述“记住我”的时间期限,具体的配置类代码如下:
package com.lemon.security.core.properties;

import lombok.Data;

/**
 * @author lemon
 * @date 2018/4/5 下午3:08
 */
@Data
public class BrowserProperties {

    private String loginPage = "/login.html";

    private LoginType loginType = LoginType.JSON;

    private int rememberMeSeconds = 3600;
}
修改完这个类之后,它就支持用户自定义配置时间了,这里默认的有效期是一个小时,也就是说在一个小时内重复登录,无需输入用户名和密码。
在浏览器的安全配置类BrowserSecurityConfig中添加一个Bean,这个Bean就是TokenRepository,配置完这个Bean就基本完成了“记住我”功能的开发,然后在将这个Bean设置到configure方法中即可。
具体代码如下:
@Bean
public PersistentTokenRepository tokenRepository() {
    JdbcTokenRepositoryImpl tokenRepository = new JdbcTokenRepositoryImpl();
    tokenRepository.setDataSource(dataSource);
    tokenRepository.setCreateTableOnStartup(true);
    return tokenRepository;
}
上面的代码tokenRepository.setCreateTableOnStartup(true);是自动创建Token存到数据库时候所需要的表,这行代码只能运行一次,如果重新启动数据库,必须删除这行代码,否则将报错,因为在第一次启动的时候已经创建了表,不能重复创建。其实建议查看JdbcTokenRepositoryImpl类中的一个常量字段CREATE_TABLE_SQL,这个字段是描述了建表的一个SQL语句,建议手动复制这个SQL语句建表,那么就完全不需要tokenRepository.setCreateTableOnStartup(true);这行代码。完整的配置代码如下所示:
package com.lemon.security.browser;

import com.lemon.security.core.properties.SecurityProperties;
import com.lemon.security.core.validate.code.ValidateCodeFilter;
import org.springframework.beans.factory.annotation.Autowired;
import org.springframework.context.annotation.Bean;
import org.springframework.context.annotation.Configuration;
import org.springframework.security.config.annotation.web.builders.HttpSecurity;
import org.springframework.security.config.annotation.web.configuration.WebSecurityConfigurerAdapter;
import org.springframework.security.core.userdetails.UserDetailsService;
import org.springframework.security.crypto.bcrypt.BCryptPasswordEncoder;
import org.springframework.security.crypto.password.PasswordEncoder;
import org.springframework.security.web.authentication.AuthenticationFailureHandler;
import org.springframework.security.web.authentication.AuthenticationSuccessHandler;
import org.springframework.security.web.authentication.UsernamePasswordAuthenticationFilter;
import org.springframework.security.web.authentication.rememberme.JdbcTokenRepositoryImpl;
import org.springframework.security.web.authentication.rememberme.PersistentTokenRepository;

import javax.sql.DataSource;

/**
 * 浏览器安全验证的配置类
 *
 * @author lemon
 * @date 2018/4/3 下午7:35
 */
@Configuration
public class BrowserSecurityConfig extends WebSecurityConfigurerAdapter {

    private final SecurityProperties securityProperties;
    private final AuthenticationSuccessHandler lemonAuthenticationSuccessHandler;
    private final AuthenticationFailureHandler lemonAuthenticationFailureHandler;
    private final DataSource dataSource;

    @Autowired
    public BrowserSecurityConfig(SecurityProperties securityProperties, AuthenticationSuccessHandler lemonAuthenticationSuccessHandler, AuthenticationFailureHandler lemonAuthenticationFailureHandler, DataSource dataSource) {
        this.securityProperties = securityProperties;
        this.lemonAuthenticationSuccessHandler = lemonAuthenticationSuccessHandler;
        this.lemonAuthenticationFailureHandler = lemonAuthenticationFailureHandler;
        this.dataSource = dataSource;
    }

    @Autowired
    private UserDetailsService userDetailsService;

    /**
     * 配置了这个Bean以后,从前端传递过来的密码将被加密
     *
     * @return PasswordEncoder实现类对象
     */
    @Bean
    public PasswordEncoder passwordEncoder() {
        return new BCryptPasswordEncoder();
    }

    @Bean
    public PersistentTokenRepository tokenRepository() {
        JdbcTokenRepositoryImpl tokenRepository = new JdbcTokenRepositoryImpl();
        tokenRepository.setDataSource(dataSource);
        return tokenRepository;
    }

    @Override
    protected void configure(HttpSecurity http) throws Exception {

        ValidateCodeFilter validateCodeFilter = new ValidateCodeFilter();
        validateCodeFilter.setAuthenticationFailureHandler(lemonAuthenticationFailureHandler);
        validateCodeFilter.setSecurityProperties(securityProperties);
        validateCodeFilter.afterPropertiesSet();

        http.addFilterBefore(validateCodeFilter, UsernamePasswordAuthenticationFilter.class)
                .formLogin()
                .loginPage("/authentication/require")
                .loginProcessingUrl("/authentication/form")
                .successHandler(lemonAuthenticationSuccessHandler)
                .failureHandler(lemonAuthenticationFailureHandler)
                .and()
                .rememberMe()
                .tokenRepository(tokenRepository())
                .tokenValiditySeconds(securityProperties.getBrowser().getRememberMeSeconds())
                .userDetailsService(userDetailsService)
                .and()
                .authorizeRequests()
                .antMatchers("/authentication/require", securityProperties.getBrowser().getLoginPage(), "/code/image").permitAll()
                .anyRequest()
                .authenticated()
                .and()
                .csrf().disable();
    }
}
注意上面的代码,重新注入了DataSource和UserDetailsService,其中UserDetailsService并没有使用构造器注入,而是字段注入,这是因为UserDetailsService的实现类中注入了PasswordEncoder的Bean,这就造成了依赖注入的循环应用问题。
配置完这么多,基本完成了“记住我”的功能,最后还需要在登录页面添加一个checkbox,如下所示:
<tr>
    <td colspan="2"><input name="remember-me" type="checkbox" value="true">记住我</td>
</tr>
其中name属性必须是remember-me。
这时候启动项目,在登录页面勾选“记住我”复选框,然后登录,登录完成之后,关闭项目,再次启动项目,尝试访问一个服务,这时候是直接可以访问的,而不需要重新登录。
三、Spring Security的记住我功能源码解析
这里再次展示Spring Security的“记住我”功能的原理图,根据这个图以及源码来进行解析。
1)第一次登录
- 第一步:当用户发送登录请求的时候,首先到达的是
UsernamePasswordAuthenticationFilter这个过滤器,然后执行attemptAuthentication方法的代码,代码如下图所示:
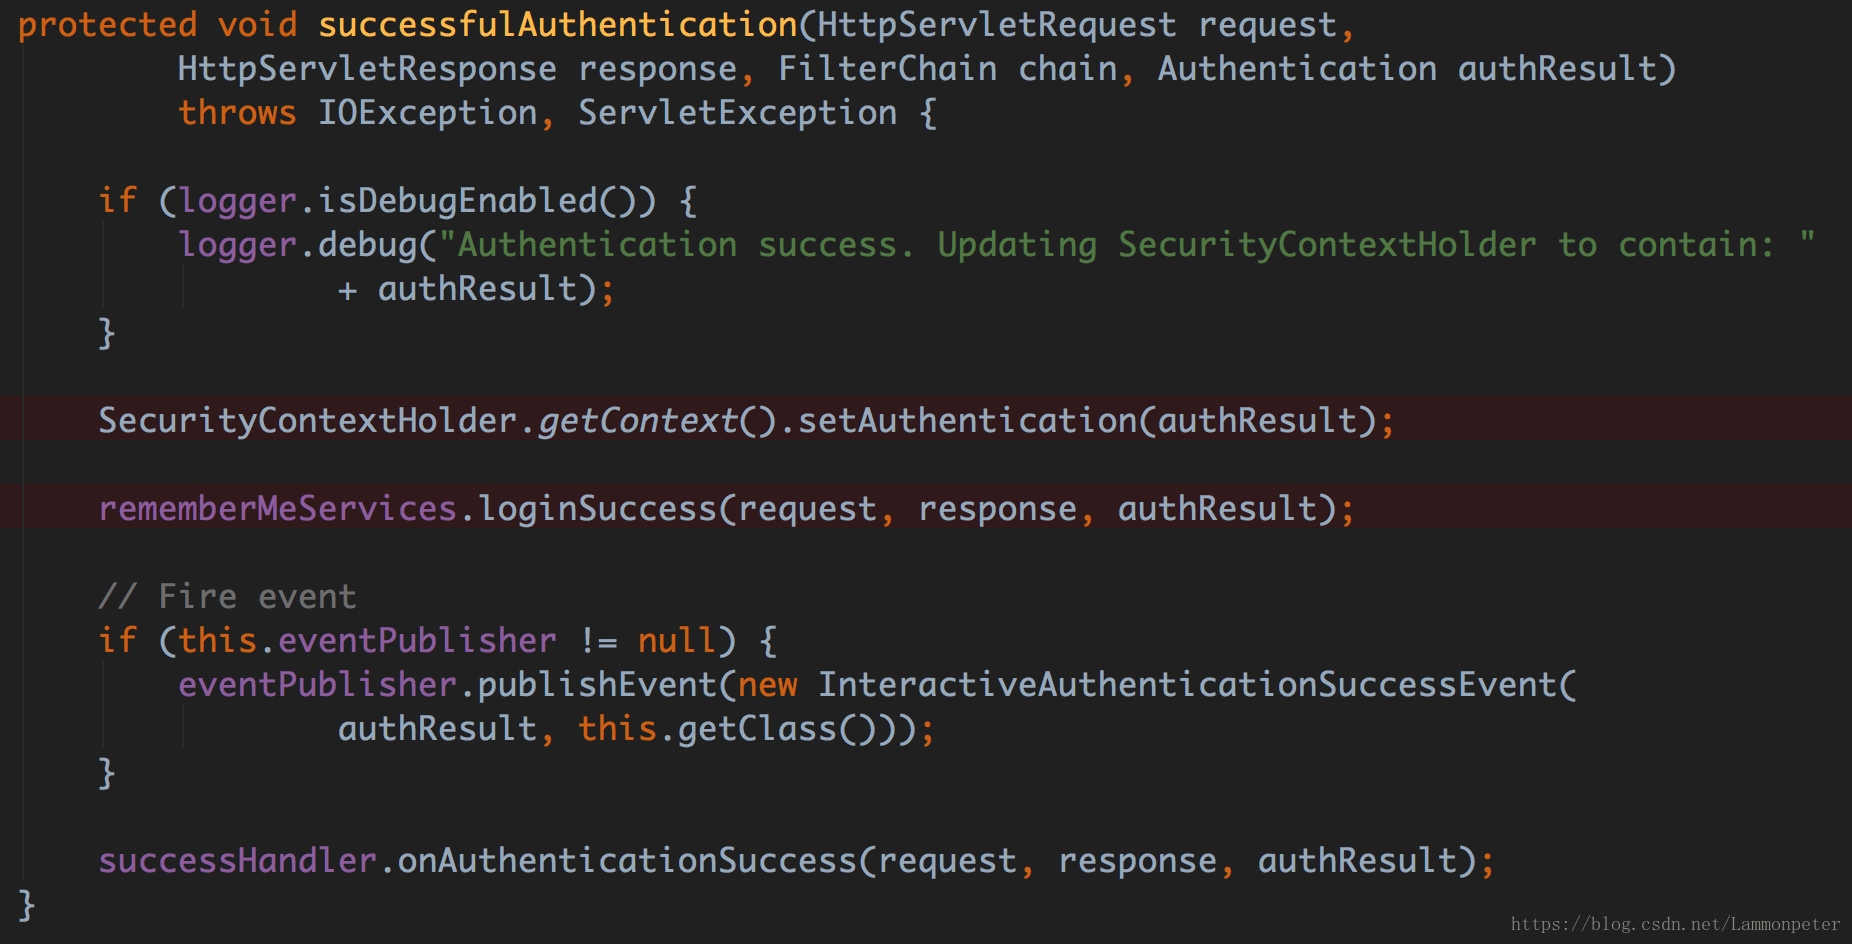
- 第二步:验证成功之后,将进入
AbstractAuthenticationProcessingFilter类的successfulAuthentication的方法中,首先将认证信息通过代码SecurityContextHolder.getContext().setAuthentication(authResult);将认证信息存入到session中,紧接着这个方法中就调用了rememberMeServices的loginSuccess方法,如下图所示:
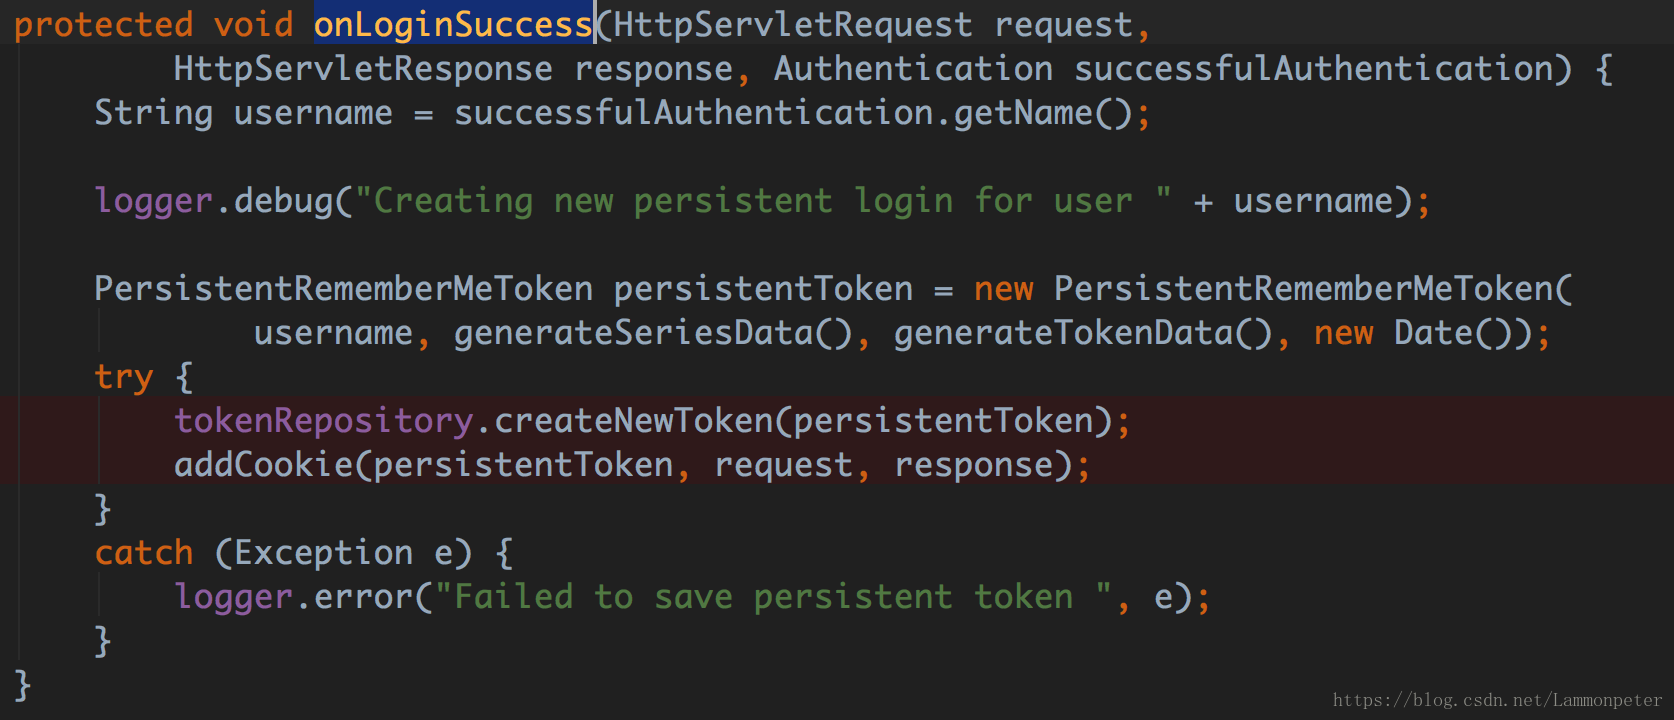
- 第三步:进入
rememberMeServices的loginSuccess方法中,可以看出,它方法内部调用了PersistentTokenBasedRememberMeServices的onLoginSuccess方法,代码如下:
这个方法中调用了tokenRepository来创建Token并存到数据库中,且将Token写回到了Cookie中。到这里,基本的登录过程基本完成,生成了Token存到了数据库,且写回到了Cookie中。

2)第二次再次访问
重启项目,这时候服务器端的session已经不存在了,但是第一次登录成功已经将Token写到了数据库和Cookie中,直接访问一个服务,尝试不输入用户名和密码,看看接下来都经历了一些什么。
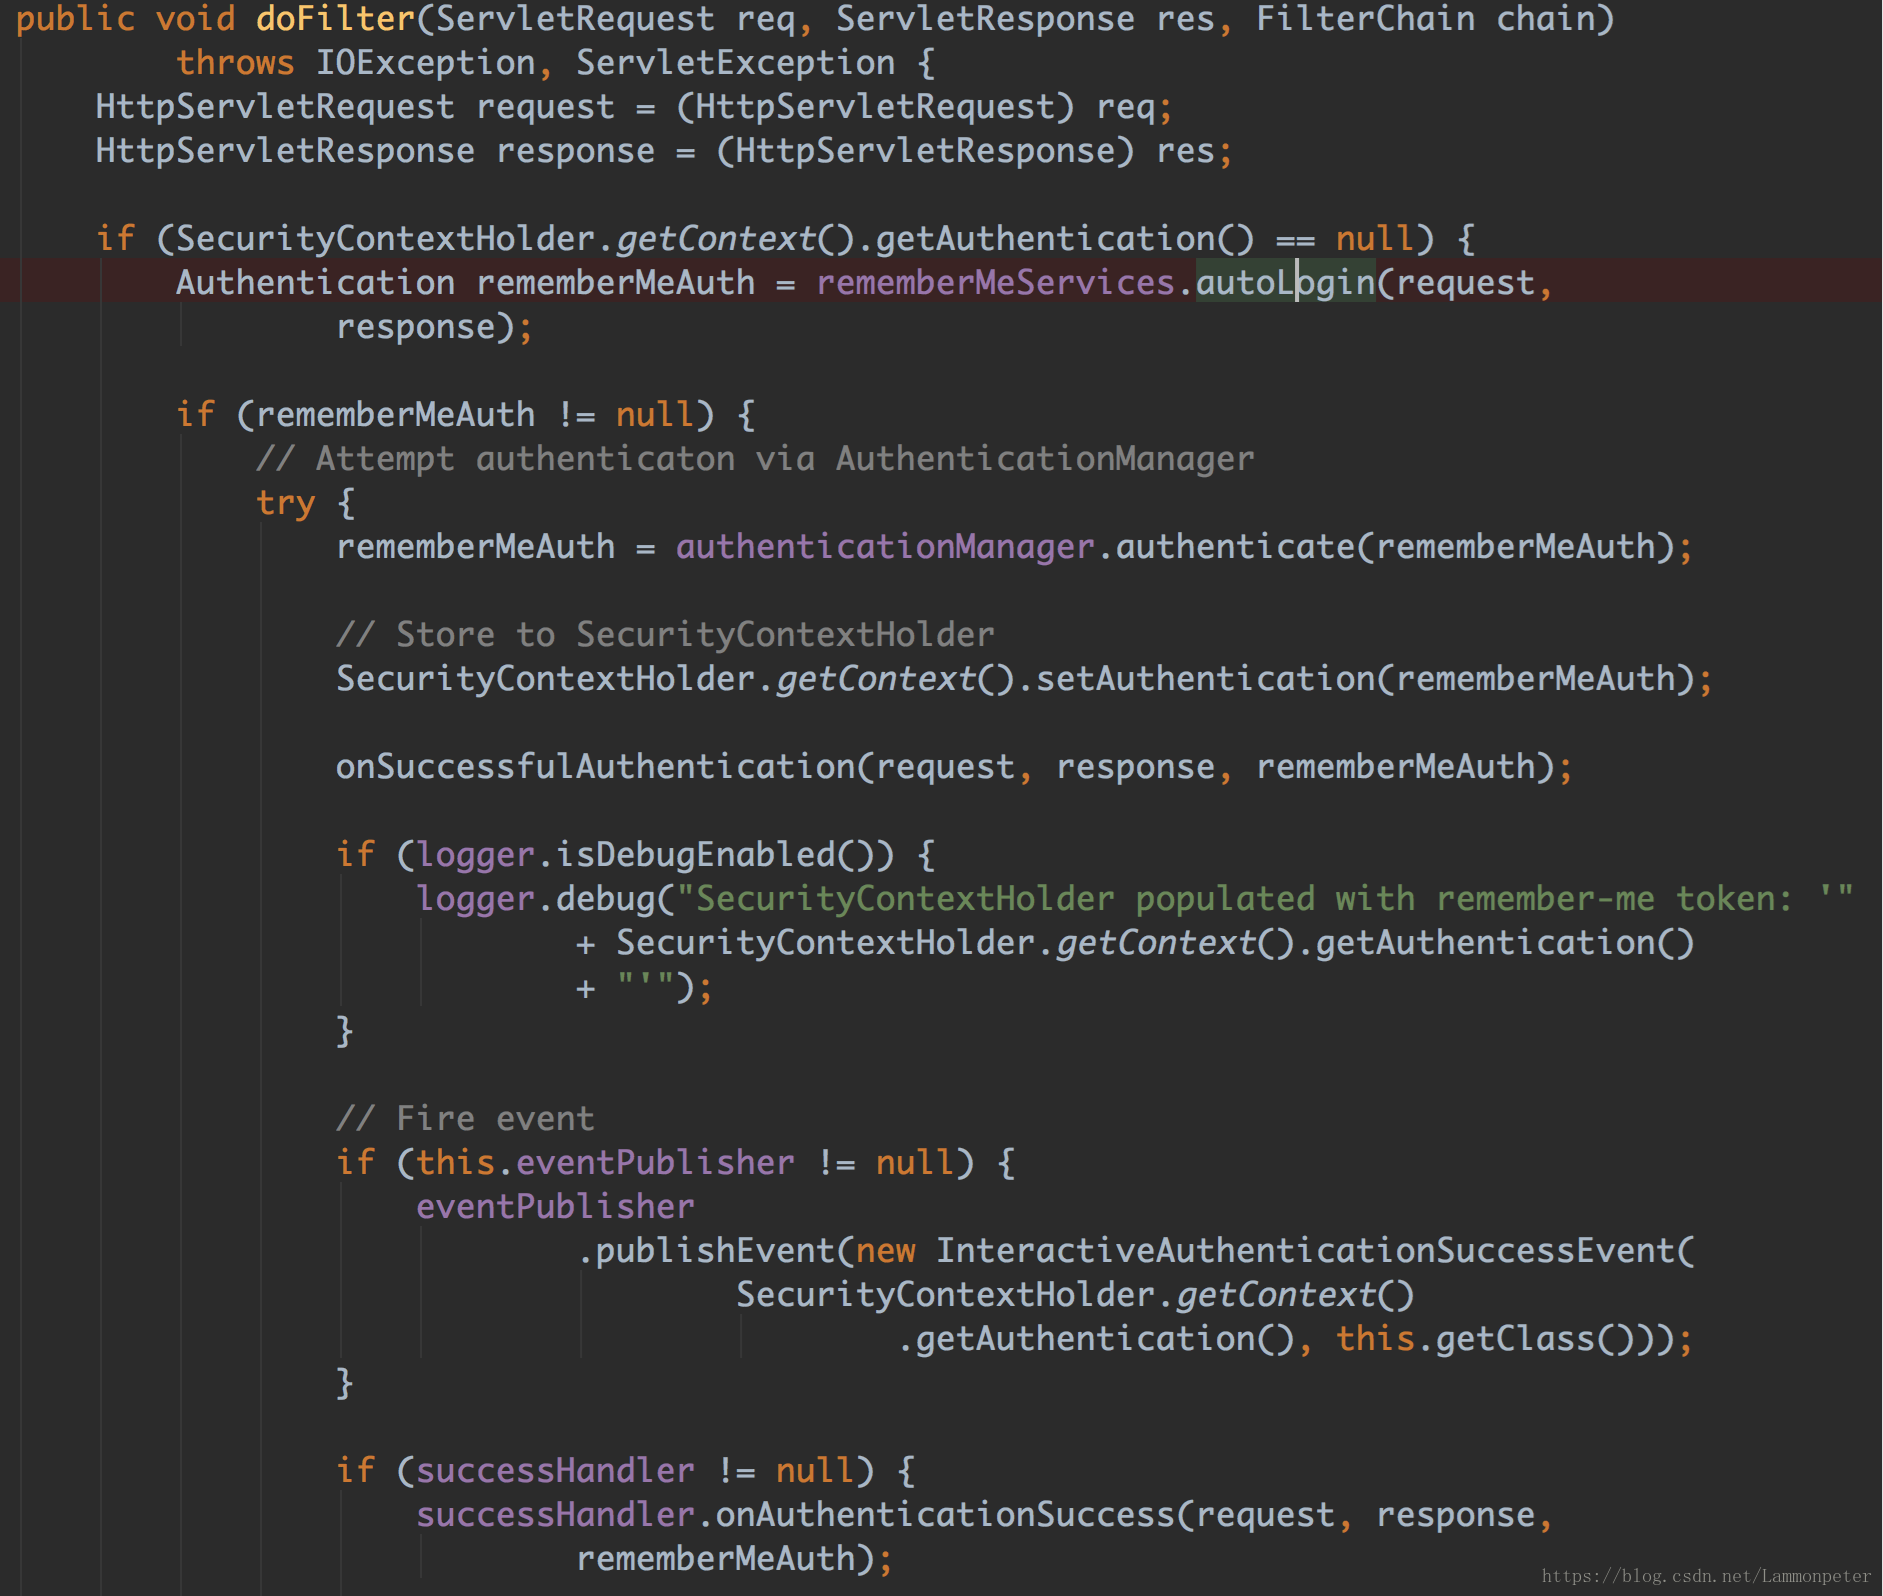
- 第一步:首先进入到了
RememberMeAuthenticationFilter的doFilter方法中,这个方法首先检查在session中是否存在已经验证过的Authentication了,如果为空,就进行下面的RememberMe的验证代码,比如调用rememberMeServices的autoLogin方法,代码如下:
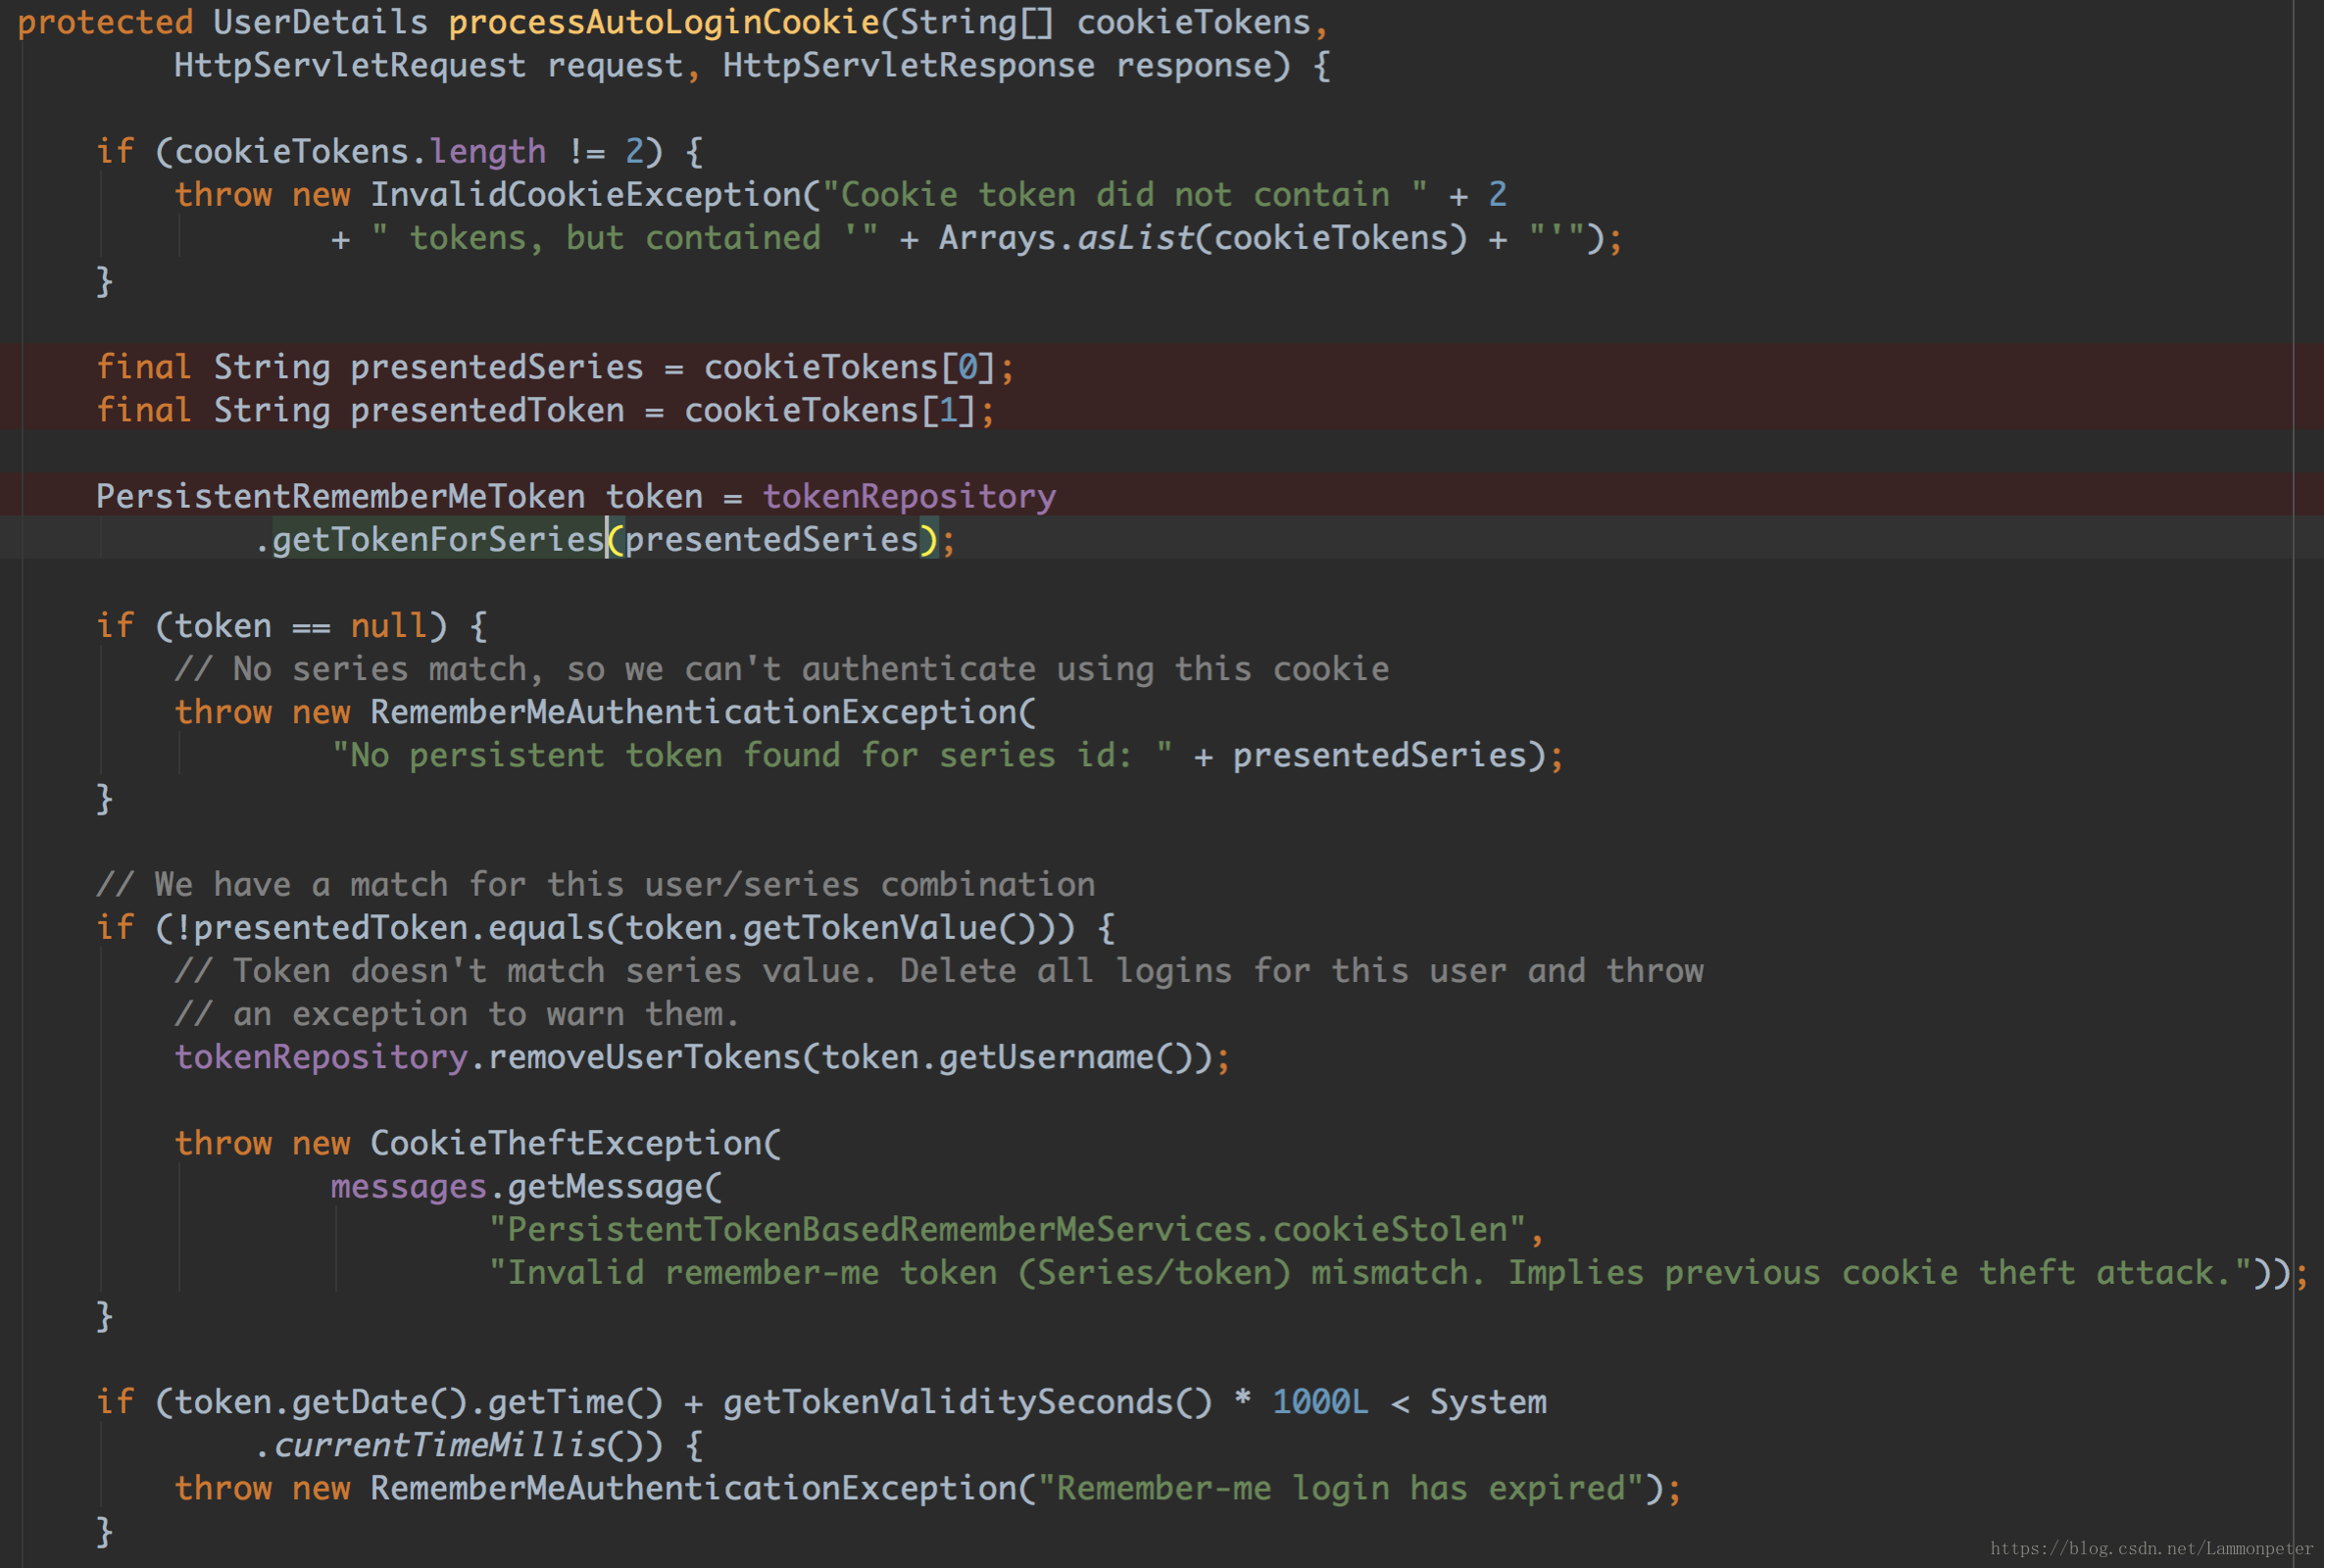
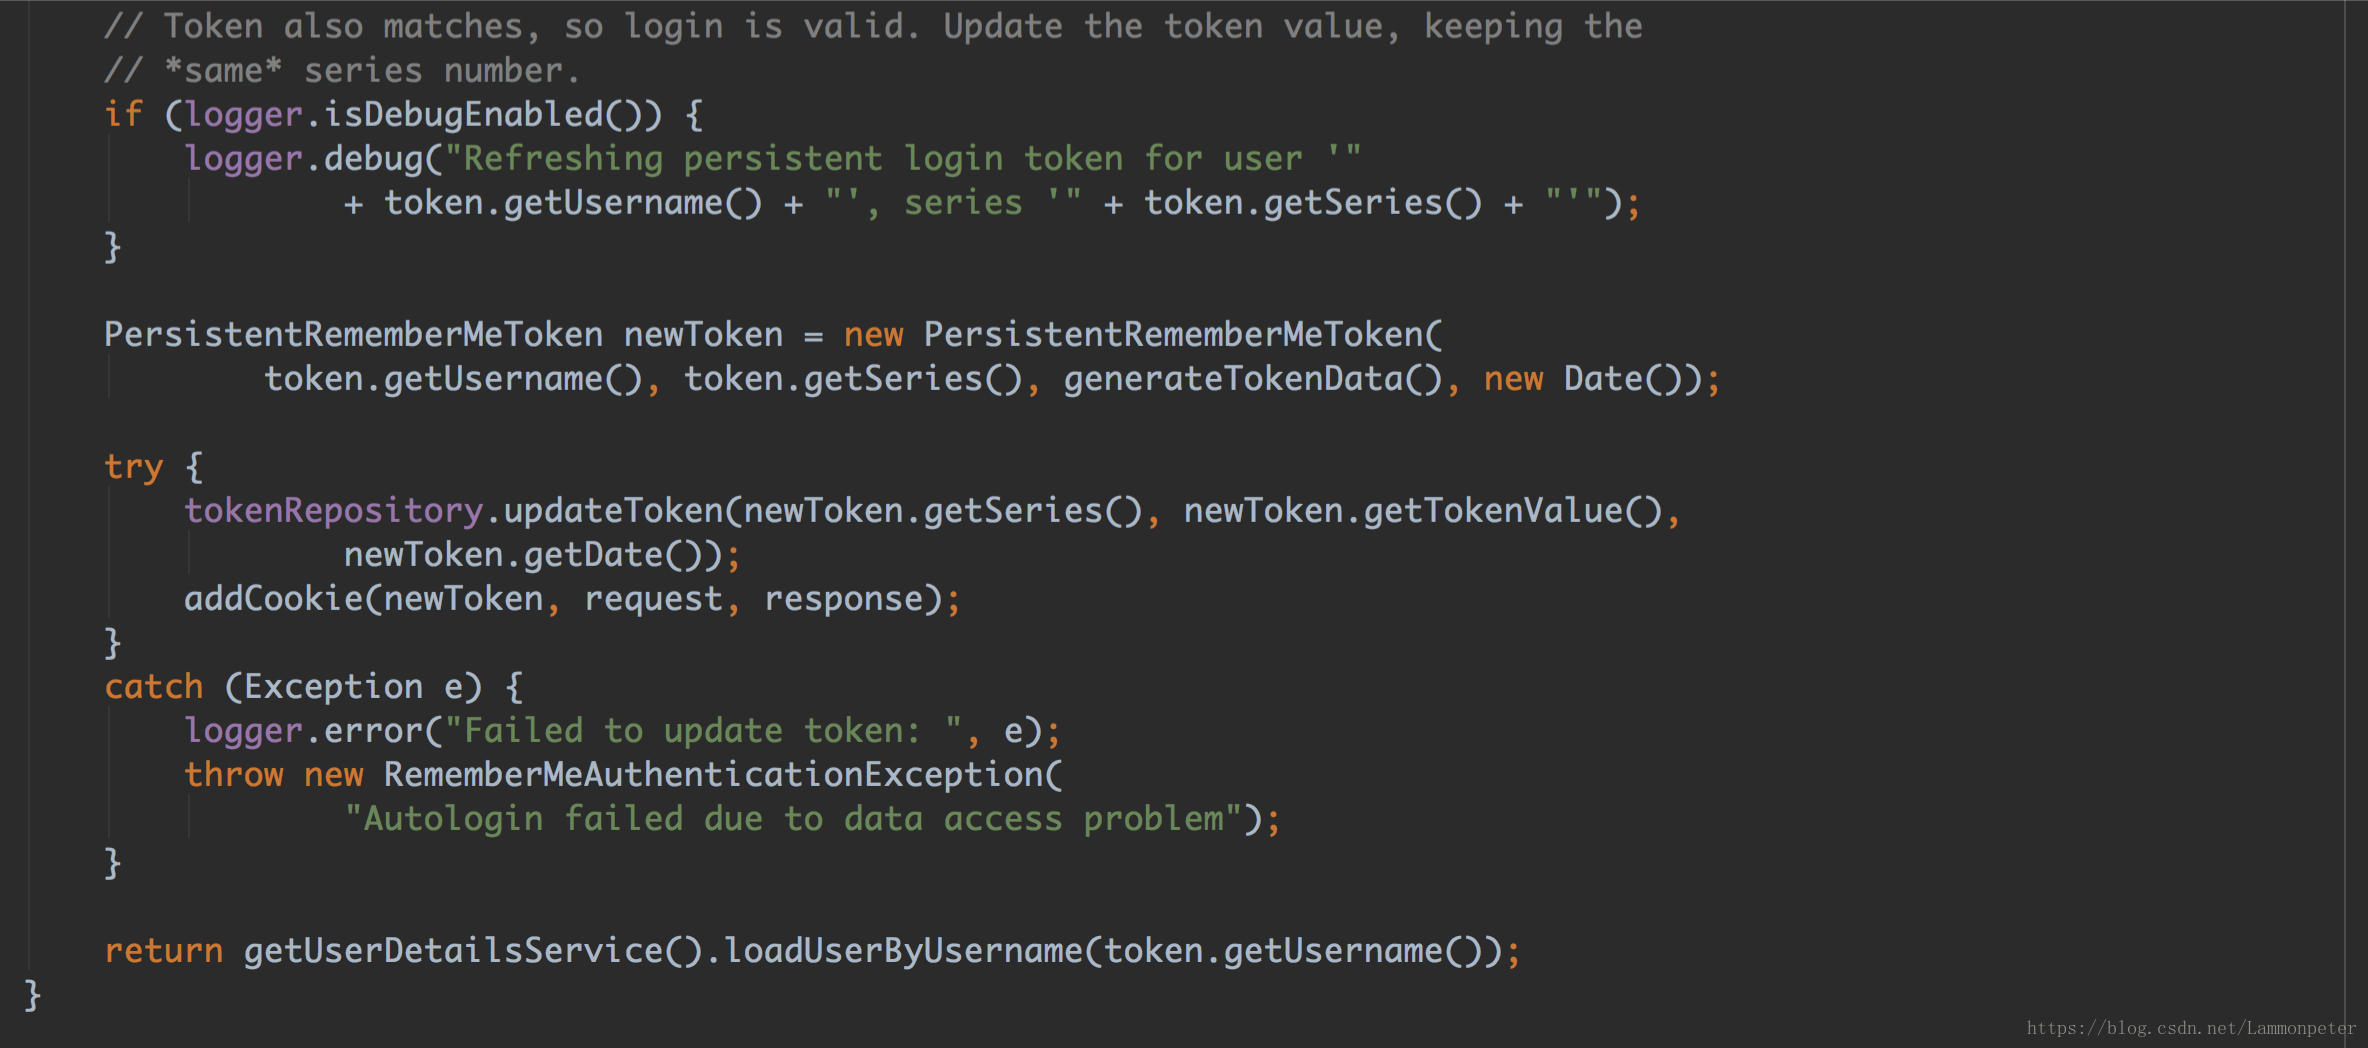
- 第二步:然后进入
PersistentTokenBasedRememberMeService的processAutoLoginCookie方法中,从请求中的Cookie中拿到Token,并且调用tokenRepository的getTokenForSeries从数据库中查询到Token,接下来就是进行一系列的对比验证工作。最后调用UserDetailsService来完成返回UserDetails的实现类对象。
- 第三步:再次返回到
RememberMeAuthenticationFilter中将登录信息存储到session中,然后去访问自定义的RESTful API。这就完成了整个功能的源码解析。
Spring Security技术栈开发企业级认证与授权系列文章列表:
Spring Security技术栈学习笔记(一)环境搭建
Spring Security技术栈学习笔记(二)RESTful API详解
Spring Security技术栈学习笔记(三)表单校验以及自定义校验注解开发
Spring Security技术栈学习笔记(四)RESTful API服务异常处理
Spring Security技术栈学习笔记(五)使用Filter、Interceptor和AOP拦截REST服务
Spring Security技术栈学习笔记(六)使用REST方式处理文件服务
Spring Security技术栈学习笔记(七)使用Swagger自动生成API文档
Spring Security技术栈学习笔记(八)Spring Security的基本运行原理与个性化登录实现
Spring Security技术栈学习笔记(九)开发图形验证码接口
Spring Security技术栈学习笔记(十)开发记住我功能
Spring Security技术栈学习笔记(十一)开发短信验证码登录
Spring Security技术栈学习笔记(十二)将短信验证码验证方式集成到Spring Security
Spring Security技术栈学习笔记(十三)Spring Social集成第三方登录验证开发流程介绍
Spring Security技术栈学习笔记(十四)使用Spring Social集成QQ登录验证方式
Spring Security技术栈学习笔记(十五)解决Spring Social集成QQ登录后的注册问题
Spring Security技术栈学习笔记(十六)使用Spring Social集成微信登录验证方式
示例代码下载地址:
项目已经上传到码云,欢迎下载,内容所在文件夹为
chapter010。
更多干货分享,欢迎关注我的微信公众号:爪哇论剑(微信号:itlemon)


 2178
2178


 被折叠的 条评论
为什么被折叠?
被折叠的 条评论
为什么被折叠?
 到【灌水乐园】发言


